User notification system components
The Bravura Security Fabric user notification system consists of four main binaries:
Notification Service | Updates the database with information about notification events and compliance rules, and runs plugins that:
|
Notification Client | The Notification Client ( |
User notifications (PSN) module | Acts as the gateway between the Notification Client ( |
ntftrigger | Bravura Security Fabric uses the |
Best practice
Configure the Startup Programs on all PCs, using a GPO, to call the Bravura Security Notification Client, which will check if there are any messages to display to the user and, if so, launch their default web browser to the appropriate URL. The notification client need not be installed locally on PCs – it can be run from a network share that is placed on the Intranet Zone to avoid security warnings.
Secondary servers and replication
Note the following concerning secondary servers and replication:
Web and batch notifications are replicated to replica servers during auto discovery.
You cannot add or configure notifications on a replica server , although you can schedule batch notifications on a replica server. All fields on the Manage the system > Policies > User notifications pages, except for the batch notification scheduling fields, are read-only.
Batch notifications are run only on the server on which they are scheduled. The schedule is not replicated, to avoid duplicate notifications.
User statistics and user notification data are updated in real-time.
Notification Service (psntfsvc)
Notification Service (psntfsvc) is installed and started on the Bravura Security Fabric server when you install the Bravura Security Fabric software. You can modify default options by clicking Manage the system > Maintenance > Services and selecting Notification Service.
User notifications (PSN)
The User notifications (PSN) module acts as the gateway between the Notification Client (psntfclient) and the Notification Service, and enables users to receive, acknowledge, and act on notifications from their web browser.
When a web notification is triggered, the user is prompted to log into Bravura Security Fabric and then the web browser will open at the page of the User notifications (PSN) module. Users can also access this page, if they have notifications, from a link on the main menu.

Enabling / disabling the User notifications (PSN) module
The User notifications (PSN) module is enabled by default.
To disable the User notifications (PSN) module:
Click Manage the system > Modules> User notification.
Turn off PSN ENABLED to disable the module.
Click Update to commit your changes.
Disabling the User notifications (PSN) module disables all web notifications. It does not affect batch notifications.
Configuring notification events
If you are using a web notification to enforce compliance with an Acceptable use policy configure event options, listed below, which trigger external programs. See Event actions for more information about configuring event actions.
Control what happens after user declines AUP
You can use a plug-in to control what should happen after a user declines an acceptable use policy.
The plugin is set by the AUP PLUGIN field (Manage the system > Modules> User notifications (PSN)).
The plugin runs when users accept or decline an acceptable use policy, and returns the action to perform if declined (continue to sign in or logout).
There are no shipped plugins for use with this plugin point. See below for more information on writing a custom plugin.
Requirements
Configure a web notification for AUP (see example).
Set the Plugin to run to determine compliance to Query USERSTAT tag.
On the Configure notification plugins page, select External option for Non-compliant users will be directed to this URL : and set its value to PSNAUP in order to get the Accept / Decline button.
Enable Acceptable use policy .
Enter the name of the plugin in the AUP PLUGIN field (Manage the system > Modules> User notifications (PSN)).
See Writing plugins for general requirements.
Execution points
This plugin is executed once when a user accepts or declines an acceptable use policy
Input
The following is a sample of input:
"" "" = {
 "notifyId" = "AUP"
 "buttonName" = "SUBMIT-NOTIF-AUP-DCLN"
 "viewer" "user" = {
 "id" = "User1"
 "name" = "User 1"
 }
}
Output
The following is a sample of output:
"output" "None" = {
  "declineAction" = "1"
  "retval" = "0"
  "errmsg" = “<your error message if needed>”
Where declineAction is used to specify the action to perform when declining:
"0" (default action, stay on AUP Accept/Decline page)
"1" (return to previous page, which is AUP list page
"2" (logout user)
Modify notifications and redirect users
You can use a plugin to modify the order of notifications and redirect users as they navigate and act on notifications.
When the User notifications (PSN) module is enabled and the plugin is set, and a user logs into Bravura Security Fabric :
The plugin presents a list of notifications in order of priority.
After the user acts on a notification (clicks Accept or Decline), the plugin directs the user to the next notification in the list.
When there are no more notifications left, the user is directed to the Front-end .
The plugin is set by the PSN MODIFY ORDER AND REDIRECTION PLUGIN field (Manage the system > Modules> User notifications (PSN) )
There are no shipped plugins for use with this plugin point. See below for more information on writing a custom plugin.
Requirements
The plugin must return notifications not only in order but without any gaps in numbers. If there are 5 notifications and you want to show them all, then they will have to be numbered 1, 2, 3, 4, 5. If say they were numbered 1, 2, 3, 4, 6 then the last one will be hidden.
Notifications can be hidden by:
Setting their priorities to "0" or any number behind the real sequence; for example if you have 10 notifications: 1 through to 10, you can hide notifications by setting the priority to 12, 100 or 9999.
Removing particular KVGroups from output altogether. Ensure that you update priorities of all notifications "behind" the deleted one.
See Writing plugins for general requirements.
Execution points
This plugin is executed once when a user logs into Bravura Security Fabric.
Input
The following is a sample of input:
# KVGROUP-V1.0
"" "" = {
  "notification" "" = {
    "id" = "AUP1"
    "desc" = "AUP1"
    "severity" = "F"
    "maxrem" = "-1"
    "infomsg" = "AUP1"
    "link" = "PSNAUP"
    "status" = "R"
    "nreminders" = "0"
  }
  "notification" "" = {
    "id" = "AUP2"
    "desc" = "AUP2"
    "severity" = "F"
    "maxrem" = "-1"
    "infomsg" = "AUP2"
    "link" = "PSNAUP"
    "status" = "R"
    "nreminders" = "0"
  }
  "notification" "" = {
    "id" = "AUP3"
    "desc" = "AUP3"
    "severity" = "F"
    "maxrem" = "-1"
    "infomsg" = "AUP3"
    "link" = "PSNAUP"
    "status" = "R"
    "nreminders" = "0"
  }

  "notification" "" = {
    "id" = "AUP4"
    "desc" = "AUP4"
    "severity" = "I"
    "maxrem" = "-1"
    "infomsg" = "AUP4"
    "link" = "PSNAUP"
    "status" = "R"
    "nreminders" = "0"
  }
}
Output
The following is an example of the possible output, where "AUP2" is hidden:
# KVGROUP-V1.0
  "" "" = {
  retval = "0"
    "notification" "1" = {
      "id" = "AUP1"
      "desc" = "AUP1"
      "severity" = "F"
      "maxrem" = "-1"
      "infomsg" = "AUP1"
      "link" = "PSNAUP"
      "status" = "R"
      "nreminders" = "0"
    }
    "notification" "3" = {
      "id" = "AUP3"
      "desc" = "AUP3"
      "severity" = "F"
      "maxrem" = "-1"
      "infomsg" = "AUP3"
      "link" = "PSNAUP"
      "status" = "R"
      "nreminders" = "0"
    }

    "notification" "2" = {
      "id" = "AUP4"
      "desc" = "AUP4"
      "severity" = "I"
      "maxrem" = "-1"
      "infomsg" = "AUP4"
      "link" = "PSNAUP"
      "status" = "R"
      "nreminders" = "0"
    }
  }
Note that:
Output has to contain a "retval" KV-pair.
KVGroup key has to be "notification" precisely and cannot be changed.
KVGroup names have embedded integers, representing the order in which plugin has organized the notices. Starting from 0: "0" is the first notice, "1" is the second, and so on.
.
Notification Client (psntfclient)
Client software is required only if users will be notified via their web browser. For Windows clients, Bravura Security provides ntfclient.msi, or ntfclient-x64.msi for 64-bit systems located in the \<instance>\addon\ directory. For Unix/MacOSX clients, you can write a Perl script based on ntfclient.pl, located in the \<instance>\samples\ directory.
You may also centralize the maintenance of the notification client and its configuration by deploying the Notification Client on an Active Directory network share, which is maintained via a GPO (Group Policy Object). This also avoids the need to install and upgrade the Notification Client via the MSI installer (ntfclient.msi or ntfclient-x64.msi) on each workstation.
Requirements
Microsoft Edge WebView2 Runtime must be installed with elevated privileges prior to installing with psntfclient-x64.msi or psntfclient.msi.
If it is not installed or it is not installed with elevated privileges, you will see a message such as this when opening the notification client: Runtime error: Couldn't find WebView2 runtime, it should be installed as admin.
To install with elevated privileges, either open a command prompt using the Run as administrator option for cmd.exe or right-click on the installer and click Run as administrator, then install Microsoft Edge WebView2 Runtime.
Note
The installer simply copies the psntfclient program to the file system. It does not configure the client to launch. It is recommended that you install the client on network share, and set up a GPO (Group Policy Object) to launch the client upon user login to their workstation with a command such as psntfclient.exe -userid %USERNAME%.
Deployment methods
The Notification Client may be deployed using the following methods:
Running the
ntfclientMSI installer on every workstation to installpsntfclient.exe.See Install the Notification Client using the ntfclient MSI installer.
Placing
psntfclient.exeand other required DLLs on a file share.See Configure the psntfclient.exe program for a network share.
The network share can be used with:
A GPO (Group Policy Object) configured for a logon script (such as a batch or PowerShell script) that calls
psntfclient.exe.A Task Scheduler call that runs at a specific time or at user login for
psntfclient.exe.
Click below to view a demonstration including the following steps:
Installing Microsoft Edge WebView2 Runtime with elevated privileges
Manually installing the Notification Client (
psntfclient) for Windows using thentfclient-x64.msiTesting desktop web notifications for a user using Windows Command Prompt as Administrator
Install the Notification Client using the ntfclient MSI installer
To manually install the Notification Client for Windows using the ntfclient.msi or nftclient-x64.msi:
Copy the installer from the addon directory to a scratch directory (C: \ temp) on the local workstation or to a publicly accessible share.
Launch the installer.
Click Next .
Read the Bravura Security Fabric license. Select I accept the terms in the License Agreement if you agree to the terms and click Next .
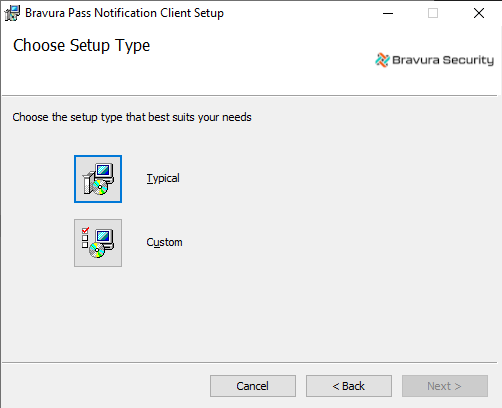
Click:
Typical (recommended)
Custom if you want to change the default installation directory from
C:\Program Files\Bravura Security\Notification Client\
Set the URL for the User notifications (PSN) module on the Bravura Security Fabric server, and the Timeout in minutes.
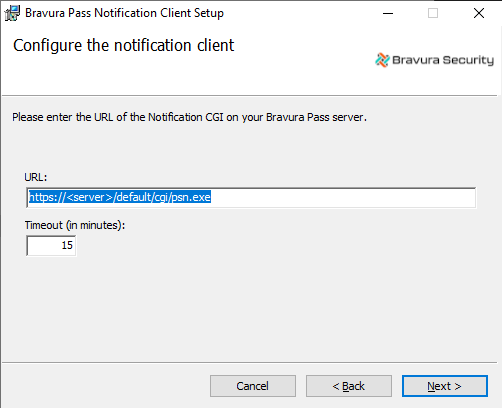
Click Next .
Click Install to start the installation.
The installer begins copying files to your computer. The Installation Complete dialog appears after the notification client has been successfully installed.
Click Finish to exit.
Configure the psntfclient.exe program for a network share
If you do not install the Notification Client software on users’ workstations, the psntfclient.exe program, which launches a web browser in kiosk mode, must be installed on a public share accessible to computers in the domain.
To configure the psntfclient program, copy the following files from a Notification Client installation to a network share on each domain controller:
psntfclient.exeThe installed DLLs found in:
C:\Program Files\Common Files\Bravura Security.All DLLs should be copied to the same directory as the
psntfclientprogram.
The language files (if used for internationalization of the client interface) must follow the same structure as when they are installed on each workstation (skin\lang-region\, for example: default\fr-ca).
A new network share may be created, or the SYSVOL network share may also be used. You can determine the location of your SYSVOL share by typing net share from the command prompt on your DC.
Test psntfclient from the command prompt of a workstation logged into the domain by typing (modify servername and instancename as appropriate for the environment):
%LOGONSERVER%\sysvol\psntfclient.exe -userid %USERNAME% -url https://servername/instancename/cgi/psn.exe
Ensure that a web browser opens and shows the appropriate web notification message for the user.
A GPO (Group Policy Object) may then be configured to run a logon script (such as a batch or PowerShell script) that calls psntfclient.exe. A Task Scheduler call may also be added to run at a specific time or at user login for psntfclient.exe.
Example instructions for configuring a group policy object for when a user logs in:
Open the Group Policy Management Console (
gpmc.msc).Navigate to your GPO (Group Policy Object) or create a new one.
Edit the GPO and go to User Configuration > Policies > Windows Settings > Scripts (Logon/Logoff).
Double-click Logon.
Click Add and either:
Browse to an existing script file, or
Click Show Files to open the GPO's script folder and create your script there.
This script will contain the command for
%LOGONSERVER%\sysvol\psntfclient.exeas noted above.Modify this command for
psntfclient.exeas appropriate.
Click OK.
See also
Installing Add-on Software for general requirements for using a client MSI installer, and instructions for automatic installation using a group policy.
ntfclient.msi / ntfclient-x64.MSI for more information about setting MSI properties in a transform file or from the command line.
psntfclient for more information and for additional command line usage and examples.
Notification utility (ntftrigger)
Bravura Security Fabric uses the ntftrigger program to communicate with the Notification Service (psntfsvc) and send out notifications. Scheduling a batch notification creates a scheduled job to run ntftrigger . You can use this program to test notifications rather than wait for the scheduled time.
See ntftrigger usage information and examples .