Adding target systems
The following procedure demonstrates the minimum requirements for manually adding a target system that will be a source of profiles in Bravura Security Fabric :
Click Manage the System > Resources > Target systems > Manually defined.
For target systems on which you can manage inventory items, you can also click Manage the system > Inventory > Target systems.
Click Add new…
Define the target system ID, type and description; for example:
ID
CODIR
Type
Active Directory DN
Description
Organization Directory
Click Change to the right of the Address field and enter the required information; for example, for Active Directory DN if this is the domain or domain controller.
Click Continue to return to the Target system information page.
Ensure that you do not double target .
Modify general options as needed.
To create Bravura Security Fabric profiles from accounts on this system, select Source of profile IDs.
Note that List accounts , List attributes, and List groups are selected by default.
Click Add.
Bravura Security Fabric displays the page.
Enter credentials for a designated account to perform Bravura Security Fabric operations on the target system; for example on Active Directory DN this would be member of the Domain Admins group with read and write permissions for passwords and accounts.
Click Update.
To add user and other information to the Bravura Security Fabric database, click the General tab, then click Run discovery at the bottom of the form.
Click the Authorization tab to select one or more users who can authorize access change requests on this target system.
See also
Applying configuration changes for more information on discovery for individual target systems, or Auto discovery for details of the full auto discovery process.
Target system options for descriptions of all general target system options.
Adding target system administrators for more detail on target system credential requirements.
Configuring target-system-level authorization for more details on target system authorization.
Example: Adding an Active Directory target system as a source of profiles
Click below to view a demonstration of defining an Active Directory target system as the source of profiles (users) for Bravura Security Fabric including the following steps:
Creating a list file with the OUs to list users from
Specifying the target system as a source of profiles
Adding target system administrator credentials
Testing the connectionRunning auto discovery
This section shows you the typical procedure for adding an Active Directory target. For this demonstration, this target will be set up so that it becomes the source of Bravura Security Fabric profiles. This means that users with accounts in Active Directory will have profiles, including full user name, created for them in Bravura Security Fabric .
Click Manage the System > Resources > Target systems > Manually defined.
Click Add new... to add a new target system.
Enter a unique identifier for the new target system. The target ID can contain only letters (A-Za-z), digits (0-9), and underscores (_).
Select the target system’s Type; for example, Active Directory DN.
Type a Description for the target system.
Click Change next to the Address field to enter values for the target system address. For Active Directory, there are three primary methods for specifying the Active Directory target address:
globaldomain.example.com
\\mydomaincontroller.example.com
\\mydomaincontroller
You can restrict user listing by container or group membership.
Enable Automatically create a Bravura Privilege managed system if you want to manage privileged access to this system.
Select the Source of profile IDs checkbox.
If you want Bravura Security Fabric to generate a list of attributes for each account during auto discovery, select List attributes. You must select this checkbox if you want Bravura Security Fabric to import OrgChart data from the target system.
Select the Allowed in the certification process checkbox.
For this demonstration installation, leave other parameters with default values.
Click Add.
The Administrator credentials page displays so you can add a target system administrator for the target.
Type the target system administrator’s login ID in the Administrator ID field.
Type the account password in the Password and Confirm password fields.
For this demonstration, the Workstation ID and Account ID do not apply.
Click Update.
Test the connection
To test that your target system is configured correctly:
Click the Test connection tab.
Click Test credentials .
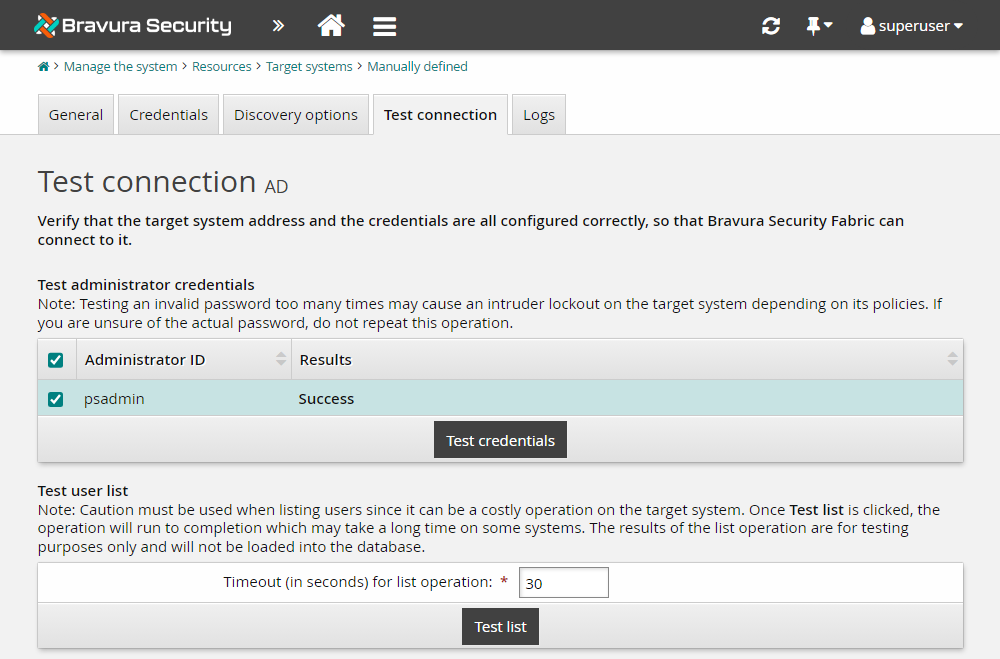
Results should show "Success". If not, verify that the address, target type and administrator credentials are entered correctly.
For the next test, Bravura Security Fabric performs a list operation to enumerate user accounts on the target system. The results of the list operation are for testing purposes only and, unlike during auto discovery, will not be loaded into the database.
Click Test list .
Warning
In a production environment, listing can be a costly operation on the target system. This may take a long time on some systems. The Test list is practical for testing the listing capabilities on target systems that are expected to finish quickly.
If the listing takes longer than the value defined in Timeout (in seconds) for list operation, it will return nothing.
While the list operation is running, click the Refresh icon on the Bravura Security Fabric navigation bar to update the list results.
When the operation completes, the "Number of users found" (at bottom left) should match the number of enabled accounts on the target system.
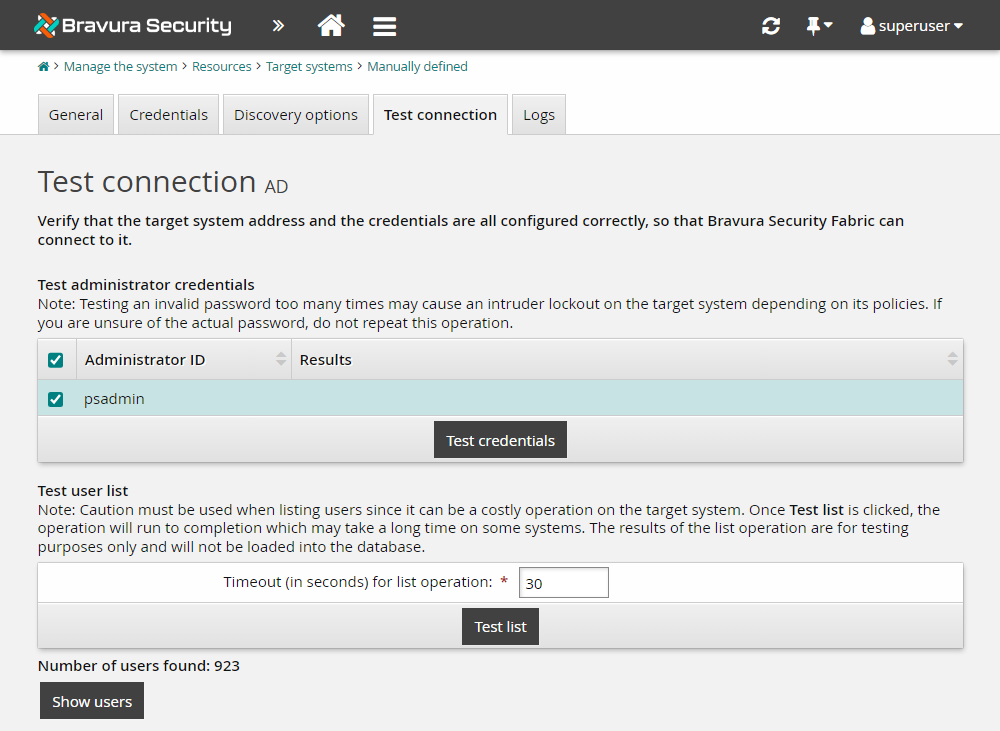
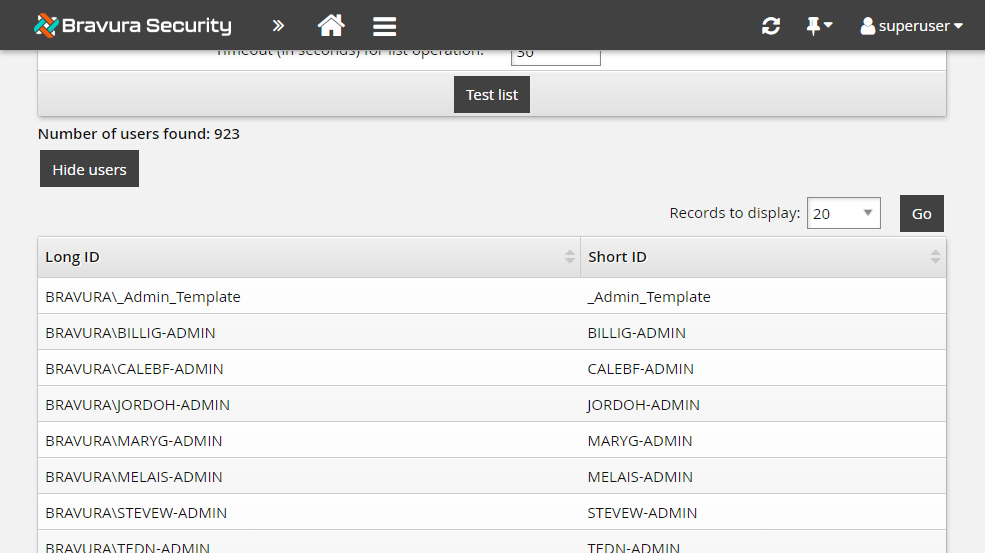
Click Show users .
Bravura Security Fabric displays the results of the generated user list.
Run auto discovery
Once a target system has been added and is flagged as a source of profile IDs, you need to run psupdate to list accounts and create user profiles:
Click the General tab.
At the bottom of the page, click Run discovery .
Alternatively, on the Target systems list page, select the target system and click Run discovery .
Click OK to confirm that you want to run discovery for the selected target system.
Depending on the number and type of target systems, this process may take several minutes to complete.
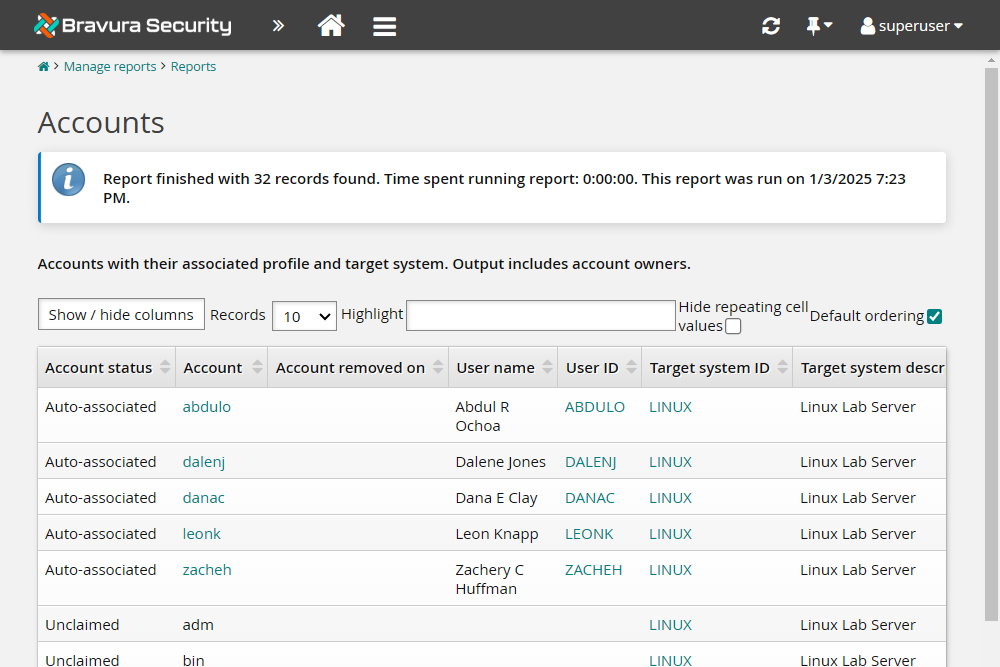
Verify that AD accounts have been auto-associated to Bravura Security Fabric user profiles by running a user accounts report:
Click Home.
Click Manage reports > Reports > Users > Accounts .
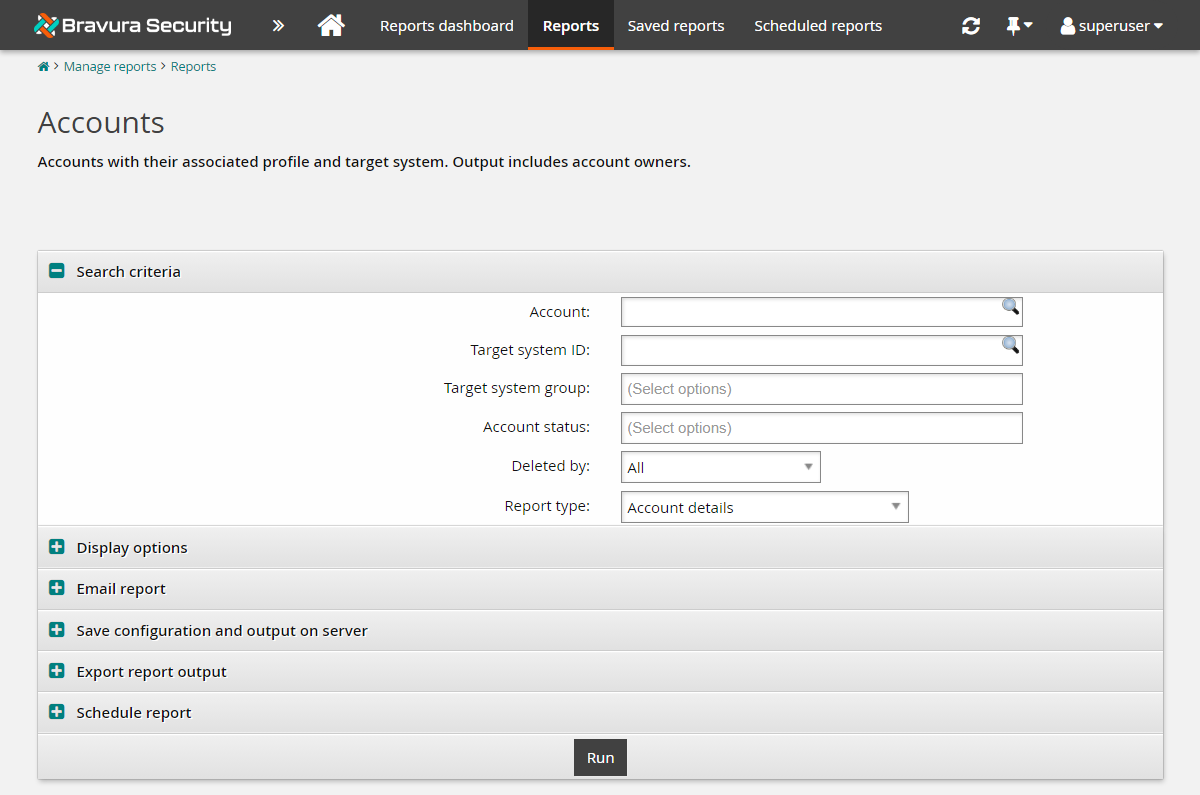
Click Run at the bottom of the report form.
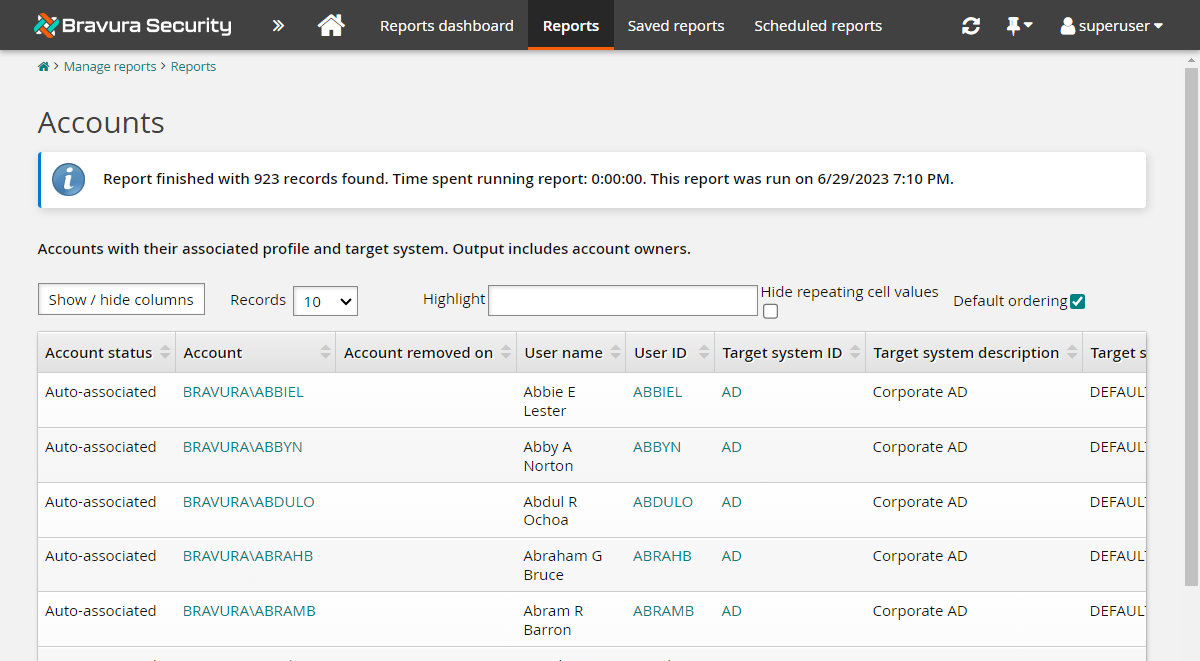
If auto discovery was successful, you should see a number of accounts with their Account status listed as "Auto-associated".
Example: Adding a Linux target system
This section shows you the typical procedure for adding a Linux target system, using the Linux SSH connector to list accounts and synchronize passwords. This example assumes that you have added another target as source of profiles, as in the Active Directory example.
To add the Linux target system:
Log in to the Bravura Security Fabric Front-end (PSF) as superuser.
Click Manage the system > Resources > Target systems > Manually defined.
Click Add new…
Enter the following information:
ID LINUX
Type Generic Linux Server (SSH)
Description Linux Lab Server
Click Change to the right of the Address field.
Enter your Linux server IP address in the Server field.
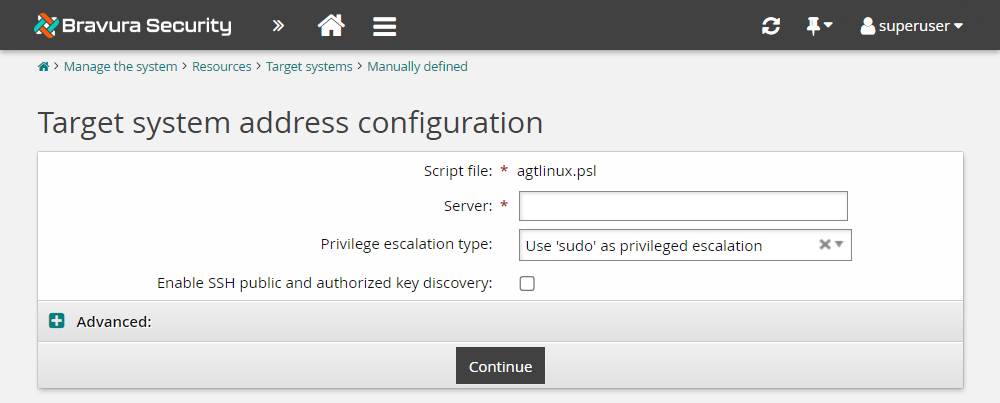
Leave other fields set to their default.
Click Continue to return to the page.
Note
Do not select the Source of profile IDs option for this target.
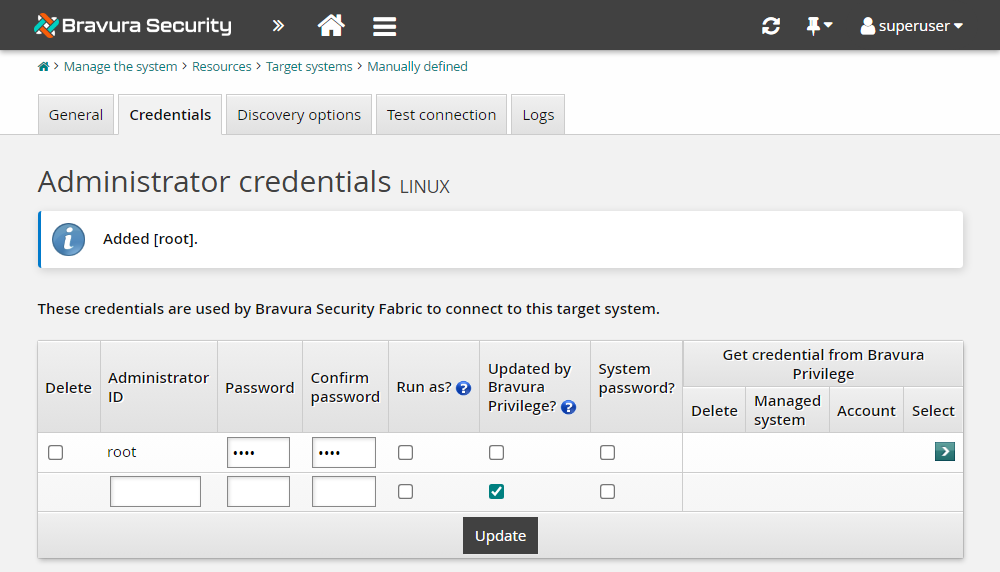
Scroll to the bottom of the page and click Add.
The page will be displayed.
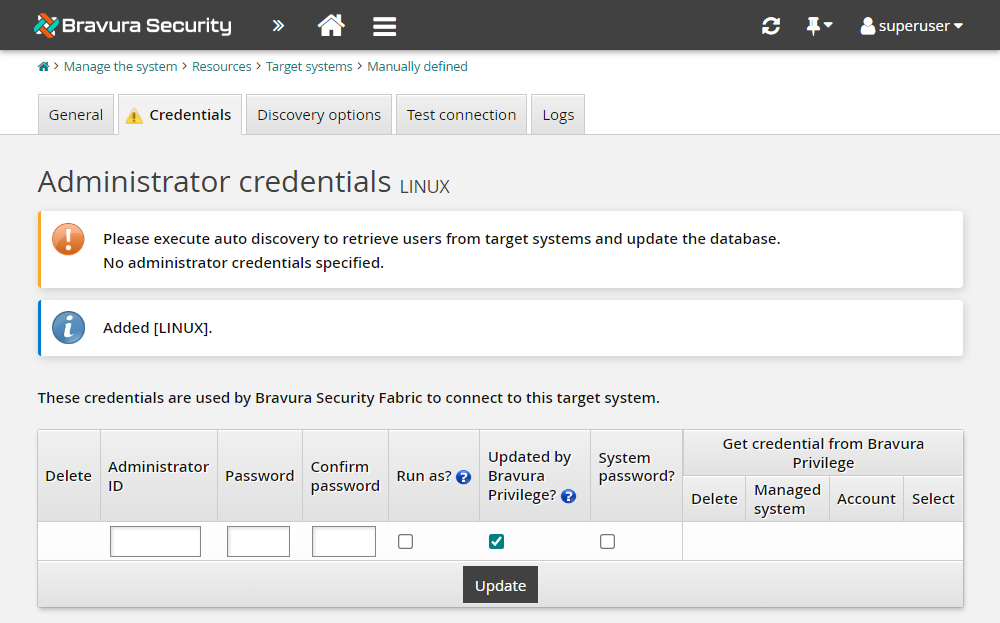
Enter and confirm the Administrator ID and Password.
Deselect Updated by Bravura Privilege?
Click OK to confirm the action.
Click Update.
Click the Test connection tab.
Click Test credentials and test that the credentials work.
The Results column should show "Success".
Click Test list, click Refresh then click Show users to see the list of users.
Run auto-discovery for the LINUX target, similar to Targeting Active Directory, to load accounts and information.
Verify auto-discovery of accounts by running a user accounts report for the LINUX target.
Tip
When you run the accounts report, set the Target system ID to LINUX in Search criteria before clicking Run.
In this case, because you did not select Source of Profile IDs on the Target system information page, the accounts have been loaded, but only accounts with short IDs that match existing Profile IDs show up as "Auto-associated". The rest of the Account status' appear "Unclaimed" because they do not match any existing Bravura Security Fabric user profiles.