Profile and request attributes
Profile and request attributes can play an important role during Bravura Security Fabric processes. A profile and request attribute can define a user object’s parameters and use. In many cases, attributes and attribute values represent different roles and access privileges on target systems. Many organizations determine a user’s system status by the value of some attribute. For example, the value of an attribute of "F" versus "T" may determine whether the user is disabled on a given system or not.
You can also define profile and request attributes to gather extra information about a user. For example, users may enter human resource information such as date of birth, mobile phone provider and number or social security number.
Request-only attributes are used solely in the context of requests, and do not have a permanent effect on user profiles.
Profile and request attributes are mainly configured under the menu and are important in resource management.
How attribute information is collected
Information can be collected by:
The auto discovery process, which loads account attribute information – from target systems that support attribute listing – into mapped profile and request attributes.
A plugin that automatically collects and/or generates or looks up information, such as an employee ID, from a database.
To learn how to configure and write such a program, see Validating and generating attribute values .
Users who update profile information using the web interface.
To learn how end users update attributes using the self-service form, see Update attributes.
Click below to view a demonstration.
Mapping profile and request attributes
You can map profile and request attributes to account attributes to load users’ information from a target system. You can also configure attributes so that users’ accounts are updated when their profile information is updated.
The type and number of values of the profile and request attribute must be compatible with the account attribute. For example, you cannot map a required account attribute to an optional profile and request attribute, or a single-valued account attribute to a multi-valued profile and request attribute.
See Account attributes for more information about mapping attributes.
Grouping attributes
Attributes must be included in an attribute group in order to be used. You can organize attributes into groups to:
Assign read and write privileges to users in different stages of authorization workflow.
Assign read and write privileges to creators of managed system policies, when Bravura Privilege features are used.
Determine whether attributes are displayed for specific operations, such as view profile.
Determine how attributes are displayed to users on the request form.
See Attribute groups for details.
Enforcing validation
Normally, if a value is required, Bravura Security Fabric stops a request from proceeding if the user has not entered a correctly formatted value. You can turn off validation for an attribute or attribute group if an incorrectly entered value should not block a request. This can be useful, for example, if a user needs to create or update their profile but does not have complete information.
If used, the attribute validation plugin overrides these settings.
See also
Types of profile and request attributes
Profile and request attributes can be defined according to the following types:
String | A short alpha-numeric value |
Integer | An all-numeric value |
Boolean | A true or false value. |
Memo | A multi-line alpha-numeric value |
Password | A value hidden from view. Bravura Security Fabric obscures user input with asterisk (*) or other characters. This type of profile and request attribute can be mapped to character or numerical account attributes only. |
Date/time | Users select a date/time in one of the three following formats:
Native date attributes are converted to ISO date format to map to Date/time type attributes. If the target system does not support conversion of native format to ISO format, you can use the attribute validation plugin to mirror the attribute to a hidden attribute that can be mapped. See Validating and generating attribute values. Note: Attributes of type ”Date/time” cannot accept values predating 1970. |
User | A user profile. A valid profile ID entered into this attribute will be displayed as a clickable user object on read-only pages. This is used, for example, for searching recorded sessions of a particular user. |
Link | An external link to a web page or image; for example a personal web page or photo ID. When the link is read-only, users can click on it to open a window or tab in the browser. Hover your cursor over an image link for a preview of the image. |
File | Users can attach a file to their profile or request. Various file extensions are supported. The default maximum file size is 1000KB, which can be set using the MAX UPLOAD FILE SIZE system variable in the Manage the system > Workflow > Options menu. |
Target system | A target system. Users can search for the ID of the target system. A valid discovered system ID entered into this attribute will be displayed as a clickable target system object on read-only pages. |
Managed system | A managed system, for privileged access management. Users can type, or search for, the ID of the managed system. A valid managed system ID entered into this attribute will be displayed as a clickable managed system object on read-only pages. |
Discovered system | An unmanaged discovered system. Users can search for the ID of the discovered system. A valid discovered system ID entered into this attribute will be displayed as a clickable discovered system object on read-only pages. |
Manageable account | A managed or unmanaged account. Users can search for the ID of the manageable account. A valid account ID entered into this attribute will be displayed as a clickable account object on read-only pages. |
Managed group | A managed group. Users can search for the ID or description of the managed group. A managed group entered into this attribute will be displayed as a clickable managed group object on read-only pages. |
Built-in profile and request attributes
There are several built-in attributes. When you install Bravura Pattern components, many other useful attributes are pre-configured and can be modified to suit requirements. Standard built-in attributes are listed in Table 1, “Standard built-in profile and request attributes”.
Warning
Changing the values in the built-in attributes can cause serious problems. Ensure you thoroughly test your changes.
Attribute | Usage |
|---|---|
APIUSER_CIDR | Used to define a product administrator ’s allowed network addresses for remote API access. It is not included in an attribute group by default. |
ARCH_EXTEND_CHECKOUT_REASON | Used for Bravura Privilege check-out extension requests: Reason for the check-out extension. It is included in the Check-out extension details group. |
DESC_APP | Used to store the request description. It is included in the App built-in attributes group. |
Used to store users’ email addresses. You can add EMAIL to an attribute group if you want requesters to define an email address for new users. | |
EMAIL_APP | Used to store users’ email addresses. It is included in the App built-in attributes group. |
FIRST_NAME | Used to store users’ first names. It is included in the base attributes group. |
LAST_NAME | Used to store users’ last names. It is included in the base attributes group. |
LUPD_AUTO_ASSOCIATE | When this boolean attribute is set to true, the account will be auto associated with other accounts. If the attribute is set to false, the account will not be subjected to the auto association process. |
MAQCMD_SCOPE | Used to limit the commands that can be executed. It is included in the Commands for account set access attribute group. |
MAQ_COMMAND | Account set commands. It is included in the Commands for account set access attribute group. |
NOTES_APP | Used to store the requester notes. It is included in the App built-in attributes group. |
ORGCHART_MANAGER | Used to store or to change a user’s primary manager. This attribute loads OrgChart data when mapped to a manager account attributes. Users can also be allowed to update their primary manager directly. It is not included in an attribute group by default. |
OTHER_NAME | Used to store users’ middle names or initials. It is included in the base attributes group. |
PPM_VIEW_TIME_BEGIN | In Bravura Privilege password check-out requests, this is the beginning of the interval in which a user has permission to check out an administrative password. It is included in the Privileged Access Manager request base attribute group. |
PPM_VIEW_TIME_END | In Bravura Privilege password check-out requests, this is the end of the interval in which a user has permission to check out an administrative password. It is included in the Privileged Access Manager request base attribute group. |
PROFILE_PIC | Used to link a profile picture for each user. It is included in the base attributes group. |
RBACENFORCE | When this boolean attribute is set to true, the user is included in the role enforcement jurisdiction. When a new user is created, or an access change request is issued for an existing user, the default value is true. It is included in the RBACENFORCEATTR group. |
SEND_RECIPIENT_EMAIL | By default, recipients receive all emails addressed to them. When this boolean attribute is set to false, the recipient will no longer receive emails involving the request. It is not included in an attribute group by default. |
SEND_REQUESTER_EMAIL | By default, requesters receive all emails addressed to them. When this boolean attribute is set to false, the requester will no longer receive emails involving the request. It is not included in an attribute group by default. |
SM_BROWSER_VIEW_TIME_END | Used for requests to view recorded sessions. Allow the recipient to view sessions in a browser until this time. It is included in the Recorded session meta data browser view limits group.. |
SM_BROWSER_VIEW_TIME_START | Used for requests to view recorded sessions: Allow the recipient to view sessions in a browser starting at this time. It is included in the Recorded session meta data browser view limits group. |
SM_EVENT_TYPE | Used for requests to download recorded sessions: Content types to include in package. It is included in the Recorded session meta data view limits group. |
SM_SEARCH_DEST_MANAGED_SYSTEM | Used for requests to search recorded sessions: Managed system. It is included in the Recorded session meta data browse limits group. |
SM_SEARCH_INITIATOR | Used for requests to search recorded sessions: Session initiator profile ID. It is included in the Recorded session meta data browse limits group. |
SM_SEARCH_MANAGED_ACCOUNT | Used for requests to search recorded sessions: Privileged access. It is included in the Recorded session meta data browse limits group. |
SM_SEARCH_SEARCH_TIME_END | Used for requests to search recorded sessions: Allow the recipient to search until this time. It is included in the Recorded session meta data browse limits group. |
SM_SEARCH_SEARCH_TIME_START | Used for requests to search recorded sessions: Allow the recipient to search starting at this time. It is included in the Recorded session meta data browse limits group. |
SM_SEARCH_SESS_TIME_END | Used for requests to search recorded sessions: Search for sessions active until this time. It is included in the Recorded session meta data browse limits group. |
SM_SEARCH_SESS_TIME_START | Used for requests to search recorded sessions: Search for sessions active starting at this time. It is included in the Recorded session meta data browse limits group. |
SM_SEARCH_SOURCE | Used for requests to search recorded sessions: User device ID. It is included in the Recorded session meta data browse limits group. |
SM_SEARCH_SOURCE_ACCOUNT | Used for requests to search recorded sessions: User login ID. It is included in the Recorded session meta data browse limits group. |
SM_VIEW_EXPIRY_TIME | Used for requests to download recorded sessions: How long the package should be retained once it is generated (in days). It is included in the Recorded session meta data view limits group. |
SSH_AUTH_KEY | In Bravura Privilege generic check-out requests, this is the SSH public key to add to the managed account. It is included in the App SSH attributes group. |
SSH_PUBLIC_KEYS | Used for storing users’ SSH public keys. It is included in the SSH public key profile attributes group. |
UPDATE_ONLY_CHANGED_ATTRS | This boolean attribute allows requesters to indicate whether to update all the account attributes, or only the changed ones. Its value is only used in context of the request, and is not saved with the user’s profile. |
VIEWABLE_BY_RECIPIENT | This boolean attribute allows requesters to indicate whether a recipient is allowed to view a request in the Requests app. Its value is only used in context of the request, and is not saved with the user’s profile. It is included in the request-only group. |
The following request attributes should not be modified as they are required for requests in the Privileged access app and Session monitor app to work:
ACCOUNT_TARGET_LIST
DURATION_INTERVAL
DURATION_UNIT
EXTENSION_DURATION_UNIT
SM_SEARCH_MSPS
USE_DURATION
RECIPIENT_APP
Getting started
Requirements
You require the Configure workflow setup administrative privilege in order to configure profile and request attributes.
Navigation
Use the Manage the system > Workflow > Profile and request attributes menu to add, modify, and delete attributes, and to configure global settings.
Bravura Security Fabric displays a list of existing profile and request attributes.
Adding a new profile and request attribute
To add a new profile and request attribute:
Click Manage the system > Workflow > Profile and request attributes > Profile and request attributes.
Type an ID and the Description that users will see.
Select a Type.
Bravura Security Fabric refreshes the page and displays settings according to the type you selected. If JavaScript is not enabled for your browser, you must click Add to allow the page to refresh.
Set parameters as described in Table Profile and request attribute parameters.
Click Add, or Update.
You can also add profile and request attributes from the account attribute configuration page when mapping attributes. See Mapping account attributes to profile and request attributes.
Defining profile and request attributes
Parameters for profile and request attributes vary depending on the attribute’s type, as listed in the table below:
Setting | Type | Description |
|---|---|---|
Display type | Boolean, Date/time, String | Determine how users select or enter values. For boolean attributes the options are "Drop-down", "Checkbox", or "Radio buttons". For date/time attributes the options are "Date/time" or "Date only (calendar)" where the date is selected with a popup calendar, or "Date only (YYYY-MM-DD)" where the date is selected with a drop-down menu. For string attributes with restricted values it becomes available only if the attribute allows multiple values and the options are "Drop-down" or "Drop-down with two-columns" to allow user to select values from either a drop-down list or a two-columns window.. |
Validate user | User | Determine whether the profile ID entered for a user-type attribute is a valid or invalid user.. |
Display as an image | Link, File | Display the link or file as an image with a size of 100 x 100 pixels |
Validate attribute value | Link | Checks whether the specified link is valid before accepting the value.. |
Minimum required number of values | All | A number greater than 0 means the attribute is required. |
Maximum allowed number of values | All except Boolean, Memo, Password, and Date/time | A number greater than 1 means that multiple values are allowed. |
Maximum field length | String, Integer, Password | Maximum length allowed for each value. |
Allow duplicate values | String, Integer, User | Determine whether the values for a multi-valued attribute must be unique. This does not apply to single-valued attributes. |
Sent in emails | All except Password and File | Profile and request attributes can be included or excluded from the information sent in email notifications. |
Allow for profile comparison | All except Password and File | Profile and request attributes can be included or excluded from the Profile comparison page. These attributes cannot be encrypted in the database. |
Allow for authentication chains | String, Integer, Password, Date/time | Profile and request attributes can be used in authentication chain configuration. This is enabled for the EMAIL attribute by default. It is currently used only for the Email/SMS PIN authentication module. |
Only use for requests (do not apply to a user profile) | All | Determine whether the attribute’s values are only used in the context of a request, and are not saved with the user’s profile. For example, the built-in VIEWABLE BY RECIPIENT is used to determine whether a request is hidden from the recipient. |
Editable only on request creation | All | Allow or disallow changes to the attribute value after request creation. |
Track changes | All except File | Changes to profile and request attribute values can be tracked. The tracked changes are viewable as part of each user’s profile history. You can also configure the |
Users must verify and confirm the value | String, Integer, Password (recommended) | Require users to re-type the value in a second text box. For example, you might want to set this option for password-type attributes, where users can’t see what they are typing. |
Changes made will invalidate authorizations | All | If an authorizer changes an attribute value, any previous authorizations of a request are invalidated. Other authorizers are notified and need to re-authorize the request. This is useful where an attribute change can be a security issue; for example, if a security level attribute is set to a value of 2, and an authorizer changes the value to 1, the original request should be invalidated. |
Allow in advanced search criteria | All | Profile and request attributes can be included or excluded from the Advanced search. This does not affect the advanced search page for the main Profile and request attributes menu. |
Display in reports | All | Allow or disallow the attribute values to be displayed in reports. This is enabled by default. |
Map to vCard property | All | Map profile and request attributes to commonly used vCard properties |
Notes | All | Help information for the attribute. Once set, it will be available in wizards by hovering over the question mark icon. |
Description of input values | String, Memo, Integer, Password, File | This is displayed to users to show them how to enter values for the attribute. For example, type YYYY-MM-DD for a Date of birth field. |
Format requirement of input values | String, Password, File | For example, type NNNN-NN-NN to indicate a series of numbers. |
Regular expression used for validation of input values | String, Memo, Integer, Password | If you use a regular expression for validation the Description of input values is required. |
Restricted values are case-sensitive | String, Integer | The restricted values entered will maintain their case. Default behavior is to uppercase all Actual values entered. When configuring date/time attributes (PREFERRED_DATEFORMAT and PREFERRED_TIMEFORMAT), ensure that they are case-sensitive. |
Plugin used to generate a list of restricted values | String, Integer | You can use a plugin to supply one or more restricted values for an attribute. Leave this field blank to define restricted values manually.. |
Parent attribute | String, Integer | You can use a plugin to supply one or more restricted values for an attribute. Leave this field blank to define restricted values manually. |
Display text for positive value | Boolean | The default is True . |
Display text for negative value | Boolean | The default is False . |
Display text for no value | Boolean | The default is (None) . |
Default values | String, Integer, Boolean | Attributes can be set up with default values, so that unless a user intervenes and changes them, the default values are entered with a request then copied to the newly created account. If you define restricted values for the attribute, you can select them from a drop-down list for this option. |
Inherit validation enforcement from attribute group | All | Leave this enabled if you want the attribute to inherit validation enforcement rules from the attribute group to which it belongs.
|
Encrypt this attribute in the database | All except User, Managed system, Discovered system, Manageable account | Enable this to encrypt attribute values in the database. If encrypted, the attribute cannot be used in advanced search criteria, mapped to an account attribute, or used in profile comparisons. Encrypted attribute values are masked in reports. Certification reviewers must have appropriate permission to view encrypted attribute vaules; otherwise they are masked. |
The Description, Description of input values, Format requirement of input values, and Regular expression used to validate input values fields can accept custom text macros. If a custom macro has been configured for the Description, Description of input values and/or Format requirement of input values fields, a second text field will appear on this page detailing the value that will be displayed to the user.
Boolean values
Boolean attributes require users to select a true or false value. The default choices displayed to end users are True or False, or (None) if the attribute is optional.
To specify other values:
On the Profile and request attribute information page, type a text string for:
Display text for positive value
Display text for negative value
Display text for no value
Set the Default values.
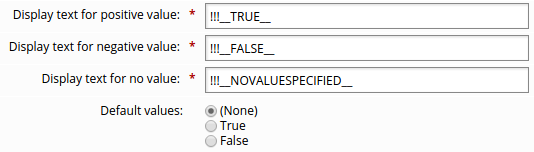
Click Update.
When you click Update, the default values text will change to reflect the values you specified.
See also
See Entering multi-language descriptions for information about using multi-language display text.
Number of values required or allowed
The number of values required or allowed is set by the Minimum required number of values and Maximum allowed number of values on the page.
If the attribute is required for a request to be complete, type a number greater than 0 in the Minimum required number of values field.
If more than one value can be entered, type a number greater than 1 to set a Maximum allowed number of values, or type -1 to allow an infinite number of values.
This number can only be set to a positive number or -1. A value of 0 is invalid.
This means that when users update attributes, they will be presented with a More button that displays additional fields for this attribute.
Only string and integer attribute types can have more than 1 value. The boolean, date/time, memo, and password attribute types can only have one value.
A value for a required attribute can be provided at any stage of the request process. That is, an authorizer with assigned rights can enter information, such as salary or Social Security Number, to which the requester does not have access. Configure access controls (Manage the system > Security > Access to profile and request attributes) to determine which users can view or edit certain attributes.
If requesters do not have write permissions to a required attribute, then authorizers must enter a value for the attribute. If not, the request will be automatically denied.
If an attribute not enabled for comparison requires a value, then the requester is brought to the recipient’s Profile information page. There, the requester can enter the required value.
Maximum length
You can restrict the maximum length of a profile and request attribute value by using the Maximum field length setting on the page.
For multiple … | Maximum length refers to … |
|---|---|
Restricted values | Maximum length allowed for each value |
Unrestricted values | Total number of characters allowed in the text field for the attribute |
vCard properties
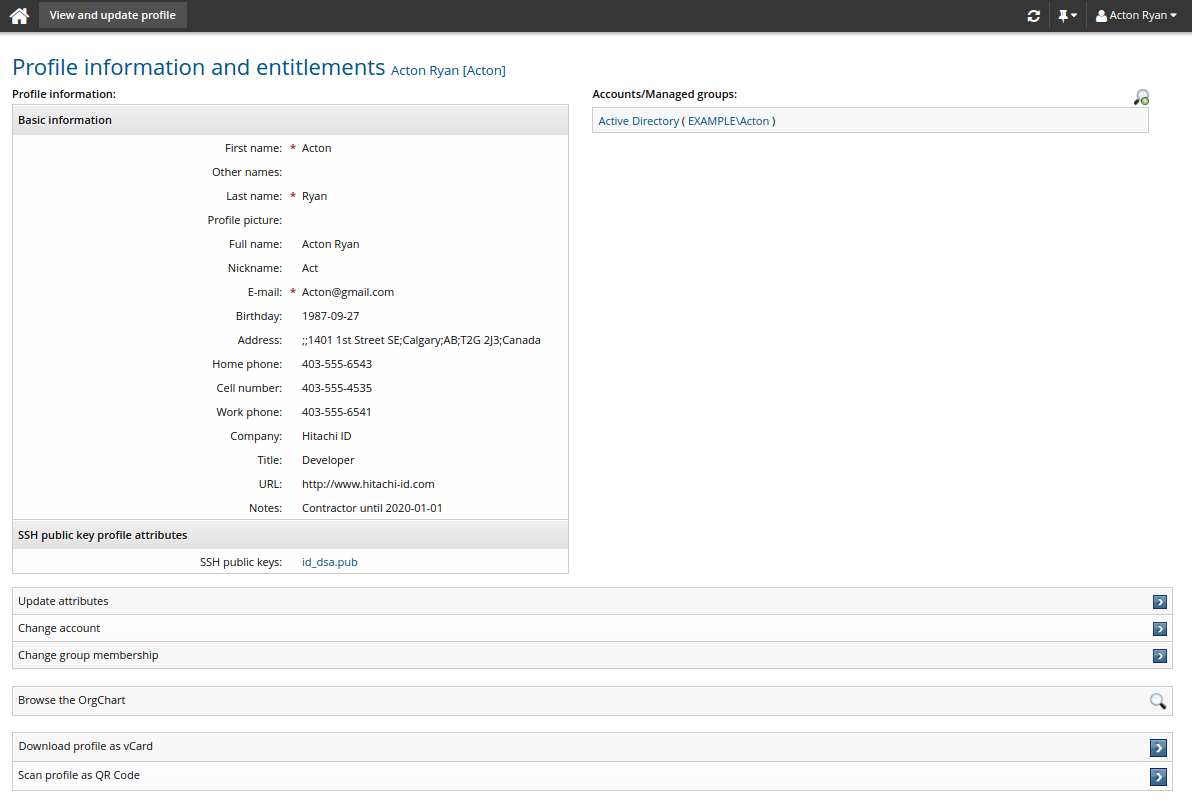
When at least one profile and request attribute is mapped to a vCard property, users can view profile information as a vCard contact record.
Bravura Security Fabric includes links on profile information pages to Download profile as vCard, and Scan profile as QR Code.
Below is an example of a vCard contact record, saved as a .vcf file:
BEGIN:VCARD
VERSION:3.0
FN:John Doe
EMAIL:doejo@example.net
ADR:;;1401 1st Street SE;Calgary;AB;T2G 2J3;Canada
BDAY:1987-07-23 06:00:00
TEL;TYPE=CELL:403-555-4535
ORG:Bravura Security
TEL;TYPE=FAX:403-555-2545
FN:John Doe
N:Doe;John
NICKNAME:Johnny
NOTE:Contractor until 2015-12-31
TEL;TYPE=HOME:403-555-6543
TITLE:Developer
URL:http://www.bravurasecurity.com
TEL;TYPE=WORK:403-555-6541
END:VCARD
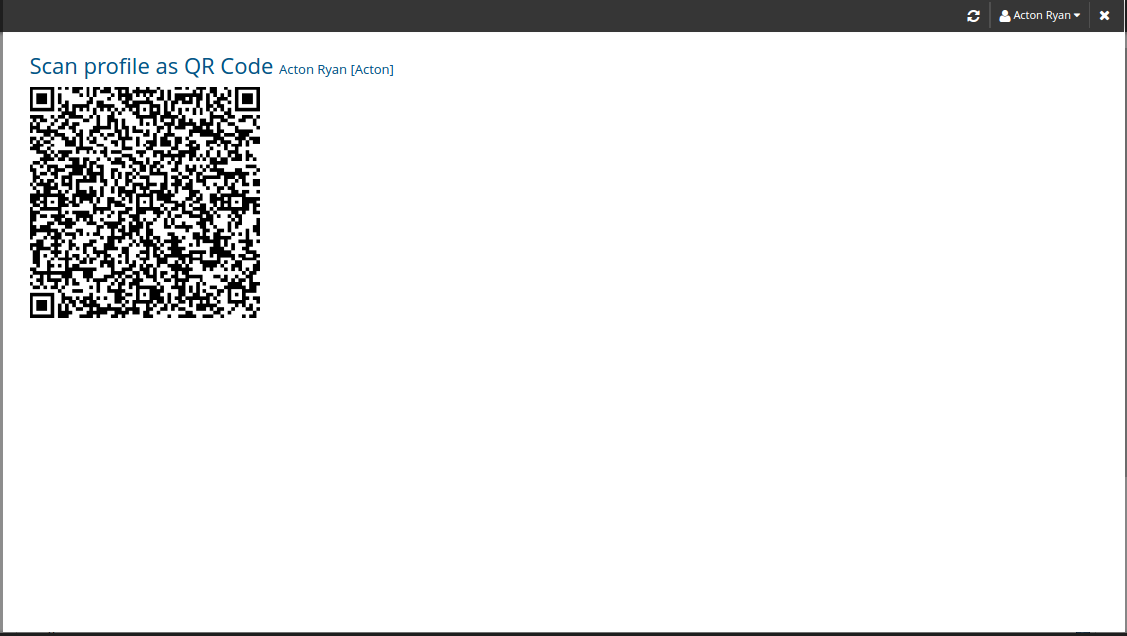
Below is an example of profile as QR Code:
Users can also add contact records directly into the native contacts lists for both Android and iOS mobile devices from the Download profile as vCard link when accessed from the Bravura One app.
From the Bravura One app, navigate to the Profile information and entitlements page for a user and then click Download profile as vCard. The contact record will be added to the native contacts lists for the Android or iOS mobile device.
See also
See Mobile access for more information about Bravura One and the Bravura One app.
Restricted values
You can supply one or more restricted values for an integer or string type attribute.
When multiple restricted values are supplied for an attribute, users select one or more of the values from a list when they make a request.
You can configure the values:
Defining restricted values manually
To manually define restricted values:
Add the attribute using the page. It is not necessary to give a value for Plugin used to generate a list of restricted values.
The Restricted values tab appears once the attribute has been created.
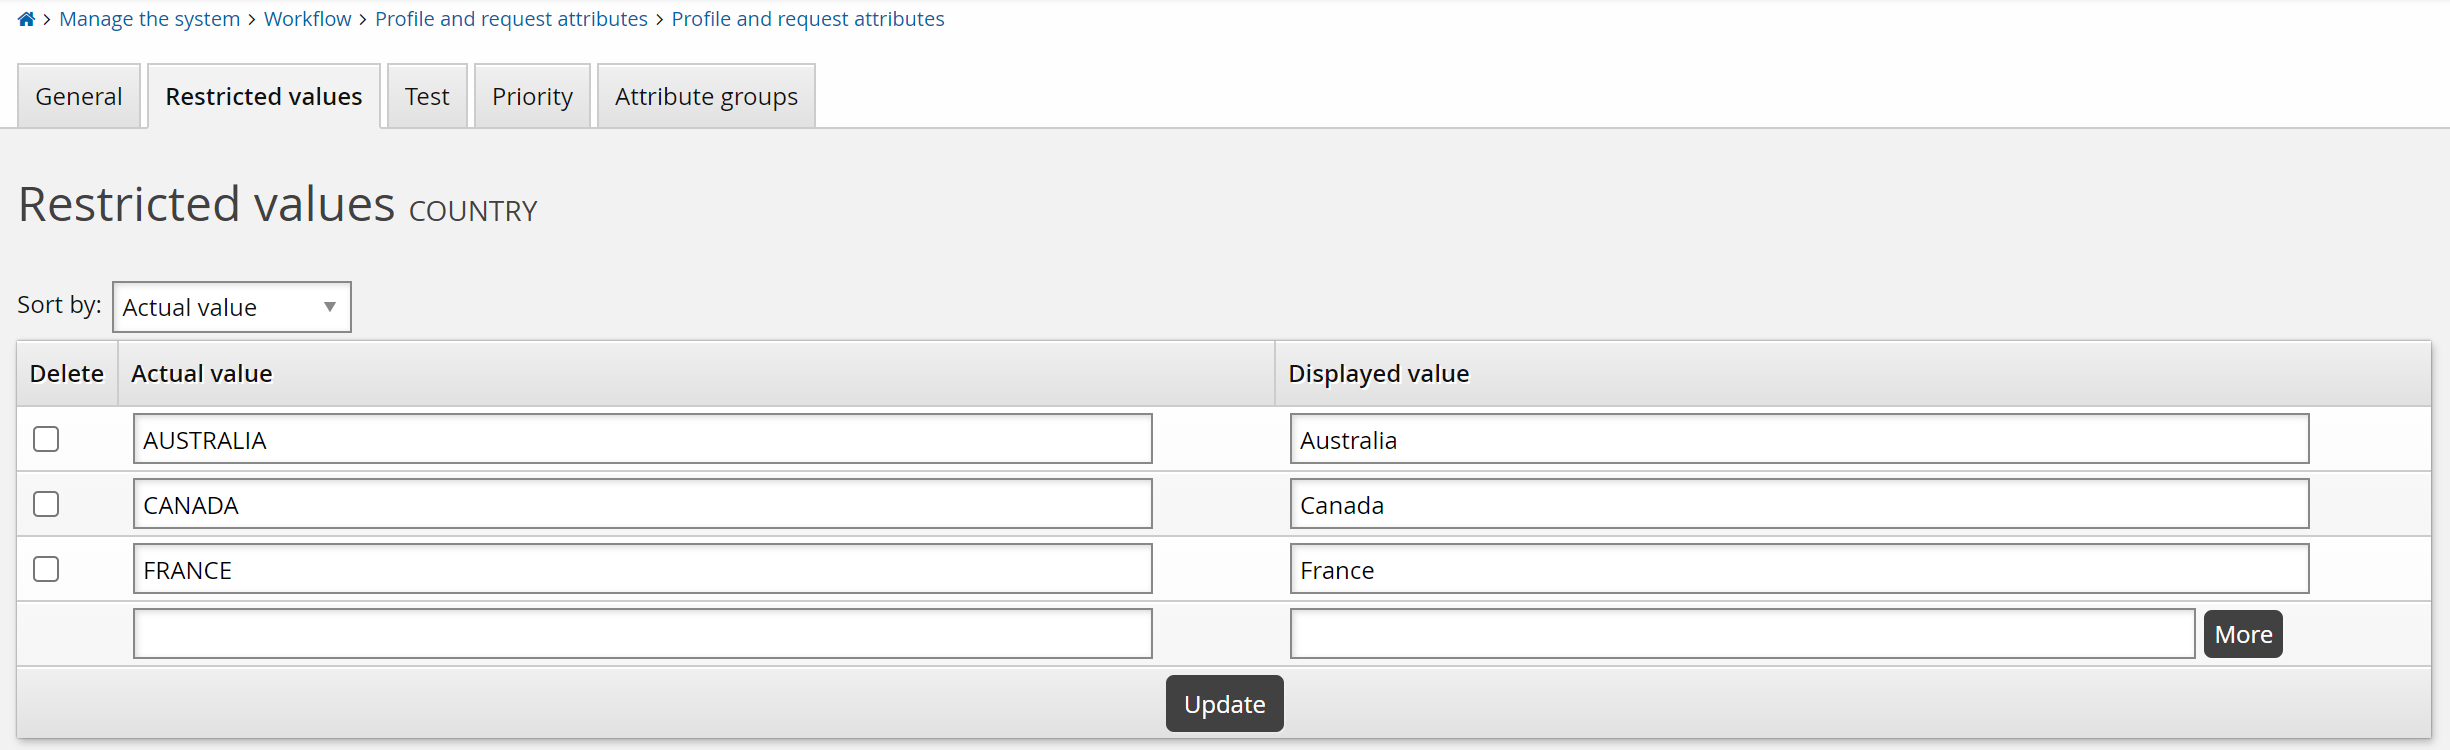
In the Restricted values tab, type the Actual value, to be recorded in the database and potentially be written out to target systems, and Displayed value, to be shown to users. The actual value will be stored uppercase unless the Restricted values are case-sensitive option is selected.
To add additional values, click More or Update to add rows.
Click Update when you have added all values.
To delete a restricted value, select the check box next to the value then click Update.
You can sort values alphabetically according to actual value or displayed value.
Caution
If actual values contain the sequence !!!, Bravura Security Fabric will treat them as macros and expand them according to the skin being used. The actual values applied in this case will be different from what is defined in the attribute configuration. This will lead to the values being rejected, due to restricted list mismatch. The !!! sequence must therefore be avoided in actual values. If localization is required, specify the macro tag in the displayed value instead.
Click below to view a demonstration of manually adding static restricted values (such as Employee, Contractor and Student) to an EMPLOYEE-TYPE profile and request attribute, allowing users to select a value from a drop-down list rather than typing a value when filling out a request form.
Loading restricted values from an external source
Values can be extracted from an external source and loaded into Bravura Security Fabric . The attrfixedval program is used to load or update values that are static; that is, do not change during the course of a request. attrfixedval also allows you to manipulate the display values which correspond to the static restricted values.
Updating the list of restricted values for an attribute using batch loading can be useful where the values can vary over time; for example, seasonal employment, or academic schedules.
See attrfixedval usage .
Defining dynamic restricted values using a plugin
Where attribute values are dynamic - they can vary as a user proceeds through the request workflow - you can use a plugin to supply the values. Values may depend on the user or other attributes, and can be extracted from an external database. The plugin runs on each page as a user proceeds through a request.
The configured plugin must return the list of actual values. If the display value is set for an actual value, then the Requests app uses the display value rather than the actual value. The display value used must be set statically; it cannot be returned from the plugin. Display values are set using the procedure for manually or automatically defining restricted values.
If a plugin is used to supply restricted values, those values which are statically defined (in the Manage the system (PSA) module or by using attrfixedval) are only displayed if their actual value is returned by the plugin.
To enable this feature, type the name of the plugin in the Plugin used to generate a list of restricted values field on the Profile and request information page.
There are no shipped plugins in use with this plugin point. Sample plugin scripts are located in the samples\ directory:
restricted-value-plugin.pslfor attributes with no parentrestricted-value-hierattrs-plugin.pslfor attributes with a parent attribute
Requirements
The plugin only sets actual values. If a display value has been set for any of the restricted values, then that value is displayed in place of the actual value. Display values must be set via the Manage the system (PSA) module prior to the execution of the plugin. See Writing plugins for general requirements.
Execution points
The plugin is run by the View and update profile (IDR) module and Requests app whenever attributes are edited.
The plugin runs when a user clicks:
Clicks a menu option to create a new user profile or access an existing user profile.
Accesses an attribute group on a subsidiary page
Clicks Update after editing attributes on a subsidiary page
Clicks Continue on a profile information page.
When requesters define or update a value for another attribute, the plugin runs again. This means that if an attribute with dynamic restricted values depends on the value of another attribute, all values remain valid.
The plugin also runs when a request is submitted to Workflow Manager Service. If the attribute value does not match one of the values returned by the plugin, then request will be denied.
Input
Input passed to the plugin is as follows:
"" "" = {
  "attribute" = "<attribute id>"
    # The ID of the attribute for which the plugin is being run.
  "module" = "<idp|ids|idr|idwfm>"

    # Where the plugin is being run from.
  "userid" = "<profile ID>"
    # The profile ID (if known) of the recipient.

    # This is empty if a profile ID generator is used.
  "requestID" = "<request ID>"
    # The request ID for the associated request.
  "sessionid" = "<session ID>" # session ID for the viewer
  "operation" = "<operation type>"
    # The possible operation that can be requested; 0 or more
    # See Operation codes for a list of codes.

  "parent" = "<parent attribute>"
    #ID of the parent attribute, if set
  "username" = "<full name>"
    # The full name (if known) of the user for whom the plugin
    # is being run.  Omitted if the userid is empty.
  "recipient" "<user>" = { ... }
    # Recipient of the request.  The KVGroup name is not present if the request is for a new user.

  "request" "" = { ... }
    # Request details.
  "requester" "user" = { ... }

    # Requester's data.
  "viewer" "user" = { ... }
    # The viewer's data.
  "model" "user" = { ... }
    # Data of the model user used in profile comparison.
   }
For example:
"" "" = {
  "attribute" = "STATE"
  "module" = "idr"
  "operation" = "GRUA"
  "parent" = "COUNTY"
  "requestID" = "536C788C1D12B58CADCDCCE4FD0E3D62"
  "sessionid" = "Scced6c11-2387-4e0d-a09a-d42ed23360cc"
  "viewer" "user" = {
    "id" = "crysta.soria"
    "name" = "Crysta Soria"
  }
}
Output
Output passed from the plugin is as follows:
"" "" = {
  "errmsg" = "<return message>" # Error messaged by the plugin
  "retval" = "0" # Mandatory; zero is success and non-zero is failure
  "restrictedvalue" = "<value>" # 1 or more; each value represents a
                                # selection for the user.
}
If the attribute has a parent attribute, then additional KVGroups can be returned in the format:
"parent" "<parent value>" {
    "restrictedvalue" = "<value>" # 1 or more
  }
The following is an example of output that should be returned, where there is no parent attribute:
"" "" = {
  "errmsg" = "success"
  "restrictedvalue" = "Alberta"
  "restrictedvalue" = "Quebec"
  "restrictedvalue" = "New York"
  "restrictedvalue" = "California"
  "retval" = "0"
}
The following is an example of output that should be returned, where a parent attribute has been set:
"" "" = {
  "restrictedvalue" = "Other"
  "parent" = "US" = {
    "restrictedvalue" = "NY"
    "restrictedvalue" = "WA"
    "restrictedvalue" = "TX"
    "restrictedvalue" = "CA"
  "parent" = "CA" = {
    "restrictedvalue" = "AB"
    "restrictedvalue" = "QC"
  "errmsg" = "success"
  "retval" = "0"
}
If the parent’s value is empty, then any "restrictedvalue" KVPairs not inside a "parent" KVGroup ("Other" in the above example) would fall under the empty parent value. The plugin can also specify an explicit "parent" "" KVGroup for this case. If the parent value is not optional, then any dangling "restrictedvalue" KVPairs are ignored.
Parent values
Attributes can be inter-related in a hierarchical relationship. Common use cases include geographical locations (for example, country > state/province > city > office location) or organizational hierarchy (for example, company > department > division).
From an end-user’s perspective, this means the value they select for a parent attribute will determine the values that are available for a child attribute .
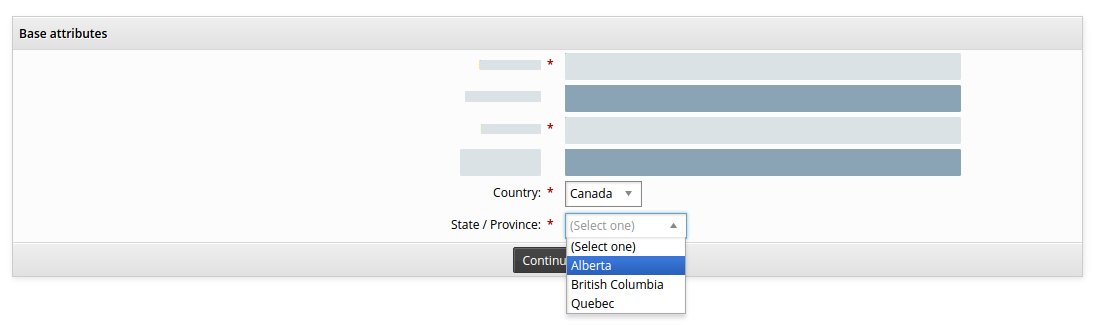
Both parent and child attributes must have restricted values. To set up a hierarchical relationship between attributes:
Create an attribute, for example COUNTRY, that will be the parent attribute.
Define the parent attribute with restricted values.
Create an attribute, for example STATE , that will be the child attribute.
You must click Add to create the child attribute before the next step
Enter the ID of the parent in the Parent attribute field of the child attribute.
Click Update. If the parent ID is valid, its values are added as settings for restricted and default values.
Click the Restricted values tab.
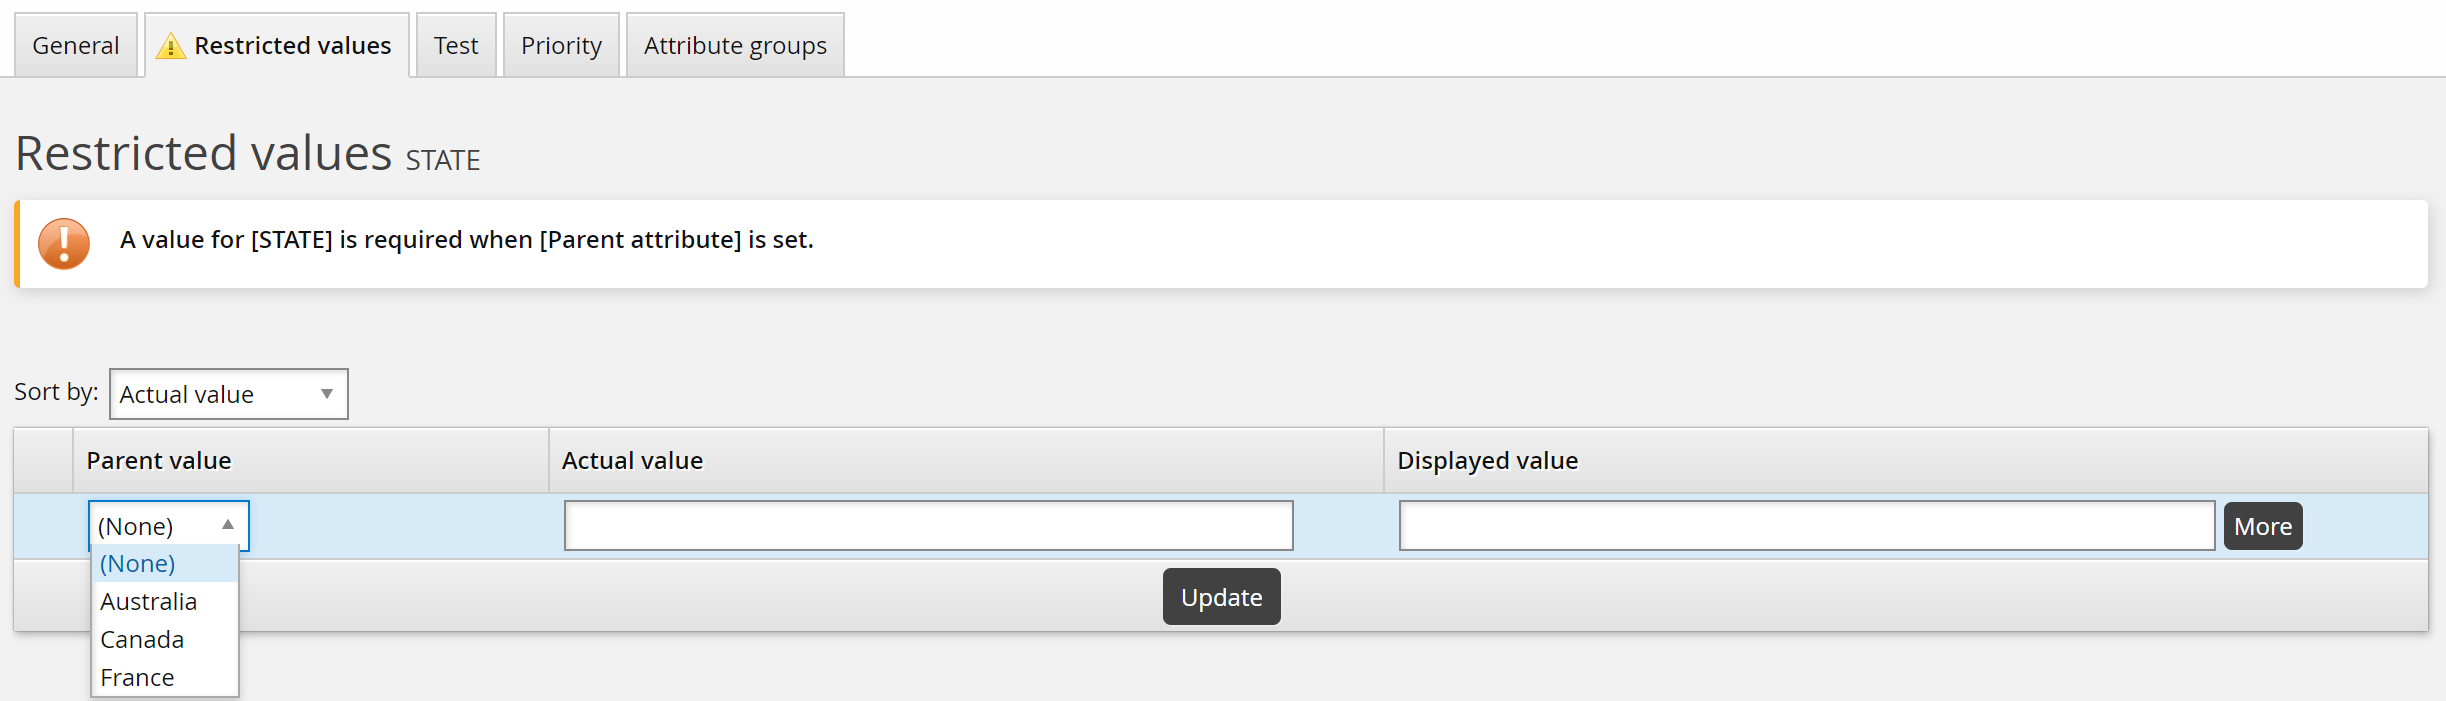
Select a Parent value, then enter Actual value and Displayed value.
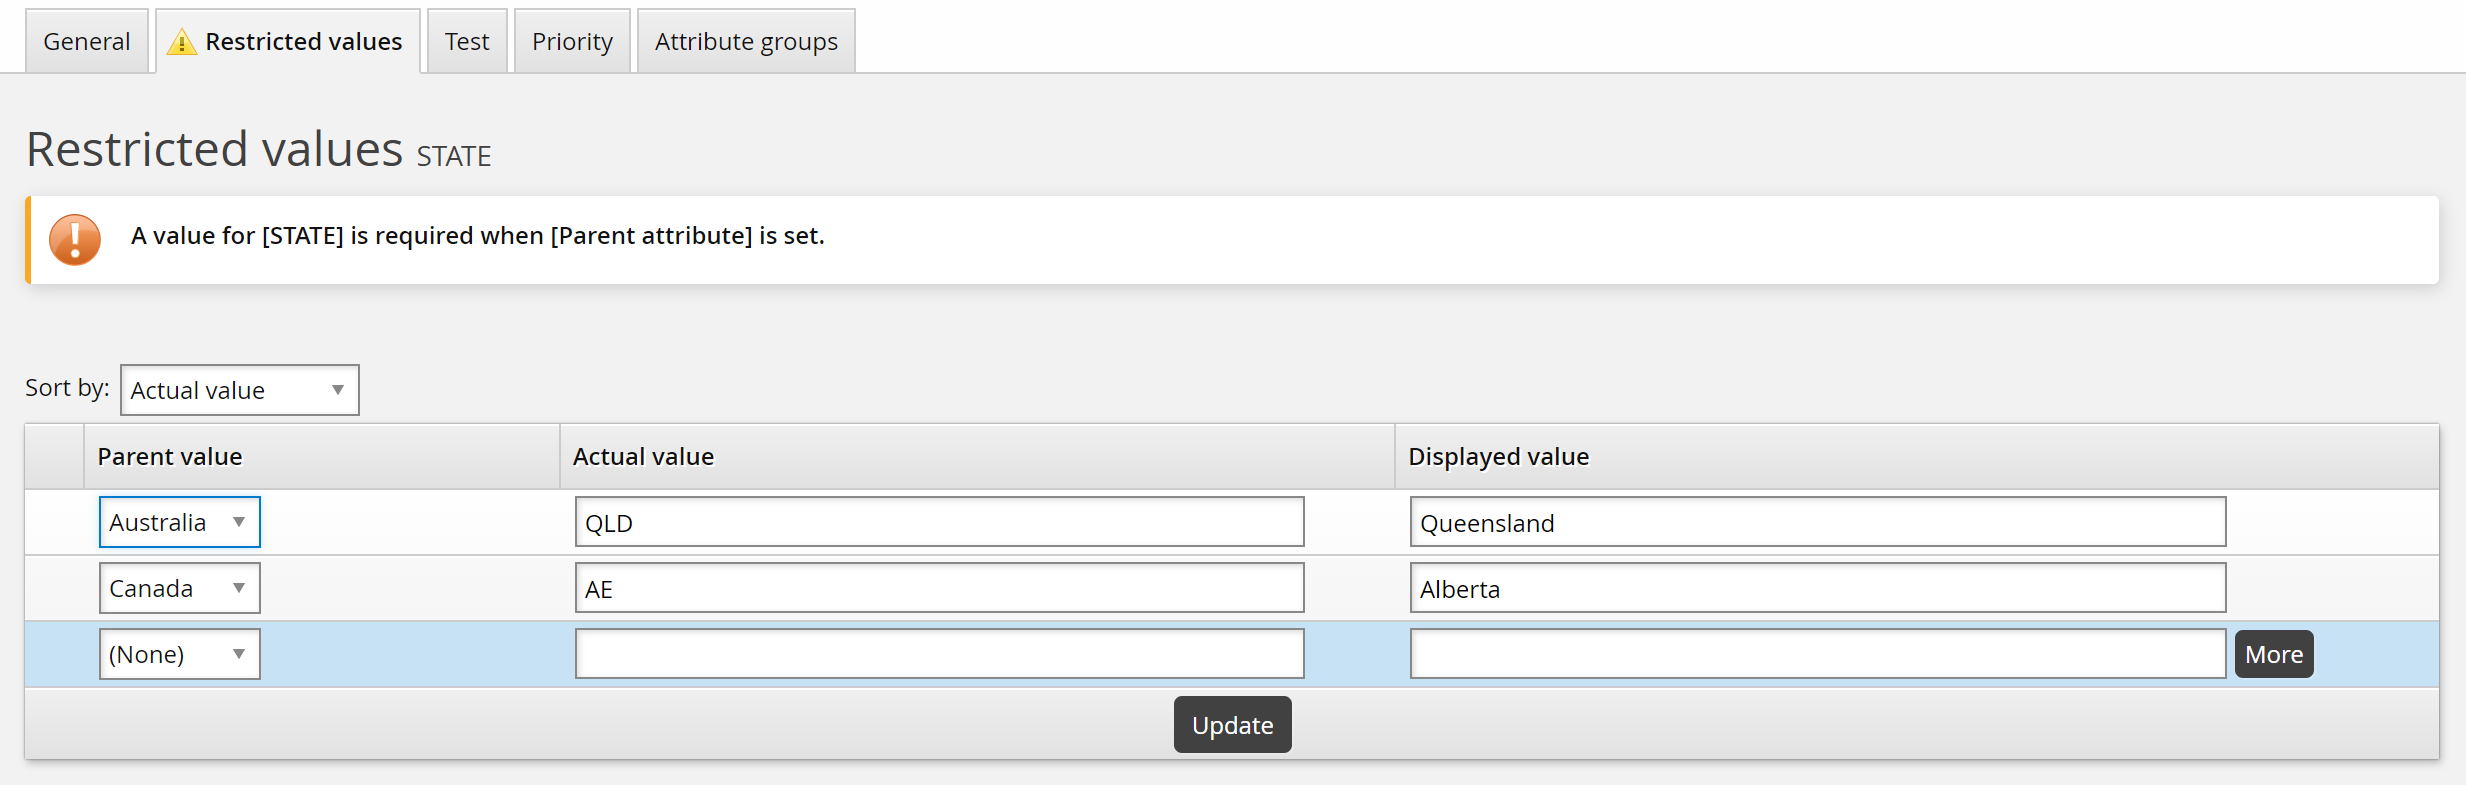
The actual value will be stored uppercase unless the Restricted values are case-sensitive option is selected.
To add additional values, click More or Update to add rows.
Click Update when you have added all values.
To delete a restricted value, select the check box next to the value then click Update.
You can sort values alphabetically according to actual value or displayed value.
After you have entered restricted values for a child attribute, you can set default values.
Caution
If actual values contain the sequence !!!, Bravura Security Fabric will treat them as macros and expand them according to the skin being used. The actual values applied in this case will be different from what is defined in the attribute configuration. This will lead to the values being rejected, due to restricted list mismatch. The !!! sequence must therefore be avoided in actual values. If localization is required, specify the macro tag in the displayed value instead.
It is possible for parent and child attributes to be in separate attribute groups. For example, you could set up a pre-defined request to add a New York employee. In this case the country and state would be auto-populated and hidden from the requester, who only needs to specify a city. The city attribute would be in a different group to the country and state attributes.
Default values
Attributes can be set up with default values, so that unless a user intervenes and changes them, the default values are entered with a request. This is the case for both required and optional attributes.
Default values are always used for request-only attributes, or for profile attributes during requests for new profiles. They are not applied to profile attributes of existing users.
Caution
Default attribute values are automatically saved with a request if the attribute is not part of an editable attribute group.
On the page, define Default values by typing them in the text box (unrestricted values) or selecting from the list of values (restricted or boolean values).
If the attribute has a parent attribute, you can set default values based on each parent value. The parent’s restricted values must be defined first.

Testing the validity of attribute values
To test an attribute value’s validity, click the Test tab on the page. Enter an attribute value to validate, then click the Test button.
The value entered is validated against the Format requirement of input values setting, the Regular expression used for validation of input values setting, the Plugin used to generate a list of restricted values, and any manually entered restricted values.
Click below to view a demonstration of defining and testing a validation rule using a format requirement of input values for an EMPLOYEE-NUMBER profile and request attribute that is mapped to the Active Directory employeeNumber account attribute.
Validating and generating attribute values
Bravura Security Fabric can use a customized plugin to validate, provide values for, or alter the mandatory status of attributes according to business logic.
The process can be summarized as follows:
A user (requester, recipient, or authorizer) updates a change request page (submits or modifies a request).
Bravura Security Fabric sends all attribute values to the plugin.
The plugin determines whether:
The value should be changed to a value specified by the plugin
The value should be changed to a value input by the user
The value should be unchanged
The attribute field should be disabled to prevent further changes
The attribute should be mandatory
The value should be hidden from the user
Bravura Security Fabric redisplays the page. You can configure the plugin so that Bravura Security Fabric displays messages indicating what has changed, or that the user needs to modify the value, and why. Disabled fields are “grayed out”.
The attribute validation plugin overrides configured settings for enforcing validation for attribute groups or individual attributes. Since the plugin can be used to supply values for “hidden” attributes, it is not subject to access controls set for user-controlled attributes.
Note
Some of the functionality provided by the plugin applies to products that you may not have licensed.
The plugin program must be listed in the ATTR VALIDATION PLUGIN field in the Manage the system > Workflow > Profile and request attributes > Attribute logic menu. For Bravura Privilege requests, the plugin program must be listed in the PAM ATTR VALIDATION PLUGIN field instead.
There are no shipped plugins in use with this plugin point. A sample plugin script, attribute-validation-plugin.psl, is located in the samples directory. See how to Write a custom attribute validation plugin below.
Validation of values
Bravura Security Fabric provides some rudimentary validation of values out of the box. The definition of a profile and request attribute allows for configuration of validation rules based on structured text (NN/NN/NNNN for dates or NNN-NNN-NNNN for phone numbers) and the use of regular expressions.
In many cases advanced attribute validation is required. For example an external source, such as LDAP or SQL, might provide the information for proper attribute validation. In such cases the attribute validation plugin is most useful. It has the ability to look at the information the user has entered and, based on business rules, decide if the value is acceptable.
The attribute validation plugin can use business rules to deny the value entered by the user or accept it. Along the way, the plugin informs the user of the result by displaying a custom message on the Bravura Security Fabric user interface.
You can "turn off" the enforcement of validation rules at the attribute group or single attribute level, in cases where an incorrectly formatted value should not block a whole request. For existing accounts, you can also set validation rules to be enforced only if the value is changed. The attribute validation plugin executes in all cases and overrides configured settings.
Generation of hidden values
On many occasions, the creation of a user object requires a number of attributes with values that are calculated or generated. The best practice dictates that it is easier for a user to only enter information that is required. All other attribute values should be generated. The less interaction that is needed with the requester, the better the usability experience.
Access control lists in Bravura Security Fabric dictate which attribute groups are displayed on the user request screen. If a profile and request attribute is not displayed on the request form, it is considered hidden. Such hidden attributes are still available for processing within the attribute validation plugin point.
All hidden attributes can be populated with generated values based on values from other attributes or external sources (LDAP, SQL). The values are not displayed to users.
For example, if the requester enters the country location of the new user (US, Canada, UK), the attribute validation plugin can generate the country code and populate a hidden attribute called COUNTRY_CODE. As a result, the target system where the account is created will accept the country code rather than the country name. In this example, the user works with a human readable country name, where the account creation uses a code number for the country instead.
Requirements
The plugin must be placed in the \<instance>\plugin\ directory and runs on the Bravura Security Fabric server. See Writing plugins for general requirements.
Execution points
The attribute validation plugin is executed in various places and during various workflow steps. Attribute validation is required every time the value of a given attribute is changed. Such attribute change operations occur in the View and update profile (idr) module, Requests app, and Workflow Manager Service:
The attribute validation plugin is executed when:
A profile and request attribute value for an existing user is added or modified.
A new user request is submitted, reviewed, or authorized.
A request to add or remove a resource is made for an existing use.r
When the WF ATTRVAL PLUGIN RUN IDR SUMMARY setting is enabled, the attribute validation plugin will execute on the request summary page. This will allow any additional attributes to be added to the request before submission. By default, this option is disabled. You can enable it at Manage the system > Workflow > Options > General.
Note
An attribute validation plugin can generate values for profile and request attributes. The author of an attribute validation plugin is responsible for ensuring that the plugin only sends confirmation to the CGI program that an attribute’s value has changed when the value has actually changed. If the output of the attribute validation plugin defines that the value for a profile and request attribute has changed, the CGI program will not carry out any validation to confirm that the value has changed. The end result is that the value for the "changed" profile and request attribute will be pushed to all target systems where the profile and request attribute is linked to an account attribute. This could create problems if no actual change to the attribute’s value has occurred.
Input
The plugin receives all attributes in addition to the other standard information contained in the session. It also receives information about users’ navigation on the CGI.
Input passed to the plugin is as follows:
"" "" = {
   "module" = "<idp|ids|idr|idwfm>"

     # Where the plugin is being run from.
   "operation" = "<operation code>"
     # The possible operation that can be requested; 0 or more
     # See Operation codes  for a list of codes.

   "sessionid" = "<session ID>"
     # The session ID for the viewer
   "valuessubmitted" = "true|false"
     #If the value is false, the plugin is expecting pre-set values, and no
     #reservation is done.  If the value is true, it is safe to do
     #reservation. See Reservation ID on Page 115.
   "navigation" "" = { ... } # User navigation data
   "attribute" "<attribute id>" = {
    "parent" = "<parent attribute>" #present if set
     "oldValue" "" = { # Applies to the workflow manager service only

       "value" = "<old request value>" # 0 or more
     }
     "value" "" = {
       "value" = "<request value>" # 0 or more
     }
   } # 0 or more
   "recipient" "user" = { ... } # Recipient's data

   "request" "" = { ... } # Request data
   "requester" "user" = { ... } # Requester's data
   "viewer" "user" = { ... } # Applies to Requests app or View and update profile (idr) module only
   "model" "user" = { ... } # Data of the model user used in profile comparison
   "event" = "<event id>"
     # The event context where the plugin is being called.
   "postedByAPI" = "<false|true>"
     # This key value is present when the request is posted.  If true, the request
     # is submitted through IDAPI.  Otherwise, the value is false.
}
For example:
# KVGROUP-V1.0
"" "" = {
  "module" = "idr"
  "operation" = ""
  "operation" = "GRUA"
  "preselect_nosgroup" = "1"
  "preselect_role" = "1"
  "preselect_template" = "1"
  "sessionid" = "Scced6c11-2387-4e0d-a09a-d42ed23360cc"
  "valuessubmitted" = "false"
  "attribute" "APIUSER_CIDR" = {
    "value" "" = {
    }
  }
  "attribute" "COUNTRY" = {
    "value" "" = {
    }
  }
  "attribute" "EMAIL" = {
    "oldValue" "" = {
      "value" = "andersch@EXAMPLE.local"
    }
    "value" "" = {
      "value" = "andersch@EXAMPLE.local"
    }
  }
  "attribute" "FIRST_NAME" = {
    "oldValue" "" = {
      "value" = "Christopher"
    }
    "value" "" = {
      "value" = "Christopher"
    }
  }
  "attribute" "LAST_NAME" = {
    "oldValue" "" = {
      "value" = "Anderson"
    }
    "value" "" = {
      "value" = "Anderson"
    }
  }
  "attribute" "LUPD_AUTO_ASSOCIATE" = {
    "value" "" = {
    }
  }
  "attribute" "ORGCHART_MANAGER" = {
    "value" "" = {
    }
  }
  "attribute" "OTHER_NAME" = {
    "value" "" = {
    }
  }
  "attribute" "PROFILE_PIC" = {
    "value" "" = {
    }
  }
  "attribute" "RBACENFORCE" = {
    "value" "" = {
      "value" = "T"
    }
  }
  "attribute" "STATE" = {
    "parent" = "COUNTRY"
    "value" "" = {
    }
  }
  "attribute" "UPDATE_ONLY_CHANGED_ATTRS" = {
    "value" "" = {
      "value" = "F"
    }
  }
  "attribute" "VIEWABLE_BY_RECIPIENT" = {
    "value" "" = {
    }
  }
  "navigation" "" = {
    "wfpage" = "selectpredefinedrequestoper"
  }
  "recipient" "user" = {
    "id" = "andersch"
    "name" = "Anderson, Christopher"
  }
  "request" "" = {
    "autoressig" = ""
    "entryDate" = "1399619891"
    "macroStatus" = "U"
    "notes" = ""
    "prequest" = "PDR"

    "reason" = ""
    "recipient" = "andersch"
    "recipientEmail" = ""
    "requestID" = "536C813022AB69E86D9E8BC35E234625"
    "requester" = "andersch"
    "requesterEmail" = ""
    "requesterName" = "Anderson, Christopher"
    "reservationid" = "00000000-0000-0000-0000-000000000000"
    "segment" = ""
  }
  "requester" "user" = {
    "id" = "andersch"
    "name" = "Anderson, Christopher"
  }
  "viewer" "user" = {
    "id" = "andersch"
    "name" = "Anderson, Christopher"
  }
}
Output
The plugin returns the following KVGroups:
"" "" = {
   "<errmsg|warnmsg|infomsg>" = "<request message>"
     # If supplied, the message is logged, and
     # an errmsg is displayed in red,
     # warnmsg in orange, and infomsg in green.
   "retval" = "0" # Mandatory; zero is success and non-zero is failure
   "reservationid" = ""
     # Optional reservation ID but required if it was passed into attribute
     # validation or idm-suite id plugins
     # See "Reservation ID" notes below.
   "attribute" "<attribute ID>" = {
     # Required for each attribute to be modified or failed.
     # Optional if no change.
     # All the following are optional:
        "<errmsg|warnmsg|infomsg>" = "<attribute message>"
          # If supplied, logged and displayed for the attribute
          # in addition to any request message.
        "failedValidation" = "0|1"
          # 0 = the attribute was validated
          # 1 = the attribute could not be validated
        "forceRequired" = "0|1"
          # 0 = the attribute value is not required
          # 1 = the attribute value is required -- the user cannot proceed
          #     until a value is supplied
        "forceDisabled" = "0|1"
          # 0 = the attribute is enabled  -- the value can be changed
          # 1 = the attribute is disabled -- changes are disallowed
        "display" = "0|1"
          # 0 = the attribute is hidden
          # 1 = the attribute is visible to the user
        "modifiedValue" "" = { #if values are modified
           "value" = "<first_value>"
           "value" = "<second_value>"
           ...
              }
      }
      ...
   }
Reservation ID
The reservation ID is a unique ID that is recorded in the database for the life of the request. It can be passed as input to other plugins along with request details; for example template and role filter plugins. It is also passed as input into subsequent runs of the attribute validation plugin.
If there is no reservation ID for a request, then the value is 00000000-0000-0000-0000-000000000000. Once a reservation has been made for a request, the unique ID looks something like this: 4dc9e603-0e50-4503-b152-4a76de77a5f6.
Examples
The following are examples of KVGroup plugin output:
To replace an attribute value then disable the field:
"attribute" "LAST_NAME"  = {
    "forceDisabled" = "1"
    "modifiedValue" "" = {
      "value" = "Johns"
    }
  }
To change an attribute from optional to required:
"attribute" "OTHER_NAME"  = {
     "warnmsg" = "You must provide a middle name"
     "forceRequired" = "1"
    }
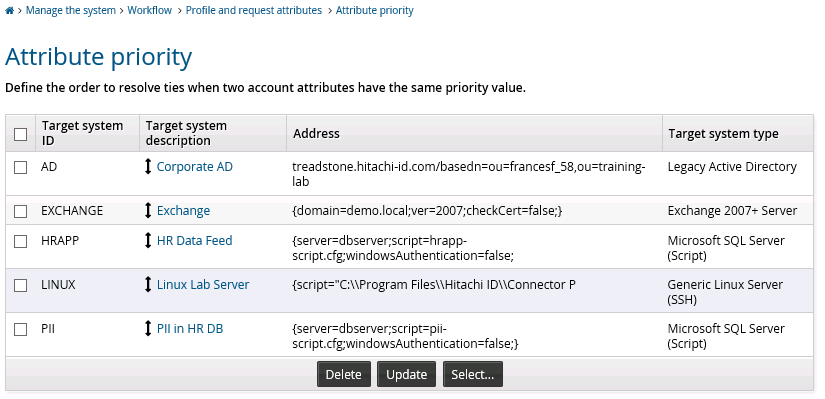
Controlling attribute priority
When auto discovery is run, if target systems are configured to list attributes, account attributes are loaded into the Bravura Security Fabric database.
You can set up an attribute priority scheme, so that when attributes from more that one target system are mapped to the same profile and request attribute, the differences can be reconciled as part of the loading process. To illustrate with an example, assume you have:
A Windows Server 2016 target system (WIN) and an LDAP target system (LDAP).
Both have their “description” attribute mapped to the profile and request attribute “DESC”.
There is a user JDOE with an account on both the WIN and LDAP target systems.
JDOE’s W2K8 description attribute = ”userjohndoe”.
JDOE’s LDAP description attribute = ”LDAP userjohndoe”.
If the attribute priority scheme prioritizes WIN over LDAP, then during auto discovery the attribute will be updated with the value userjohndo ; if LDAP has the higher priority, the value will be LDAPuserjohndoe .
You can define profile and request attribute priority at three levels of granularity: all attributes, per attribute, and one-time override.
all attributes | Target systems with mapped attributes are listed in a priority sequence. All profile and request attributes take their definitions from the highest priority target system with an equivalently mapped attribute. You set the priority for all attributes on the Manage the system > Workflow > Profile and request attributes > Attribute priority page. |
per attribute | Target systems with mapped attributes are prioritized for this specific profile and request attribute. This attribute takes its definition from the target system with the highest priority. This takes precedence over the “all attribute” priority sequence. Other attributes not defined at the per attribute level still follow the “all attribute” priority sequence, unless overridden by a one-time override. You set the priority per attribute on the attribute’s Priority tab. |
one-time override | An additional field can be used to give priority to a target system only when the definition of the mapped attribute on that target system is changed. This is primarily intended for use in situations where you want to preserve a particular priority sequence, but allow for a one-time override. For example, a target system that is the authoritative source for a particular attribute is known to contain incorrect information, and the group responsible for managing the target system will not or cannot make the required data changes for some time. You can use the Override on change field to give higher priority to another target system, then update the attribute value on that target system to the correct value. That value will now be applied to the attribute for that user in Bravura Security Fabric , and the original priority sequence will remain intact. Note that the value that is applied to the attribute on Bravura Security Fabric will be overwritten by the next auto discovery process. The value is not persistent. One-time overrides take precedence over per-attribute and all-attribute overrides. You set the Override on change option on the attribute’s Priority tab. |
All three priority methods can be used together to define an attribute priority scheme that suits your particular needs. You can set up a default priority scheme that applies to all the profile and request attributes and which will work for most of them, then create specific priority sequences for the profile and request attributes that need to be treated differently.
Setting up an attribute priority sequence for all profile and request attributes
To define a general attribute priority sequence order for all profile and request attributes:
Click Manage the system > Workflow > Profile and request attributes > Attribute priority.
If required, search to narrow the list of target systems.
Drag and drop one of the double direction arrows in the ID field to change the attribute groups’ order in the list.
Click Update at the bottom of the form.
If target systems are not included in the attribute priority list, their priority will be based on their physical sequence in the database, after any target systems included in the list.
Note
If you modify the attribute reconciliation order, user attribute values will not be reloaded unless a user’s profile has been updated since the last time attributes were listed. To ensure that all user attribute values are loaded:
Navigate to the configuration page for each affected target.
Locate the List attributes setting.
Click Generate full list.
Once auto discovery runs, the user profile attributes are updated.
Setting up an attribute priority sequence for a specific profile and request attribute
To define the target system priority sequence for a specific profile and request attribute:
Click Manage the system > Workflow > Profile and request attributes > Profile and request attributes.
Select the attribute you want to set the priority for.
Select the Priority tab.
Bravura Security Fabric lists the mapped attributes and their target systems.
Enter priority values for the mapped account attributes. A larger value indicates a higher priority.
A default value of 50 is assigned to changes made to attribute values from within Bravura Security Fabric . This value is controlled by the ATTR PRIORITY IDSYNCH field (Manage the system > Workflow > Profile and request attributes > Attribute logic).
Click Update.
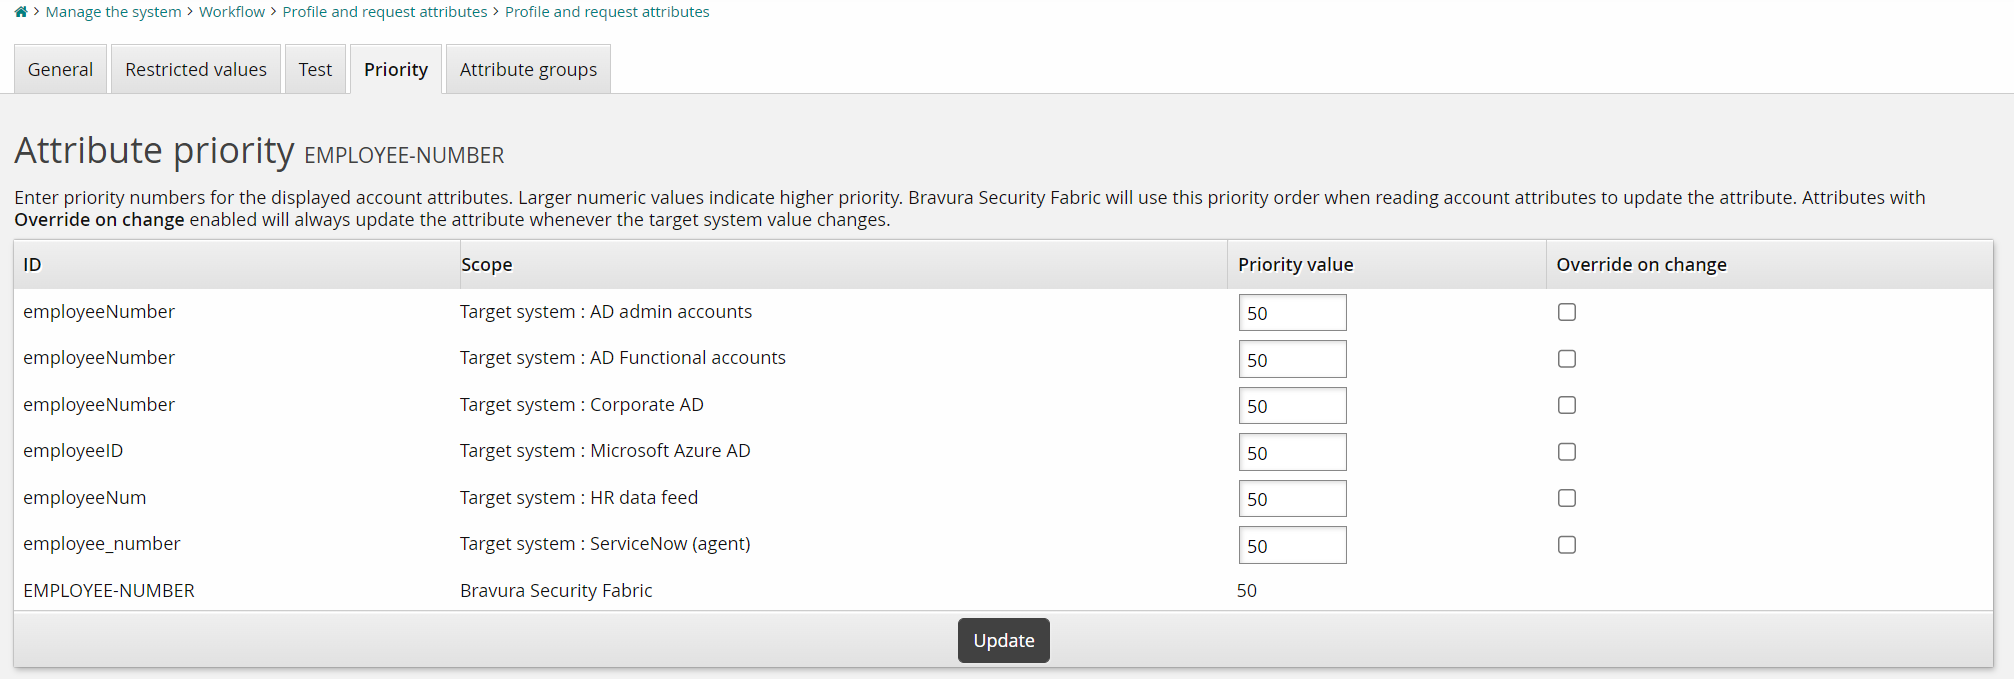
Click below to view a demonstration of configuring an EMPLOYEE-NUMBER profile and request attribute so the value of the employeeNumber account attribute from Active Directory takes priority over other mapped target account attribute values.
Setting up a one-time override
To define a one-time override for a specific profile and request attribute:
Click Manage the system > Workflow > Profile and request attributes > Profile and request attributes.
Select the attribute for which you want to set the override.
Select the Priority tab.
Bravura Security Fabric lists the mapped attributes and their target systems.
Ensure that the priority sequence has been set for the mapped attributes.
Select the Override on change checkbox for the appropriate account attribute.
When the value for the mapped account attribute changes, it will override the defined priority sequence, and its value will be applied to the profile and request attribute.
Click Update.
Tracking and propagating attribute changes
Changes to profile and request attribute values can be tracked. You can configure the idtrack program to execute a variety of provisioning actions automatically. A common use case is to track changes to a profile and request attribute to synchronize attributes on target systems.
To configure idtrack to synchronize profile and request attributes:
Determine which attributes are authoritative and what changes should occur based on changes to authoritative attributes.
Configure profile and request attributes to be tracked and set the Track changes to this attribute option.
Configure attribute propagation by:
Configuring attribute logic.
or,
Writing an
idtrack.pslscript.
Configuring automatic attribute propagation
To set up profile and request attribute logic settings for automatic propagation:
Click Manage the system > Workflow > Options > Automation .
Enable ATTR AUTO PROPAGATE EXECUTE to automatically execute the propagation of changes to profile and request attributes to account attributes on subordinate systems.
Set the ATTR AUTO PROPAGATE REQUESTER field to a valid Bravura Security Fabric user. This is the user that will submit change requests to the Bravura Security Fabric workflow system.
Enable ATTR AUTO PROPAGATE WRITE to automatically write the propagation of changes to profile and request attributes to a work file. You can set this one alone to make changes manually, or combined with ATTR AUTO PROPAGATE EXECUTE for logging purposes.
Set the ATTR AUTO PROPAGATE THRESHOLD to control the number of requests to be submitted due to changes to profile attributes, unless overridden on the command line. If the threshold is exceeded, no requests will be submitted automatically by
idtrack. Bravura Security Fabric sends an email to the product administrator (defined by RECIPIENT EMAIL) who can decide whether to runidtrackmanually to submit those requests.
Example: Tracking and propagating changes
For the following example, it is assumed there are three target systems:
Active Directory with a target ID of “AD”
LDAP server with a target ID of “LDAP”
SQL hosted application with a target ID of “SQL”
In addition, these Workflow > Options > Automation options are also set:
ATTR AUTO PROPAGATE EXECUTE to “On”
ATTR AUTO PROPAGATE REQUESTER to a valid profile ID
Profile and request attributes can be authoritative so that when a profile and request attribute changes during auto discovery, the new value is automatically propagated to account attributes. The most common way that a profile and request attribute value is changed during auto discovery is when it is mapped to an overridden account attribute with the Load attribute values from target system option checked.
The other common way that profile and request attribute values are set or changed is when a requester creates a request interactively using the View and update profile (IDR) module. The idtrack program is not executed in this situation.
Preparation:
Override the AD target system description attribute.
Map to the DESC profile and request attribute.
Override the SQL target system description attribute.
Map to the DESC profile and request attribute.
Override the LDAP target system description attribute.
Map to the DESC profile and request attribute.
Check Load attribute values from target system.
This sets the DESC profile and request attribute value to the value of the LDAP description account attribute.
Track changes to the DESC profile and request attribute.
Changes to this profile and request attribute value will cause
idtrackto automatically propagate changes to all mapped account attributes.
Scripting attribute propagation
Scripted attribute propagation is not as simple to set up as automatic propagation, but is more flexible. A tracked change can be a triggering event to perform any provisioning operation allowed via the API.
See Automated User Administration for more information about idtrack scripting and automated user administration.
Profile and request attributes and workflow authorization
Updates to profile and request attributes not associated with target systems are automatically approved as part of the workflow authorization process. You can assign authorizers to these types of updates using the authorizer selection plugin , configured by the IDSYNCH AUTH CRITERIA MOD PLUGIN field (Workflow > Options > Plugins).
Using dryrun mode for requests
To test product configuration without requests actually being submitted, use dryrun mode:
Log in to the Front-end (PSF) as
superuser.Click Manage external data store.
Select the hid_global_configuration table.
Locate the following rule:
namespace = AUTOMATIONsetting = OPERATIONkey = dryrunClick the Edit icon at far left.
Enter the desired value :
Trueprevents requests from being submitted.Falseallows requests to be submitted.
If you are testing the pre-defined request function, for example, and your requests are not going through, check that this value is set to
False.Click Done.
Click Update.