Groups app
The Groups app allows users with assigned privileges to request changes to group membership or to create or update groups.
See also
When Bravura Identity is licensed, self-service users can also request changes to group membership via the View and update profile menu.
The examples below use settings and users from a demonstration environment. See Viewing and Updating Groups the end-user documentation for more generic procedures for viewing and managing groups.
Groups app access
Access to the Groups app options is controlled by giving users access to applicable pre-defined requests, as described below.
Group members
All end users can view their group membership and request changes to group memberships via the Groups app. You can configure the Groups app so that users see recommendations of group memberships to add or delete, based on consistency among peers.
Group owners
Group owners can use the Groups app update groups when they have access to the following pre-defined requests:
Pre-defined request | Description |
|---|---|
_GROUP_ADD_MEMBERS_ | Add accounts and child groups as members to multiple groups on target systems. |
_GROUP_ADD_OWNERS_ | Add owners to multiple groups on target systems. |
_GROUP_ADD_PARENTGROUPS_ | Add parent groups to multiple groups on target systems. |
_GROUP_DELETE_ | Delete a group on a target system. |
_GROUP_DELETE_MEMBERS | Delete members from multiple groups. |
_GROUP_DELETE_OWNERS | Delete owners from multiple groups. |
_GROUP_DELETE_PARENTGROUPS | Delete parent groups from a multiple groups. |
_GROUP_UPDATE_ATTRS | Update attributes on one or more groups. Product administrators must also configure group attributes in the Resource attributes menu, as described in the example below . |
_GROUP_UPDATE_MEMBERS | Add or remove members from a group. |
_GROUP_UPDATE_OWNERS | Add or remove owners from a group. |
_GROUP_UPDATE_PARENTGROUPS | Add or remove parent groups from a group. |
Group creators
Members of the _GROUP_CREATE_USERS_ user class can use the _GROUP_CREATE pre-defined request to create a group on a target system.
Group report readers
Users who belong to a user class set in system variable GROUPAPP REPORT ACCESS can view and run reports via the Groups app.
In addition, the Python sample script view_group_filter_and_clickable_link.py must be copied to <instance>/plugin and set in the system variable VIEW GROUPS PLUGIN.
Administrators have more report options available in the menu. See Reports for details.
Enabling group membership recommendations
You can configure the Groups app and group request pages so that users see recommendations of group memberships to add or delete, based on consistency among peers.
A peer group is a group of users with some attribute in common; for example, users working at the same location or department, or having the same manager.
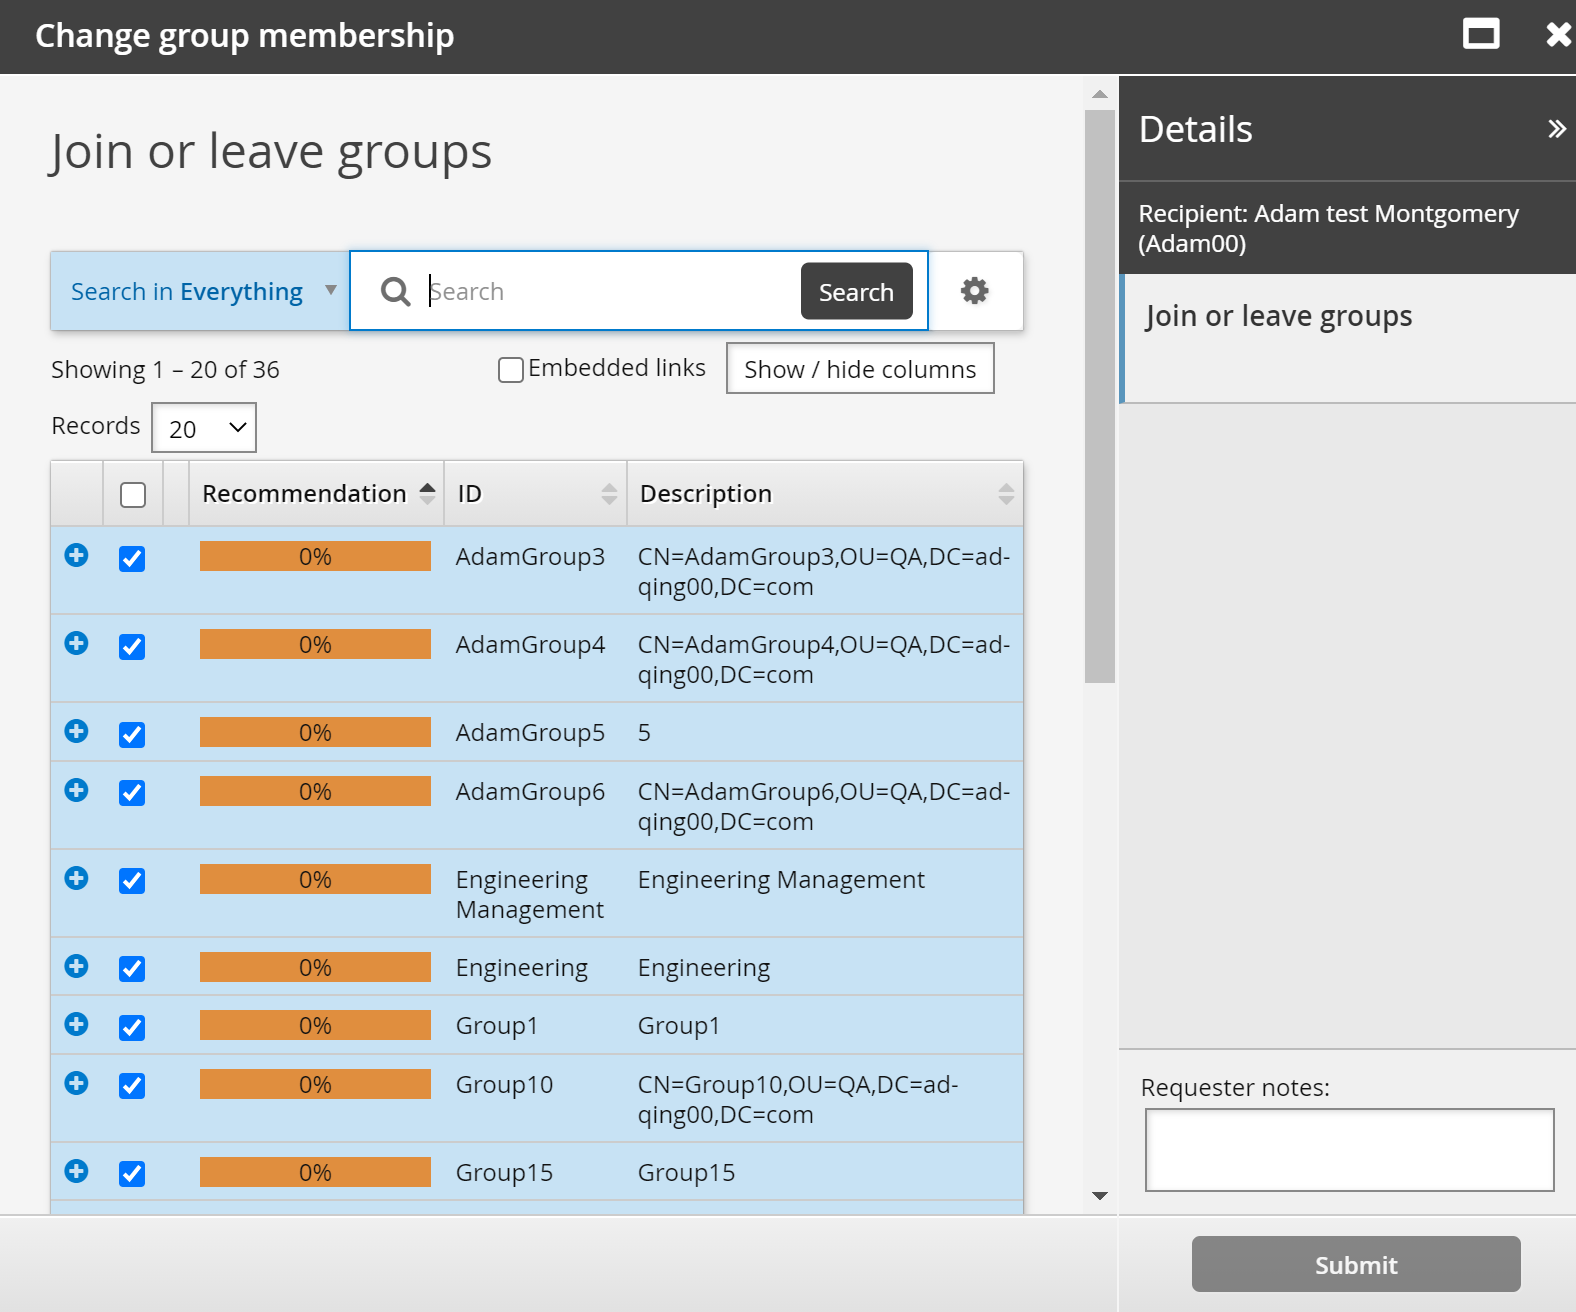
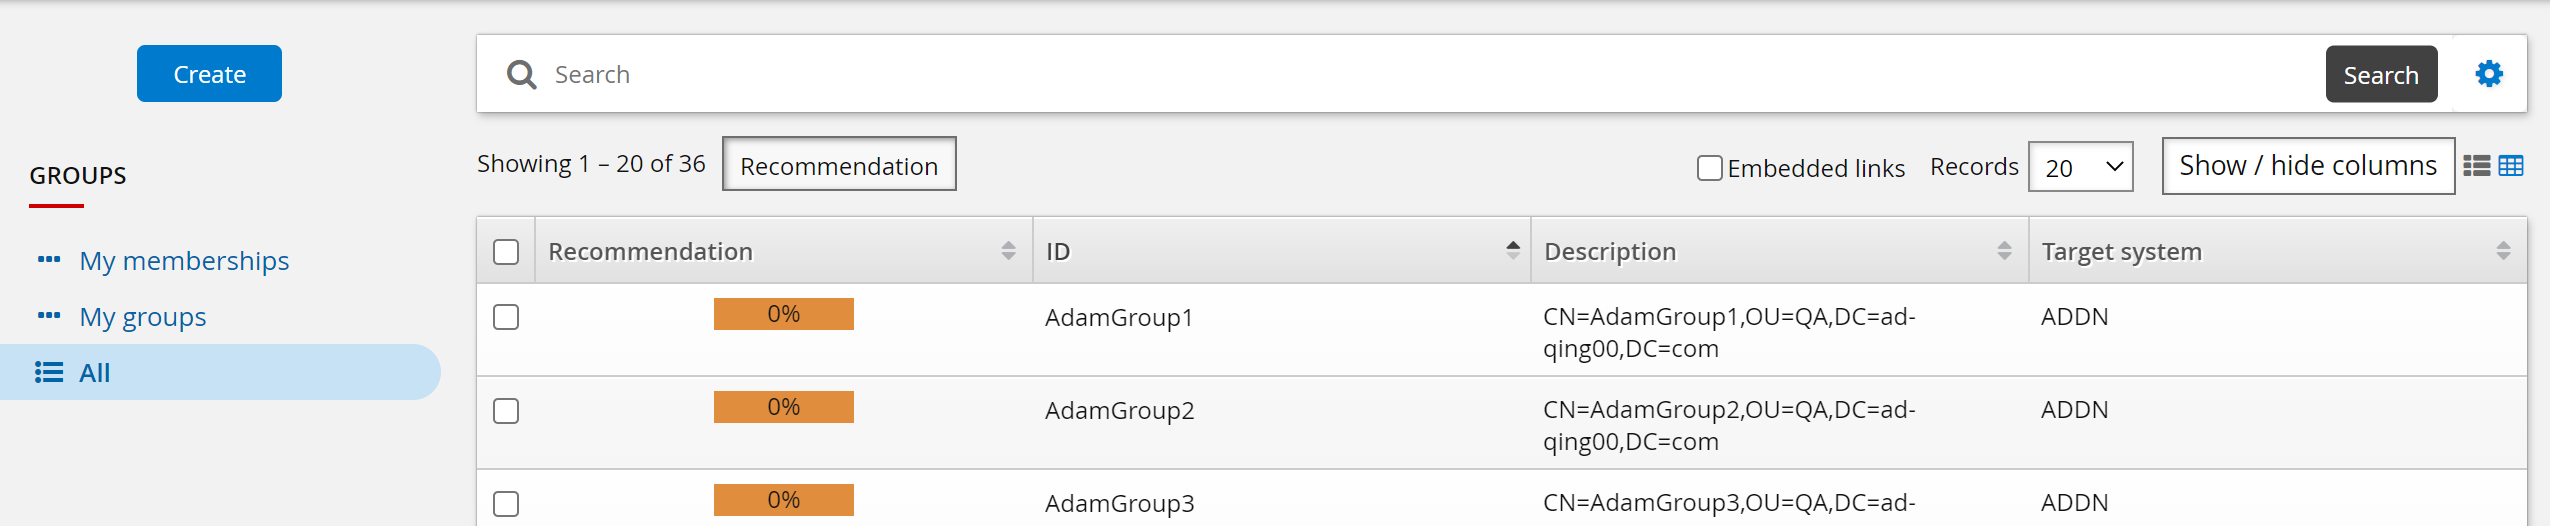
When enabled, group membership recommendations are displayed in the Groups app and the Change group membership page in request wizards. Recommendations are visually represented by a color bar with a number stating the percentage of peers who are members. This can help the user to decide whether to add or delete membership. The recommendations color bar is:
Red, where membership is not recommended; that is, most of a user’s peers are not members.
This is indicated where the number of users with the membership is between 0% and a lower threshold.
Yellow, where membership is recommended: that is, some of the user’s peers are members.
This is indicated where the number of users with the membership is between a lower threshold and an upper threshold.
Green, where membership is strongly recommended; that is, most of a user’s peers are members.
This is indicated where the number of users with the membership is between an upper threshold and 100%.
The following screenshot shows how recommendations are displayed in the request wizard:
The display of recommendations is controlled by the following system variables in the Manage the system > Modules> Options menu:
GROUP APP MATCHING ATTRIBUTE GROUP | The attribute group used to define a peer group. If set, the Groups app includes a Recommendation button that toggles the display of recommendations. |
GROUP APP MATCHING USERS LOWER THRESHOLD | 0-100 value representing the recommended values (yellow threshold). |
GROUP APP MATCHING USERS UPPER THRESHOLD | 0-100 value representing the highly recommended values (green threshold). |
SEARCH FILTER RECOMMENDATION CUTOFF | If the search filter plugin returns a ”showOnly” value of 1, this sets the default 0-100 lower threshold to filter on. Values less than this cutoff will be filtered out by the plugin. |
Example: Group membership recommendations
This example illustrates how to set up the entitlement consistency recommendations when certifying group memberships. The peer group is users that have the same manager, calculated based on the ORGCHART_MANAGER attribute, which is a member of the CERT_ORGCHART_MANAGER group.

Configure global settings
To configure global settings for the recommendation engine:
Click Manage the system > Modules> Options .
Set the following:
GROUP APP MATCHING ATTRIBUTE GROUP
CERT_ORGCHART_MANAGERGROUP APP MATCHING USERS LOWER THRESHOLD
20GROUP APP MATCHING USERS UPPER THRESHOLD
50Click Update

View group membership recommendations
To view group membership recommendations:
Log into Bravura Security Fabric as an end user.
From the main menu, click Groups.
Click the All filter in the Filter panel .
Click the
 icon in the top right corner to switch to Table view
Click Recommendation in the middle panel.
Recommendations are displayed.
Example: Update group attributes
Group owners can use the Groups app to update the group description and other attributes configured by product administrators.
In this example, we add a resource attribute that can be updated by group owners using the standard _GROUP_UPDATE_ATTRS (Update attributes) pre-defined request. We map the resource attribute to an Active Directory group attribute, so that updating the attribute in Bravura Security Fabric also updates the group in Active Directory.
Assumptions
This example assumes:
Bravura Workforce Pattern is installed.
The "AD" Active Directory target system is configured as a source of profiles.
Group owners in AD are configured as group managers in Bravura Identity .
Click below to view a demonstration of this example.
Add a resource attribute
To add a resource attribute:
Log in to the Bravura Security Fabric Front-end (PSF) as superuser .
Click Manage the system > Resources > Resource attributes.
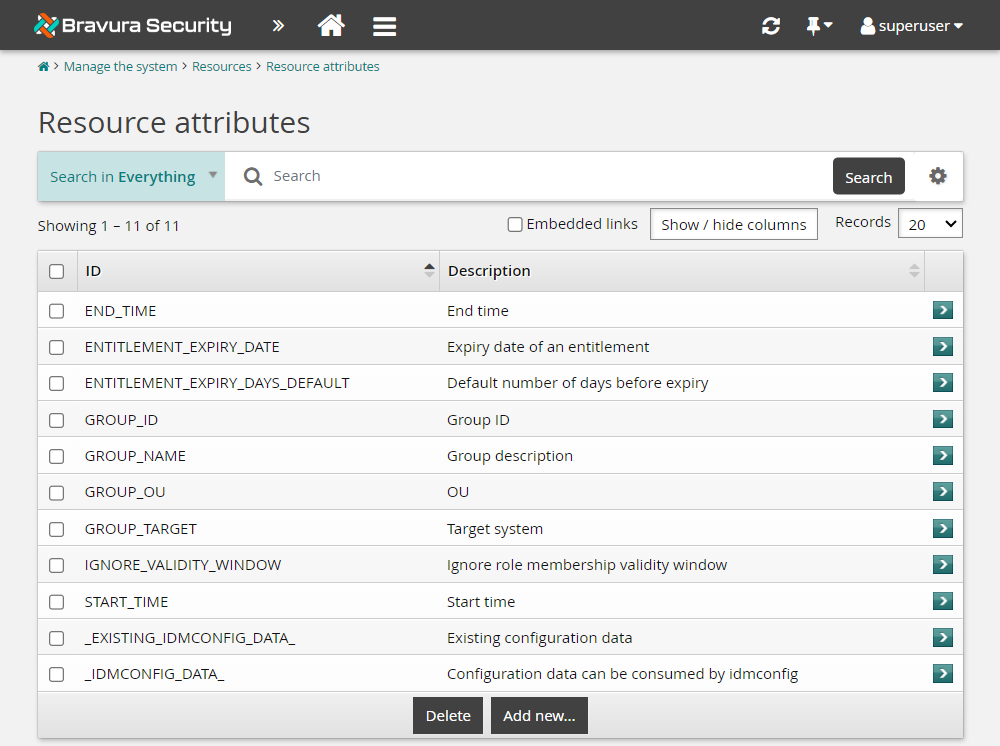
Click Add new…
Enter values as follows:
ID
SECURITY_LEVELDescription
Group security levelType
StringMinimum required number of values
0Maximum allowed number of values
1
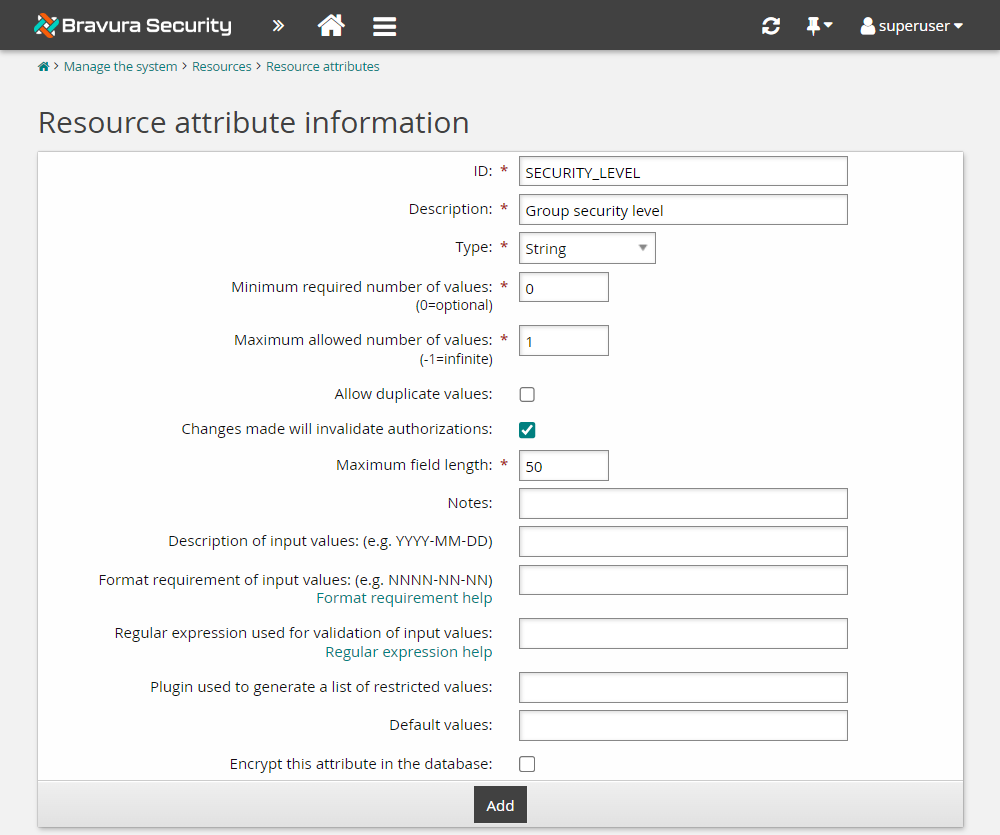
Click Add.
Click the Restricted values tab and add the following:
Actual value
1and Displayed valueSecurity Level 1, then click More.Actual value
2and Displayed valueSecurity Level 2, then click More again.Actual value
3and Displayed valueSecurity Level 3.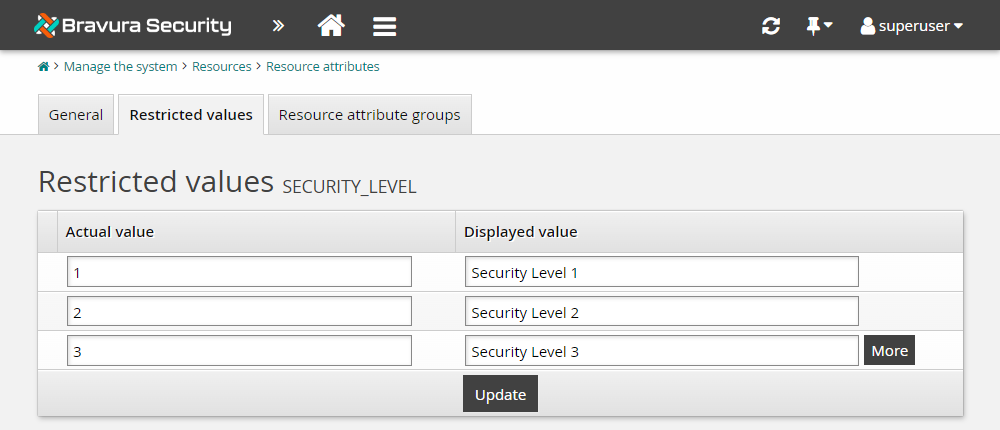
Click Update.
Set attribute access controls
To set access controls for the new attribute, add it to an attribute group:
Click Manage the system > Resources > Resource attribute groups.
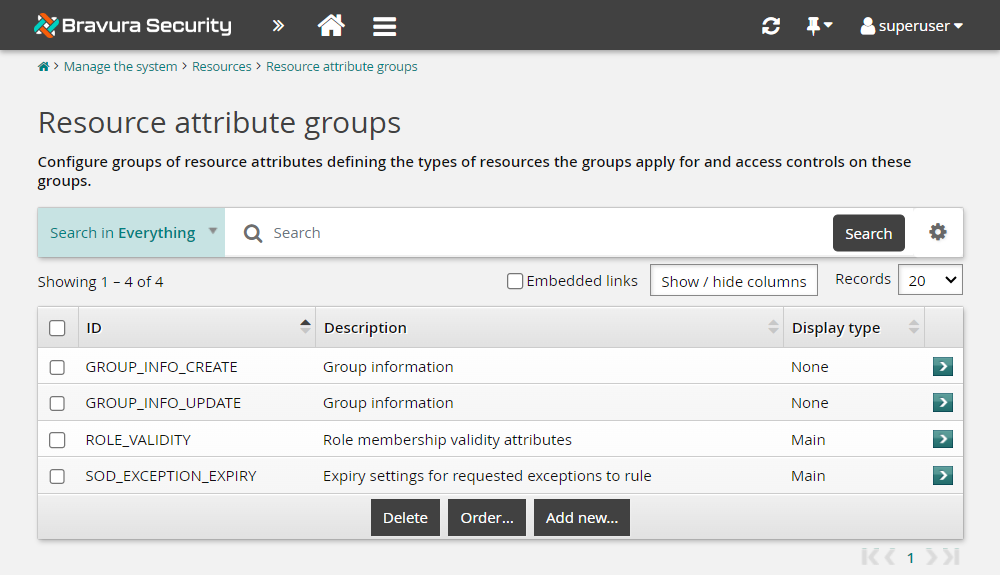
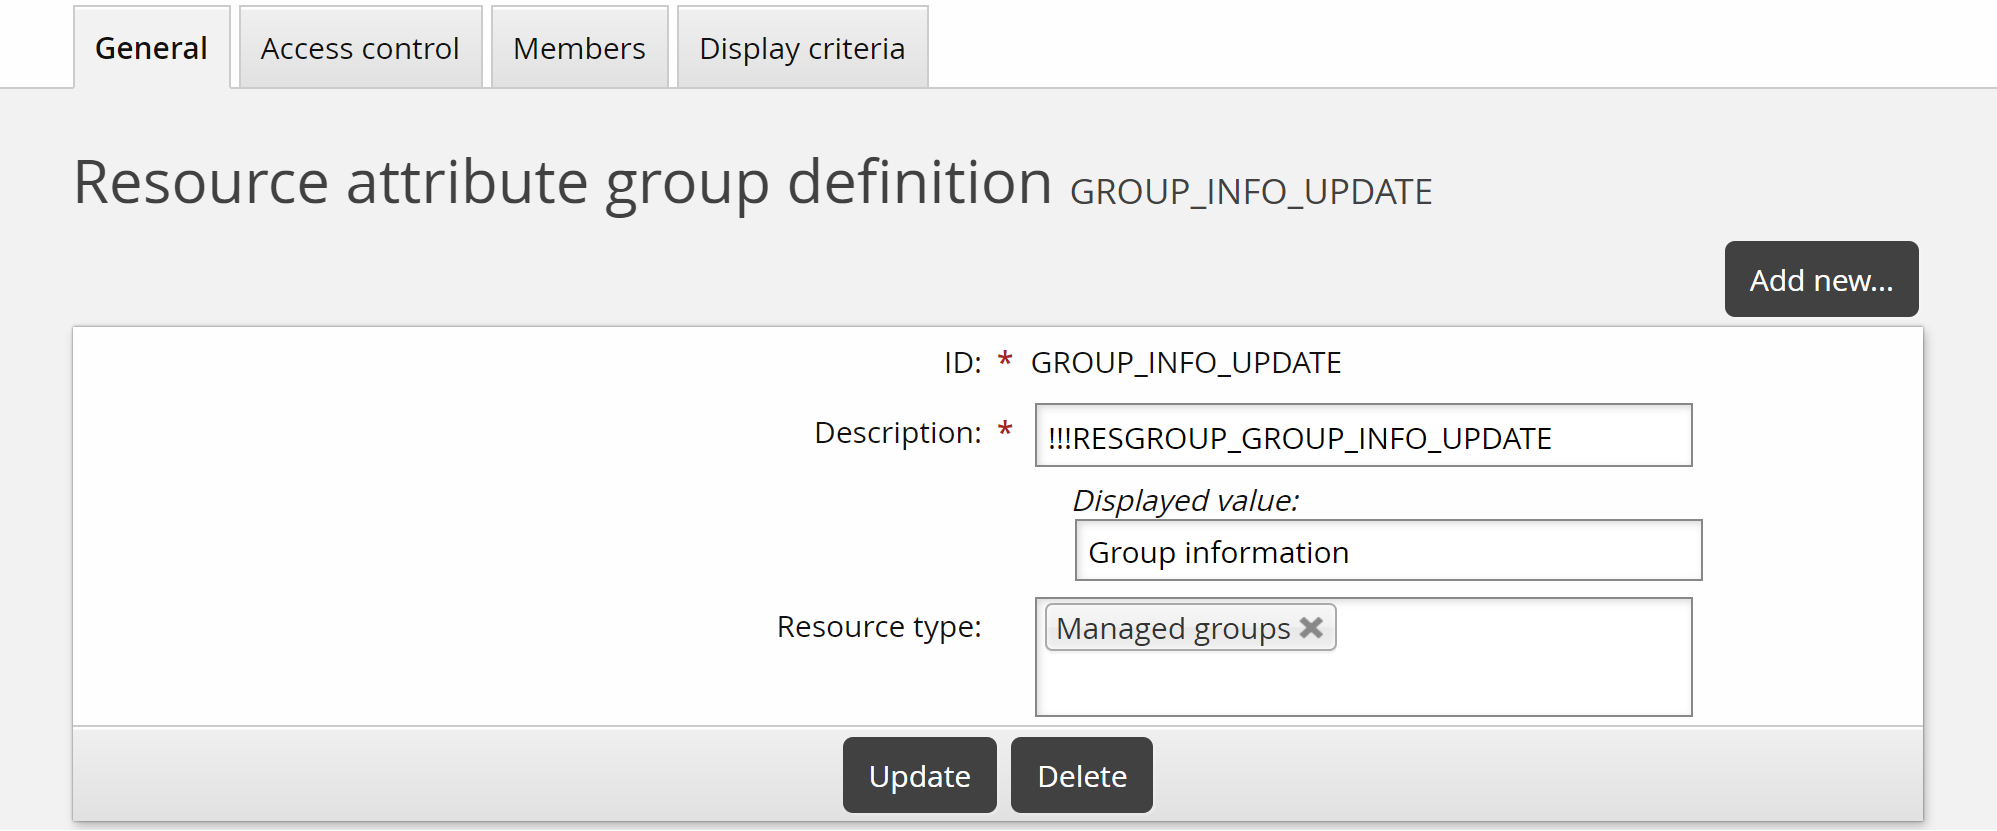
Select GROUP_INFO_UPDATE.
This is a built-in resource attribute group that is included in the _GROUP_UPDATE_ATTRS pre-defined request. Attributes that are members of this group can be updated by group owners.
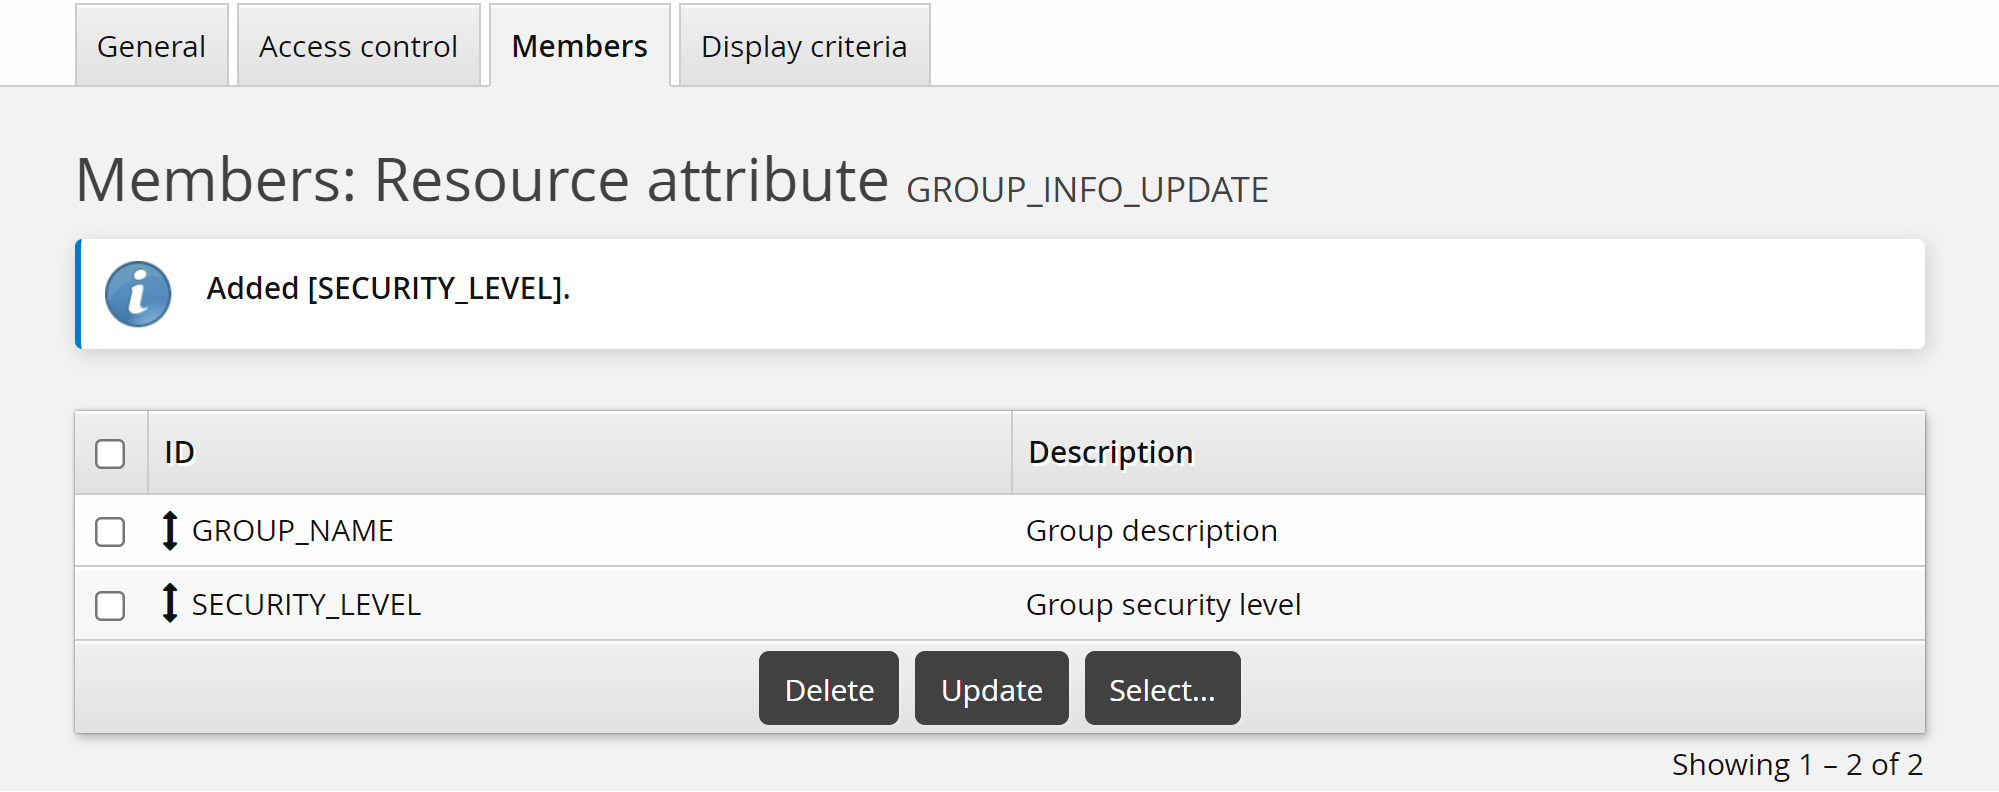
Click the Members tab.
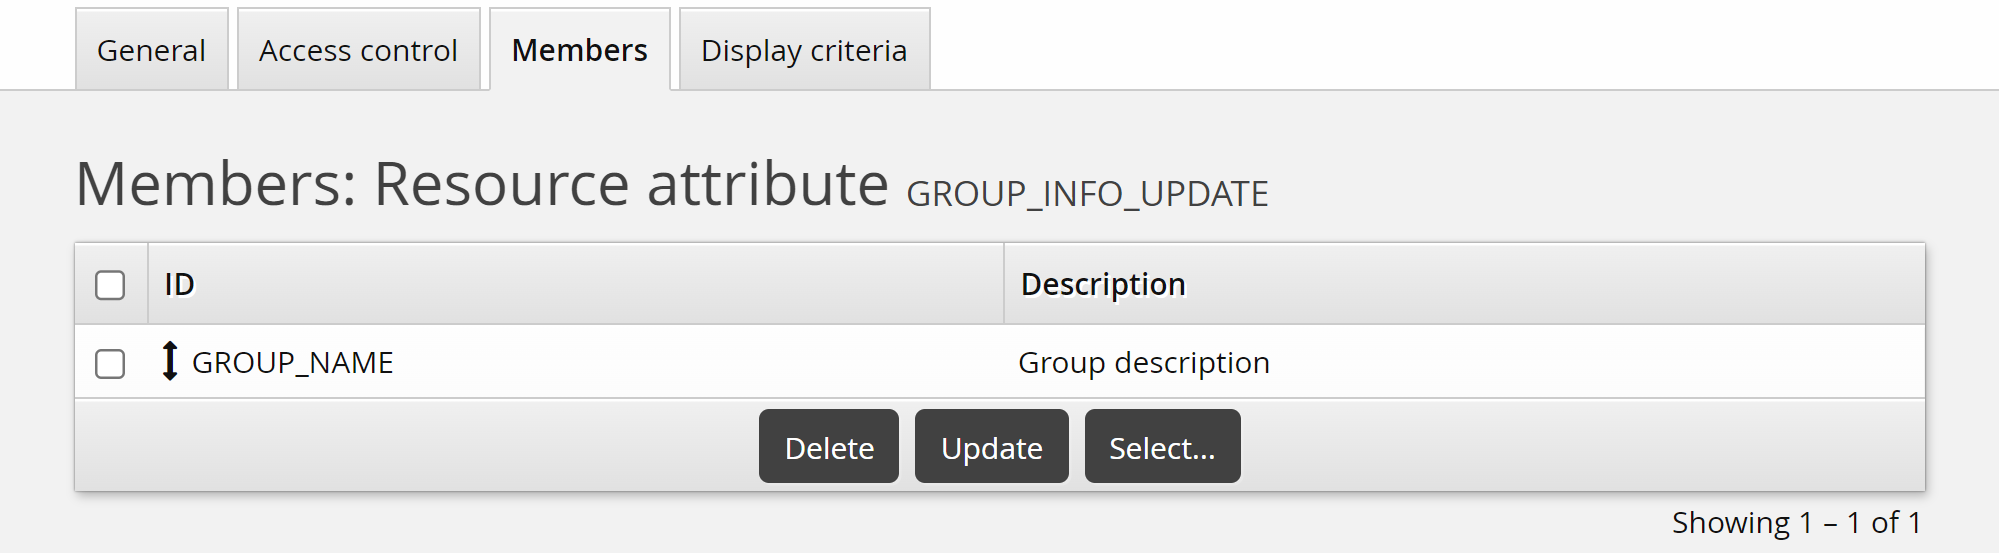
Click Select… .
Select the checkbox for the SECURITY_LEVEL attribute you added above, then click Select.
Click the Display criteria tab.
Set the Display type to "Main".
This will display the Group security level field on the main page of the Update attributes pre-defined request.
Click Update.
Now the SECURITY_LEVEL attribute will be available for editing by group owners.
Map SECURITY_LEVEL attribute to an Active Directory group attribute
We will now map this resource attribute to the Active Directory "info" group attribute. The "info" group attribute displays in the "notes" field in (ADUC). This way, when we view a group via ADUC, we can read the notes and see what security level the group is.
Click Manage the system > Resources > Group attributes > Target system.
Select the Corporate AD target.
Click Add new… .
Enter the following information:
ID
infoMap group attribute to resource attribute
SECURITY_LEVELLoad attribute values from target system selected
Populate mapped resource attribute with values from target system selected
Leave all other settings as default.
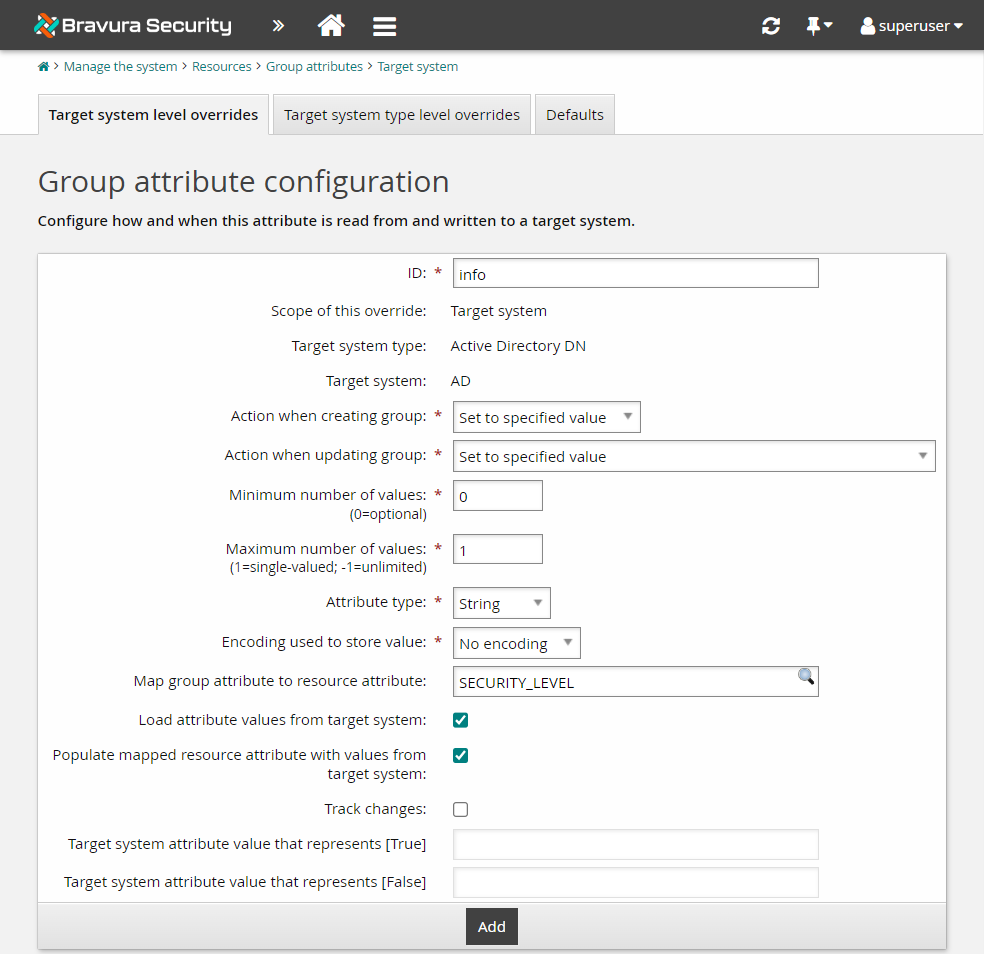
Click Add.
Click Yes to retrieve a full attribute list during the next auto discovery.
Execute auto discovery for the AD target system.
Update group attributes
To update group attributes as a group owner:
Log in to the Front-end (PSF) as an end user who is a group owner.
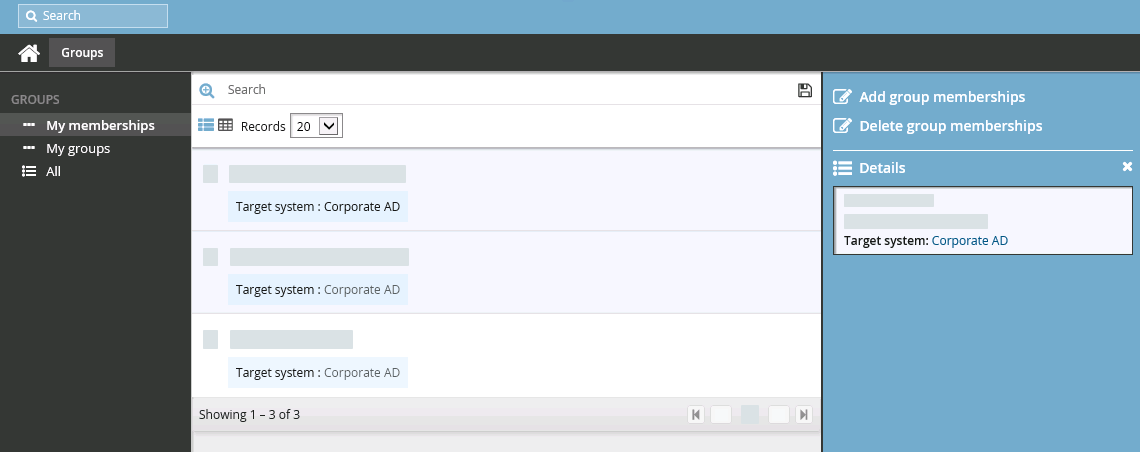
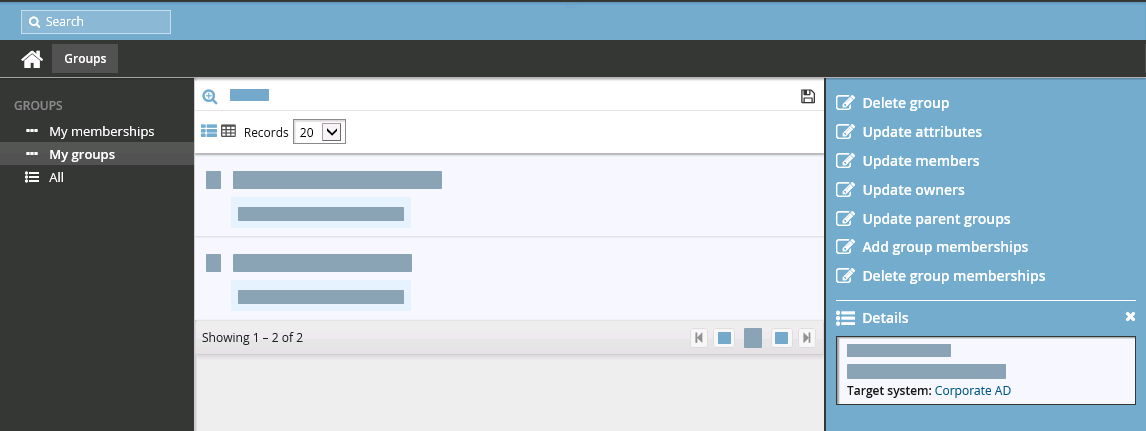
From the self-service main menu, click Groups.
This displays My groups.
Select the IT-MANAGERS group from the Results panel.
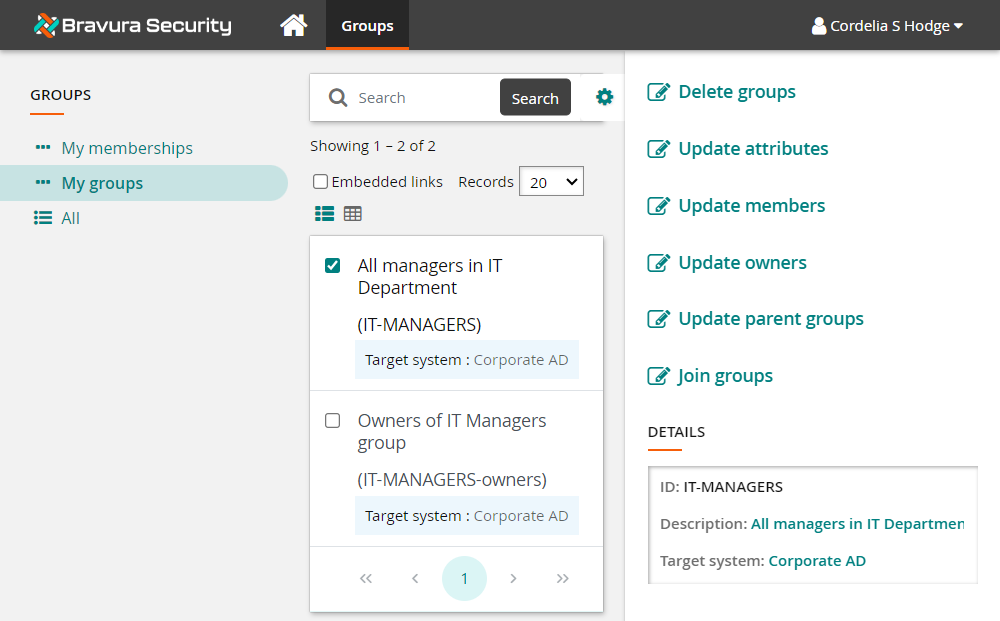
Click Update attributes.
Notice the Group description is already filled in. This is because the Active Directory description attribute is mapped to the GROUP_NAME attribute when Bravura Workforce Pattern is installed and the attribute contained a value. The List group attributes option must also be selected on the Active Directory target.
However, the info attribute does not contain any values at this point in time so no data is shown.
Select "Security Level 3" for the Group security level.
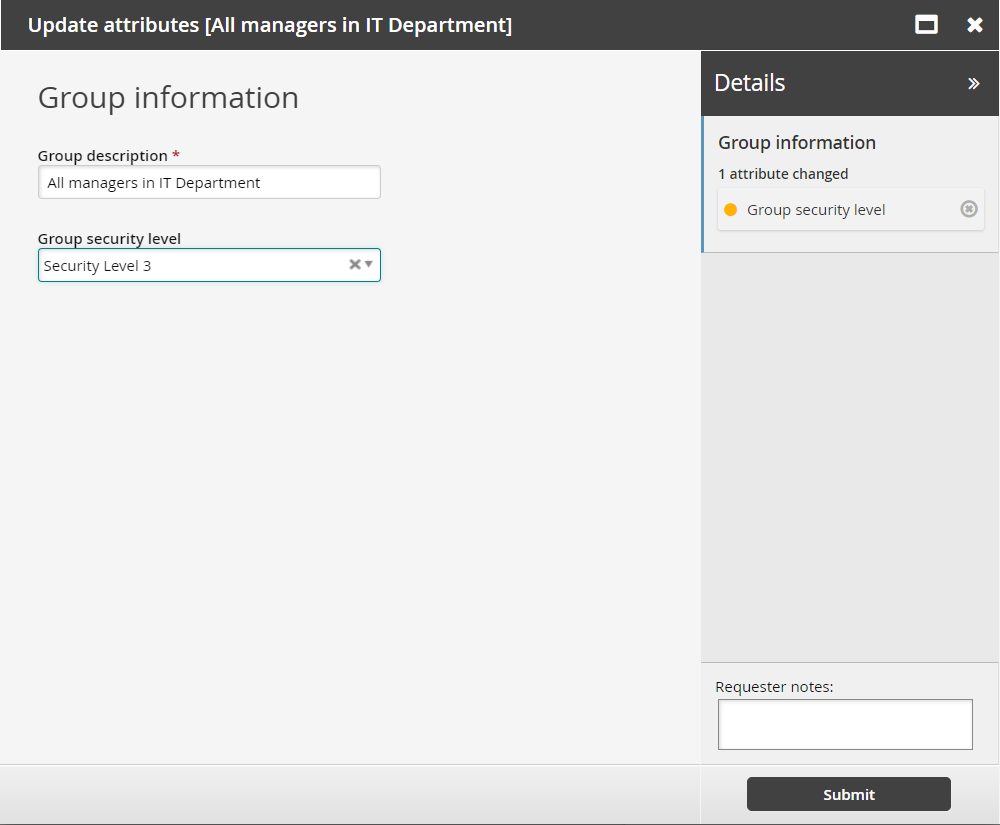
Click Submit.
Click the View request link at the top of the page to view the request status.
In the right Actions panel , select the Request ID link and display Operations and Authorizers.
Note that with the current configuration, you would also need to approve the request as the group owner, but since we are using the owner of the group to make the request, it is auto-approved.
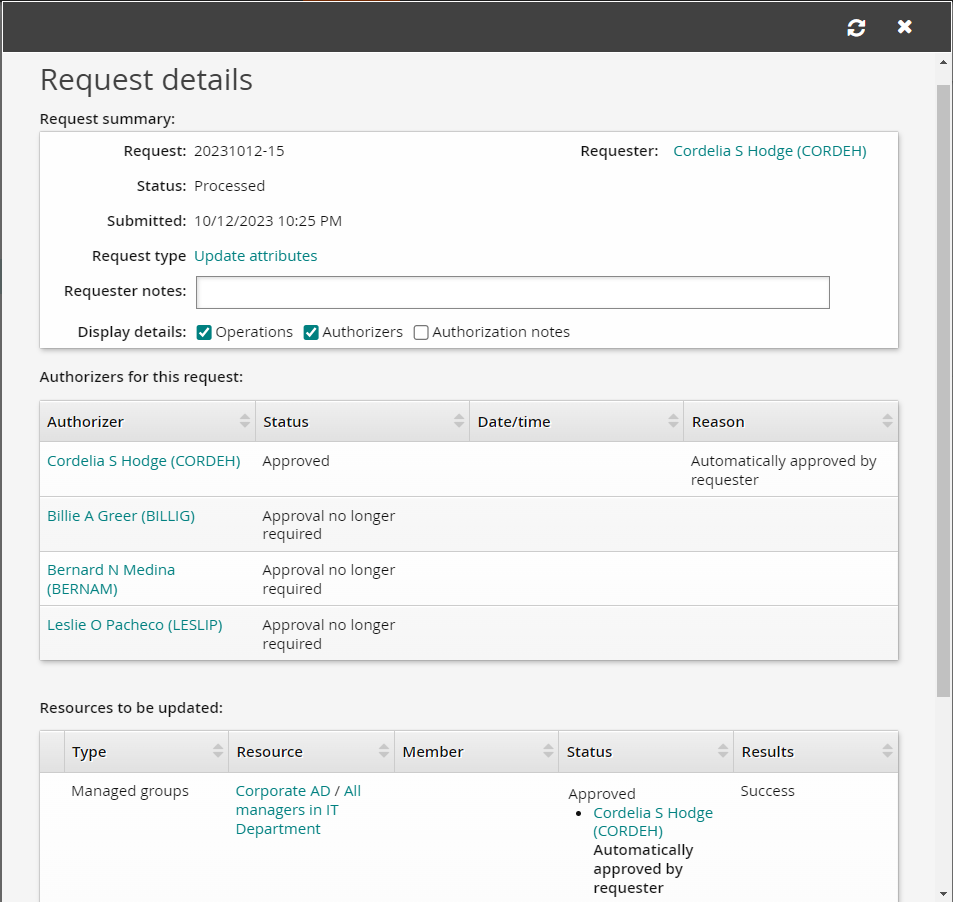
If the value in the Results column of the Resources to be updated table is "Success" then you know the task has been completed properly.
You can confirm the request was successful by viewing the properties of the IT-MANAGERS group directly in .

The info attribute was updated for the IT-MANAGERS group and the specified value of [Security Level] "3" now appears in the Notes field.
Example: Configure group entitlement attributes
In Example: Updating group attributes , you learned how to update a resource attribute that was mapped to a group attribute on Active Directory. Resource attributes can also be configured as entitlement attributes to define the relationship between two resources.
The built-in ENTITLEMENT_EXPIRY_DATE attribute can be used to trigger an event to complete an action; for example, when a member’s expiry date arrives, an email is sent to prompt the removal of that user from the group.
In this example, we add a resource attribute group so that users can set this expiry date in a pre-defined request.
Assumptions
This example assumes:
Bravura Workforce Pattern is installed.
The "AD" Active Directory target system is configured as a source of profiles.
Group owners in AD are configured as group managers in Bravura Identity .
Click below to view a demonstration of this example.
Add a resource attribute group
Log in to the Bravura Security Fabric Front-end (PSF) as superuser .
Click Manage the system > Resources > Resource attribute groups.
Click Add new… .
Enter the following information:
ID
Group_entitlements_attrsDescription
Group entitlement attributesResource type
Account group memberships
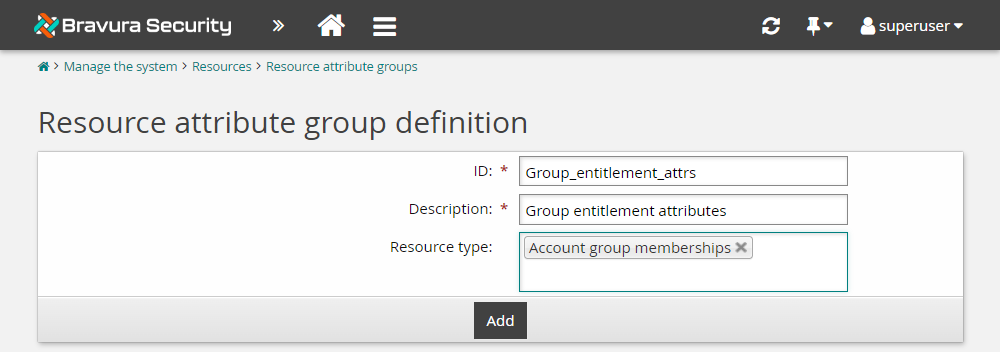
Click Add.
Click the Access control tab.
Select "Allow read" and "Allow write" for ALLUSERS.
Click Update.
Click the Members tab.
Click Select… .
Select "ENTITLEMENT_EXPIRY_DATE".
Click Select .
Click the Display criteria tab.
Ensure the Display type is set to "Main".
Click Update.
We have now configured the ENTITLEMENT_EXPIRY_DATE attribute so that it can be updated by users. In the next example, we will configure the _GROUP_CREATE_ pre-defined request to include the ability to set an expiry date for each group member.
Example: Create a group
This example shows you how certain users can use the Groups app to create a group on the Active Directory target system.
Assumptions
This example assumes:
Bravura Workforce Pattern is installed.
The "AD" Active Directory target system is configured as a source of profiles.
Group owners in AD are configured as group managers in Bravura Identity .
Click below to view a demonstration of this example.
Remove authorizers from the target system
Requests to create groups requires authorization from the target system authorizers and any group owners involved in the request. For this demonstration , we are lowering the requirement to just the group owners by setting the required authorizers on the Active Directory target to zero:
Log in to the Bravura Security Fabric Front-end (PSF) as superuser .
Click Manage the system > Resources > Target systems > Manually defined > AD .
Click the Authorization tab.
Change the following entries:
Minimum number of authorizers
0Number of denials before a request is terminated
0
Click Update.
Give a user permission to create groups
Users must belong to the built-in user class called _GROUP_CREATE_USERS_ that allows them to access the Create group request. For this example, add a single explicit user to the _GROUP_CREATE_USERS_ user class:
As superuser, click Manage the system > Policies > User classes .
Search for and select the _GROUP_CREATE_USERS_ user class.
Click the Explicit users tab.
Click Select… .
Select the checkbox for an end user; in this example it is ABBIEL.
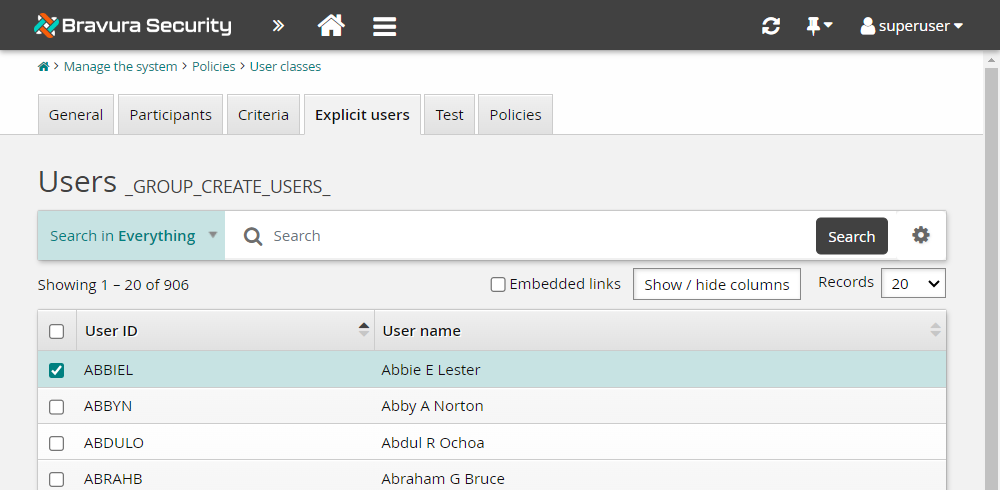
Click Add.
Add the group entitlement attributes to the pre-defined request
Now we will add the attribute group created in the previous example to the _GROUP_CREATE_ pre-defined request. This will then allow an expiry date to be set for members when they are added to the group during group creation. You could also add this new attribute group to other pre-defined requests such as _GROUP_UPDATE_MEMBERS.
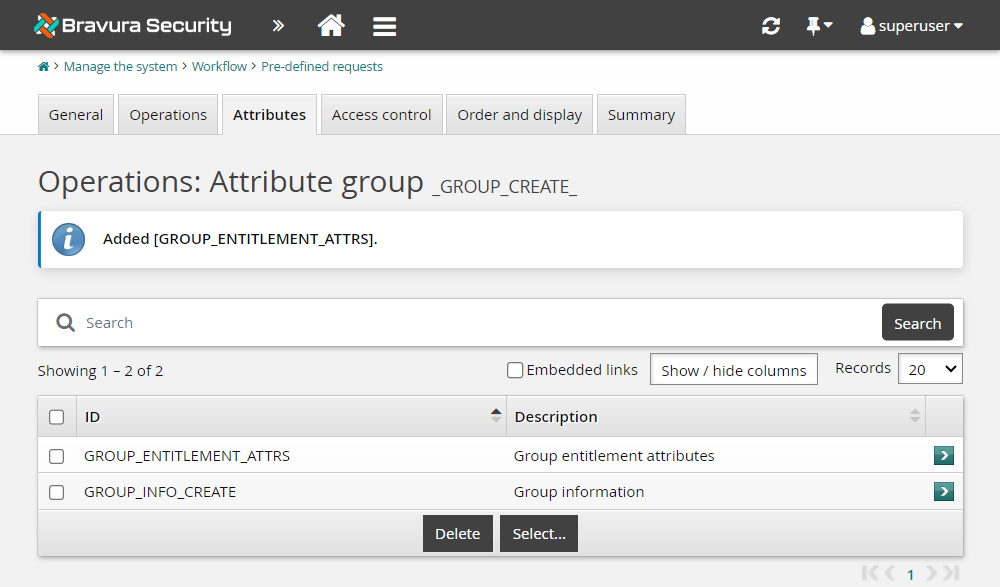
Click Manage the system > Workflow > Pre-defined requests .
Search for and select the _GROUP_CREATE_ pre-defined request.
Click the Attributes tab.
Click Select…
Select GROUP_ENTITLEMENT_ATTRS.
Click Select .
Configure default values for the GROUP_OU attribute
Adding a default value for the group ou will reduce the chance of human error and ensure the group is created in the correct location in Active Directory.
On the Attributes tab for the _GROUP_CREATE_ pre-defined request, select GROUP_INFO_CREATE.
In the OU field, enter ou=Groups,ou=Demo,dc=<Exampledomain>,dc=corp as the default value.
Click Update.
Create a group
Log in to the Front-end (PSF) as end user.
Click Groups under the heading.

Click the Create button at the top of the Filter panel.
Note that the OU field is filled in for you.
Define group information:
Group ID
ENG-TEMPGroup description
Temporary Engineer HiresTarget system
AD
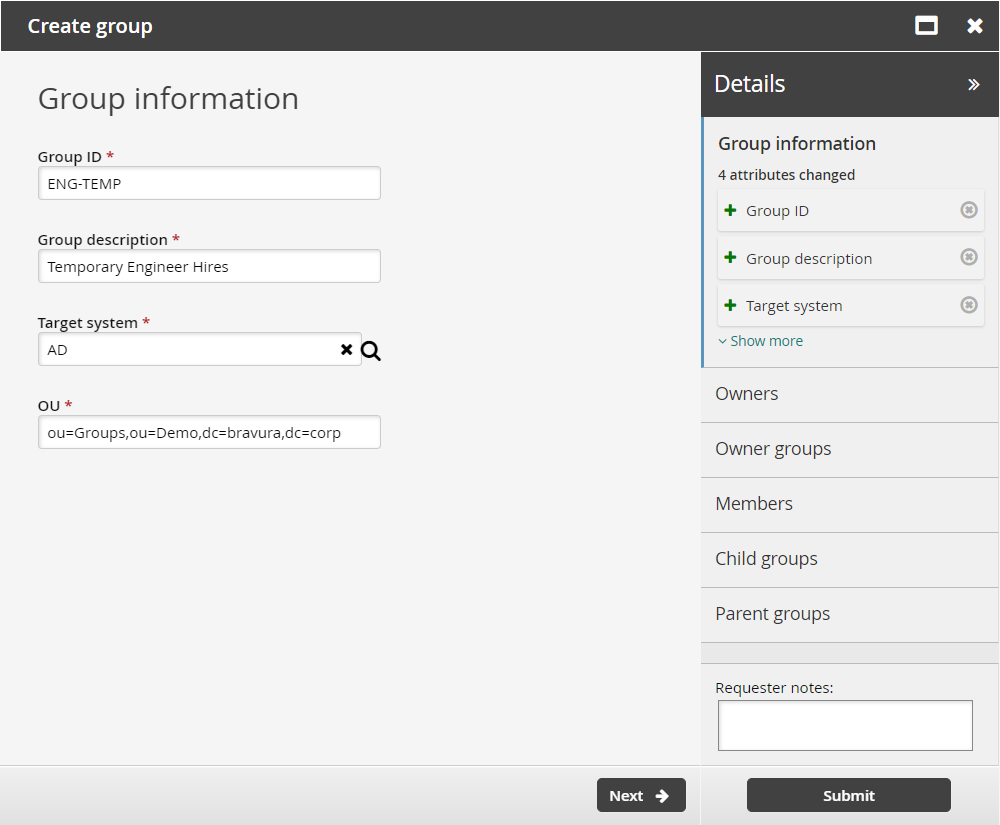
Click Next .
On the page, click Next .
On the page, search for and select the checkbox for ENG-MANAGERS-owners.
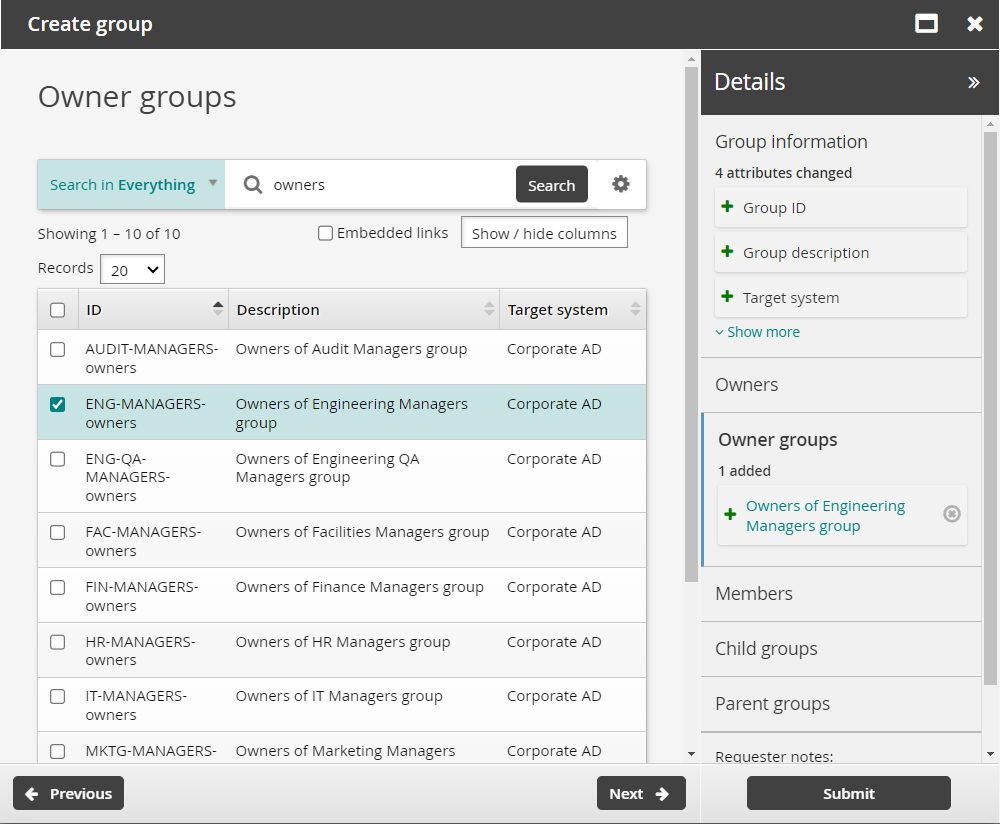
Click Next .
Search for and select Adam Gibbs
ADAMG0on the page.ADAMG0will be a temporary member of this group so we will set the expiry date entitlement attribute.Click on the Expiry date of an entitlement field next to ADAMG0 to display the calendar.
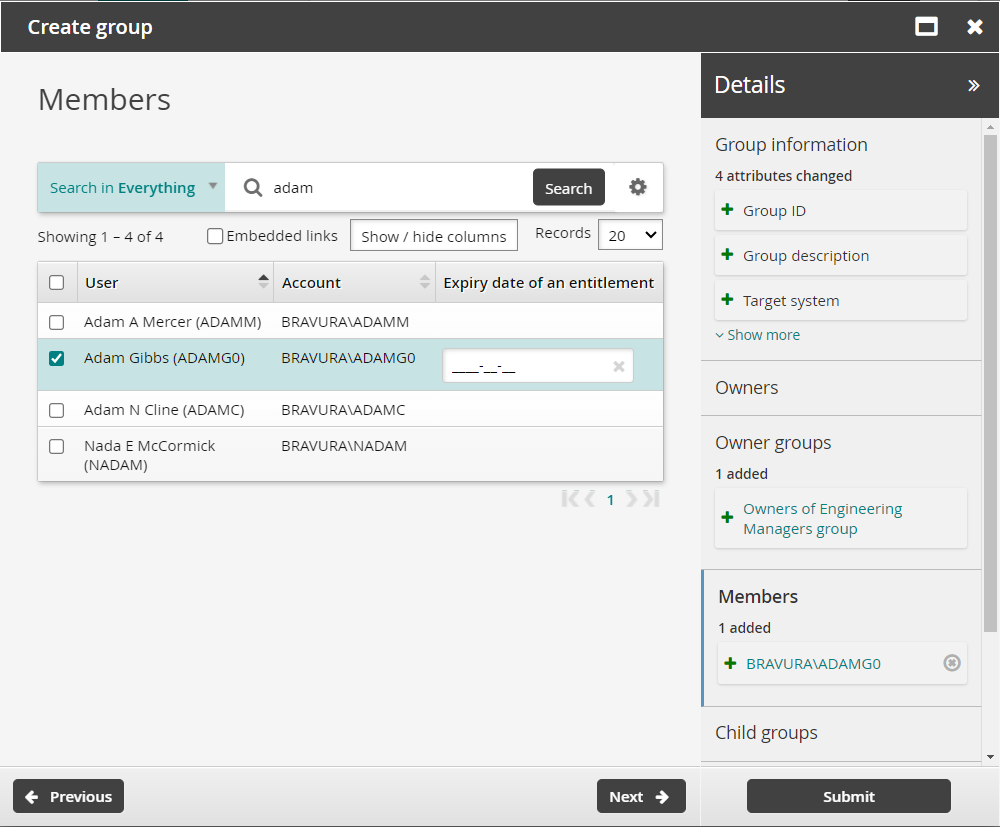
Select a future date for Expiry date of an entitlement.
Click Next .
On the page, click Next .
On the page, search for and select the checkbox of the TEMPS group.
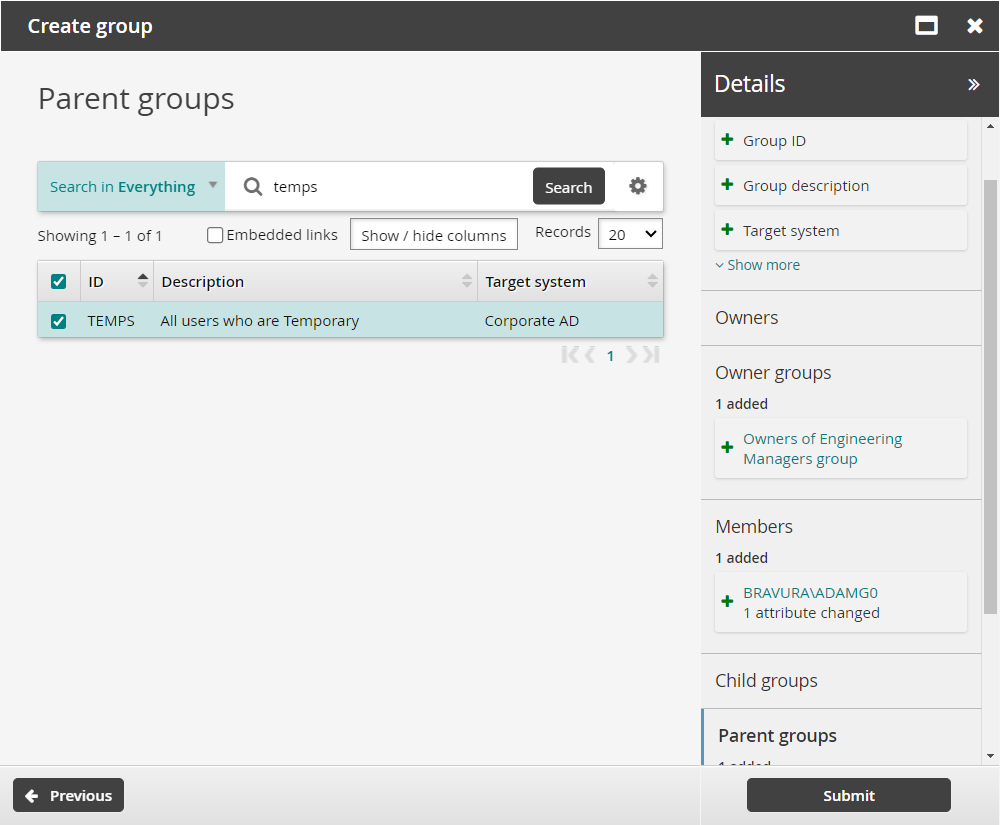
Click Submit.
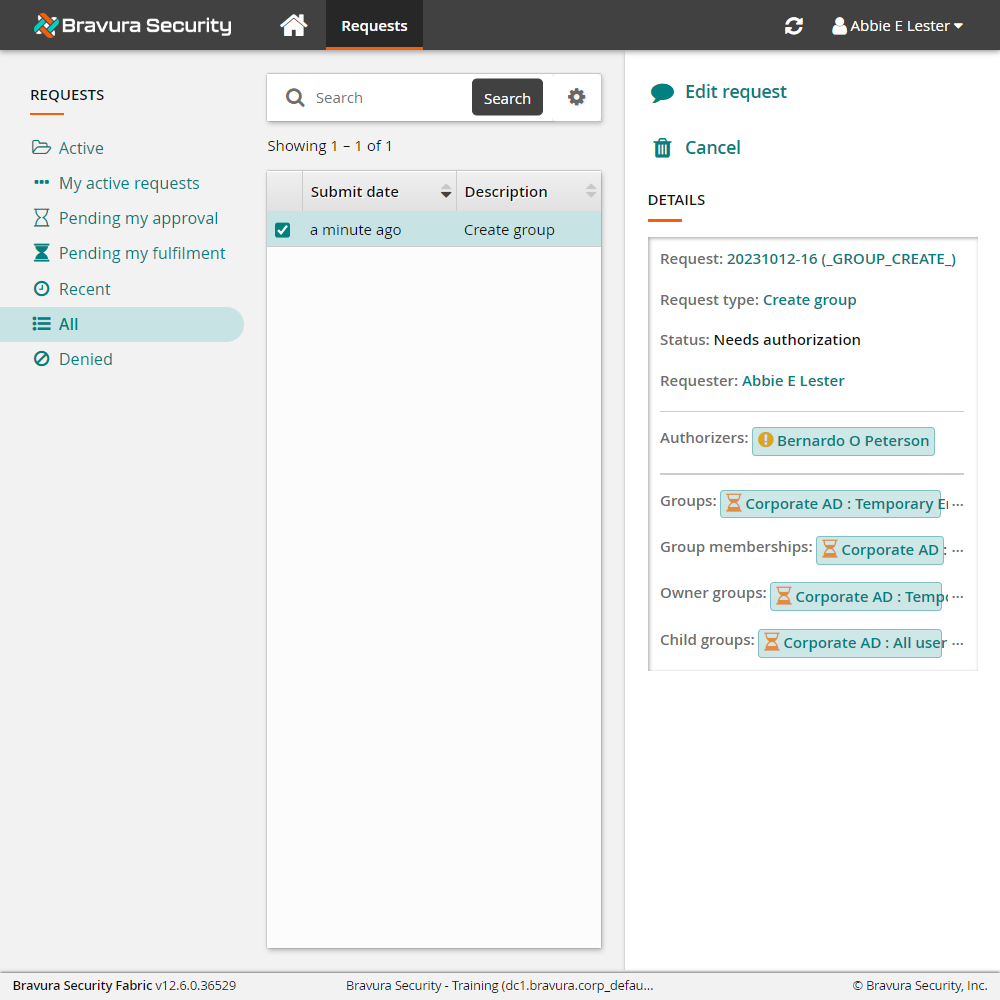
Click the View request link at the top of the page to check the status of the request.
Approve the request
To approve the request:
Log in to the Front-end (PSF) as a group owner; in this case the user is a member of the ENG-MANAGERS-owners group.
Click the link: There are 1 request(s) awaiting your approval.
The Requests app opens.
Select the request you want to review; Create group.
Bravura Security Fabric displays the details in the Actions panel on the right.
Review the request details.
Click Approve and confirm the approval by clicking the Approve button below the Comment field.
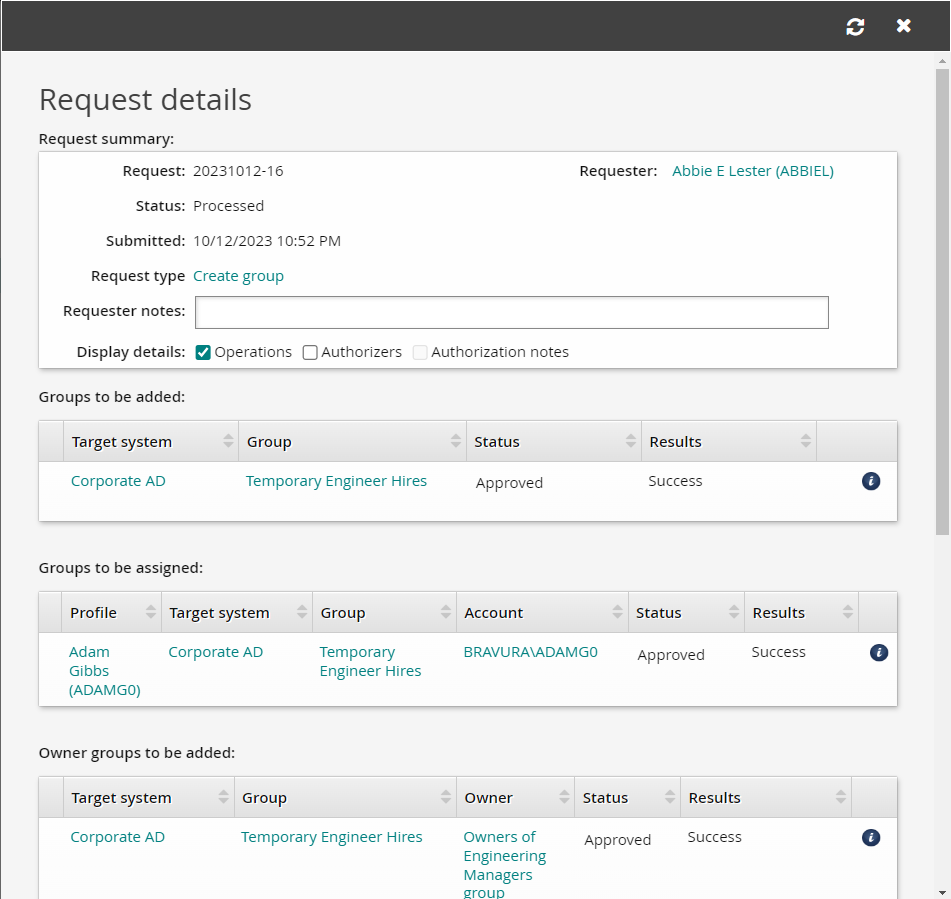
Track the results of the request
Return to your browser tab where abbiel is logged in and refresh the request details for the new group.
The request status will change to "Processed".
If the values of the Results columns in Request details tables are all "Success", you will know you have successfully completed the group creation.