API SOAP Service (idapisoap)
The API SOAP Service (idapisoap) provides access to the Bravura Security Fabric API Service (idapi) with the WWS web service API. It is installed and started on the Bravura Security Fabric server during setup.
Some organizations use the SOAP API to build their own customized front-end to Bravura Security Fabric .
Refer to the Bravura Security Fabric Remote API (api.pdf) for detailed reference information.
The API SOAP Service (idapisoap) requires:
Windows Server 2012, or
Windows Server 2012 R2
Microsoft .NET Framework 4.5+
The API SOAP Service is dependent on the API Service (idapi). The PSLang API, IIS.NET API, and WWS API call into this service.
Configuration
The service is automatically installed and started on the Bravura Security Fabric server during setup.
You can modify the following parameters related to the API SOAP Service on the Service information page:
Option | Description |
|---|---|
Endpoints for the IDAPI SOAP native service | The URL that the API SOAP Service will listen in on. An optional port can be appended to the host and preceded by a colon. Multiple endpoints can be defined in a comma separated list. To secure the endpoint, configure it to listen on https. |
Use system setting: | Will be set to the following: http://<IP>/default/idapi2,http://localhost/default/idapi2,http://<IP-fqdn>/default/idapi2. |
Note
For versions of Bravura Security Fabric prior to 12.6.1, the SOAP endpoints ended with idapi . The target namespace, www.hitachi-id.com, used by these endpoints has been deprecated. Client applications that use libraries and binaries from these older products will still connect to the 12.6.1 IDAPI SOAP service using the idapi endpoint; however, any new client applications written with the 12.6.1 libraries and binaries will need to use the new endpoints ending with idapi2 and the target namespace www.bravurasecurity.com.
When declaring the custom endpoint values, use the old name, idapi . This will cause the creation of two endpoints for every declared URL:
The
idapiendpoint using the legacy namespace in the WSDL,A separate endpoint, idapi2 , with the new namespace.
Whatever value is used in the last URL section of the endpoint (e.g. replace "idapi" with "test"), will get an appended "2" for providing the API service with the new SOAP namespace.
Existing integrations using the old namespace WSDL can remain configured to use the idapi endpoint. Any new integrations will be configured to use the new idapi2 endpoint. That idapi2 endpoint should not be declared explicitly in the idapisoap service configuration.
The reason for this change is twofold:
The WSDL namespace was changed to follow the company name change
Application administrators do not have to update thousands of old clients that are all both pointing at /idapi and expecting a namespace of www.hitachi-id.com when they upgrade the instance.
The "server" URL fragment must be the IP, hostname or FQDN (fully qualified domain name) of the server. If the connection is secured with TLS (https protocol), only an FQDN listed in the TLS server certificate used on the IIS server will allow a secure remote connection.
Command-line options for idapisoap are listed below:
Argument | Description |
|---|---|
-h | Displays usage information. |
-v | Displays version number only. |
-binding <binding> | Specify the binding type: – basicHttpBinding – wsHttpBinding (default) |
-endpoint <endpoint> | The endpoint that this SOAP service listens on |
-mextype <mextype> | The metadata exchange method: – None – MexHttpGet – Mex (only for wsHttpbinding) – HttpGet (default). The default is suited for most applications. |
-config | Displays service configuration information. |
-server | Run the service in server mode. |
-start | Starts the service. |
-stop | Stops the server/service |
To configure wsbinding and mex, set the service like this:
idapisoap -binding 1 -mextype 2
where the API service class can be generated from <endpoint>; for example, http://<IP or fqdn>/hiim/idapi2.
To configure httpbinding and HttpGet, set the service like this:
idapisoap -binding 0 -mextype 4
where the API service class can be generated from the WSDL <endpoint>/wsdl; for example,
http://<IP or fqdn>/hiim/idapi2/wsdl
Changing the SOAP connection type by using the "binding" and "mextype" arguments is only required if the remote SOAP tooling used requires it. Do not change the default connection type if testing the collection of the WSDL using a browser, otherwise you will receive a generic server error (HTTP 500) instead of the WSDL.
Metadata exchange
The API SOAP Service has a couple of methods of exchanging metadata. When using the default httpget, the metadata exchange URL is:
service_endpoint/wsdl
For example:
https://<IP or fqdn>/INST/idapi2/wsdl
If the API SOAP Service uses MexHttpGet, the URL is:
https://<IP or fqdn>/INST/idapi2/metadata/wsdl
If the API SOAP Service uses wsHttpBinding, then Mex metadata exchange can be used, and the metadata exchange URL is same as service endpoint.
Changes to the service are not effective until the service is restarted.
Binding
If the end point is secured with SSL (https), then the binding for IIS is used to map the certificate to the secure endpoint.
Example: Configure the API SOAP service for external API access
This example demonstrates how to create a product administrator with the IDAPI caller privilege and configure the Bravura Security API SOAP service for external API access. This setup allows a third-party application to communicate with Bravura Security Fabric .
With this configuration, a third party application can be configured to use the administrator account and the configured API SOAP service to communicate with Bravura Security Fabric .
For example, a ticket is raised in ServiceNow for a new employee. ServiceNow communicates with Bravura Security Fabric to submit a request for an account creation in Bravura Security Fabric .
Create a user with the IDAPI caller privilege
To create the user:
Log in to your instance as a superuser.
Click Manage the system > Security > Access to product features > Individual administrators.
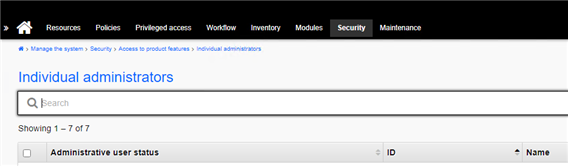
Click Add new…
Fill in the relevant information.
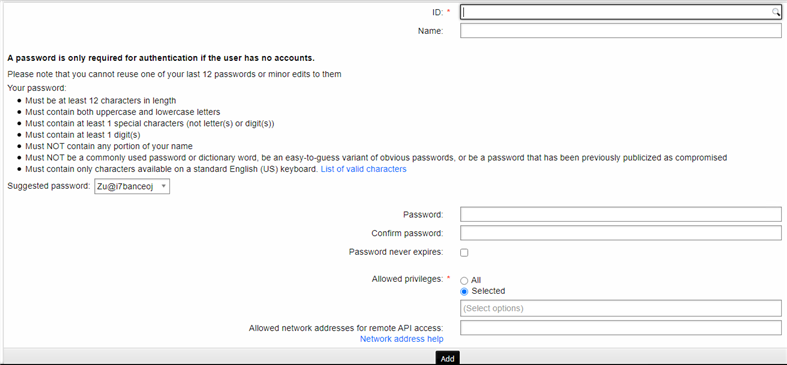
Set a password.
Grant the user the "IDAPI Caller" privilege.
Configure the IP address with CIDR bitmask to include the IP address of the the servers of the third party applications which have to be allowed to make API calls into the
idapisoapendpoints.In case the calls arrive via any form of IP translation (Network Address Translation network devices, HTTP proxies or other network gateways), both the IPs included in the HTTP requests at the source and the IPs seen when the request reaches the
idapisoapservice must be included. If left empty, everything except being called from the localhost (127.0.0.0) will be refused.Click Add.
Add the API administrator profile to any administrative groups or user classes which will provide it with the privileges required to run the operations on the data inside the application;for example, if the API profile is used in a voice recognition bot integration (IVR), add the API to the user class EXPLICIT_API_USERS_TPM or a similar one.
Set up the Bravura Security API SOAP service
This step specifically assist with the IIS binding that is needed for the service to run. For more detailed information about the API SOAP Service, see API SOAP Service .
Log in to your instance as a superuser.
Click Manage the system > Maintenance > Service.
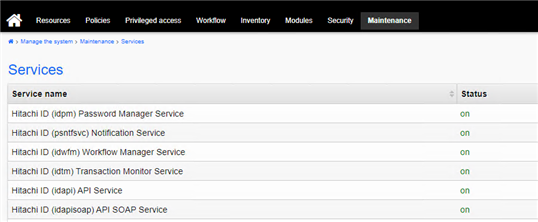
Click the Bravura Security (idapisoap) API SOAP Service.
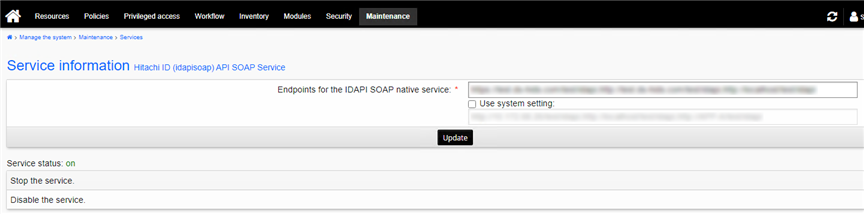
In the Endpoints for the IDAPI SOAP native service field enter the appropriate comma separated values. For example, http://localhost/<Your Instance>/idapi . In the case of a fully qualified domain, ensure that you add in a similar fashion for both http and https.
Click Update.
Stop and start the service so that these settings will be recognized by the service. This is a requirement to update this setting. This will also have to be done any time the settings change.
If you have multiple nodes, repeat these steps to set the endpoints on all nodes. This is not a setting that will automatically propagate through the synchronization process.
Sample script in Python
This following script is an example of an API call to display the known attributes for a specific profile to ensure you have a successful connection and can list data.
from zeep import Client
from zeep.helpers import serialize_object
# Update with appropriate URL
wsdl = 'http://localhost/test/idapi/wsdl'
# Update with appropriate API user that you created
api_user = 'API_TEST_USER'
# Update with appropriate password that you set
api_pass = 'SomethingRandom123456!'
# Update with appropriate profileID from your system
profile = '100005'
class ApiError(Exception):
  pass
def assert_api_op(ret, op=None):
  if ret.rc != 0 and ret.rc != 1:
    if op:
      raise ApiError('{} Error#{}: {}'.format(op, ret.rc, ret.errmsg))
    else:
      raise ApiError('Error #{}: {}'.format(ret.rc, ret.errmsg))
  return ret.sessdat
client = Client(wsdl)
LoginRequest = {
  'userid': api_user,
  'password': api_pass,
  'isadmin': 1,
  'options': '',
  'sessdat': ''
}
LoginResponse = client.service.Login(LoginRequest)
sess = assert_api_op(LoginResponse, 'Login')
UserStatusGetResponse = client.service.UserStatusGet(
  {'userid': profile, 'sessdat': sess})
sess = assert_api_op(UserStatusGetResponse, 'UserStatusGet')
UserStatus = serialize_object(
  UserStatusGetResponse.output.UserStatusGet_vectorOutput[0])
print("      Profile: {}".format(profile))
for k,v in UserStatus.items():
  print("{:>18}: {}".format(k, v))