Unix trigger
This section shows you how to set up transparent synchronization with a Unix-based trigger system. Bravura Pass can intercept interactive password changes on a Unix server using one of two methods:
Replacing the native password program (
/usr/bin/passwd) withpspasswdto intercept changes made using the standard password command (passwd).This method is considered more robust and is less likely to cause side effects due to non-standard configurations.
Configuring the Bravura Pass pluggable authentication module (PAM) on Solaris, HP-UX, and Linux systems to intercept password changes made by any authentication program. Normally, all authentication goes through the PAM, including passwd.
This method allows Bravura Pass to intercept any password change, including password changes where the regular password program is not used.
These PAM modules are not shipped with Connector Pack 4.6 or newer. Support can be provided at additional cost.
Before you begin, ensure you have researched and followed the steps outlined in Implementing Transparent Password Synchronization .
To set up transparent password synchronization with a Unix-based system:
Configure the API SOAP Service.
If you are using SSL, ensure that a compatible version of OpenSSL (3.0.x) is installed on the Unix system.
If you did not select the Unix Installation Packages when you installed the Connector Pack, install the
psunixinstallation package.Configure transparent synchronization by replacing the native password program (/usr/bin/passwd).
These steps are detailed in the following sections.
Configure the API SOAP service
The psunix interceptor installed with Connector Pack uses the API SOAP Service.
To use the API SOAP Service:
Ensure the API SOAP Service is set to automatic and started .
Optional: Ensure the messages are encrypted, by configuring the API SOAP service and IIS server to listen and communicate over SSL.
Recommended: Create a new administrator with administrative privileges to connect to the Bravura Security Fabric API for the remote connections used by the UNIX trigger.
By default, Bravura Security Fabric includes the _API_USER user. By default, this administrator is only available for shared memory connections to the API that do not require a password.
The new IDAPI caller must be assigned a password before it can be used for remote connections.
Click Manage the system > Security > Access to product features > Individual administrators.
Click Add new… .
Enter a value for the ID (for example: UNIXAPI) and Name.
Enter a password and confirm the password.
Add the IP Address of the trigger system in the CIDR notation to the Allowed network addresses for remote API access field .
Click Update.
Add the newly created administrator for the remote connections to the API to the _EXPLICIT_API_USERS_ user class.
Click Manage the system > Policies > User classes > _EXPLICIT_API_USERS _.
Click the Explicit users tab.
Click Select… .
Search for the newly added adminstrator’s ID.
Click on the administrator and then Add.
Assign the product administrator "Change passwords" global help desk privileges to complete transparent synchronization.
Install the psunix installation package
The psunix archive package contains the Unix Listener and other tools and files used to perform Bravura Security Fabric operations on Unix systems. There are versions for each type of supported Unix system. The packages are installed in the unix directory when you choose a complete Connector Pack installation, or select them as part of a custom installation.
To install the package on a Unix system:
If you did not select the Unix Installation Packages when you installed Connector Pack, run the
setupfrom the main software installation to modify your instance.The
setupprogram displays the page.Click Connector Pack 64-Bit .
Click Modify.
Choose Change.
Ensure that the select

 icon is selected for Unix Installation Packages, and the appropriate packages, on the component selection page.
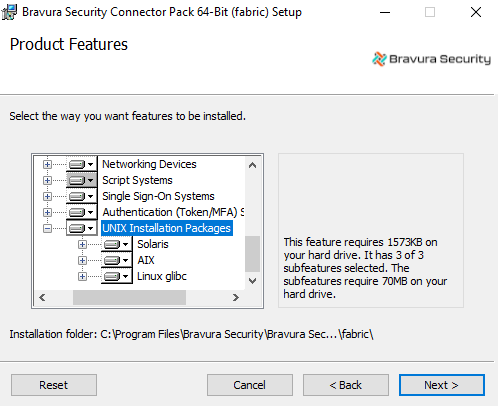
Click Change, then complete the installation procedure.
Copy the
psunix-<os>.<cpu>.tar.gzfile from the unix directory to a scratch directory, such as /tmp/, on the Unix server.Log into the Unix server with administrative privileges, and extract the files from the
psunixarchive. For example, type:cd /tmp tar -zxvf psunix-linux-glibc-2.28.x64.tar.gz
See Unix Configuration Scripts for more information about installing psunix.
Replace the native password program
To effectively intercept all password changes made using the regular password program on Unix (/usr/bin/passwd), you can install a replacement password program and a matching configuration file (psunix.cfg) on every Unix server where users might change their local or NIS/NIS+ passwords. See notes about synchronization in an NIS / NIS+ environment .
The Bravura Security password replacement program (pspasswd ) applies password strength rules defined on the Bravura Pass server to all new password selections. It uses the old, renamed, password program to implement the password change locally on the Unix server, and then forwards a request for synchronization to the Bravura Pass server.
Install pspasswd on the Unix trigger system
To install Bravura Security password replacement program:
Note the communication key (or Master Key).
The CommKey value is encrypted in Bravura Security Fabric . If you did not record the key in a secure location, copy the
idmsetup.inffile from <instance> \ psconfig \ on the Bravura Security Fabric server to the same location as the installer. The installer will extract the Communication Key value from the file.Note the product administrator and password to connect to the API SOAP Service.
Note the URL of the API SOAP Service.
If you did not select the Unix Installation Packages when you installed the Connector Pack, install the
psunixinstallation package .Run the installation shell script in:
Install pspasswd interactively
Installing interactively takes less preparation and allows you to specify settings during installation. You can use the idmsetup.inf configuration to pass through some of the information as defaults.
To interactively install pspasswd on the Unix system:
Run the shell script
install.shfrom the root of the installation package:sudo sh install.sh [ -inf <path>/
idmsetup.inf] [ -inst <instancename> ]where:
Option
Description
-inf
Specifies the path to the
idmsetup.inffile. If omitted, you must enter communication key (or Master Key) and other information when prompted.-inst
Specifies the instance name for location of the psunix files. If omitted, files are copied to the /usr/local/psunix/default instance .
Follow the instructions displayed by the installer script.
In the installation process:
Allow system files to be backed up.
Select the "Passwd Transparent Synch" installation option.
If you want to use the configuration options that exist in /etc/psunix.cfg, type
Ywhen asked. If you want to change the values, typen.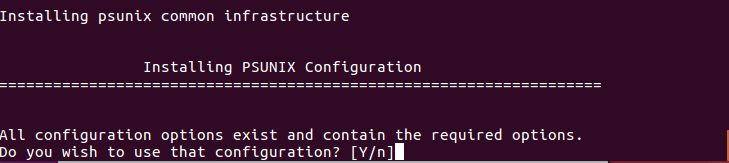
See Unix Configuration Scripts for more information about the Unix listener.
Enter the target ID of the target used to target this system.
Enter the URL of the API SOAP Service.
Enter a proxy URL if you are using a proxy. Press Enter if you are not using a Proxy.
Enter the proxy user name if you are using a proxy. Press Enter if you are not using a Proxy.
Enter the proxy user name’s password if you are using a proxy. Press Enter if you are not using a Proxy.
If you are using SSL, enter the path holding the CA certificate(s). Press Enter if you are not using SSL.
If you are using SSL, enter the certificate details. Press Enter if you are not using SSL.
Define the [libcurl] path or press Enter to use the system default libcurl library.
Define the [ignore] or press Enter to use the default value.
Define the user name for login to the IDAPI service.
Define the password for the IDAPI user.
The installer renames the old password program to <program name>.bin and replaces it with pspasswd .
Install pspasswd non-interactively
The installer’s non-interactive mode allows you to perform unattended installations. This would be advantageous where you want to install on many systems over SSH, for example. This mode requires you to write a response file that is used with a command line option.
To install pspasswd non-interactively:
Edit the following sections of the
psunix-responsefile.cfgin the root of the installation package:###################################################################### ## general options # Prior to installing PSUNIX, the installer allows the option to # backup files affected by the installation process. pre-backup = "Y"; # By default, if pre-existing configuration file(s) contains all the # required options, do not replace them. use-preexisting-cfg = "Y";
Edit < psunix-root>/conf/
psunix.cfgto define the communication key (or Master Key) that matches the one set during installation on the Bravura Security Fabric server; for example:commkey = "<encrypted commkey value>";
Optionally, you can pre-configure other options in this file if you want different behavior from the default. See the Unix Configuration Scripts for details.
Run the shell script
install.shfrom the root of the installation package:sh install.sh -c 2 -ni [ -inst <instancename> ]
where - inst specifies the instance name for location of the psunix files. If omitted, files are copied to the /usr/local/psunix/default instance.
pspasswd and non-default instances
The psunix local instance name, defined by the -inst option when running the install.sh script, is not connected to the main Bravura Security Fabric instance name. If specified, it designates a sub-target.
During install/setup, if the instance name is the default, the installer symbolically creates a link from:
/usr/local/psunix/<instance>/psunix.d to /etc/psunix.d, and
/usr/local/psunix/<instance>/psunix.cfg to /etc/psunix.cfg
The pspasswd binary (due to the fact that only one version can be installed in /usr/bin or /bin) always looks for /etc/psunix.cfg.
If you want to install pspasswd to run in a non-default instance, you must manually create the symbolic links to /etc/psunix.d and /etc/psunix.cfg.
Unix with NIS or NIS+
Normally, in an NIS or NIS+ environment:
There is a single, master password for every user.
Password changes made on an NIS client are automatically propagated to the NIS master server. When this happens, only the password hash, and not the plaintext password, is sent to the NIS master server.
Password resets are only possible on the master server.
In NIS, password resets must be made by manually editing the passwd map file.
Bravura Pass allows you to extend the reach of the single NIS password:
Password changes made in the NIS environment can be automatically propagated to other, non-NIS systems.
Password changes made outside of NIS can be automatically propagated to the NIS environment.
Password resets can be made from the command-line of the NIS master, or from a web browser, replacing the manual editing process.
Propagation of new passwords between an NIS master and its secondaries can be replaced by Bravura Pass password propagation, which is much faster.
The installation process is the same as for individual Unix servers, with the following exceptions:
The Bravura Pass Unix server / listener is only installed on the NIS master server.
You need to edit additional scripts for an NIS connector. See the Connector Pack Documentation .
A replacement passwd program (
pspasswd) must be installed on all NIS client machines, and not just on the master. This is required because Bravura Pass needs access to plaintext password values to synchronize with other systems, but the NIS master only receives password hashes, and not plaintext passwords.Alternately, you can replace passwd on the NIS clients with a shell script that can:
Invoke a web browser, prompting users to change their passwords using a Bravura Pass web interface.
Use a program such as SSH to run the passwd program on the NIS master server.
Editing psunix configuration files
Bravura Security Fabric add-ons that you install on a Unix-based server use a configuration file to define interaction between the add-on, the Unix server, and the Bravura Security Fabric server. By default, this file is /etc/psunix.cfg ; however, most add-ons allow you to specify an alternate file.
When you install Bravura Security Fabric add-on on Unix using an installer script (for example, install.sh ), the installer creates a psunix.cfg file and configures the required values. You can later edit this file to configure additional options or change your settings.
The psunix.d configuration directory contains several configuration files that contain the settings for the various psunix add-ons, including the pushpass file, which contains settings for transparent password synchronization.
See Unix Configuration Scripts for more information.
passwd utility configuration
The pspasswd file specifies the passwd utility used to perform an operation on a non- Bravura Security Fabric users password. Usually, this option specifies operating system’s passwd command. The native password operation is executed if the user is contained in the [restricted-user-list] option, or is contained in the ignore list on the Bravura Security Fabric server. The options are as follows:
passwd-cmd-reset A reset operation is less strict than a change operation since it does not validate the users old password first. Most native passwd commands do both change and reset operations depending on who is running the command and the arguments passed on the command line. Generally, running the passwd command as superuser is considered a password reset operation.
This option accepts
psunixtextual replacement strings, notably the "%u" keyword indicating the username.Example:
passwd-cmd-reset = "/bin/passwd.bin %u";
passwd-cmd-change A change operation is more strict than a reset operation since it validates the users old password first. Most native passwd commands do both change and reset operations depending on who is running the command and the arguments passed on the command line. Generally, running the passwd command as a non-privledged user is considered a password change operation.
This option accepts
psunixtextual replacement strings, notably the "%u" keyword indicating the username.Example:
passwd-cmd-change = "/usr/bin/yppasswd %u";
Exit status codes
The following table outlines the pspasswd exit status codes:
Error code | Description |
|---|---|
0 | Success. |
1 | Syntax error in PSLang override script. |
2 | Failed to acquire password policy from remote |
3 | Failed to reset password using native command line tool. |
4 | Failed to reset password. |
API SOAP Service configuration
The idapi file is used to configure the connection to API SOAP Service (idapisoap). The options are as follows:
targetid If you are using aliasing, this option is used to specify the ID of the target.
Example:
targetid = "UNIXSERVER";
url The url that API SOAP Service is listening on.
Example:
url = "http://hipmserver/default/idapi";
user The product administrator used to connect to the API SOAP Service.
Example:
user = "_API_USER";
psw The product administrator password used to connect to the API SOAP Service. idaptool can be used to provide an encyrpted form of the password.
Example:
psw = "{AES}xdWShI2f+fM7Bd0SRhIi9kHvdhM9Y0fVxvKjpIbHfp4T47X2IAjLakoNitoSfu4Z" ;libcurl In order to communicate to the API SOAP Service over SSL, the libcurl is required. If the full path is specified, then the library can be loaded when connecting over SSL. If no libcurl is avalable and plain HTTP is used, the value can be set to ’0’. If empty, the system default is used.
Example:
libcurl = "0";
capath When communicating to the API SOAP Service over SSL, a certificate check will be made unless ignore is set to "1". If the CA certificate is not installed on the system default paths, a path can be specified.
Example:
capath = "/etc/certs";
cert When communicating to the API SOAP Service over SSL, a client-side certificate can be provided. If there is a passphrase as part of the certificate it needs to be specified as well.
Example:
cert = "/etc/certs/hipmcert.pem:apassphrase";
ignore When communicating to the API SOAP Service over SSL, the certificate check can be ignored. If 0, the check is not ignored. If 1, the check is ignored.
Example:
ignore = "1";
language The language set in this value will be used when fetching the password rules. By default is it is en-us. The language packs must be installed in order to retrieve rules in other languages.
Example:
language = "fr-fr";
fail -if-unavailable Specifies the action to take if the password operation fails and the Password Manager service cannot be contacted. The default behavior is to fail the operation if the Password Manager service is unavailable.
Example:
fail-if-unavailable = "true";
Password Manager Service configuration (idpm )
The pushpass file is used to configure the Password Manager service (idpm ). The options are as follows:
targetid If you are using aliasing, this option is used to specify the ID of the target.
Example:
targetid = "UNIXSERVER";
hostname The hostname option is used to specify the location of the Password Manager service service to be used by
pspasswd. This can either be an IP address or a hostname.Example:
hostname = "UNIXSERVER";
port The port option is used to specify the port that the Password Manager service is running on. The default value for the Password Manager service is 3333.
Example:
port = "3333";
timeout Specifies the timeout (in seconds) that should be used when communicating with Password Manager service. The default value is set to 10 seconds.
Example:
timeout = "10" ;
fail-if-unavailable Specifies the action to take if the password operation fails and the Password Manager service cannot be contacted. The default behavior is to fail the operation if the Password Manager service is unavailable.
Example:
fail-if-unavailable = "true";