Custom Connector Building
Note
Implemented in Connector Pack 4.3.
The following sections show you how to create a custom Python connector that expands the scope of a systems integration with Bravura Security Fabric.
Connector/Agent functional overview
The terms connector and agent are used interchangeably at Bravura Security. The original term used was agents, but as our products grew, they became better known as connectors. Connectors are used to communicate with target systems.
Connector operations
The connectors communicate with Bravura Security Fabric through proprietary API so input and output to the connectors is handled in a standard way. The product executes the connectors through standard functionality exposed through the UI or can be customized programmatically via Python. The client calling API and the underlying connector API in our programmatic connectors preserve connector compatibility. As a result, connectors written in the past are generally fully compatible in an upgrade. Due to this separation of connectors from product, newer connectors and the connector pack, generally run in older versions of the product without issue. The reverse is not true, however, as new functionality added to the product often relies on lock step functionality added to the connector pack.
Most connectors list account objects and act on those account objects with an array of other operations. Similarly, most connectors list group objects and act on those group objects.
Operations include, but are not limited to:
Server Information
List objects
Verify password
Reset password
Unexpire password
Expire password
Is password expired
Enable object
Disable object
Is object enabled
Unlock object
Is object locked
Create object
Delete object
Rename object
Update object
Assigning and removing relationships to/from object
In addition, listing resource objects, such as computers or tokens, is possible through connectors.
In any customized script the serverinfo (server information) must succeed; if it is missing or fails, the listing operation will fail. Whichever types of listing are enabled for the Target system information must succeed; for example: if you have "list accounts" checked and the connector returns ACOperationNotSupported when listing accounts, that is treated as a listing failure.
For a full list and explanation of each connector operation, see Connector operations.
See also the Python Agent API Reference for details on specific connector operations.
It is also entirely possible to build a connector that deviates from typical behavior. For example, you could create a connector that operates on a custom operation, not explicitly exposed in the product but is called through workflow in a complicated use case. There are also interceptor connectors, which are intended to be called in exit traps and generally act on a ticketing systems like ServiceNOW, by opening and closing tickets.
For this document, we will focus on the typical use case of listing of account objects and group objects and the operations that act on these objects.
When developing connectors, be aware that the terminology may differ between the Bravura Security product and the target system. From the Bravura Security product side it may appear like we are listing groups, but from the external program this might be viewed as collecting user role information, even though these semantics are similar enough as to not be an issue. Also understand that the operations may be asymmetrical in meaning, for example, unlocking an account in Bravura Security terminology means that the intrusion lock is reset, however, in some targets, unlock can mean to enable an account. Take the time to understand how the Bravura Security product objects and operations map to the end target.
Connector type and target address options
A connector is identified by its type name which is internally known in the product as its platform name. When you set up a target under Manage the System > Resources > Target systems > Manually defined the connector is selected when you choose the Type.
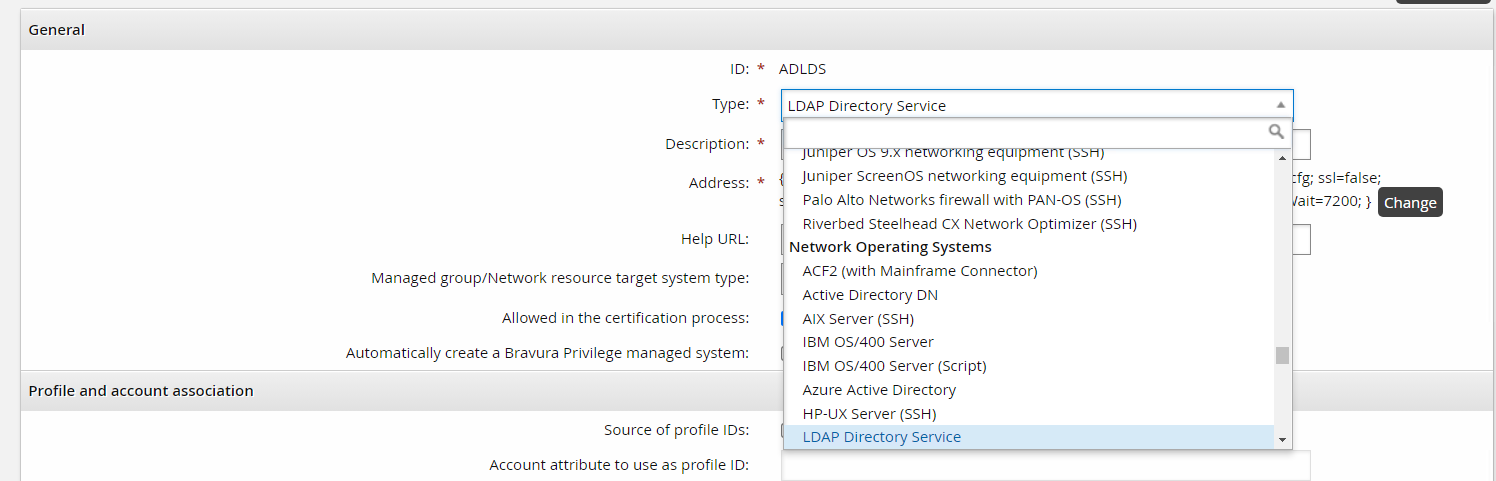
Also note that a connector’s type or platform is further grouped into common categories such as Network Operating System, in the example above.
The type of connector you select for your target system affects the required fields needed in the target address configuration. The target address configuration options are used to configure connector behavior in the UI. After setting up a target under Manage the System > Resources > Target systems > Manually defined and choosing your Type, you can select the Change button on the Address field and configure the target address options.

It is essential to understand these concepts before connector development. Developing a connector involves defining a connector type, setting its category and defining its target address options.
The auto discovery and account policy sections gray out functionality if certain features are not exposed. For example:
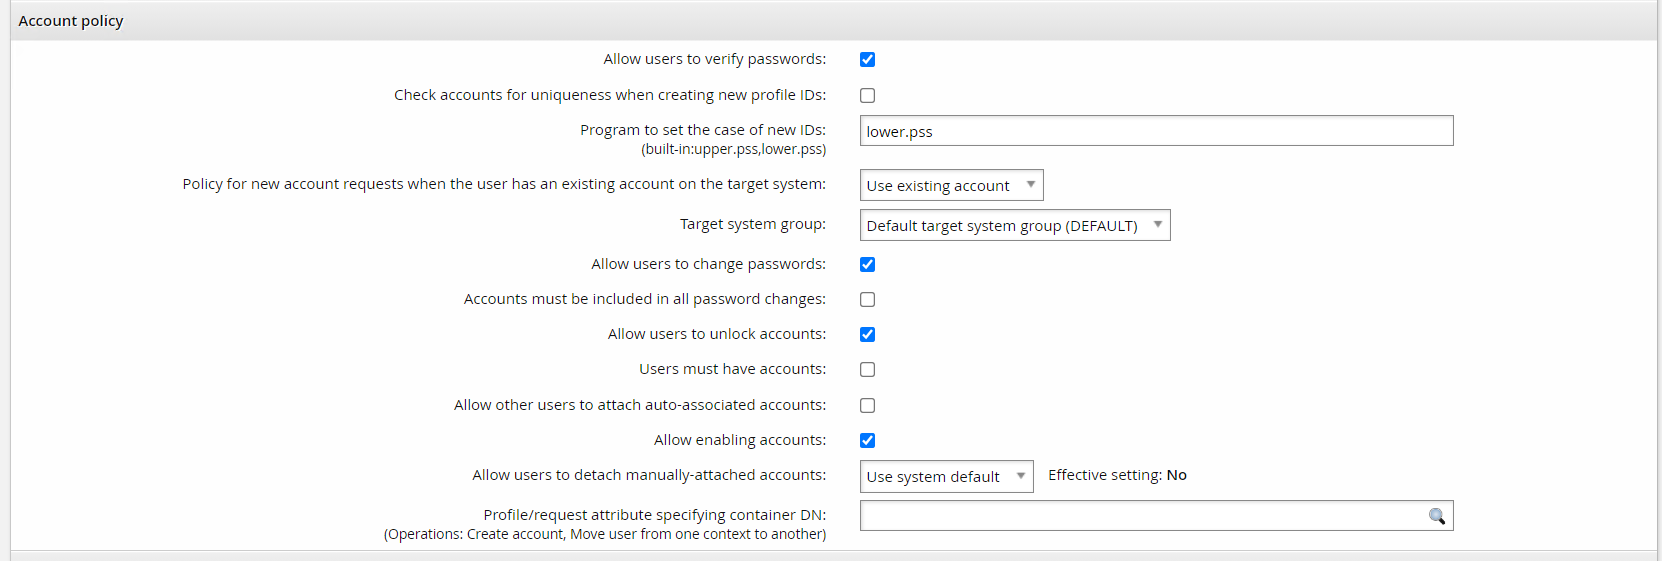
The Allow users to change passwords or Allow users to verify passwords options require both the reset and verify operations respectively. The Allow users to unlock accounts option requires the unlock/islocked operations. The Allow enabling accounts option requires the enable/disable/isenabled operations.
Connector files
Provide a connector file along with your Python script and any files you might import with your Python script. This file is placed beside your script and used to associate your custom Python connector with a platform type and define a category and short description. For example, the agtsfrest agent connector file looks like this:
# KVGROUP-V2.0
 agtsfrest = {
 agent = agtpython.exe;
 script = agtsfrest.py;
 category = HRMS;
 platform = SFREST;
 description = !!!PLATFORM_SUCCESSFACTORSREST_DESC;
 system = true;
}
In your connector file, since you are writing a Python connector, the agent key value will always be agtpython.exe. The script key value specifies the name of your Python script. The category key value specifies the category. This is used when grouping your connector in the pulldown menu item when targeting your connector. Allowed categories are as follows:
ATTAP - Application Servers
AVALMON - Availability and Monitoring Software
CRMS - Customer Relationship Management Systems
DB - Database Systems
FLATFILE - Flat File Connectors
HD - Help Desk Systems
HDDENC - Hard Drive Encryption Systems
HR - IT Service Management Systems
HRMS - Human Resource Management Systems
MAIL - Email Systems
NETDEV - Networking Devices
NOS - Network Operating Systems
NR - Network Resource
PKI - Public Key Systems
QUEUE - Queue
SCRIPT - Script
SOCM - Social Media Systems
SSO - Single Sign-On
STORAGE - Storage Systems
TOKEN - Authentication (Token/MFA)
VP - Virtualization Platform
The platform key value defines a short uppercase name for your platform that will be used internally in the product to uniquely identify your platform. Finally, the description key value allows you to specify a short description that gets displayed on the pulldown menu item when targeting your connector.
Target credentials
Credentials are grouped into administrator and system credentials. The primary credentials are the administrator and if there are a pair of credentials, the secondary credentials are the system. What is considered primary and secondary credentials is arbitrarily up to the connector developer. Historically, there has never been a connector with more than two credentials.
The Python credential variables are special in that they are encrypted until used. A best practice during development suggests retrieving credentials only when they are needed, reducing the window where credentials can be compromised. Additionally, there are security implications during development where passwords may be exposed through logging. After development is completed ensure that credentials are not logged or written out to disk.
Generally, development of a connector starts with the serverinfo operation and list user operation, in that order. The target system Test connection tab can be used to test connectivity by running the serverinfo operation. This is followed by testing the list operation with the "Test user list" operation, on the same page. These tests do not catch all the errors, but it is an easy sanity check when building your connector and can be safely run in production environments.
For other operations, it is recommended when developing and testing a connector that you are not using a production target system.
Multiple credentials (admin and system)
Both the admin and system creds handle multiple credentials by attempting a connect operation over both the admin and system creds until either an ACSuccess or ACNotConnected are returned. The logs indicate an connection attempt failure for each credential with the following logging:
Cannot connect to address [Address] by using [adminID] [sysID]
The return code ACNotConnected is a special case to indicate all connection attempts fail and this error code is used specifically to attempt the next failover in the proxy list. When implementing the connect function, do not return ACNotConnected for credential check failure.
Prerequisites for development
A development environment is highly recommended when developing and testing the connector.
A text editor, such as Notepad++ is not explicitly required since you will be completing the development of the connector in a different utility, but it is nice to have for reading various system files.
For the Python development, Bravura Security recommends the use of "PyCharm Community Edition". It will help enforce some of the code review items. For example, pep8 is a fairly standard set of guidelines for how to write code for readability and using industry best practices. PyCharm will highlight portions of your code where you are not following these guidelines and if you use PyCharm’s built-in tools to reformat the code, it will format the code in a way that follows the appropriate style.
Finally, any DB browser that allows you to browse SQLite databases because target system list files are written to disk as SQLite databases files. A DB browser allows you to see if the required attributes or accounts that you are attempting to list are being pulled in correctly. Alternatively, if you are not as comfortable working with databases, you can also use Bravura Security product reports to view listing results.
You should test your connector on a full company solution so you can ensure it will work in production. However, during the connector development process you may find it useful to test and develop it on a bare bones instance where the minimum targets and configuration is set up. This reduces logging noise and allows you to more easily see connector errors.
Connector development process
The way you work within your organization may differ from this process, but we recommend the following approach:
Define requirements and scope.
Develop "proof of concept" Python script for target outside of Bravura Security Fabric.
Hard-coded values
Standard output
Combine proof of concept script with Bravura Security Python connector samples.
Test and troubleshoot.
Submit for Bravura Security Code Review.
Package and deploy.
Requirement and scope
When writing your requirements and scope, be precise on the connector operations and behavior. Things to consider include:
What are your API points? In this case, is Python the best language for integration? Python is powerful, but are there other scripted connectors that would be a preferable integration point – such as the Powershell or SQL connectors?
When listing objects, what properties/attributes are you interested in pulling?
When creating or updating an object, what properties/attributes are you interested in pushing?
Are you interested in enabling/disabling accounts, or unlocking passwords?
Are you interested in acting on groups or their relationships?
To help you with your requirements design, look in the sample folders of your instance, for agtpython-*.py samples. These give examples of things the product supports and help guide a short-list of items to consider. You can also use those sample scripts as a base when writing your connector. Any operations contained in those scripts that you do not require for your requirements can be deleted or alternatively return an ACOperationNotSupported error code.
Proof of concept
A proof of concept is useful to be able to experiment with integration. This is generally done by writing Python code that can be called via the command line. This can be used to test the integration point to your operations, such as listing accounts or resetting a password, then using that code in your Python connector.
For example:
Test connectivity issues, paging issues, correctness in authentication.
Test that the list operation is returning sensible data: looks ok, is in the right format, makes sense, is readable and unencrypted.
Test any packaging issues you have, figure out which frameworks you’re going to need to bring in...etc.
Test create and update operations for mandatory attributes, attribute value integrity and value constraints.
Once you have a working proof of concept, the Python script, you can clean up the code and add complexity to achieve your final desired results.
Keep in mind that a proof of concept does not allow you to completely test a whole custom connector integration but it does simplify the process of writing a custom connector.
Combine proof of concept with samples
Implement the proof of concept script into your Bravura Security Python connector sample. If you have other custom connectors that have been developed for your organization, these can also serve as good samples to work from.
Test, troubleshoot, and submit
Setup and target your custom connector. Test your use cases via the UI and troubleshoot. Then submit your code for internal code review. This process will vary depending on your organization, so it is important to find out what this process is for your company. For Bravura Security code review, the goal is to ensure that the code is maintainable so on upgrade, a script only needs minor adjustments.
Package and deploy
The connector should be packaged into a component before being deployed in the production environment.
Suggestions for developing your script
When using PyCharm, you should run it "as administrator". This tends to be a popular requirement for developer tools. The PyCharm version does not matter.
Some useful settings to configure in PyCharm:
Go to File > Settings > Project: company > Project Structure.
To make it resolve the Python content correctly, there is a set of four folders to index:
<instance>/component/ - Right-click on the Custom folder and select Sources.
Default - Right-click on the Default folder and select Sources.
<instance>/ - Right-click on the idmlib folder and select Sources.
<instance>/idmlib/ - Right-click on the extras folder and select Sources.
These four folders are often needed. Once you click Ok, there won’t be any visible impact.
Turn off the option in PyCharm to collapse imports because, as part of the Bravura Security code review, there is a specific way that we like to see the imports:
Go to File > Settings > Editor > General > Code Folding.
Remove the checkmark for Imports and click Ok.
Turn off flagging of spelling errors. This prevents every keyword and words in other languages being flagged all the time.
Go to File > Settings > Editor > Inspections.
Remove the checkmark for "Spelling" (This will also remove it for "Typo") and click Ok.
Tell PyCharm the location of the interpreter:
Go to File > Settings > Project: company > Project interpreter.
Select the drop-down for project interpreter.
This should come up with a selection for where the interpreter is; if it doesn’t then look for where the python.exe file is.
Telling PyCharm where the interpreter exists helps PyCharm provide error messages about the code since different versions of Python support different features and functionality.
Writing your script
In the <instance>/samples folder, most of the script connector types have a representative sample file. These samples offer a boilerplate for quick turn around in writing your custom connector. Copy the sample file file into the agent folder with the connector script name you wish – in the case of the Python connector, the sample file is named agtpython-simple.py. This sample also contains useful documentation at the beginning of the script. Do not move the sample file and also ensure to leave the original file in the sample folder unmodified.
Ensure when writing your script that you bring the code into compliance with appropriate coding practices (for example pep8.)
View the structure of an existing sample script
Looking at the agtpython-simple.py comment section, the sample script documents:
Several useful variables for inputs from the Bravura Security product.
The Python function points for operations.
The Python callbacks used to integrate outputs to the Bravura Security product.
The Python connector return codes
Following the comment section are code samples for integrating all the operations, generally in the order of precedence.
The addressattr definition allows you to expose target address attributes in your custom connector. These address attributes are parameters that expose configuration when targeting your connector. For example, our SuccessFactor EC rest connector (which is written in Python) provides the following target system address configuration:

And this is exposed via the following addressattr function:
def addressattrs(cinfo):
 """ Target address settings must specify:
 """
 agent.addAddressAttr(

   "url", "SuccessFactors OData REST API URL", "string", "", True)

 agent.addAddressAttr("proxy", "Proxy server to use", "string", "", False)
 agent.addAddressAttr("groupTypes",
        "GroupType(s) to list",
        "string",
        "permission",
        False)
The connect/disconnect definitions allow you to implement the connection/disconnection logic to your target. These definitions are called automatically before and after an operation function such as listusers or reset are called. The provided sample script as-is does not connect to anything but shows what variables are useful during connection. Note that cinfo Python dictionary often exposes many of the inputs from the connector framework. There are also commented out lines in the sample which present how to validate addressattr values passed in from the target system address configuration, such as port numbers. Also noteworthy is the log.info example to log to our logging facility (to the idmsuite.log):
log.info("connecting as adminid [{0}] sysid [{1}] with address line [{2}] "
       "timeout [{3}] settings [{4}]".format(adminid,
                                 sysid,
                                 address,
                                 timeout,
                                 settings))
And the agent.error example to return an error code and an error message back through the connector framework to the caller of the connector:
agent.error("Port number option must be defined");
 return ACUnknownError
The serverinfo function is mandatory with the list operation. The serverinfo operation is also used to test your connection on the Test connection tab of your target configuration in the product UI. This operation, and the function itself returns general information on the target, such as its version or any general functionality that this target might offer. Generally, the information returned is inconsequential and returning any version value is fine. As is the case in the provided sample using the agent.serverInfo callback:
attr_dict = {'attr1': ['value1-1'], 'attr2': ['value1-2']}
agent.serverInfo("1.1", attr_dict)
The listusers,listgroups,listcomputers,listsubscribers definitions provide the ability to return list information on the associated objects. The samples fill in mock data, but it shows how you can return account/group/computer/subscriber information through the connector framework using the provided agent.addAccount/agent.addGroup/agent.addComputer/agent.addSubcriber callbacks. These callbacks write the object information into the connector sqlite db files stored in psconfig, and these files are read by the iddiscover service into the product database.
Caution
Sometimes, a failure to list objects or their attribute information can fail unexpectedly due to connectivity issues or simply because the attributes or tables read do not exist for that object. It is not uncommon for targets to return object information using paged fetches. A failure to list but returning success can cause objects that were unsuccessfully listed to become invalid in the product. For example, a user’s account can disappear. Keep all this in mind when implementing the list operations.
There are other operations in the sample script, for example, verify, change, reset, expirepw, etc, that are unimplemented and return success. The operations and their respective Python definitions are generally considered push operations. Sometimes, they return attribute information, but generally, their main intent is to update the end target. As a result, they are generally easier to implement except for create and update.
Finally, the custom operations and the challengeresponse operation require detailed knowledge of the product and are complicated to implement. These are not operations we recommend writing yourself.
Hello World: Start on writing your own script
Prerequisites
Bravura Security Fabric is installed.
Steps
Find the
agtpython-simple.pysample script in <instance>/samples folder.Copy
agtpython-simple.pyand paste it into your <instance>/agent folder. Later on when we package the script as a component, it is moved elsewhere.Rename
agtpython-simple.pytoagthelloworld.py.With PyCharm or the editor of your choice, open up your agthelloworld.py script so you can follow along with the code that matches this walkthrough.
In the agent folder, create a connector file named
agthelloworld.conin the <instance>/agent folder with the following content:# KVGROUP-V2.0 agthelloworld = { agent = agtpython.exe; script =.py; category = SCRIPT; platform = HELLOWORLD; description = "Hello World Python Agent"; system = true; }Execute
loadplatformfrom the utils directory to load your connector file into Bravura Security Fabric .loadplatform.exe -a agthelloworld
Log into Bravura Security Fabric as an administrator and navigate to Manage the System -> Resources -> Target Systems and click Add new…
For the target type, select your "Hello World" Python agent:

Add an appropriate ID and Description. For example:
ID: MYWORLDROCKS
Description: My World Rocks
Click Change next to the Address field. Note the address attribute options match the
addressattrsPython definition in your agthelloworld.py file. View the file to get a better understanding of the power of exposing functionality to the target address configuration UI.def addressattrs(cinfo): agent.addAddressAttr("verbose", "Log extra information", "boolean", "false", False) agent.addAddressAttr("host", "Host name", "string", "", False) ...The matching address configuration might look something like this:
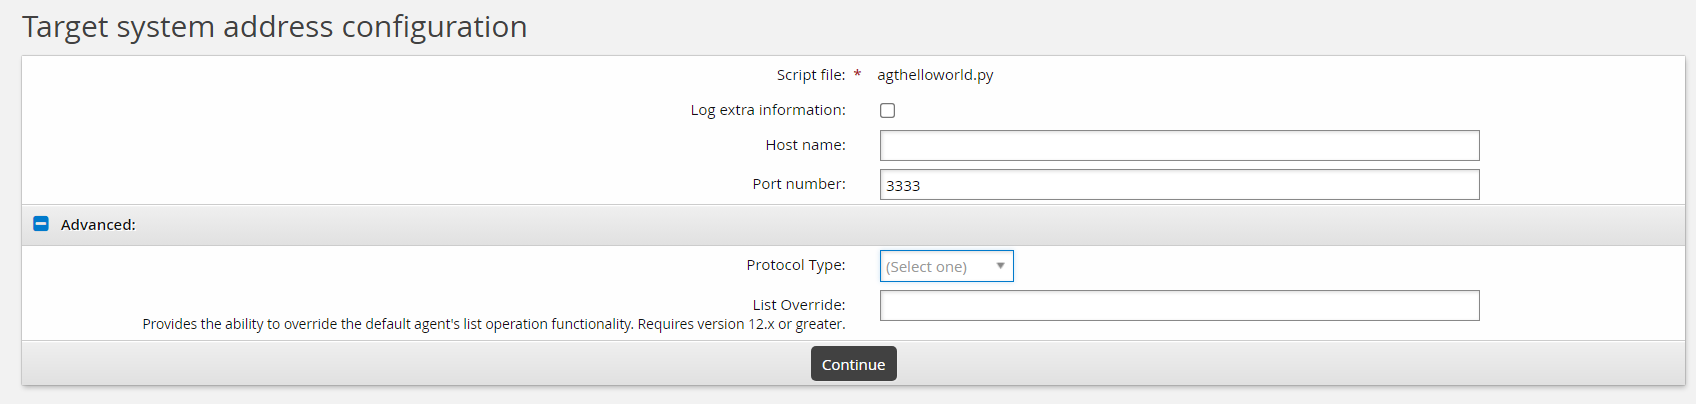
Since these options are for illustration purposes only, none of these options actually do anything. Click Continue.
Set Automatically manage groups to "All groups, approval required"
Set Groups whose membership will be listed to "Managed groups"
Click Add on the target main page.
On the credential page enter in placeholder credentials. Since this connector does not actually target any actual target end point, these credentials can be anything. For this example:
Administrator ID: placeholder
Password: North*1
Confirm password: North*1
Click Update.
Select the Test connection tab.
Click Test credentials .
Results should return success.
The Test connection tab executes the server info operation, which implicitly calls the connect operation first. This corresponds with both the
connectand theserverinfoPython definitions. In your sample navigate to these respective definitions for a better idea how these work. Keep in mind that these are samples and do not actually connect to any end target:def connect(cinfo): agentinput = cinfo['agentinput'] instance = agentinput['instance']['VALUE'][0] hostid = agentinput['hostid']['VALUE'][0] log.info("agent python with instance name [{0}] hostid [{1}]". format(instance, hostid))And
def serverinfo(cinfo):
  # The serverinfo operation must be defined and return ACSuccess
  # for a successful list (discovery) operation.
  opinput = cinfo['opinput']
  lastModifiedTime = ''
  if 'lastModifiedTime' in opinput:
    lastModifiedTime = opinput['lastModifiedTime']
  log.info("lastModifiedTime [{0}]".format(lastModifiedTime))
…
Click Test list.
Results should return the two users in the script.
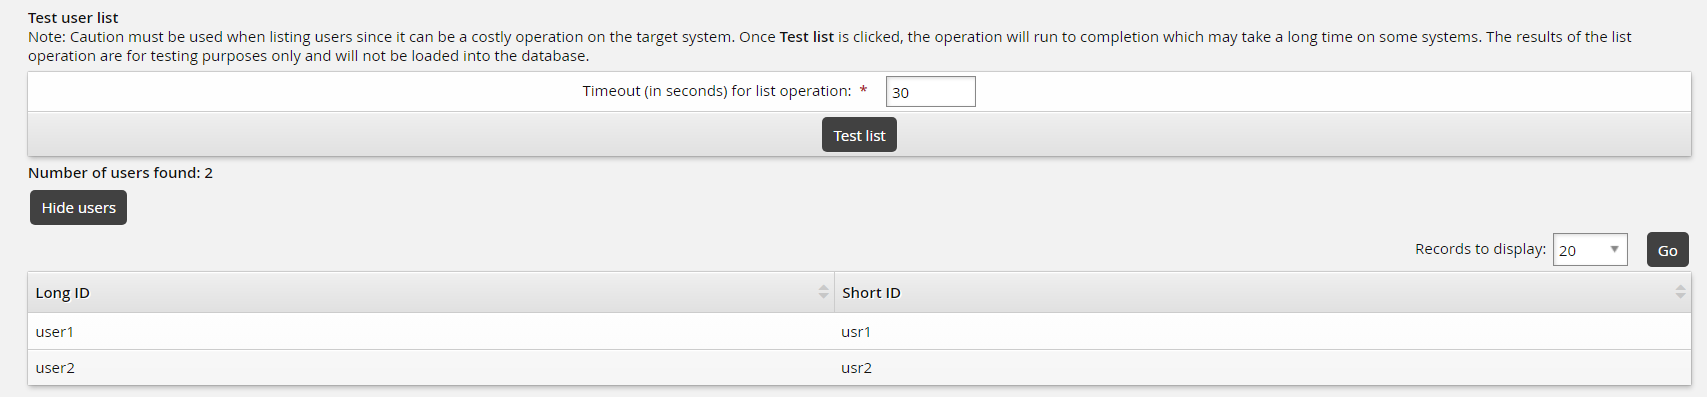
This corresponds with your
agthelloworld.pylistusersdefinition which adds two users:def listusers(cinfo, wantGroups, wantAttributes): log.info("listing users") listattributes = cinfo['listattributes'] log.info("agent python listattributes [{0}]".format(listattributes)) …Go back to the General tab and click Run discovery.
Click the Home icon and navigate to Manage Reports > Reports > Users > Accounts. Select your Target System ID "MYWORLDROCKS" and click Run.
You should see the two accounts from the target.
Navigate to Manage Reports > Reports > Roles and Groups > Groups. Select your Target System ID "MYWORLDROCKS" and click Run.
You should see the two groups from the target.
Demo/Lab: Targeting with SQLite example
In this lab we build a connector to integrate with SQLite.
Prerequisites
Bravura Security Fabric is installed.
Steps
Find the
agtsqlitedemo.pysample script andagtsqlitedemo.concontainer file in <instance>/samples folder.Copy
agtsqlitedemo.pyandagtsqlitedemo.coninto your <instance>/agent folder.With PyCharm or the editor of your choice, open your
agtsqlitedemo.pyscript.Note that the connector bootstraps an SQLite database schema and preloads accounts and groups. This is not typical connector behavior, but given that this is a demo connector, this simplifies the creation and loading of an SQLite database with useful test accounts and groups.
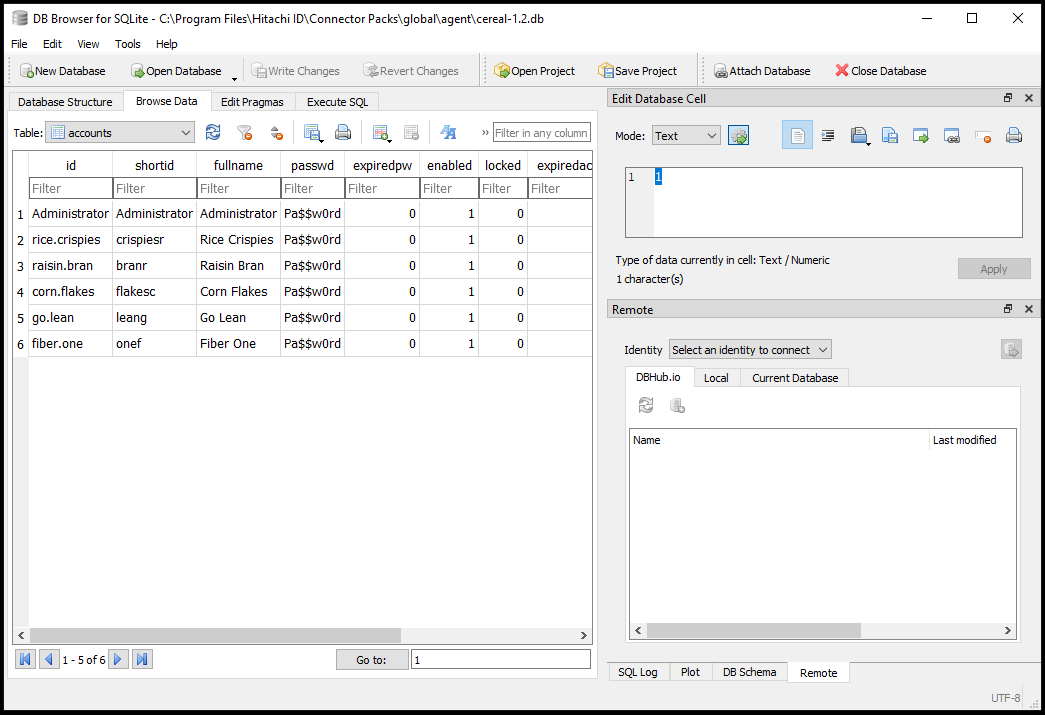
The name of the database file is cereal-1.2.db.
If the cereal-1.2.db database does not already exist, the sample script will create the database schema and preload hard coded values.
With PyCharm, you can turn on "structure view" to get a better understanding of what is in the Python file. To turn on this feature:
Go to View > Tool Windows and select "Structure".
The structure panel will appear in the bottom left corner of your screen.
Click the settings cog on the right top corner of the window to select a different location for the window.
Log into Bravura Security Fabric as an administrator and create a manually defined target with the following:
Type: Demo Python Agent using SQLite
ID: MYSQLITEDEMO
Description: My SQLite Demo
Click Change next to the Address field.
Notice that, at this time, this demo has no address attributes and, therefore, does not expose any target configuration options.
Click Continue.
Set Automatically manage groups to "All groups, approval required".
Set Groups whose membership will be listed is set to "Managed groups".
Click Add on the target main page.
On the page enter in credentials. This SQLite database authenticates to the accounts and passwords stored inside the cereal-1.2.db. For this demo, start with:
Administrator ID : placeholder
Password: North*1
Confirm password: North*1
Click Update.
Select the Test connection tab
Click Test credentials .
Results will fail. Look at the code first to try and determine why it failed before looking at the logs.
Navigate back to your
agtsqlitedemo.pyscript in PyCharm.Since the connect operation failed, go to the connect definition in the code to examine the settings.
Notice there are failure codes that will return for the line:
If account.get()
If account.passwd !=cinfo["adminpw"] or account.enabled !="1":
Check the logs:
Navigate to <Program Files path>\Bravura Security\Bravura Security Fabric\Logs\<instance> .
Open the
idmsuite.logcontained in that folder with Notepad and scroll to the bottom of the file for the most recent logs. Alternatively, you can also click on the Logs tab on the target configuration page.Look for entries with
agtpython.exeprocess running and find the lines forAttempting to connect to host [MYSQLITEDEMO]...You will see a line saying
Warning: Account.get - account id does not exist [placeholder]meaning that our connection is failing because the placeholder account we used as credentials does not exist.As hinted above, we need to find an account and password that cereal-1.2.db was initially bootstrapped with. Go to the top of the script and look for the database bootstrap code.
Note the following code:
c.execute('''CREATE TABLE accounts (id text, shortid text, fullname text, passwd
            text, expiredpw integer, enabled integer, locked integer, expiredacct integer, email
            text, department text)''')

...
  c.execute("INSERT INTO accounts VALUES ('Administrator','Administrator','Administrator','Pa$$w0rd',0,1,0,0,'Administrator@cereal.com','The
            Boss')")
It looks like there is an
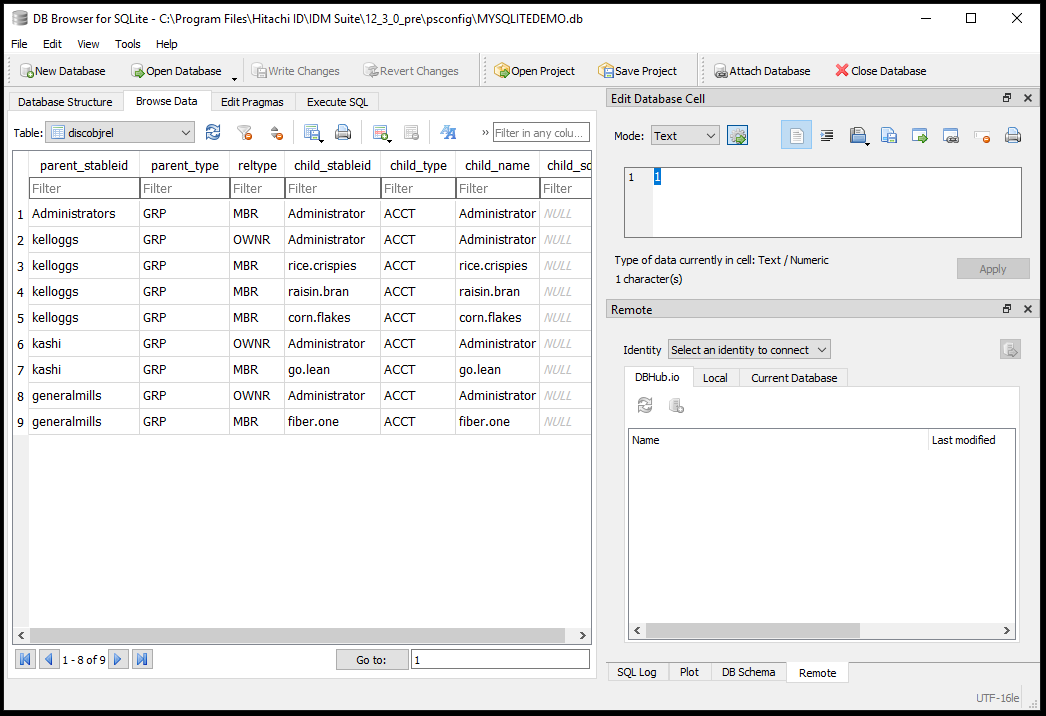
Administratoraccount with a password ofPa$$w0rdin the SQLite database.Verify the credentials by opening up cereal-1.2.db with SQLite Brower or a similar tool. This file is located in the <instance>\agent directory. To view the contents of that file :
Open the Windows start menu and click DB Browser (SQLite) program.
Click Open Database in the top toolbar.
Navigate to the <instance>\script directory.
Select the cereal-1.2.db file.
Click Open.
Click the Browse Data tab and in the Table: field select the "accounts" table. It should be something like the following:
To resolve this issue, navigate back to the credential page, delete the previous credentials and enter:
Administrator ID : Administrator
Password: Pa$$w0rd
Confirm password: Pa$$w0rd
Click Save.
Navigate back to the Test connection page and click the Test connection tab.
Click Test credentials .
The test should succeed.
Click Test list .
The test should return the six users from the script since it built the database the first time we ran it.
On your Bravura Security Fabric instance, navigate to Resources > Target Systems > Manually defined.
Click the checkbox for the MYSQLITEDEMO target.
Click Run discovery at the bottom of the target list.
Confirm the action by clicking Ok in the confirmation pop-up window.
Verify the accounts and groups listed using reports:
Click the Home icon and navigate to Manage Reports > Reports > Users > Accounts. Select your Target System ID and click Run.
Navigate to Manage Reports > Reports > Roles and Groups -> Groups. Select your Target System ID and click Run.
Demo/Lab: Working with connector list files
In this lab, we are going to look at the connector list files. The connector list files are stored in SQLite and it is often useful to be able to examine these list files during list operations to both validate data and troubleshoot listing issues.
The Python API provides callbacks to write to the connect list files. Even though you are not responsible for writing directly to the connector list files, to some extent, you are responsible for using the Python callbacks correctly. For example, it is important to understand the data you are consuming and how it is represented in list files.
Overview of primary keys and attributes
The primary keys of a connector are:
Stableid: the least immutable identifier that is ideally able to remain consistent across rename and move context operations.
Longid: the primary identifier used as the main actors on all operations: reset, unlock, enable, and so on.
Shortid: user friendly identifier used to logon and often used to associate to the user profile.
The stableid, longid and shortid all must uniquely identify an object. In other words, there cannot be duplicates across multiple objects per target.
Simplistic connectors
In many connectors the stableid, longid, and shortid can represent the same identifier. For example, when targeting UNIX, an account identifier, such as the UNIX "root" account, is the same for the stableid, longid and shortid. This does make these target types difficult to track context on rename operations, but this is generally not a limitation. Where this becomes important is when we are talking about cross targeting, as is the case with multitargeting Active Directory and Active Directory forested infrastructures.
Complex connectors
In the more complicated connectors, such as Active Directory (and sometimes ldap when using a more fully functional schema), the stableid represents a unique identifier (called an Object GUID) which never changes, even if an object is moved or renamed. In other words, the identifier is immutable. When an object is created a new unique Object GUID is issued and remains unchanged for the lifetime of the object. Active Directory also has the ability to delete an object which can then be revived/undeleted from a tombstone in which case, their Object GUID still remains unchanged.
The longid is used to act on objects during an operation. In the Active Directory scenario, the longid represents the Distinguished Name. This identifier can change, either by:
Arename operation by changing the object’s common name or,
By the move context operation where the object is moved to a different relative DN.
It is for this reason, the rename and move-context operations return the longid and shortid, to indicate to Bravura Security Fabric that the values for these keys have changed. This in turn updates the values within the product database. In all other operations, the longid remains unchanged.
Finally, the shortid represents a friendly name that the user can type quickly and is easy to remember. This identifier is also used during association with the profile user id. In Active Directory this object is represented by the SAM Account Name (otherwise simply known as the logon name.)
Connector performance during listing
Selective attribute listing and incremental listing are another layer of complexity in writing a connector. Generally, these are used to enhance performance. These can be exposed in your custom connector but generally, they are only warranted if your connector’s performance is a concern. Contact Bravura Security support for an explanation if this is an improving connector performance.
Connector list file schema
The connector list file contains the following tables:
Discmeta - Stores meta information about the list operation in general
Discobj - Stores objects that were discovered
Discobjattr - Stores attribute information on the objects
Discobjrel - Stored relationship information on between the objects
Demo/Lab start
Prerequisites
Use the target configured in Demo/Lab: Targeting with SQLite example .
Steps
Open the Windows start menu and find the DB Browser (SQLite) program.
Right click on the DB Browser (SQLite) program and select More > Run as administrator.
Click Yes when prompted by the "Do you want to allow this app...changes to your device" warning.
Click Open Database in the top toolbar.
Navigate to the <instance>\psconfig directory.
Select the
MYSQLITEDEMO.dbfile. This was created during the previous lab wheniddiscoverwas executed.Click Open.
Open the discmeta table. Click the Browse Data tab and in the Table field select the "discmeta" table.
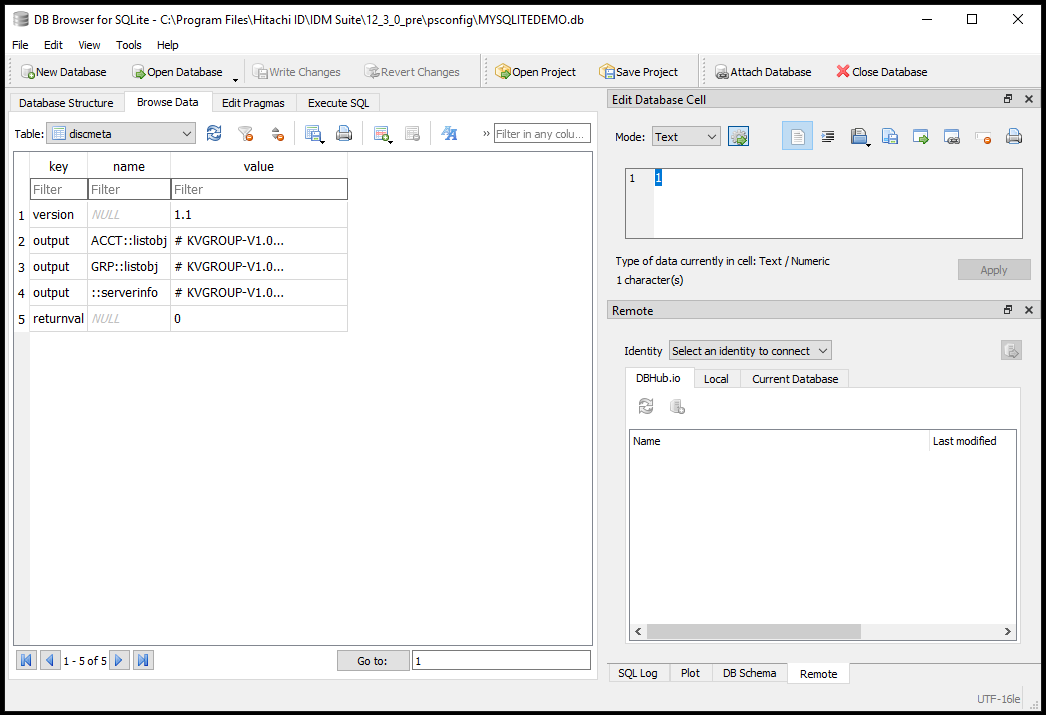
As you can see, the discmeta table shows a quick summary of the operations run, the output KVG of the run and the return value from the list operation execution. This is useful to know if the list operation failed and why it failed.
Open the discobj table. Click the Browse Data tab and in the Table field select the "discobj" table
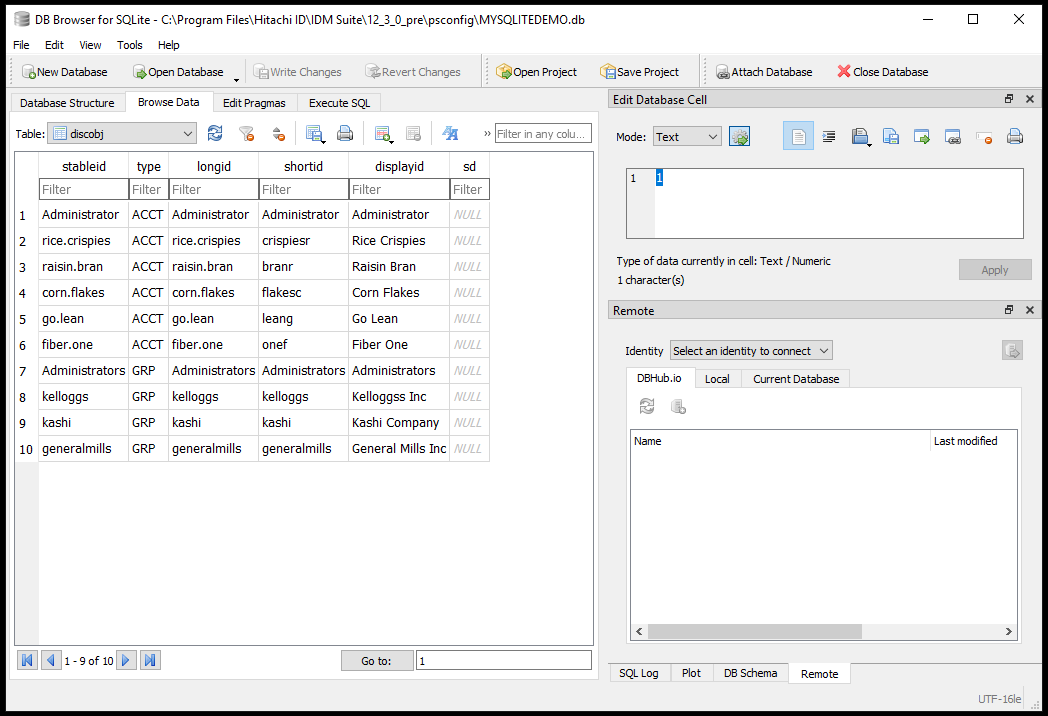
The information stored in the discobj table contains all the primary keys. As you can see, this connector is somewhat simple where the stableid and longid are using the same identifier and the shortid (generally the login identifier) is different. Note the type field and how it distinguishes between object types and also note that both accounts and groups are stored in the same table. If you listed computers, they would also coexist here.
Open
agtsqlitedemo.pyand navigate to the listusers Python definition.groups = [] attrs = {GAttrFullName: account.fullname} if wantAttributes: account.listAttributes(attrs) agent.addAccount( account.id, account.id, account.shortid, attrs, groups)When execution of the agent.addAccount is done, very much like the connector list file, you can see that the stableid and longid pass in the account.id and the shortid passes in account.shortid. Notice that we check the wantAttributes flag, which is passed in by the product by the "List account attributes" checkbox on the target configuration page. In other words, the attributes only get added to the agent.addAccount callback if attributes are desired.
Also notice that we pass in the global attribute GAttrFullName with account.fullname. This is the displayid in the connector list file above. But it’s also the "@fulName" global attribute in the discobjattr table that we will discuss next.
Open the discobjattr table. Click the Browse Data tab and in the Table field select the "discobjattr" table
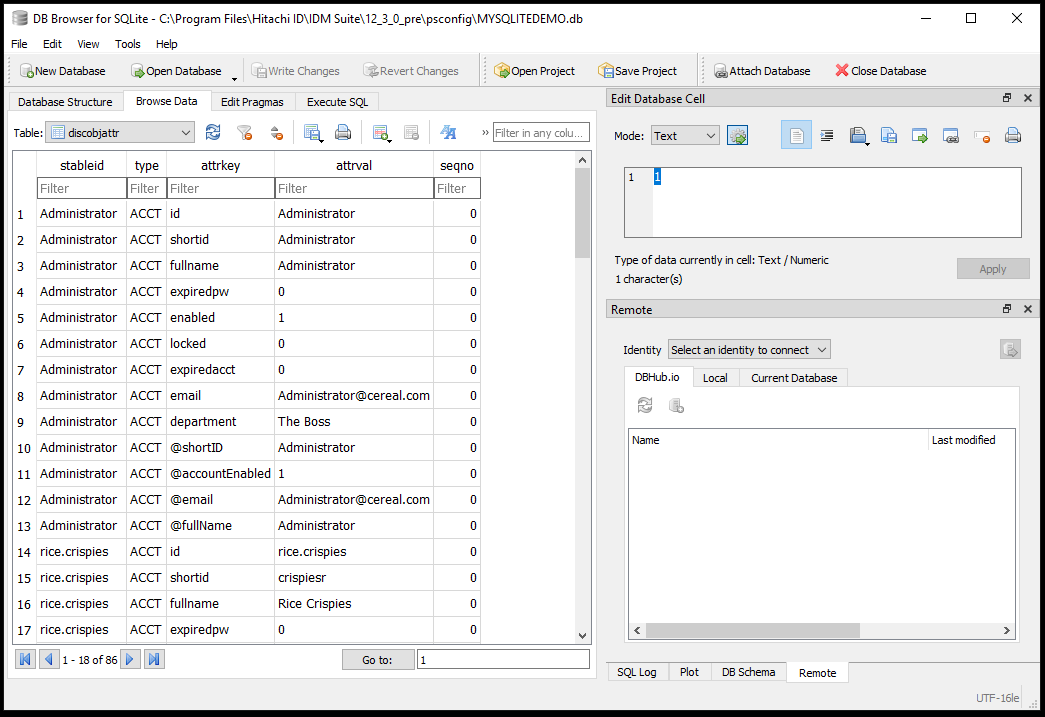
This shows you the attributes for all the objects. The id, shortid, expiredpw, enabled, etc are all attributes we pass into a dictionary. Looking at the listAttributes Python definition, in the
agtsqlitedemo.py, we see the following code:def listAttributes(self, attrs): # list attributes attrs.update({"id": self.id}) attrs.update({"shortid": self.shortid}) attrs.update({"fullname": self.fullname}) attrs.update({"expiredpw": self.expiredpw}) attrs.update({"enabled": self.enabled}) attrs.update({"locked": self.locked}) attrs.update({"expiredacct": self.expiredacct}) if self.department is not None: attrs.update({"email": self.email}) if self.department is not None: attrs.update({"department": self.department}) # list pseudo attributes attrs.update({GAttrShortID: self.shortid}) attrs.update({GAttrFullName: self.fullname}) attrs.update({GAttrAccountEnabled: self.enabled}) if self.email is not None: attrs.update({GAttrEmail: self.email}) return ACSuccessGlobal attributes are prefixed with GAttr and provide consistent attributes names for the product to utilize. For example, the GAttrEmail expands to "@email" in the connector list file and this can be used by the expiry service in conjunction with the "@passwordExpiration" (not listed here.)
Open the discobjrel table. Click the Browse Data tab and in the Table field select the "discobjrel" table
The discobjrel tables shows the relationships between objects. We need the parent object stableid and its type with its corresponding relationship type with the child stableid and its type.
There are two types of relationships: members and owners. This fits within the same paradigm with Active Directory where owners can generally manage properties of groups.
Take a look at the listgroups definition in
agtsqldemo.pyto see how the agent.addGroup callback function works.groupid = group.id shortid = group.shortid attrs = { GAttrDescription: group.desc, GAttrSecurity: 'true', 'grpattr0': group.grpattr0} owners = {} members = {} for manager in group.managers: account = Account(manager) if account.get(): return ACUnknownError owners.update({account.id: {}}) if wantMembers: for member in group.members: account = Account(member) if account.get(): return ACUnknownError members.update({account.id: {}}) agent.addGroup(groupid, shortid, shortid, attrs, owners, members)Like the agent.addAccount callback, the agent.addGroup assigns the stableid, longid and shortid, as well as, attributes, but there is also an owners and members dictionary that assigned the relationships. And memberships are only ever assigned if the wantMembers flag is true. This gets passed in by the product if groups are to be managed. This is exposed in the "Automatically managed groups" configuration option on the target configuration page.
Useful SQL Queries
The following are some useful SQL Queries when working with connector list db files:
Query objects by shortid:
SELECT * FROM discobj WHERE shortid = ‘<shortid>’
Query attributes for object based on stableid:
SELECT * FROM discobjattr WHERE type = '<ACCT|GRP>’ and stableid = '<stableid>';
Query relationships for object based on stableid:
SELECT * FROM discobjrel WHERE type = '<ACCT|GRP>’ and stableid = '<stableid>';
Demo/Lab: Basic account operations
Prerequisites
Use the target configured in Demo/Lab: Targeting with SQLite example .
Steps
Open
agtsqlitedemo.pyand navigate to the verify Python definition.def verify(cinfo): account = Account(cinfo['acctid']) if account.get(): return ACVerifyFailed if account.passwd != cinfo['oldpw'] or account.enabled != "1": return ACVerifyFailed return ACSuccess
Verify is a simple use case where an account is authenticated against the old password "oldpw". The process of authentication is generally done for us by a target’s API which should check if the accounts password expiry, enabledness, lock status and potentially various other criteria. In our simple use case, we return ACSuccess if the verify operation was successful and ACVerifyFailed otherwise.
Navigate to the reset Python definition.
def reset(cinfo):
 account = Account(cinfo['acctid'])
 account.passwd = cinfo['newpw']
 account.expiredpw = 0
 account.locked = 0
 return account.set()
Reset is also a simple use case where an account password is reset with the new password "newpw". As mentioned above, the reset process is generally done for us by the target’s API which should ensure that the password expire, enabledness, lock status and potentially any other criteria is also reset. Although not clear with the above code, if you navigate to the account class "set" definition, you will notice that this example returns ACSuccess if the reset operation was successful, ACInvalidUser if the user does not exist, and ACUnknownError for other failures. If ACUnknownError is used, it is good practice to return an informative error to the caller using agent.error().
Navigate to the disable Python definition.
def disable(cinfo):
  account = Account(cinfo['acctid'])
  account.enabled = 0
  return account.set()
The enable, disable, unlock, expireacct, and expirepw set the account and password disposition attributes and as such, simply set the account or password to a particular status. They return ACSuccess on success, ACInvalidUser if the user does not exist and ACUnknownError otherwise.
Navigate to the ispwexpired Python definition.
def ispwexpired(cinfo):
  account = Account(cinfo['acctid'])
  rc = account.get()
  if rc:
    return rc
  agent.isPwExpired(int(account.expiredpw))
  return ACSuccess
The isenabled, islocked, isacctexpired, and ispwexpired get the account and password disposition attributes. Each operation has its own callback to inform the caller of the particular account or password disposition status. These are respectively, agent.isEnabled, agent.isLocked, agent.isAcctExpired and agent.isPwExpired.
Navigate to the create Python definition.
def create(cinfo):
  account = Account(cinfo['acctid'])
  rc = account.get()
  if not rc:
    agent.stableId(account.id)
    agent.longId(account.id)
    agent.shortId(account.shortid)
    return ACObjectAlreadyExists
  account.shortid = cinfo['attributes']['shortid']['VALUE'][0]
  account.fullname = cinfo['attributes']['fullname']['VALUE'][0]
  account.passwd = cinfo['newpw']
  account.email = cinfo['attributes']['email']['VALUE'][0]
  account.department = cinfo['attributes']['department']['VALUE'][0]
  rc = account.create()
  if rc:
    return rc
  rc = account.get()
  if rc:
    return rc
  attrs = {}
  account.listAttributes(attrs)
  for key, value in attrs.items():
    agent.addAccountAttr(key, value)
  agent.stableId(account.id)
  agent.longId(account.id)
  agent.shortId(account.shortid)
  return ACSuccess
Both the create and update operations are more intricate to develop. Testing the create and update operations requires the configuration of target attributes that are passed into the connector. In the example above, the create operation gets the shortid, fullname, email and department values passed from the caller. This information is contained in the attribute dictionary. These in turn are used to create or update the account attributes on the target.
In more refined connector integrations, the target attributes configured in the product can also define ACTION and SEQUENCE. The ACTION modifier provides the ability to IGNORE, VALUE, COPY or REPLACE a value on create or update. The SEQUENCE modifier provides the ability to order or prioritize the setting and/or updating of attributes during create and update. Generally, simplicity in connector development/integration is a better policy – particularly with respect to custom connectors. Using these attribute modifiers exposes attribute configuration from the UI, at the cost of added connector complexity.
It is important to note on successful creation or update of objects, the primary keys and the modified attribute values must be returned to Bravura Security Fabric to maintain attribute synchronization with the target. The agent.stableId, agent.longId, agent.shortId and agent.addAccountAttr facilitate this.
The create operation returns ACSuccess on success, ACObjectAlreadyExists if the object already exists and ACUnknownError otherwise. And the update operation returns ACSuccess on success, ACInvalidUser if the user does not exist and ACUnknownError otherwise.
Navigate to the delete Python definition.
def delete(cinfo):
  account = Account(cinfo['acctid'])
  return account.delete()
The delete, rename and movecontext operations are the last remaining integrations to flush out the account operations for a connector. The delete is fairly self explanatory – it deletes the account object. The rename operation can either rename the shortid or the longid but generally it renames the shortid and if the shortid is a component of the longid, the longid is also renamed. The movecontext operation moves an object from one context to another. The context in most use cases is a relative distinguished name. Because most connectors do not have a context that objects can be contained within, the movecontext in most connectors is unimplemented and not supported.
Because both the rename and movecontext operation potentially act on the shortid and longid, both the agent.longId and agent.shortId callbacks must be called to maintain synchronization with the target.
All these operations return ACSuccess on success, ACInvalidUser if the user does not exist and ACUnknownError otherwise.
Add an operation retry Python definition.
def operationretry(cinfo):
# DOC - This is an example of how retrydata can be used to retry an
# an operation using idtm. In this sample, the retrydata initial state

# is set to 3 and each subsequent run, retrydata is decremented until zero
# where success is returned.
    rc = ACTryAgainLater
    opinput = cinfo['opinput']
    retrydata = ''
    if 'retrydata' in opinput:
        retrydata = opinput['retrydata']['VALUE'][0]
    if not retrydata:
        agent.retryData("3")
        agent.retryTime(300)
        agent.error('WAITING ON AGENT)
        log.debug('operationretry initial state')
    elif retrydata == '0':
        rc = ACSuccess
        log.debug('operationretry completed')
    else:
        retrydataint = int(retrydata)
        retrydataint -= 1
        agent.retryData(str(retrydataint))
        agent.retryTime(300)
        agent.error('WAITING ON AGENT)
        log.debug('operationretry set to {}'.format(retrydataint))
    return rc
Navigate to the create Python definition.
Add the operationretry logic between self.log and "columnclause = ..." such as the following:
      self.log()
      rc = operationretry(cinfo)
      if rc != ACSuccess:
          return rc
      columnclause = "id,shortid,fullname,passwd,expiredpw,enabled,locked,expiredacct"
      valueclause = "'{0}','{1}','{2}','{3}','0','1','0','0'".format(self.id, self.shortid,
          self.fullname, self.passwd)
This will add a fake retry look of three attempts for the create operation. The Transaction Monitor Service (
idtm) is responsible for detecting ACTryAgainLater and retrying until "operationretry" return ACSuccess. When creating the target attributes and profile attributes, the id, shortid, fullname and passwd attributes are mandatory.When creating a new user for the agtsqlitedemo target, the logs will indicate a countdown of three retry attempts with:
operationretry initial state
and then:
operationretry set to 2
operationretry set to 1
and finally:
operationretry completed
The Transaction Monitor Service (
idtm) will also show a "WAITING ON AGENT" message for the end user.
Demo/Lab: Pstee and replaying operations on connectors
In this lab we learn about how to "pstee" a connector and how to replay the resulting operation from a pstee file on that connector. This is useful when incrementally developing and testing your changes without having to reproduce the often complicated steps in the UI. Instead, the intent is to only do the complicated steps once to produce a pstee input kvgroup file and use the resulting file to reproduce the execution of your connector manually on the command line.
If state changes during the execution of a connector, it is often necessary to use multiple input kvg files to transition an object back to its original state. Some examples could include a test case like testing a reset operation, followed by a verify operation to ensure the password change happened correctly, then another reset operation to ensure that the accounts password is changed back to something different from the original reset operation.
With an understanding of the format of these files, you may also edit their contents and use them to test different operations or differing behavior. These files can be stored and replayed for a full day, at which point the license contained within expires and you must reproduce the steps again to produce another input kvg file.
When implementing the create and update operation, you will find input kvgroup files particularly useful. Generally, the steps necessary to execute the create and update operation are complex. It is often easier to prototype the target attributes and their values and sequence numbers using an input kvgroup file, then use these to configure the product target attributes and profile attributes that are set in workflow.
Prerequisites
Use the target configured in Demo/Lab: Targeting with SQLite example .
Steps
Open the
agtsqlitedemo.pyscript using an editor of your choice.Break the SQLite connector script by typing broken into the listusers function so the code appears as:
def listusers(cinfo, wantGroups, wantAttributes):
conn=sqliteJ.connect(dbcase)
c = conn.cursor()
c.execute(’SELECT is FROM accountsbroken’)
Save the file.
Rotate the logs in the command prompt:
In a command prompt being run "as administrator", navigate to <Program Files path>\Bravura Security\Bravura Security Fabric\<instance>\ directory.
Run command:
instance.bat
Run command:
service\idmlogsvc.exe -rotatelog
Run Auto discovery in the Bravura Security Fabric UI
Look at the <Program Files path>\Bravura Security\Bravura Security Fabric\Logs\<instance> directory; there will be several new files for
-input.logand-output.log.Open
idmsuite.logfile.Search the logs for an error message stating:
Error: Error: A Python Exception Occurred of Type [OperationalError] Message: [no such table: accountsbroken]
Use the input KVGroup file to speed up the debugging process.
Fix the SQLite connector script by removing the "broken" from the listusers function so the code appears as:
def listusers(cinfo, wantGroups, wantAttributes):
 conn=sqliteJ.connect(dbcase)
 c = conn.cursor()
 c.execute(’SELECT is FROM accounts’)
Save the file.
Copy the contents of the latest
-input.logfileObtain an Instance Prompt (see Instance Prompt )
Navigate to the <instance>\agent\ directory and run command:
agtpython
Paste the contents of the
-intput.log file.
Notice that the listusers function now succeeds and returns the list of six users since we have fixed the agtsqlitedemo.py script.
Testing and Troubleshooting
Here are some useful procedures for testing and troubleshooting connectors.
Instance Prompt
When running commands that include Python that ties in with Bravura Security products, an instance command prompt is needed.
To open a new instance of the command prompt, search cmd and select Bravura Security Fabric Command Prompt.
Notice that now your instance name appears at the start of your command prompt line.
Rotate Logs
When testing to see if a script or feature is working correctly in Bravura Security Fabric you may find it useful to clear out the logs so that you can trigger the event you are troubleshooting and see what processes are succeeding and failing. To clear these logs, we complete the following command in an instance prompt:
Obtain an Instance Prompt .
Run command:
service\idmlogsvc.exe -rotatelog
In Windows File explorer, when you navigate to <Program Files path>\Bravura Security\Bravura Security Fabric\Logs\<instance> you will notice that the idmsuite.log file has been cleared. Now you can run the event you are trying to troubleshoot and see the resulting logs more clearly.
PerfConnector logging
Each time an operation is executed in an agent, a PerfConnector log line is issued. These are often useful to track complicated workflows. In the idmsuite logs, look for something like the following log line:
Perf: PerfConnector. Address: {[server=cpcpk1ci.cpggpc.ca;system=00;client=100;version=7.5;resetmethod=loginreset;usecuagroups=false;nocache=true;gettableswork=true;unlocktype=islocked;listuserselectionrange=[LOGONDATA|UFLAG|I|NE|32|;LOGONDATA|USTYP|I|EQ|A|;];]}
      | AdminID: {ZCHITACHIP} | Duration: {135} | Event: {connector-operation} | Message: {} | Operation: {listgroups} | Result: {0} | SysID: {} | TargetID:
      {SAP_PK1_100}
This shows the address line, the operation, the message, and the result code from the operation.
Increase debugging (psdebug)
There may be times where your script/connector/task is failing, but the logs are not verbose enough to tell you where. In this case we can increase the debugging level by running the following command in an instance prompt:
Obtain an Instance Prompt .
Run command:
util\psdebug -prog agtpython -level 5
This will give you logs with more detail about each process that runs with Python so that you can look deeper into where the issue lies. We use agtpython as the program because if you look within the <instance>/agent directory, there are many .exe programs contained within that folder and agtpython is the connector program that runs Python scripts for "Python script" target types. The reason we define the program instead of increasing the level for everything is because if you increase debugging for all programs and processes to level 5, your log file will be very large. If allowed to run at level 5 for a long period of time, this will fill up your log files and memory and start to impact the usability of Bravura Security Fabric .
Log agent communication (pstee)
This method was demonstrated in Demo/Lab: Pstee and replaying operations on connectors . If the idmsuite logs are not giving you enough information, it is often useful to enable pstee to examine the communication between Bravura Security Fabric and the connector.
For example, when you are testing a target connection by pressing the "Test credentials" button in the Test connection tab of the target configuration page (or any other UI button in the product that interacts with the connector), Bravura Security Fabric is calling out to the connector. It is important to note, once you capture that input message, you can keep using that input message in a command prompt instead of having to repeat complicated reproduction steps in the UI.
This communication both to the connector and from the connector is in the format of a KVGroup. KVGroup format is a proprietary Bravura Security format which is somewhat similar to JSON.
This communication is done using stdin and stdout via command pipes. What this means is when a connector is called, an input stream (also known as an input KVGroup) is sent to the connector. The connector executes the operations in the input stream and sends an output stream (also known as an output KVGroup). These can be pasted in the command prompt after invoking an agent, or they can be streamed to the agent as files using a redirector or a pipe. For example, a redirector execution of a connector might look like this:
agtpython < input.kvg
And a pipe execution might look like this:
type input.kvg | agtpython
The following example outlines the process of pasting the input KVGroup into an agent’s stream:
Click the Windows Start menu and click the Run app/program.
Type
regeditand click Ok.In the registry, navigate to Computer\HKLM\SOFTWARE\Bravura Security\Bravura Security Fabric\<instance>\
Right click in the blank space of the <instance> contents and click "New"/"DWORD (32-bit) Value" and provide the following values:
Value name: agtpython-tee
Value data: 1
Base: Hexadecimal
Run Test Credentials from the Bravura Security Fabric UI on the target
In Windows File explorer navigate to the <Program Files path>\Bravura Security\Bravura Security Fabric\Logs\<instance> directory and open the log file that ends with -input.log
Keep in mind to keep these files secure since they do contain encrypted values and theoretically could be decrypted by something. This file has everything we need to interact with the connector and replay the Test Connection operation.
In File explorer navigate to the <Program Files path>\Bravura Security\Bravura Security Fabric\Logs\<instance> directory and open the log file that ends with -output.log. This tells you what happened from the connector side.
In this case the serverinfo operation returned a value of ‘0’. If the connector failed during your test you might see the error message and a non zero return value.
On the Bravura Security Fabric UI click the Test List option. You should notice two more files appear in the \Logs directory.
Inspect these input and output files.
Using the information from the input and output files, we can now:
Obtain an Instance Prompt .
Enter into the <instance>/agent directory.
Run command:
agtpython
Notice that nothing happens and the prompt is waiting for more input.
Open your most recent
-input.logfile from running the test list.Copy all the contents from the
-input.logand paste it into the command prompt.It will generate the output directly into the command prompt and will generate another set of input/output files in the Logs/<instance> directory.
You may run a process and first think that files have not been added to the \Logs\<instance>\ folder. In this situation, ensure the folder is refreshed. Similarly, when inspecting the
idmsuite.logfile with an editor like notepad, close and open the file again to get the most up-to-date information.