Pre-defined Requests
The Bravura Security Fabric pre-defined request facility provides a high degree of flexibility, allowing access change requests that involve operations on technical resources. Requesters may not understand the technical details, but can express the request in business terms. For example, users may understand they need to hire a contractor, schedule employee termination, or move an employee to a new department, but may not understand the technical requirements of adding accounts on a target system, setting an account termination date, or managing group membership.
Bravura Security Fabric allows you to configure pre-defined requests that:
Define common requests in terms that are familiar to users.
Reduce the number and complexity of steps required to make a request.
You must be a product administrator with the right to configure workflow setup to be able to configure pre-defined requests.
Note
The following sections deal with the creation and configuration of pre-defined requests. Bravura Workforce Pattern includes components that create and configure their own pre-defined requests. Associated configuration (policy rules, etc) for these PDRs is detailed in Bravura Workforce Pattern.
You can view information about each request via Manage the system > Workflow > Pre-defined requests. Information regarding a pre-defined request is defined in six tabs:
General | Contains the pre-defined request ID, description, help URL, status of the pre-defined request, where it can be accessed from, approval requirement, intended recipients, and instructions. |
Operations | Defines which operations will be performed on which resources when the pre-defined request is approved. Operations can be performed on managed groups, existing accounts, new accounts, roles, and profiles. You can also define custom operations on other objects. |
Attributes | Defines which attribute groups are included as part of the request. This can include profile and request attributes or resource attributes. |
Access control | Defines criteria by which a request is available to a user. |
Order and display | Defines sections and display of the user interface. |
Summary | Contains a summary of the pre-defined request which includes the general information and lists the operations, attribute groups and default attributes that are configured in the other tabs. |
Pre-defined request status
When creating a pre-defined request, you must set its status. For a pre-defined request to be used it must be enabled. An enabled pre-defined request can be deprecated once it is used.
Submitting pre-defined requests during a certification campaign
Reviewers’ requests to modify or revoke entitlements during a certification campaign are submitted via pre-defined requests. Administrators can add customized pre-defined requests when initiating certification campaigns.
See Access certification for more information.
Submitting pre-defined requests using report output
Users with the ”Manage reports” administrative right can feed the output of a report back to Bravura Security Fabric ’s workflow engine via a pre-defined request.
After running a report, users can select a pre-defined request to submit, and map report columns to profile and request attributes. The request can be submitted immediately or scheduled along with the report. Segments of the report can be submitted to pre-defined requests with iterative submissions.
Built-in pre-defined requests
The following is a list of some example built-in pre-defined requests included in the Bravura Security Fabric :
_AUTORES_ | Used by the |
_CERT_ACCOUNT_GROUP_REMEDIATION_ | Default remediation request for revoking account group memberships in certification. |
_CERT_ACCOUNT_REMEDIATION_ | Default remediation request for revoking accounts in certification. |
_CERT_ATTR_REMEDIATION_ | Default remediation request for updating profile attributes in certification. |
_CERT_CHILD_GROUP_REMEDIATION_ | Default remediation request for revoking child group memberships in certification. |
_CERT_ROLE_REMEDIATION_ | Default remediation request for revoking a role assignment in certification. |
_CERT_TRANSFER_REMEDIATION_ | Default remediation request for transferring a user profile in certification. |
_CERT_USER_REMEDIATION_ | Default remediation request for revoking a user profile in certification. |
_COMPLETE_ATTRS_ | Allows users to supply required profile and request attribute values when enforced enrollment is enabled for this task. |
_DISABLE_ACCOUNTS_ | Allows help desk users to disable other users’ accounts. The requester must be a member of the _GLOBAL_HELP_DESK_ user class and the GLOBAL_HELP_DESK rules must include the ”Disable account” privilege. |
_ENABLE_ACCOUNTS_ | Allows help desk users to enable other users’ accounts. The requester must be a member of the _GLOBAL_HELP_DESK_ user class and the GLOBAL_HELP_DESK rules must include the ”Enable account” privilege. |
_GROUP_ADD_MEMBERS_ | Allows group owners to add accounts and child groups as members to multiple groups on target systems, using the Groups app. |
_GROUP_ADD_OWNERS_ | Allows group owners to add owners to multiple groups on target systems, using the Groups app. |
_GROUP_ADD_PARENTGROUPS_ | Allows group owners to add parent groups to multiple groups on target systems, using the Groups app. |
_GROUP_CREATE_ | Allows users who belong to the _GROUP_CREATE_USERS_ user class to create a group on a target system, using the Groups app. |
_GROUP_DELETE_ | Allows group owners to delete a group on a target system, using the Groups app. |
_GROUP_DELETE_MEMBERS | Allows group owners to delete members from multiple groups, using the Groups app. |
_GROUP_DELETE_OWNERS | Allows group owners to delete owners from a multiple groups, using the Groups app. |
_GROUP_DELETE_PARENTGROUPS | Allows group owners to delete parent groups from multiple groups, using the Groups app . |
_GROUP_UPDATE_ATTRS | Allows group owners to update attributes on one or more groups, using the Groups app . |
_GROUP_UPDATE_MEMBERS | Allows group owners to add or remove members from a group, using the Groups app . |
_GROUP_UPDATE_OWNERS | Allows group owners to add or remove owners from a group, using the Groups app. |
_GROUP_UPDATE_PARENTGROUPS | Allows group owners to add or remove parent groups from a group, using the Groups app . |
_IDTRACK_ | Used by the |
_RESOLVE_ENFORCEMENT_VIOLATIONS_ | This pre-defined request is used for |
_RESOLVE_ROLE_DEFICITS_ | Allows users to add missing role entitlements. |
_RESOLVE_SOD_VIOLATIONS_ | Allows users to resolve SoD rules violations. |
_UPDATE_ACCOUNTS_ | Allows users to request to add or delete accounts from their profile or other users’ profiles, when the requester has the ”Create account” permission and a template account exists. |
_UPDATE_ATTRS_ | Allows users to update profile information for themselves or others, when the requester has the ”Update profile” permission. |
_UPDATE_GROUPS_ | Allows users to add or revoke group memberships for themselves or others, when the requester has the ”Manage group memberships” permission and groups are managed. |
_UPDATE_ROLES_ | Allows users to add or remove roles from their profiles or other users’ profiles, when the requester has the ”Add role” permission and a role exists. |
_USER_ADD_GROUPS_ | Allows users to join groups using the Groups app. |
_USER_DELETE_GROUPS_ | Allows users to leave groups using the Groups app. |
Getting started
Requirements
Before you can create a pre-defined request, you need to set up:
If your license includes Bravura Identity, you can also set up:
Planning
The way you configure the pre-defined request depends on whether it will be submitted from the View and update profile (IDR) module, from report output, or from certification. Bravura Security recommends that you create separate pre-defined requests to be used specifically with reports or with certification, because they have different configuration requirements.
Before creating your pre-defined requests determine:
Who requires permission to create pre-defined requests?
For each pre-defined request, who should be able to access and/or edit that request? For example, if it is a request that will be available in reports, the user will also need permission to run reports.
How will you manage those permissions? For example, will you have a group on Active Directory that is attached to a user class, or will you explicitly attach accounts to a user class?
Which requests do you want to run from the View and update profile (IDR) module? Bravura Security recommends that you do not make these requests available to reports or certification.
Which requests do you want to run from reports? Only these pre-defined requests should be made available to reports by enabling the Accessible from report option.
Which requests do you want to run from certification? Only these pre-defined requests should be made available to certification by enabling the Accessible from certification option.
Best practice
Create pre-defined requests which are only used for reports, a separate set to be used for certification, and a separate set to be used from the View and update profile (IDR) module.
Use the principle of least privilege; only provide users with privileges that are essential for them to do their work.
When using report output to submit requests, do a trial run with a subset of data before using all of the records.
Navigation steps
You use the Pre-defined request information page to configure general information, and to access additional configuration settings. To configure pre-defined requests:
Click Manage the system > Workflow > Pre-defined requests .
Create or select the request you want to define.
You cannot modify a deprecated pre-defined request. You must restore it first.
Warning
Changes to a pre-defined request that has been scheduled to run in a report can cause serious problems. Editing the pre-defined request will change its composition and may invalidate the attribute mappings. There is also the possibility that modifying the pre-defined request could change the report to pre-defined request’s intended result.
Bravura Security Fabric will warn you if the request is scheduled to run in a report; however, you can still edit the pre-defined request. Remember to thoroughly test your changes.
Examples
This section includes steps through some typical examples for pre-defined requests.
Request a group membership
This example demonstrates how to add a pre-defined request to allow users to easily request membership to a limited set of groups. It assumes you have set up a target system and managed groups .
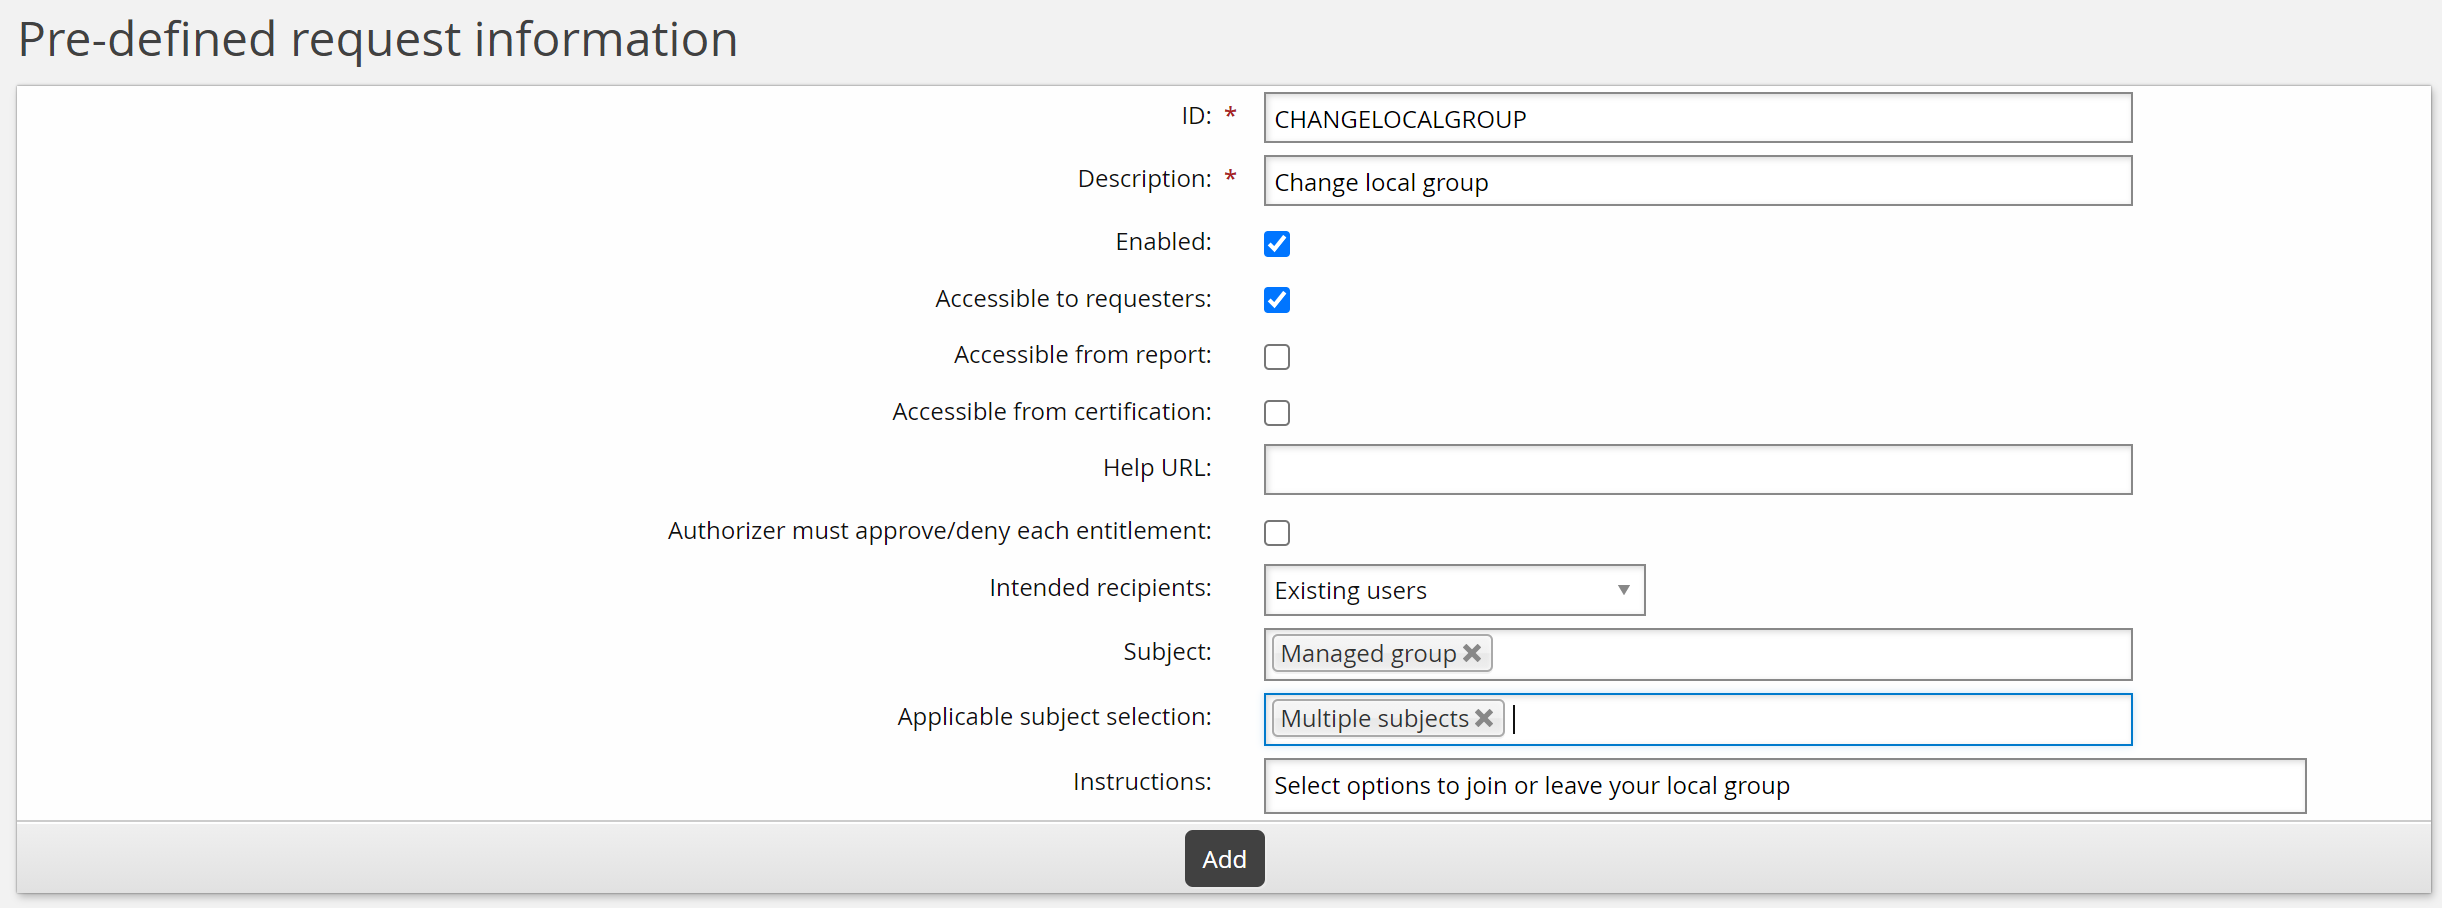
Click Manage the system > Workflow > Pre-defined requests and add a new request with the following general settings:
ID CHANGELOCALGROUP
Description Change local group
Enabled Selected
Intended recipients Existing users
Instructions Select options to join or leave your local group.
Click Add.
You can now define operations and other parameters.
For this example, the request is to assign or revoke group memberships:
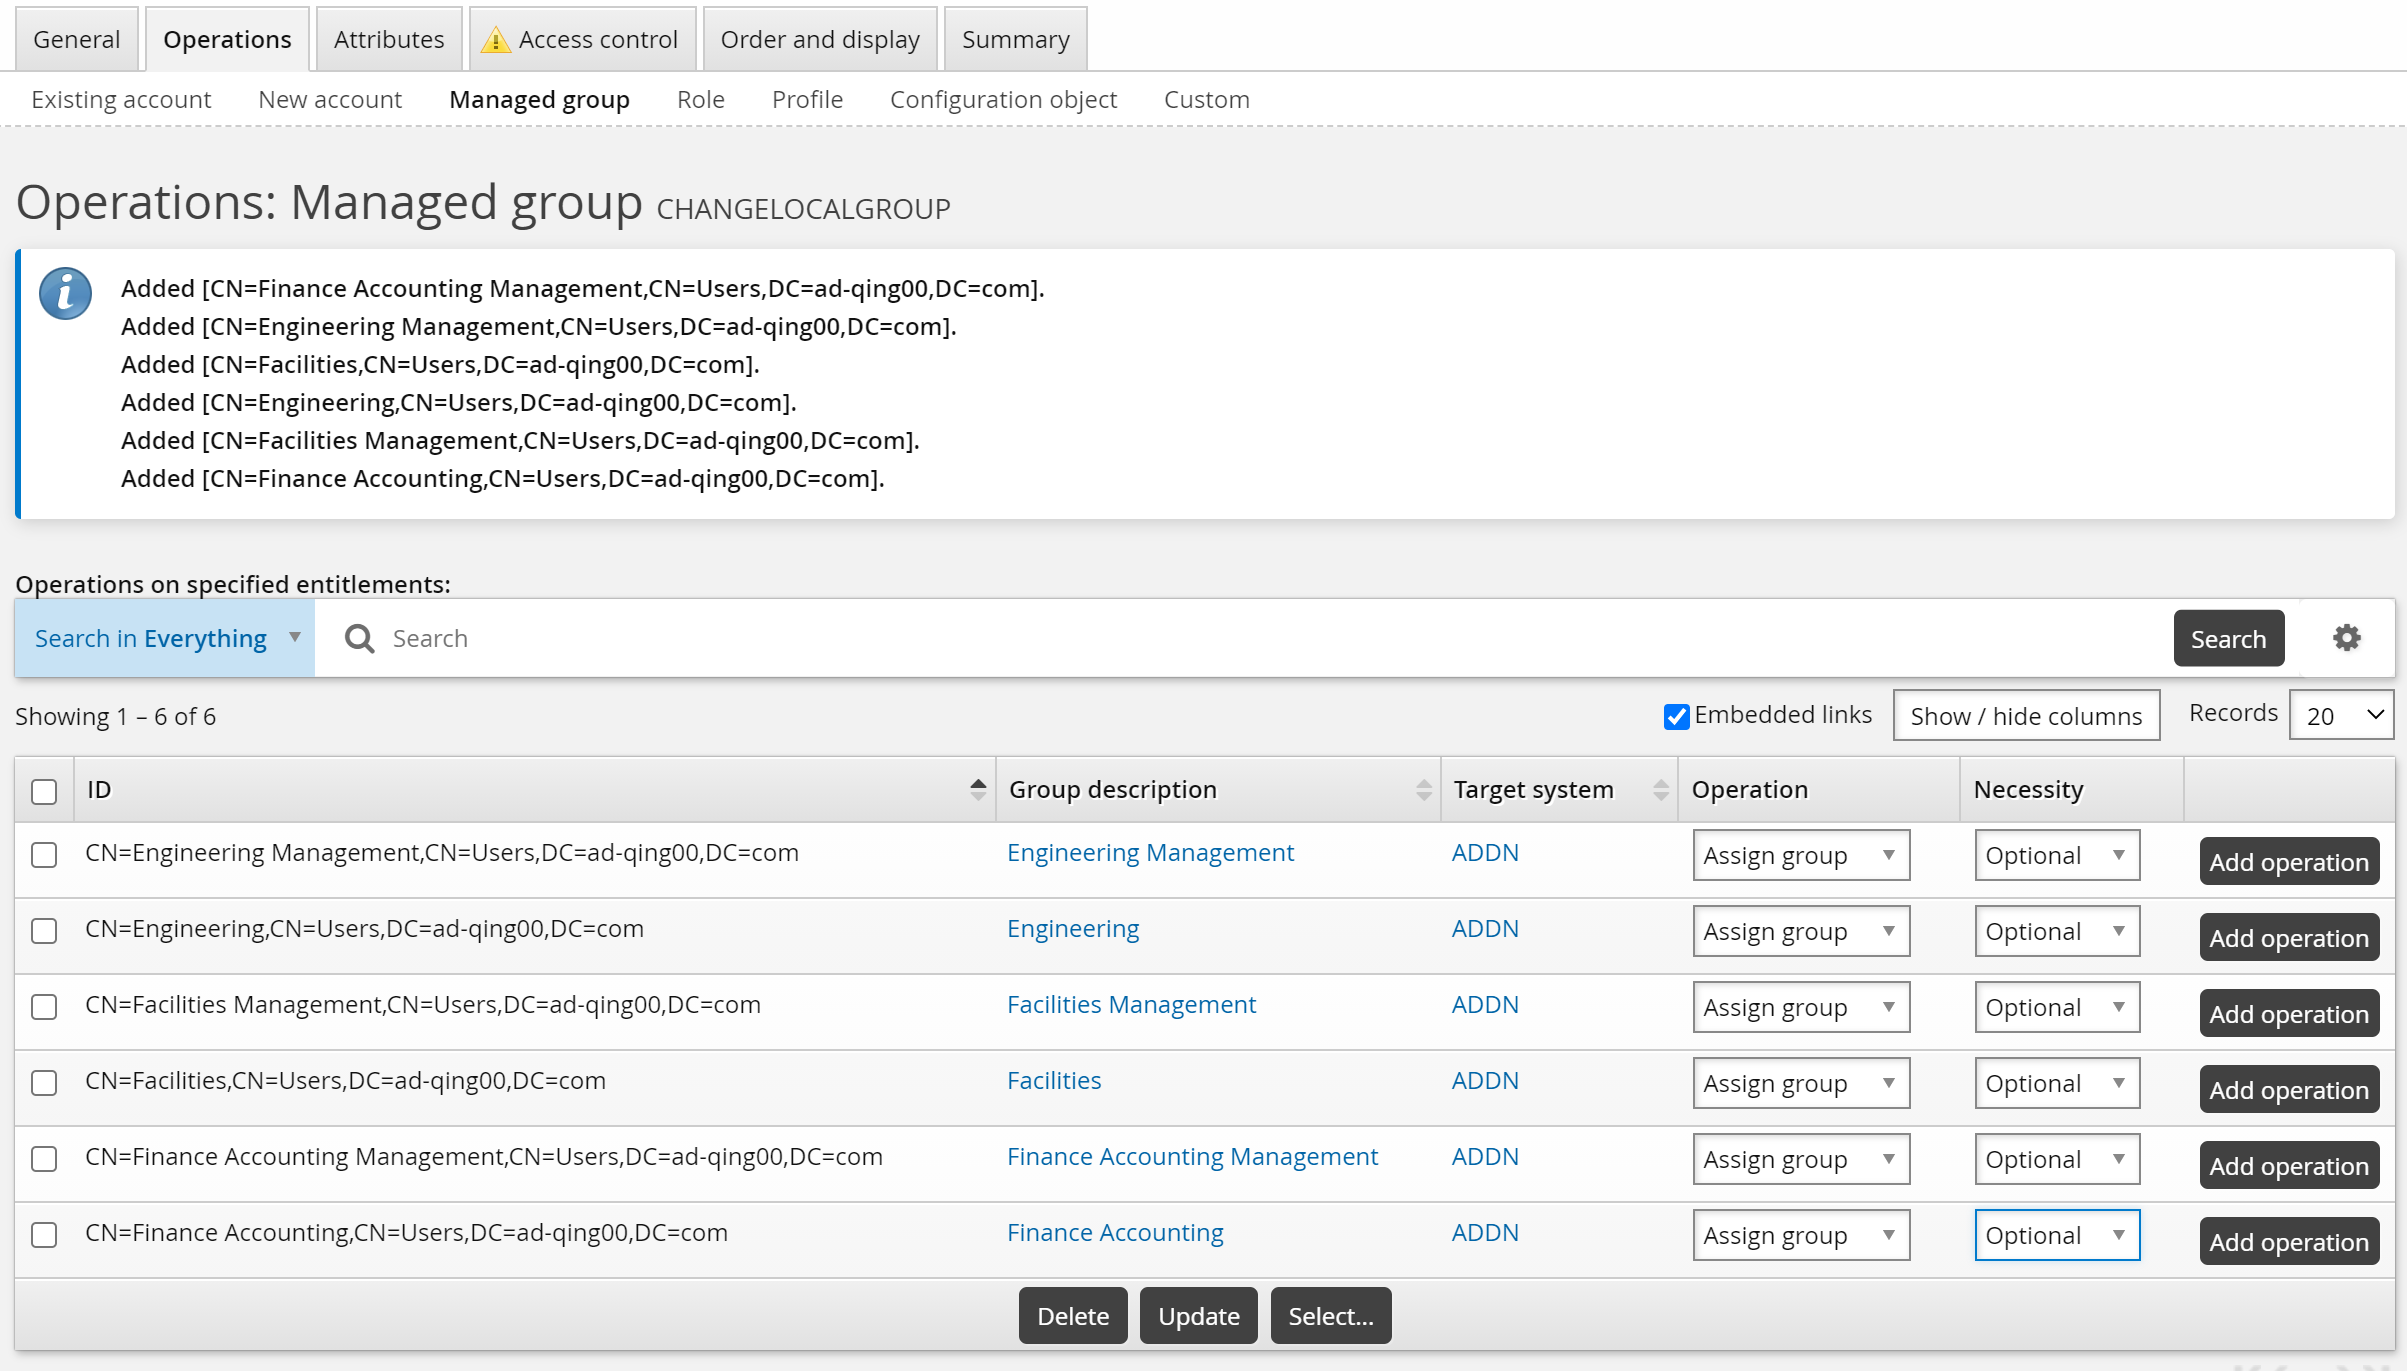
Click the Operations tab, then the Managed group sub-tab.
Click Select… to select managed groups that you want included in the request.
Click Select .
Select "Assign group" from the Operation drop-down list, and "Optional" from the Necessity drop-down list next to each group.
Click Update.
For this case, use the default _EXISTING_USERS_ class to allow existing users to request the new group membership.
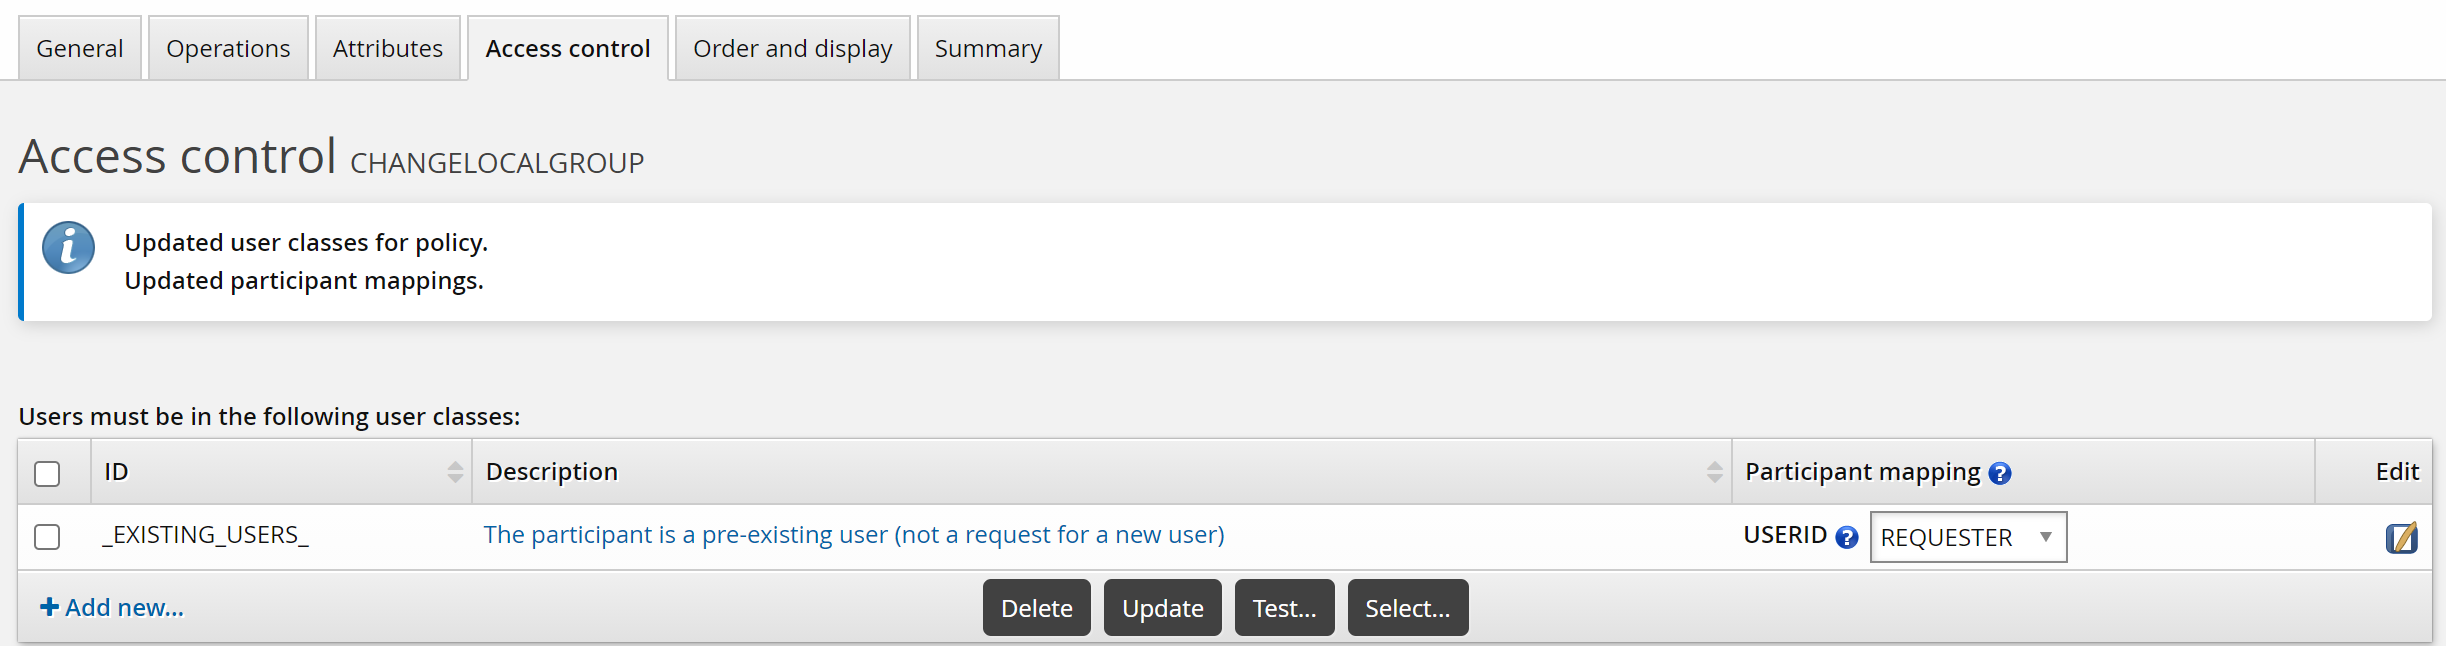
To set up access controls:
Click the Access control tab.
Click Select… .
Select the _EXISTING_USERS_ user class and click Select.
Bravura Security Fabric warns that you need to complete the access control configuration by mapping user class participants to a participant in the policy (requester or recipient).
Set the Participant mapping to REQUESTER.
Click Update.
To submit the pre-defined request, login as an end user:
Click View and update profile .
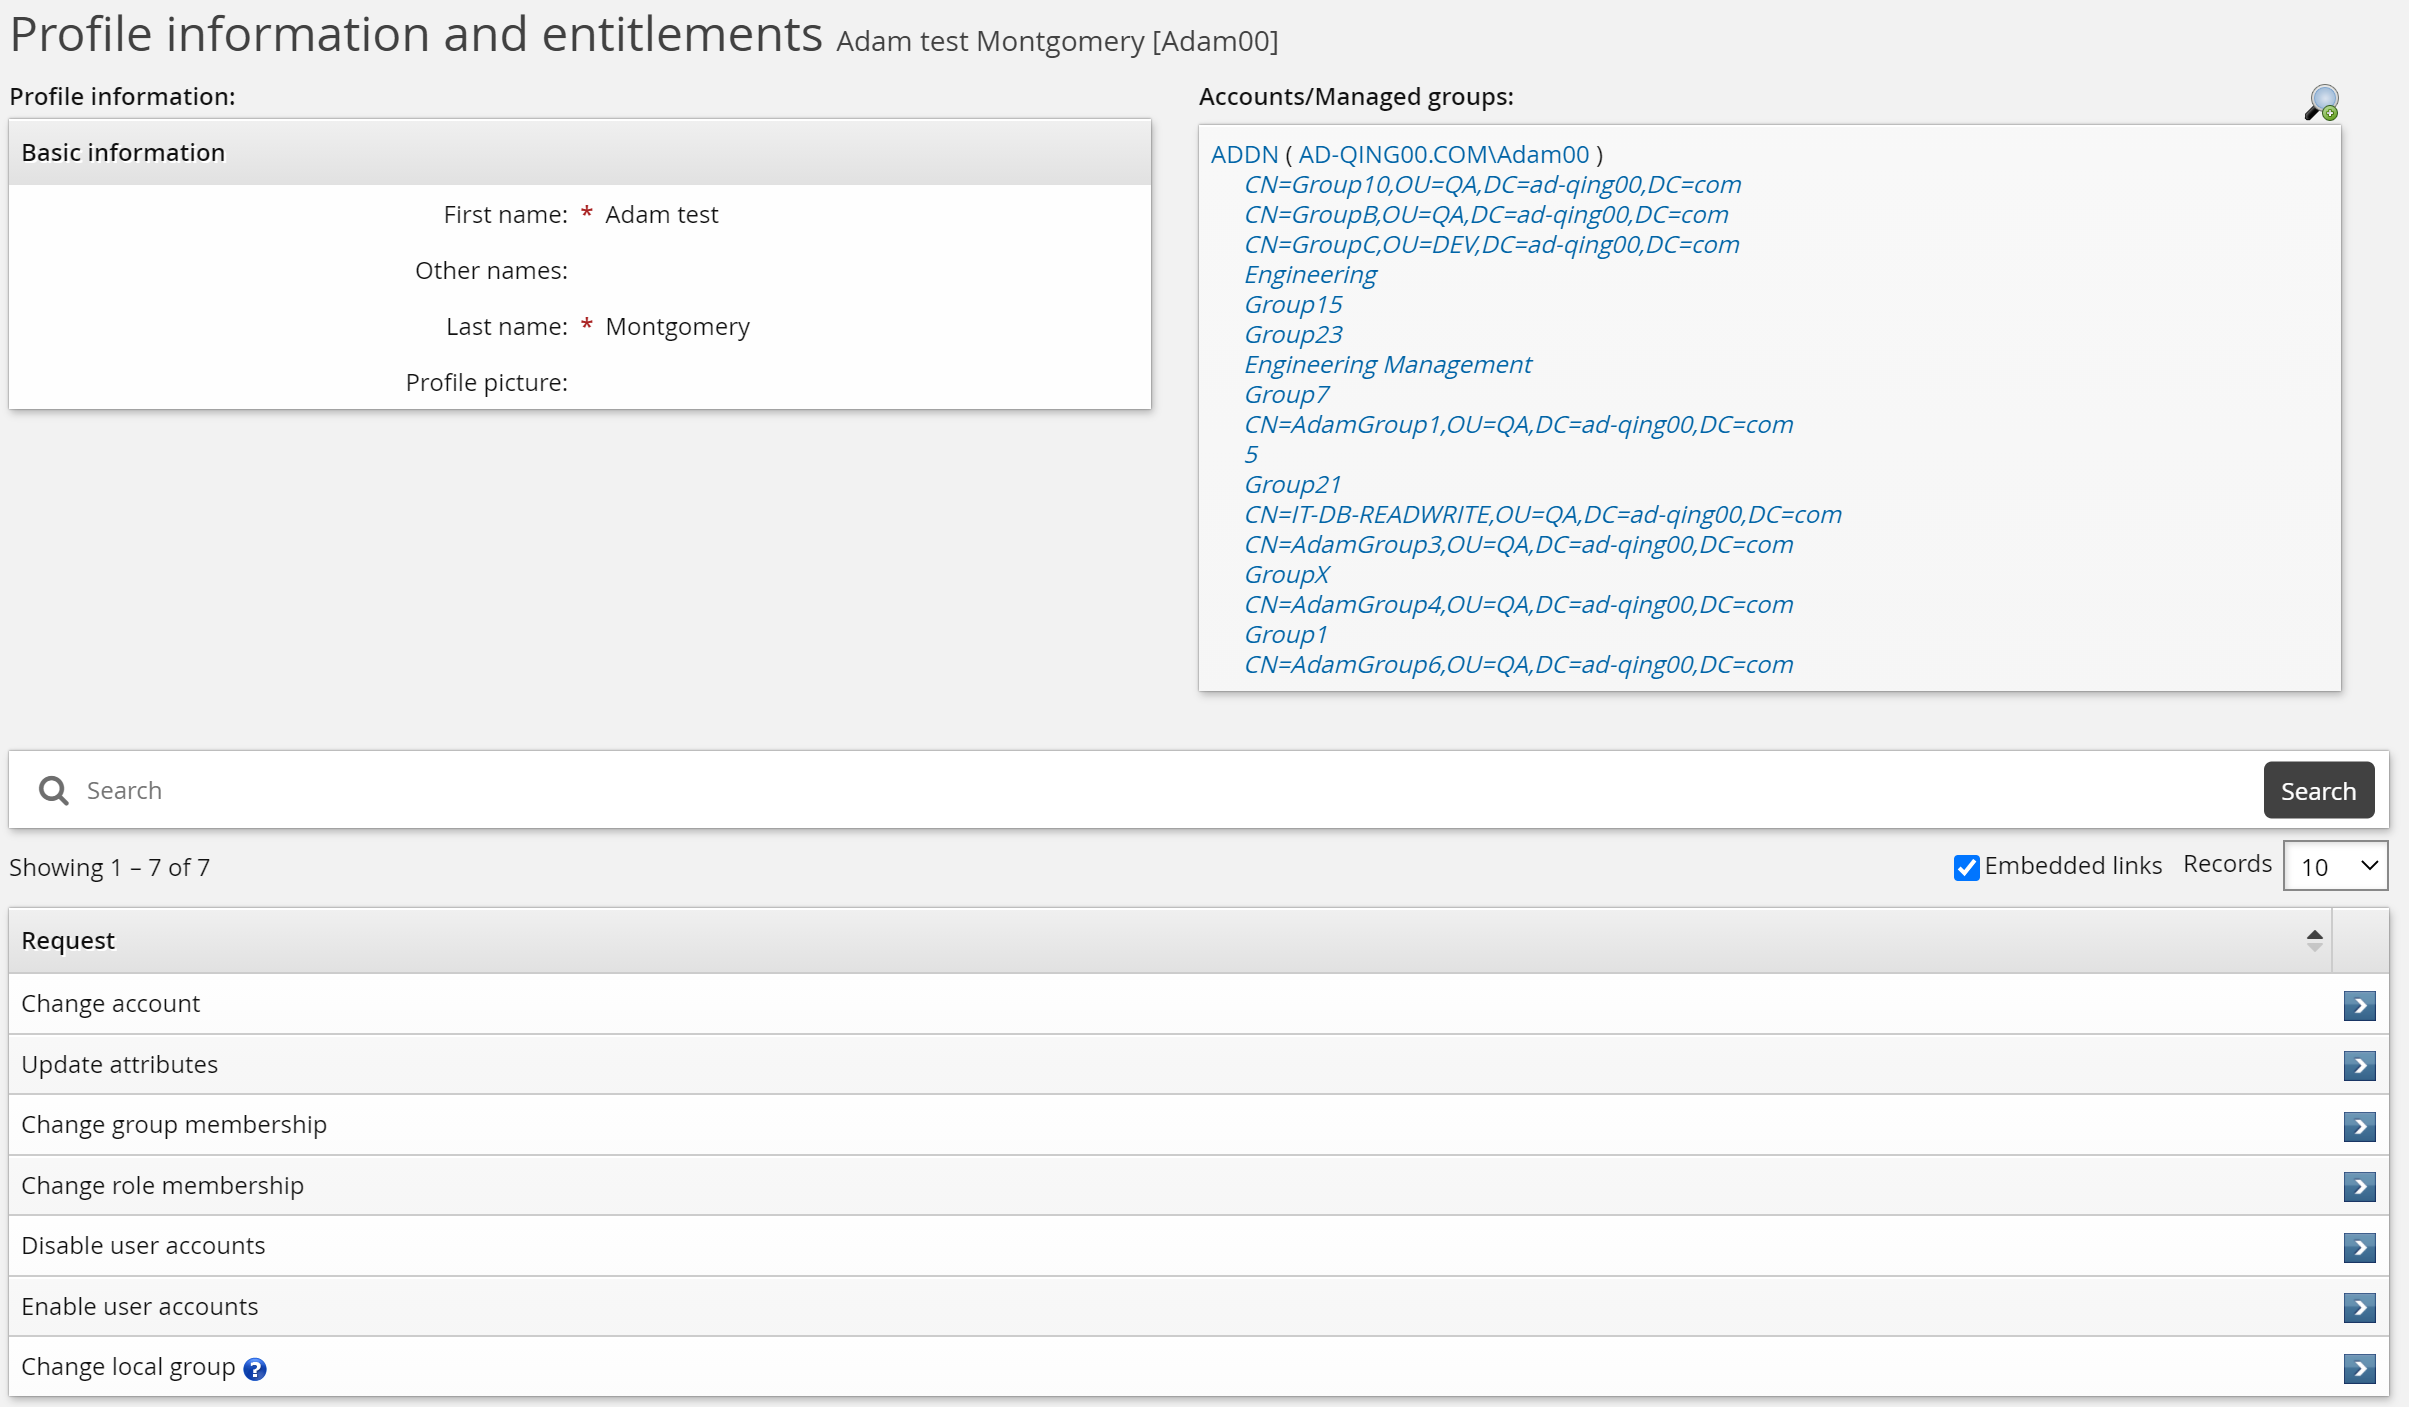
Click Change local group.
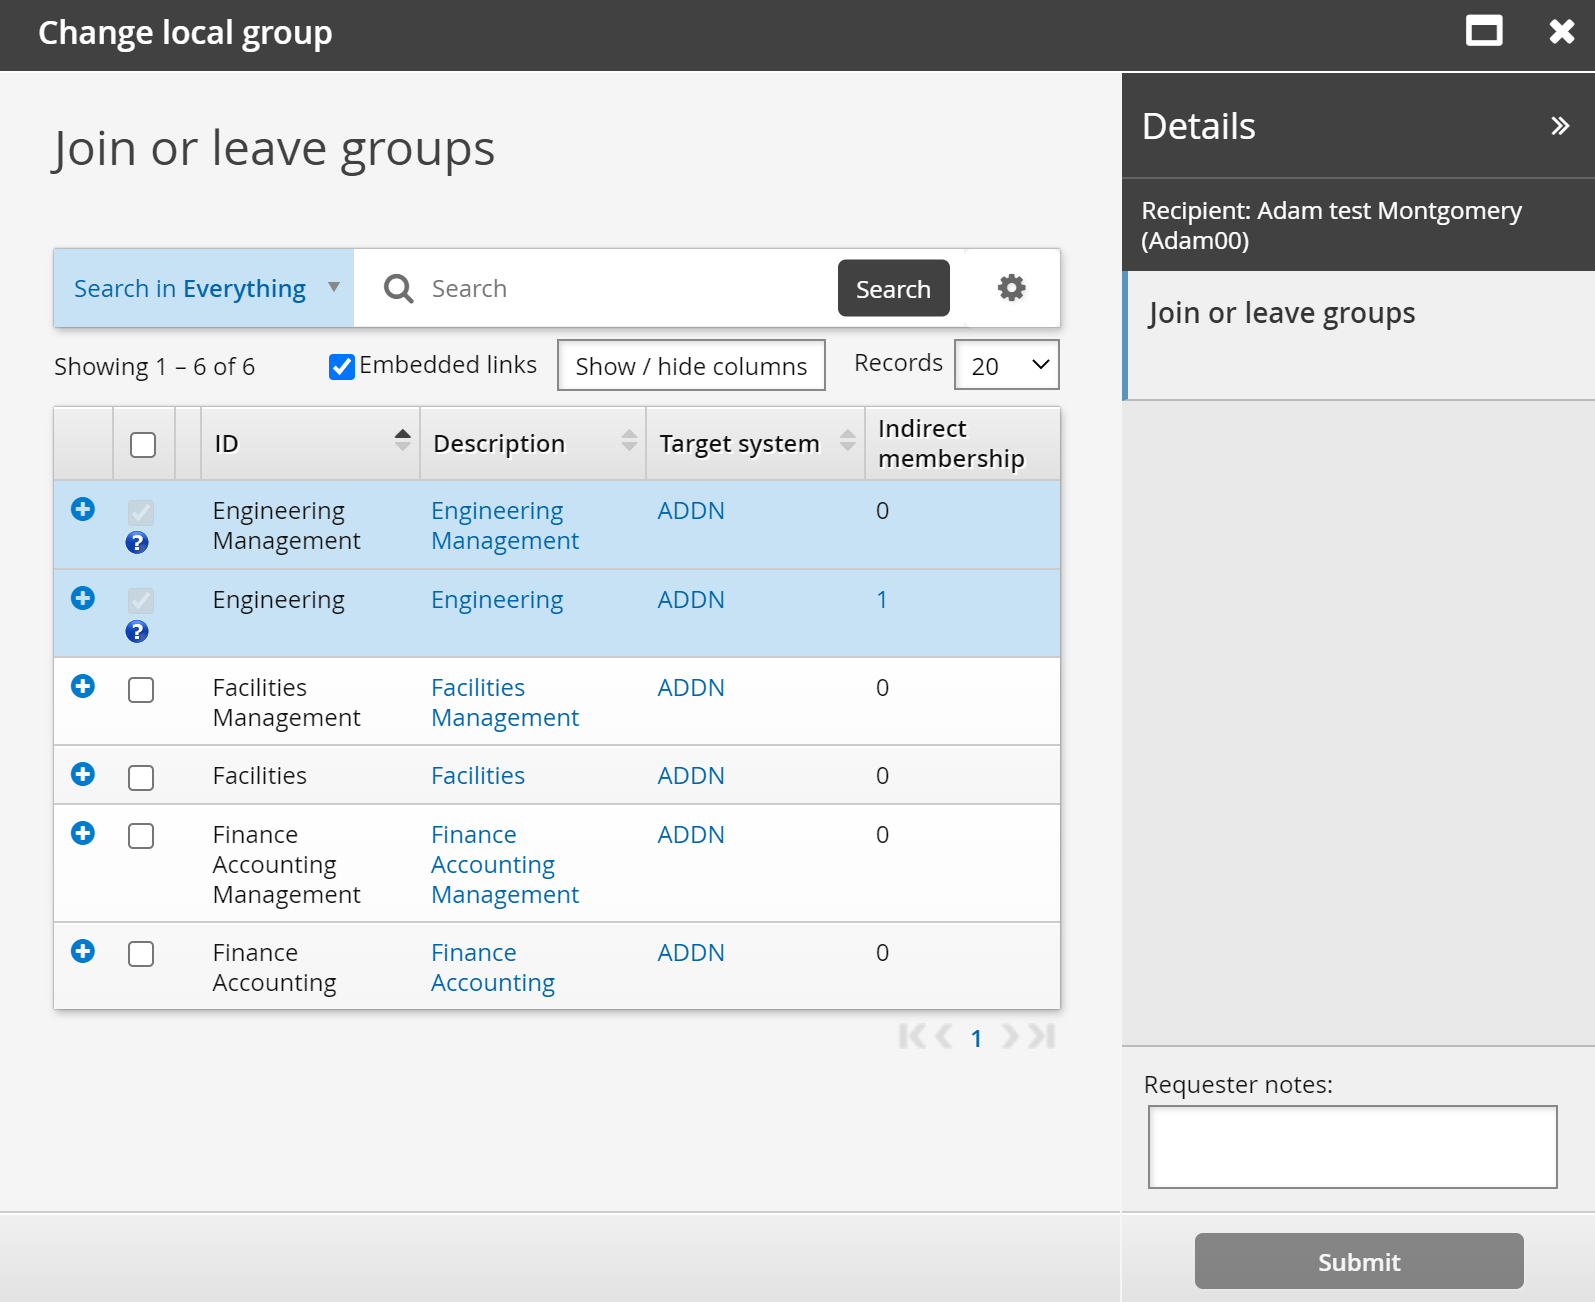
Select groups you want to join, then click Submit.
Create a new user using a standard pre-defined request
Bravura Workforce Pattern provides all the configuration to allow users to submit onboarding requests for new employees, using the NEW-EMPLOYEE pre-defined request.
This example shows how to create a new user profile using a pre-defined request NEW-EMPLOYEE.
Requirement
This example assumes that:
You have installed Bravura Workforce Pattern so the pre-defined request NEW-EMPLOYEE has been added.
You have linked the template account AD_TEMPLATE to an actual account on the Active Directory target system.
You have updated the im_policy_authorization rule for the pre-defined request (PDR) NEW-EMPLOYEE.
Click below to view a demonstration:
To create a new user:
Log into the Bravura Security Fabric web app as an end user.
Click Create a new user profile.
Select New Employee Basic Setup.
The New employee basic setup request will be automatically triggered if it is the only available request type in the Create a new user profile menu.
Enter Basic information for the new user.
Click Next .
Enter Mobile information.
Click Next .
Enter Personally identifying information.
Click Next .
Enter Work contact information.
Click Submit.
Click the link at the top of the page to check the status of the request.
The status is displayed in the Requests app , which users use to track their requests.
To approve the submitted NEW-EMPLOYEE request:
Log in to the Bravura Security Fabric web app as one of the authorizers of the request.
By default, the authorizers are selected by the authorization plugin from members of the HR department. You can update the im_policy_authorization rule for the NEW-EMPLOYEE PDR to assign authorizers.
From the main menu, click Requests.
The Requests app opens.
From the Results panel, select the request you want to review.
Bravura Security Fabric displays the details in the Actions panel panel on the right.
Review the request.
Click Approve and confirm the approval by clicking the Approve button below the notes field.
To check the status of the submitted NEW-EMPLOYEE request as the requester:
Log in to the Bravura Security Fabric web app as the requester.
From the main menu, click Requests.
The Requests app opens.
From the Results panel, select the request you want to review.
Bravura Security Fabric displays the details in the Actions panel panel on the right.
At first the status will change to "Approved, performing requested operations".
After a few more minutes click the Refresh button on the request and you should see the status change to "Processed" with a comment in the Results column that says, "Success Created with login ID" indicating that the account has been created on Active Directory.
Create a new user using a role
Click below to view a demonstration showing the creation of a PDR using both required and optional role operations, selected attributes, access controls and order and display settings for use in hiring.
Click below to view a demonstration of a request submission using the above PDR to hire, approve and confirm a new user to the associated roles.
This example demonstrates how to define a request to hire a new sales representative, based on a role that includes necessary accounts and groups.
This case assumes that you have set up target systems and:
Configured template accounts and managed groups.
Added a role called SALESPERSON that contains standard accounts and groups required for sales employees.
Created an attribute group called ORG-INFO to collect standard information such as employment type.
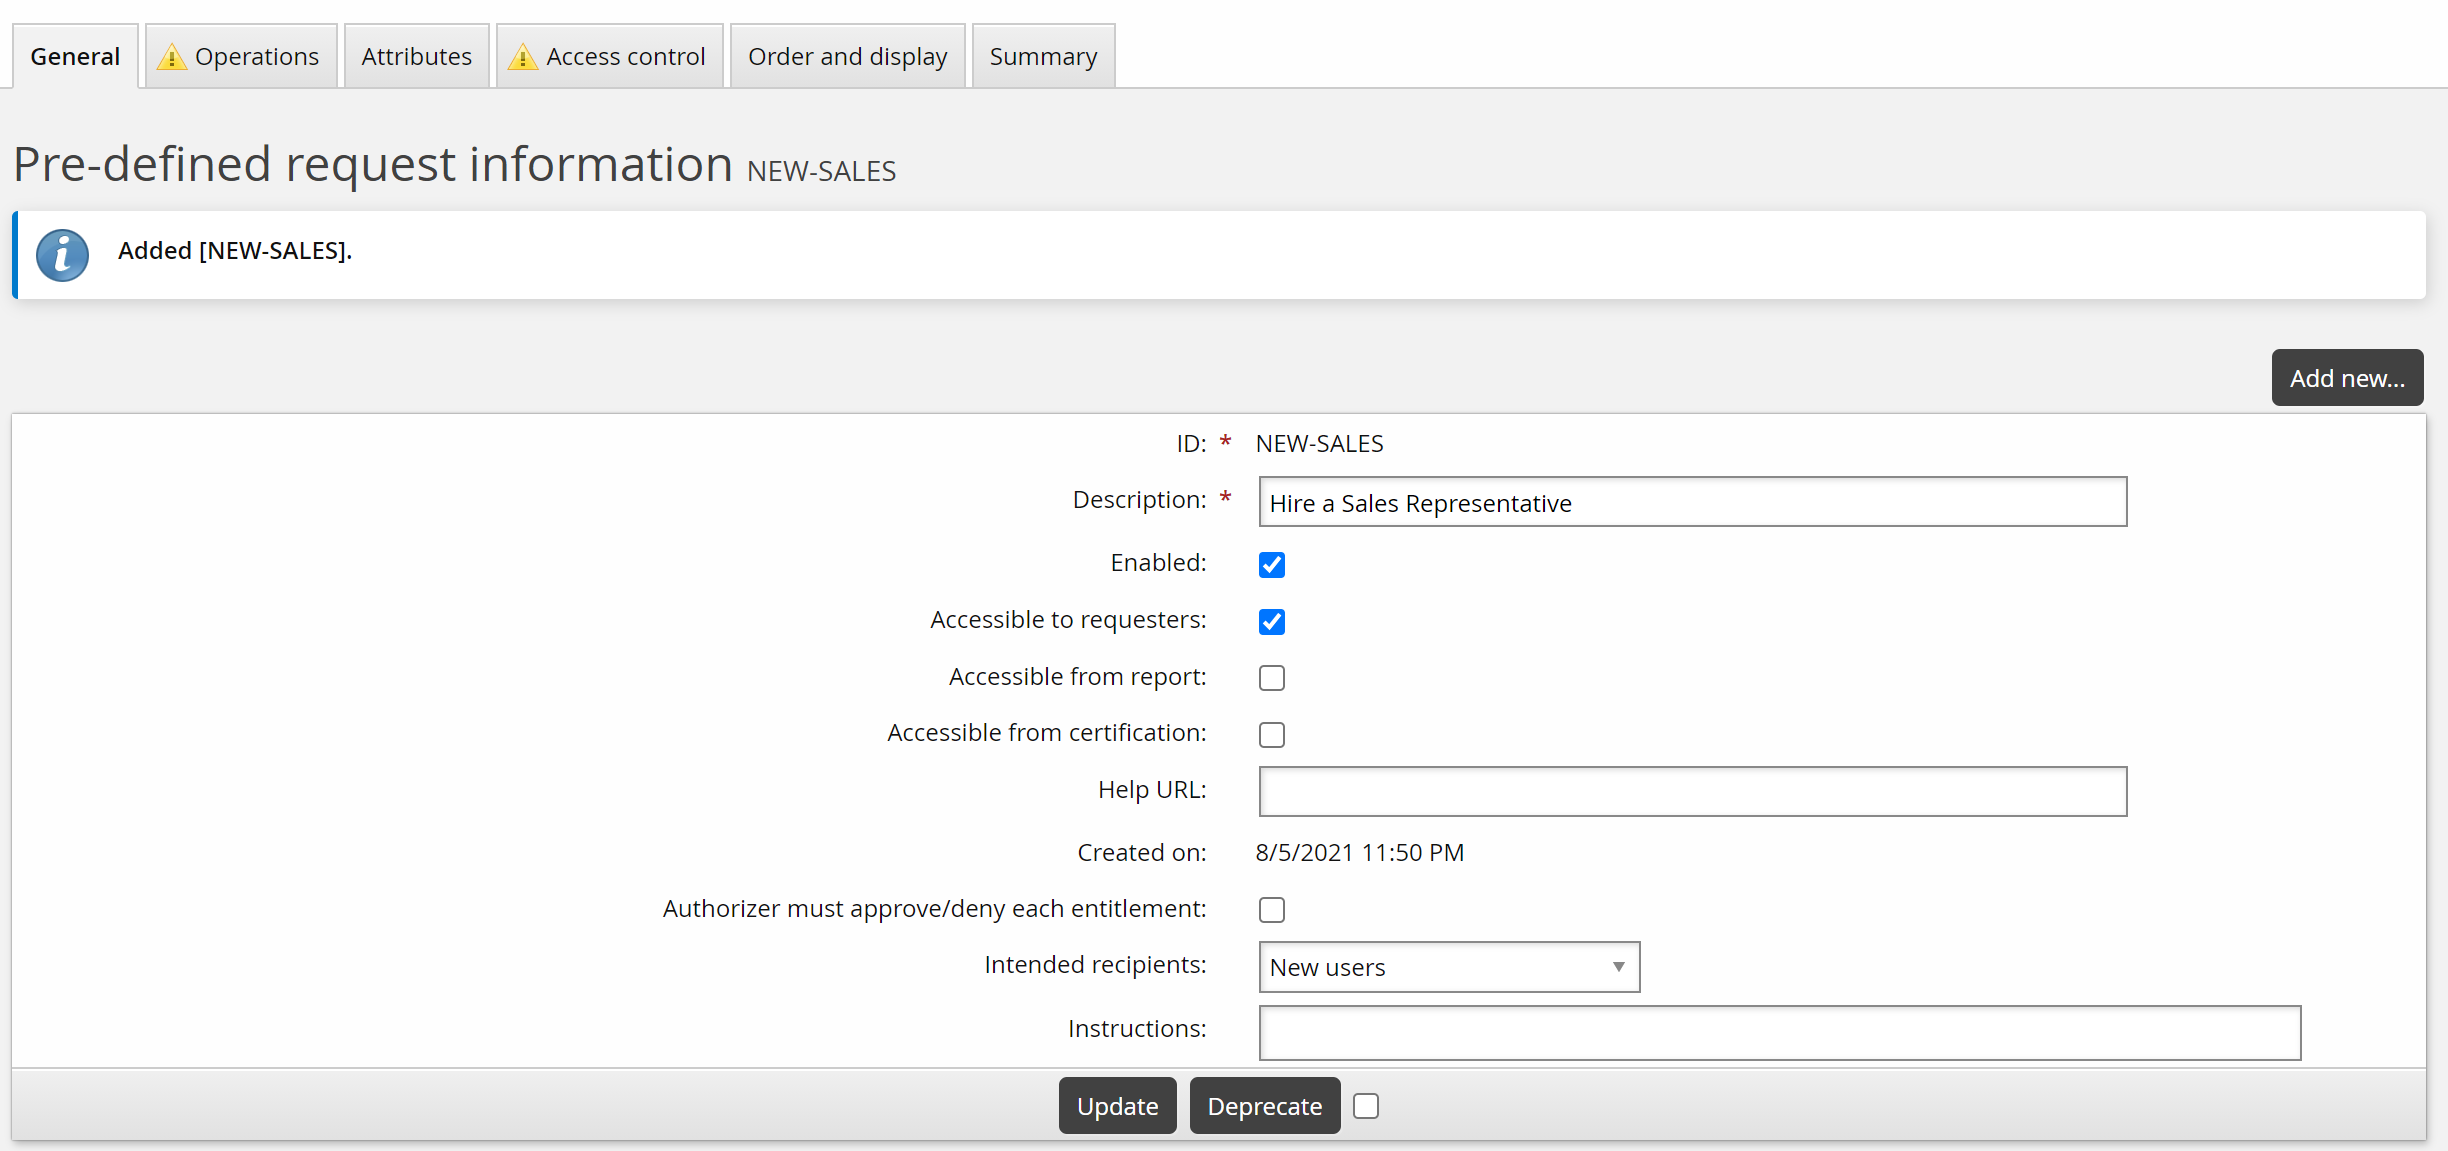
Click Manage the system > Workflow > Pre-defined requests and add a new request with the following general settings:
ID NEW-SALES
Description Hire a Sales Representative
Enabled Selected
Intended recipients New users
Click Add.
You can now define operations and other parameters.
For this use case, the request is to add a role to a new user profile:
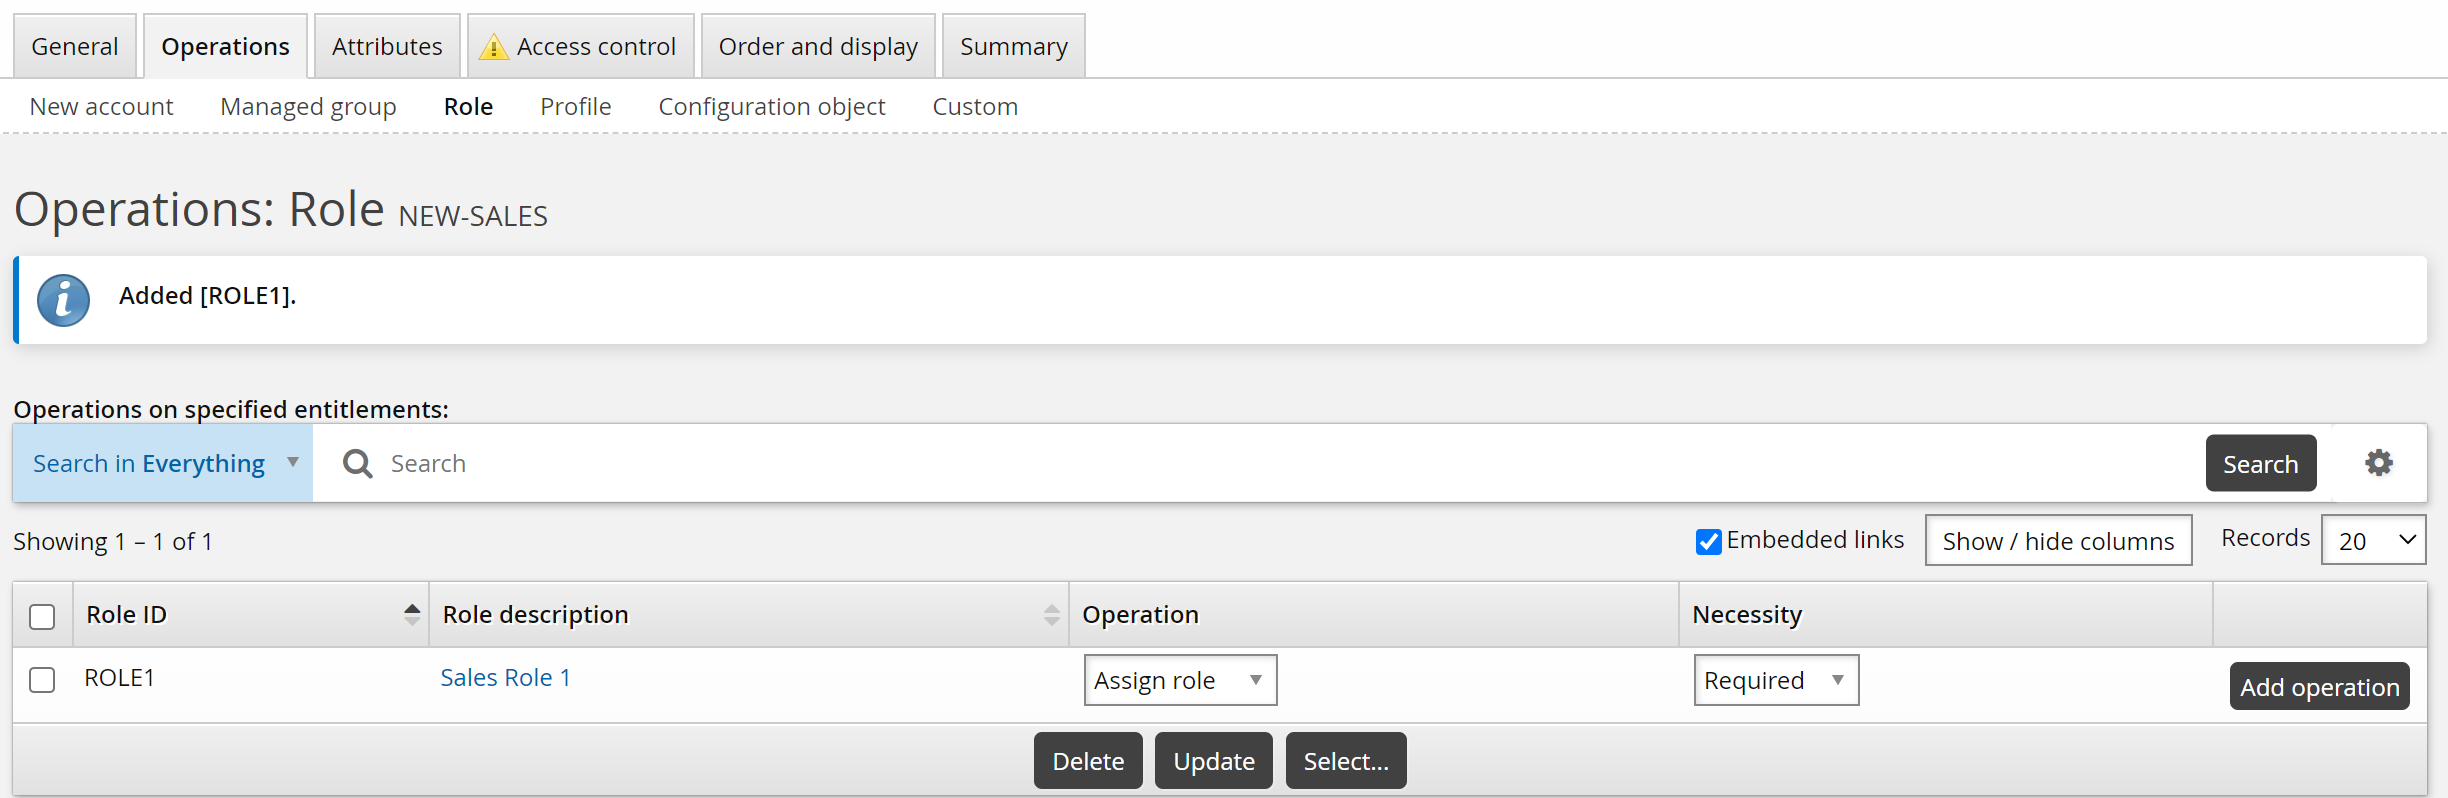
Click the Operations tab, then the Role sub-tab.
Click Select… in the upper table.
Select the SALESPERSON role and click Select.
Ensure the Necessity is set to ”Required”.
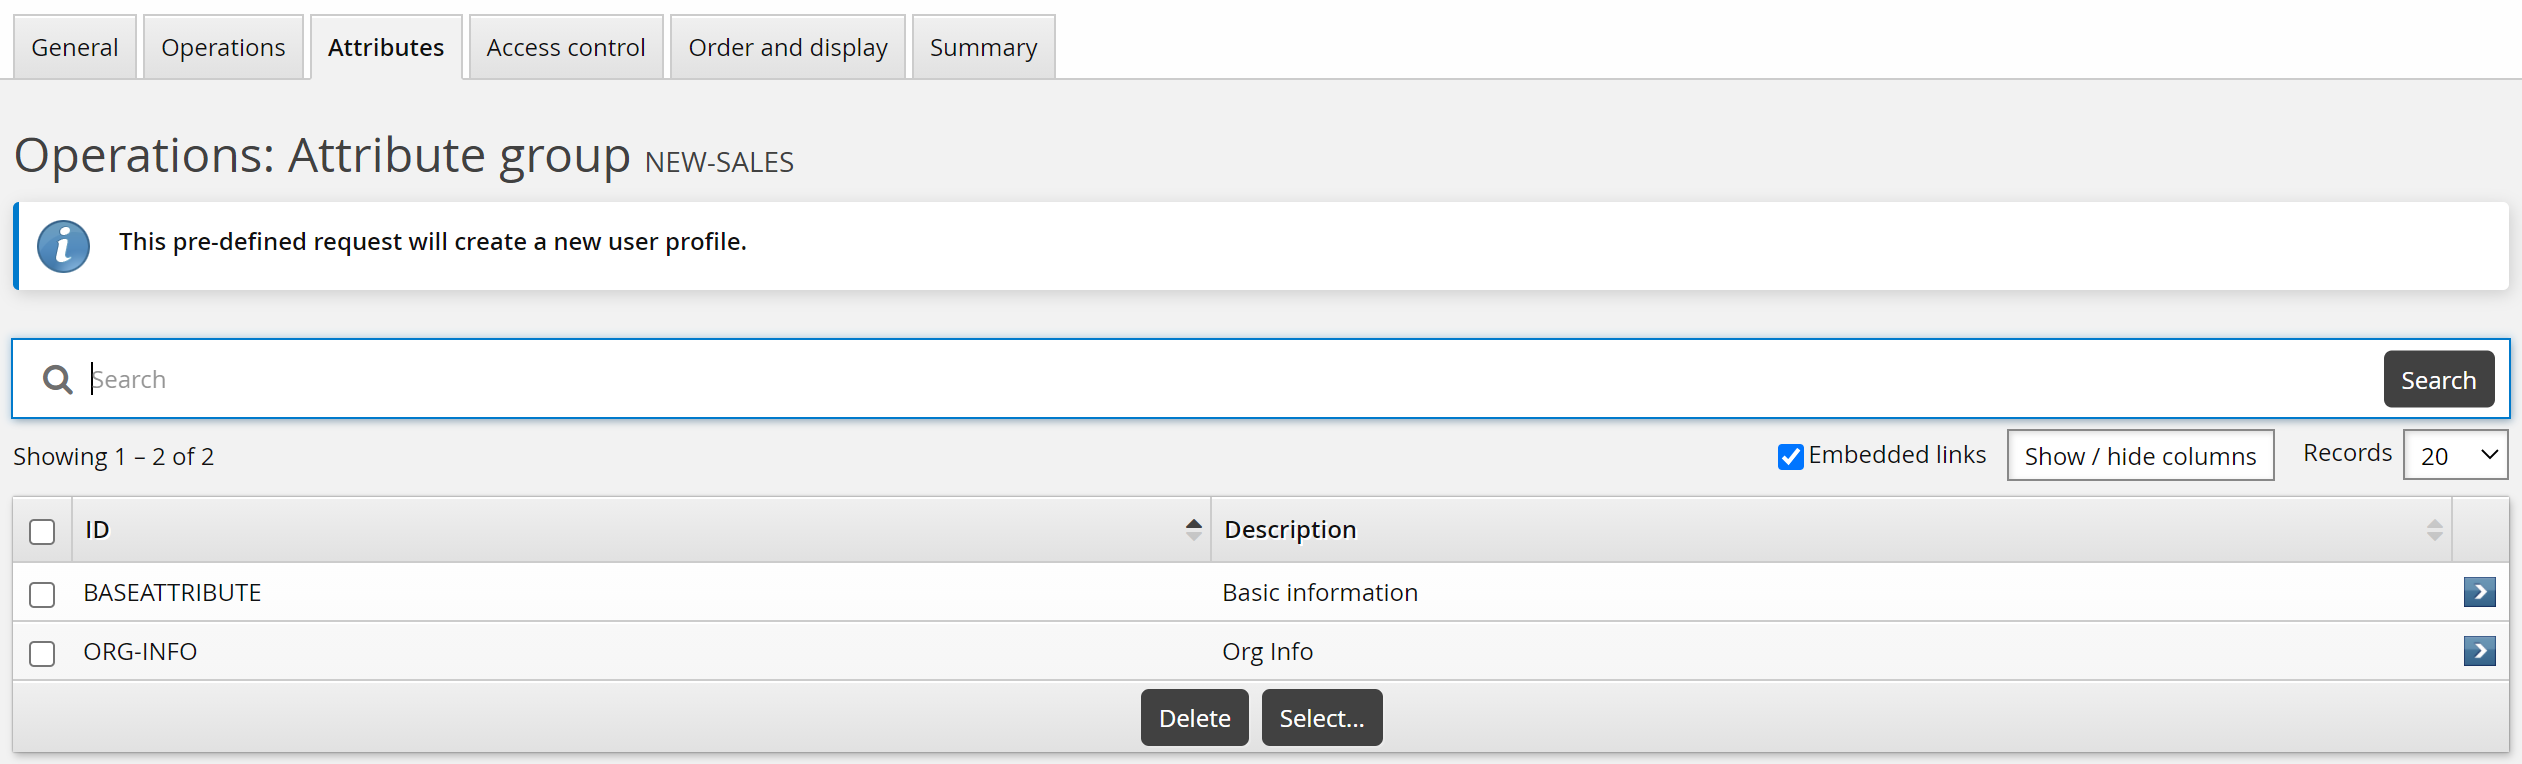
Select attribute groups to determine what information needs to be updated.
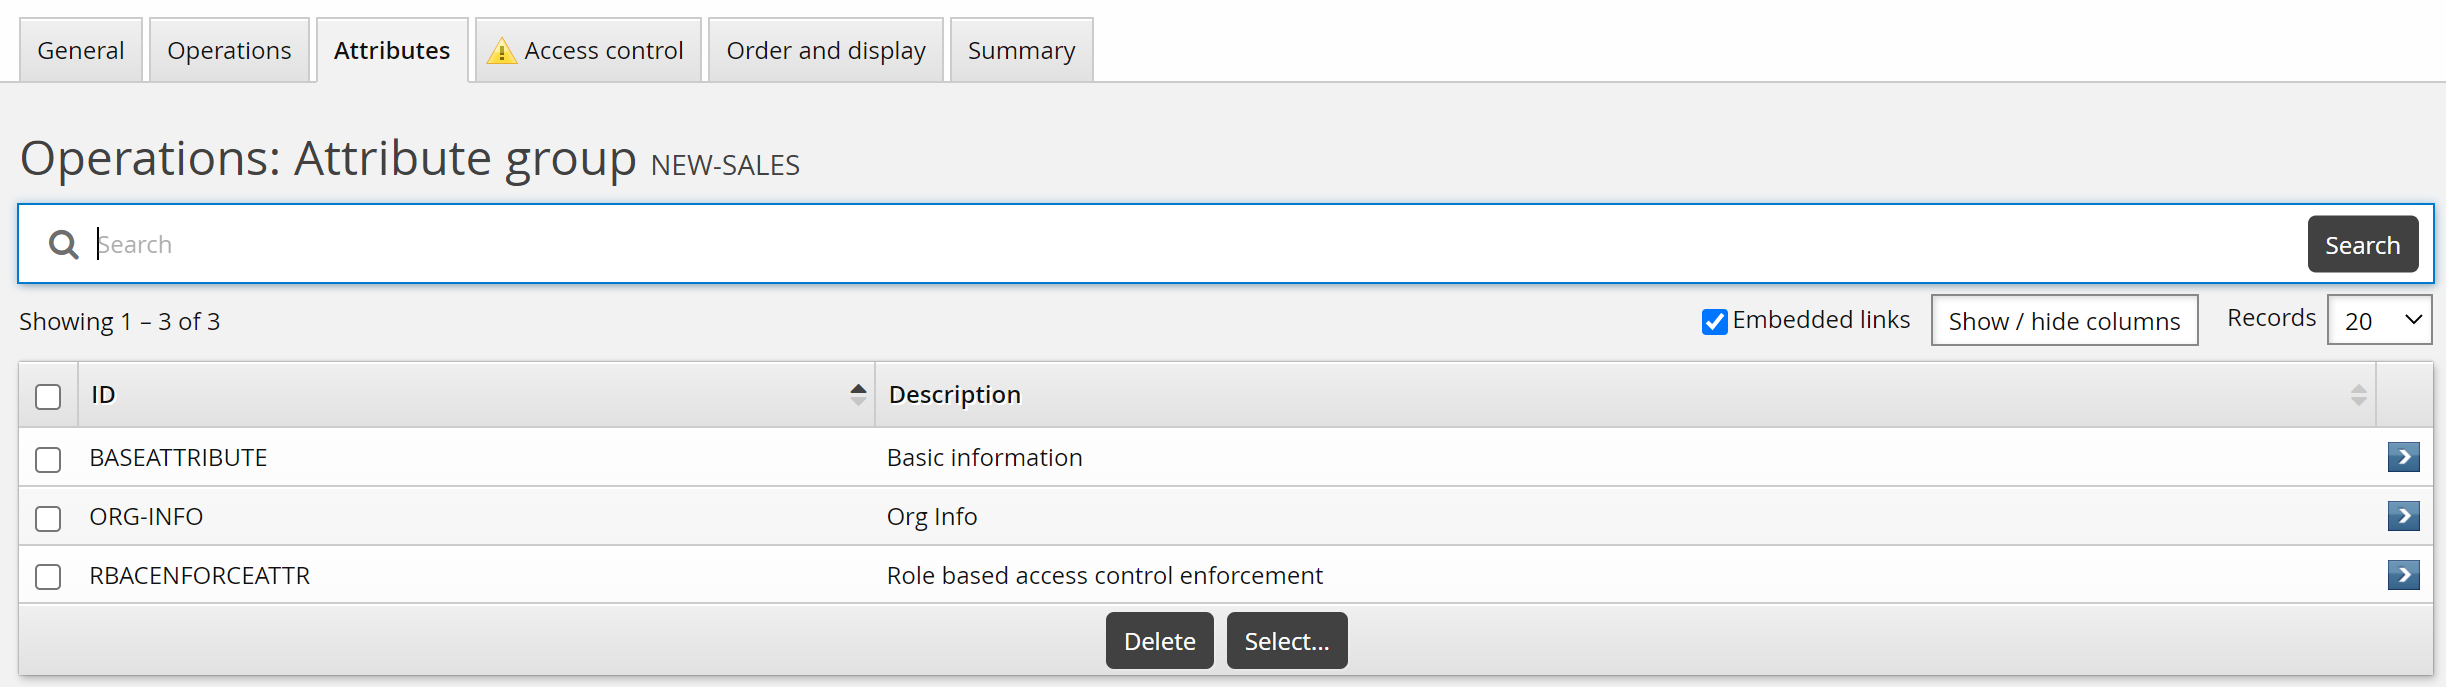
Click the Attributes tab.
Click Select…
Select:
BASEATTRIBUTE
ORG-INFO
RBACENFORCEATTR
Click Select .
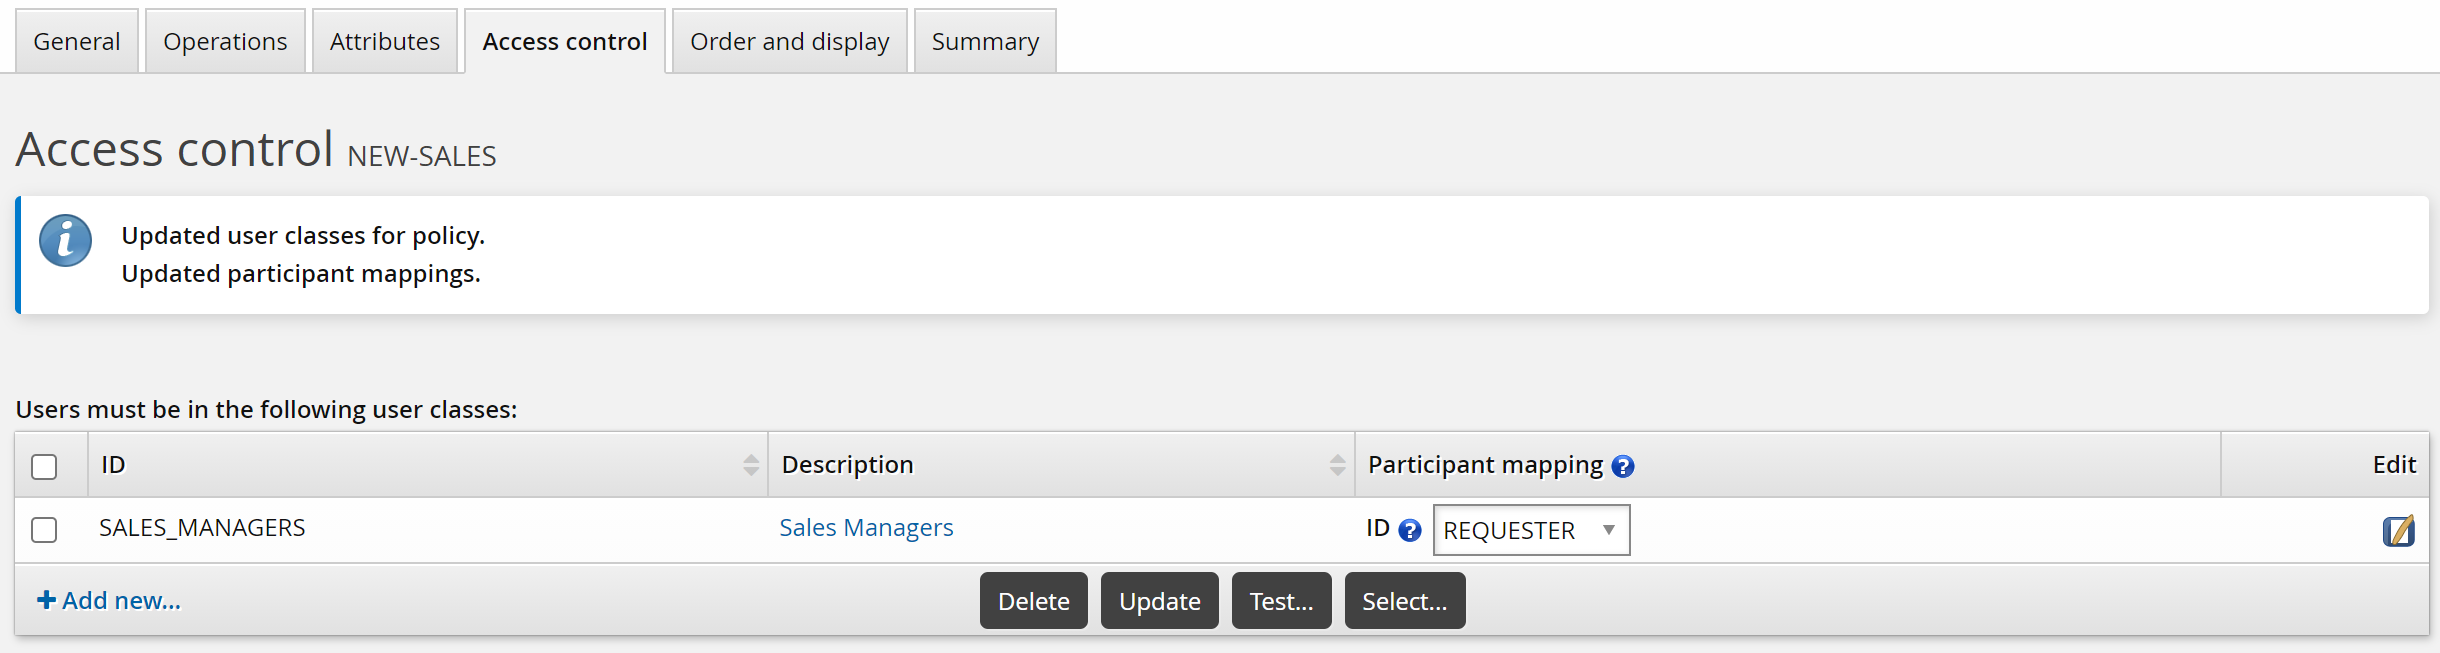
For this case, create a custom SALES_MANAGER class to allow a sales manager to request a new sales employee.
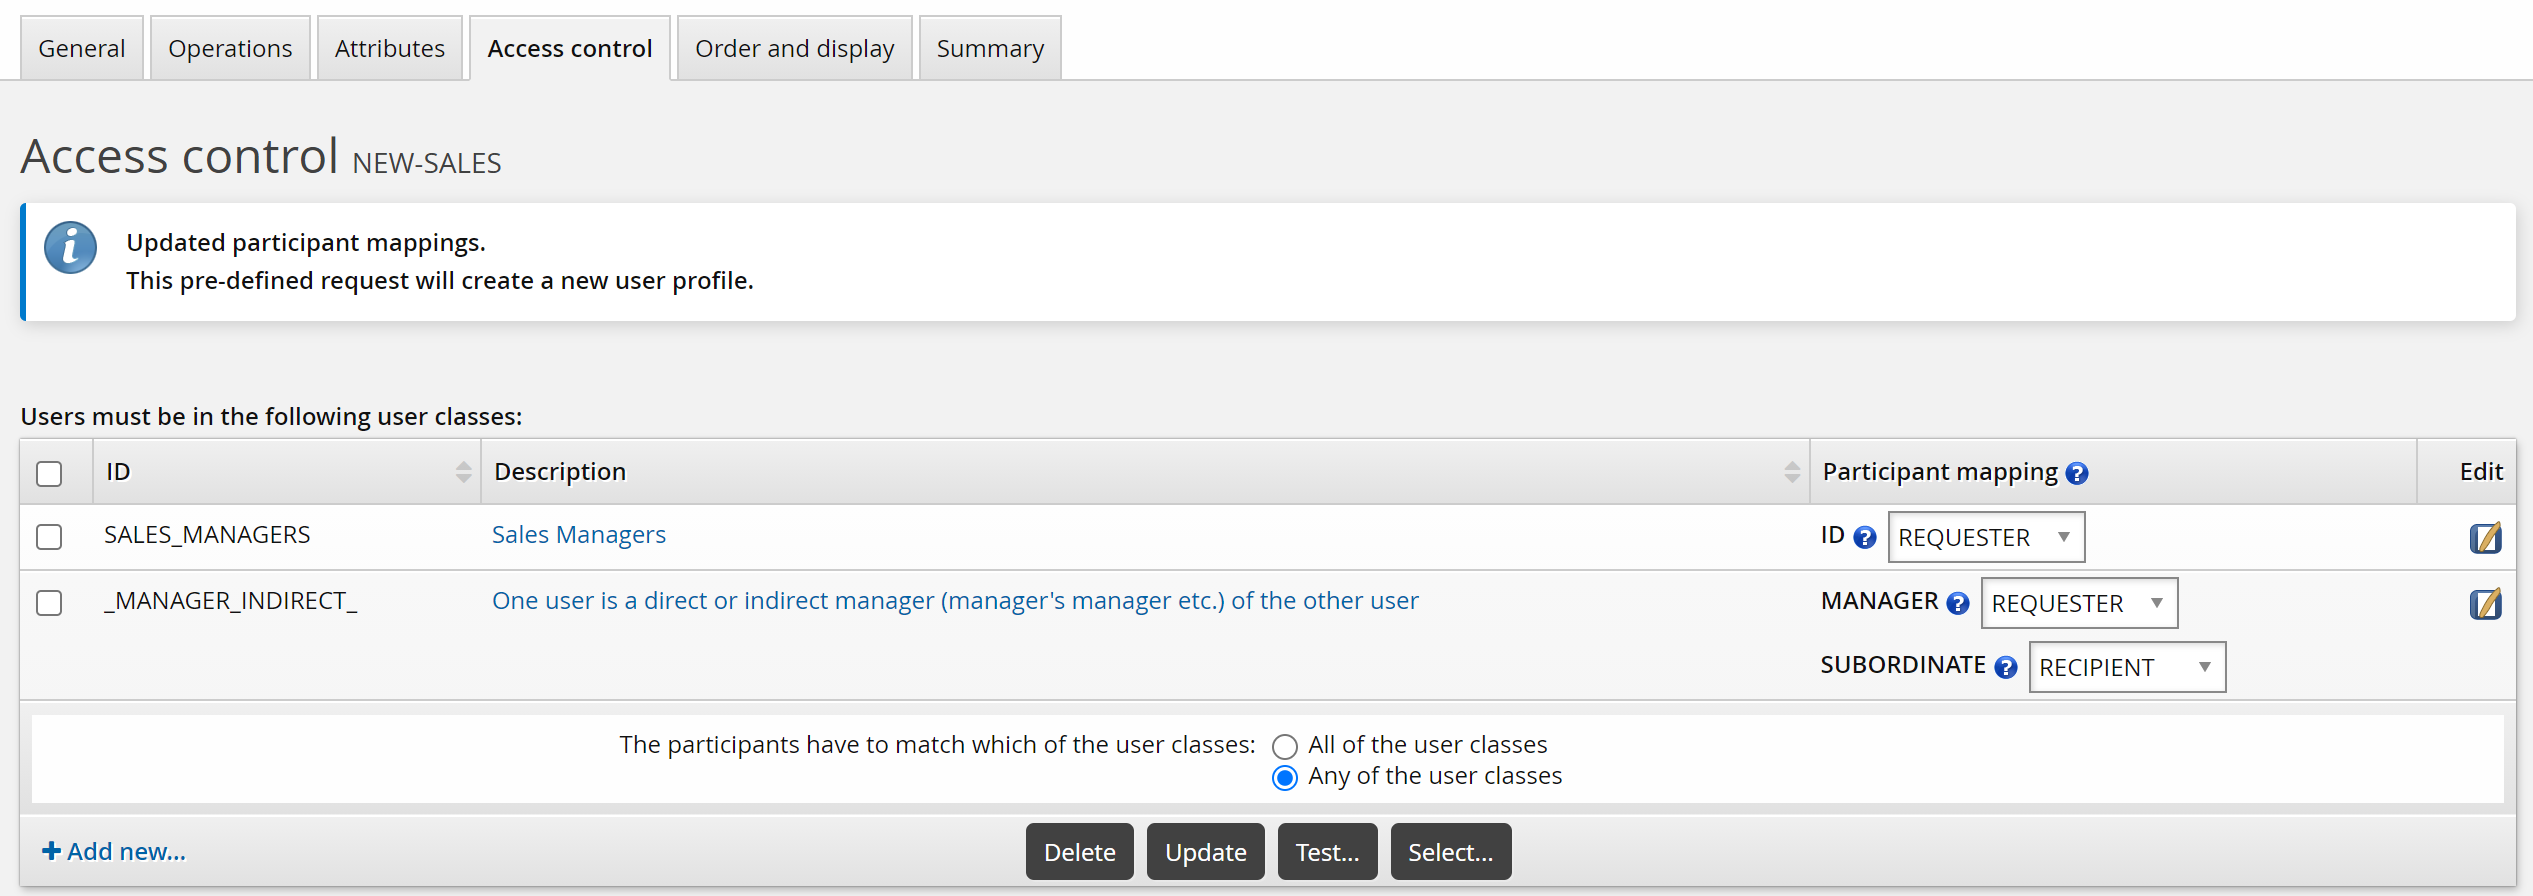
To set up access controls:
Click the Access control tab.
Click Add new…
Bravura Security Fabric displays the User class definition page in a pop-up window.
Define a SALES_MANAGERS user class.
Close the pop-up window.
Bravura Security Fabric warns that you need to complete the access control configuration by mapping the user class participant to a participant in the policy (requester or recipient).
For the user class you just created, set the Participant mapping to REQUESTER.
Click Update.
Bravura Security Fabric automatically adds request wizard pages according to the operations and attributes you add. In this case, Bravura Security Fabric added a page for each of the attribute groups. In this case, you will hide the RBACENFORCE group from requesters, because the default setting is assumed.
To customize the wizard:
Click the Order and display tab.
Set the Attribute group: Role based access control enforcement setting to ”Hide”.
Set the Set initial password setting to ”Show”.
Click Update.

To submit the pre-defined request, login as an end user:
From the main menu, click Create a new user profile.
If your administrator has set up pre-defined requests, Bravura Security Fabric displays a menu of request types.
Click Hire a Sales Representative.
Enter basic profile information.
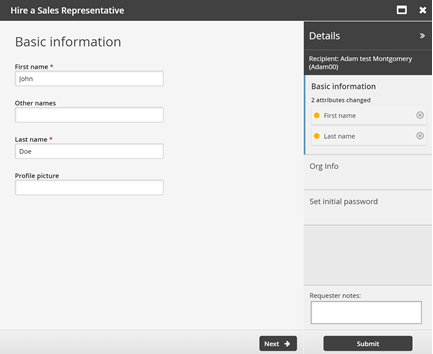
Click Next .
Enter employment information.
This is information defined by the ORG-INFO attribute group.
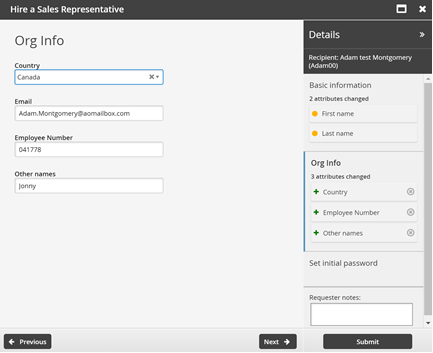
Click Next .
Set the initial password as required for new accounts.

Click Submit.
Request a new desktop computer
This example demonstrates how to define a request users can select to submit a request for a new desktop computer.
This case assumes:
You have set a NULL target system for inventory.
A REQUEST-NOTES profile and request attribute exists.
The profile and request attribute is a member of an attribute group called REQUEST_NOTES.
Click Manage the system > Workflow > Pre-defined requests and add a new request with the following general settings:
ID NEW-DESKTOP
Description Request a new desktop
Enabled Selected
Intended recipients Existing users.
Click Add.
You can now define operations and other parameters.
For this example, the request is to add an inventory item to an existing user profile:
Click the Operations tab, then the New account sub-tab.
Click Select… in the upper table.
Select the DESKTOP template and click Select.
Ensure the Necessity is set to ”Required”.
Inventory templates are used to attach inventory items to user profiles rather than create new accounts.
Select attribute groups to determine what information needs to be updated.
Click the Attributes tab.
Click Select…
Select REQUEST_NOTES.
Click Select .
For this case, use the default _EXISTING_USERS_ class to allow existing users to request a new desktop.
To set up access controls:
Click the Access control tab.
Click Select… .
Select the _EXISTING_USERS_ user class and click Select.
Bravura Security Fabric warns that you need to complete the access control configuration by mapping user class participants to a participant in the policy (requester or recipient).
Set the Participant mapping to REQUESTER.
Click Update.
Bravura Security Fabric automatically adds request wizard pages according to the operations and attributes you add. To customize the wizard:
Click the Order and display tab.
Set the Attribute group: Request notes setting to ”Show”.
Click Update.
To submit the pre-defined request, login as an end user:
Click View and update profile .
Click Request a new desktop.
Enter request details.
Click Submit.
The request has been submitted and in this case, the implementer will receive a notification and action the request.
Update a subordinate’s scheduled termination
This example demonstrates how to invite a manager to defer a subordinate’s scheduled termination. The manager will receive an email two weeks prior to the termination with a link to Bravura Security Fabric . When the manager follows the link and successfully logs in they can use the pre-defined request to update the subordinate’s termination date.
This case assumes that an HR system that contains termination details is set up as a target system, and:
The HR system’s scheduled termination date account attribute is mapped to a profile and request attribute called SCHEDULED_TERMINATION_DATE.
The profile and request attribute is a member of an attribute group called SCHEDULED_TERMINATION.
Click Manage the system > Workflow > Pre-defined requests and add a new request with the following general settings:
ID SCHEDULETERMINATION
Description Update termination date
Enabled Selected
Intended recipients Existing users
Click Add.
You can now define operations and other parameters.
For this example, the request is to update existing accounts:
Click the Operations tab, then the Existing account sub-tab.
In the bottom table select Update account and select ”All” from the All/User-selectable drop-down list.
Click Update.
Select attribute groups to determine what information needs to be updated.
Click the Attributes tab.
Click Select…
Select SCHEDULED_TERMINATION.
Click Select .
For this case, use the default _MANAGER_INDIRECT_ class to allow a manager to request the update on behalf of a subordinate. We will assume that the Orgchart has been set up, and that managers have permission to update subordinates’ information.
To set up access controls:
Click the Access control tab.
Click Select… .
Select the _MANAGER_INDIRECT_ user class and click Select.
Bravura Security Fabric warns that you need to complete the access control configuration by mapping user class participants to a participant in the policy (requester or recipient).
Set the Participant mapping for MANAGER to REQUESTER, and set SUBORDINATE to RECIPIENT.
Click Update.
Bravura Security Fabric automatically adds request wizard pages according to the operations and attributes you add. In this case, Bravura Security Fabric added a page for each of the attribute groups. In this case, you will hide the RBACENFORCE group from requesters, because the default setting is assumed.
To customize the wizard:
Click the Order and display tab.
Set the Attribute group: Role based access control enforcement setting to ”Hide”.
Click Update.
Set up automated user administration (
idtrack) to track the scheduled termination attribute.During the nightly processing, when a termination is scheduled for two weeks from now, send an email to the manager notifying her of the upcoming termination. Embed a URL linking the user to the View and update profile (IDR) module; for example:
https://idm-server/default/view-and-update-profile.
When the manager successfully logs in she will be automatically redirected to the View and update profile (IDR) module, where she can select the Update termination date pre-defined request to update the termination date.
Use report output to disable orphaned accounts
This example demonstrates how to create a pre-defined request and run a report to list orphaned accounts and then submit request to disable those accounts.
Click Manage the system > Workflow > Pre-defined requests and add a new request with the following general settings:
ID ORPHANED-ACCOUNTS
Description Disable orphaned accounts
Enabled Selected
Accessible from report Selected
Intended recipients Existing users
Click Add.
You can now define operations and other parameters.
For this example, the request is to disable existing accounts based on certain conditions:
Click the Operations tab, then the Existing account sub-tab.
In the bottom table select Disable account and select ”User-selectable” from the All/User-selectable drop-down list.
Click Update.
For this case, use the default _REPORT_READERS_ user class to allow users who can run reports to submit this pre-defined request. We will assume that users have been added to the user class.
To set up access controls:
Click the Access control tab.
Click Select… .
Select the _REPORT_READERS_ user class and click Select.
Bravura Security Fabric warns that you need to complete the access control configuration by mapping the user class participant to a participant in the policy (requester or recipient).
Set the Participant mapping to REQUESTER.
This allows any user in the user class to act as requester of the request.
Click Update.
The pre-defined request is ready to use with report output.
To run a report and use the output to submit a request to disable orphan accounts:
Log in as a member of _REPORT_READERS_.
Click Manage reports > Reports > Users > Orphan / Inactive.
Run the report.
Expand Submit pre-defined requests using report output at the bottom of the report form.
Select the ORPHANED-ACCOUNTS pre-defined request.
Click on the magnifying glass icon to configure Attributes.
Map the Recipient ID to a static ID, such as the user running the report.
The recipient ID needs to match a Bravura Security Fabric profile ID. If the report output has that information, you can map this attribute to that output, otherwise, you will need to enter a static ID.
Map the target ID and account attributes to the respective columns.
Click Done.
Click Run for submission.
Bravura Security Fabric displays a summary of the requests submitted.
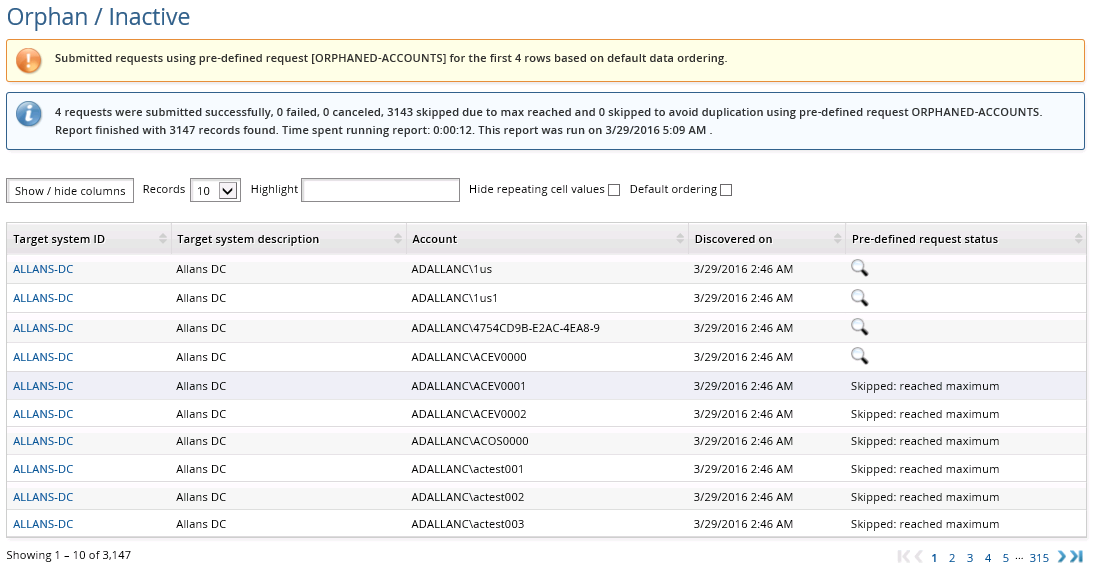
You can click on the info icon  in the request status column to view the status of each request, or use the Requests link from the main menu.
See Reports for more information on running reports.
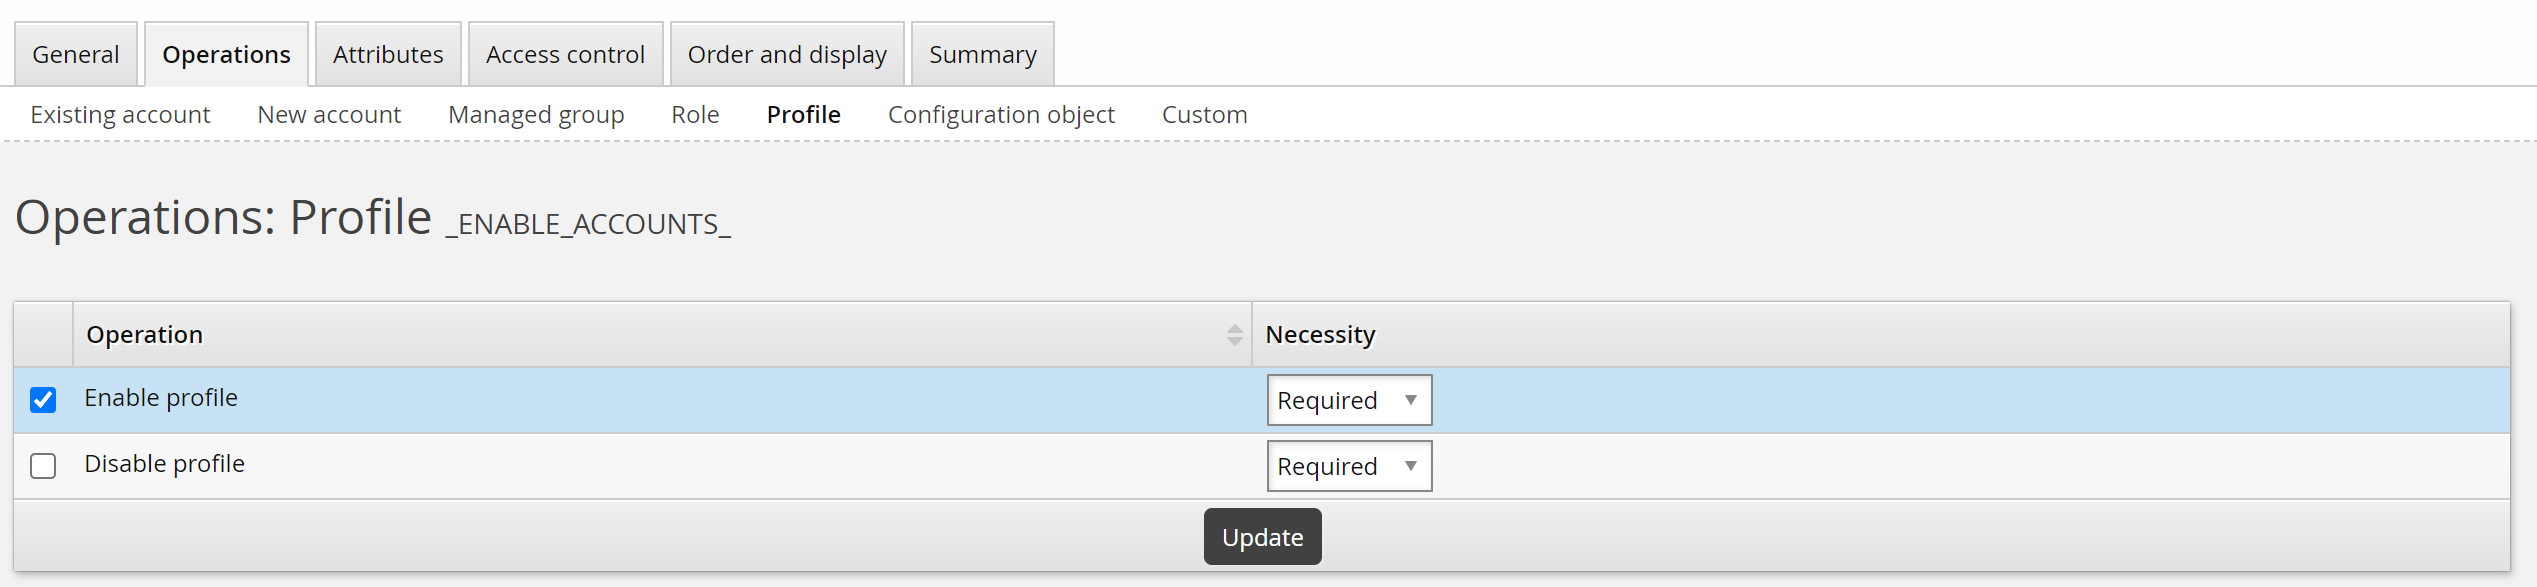
Use report output to enable disabled accounts
This example demonstrates how to run the account report to list disabled accounts, then use the output to submit a request to enable those accounts.
Click Manage the system > Workflow > Pre-defined requests and add a new request with the following general settings:
ID ENABLE-ACCOUNTS
Description Enable disabled accounts
Enabled Selected
Accessible from report Selected
Intended recipients Existing users
Click Add.
You can now define operations and other parameters.
For this example, the request is to enable existing disabled accounts:
Click the Operations tab, then the Existing account sub-tab.
In the bottom table select Enable account and select "User-selectable" from the All/User-selectable drop-down list.
Click Update.
For this case, use the default _REPORT_READERS_ user class to allow users who can run reports to submit this pre-defined request. We will assume that users have been added to the user class.
To set up access controls:
Click the Access control tab.
Click Select… .
Select the _REPORT_READERS_ user class and click Select.
Bravura Security Fabric warns that you need to complete the access control configuration by mapping the user class participant to a participant in the policy (requester or recipient).
Set the Participant mapping to REQUESTER.
This allows any user in the user class to act as requester of the request.
Click Update.
The pre-defined request is ready to use with report output.
To run a report and use the output to submit a request to enable disabled accounts:
Log in as a member of _REPORT_READERS_.
Click Manage reports > Reports > Reports > Users > Account attributes.
Set account attribute @accountEnabled to false.
Run the report.
Expand Submit pre-defined requests using report output at the bottom of the report form.
Select the ENABLE-ACCOUNTS pre-defined request.
Click on the magnifying glass icon to configure Attributes.
Map the Recipient ID to a static ID, such as the user running the report.
The Recipient ID needs to match a Bravura Security Fabric profile ID. If the report output has that information, you can map this attribute to that output, otherwise, you will need to enter a static ID.
Map the Target system ID and Account attributes to the respective columns.
Click Done.
Click Run for submission.
Bravura Security Fabric displays a summary of the requests submitted.
You can click on the info icon in the request status column to view the status of each request, or use the Requests link from the main menu.
See Reports for more information on running reports.
Creating a pre-defined request
To create a pre-defined request:
Click Manage the system > Workflow > Pre-defined requests .
Click Add new…
Type a unique ID and Description .
Determine whether the pre-defined request is Enabled for use by end users.
Enable Accessible to requesters if you want the pre-defined request to be available to requesters outside of certification and reports.
Enable Accessible from report if you want the pre-defined request to be available in the Manage reports (rpt) module.
Enable Accessible from certification if you want the pre-defined request to be available for certification remediation.
Enabling this will reveal the Remediation type option, allowing you to select which types of remediation the pre-defined request can be used for.
Type a Help URL if you want to provide a longer description for users.
You can compose and post a web page that further describes this request, and enter its URL here. Users can open the URL by clicking the request description text wherever the text appears in the user interface.
Enable Authorizer must approve/deny each entitlement if you want the assigned authorizers to approve/deny each entitlement.
Determine the Intended recipients.
This determines where the request can be accessed (if it is accessible to requesters) and which types of certification remediation this request will be available for (if it is accessible to certification).
If the request is enabled, and accessible to requesters, and the intended recipients are:
Existing users, the request is available to users via the Requests links on the main menu or, if you set the Subject field to ”Managed groups”, the request is available via the Groups link on the main menu (see the next step).New users, the request is available to users via the Create a new user profile link on the main menu.Existing and new users, the request is available via any of the above.Existing groups, the request is available to users via the Groups link on the main menu.New groups, the request is available to users via the Groups link on the main menu.Non-user-based, the request is available to users via the Use pre-defined requests for custom operations link on the main menu.Network resources, the request is available to users via the Request access to network resources link on the main menu.Existing configuration object, the request operates on an existing object (such as a role) within Bravura Security Fabric. It allows requesters to modify, update attributes of, add/remove members from, or delete an existing role through a workflow with authorization. The Subject field determines which specific type of configuration object the request targets.New configuration object, the request creates a new object (role) within Bravura Security Fabric. It allows requesters to create a new role and optionally assign users to it, all through a workflow with authorization.
Requests where a configuration object is the recipient allow organizations to put role lifecycle management (creation, modification, deletion) under the same workflow/authorization controls as user provisioning. Instead of an administrator directly creating or modifying a role in the admin console, the change goes through a request that can be authorized, tracked, and audited. Unlike "Existing users" or "New users" (which provision accounts/entitlements for people), configuration object requests change the system configuration itself; they create, modify, or remove the roles and entitlements that other requests reference.
If the intended recipients are
Existing users,Existing configuration object, orNew configuration object, select a Subject.If the intended recipients are
Existing users(with the Subject field set toManaged groups) orExisting groups, determine the Applicable subject selection.This controls whether the request is displayed based on the number of selected groups in the Groups app. Assuming the user has appropriate access to the request, ”Single subject” makes the request available if exactly one group is selected. ”Multiple subjects” makes the request available if two or more groups are selected.
If the intended recipients are
Existing groups, enable Authorizer must approve/deny each entitlement as applicable.Enter Instructions if you want to provide users with additional information.
These instructions will be presented to users after they select the pre-defined request.
Click Add.
Next:
Define operations that are part of the pre-defined request.
Defining operations
Select the operations to be performed on resources to define what will happen once a pre-defined request is approved.
Note
If adding a resource will cause the pre-defined request to be in violation of a segregation of duties rule, adding the resource will be disallowed or its default operation will be changed to Delete.
To define operations for a pre-defined request:
Navigate to the Pre-defined request information page for a PDR (General tab).
Select the Operations tab.
Select the sub-tab link for:
Existing account to add operations for existing accounts (e.g., update, enable, disable, delete, move).
New account to add operations to create accounts based on a template account.
Managed group to add operations to join, leave, or edit managed groups.
Role to add operations to assign or revoke roles.
Profile to add operations to enable or disable profiles.
Configuration object to add operations to create a configuration object or add an entitlement member.
Custom to add custom operations.
This type of operation may be used, for example, in scripted solutions for onboarding of systems and accounts, and collecting target credentials for systems being onboarded.
Define operations on specified entitlements or resources, where applicable.
Define operations on either all or user-selected entitlements, where applicable.
For Profile operations, determine whether the enable or disable profile operation is required or optional.
Operations on specified entitlements/resources
To define operations on specified groups, accounts, or roles:
Click Select… in the upper table.
Select one or more target systems (for existing accounts), template accounts (for new accounts), managed groups, or roles, then click Select.
Select an Operation from the drop-down list next to the entitlement, if options are available.
For operations that add a group membership, account, or role, determine whether the new entitlement or resource is required or optional by selecting appropriate option in the Necessity column.
Click Add operation next to an entitlement or resource to add more operations, if applicable.
Click Update.
It helps to understand how the necessity column will work if you run the pre-defined request from a report, or from the View and update profile (IDR) module. The table below shows the impact of the required and optional setting on the pre-defined request:
Necessity | Submitted via report output | Submitted by an end user |
Required | Attributes are mapped automatically to the report output. | The operation cannot be removed from a request. |
Optional | You will be prompted to map the pre-defined request attributes to the report output. | The operation is optional. |
Operations on either all or user-selected entitlements
If you select an operation from the checklist in the lower table and click Update, this has one of two effects, depending on whether it applies to ’All’ or ’User-selectable’ entitlements (not all operations have both):
All means the operation will be performed on all entitlements of one type.
If ’All’ is selected for update accounts, only the accounts with an account attribute mapped to the modified profile attribute will be updated.
User-selectable means the operation will only be performed on entitlements selected by the requester, who can choose from all entitlements of one type.
For example, if you select ”Assign group” for managed groups, users will be able to join or leave any managed group on any target system.

Note
There is no place in the user interface to configure authorizers for enable/disable profile operations. You must use the authorizer criteria modification plugin to add authorizers on the request or set the number of authorizations required. Enable/disable operations in requests are affected by the MIN AUTHORIZERS variable.
Next:
Select attributes to be displayed on the request form.
Selecting attributes for requests
Select attribute groups to determine what information needs to be gathered for a request.
To define attributes for a pre-defined request:
Navigate to the Pre-defined request information page for a PDR (General tab).
Select the Attributes tab.
Click Select… .
Select the attribute groups you want to add to the request and click Select.
Defining default attribute values for requests
To specify default attribute values for a request:
On the page, search for and/or select the relevant attribute group.
Enter default values for attributes as required.
Click Update.
The display of attributes is controlled by attribute group permissions; for example, you can set a default value for an attribute that is neither viewable nor editable to a requester.
Next:
Add access controls to the request.
Defining access controls
You can use user classes to create controls determining which users can access a pre-defined request.
To add access controls:
Navigate to the page.
Select the Access control tab.
Click Select… to select existing classes, or Add new... to create a new class.
Configure Participant mapping for each user class you add (where applicable).
Select and create user classes until you have defined control filters.
If your criteria includes multiple user classes, define whether users are required to match All of the user classes or Any of the user classes .
When the Intended recipients is set to anything other than ”Existing users” and/or ”New users”, only single-participant user classes will be available, and mapping will not be required.
Access controls do not apply to certification remediation. If the certification initiator allows it, all reviewers will be able to submit that pre-defined request for remediation.
Example
To define access control in a way that allows a manager to update the profile of his subordinate:
Select the default ”MANAGER INDIRECT” user class
Configure the participant mapping as follows:
MANAGER
REQUESTER
SUBORDINATE
RECIPIENT
Next:
Configure the request wizard.
Defining the request wizard order and display
When a user makes a request, Bravura Security Fabric will present a wizard ; a series of form pages which lead the user through a series of steps. This allows users to make requests without having to know the complex details of the pre-defined request.
The Order and display tab allows you to rearrange the order of the different pages in the pre-defined request that require user input, and you can decide to display them or not.
Pages are added to the wizard as you add operations that require user input; for example, adding the ”Assign group” operation adds the ”Join or leave groups” page. Every attribute group added to the pre-defined request will have its own page on the wizard.
When a pre-defined request is first added, it will have the following pages by default (in the given order) before any operations, or attribute groups have been added:
Resolve enforcement violations
Resolve violations
Set initial password
The Display column determines whether a page will be shown to the requester. All default operations are set to ”Auto”, which means Bravura Security Fabric will decide whether to show the page depending on the requested resources so far; for example, users only need to set an initial password if the create account operation is included. Choose ”Hide” when the values are provided by a plugin.
Warning
Misconfiguring this page can cause the pre-defined request to not function properly. Ensure you thoroughly test any changes.
Using dryrun mode for requests
To test product configuration without requests actually being submitted, use dryrun mode:
Log in to the Front-end (PSF) as
superuser.Click Manage external data store.
Select the hid_global_configuration table.
Locate the following rule:
namespace = AUTOMATIONsetting = OPERATIONkey = dryrunClick the Edit icon at far left.
Enter the desired value :
Trueprevents requests from being submitted.Falseallows requests to be submitted.
If you are testing the pre-defined request function, for example, and your requests are not going through, check that this value is set to
False.Click Done.
Click Update.
Deprecating pre-defined requests
You can deprecate a pre-defined request to render it unusable, while preserving it for auditing purposes. You cannot deprecate a pre-defined request if it is still in use. A deprecated pre-defined request can be restored at a later date.
To deprecate a pre-defined request:
Navigate to the page.
Select the checkbox next to the deprecate button and enter a Reason for deprecation if desired.
Click Deprecate.
Restoring a pre-defined request
To restore a pre-defined request:
Click Manage the system > Workflow > Pre-defined requests to see the list of existing pre-defined requests.
Select the pre-defined request you want to restore.
Click Restore.
Deleting pre-defined requests
You can delete pre-defined requests that are disabled and have not been used yet. Requests are considered “used” once they have been attempted, even if the request was not finalized. You cannot delete a pre-defined request if it is enabled or deprecated. If you want to delete a request but cannot since it has been used, then deprecate the request.
To delete a pre-defined request:
Click Manage the system > Workflow > Pre-defined requests .
Select the checkboxes next to the pre-defined requests you want to delete.
If a checkbox is not available next to a pre-defined request you want to delete, then the pre-defined request is not disabled. Select the pre-defined request, and restore and/or disable the pre-defined request as necessary, then return to the Pre-defined requests page.
Click Delete and confirm the deletion.
Alternately, you can delete a disabled pre-defined request from its page.