Self-service system management
Users with the "System Trustees" privilege can use self-service requests to onboard, update, and offboard systems managed by Bravura Privilege .
System trustees have access to the following pre-defined requests:
Onboarding a system
Users assigned as system trustees can use the System: Onboard request to onboard a system.
Click below to view a demonstration:
From the home page, click Manage resources.
Click System: Onboard.
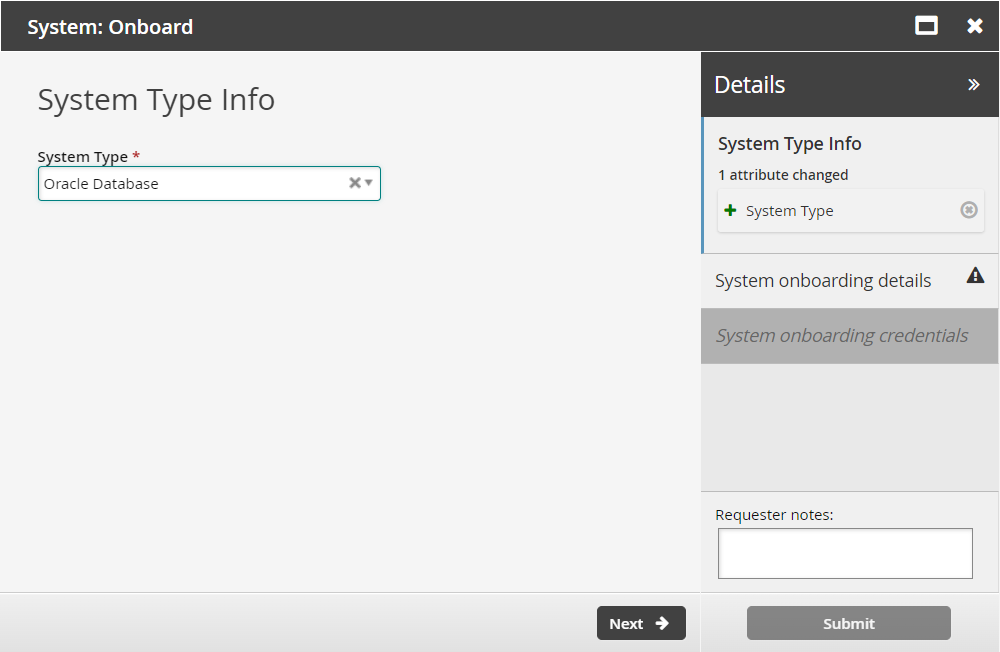
Select a System Type from the drop-down menu.
Valid system types depend on the scenario components installed, and can include:
CentOS
Windows Server
Oracle
MSSQL
Vault System
Red Hat Enterprise Linux
SUSE Linux
Solaris 10+ Server
Vault systems are null targets that can be used to simulate a target system that cannot be targeted another way.
Click Next .
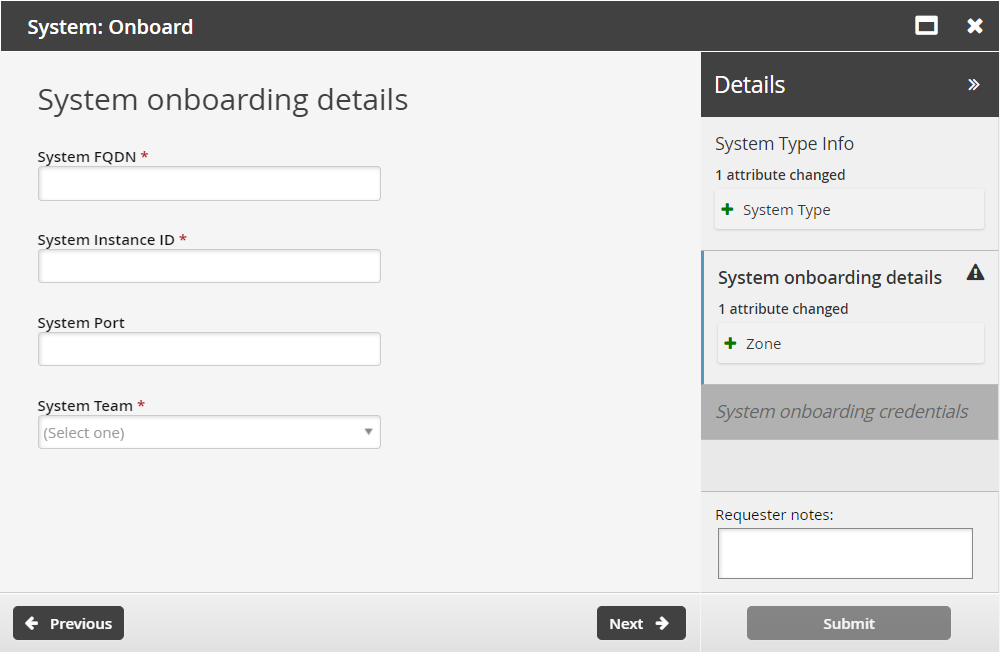
Enter system onboarding details. including the System Team, the team that will be able to access the system. Depending on the system type, other attributes may include:
System FQDN The system’s fully qualified domain name
System Team the team that will be able to access the system
System Instance ID (Oracle)
System Port Format: 1-65535
Zone The proxy zone or network (Windows, optional)
See Example: Expose the ZONE attribute for an example of how to configure this attribute.
Connect using managed account (Windows, optional)
See Example: Expose the USE_MANAGED_CREDENTIALS attribute for an example of how to configure this attribute.
Click Next .
Enter System onboarding credentials as required.
For Windows systems, if Connect using managed account was selected in the previous step, you must enter the account ID to use for target system credentials.
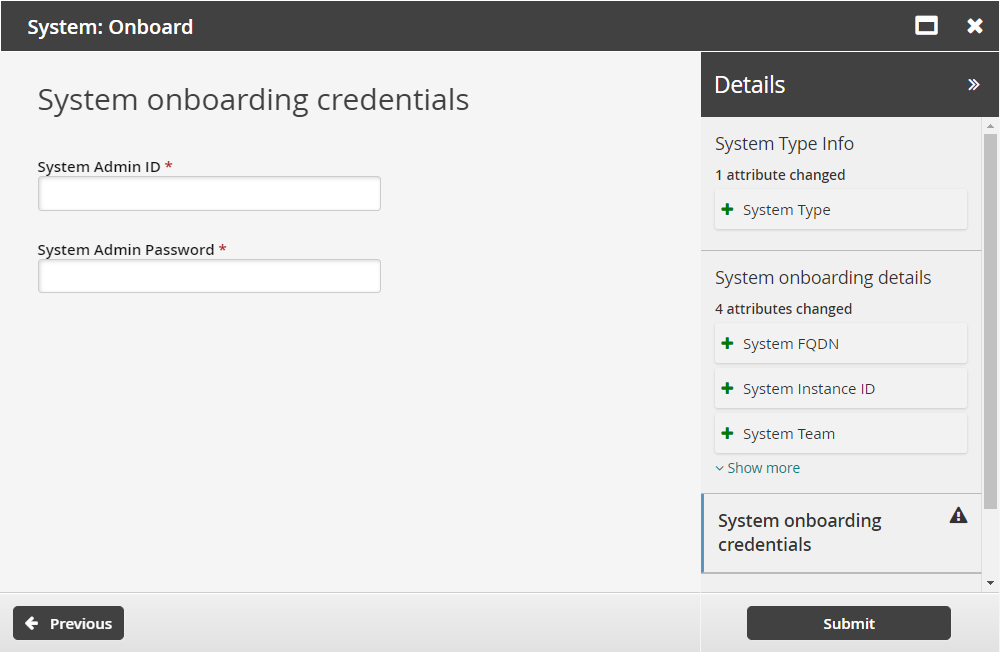
Click Submit.
Bravura Security Fabric notifies authorizers to review the request if required.
Click the View request link at the top of the page to view the status of the request.
Once the request has been approved, account trustees can manage accounts on this system. Systems are onboarded in real time; there is no need to wait for auto discovery to load the system into the database.
API automation for system onboard
Once the API has been configured (See "SOAP API" in Bravura Security Fabric Remote API (api.pdf) and your script has been authenticated to the API (Login or LoginEx API calls), the WF API calls can be used to create an API request.
Use the WFPDRSubmit function to create a workflow request and submit the request for publishing.
When submitting a request, use "ONBOARD_SYSTEM" as the PDR ID. The request uses the following attributes:
attrkey | value |
|---|---|
SYSTEM_TYPE | The system type:
|
FQDN | The fully qualified domain name of the system to be onboarded. |
INSTANCE | Optional: System Instance ID (Oracle system type only). |
PORT | Optional: System port (format: 1-65535) |
ZONE | Optional: Proxy zone. Leave it blank if not using proxy server. |
MS_TEAM | The team that the system will be assigned to |
USE_MANAGED_CREDENTIAL | T to use a managed credential, F to use system credentials. |
ADMIN | Administrator ID of the system. Leave it blank if USE_MANAGED_CREDENTIAL is set to T. |
ADMIN_PASS | Administrator password of the system. |
SYS_UUID | A universally unique identifier that will be used as the target ID of the onboarded system (Optional). |
MANAGED_ADMIN | The account GUID of the managed account being used as the admin credential. Leave it blank if USE_MANAGED_CREDENTIAL is set to F. |
Important
If an attribute value contains a comma, you must enclose the value in triple quotes (""") to prevent the CSV parser from splitting it into multiple values. For example:
"SYSTEM_TYPE","FQDN","ZONE","MS_TEAM"
"WINNT","server.corp.domain","none","""TEAM-A,TEAM-B"""
ONBOARD_SYSTEM batch request sample:
"SYSTEM_TYPE","FQDN","ZONE","MS_TEAM","USE_MANAGED_CREDENTIAL","ADMIN","ADMIN_PASS","SYS_UUID"
"WINNT", "AMS-WIN8-7M9.corp1.domain","none","TEAM-000000","F","Administrator","F00bar123","d39b55f0-7a6a-487a-abe4-bd8c9ec1679c"
Example: Onboard a system
This example shows you how to install an optional scenario component to support Windows system onboarding. Acting as a trustee, we will onboard a system for our team.
Requirements
This example assumes:
Bravura Security Fabric and Connector Pack are installed.
Bravura Privilege Pattern is installed.
Global team groups and privileges are set up.
Click below to view a demonstration:
Install the Windows onboarding and disclosure components
To manage accounts on a Windows workstation, the Windows system type component must be installed. The RDP disclosure component will also be installed as it provides access disclosure to Windows workstations through RDP sessions.
Log in to the Bravura Security Fabric Front-end (PSF) as superuser .
Click Manage Components > Scenario.
Select two components:
Scenario.pam_system_type_winntScenario.pam_disclosure_rdp_local_accountClick Install component(s) from the Actions panel on the right.
The component management program installs the components along with any dependencies. You should see Completed install for component messages for the selected components in the TASK STATUS section of the Actions panel .
Onboard a Windows system
Open another browser tab to Bravura Security Fabric .
Log in to the Front-end (PSF) as
cordeh. Since she has the System Trustees privileges for the Windows Account Admins team, she is able to onboard systems to the team.In the REQUESTS section of the main menu, click Manage Resources.
Select System: Onboard.
In the System Type field, select Windows Server.
Click Next .
Enter the following:
System FQDN wkstn1.bravura.corp
System Team Windows Admin Accounts
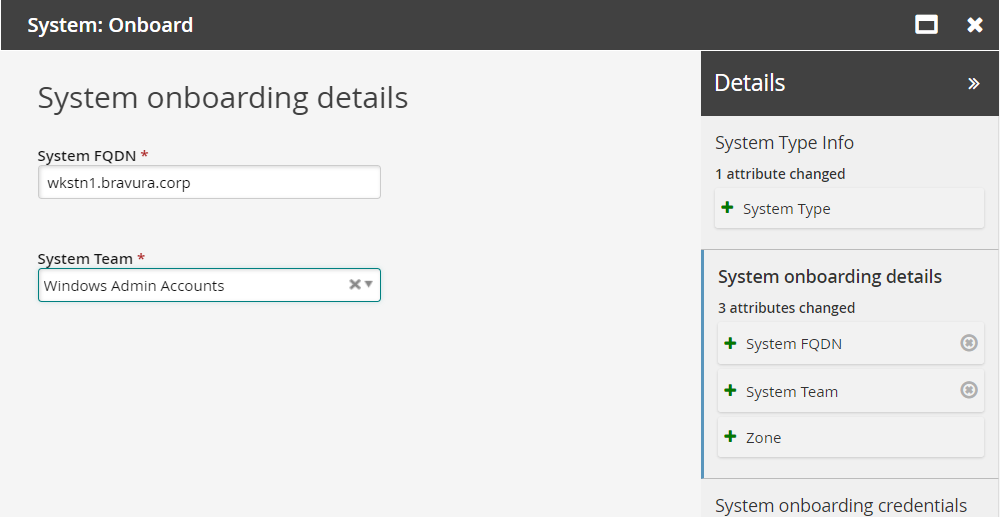
Click Next .
Add the credentials for the Windows server.
Click Submit.
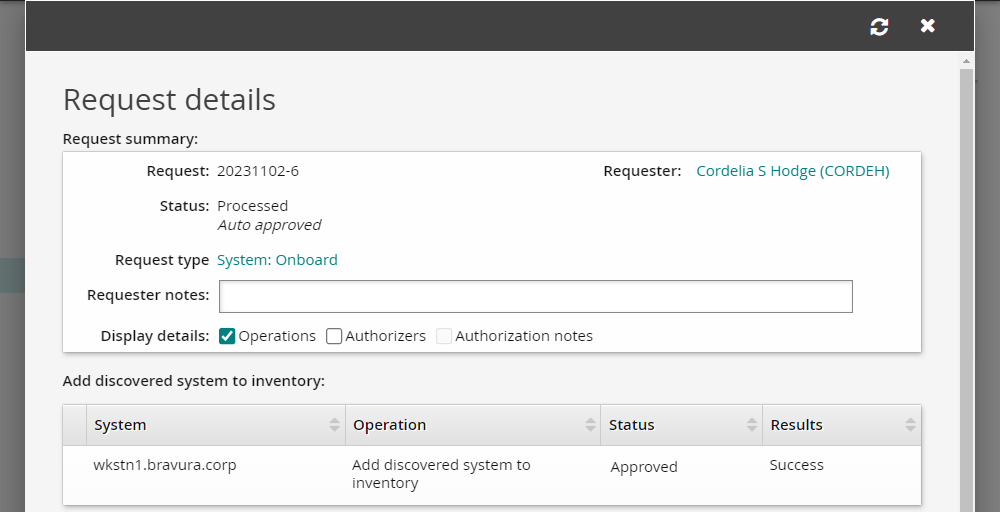
Click the View request link at the top of the page to view the status of the request.
In the DETAILS panel on the right, click the Request: ID link to review the details of the request.
Next to Display details: check the box for Operations to ensure the onboarding operation is listed as successful.

Verify the managed systems
When a system is successfully onboarded to a team, it will be listed as a managed system in Bravura Security Fabric .
To view the managed systems in Bravura Security Fabric :
Log in to the Bravura Security Fabric Front-end (PSF) as superuser.
Click Manage the system > Privileged access > Managed systems.
Verify that your Windows target system is listed as a managed system.
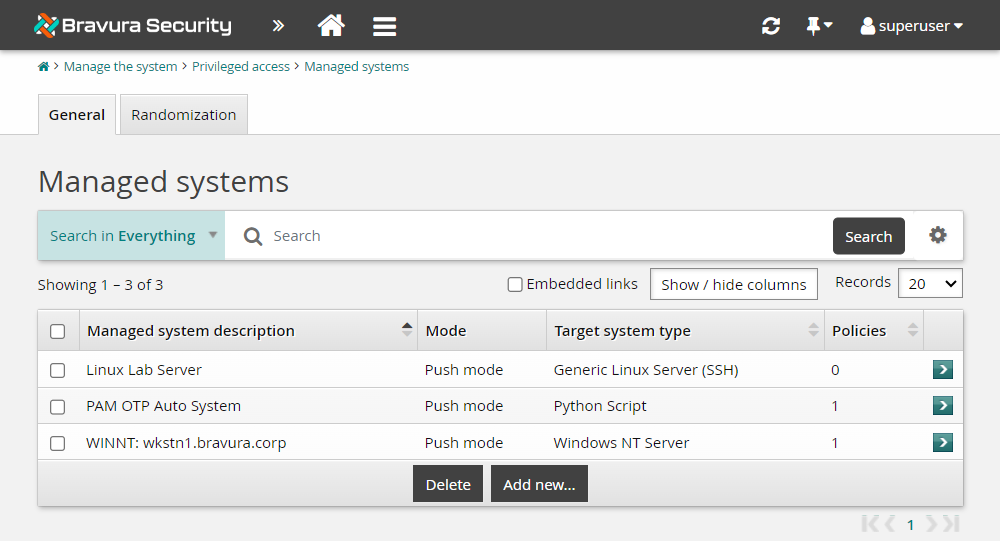
If your onboarded Windows system shows up in the Managed systems list, then you have completed the lab successfully. Systems onboarded through the System: Onboard pre-defined request are automatically added to the ONBOARDED_ACCOUNTS managed system policy. The managed system being part of a managed system policy allows accounts to be managed from that system and onboarded to teams.
Example: Onboard systems using batch request
Onboarding systems can take a significant amount of time when done manually. For this reason, Bravura Security has implemented a bulk request submission component to enable managed system onboarding in bulk using a CSV file containing system details.
This example demonstrates steps of installing the batch request component, building a CSV input file, and then using the CSV file to onboard multiple managed systems.
Install Functional.hid_batch_request_submit
Log in to the Bravura Security Fabric as superuser.
Click Manage components.
Search for
Functional.hid_batch_request_submit.Select the component and click Install.
See Managing components for more on component installation.
Create a CSV file with batch information
Create a CSV file as shown in the API automation for system onboard table.
Run the batch pre-defined request (PDR)
Log in as a profile with permissions to onboard systems to a team.
Click on Manage resources.
Click on the Submit a request batch via CSV request.
Select "System: Onboard" under Pre-defined request to submit.
Enter the batch request reason (Optional).
Select your CSV Request file.
Click Submit.
Confirm the requests have gone through
Log in as a profile with permissions to onboard systems.
Click Requests > All.
Find the most recent batch request and select it.
Click the request link on the top right corner.
On the request details page, select the check box for Operations .
The status should report 0 failed. If this is not the case you will need to troubleshoot the issues logged in idmsuite.log .
Example: Submit access requests for multiple users
Submitting individual access requests for many users can be time-consuming. The Functional.hid_batch_request_submit component enables you to submit multiple access requests at once using a CSV file. This is useful in Bravura Identity scenarios, such as organizational changes, where many users need to be moved to a new manager simultaneously.
This example demonstrates how to install the batch request component, identify the required request attributes, build a CSV input file, and submit batch access requests for multiple users.
Install Functional.hid_batch_request_submit
Log in to the front-end as superuser.
Click Manage components.
Search for
Functional.hid_batch_request_submit.Select the component and click Install.
This installs a BATCH_REQUEST pre-defined request (PDR) that is available to all users by default. To limit access to specific users, modify the Access Control settings of the PDR.
Users who have access will see a Use pre-defined requests for custom operation option under the Requests section on their landing page after login.
See Managing components for more on component installation.
Identify the request type and required attributes
Identify the request type you want to submit in bulk. For example,
MOVE-IN-ORGto change the manager for multiple users.Determine which request attributes are required for a successful submission of that request type.
For example, if all required fields for
MOVE-IN-ORGare already populated and only the manager needs to change, then the only required request attribute isORGCHART_MANAGER.To find the required attributes for a specific request type:
Identify the batchid for a successful execution of the request that the same use case.
The batchid for the request is displayed in the URL bar when you click the request in the app.
Once the batchid is identified, query the database:
select * from [reqinfo] where batchid = '<batchidhere>'
This returns the list of request attributes and their values that were used as inputs the request associated with the batchid. Use these as the basis for your CSV file.
Create a CSV file with batch information
Create a CSV file where each row represents a request and each column represents the RECIPIENT followed by the required request attributes:
RECIPIENT,REQATTR1,REQATTR2,...
BOB,VALUE1,VALUE2,...
For example, to submit MOVE-IN-ORG requests where only ORGCHART_MANAGER is needed:
RECIPIENT,ORGCHART_MANAGER
BOB,ALICE
Important
If an attribute value contains a comma, you must enclose the value in triple quotes (""") to prevent the CSV parser from splitting it into multiple values. For example, to specify an OU path that contains commas:
RECIPIENT,OU
BOB,"""OU=Groups,DC=corp,DC=domain"""
Note
The RECIPIENT column is required in the CSV file. This column identifies the user that each request applies to.
Submit the batch request
Log in as a user who has access to the BATCH_REQUEST PDR.
Navigate to the Requests section on the landing page.
Click Use pre-defined requests for custom operation.
In the Pre-defined request to submit field, specify the PDR ID for the request type you want to submit.
Enter a reason for the batch request (optional).
Select your CSV request file.
Click Submit.
The system first submits the BATCH_REQUEST. If processing is successful, the individual requests are submitted automatically. If the batch request fails, no additional requests are submitted and details on the failure are available in the logging.
Confirm the requests
Click Requests > All.
Find the most recent batch request and select it.
Click the request link in the top right corner.
On the request details page, select the check box for Operations.
The status should report 0 failed. If this is not the case, troubleshoot the issues logged in idmsuite.log.
Migrating a system to another team
Users who are system trustees of multiple teams can use the System: Update request to migrate a system to another team.
From the home page, click Manage resources.
Select the System: Update request.
Select a managed system.
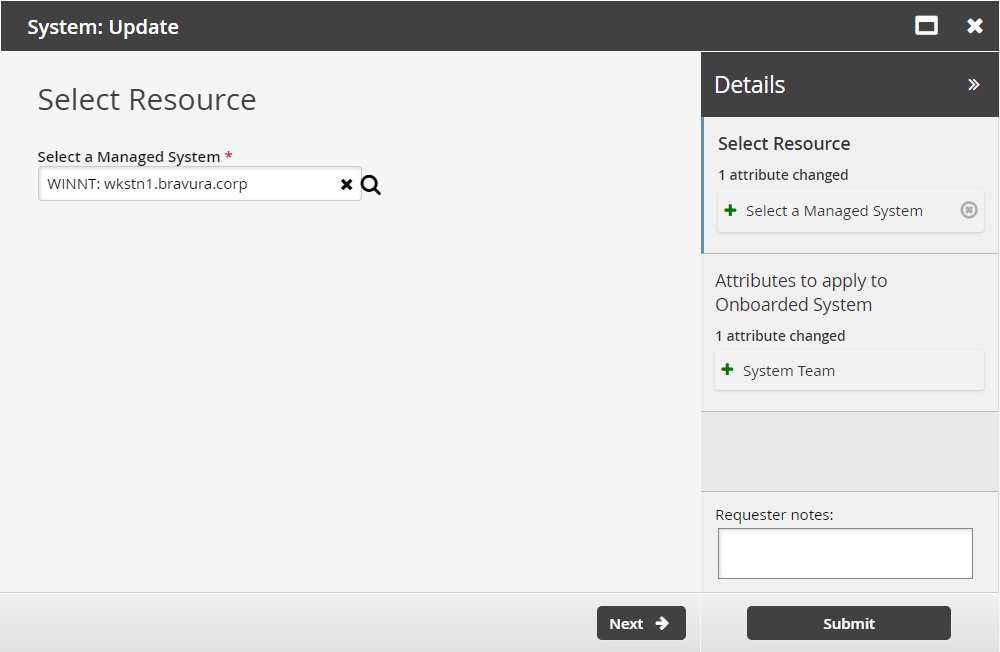
Click Next .
Select a team that will take over management of this system.
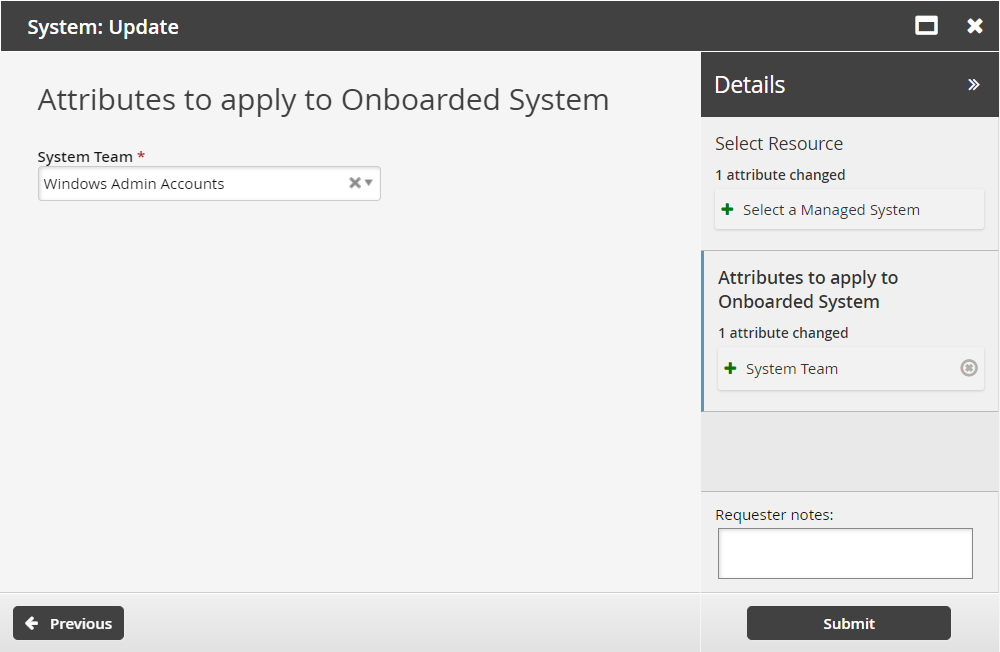
Click Submit.
Bravura Security Fabric notifies authorizers to review the request if required.
Click the View request link at the top of the page to view the status of the request.
API automation for system update
Once the API has been configured (See "SOAP API" in Bravura Security Fabric Remote API (api.pdf) and your script has been authenticated to the API (Login or LoginEx API calls), the WF API calls can be used to create an API request.
Use the WFPDRSubmit function to create a workflow request and submit the request for publishing.
When submitting a request, use ”UPDATE_ONBOARDED_SYSTEM” as the PDR ID. The request uses the following attributes:
attrkey | value |
|---|---|
HOSTID | The ID of the system. |
DESTINATION_TEAM | The team that the system will be assigned to. |
UPDATE_ONBOARDED_SYSTEM batch request sample:
"HOSTID","DESTINATION_TEAM"
"D39B55F07A6A487AABE4BD8C9EC1679C","TEAM-000001"
Offboarding a system
Users assigned as system trustees can use the System: Offboard request to disable, archive or delete a system.
Disable involves disabling listing of accounts on the system.
Archive involves moving the system and all of its accounts to an archive. All password history for the accounts will be kept. The listing operation for archived systems remains enabled. To disable the listing operation, run the System: offboard request with the "Disable" option.
Caution
If systems are decommissioned, and the listing operation is not disabled, it could cause discovery failure.
Delete involves removing the system and all of its accounts from the archive. All password history for the accounts will be lost.
You cannot delete a system that still has managed accounts associated with it.
From the home page, click Manage resources.
Select the System: Offboard request.
Select a managed system and an action to take.
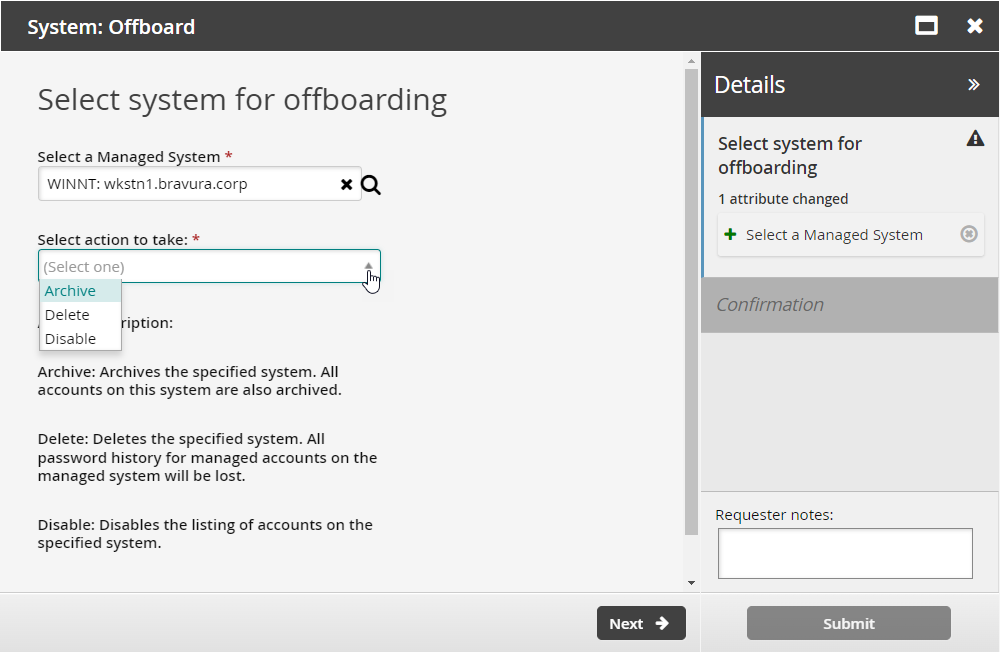
Click Next .
Confirm that you want to proceed.

Click Submit.
Bravura Security Fabric notifies authorizers to review the request if required.
Click the View request link at the top of the page to view the status of the request.
Archiving systems via reports
If the team management component has been installed, pre-defined requests to archive or delete onboarded systems can be submitted from the Managed System Summary report. This functionality can be used to perform scheduled offboarding for systems that cannot be offboarded through import rules.
To enable this functionality, the pre-defined request that will offboard managed systems must be available through reports, and the user submitting the request must be a trustee of the team to which the system is attached.
See Reports for more information.
API automation for system offboard
Once the API has been configured (See "SOAP API" in Bravura Security Fabric Remote API (api.pdf) and your script has been authenticated to the API (Login or LoginEx API calls), the WF API calls can be used to create an API request.
Use the WFPDRSubmit function to create a workflow request and submit the request for publishing.
When submitting a request, use ”ARCHIVE_ONBOARDED_SYSTEM” as the PDR ID. The request uses the following attributes:
attrkey | value |
|---|---|
HOSTID | The ID of the system. |
OFFBOARD_ACTION | DISABLE to disable listing of the system, DELETE to remove the system. |
CONFIRM_ACTION | T to confirm, F to cancel. |
REQUEST_TEAM | The team in which its system trustee(s) will be used to authorize the request. See REQUEST_TEAM attribute for more information. |
ARCHIVE_ONBOARDED_SYSTEM batch request sample:
HOSTID","OFFBOARD_ACTION","CONFIRM_ACTION"
"D39B55F07A6A487AABE4BD8C9EC1679C","DELETE","T"
The REQUEST_TEAM attribute is the team in which its system trustee(s) will be used to authorize the request. This can be a different value depending on which PDR is used. In some cases, the value is auto filled and in other cases, a value is not required.
PDR ID | API submittable | REQUEST_TEAM required | REQUEST_TEAM auto-filled |
|---|---|---|---|
BATCH_REQUEST | No | N/A | N/A |
CREATE_LARGE_CREDENTIAL | No | N/A | N/A |
UPDATE_LARGE_CREDENTIAL | No | N/A | N/A |
WEBAPP_DISCLOSURE_CREATE | No | N/A | N/A |
WEBAPP_DISCLOSURE_DELETE | Yes | No | N/A |
WEBAPP_DISCLOSURE_UPDATE | No | N/A | N/A |
TEAM-CREATE | Yes | Yes | Yes |
TEAM-DELETE | Yes | Yes | Yes |
TEAM-MEMBERS | Yes | Yes | Yes |
TEAM-UPDATE | Yes | Yes | Yes |
CREATE_VAULT_SYSTEM | Yes | Yes | Not required |
ARCHIVE_VAULT_SYSTEM | Yes | Yes | Yes |
UPDATE_VAULT_SYSTEM (1 - same team) | Yes | Yes | Yes |
UPDATE_VAULT_SYSTEM (2 - transfer) | Yes | Yes | Yes |
CREATE_VAULT_ACCOUNT (1 - team vault) | Yes | Yes | Yes |
CREATE_VAULT_ACCOUNT (2 - system vault - same team) | Yes | Yes | Yes |
CREATE_VAULT_ACCOUNT (3 - system vault - different team) | Yes | Yes | Yes |
ARCHIVE_VAULT_ACCOUNT | Yes | Yes | Yes |
UPDATE_VAULT_ACCOUNT (1 - team vault) | Yes | Yes | Yes |
UPDATE_VAULT_ACCOUNT (2 - system vault - same team) | Yes | Yes | Yes |
UPDATE_VAULT_ACCOUNT (3 - system vault - transfer) | Yes | Yes | Yes |
ONBOARD_SYSTEM | Yes | Yes, but not enforced | No |
ARCHIVE_ONBOARDED_SYSTEM | Yes | Yes, but not enforced | No |
UPDATE_ONBOARDED_SYSTEM | Yes | No | If the destination team is unset or the destination team is the same as the source team |
ONBOARD_ACCOUNT | Yes | Yes, but not enforced | No |
OFFBOARD_ACCOUNT | Yes | Yes | Yes |
UPDATE_ONBOARDED_ACCOUNT | Yes | Yes, but not enforced | No |
CREATE_PAMUTIL_API_USER | Yes | No | Not required |
 improper display of the team in update/archive when the destination team's vault trustee is not in a team owning the vault system. This will be fixed in a future release.