Requesting / Checking Out Privileged Access
Bravura Privilege allows regular users to request temporary privileged access to managed systems, for themselves or other users, using authorization workflow.
Privileged access can mean:
Access to a single administrative account
Access to keys
Access to documents
Temporary group membership using group sets
The ability to run commands on multiple systems and accounts
Requests can be auto-approved for certain users, or require approval by authorizers . If approval is required, Bravura Privilege notifies one or more authorizers, by email or other means, that they need to review the request. Most requests should be auto-approved; when an authorizer receives too many requests, they tend to approve requests without reading them. This is called approver fatigue .
Checking out account access does not allow a user to reset or change the account’s password.
If approved, a user can check out the requested privileged access. Broadly, the check-out workflow proceeds as follows:
A user logs into the Front-end (PSF) and clicks the Privileged access link.
From the available menu options, the user chooses:
Accounts to select one or more administrative accounts.
Account sets to select an existing account set.
Group sets to select from a list of group sets.
The user selects an account, group set, or account set and begins the request for access.
The user enters required information, including the time needed for the check-out, and submits the request. You can grant permission for users to bypass this step and proceed to Step 6.
Bravura Privilege notifies appropriate authorizers who must log in to approve, modify, or deny the request.
If approved, the user logs in to check out the access privilege. The account access or group membership applies once they have it checked out.
In the case of account check-outs, access disclosure plugins provide the user with access to the password or automatic connection to the managed system.
In the case of account set check-outs, user can access each individual account included in the set and may be able to run command on multiple systems.
The user checks in when finished with the accounts or group membership. Bravura Privilege forces the check-in after a certain time. The user can check out and check in once during an authorized interval.
In the case of account check-outs, the password is randomized upon check-in.
Checking access privileges in and out allows Bravura Privilege to control and audit who has access to an account or group set and when, and provides "dual-key" limitations on account access.
Terminology
The following terminology is introduced in these sections:
Requester A requester is a person who submits an access change request. The change may be to alter the requester’s own access to systems, or to alter another user’s access privileges.
Recipient The recipient is the person whose access privileges change once an access change request is approved and fulfilled.
Authorizer A user who can review and act on security change requests.
Privileged accounts A privileged account is a login ID on a system or application which has more privileges than a normal user. Privileged accounts are normally used by system administrators to manage the system, or to run services on that system, or by one application to connect to another. Examples include Administrator on Windows, sa on SQL Server and root on Unix/Linux.
Group sets A predefined set of one or more groups, defined within the scope of a managed system policy, which can be checked out – that is, temporarily attached to an authorized user’s (normally unprivileged, pre-existing) account.
Account sets A set of accounts from one or more managed systems that are used for temporary account access. This allows users to check out multiple accounts in a single operation, run commands or scripts on checked out accounts, and collect program output or log files from multiple systems.
Authentication type Authentication type refers to the operation to perform once users are granted temporary access to accounts, account sets, or group sets.
Getting started
If granted appropriate permissions, users can use the Privileged access app to:
Request and check out single account access
Request and check out account set access
Run commands with account set access
Request and check out group set access
Request check-out extensions
Check in access of another user
Override and randomize passwords
Force randomize passwords
Access password history
For general information about using Bravura Security Fabric applications see Using Apps .
Single Accounts
Bravura Privilege allows you to request temporary privileged access to accounts, for yourself or other users. If approved, you can check out the requested privileged access. On single accounts, privileged access can mean:
Access to the ID and password of an administrative account
Connection via remote desktop connection
Connection via SSH public key authentication
Some other means
When you check in, or a certain time expires, your access is revoked. You can check out the privileged access only once for every approved request. In some cases you may be pre-approved to check out privileged access.
Requesting single account access
Unless you have pre-approval to check out privileged account access, you must submit a request to be reviewed by authorizers. If you are pre-approved, you can skip to Pre-approved access .
To request permission to check out privileged single account access:
Click Accounts under the PRIVILEGED ACCESS heading in the Filter panel.
The Results panel will list the available accounts and their current status.
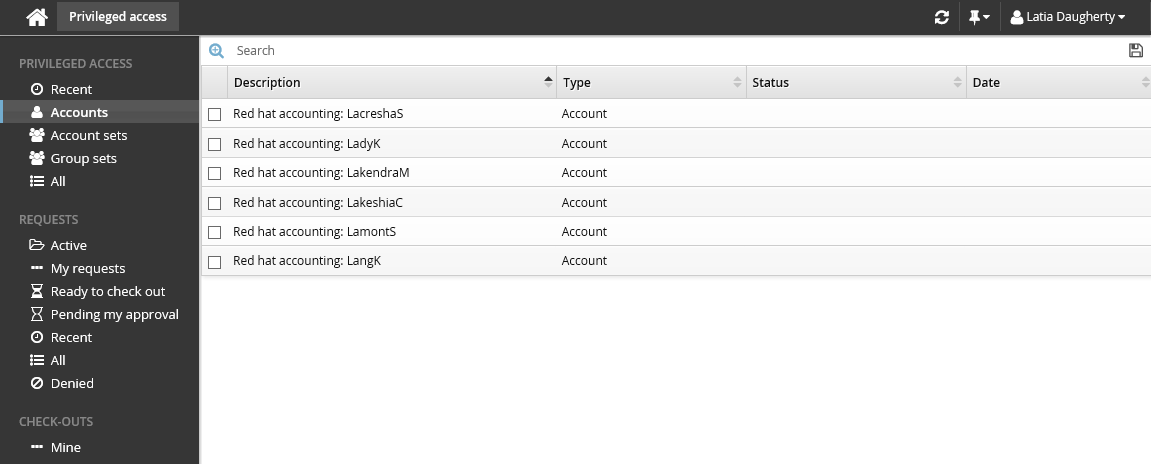
Alternatively, you can click Recent to see privileged accounts you have requested before.
Select an account.
Select the account you want to view details about, request check out, or check out access (if you have been granted access). Depending on the configuration, you may be able to view account access status details and check-out details. Various options may be available in the Actions panel, such as:
Request check-out if account access can be requested
View request if you have an existing request awaiting approval
Check out if there is an existing approved request for this account
Configured disclosure plugins if you already have this account checked out
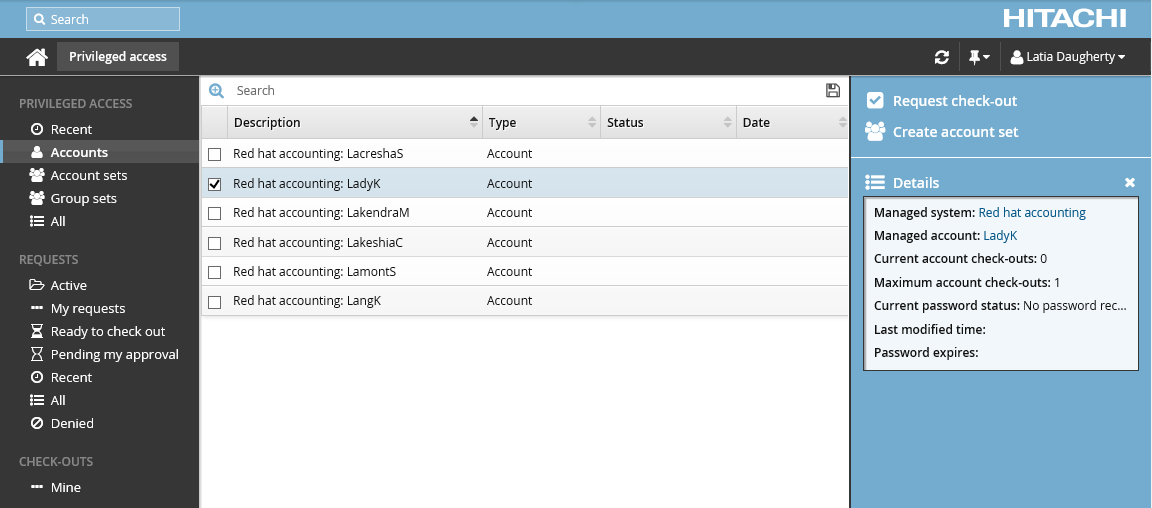
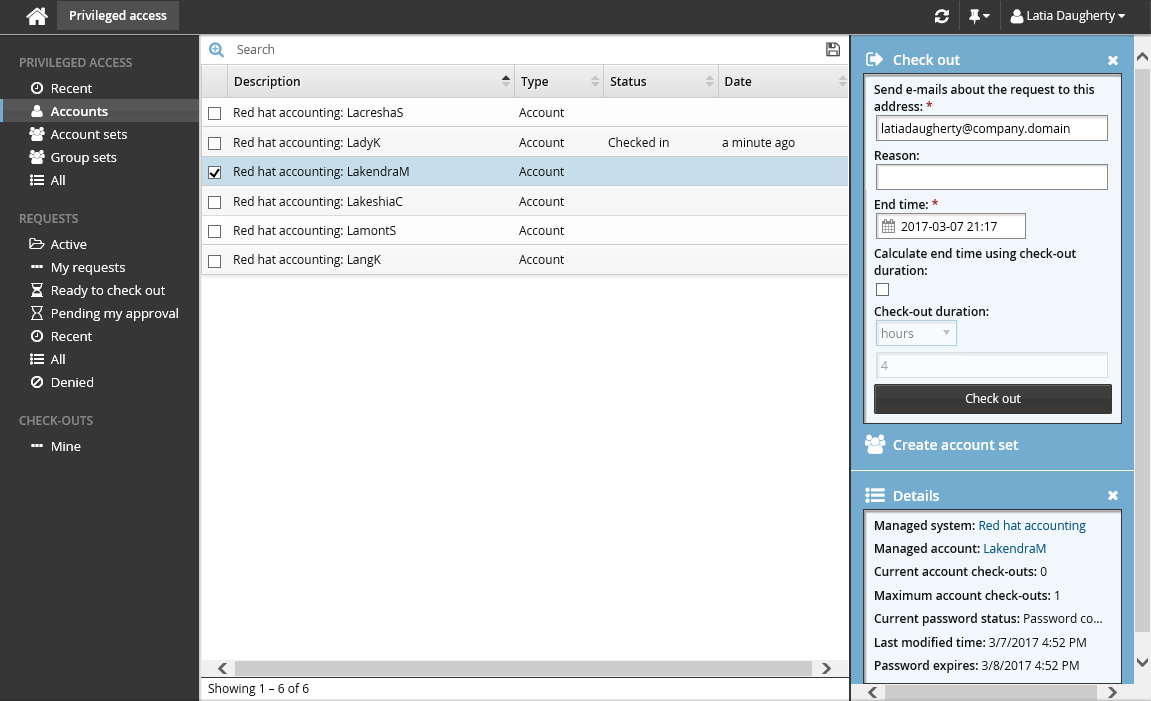
Click Request check-out in the Actions panel to open the request details form.

Enter request details:
Optional : Edit the default Request description.
Enter Requester notes to be displayed to the authorizers.
Enter notification details if needed.
If the request is for another user, click the search icon
 under Recipient to search for the recipient’s ID.
Specify the period that you want the access to be available for check-out.
Select the Start time and End time.
or
Select the Calculate end time using check-out duration checkbox, choose a duration unit and type the number of days, hours or minutes.
The duration is affected by the configured maximum and minimum check-out intervals. It must start later than the current time.
Select an Operation to perform for check-out and check-in.
Depending on configuration, these authentication types are available for you to choose:
Select Password to connect to the account using password authentication.
Select SSH key to connect to the account using SSH authentication. If selected, you must also specify a SSH public key (from your profile) to use for SSH public key to add to account.
Enter values for other request attribute fields as required.
Click the Submit button at the bottom of the request details form.
Bravura Security Fabric issues the request, notifies appropriate authorizers, and displays a summary of the request.
If you are assigned as an authorizer capable of approving account access check-out requests, the request may be automatically approved, depending on which managed systems you are assigned.
Checking out single account access
Once you have approval you can check out privileged account access, as long as the number of allowable simultaneous check-outs has not been exceeded.
Requested and approved access
To check out account access after your request is approved:
Click Ready to check out under the REQUESTS heading.
Alternatively, click the Your privileged access request has been approved link on the main menu.
Select the account you want to check out.
Click Check out.
The Privileged access app displays available actions in the Actions panel to the right.

If the account access has already been checked out and the check-out limit has been reached, Bravura Security Fabric notifies you when the access is available for check-out again.
Alternatively, if you already have approved access, you can also:
Search for the account you want to check out under the PRIVILEGED ACCESS heading.
Select the account you want to check out.
Click Check out.
Pre-approved access
To check out pre-approved account access:
Click Accounts under the PRIVILEGED ACCESS heading to see available accounts.
Select an account from the Results panel.
Click Check out in the Actions panel to open the check-out details form.
If you want notification sent to an address other than the one shown, change the value in Send emails to this address with information about the request.
Click the Check out button.
Using single account access
Once you have checked out you can:
Use the available access disclosure plugins to access the privileged account within the time given. For information about each access disclosure plugin see Access disclosure plugins .
Depending on your permissions, you may be also be able to:
Override or randomize passwords
Access password history.
To view your own check-outs, click Mine under the CHECK-OUTS heading in the Filter panel on the left.
You can also access your check-outs under the PRIVILEGED ACCESS heading, by searching and selecting the account you have access to.
Your access is revoked once your check-out time expires, or you check in your access.
Checking in single account access
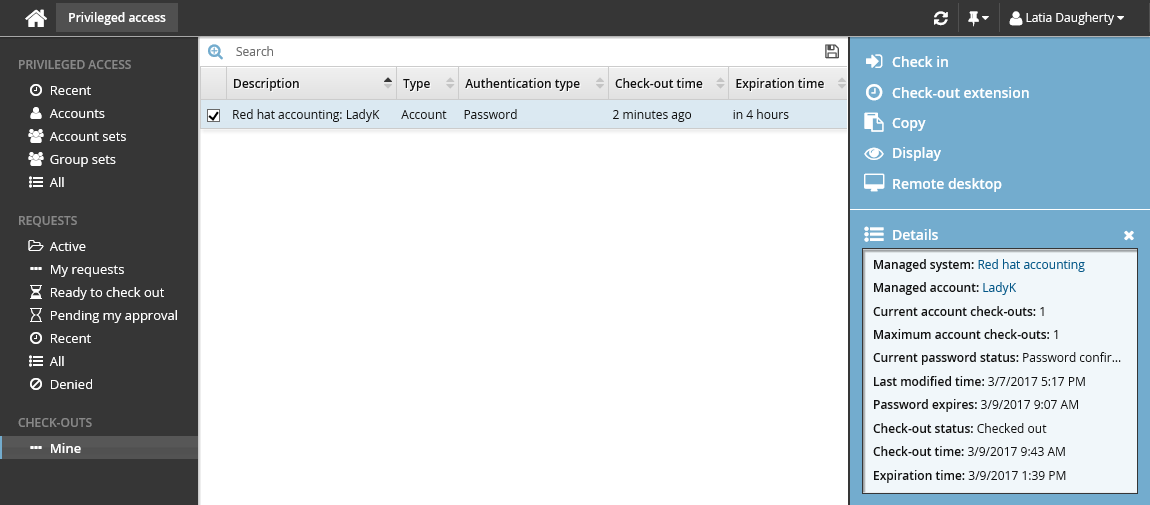
To check on the expiry time and check in an account:
Click Mine under the CHECK-OUTS heading.
Alternatively, click Active to find the checked out account.
The details of your check-outs are displayed in the Results panel, including the expiration time.
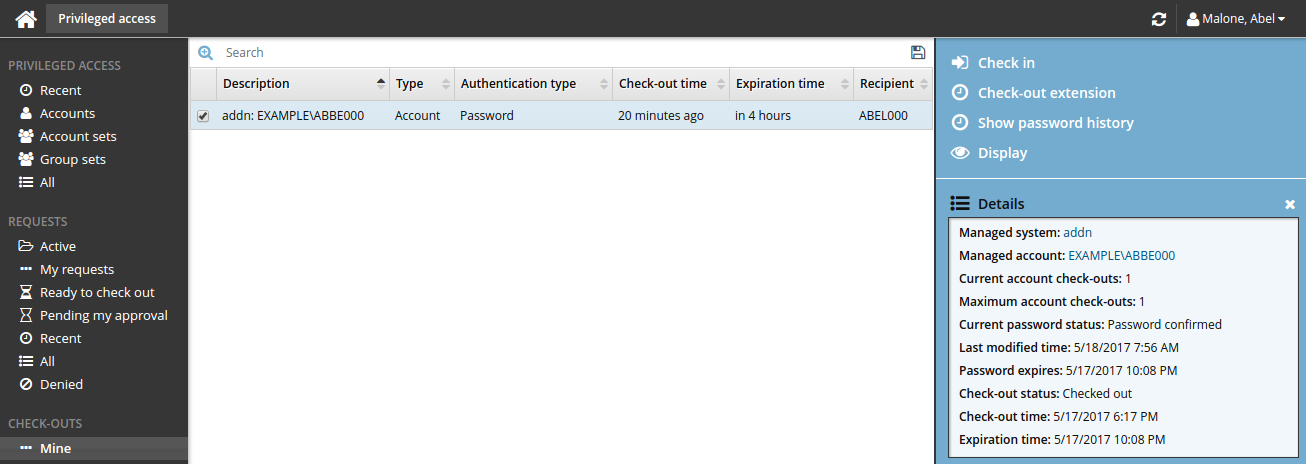
Select an account from the Results panel to display the check-out details in the Actions panel.
Click Check in when you no longer need the account.
If you need to access the account again, you must submit another request.
Accounts can also be checked in by searching and selecting the checked out account under the PRIVILEGED ACCESS heading.
Use case: Checking out a single account
This use case demonstrates the typical workflow steps followed when a regular user requests to check out a managed account.
Log into the Front-end (PSF) as a regular user.
Click Privileged access to open the Privileged access app.
Click Accounts under the PRIVILEGED ACCESS heading to display the available accounts in the Results panel.

From the Results panel select the account you want to check out.
Click Request check-out in the Actions panel.
Review the required information for the request.
Enter a request reason in the "Requester notes" field to be displayed to the authorizers.
Click Submit at the bottom of the form.
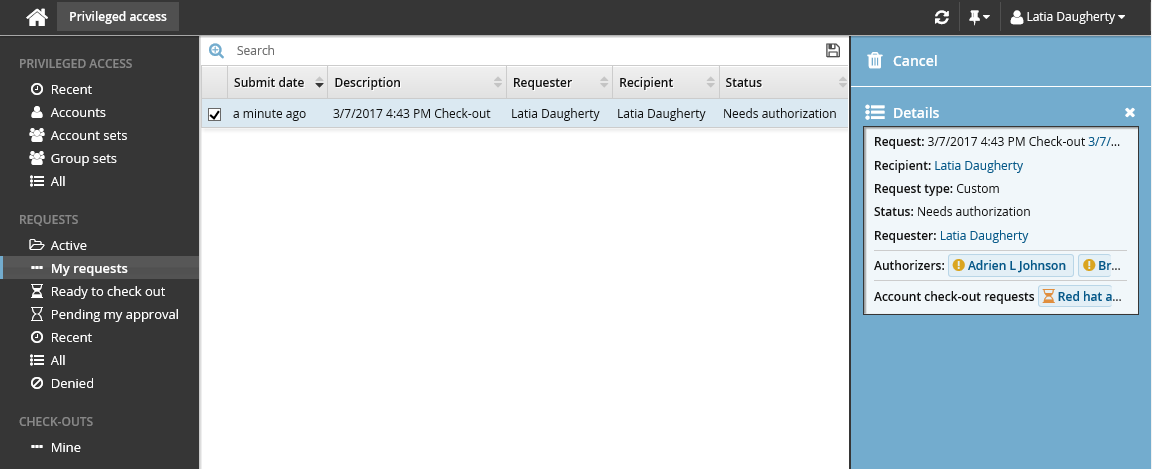
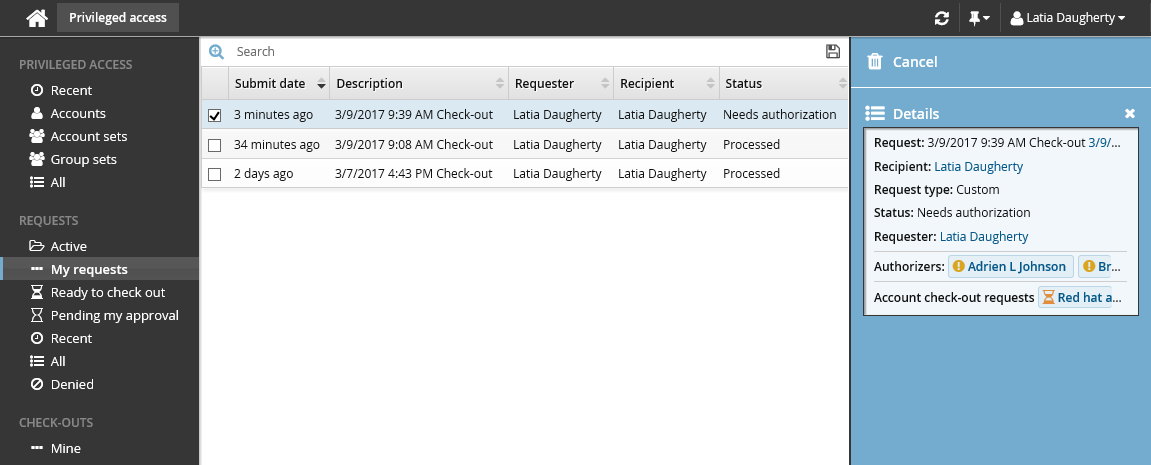
Bravura Security Fabric issues the request, notifies the appropriate authorizers, and displays the a summary of the details in the Actions panel.
You can click on the various links under the REQUESTS heading in the Filter panel to view your request status.
To authorize the request:
Log into the Front-end (PSF) as an authorized user.
In this example, you can see in the details of the request, the authorizer is Abbie Lester.
Click You have 1 request(s) awaiting your approval.
This opens the Requests app.
Click Active under the REQUESTS heading to display the active request.
Select the request you want to review from the Results panel.
The details appear in the Actions panel for you to review.
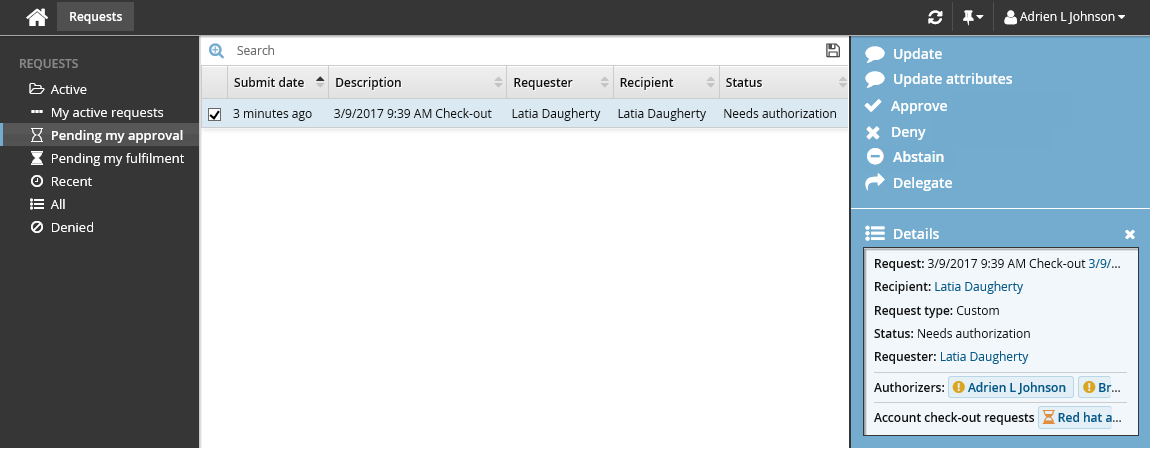
Click Approve.
You have the option to include some notes in the approval.
Click Approve again.
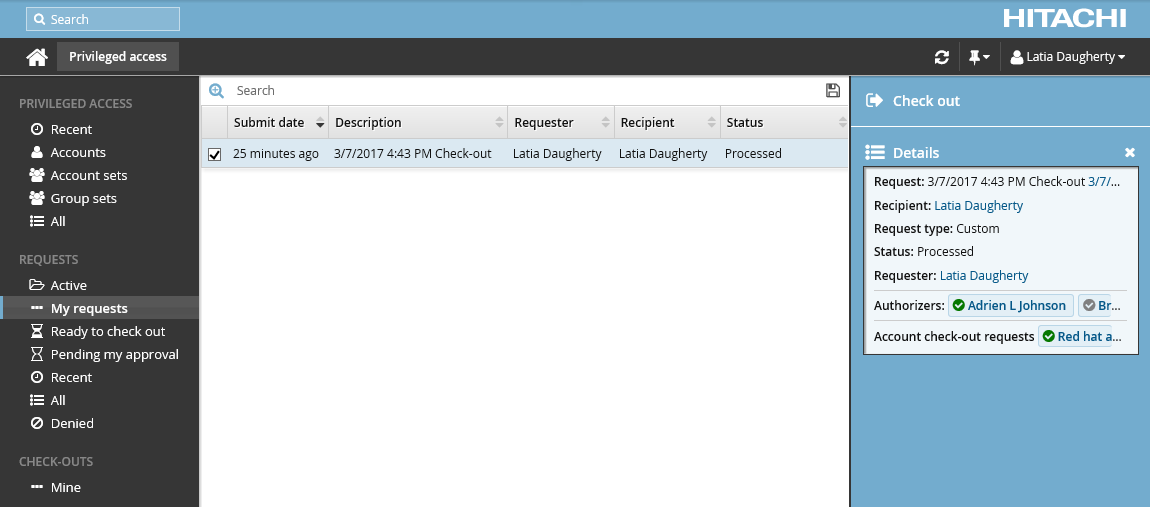
Once the request has been approved, you can check-out the account:
Log into the Front-end (psf) as the requester again.
Click the link Your privileged access request has been approved.
The Privileged access app opens.
Select the request from the Results panel if it is not already pre-selected.
Click Check out in the Actions panel.
The Privileged access app displays the available access disclosure plugins you can choose from.
To view the password, click Display, and then click View.
Once you have finished using the account, click Check in on the Actions panel. The password will be randomized and the account checked back in.
Use case: Using SSH keys to check out a single account
This example demonstrates the typical workflow steps followed when regular users request to check out a managed account using their SSH keys.
Log into the Front-end (psf) as a regular user.
The user should already have SSH public keys in the profile .
Click Privileged access to open the Privileged access app.
Click Accounts under the PRIVILEGED ACCESS heading to display the available accounts in the Results panel.
From the Results panel select the account you want to check out.
Click Request check-out in the Actions panel.
Review the required information for the request.
Select ’SSH key’ for Operation to perform for check-out and check-in.
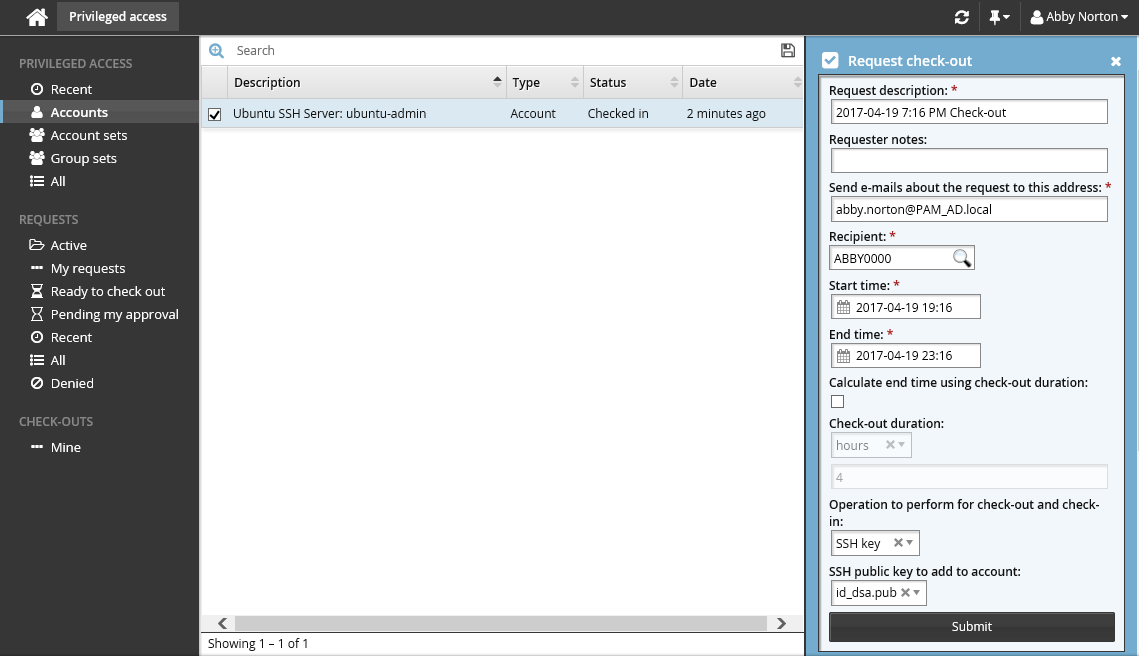
Select a SSH public key file from your profile for SSH public key to add to account.
Click Submit at the bottom of the form.
Bravura Security Fabric issues the request, notifies the appropriate authorizers, and displays the a summary of the details in the Actions panel.
You can click on the various links under the REQUESTS heading in the Filter panel to view your request status.
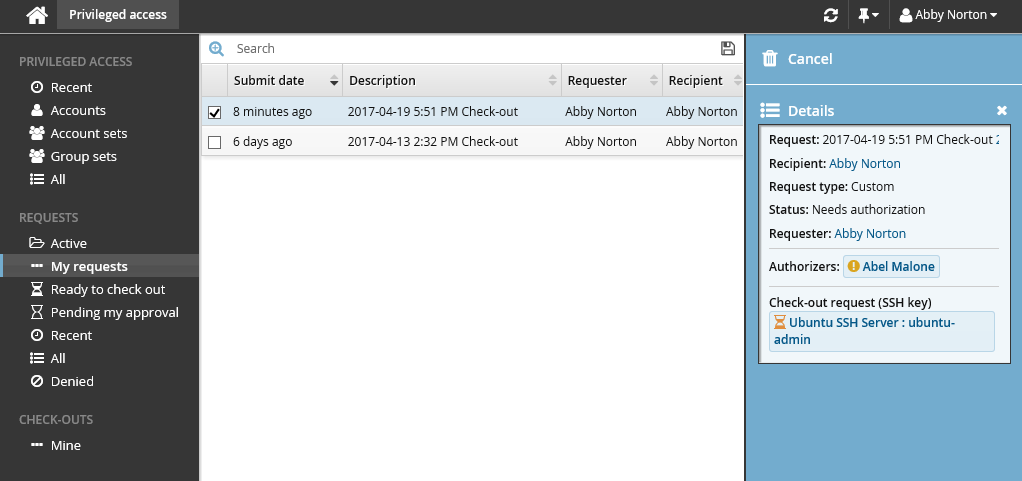
To authorize the request:
Log into the Front-end (PSF) as an authorized user. In this example, you can see in the details of the request, the authorizer is Abel Malone.
Click You have 1 request(s) awaiting your approval. This will open the Requests app.
Click Active under the REQUESTS heading to display the active request.
Select the request you want to review from the Results panel.
The details will appear in the Actions panel for you to review.

Click Approve.
You have the option to include some notes in the approval.
Click Approve again.
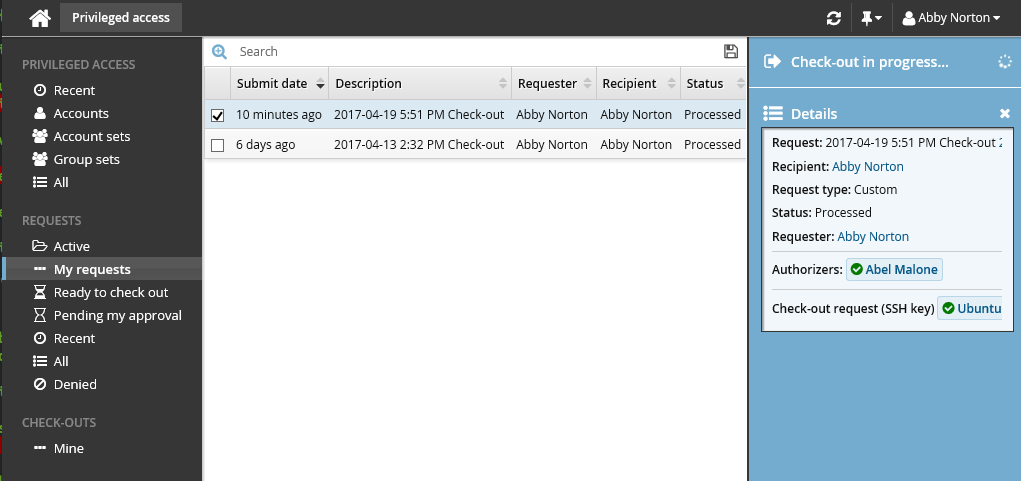
Once the request has been approved, you can check-out the account:
Log into the Front-end (PSF) as the requester again.
Click the link Your privileged access request has been approved.
Select the request from the Results panel if it is not pre-selected.
Click Check out in the Actions panel. Wait for the check-out operation to finish. During this time, Bravura Security Fabric is attempting to add your SSH public key to the SSH server.
If the check-out operation failed, Bravura Security Fabric will automatically attempt to check out the account again after a certain amount of time. Alternatively, you can click Check-out retry to try checking it out again now.
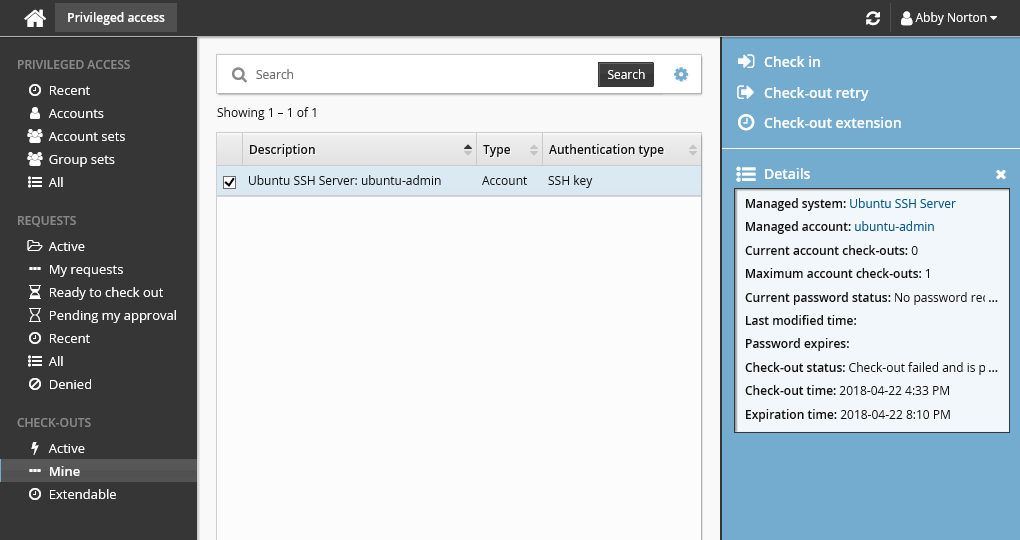
Once the check-out operation is successful, the Privileged access app will display the PuTTY over SSH access disclosure plugin.

To connect to the SSH server and access the managed account, click PuTTY over SSH.
The user is connected using SSH key authentication.
Once you have finished using the account, check it back in.
Click Check in in the Actions panel.
Bravura Security Fabric removes your SSH public key from the SSH server and checks the account back in.
Account Sets
Bravura Privilege allows you to request temporary privileged access to account sets, for yourself or other users. The account set may include accounts on different systems; however, they must belong to the same managed system policy. If approved, you can check out the requested privileged access. On account sets, privileged access can mean:
Access to the ID and password of an administrative account
Connection via remote desktop connection
The ability to run commands on multiple systems and accounts
Some other means
When you check in, or a certain time expires, your access is revoked. You can check out the privileged access only once for every approved request. In some cases you may be pre-approved to check out privileged access.
Requesting account set access
Account set check-outs are governed by the same access controls as single account access. Unless you have pre-approval, you must submit a request and receive approval before you can check out account set access.
When submitting a request, you can:
Create an account set
In this process you create the account set first, which you can use again later, or modify, and share with others.
Request access to a pre-defined account set
Pre-defined account sets are available if you created one earlier, or another user has created and shared one with you.
If you are pre-approved, you can skip to Pre-approved access .
Creating an account set
To create an account set:
From the main menu , click Privileged access.
Click Accounts under the PRIVILEGED ACCESS heading to see available accounts.
From the Results panel, select the checkboxes for the accounts you want to use.

The Privileged access app displays the Create account set action in the Actions panel if all accounts selected can be grouped as an account set.
Click Create account set.

Enter a description for the account set.
Click Submit.
Bravura Security Fabric saves the selected accounts as an account set that you can request access to.
Requesting access to an account set
To request access to a previously-created account set:
Click Account sets under the PRIVILEGED ACCESS heading to see available account sets.
Alternatively, you can click Recent to see account sets you have recently requested access too.
Select an account set from the Results panel.
Select the account set you want to view details about, or to request check out. Depending on the configuration, you may be able to view access status details and check-out details. Various options may be available in the Actions panel, such as:
Request check-out if account set access can be requested
View request if there is an existing request awaiting approval
Check out if there is an existing approved request for this account set
View accounts in set and/or Run command if you already have this account set checked out
Delete account set if you have permission to delete account sets
Click Request check-out in the Actions panel to open the request details form.
Enter request details:
Enter Requester notes to be displayed to the authorizers.
Enter notification details if needed.
If the request is for another user, click the search icon
under Recipient to search for the recipient’s ID.Specify the period that you want the access to be available for check-out.
Select the Start time and End time.
or
Click the Calculate end time using check-out duration check box, select a duration unit and type the number of days, hours or minutes.
The duration is affected by the configured maximum and minimum check-out intervals. It must start later than the current time.
If the selected accounts support command execution:
Select Can only execute the specified command if you want to restrict the command to be run with this request. Once the request has been approved, the command cannot be edited.
Enter the command you want to run in Account set commands or search available commands. This is an optional field.
Commands can also be specified after checking out the account set. See Running commands .
There is a 450 character limit for commands.
Enter values for other request attribute fields as required.
Click the Submit button at the bottom of the request details form.
Bravura Security Fabric issues the request, notifies appropriate authorizers, and displays a summary of the request.
Deleting account sets
You can delete account sets you have created. If granted the Modify all account sets in this policy, you can also delete any account set belonging to that policy. To delete an account set:
Click Account sets under the PRIVILEGED ACCESS heading to see available account sets.
Select one or more account sets from the Results panel.
Click Delete account set in the Actions panel.
Confirm the deletion.
Checking out account set access
Once you have approval you can check out the account set, as long as the number of allowable simultaneous check-outs has not been exceeded.
Requested and approved access
To check out the account set:
Click Ready to check out under the REQUESTS heading.
Alternatively, click the Your privileged access request has been approved link on the main menu.
Select the account set from the Results panel if necessary.
Click Check out in the Actions panel.
If an account set access has already been checked out and the check-out limit has been reached, Bravura Security Fabric notifies you when the access is available for check-out again. Bravura Security Fabric may also block the account set check-out if one of the individual accounts has reached its check-out limit.
After you click Check out, a filter for the account set is saved under the CHECK-OUTS heading in the Filter panel.
Alternatively, if you already have approved access, you can also:
Search for the account set you want to check out under the PRIVILEGED ACCESS heading.
Select the account set you want to check out.
Click Check out.
Pre-approved access
To check-out pre-approved access to an account set:
Click Account sets under the PRIVILEGED ACCESS heading to see available accounts.
Select an account set from the Results panel.
Click Check out in the Actions panel to the right to open the check-out details form.
If you want notification sent to an address other than the one shown, change the value in Send emails to this address with information about the request.
Click the Check out button.
Using account set access
Once you have checked out the account set, you can use the available controls to access the privileged accounts within the time given. You can access individual accounts within an account set using the same access disclosure plugins that are available in a single-account check-out.
To obtain access to a particular account:
From the CHECK-OUTS heading in the Filter panel, click the link for the account set you want to access.
The individual accounts attached to the account set will be displayed in the Results panel.

Select an account from the Results panel.
The Privileged access app displays available access disclosure plugins in the Actions panel to the right.
For information about each access disclosure plugin see Access disclosure plugins .
Running commands
In addition to the single account controls, you may have an option to execute commands on multiple accounts if your administrator configures the Run commands option.
To run commands that were specified during the check-out request:
From the CHECK-OUTS heading in the Filter panel, click the link for the account set you want to access.
The individual accounts attached to the account set will be displayed in the Results panel.
Select the accounts you want to run the commands on.
The command will be pre-filled. If Can only execute the specified command was selected at request time, you will not be able to modify the command here, otherwise, modify the command if required.
Click >_Run Command.
Click Run.
There is a 450 character limit for commands.
To specify and run commands after checking out the account set:
From the CHECK-OUTS heading in the Filter panel, click the link for the account set you want to access.
The individual accounts attached to the account set will be displayed in the Results panel.
Select the accounts you want to run the commands on.
Click >_Run command.
Specify commands in Command.
Click Run.
Alternatively, you can run commands by selecting the checked out account set from the PRIVILEGED ACCESS heading.
You can also run commands across multiple account sets by selecting more than one checked-out account set and then clicking Run command . In this case, the command will run across all accounts belonging to those account sets.
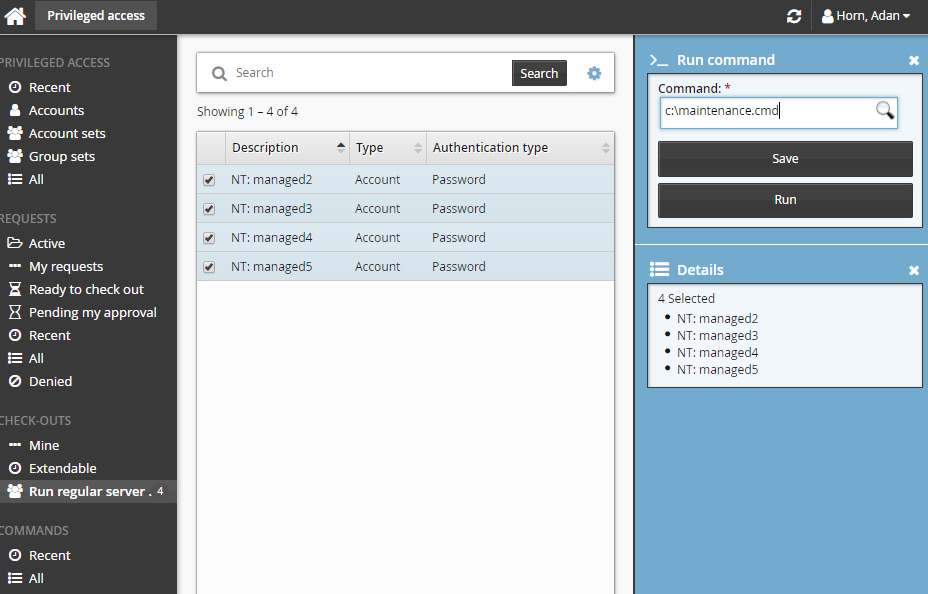
Saving and loading commands
You can either manually enter commands, or save and load them.
To save commands:
From the CHECK-OUTS heading in the Filter panel, click the link for the account set you want to access.
The individual accounts attached to the account set will be displayed in the Results panel.
Select the accounts you want to run the command on.
Click >_Run commands.
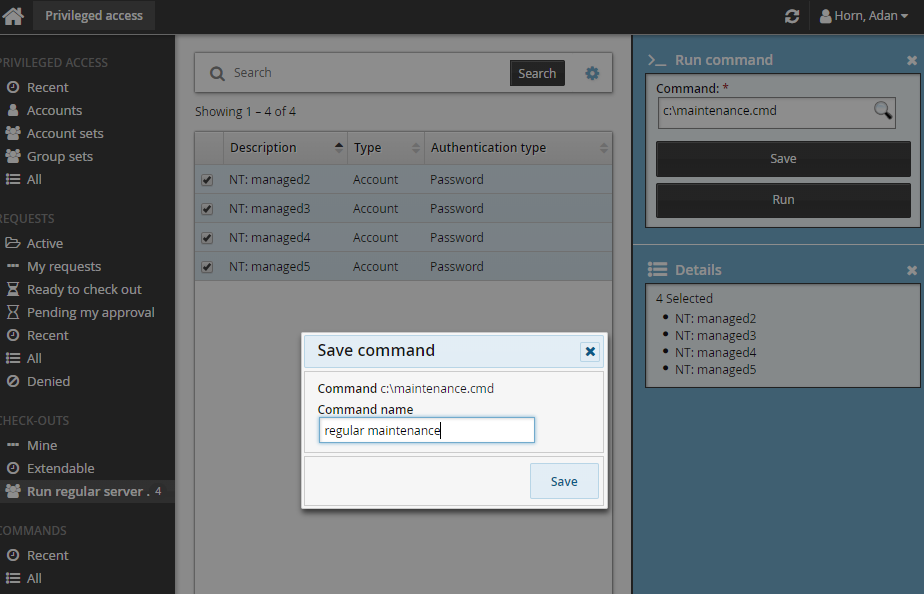
Enter the commands you want to run.
Click Save.
Verify your command in the pop-up.
Enter a command name.
Click Save.
Saved commands can be loaded anywhere a command can be specified. To load a saved command, search for existing commands, and select the desired command.
Viewing command execution status
A COMMANDS category is added to the Filter panel when at least one command execution is attempted.
To view a run commands execution status:
Click the link on the pop-up confirmation message, click Recent from the Filter panel and search for the command under COMMANDS.
Select your command.
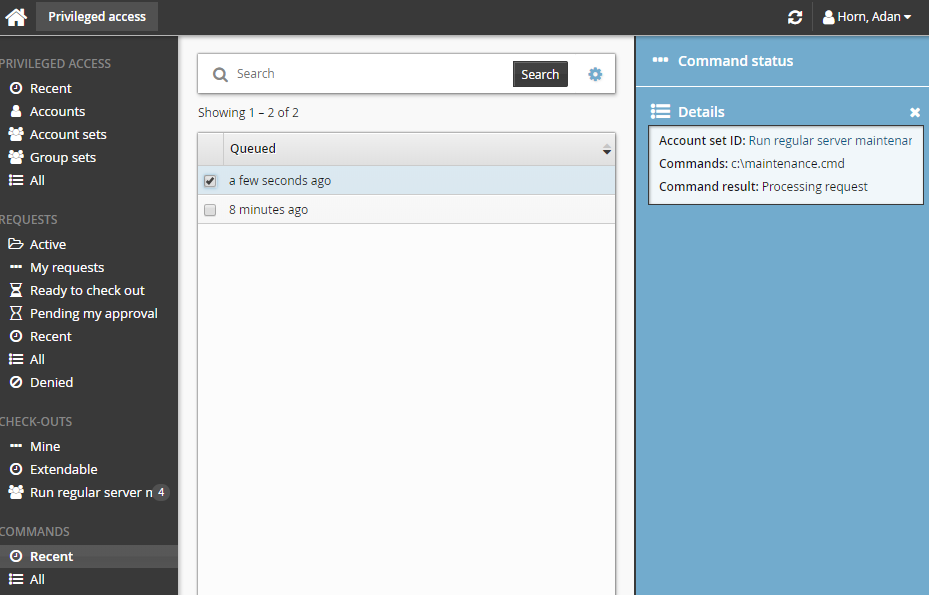
Click Command status.
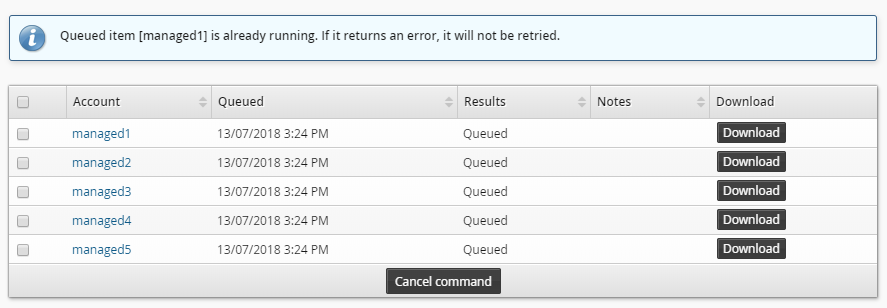
If the commands have been processed, and an output file is save, you can click Download to download the file.
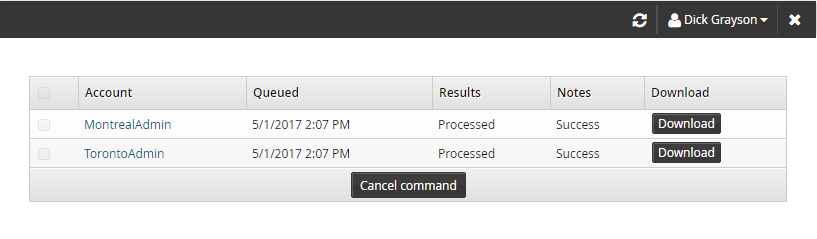
If the commands have not been processed, you can cancel the commands by selecting it and clicking Cancel command.
If the command is in "queued" status you can cancel it before it starts running, Once it starts running you cannot cancel it, even if it is still in the "queued" status; Bravura Security Fabric displays an error message like the one illustrated below.
Setting other options
The following options are only available if your product administrator allowed users to override them:
Delete command output after expiration date – select to remove an output file from the server after it expires. By default, this is selected and files are deleted in 365 days.
Retrieve command output and save on server – select to retrieve and save an output file. By default, this is selected.
The default Connector timeout as defined on the Target system information page is 300 seconds. Update this value if the command you are running will take longer.
Checking in account set access
If you have more than one account set checked out you can view a summary with additional information including the check-out age and time remaining for outstanding check-outs. The summary also displays alerts and warnings of check-out age and time remaining.
To view the current check-out summary for account sets:
Click Mine under CHECK-OUTS from the Filter panel.
Select the account set you want to view from the Results panel.
Bravura Security Fabric displays the details in the Actions panel.
To check on the expiry time and check in an account set:
From the CHECK-OUTS heading in the Filter panel, click the link for the account set you want to access.
The individual accounts attached to the account set will be displayed in the Results panel.
To view the details of the check-out, select an account from the Results panel.
Alternatively, select the account set from Mine.
The Privileged access app displays details and available controls in the Actions panel to the right.
Click Check in account set when you no longer need the account set.
If you need to access the account set again, you must submit another request.
Account sets can also be checked in by searching and selecting the checked out account set under the PRIVILGED ACCESS heading.
Use case: Running a script via an account set
The following use case shows a typical scenario, where a network administrator needs to complete the same task on many servers. The administrator has written a script called maintenance.cmd and stored it in a shared folder on the network. In this scenario the account set already exists because the same accounts are used regularly.
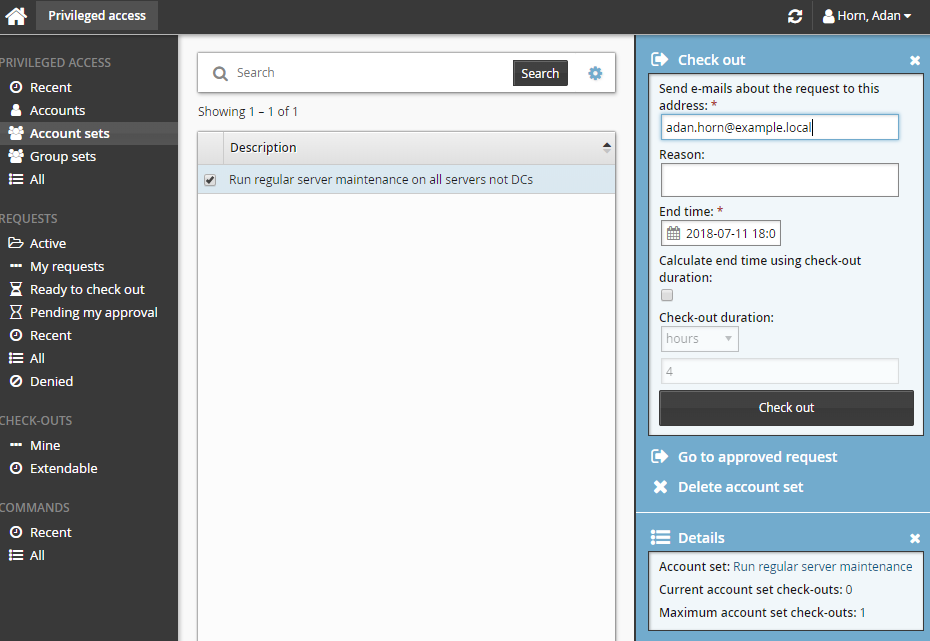
To request access to a previously-created account set:
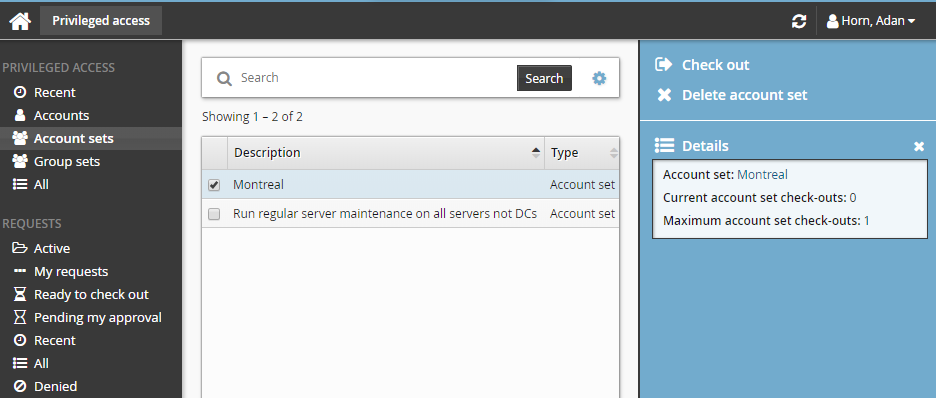
Click Account sets under the PRIVILEGED ACCESS heading to see available account sets.
Select an account set from the Results panel.
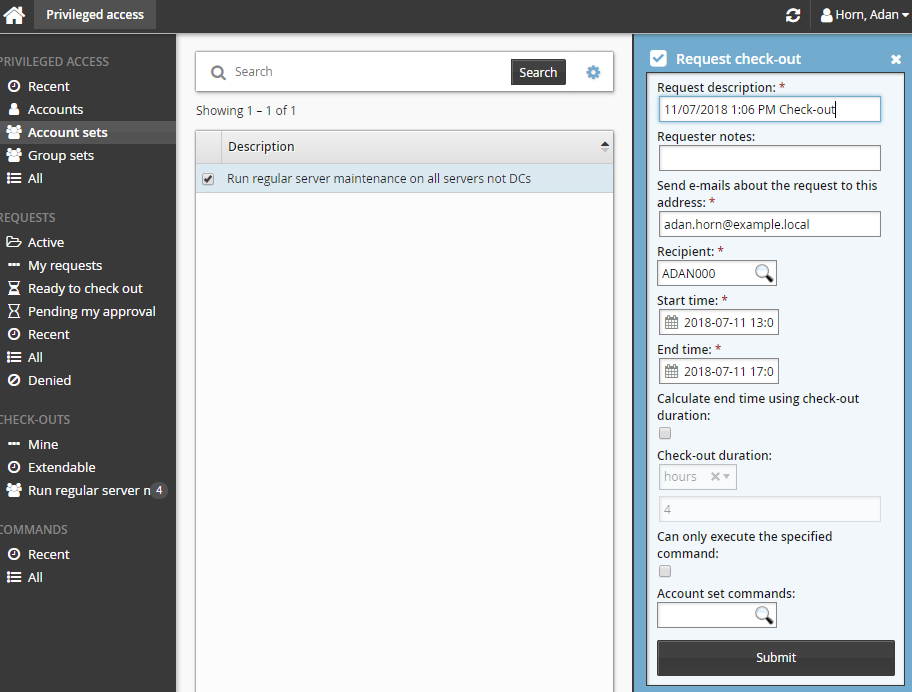
Click Request check-out in the Actions panel to open the request details form.
Enter request details:
Enter Requester notes to be displayed to the authorizers.
Enter notification details if needed.
Specify the period that you want the access to be available for check-out.
Select the Start time and End time.
or
Click the Calculate end time using check-out duration check box, select a duration unit and type the number of days, hours or minutes.
The duration is affected by the configured maximum and minimum check-out intervals. It must start later than the current time. .
Click the Submit button at the bottom of the request details form.
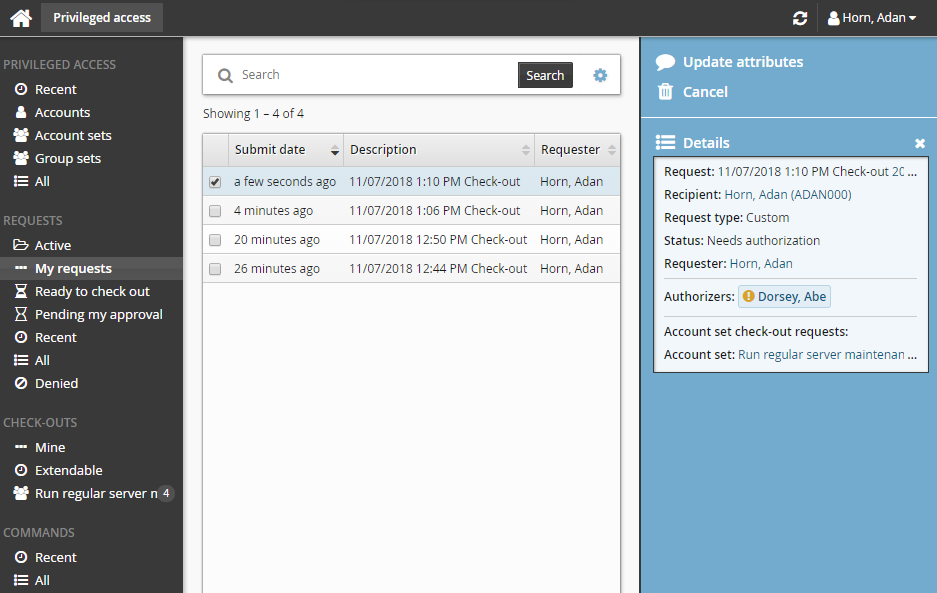
Bravura Security Fabric issues the request, notifies appropriate authorizers, and displays a summary of the request.
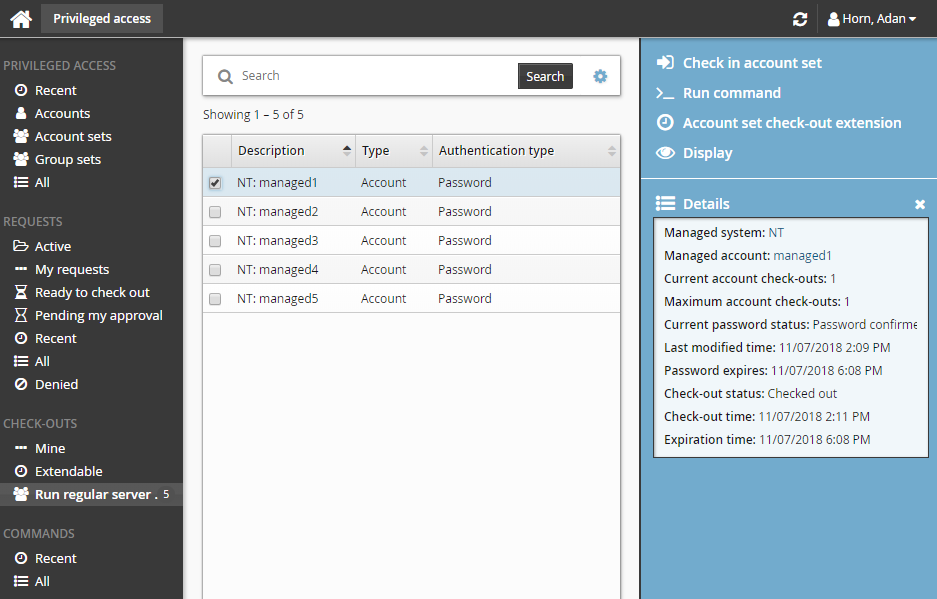
Once you have approval you can check out the account set, as long as the number of allowable simultaneous check-outs has not been exceeded.
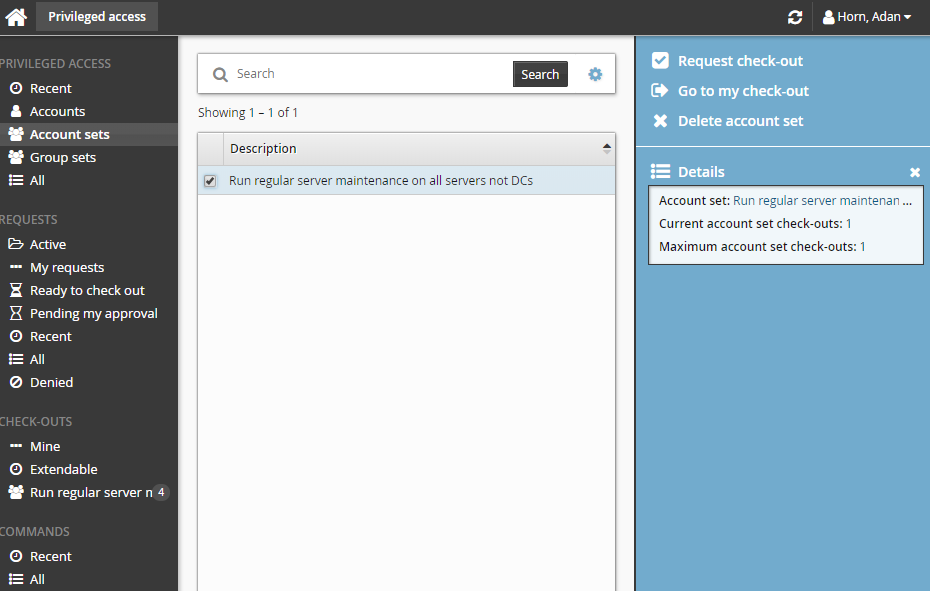
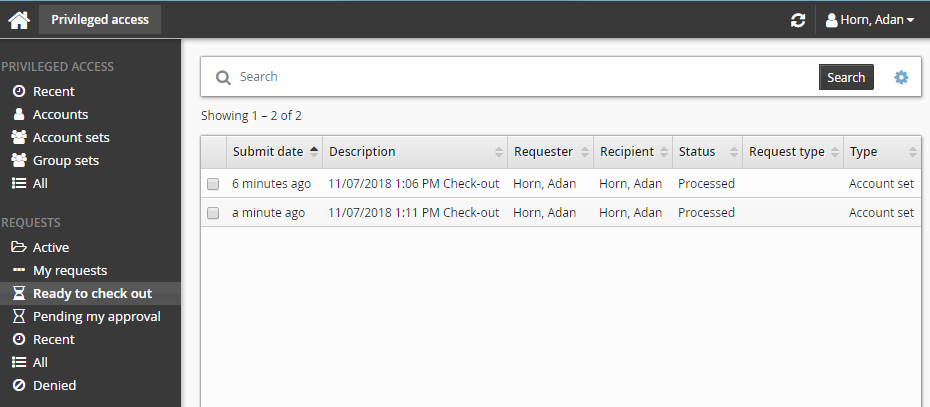
To check out the account set:
Click Ready to check out under the REQUESTS heading.
After you click Check out, a filter for the account set is saved under the CHECK-OUTS heading in the Filter panel.
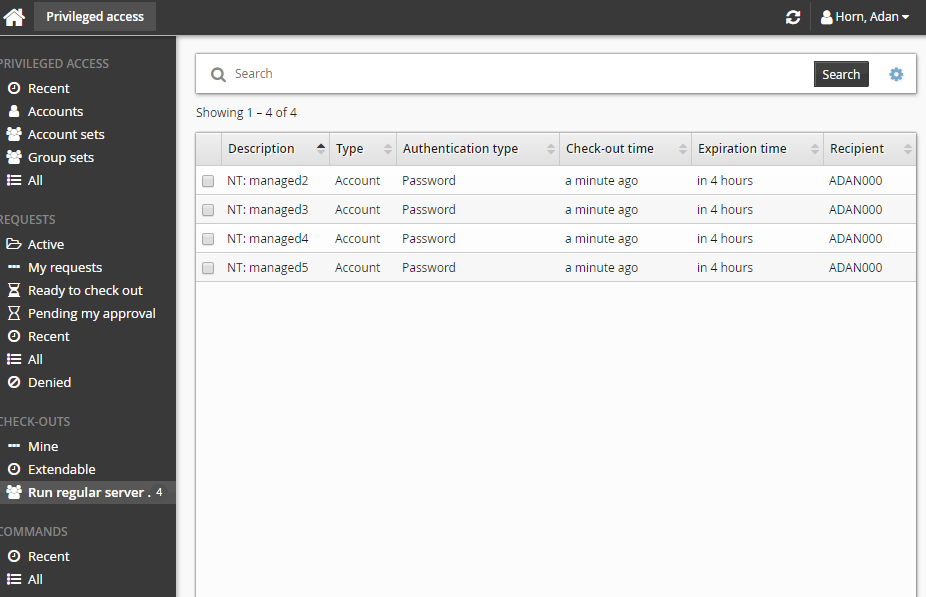
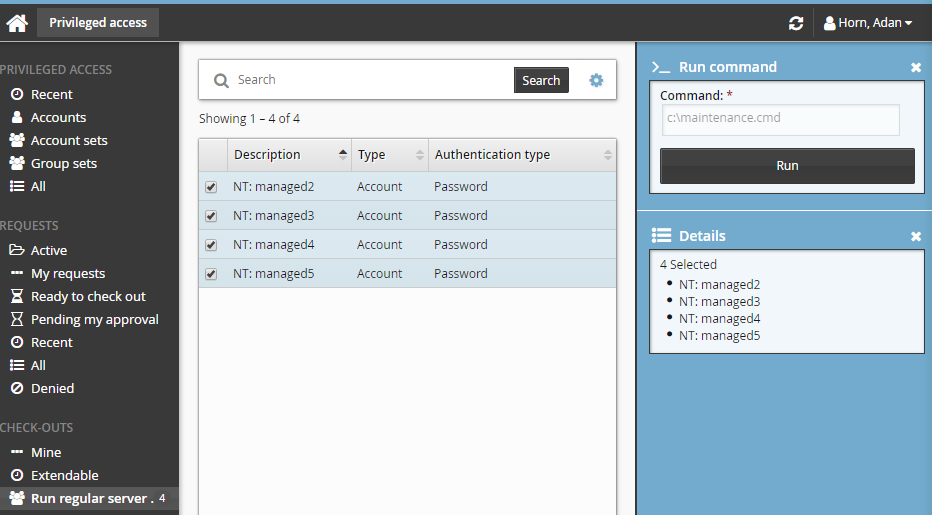
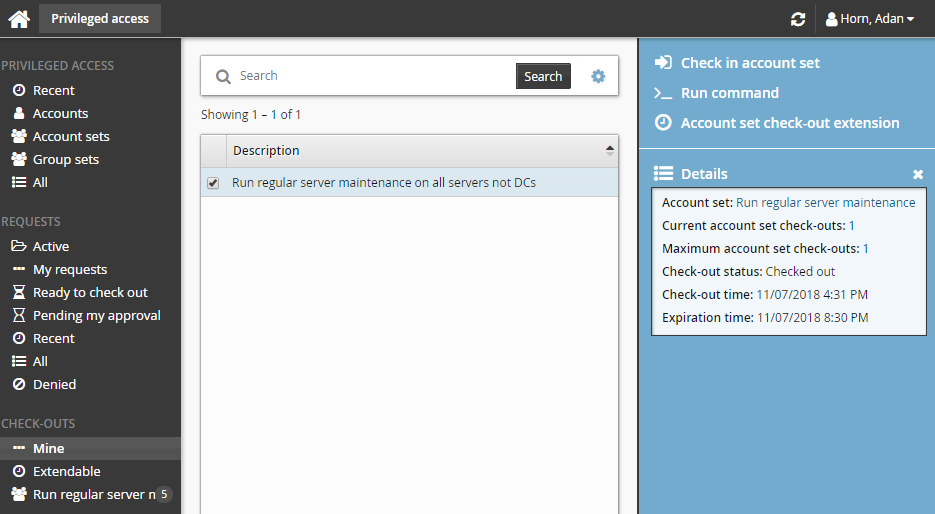
To specify and run commands after checking out the account set:
From the CHECK-OUTS heading in the Filter panel, click the link for the account set you want to access.
The individual accounts attached to the account set will be displayed in the Results panel.
Select the accounts you want to run the commands on.
Click >_Run command.
Click the search icon
.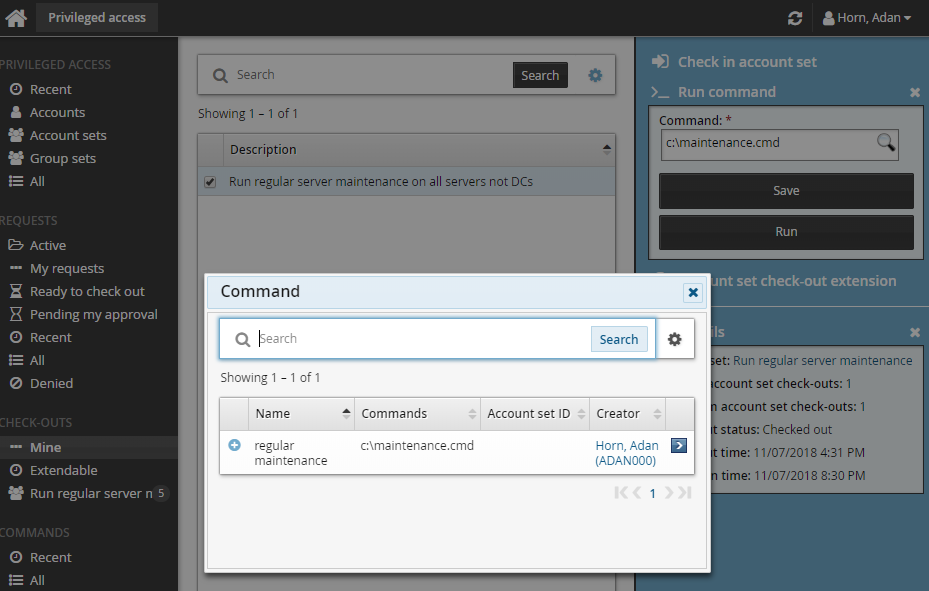
Select the required command. In this case the command is a script.
Click Run.
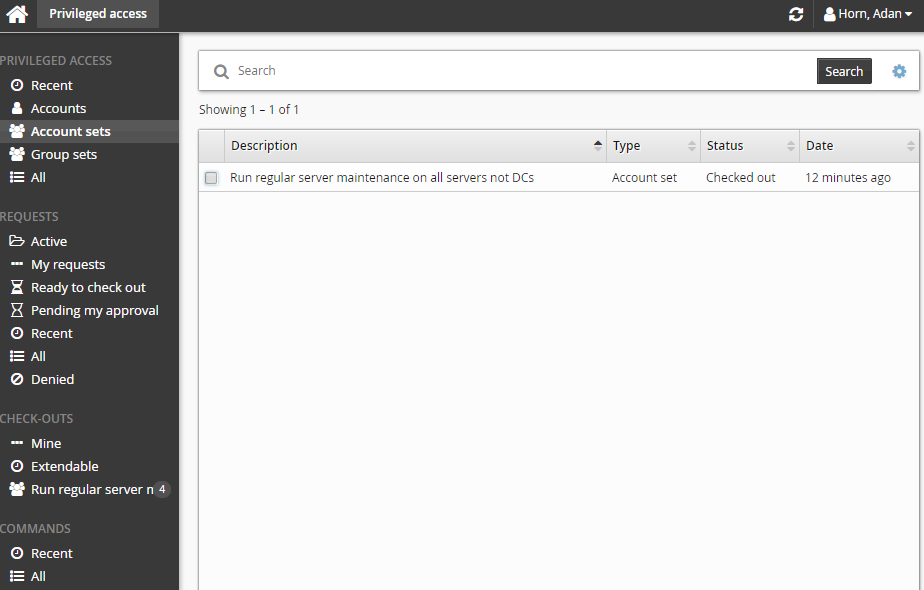
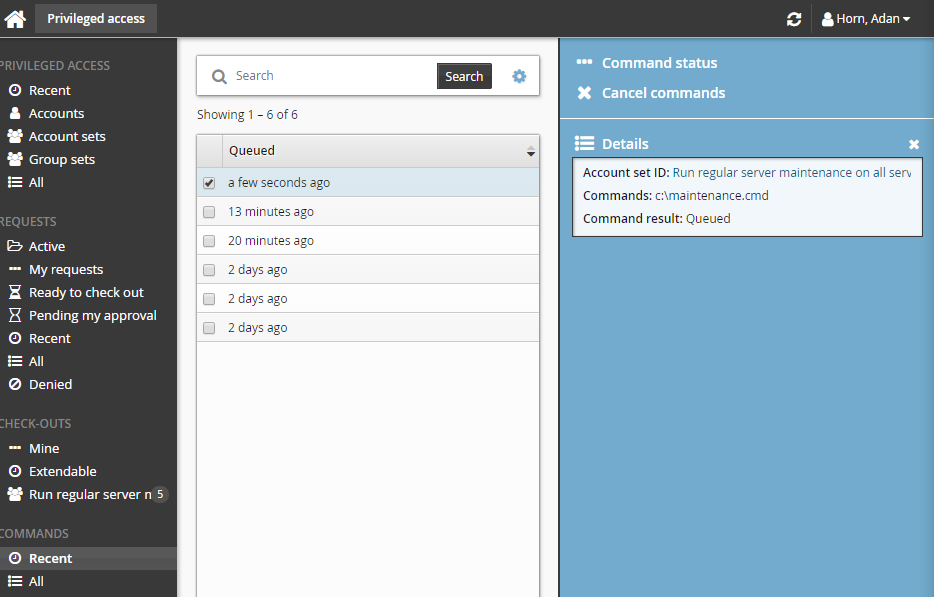
A COMMANDS category is added to the Filter panel when at least one command execution is attempted.
To view a run commands execution status:
Click the link on the pop-up confirmation message, click Recent from the Filter panel and search for the command under COMMANDS.
Select your command.
Click Command status.
When the command has been processed, and an output file is save and you can click Download to download the file.
To check the account set back in:
Click Mine under CHECK-OUTS from the Filter panel.
Select the account set you want to check-in from the Results panel.
Bravura Security Fabric displays the details in the Actions panel.
Click Check in account set when you no longer need the account set.
Group sets
The Privileged access app allows you to request temporary membership of privileged groups, known as group sets, on managed systems for yourself or other users. Group sets can be organized to serve a specific purpose, such as running a program or accessing a folder on a system.
If approved, you can check out the requested group set, which will allow you to login to a specified program or access a system via a remote desktop connection.
When you check in, or a certain time expires, your access is revoked. You can check out the privileged access only once for every approved request. In some cases you may be pre-approved to check-out privileged access.
Requesting group set access
Unless you have pre-approval to check out a group set, you must submit a request to be approved. If you are pre-approved, you can skip to Pre-approved access .
To request permission to check out a group set:
Click Group sets under the PRIVILEGED ACCESS heading to see available group sets.
Alternatively, you can click Recent to see group sets you have recently requested access too.
Select a group set from the Results panel.
Select the group set you want to view details about, or to request check out. Depending on the configuration, you may be able to view access status details and check-out details. Various options may be available in the Actions panel, such as:
Request check-out if access can be requested
View request if there is an existing request awaiting approval
Check out if there is an existing approved request for this group set
Configured disclosure plugins if you already have this group set checked out

Click Request check-out from the Actions panel to open the request details form.
Enter request details:
Enter Requester notes to be displayed to the authorizers.
Enter notification details if needed.
Specify the period that you want the access to be available for check-out.
Select the Start time and End time.
or
Click the Calculate end time using check-out duration check box, select a duration unit and type the number of days, hours or minutes.
The duration is affected by the configured maximum and minimum check-out intervals. It must start later than the current time.
Note
If your permissions only permit check-outs to be pre-approved, you can only pre-approve check-outs for yourself.
If no drop-down menu appears for the recipient, then the user has no applicable accounts on the managed system to request group set access for.
Click the Submit button at the bottom of the request details form.
The Privileged access app displays a summary of the request.
Group inclusion rules and any changes on pre-existing groups in the group set will be evaluated once the request has been submitted.
Bravura Security Fabric issues the request and notifies appropriate authorizers.
If you are assigned as an authorizer capable of approving group set access check-out requests, the request may be automatically approved, depending on which managed systems you are assigned.
Checking out group set access
Once you have approval to access a group set, you can check out the group set, as long as the number of allowable concurrent check-outs has not been exceeded.
Requested and approved access
To check out a group set after your request is approved:
Click Ready to check out under the REQUESTS heading.
Alternatively, click the Your privileged access request has been approved link on the main menu.
Select the group set if necessary from the Results panel.
Click Check out.
Bravura Security Fabric records that you have checked out the group set.
By default, any of the groups in the group set that fail to have membership applied to it will be ignored. You can configure this behavior to rollback previous changes or abort any remaining changes in the event of a failure.
You may need to click Refresh
 during the Checking out phase to get the current check-out status. You can also click the view icon under the View details section to view the group membership result.
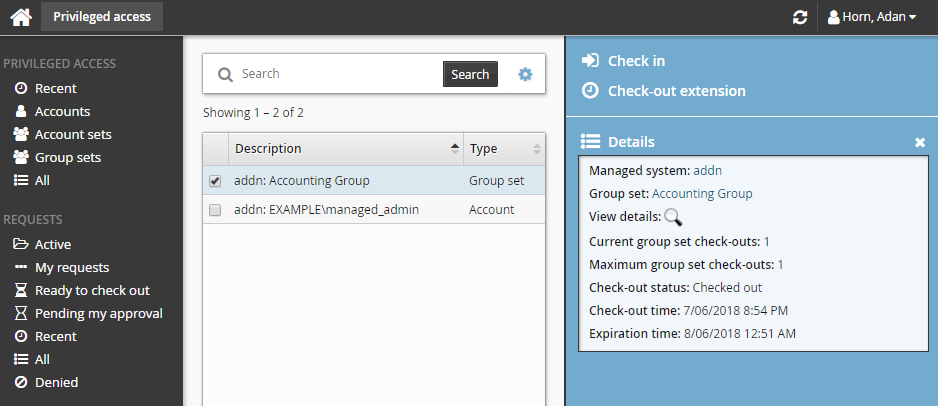
The amount of time it takes to check out a group set depends on the type of managed system used to request group set access. Check-out of group sets created in a push-mode managed system policy should occur immediately. However, check-out of group sets created in a local service mode managed system policy will not be performed until the next time the Privileged Access Manager Local Workstation Service (hipamlws) polls the Bravura Privilege server.
If none of the groups in the group set are successful in having group membership added to it, the check-out will not continue. You will then need to check out at a later time.
If the group set has already been checked out by another user and the check-out limit has been reached, Bravura Security Fabric notifies you by email when the access is available for check out again.
Alternatively, if you already have approved access, you can also:
Search for the group set you want to check out under the PRIVILEGED ACCESS heading.
Select the group set you want to check out.
Click Check out.
Pre-approved access
To check-out pre-approved access to a group set:
Click Group sets under the PRIVILEGED ACCESS heading from the Filter panel.
Select a group set from the Results panel.
Click Check out in the Actions panel to open the check-out details form.
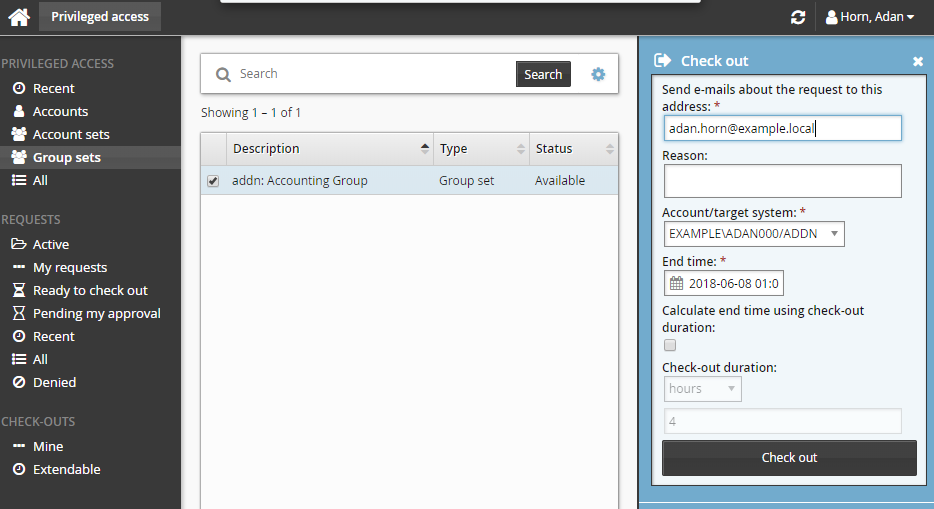
If you want notification sent to an address other than the one shown, change the value in Send emails to this address with information about the request.
Click the Check out button.
Using group sets
Once you have checked out, you can use the available access disclosure plugins to access the group set within the time given.
Your access is revoked when the checkout time expires, you are inactive for too long, or you check in.
For information about each access disclosure plugin see Access disclosure plugins .
Checking in group set access
To check on the expiry time and check in a group set:
Click Mine under the CHECK-OUTS heading in the Filter panel.
Select a group set from the Results panel.
The Privileged access app displays details and available controls in the Actions panel. You can also click the view icon
under the View details section to view details about a group set’s members and status.Click Check in when you no longer need access to the group set. If you need to access the group set again, you must submit another request.
Your group sets can also be checked in by searching and selecting each checked out group set under the PRIVILEGED ACCESS heading.
Use case: Request group set access
The following example shows a typical scenario, where a regular user requires temporary access to the accounting folder on the network to complete a job function.
To request permission to check out the accounting read only group set:
From the main menu, click Privileged access. The Privileged access app will open.
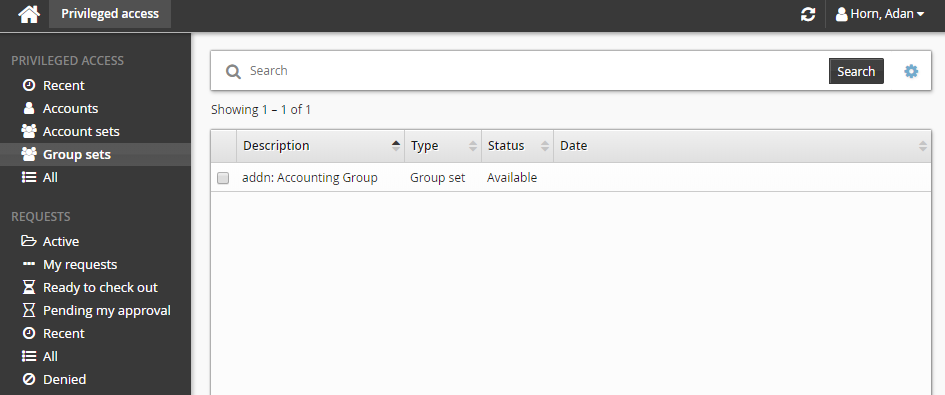
Click Group sets under the PRIVILEGED ACCESS heading to see available group sets.
Select the group set with the description "Provides read only access to the accounting network folder" from the Results panel.
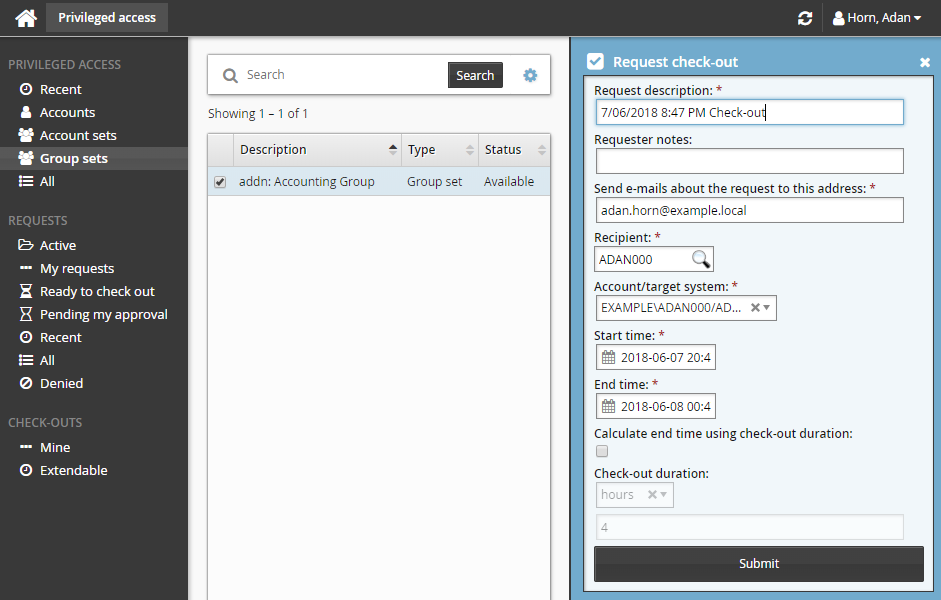
Click Request check-out from the Actions panel to open the request details form.
Enter Requester notes for the request:
Select the Calculate end time using check-out duration checkbox and choose a 4 hour check-out duration.
Leave all other settings as default.
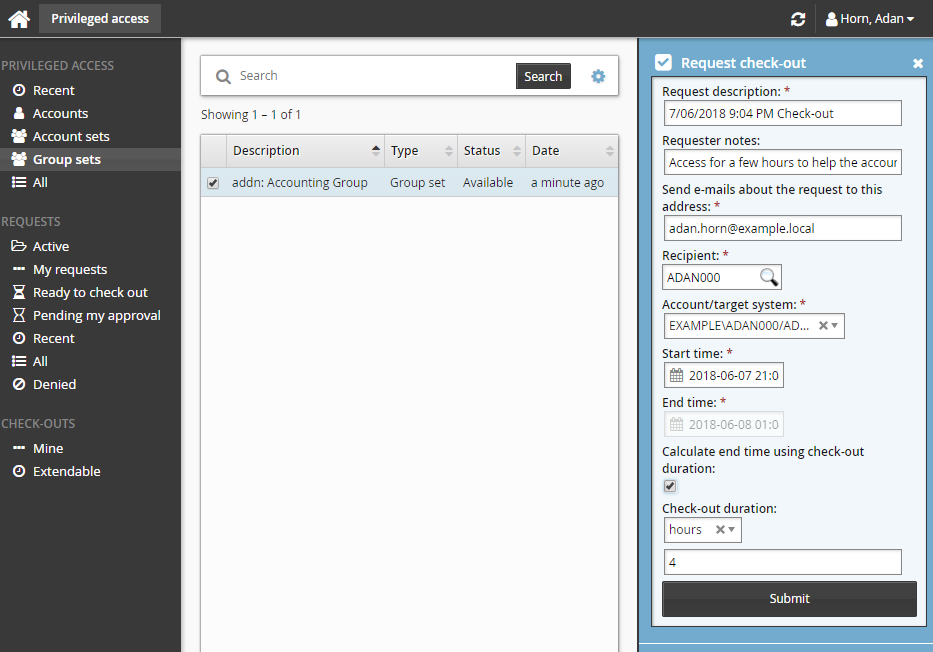
Click the Submit button at the bottom of the request details form.
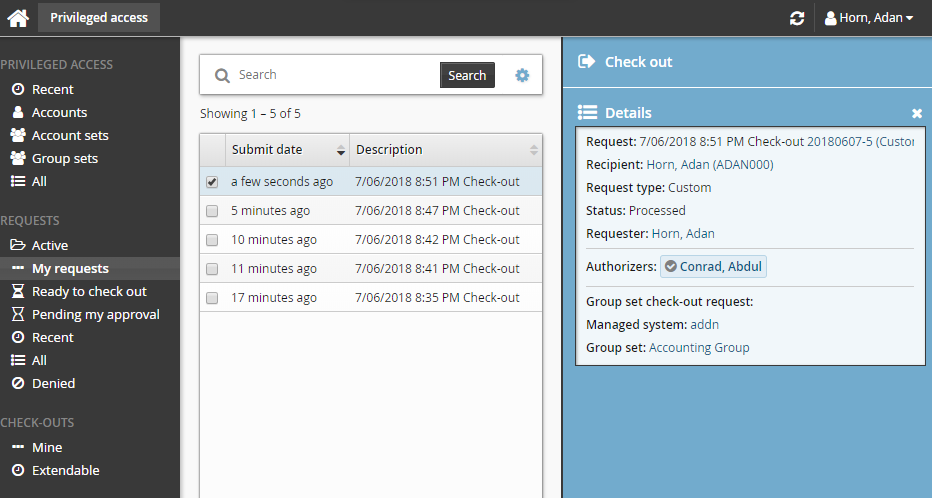
The Privileged access app displays a summary of the request.
Bravura Security Fabric issues the request and notifies appropriate authorizers.
Once the request has been approved, you can check out the group set, as long as the number of allowable concurrent check-outs has not been exceeded.
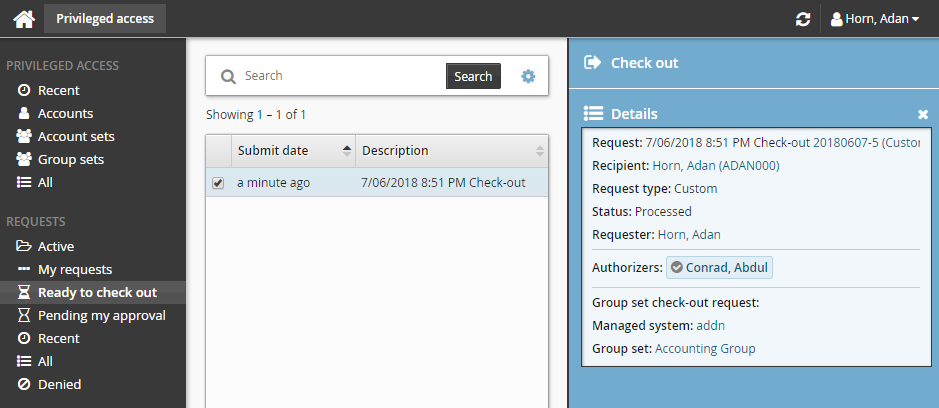
To check out a group set:
Click Ready to check out under the REQUESTS heading.
Select the group set if necessary from the Results panel.
Click Check out.
Bravura Security Fabric records that you have checked out the group set.
In this example, once you have checked out the group set you will have read only access to the accounting folder on the network. This will be enough for the user to help the accounting department for the few hours required.
The users access will be revoked in 4 hours.
Extending check-out access
You can extend privileged access check-outs via the Privileged access app.
The CHECK-OUTS menu includes an Extendable filter to allow you to request an extension on privileged access you have already checked out. Users must have the "Request check-out extensions" access control in order to use this filter. By default, the requester and recipient of the original request can request an extension. This type of request does not apply to pre-approved check-outs, which can be extended directly by the recipient.
This section shows you how to extend check-outs for:
Single accounts
Account sets
Group sets
Single accounts
Requesting an extension on single-account access
To submit a request for a single account check-out extension:
Click Extendable under the CHECK-OUTS heading.
Alternatively, click Active to find the checked out account.
Select the account from the Results panel.
The Privileged access app displays details and available controls in the Actions panel to the right.
Click Check-out extension.
Enter request details:
Enter Requester notes to be displayed to the authorizers.
Enter notification details if needed.
Specify a reason for the extension.
Specify how long the check-out duration should be extended for (in minutes, hours, or days).
Click the Submit button at the bottom of the request details form.
Extending pre-approved single-account access
If your account check-out was pre-approved, you can directly modify the end time of your check-out:
Click Mine under the CHECK-OUTS heading.
Select the account from the Results panel.
The Privileged access app displays details and available controls in the Actions panel to the right.
Click Check-out extension.
Specify how long the check-out duration should be extended for (in minutes, hours, or days).
Click the Extend check-out button.
Account set
Account set check-out extension requests can be made both under the CHECK-OUT filters or from the account set filter created at check-out.
Requesting an extension on account-set access
If your check-out was not pre-approved, you can submit a request for a check-out extension to modify the end time of your check-out:
Click Extendable under the CHECK-OUTS heading.
Select the link for the account set you want to access.
The individual accounts attached to the account set will be displayed in the Results panel.
To view the details of the check-out, select an account from the Results panel.
Click Account set check-out extension.
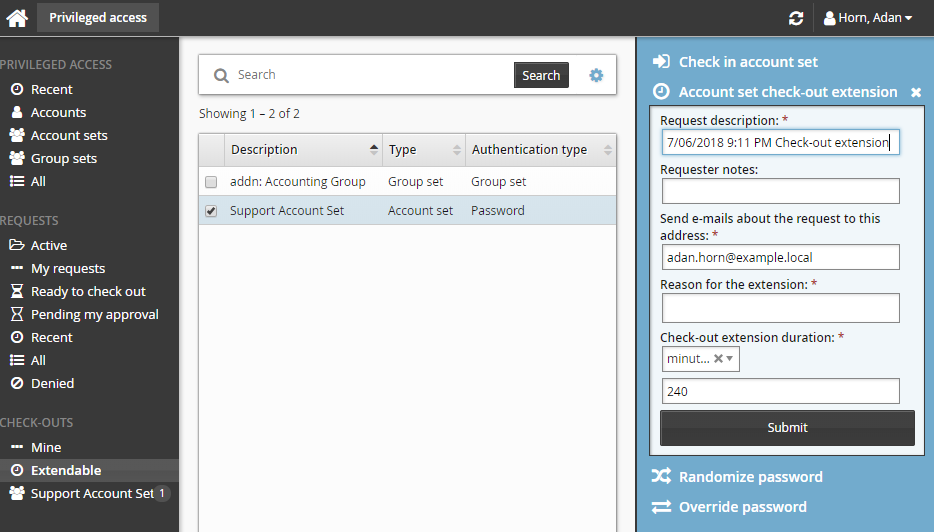
Enter request details:
Enter Requester notes to be displayed to the authorizers.
Enter notification details if needed.
Specify a reason for the extension.
Specify how long the check-out duration should be extended for (in minutes, hours, or days).
Click the Submit button at the bottom of the request details form.
Extending pre-approved account-set access
If your account-set check-out was pre-approved, you can directly modify the end time of your check-out:
From the CHECK-OUTS heading in the Filter panel, click the link for the account set you want to access.
The individual accounts attached to the account set will be displayed in the Results panel.
To view the details of the check-out, select an account from the Results panel.
Click Account set check-out extension.
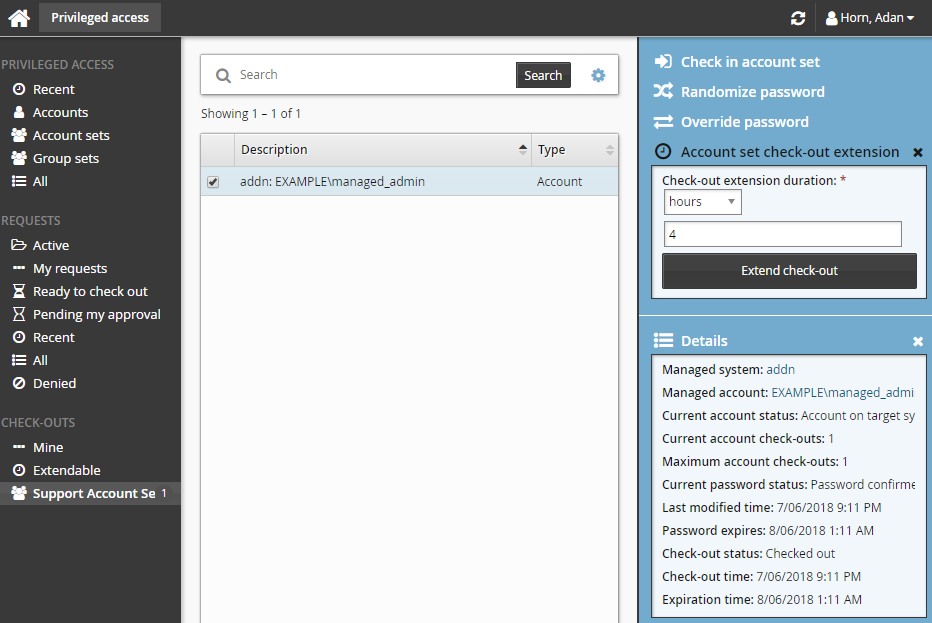
Specify how long the check-out duration should be extended for (in minutes, hours, or days).
Click the Extend check-out button.
Group set
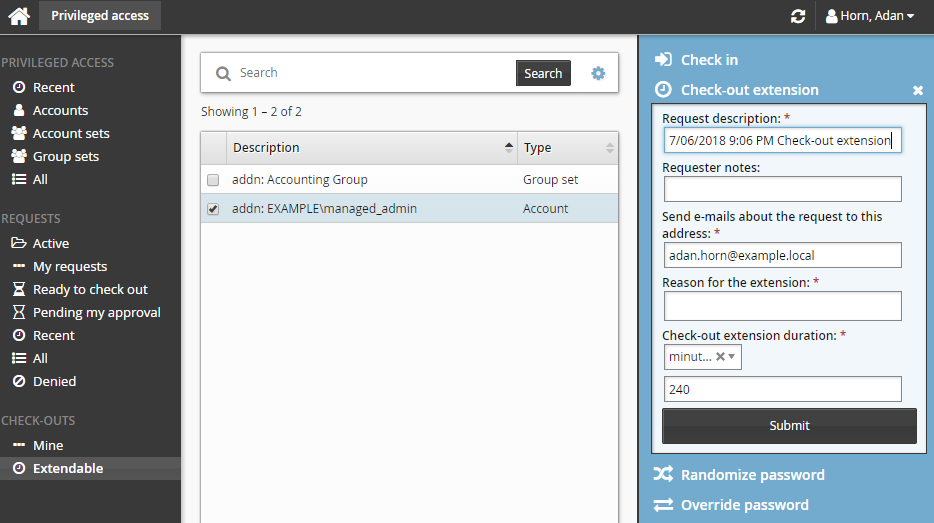
Requesting an extension on group-set access
If your check-out was not pre-approved, you can submit a request for a check-out extension to modify the end time of your check-out:
Click Extendable under the CHECK-OUTS heading.
Select group set from the Results panel.
The Privileged access app displays details and available controls in the Actions panel.
Click Check-out extension.
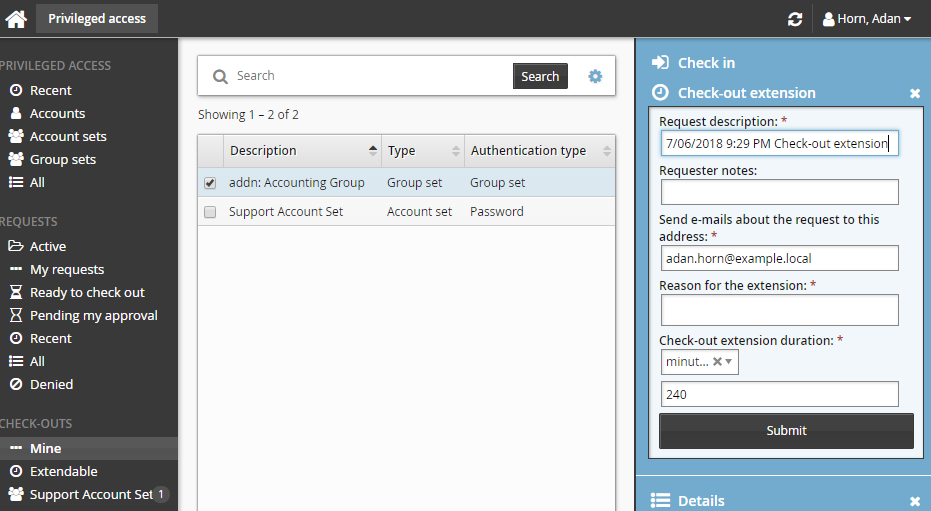
Enter request details:
Enter Requester notes to be displayed to the authorizers.
Enter notification details if needed.
Specify a reason for the extension.
Specify how long the check-out duration should be extended for (in minutes, hours, or days).
Click the Submit button at the bottom of the request details form.
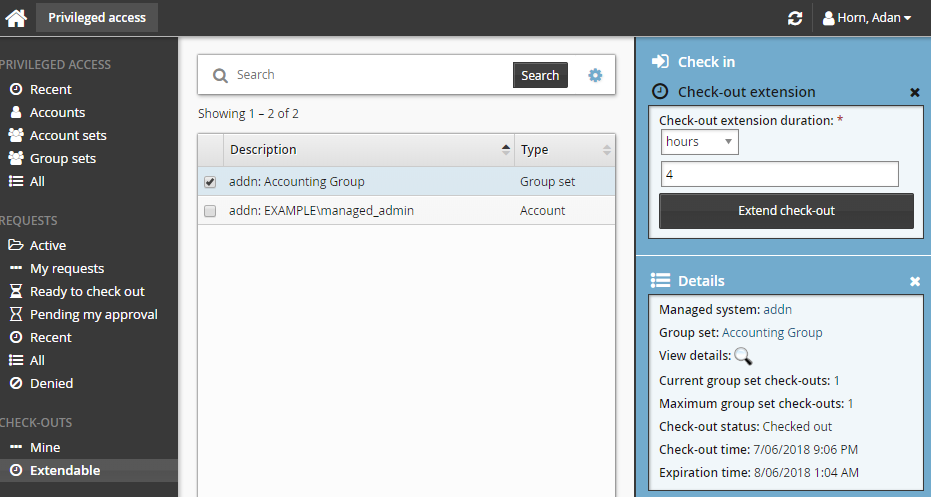
Extending pre-approved group-set access
If your group-set check-out was pre-approved, you can directly modify the end time of your check-out:
Click Mine under the CHECK-OUTS heading in the Filter panel.
Select a group set from the Results panel.
The Privileged access app displays details and available controls in the Actions panel.
Click Check-out extension.
Specify how long the check-out duration should be extended for (in minutes, hours, or days).
Click the Extend check-out button.
Viewing warnings and alerts for check-outs
A warning icon  or alert icon
  is displayed when the time remaining and the check-out age reaches a certain threshold.
Configuration notes
Product administrators can configure the interface as follows:
Permissions
Users must belong to a user group that has permission to access accounts or groups that belong to a managed system policy.
Checkout age and time remaining thresholds
The default thresholds are defined by the following system variables, which can be set in Manage the system > Modules > Privileged access:
PSW CHECKIN CHECKOUT AGE ALERT THRESHOLD
PSW CHECKIN CHECKOUT AGE WARNING THRESHOLD
PSW CHECKIN TIME REMAINING ALERT THRESHOLD
PSW CHECKIN TIME REMAINING WARNING THRESHOLD
Recent requests
You can configure the number of days that an account, account set or group set is considered recent by setting the PSW RECENT ACCESS option for the Privileged access app.
Password override
Users who have been granted the "Randomize/override password of managed accounts" permission to the vault-only managed system policy of the checked out password have the option to override the stored vault-only password.
Time remaining
By default, recipients and users with the Check in access privilege will see:
A warning icon
 by the Expiration time if the time remaining for a check-out is less than 60 minutes.
An alert icon
by the Expiration time if the time remaining for a check-out is less than 30 minutes.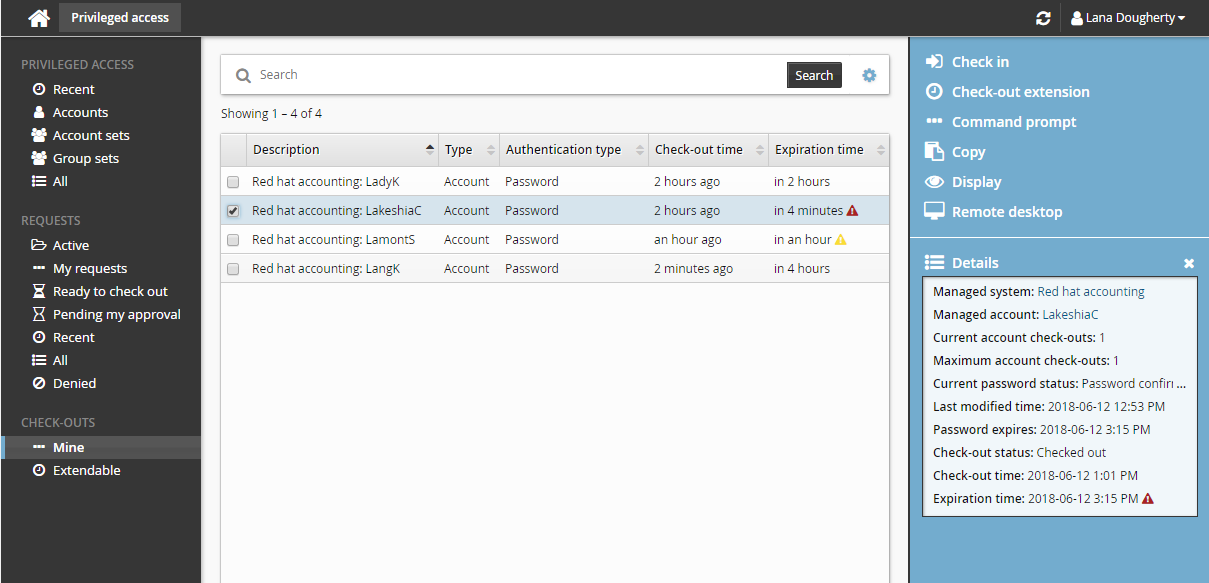
Check-out age
By default, users with the Check in access privilege will also see:
A warning icon
by the Check-out time if the check-out age is greater than 60 minutes.An alert icon
by the Check-out time if the check-out age is greater than 120 minutes.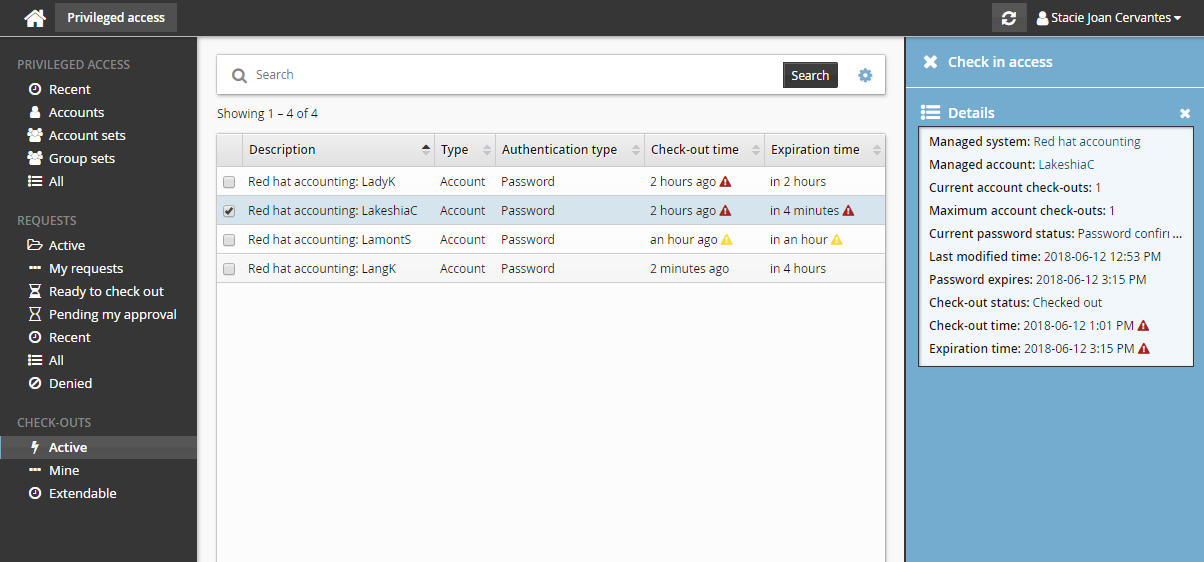
Checking in access of another user
Users with the Check in access privilege will have the option to check in any checked-out privileged access.
To check in access:
Click Privileged access on the home page.
Click Active under the CHECK-OUTS heading in the Filter panel.
All active check-outs are displayed in the Results panel.
Select any check-out (account, account set, or group set) that you want to check in.
Click Check-in the Actions panel.
Overriding and randomizing passwords
If you are in a user group with the "Randomize/override password of managed accounts" permission, you can change the password with a manual override or randomized value.
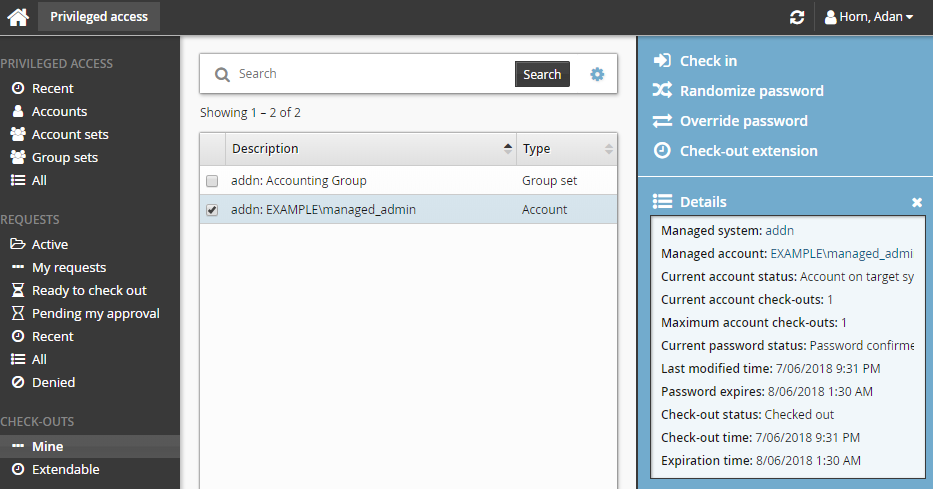
To manually override the password:
Click Privileged access on the home page.
Click Mine under the CHECK-OUTS heading in the Filter panel to see all active check-outs.
Select an account from the Results panel.
Click Override password for the Actions panel.
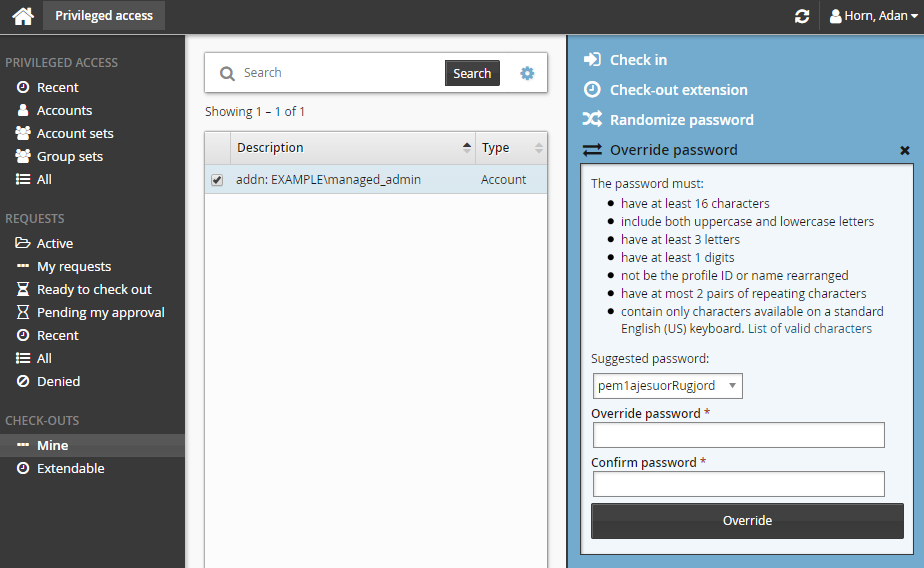
Type a new password and click Override.
To randomize the password:
Click Privileged access on the home page.
Click Mine under the CHECK-OUTS heading in the Filter panel to see all active check-outs.
Select an account from the Results panel.
Click Randomize from the Actions panel.
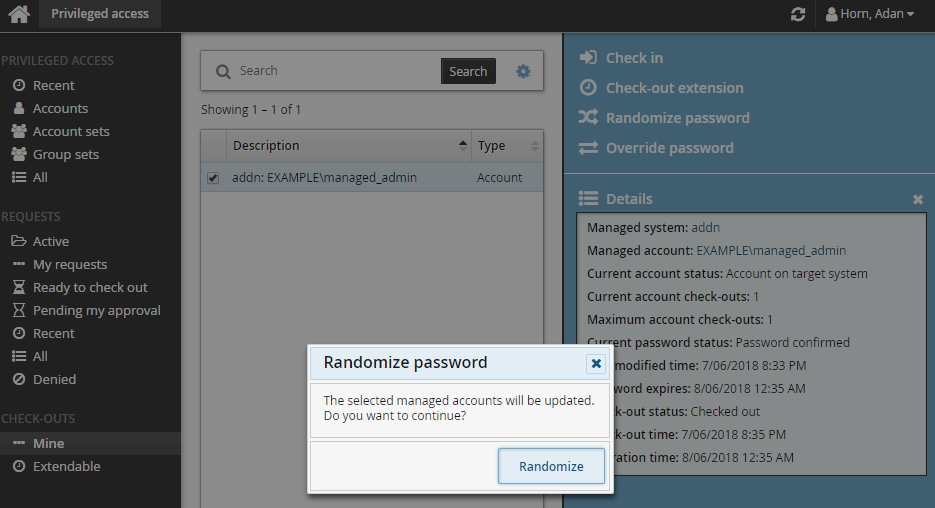
Click Randomize to confirm.
It may take some time for the password change to take effect. Refresh the page to load the current password.
Force randomizing passwords
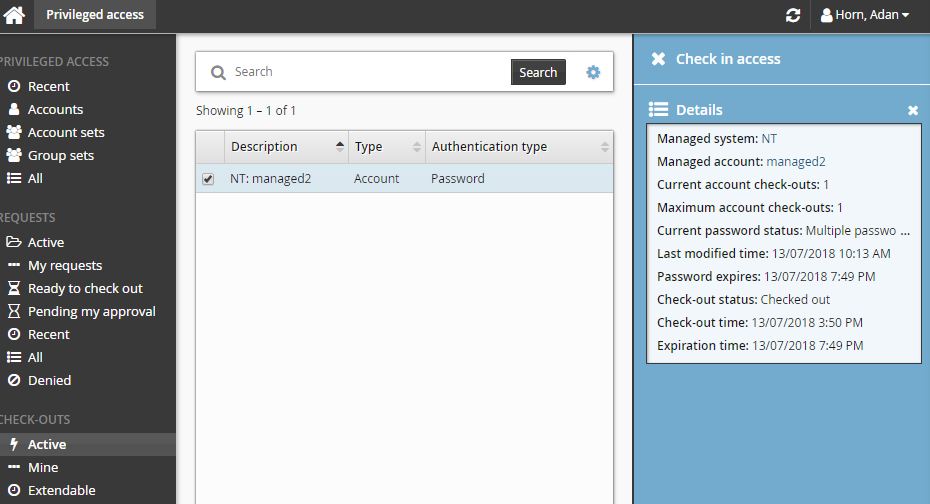
Occasionally you may encounter a situation where a check-out has conflicting passwords; that is, multiple passwords have been set on an account, but it is unknown which one is valid.
In this case, if you are in a user group with the "Randomize/override password of managed accounts" permission, you can force randomize the password to resolve the conflict.
To force randomize:
Click Privileged access on the home page.
Click Active under the CHECK-OUTS heading in the Filter panel to see all active check-outs.
Select an account or account set from the Results panel.
You may also select specific accounts from an account set.
Click Force randomization.
Confirm action by clicking Force randomization in the pop-up.
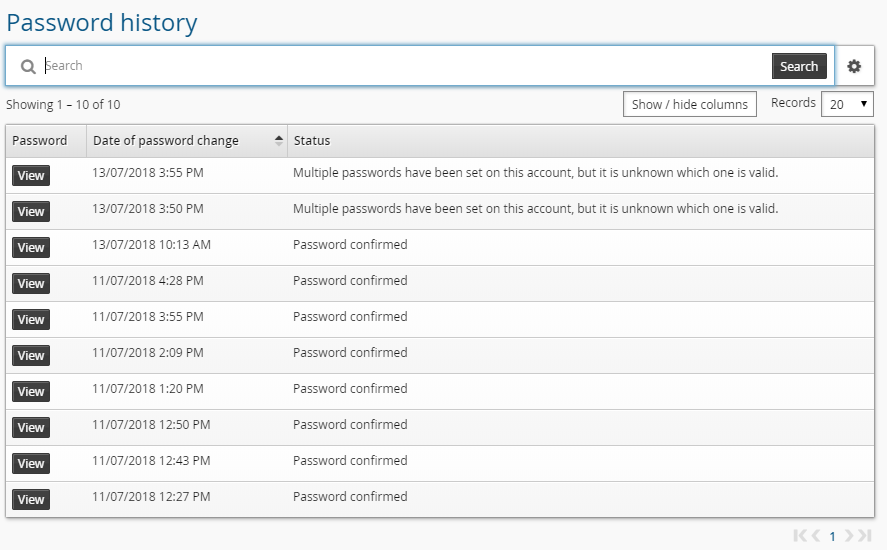
Accessing password history
If you are in a user group with the "Access password history for managed accounts" permission, you can view a list of password changes for an account.
To view the password history of an account:
Click Privileged access on the home page.
Click Active under the CHECK-OUTS heading in the Filter panel to see all active check-outs.
Select an account from the Results panel.
Click Show password history for the Actions panel.

Bravura Security Fabric presents the password history in a pop-up window. You can click the appropriate access control button (Copy or View) to access the old password. The password that is copied or viewed depends on the status:
Status
Password to be copied/viewed
Password randomization is in progress
The password that is being set as the new password.
Randomization failed
The failed password.
Password confirmed:
The password confirmed by the target.
One of multiple passwords has been set on this account. Which password was set last is not known.
Bravura Security Fabric does not know which is correct. It will depend on many factors as to which one is copied or viewed.
Access disclosure plugins
The following access disclosure plugins may be available, depending on configuration and the type of privileged access checked out:
Browser driver | Access the managed system via a web site. |
Command prompt | Access the managed system via a program. The program is determined by Bravura Security Fabric administrators. You may be prompted for your password before or after the program opens. |
Copy | Paste the password into any application or document. |
Display | Reveals the password. Display is the only control that can run without JavaScript or additional extensions. |
In-browser RDP | Access the managed system via a remote desktop connection. |
In-browser Remote App | Access a program on the managed system. |
In-browser SSH | Access the managed system using Secure Shell (SSH). |
In-browser Telnet | Access the managed system via Telnet terminal. |
In-browser VNC | Access the managed system via virtual network computing. |
Run command | For use with account set check-outs where connectors will run commands on managed systems using managed account credentials. |
PuTTY over SSH | Access the managed system via a PuTTY program. The connection uses SSH keys, passwords are not used. |
Remote App RDP | Access a program on the managed system via a remote desktop connection. |
Remote desktop | Access the managed system via a remote desktop connection. |
Warning
Any time you reveal a password, ensure that you are the only person who can see the screen.
Disclosure plugins that use passwords are unavailable if the account has no password stored or if a password conflict has been detected for the account.
If you are using an in-browser access disclosure plugin on a mobile device, ensure you set the input method.
No additional software or extensions are required to view in-browser (Guacamole) access disclosure plugins. However, depending on the browser type, you may need to install additional software or extensions for other access disclosure plugins to work. See Installing access disclosure plugins for more information.
Setting the input method to use the in-browser (Guacamole) access disclosure plugins on a mobile device
The in-browser access disclosure plugins can be viewed on a mobile device, including Android and iOS. Other devices are supported as long as it has an HTML5 compatible browser. By default, they do not set an input method. This will need to be set in order to enter text.
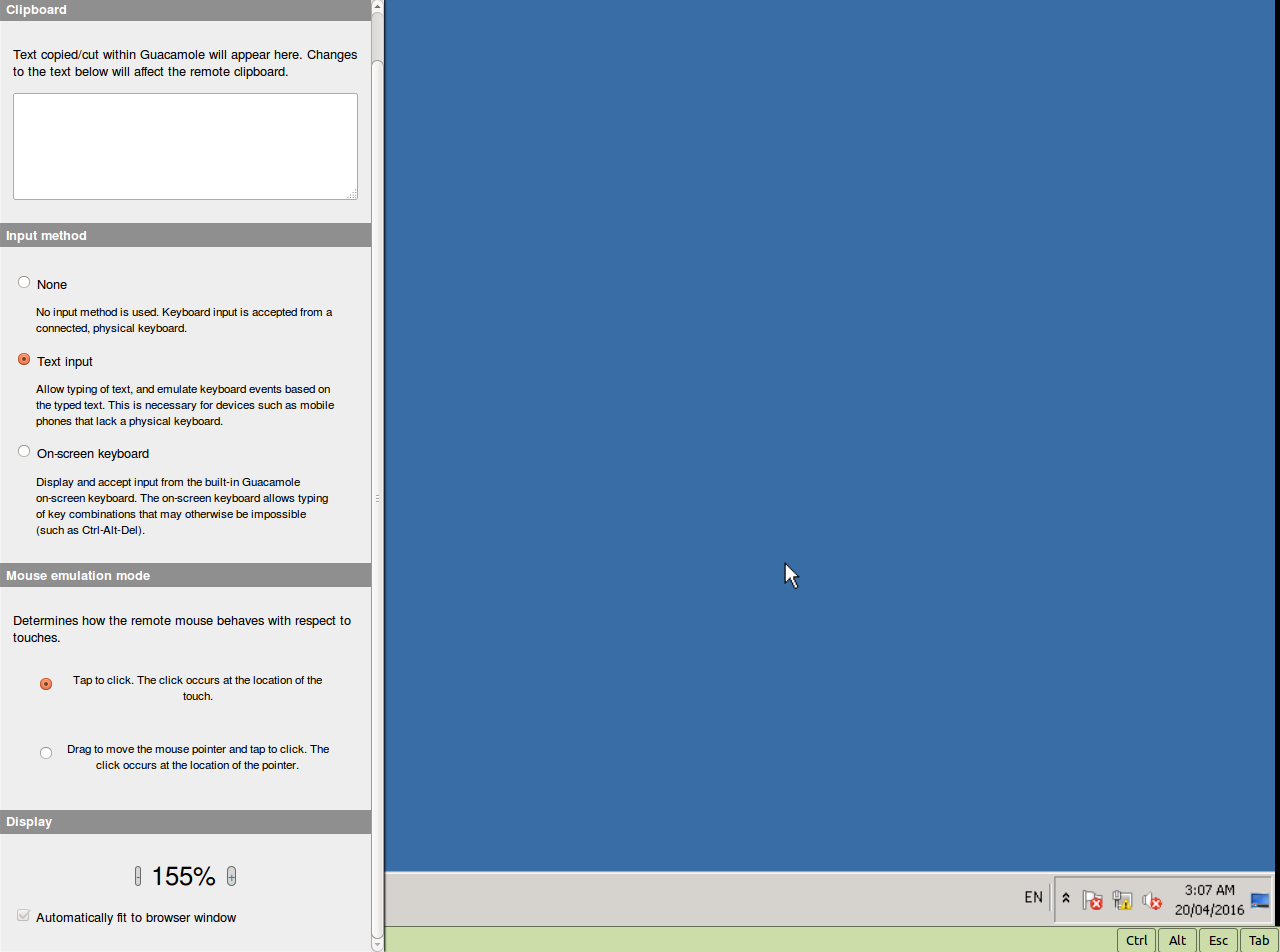
To change the input method on a touchscreen device, or to change the display size or to change the mouse emulation mode for RDP and VNC, swipe right from the left edge of the screen to access the menu. To exit the menu, swipe left.
Currently, only text input can be used as the input method.
Installing access disclosure plugins
Depending on the browser type, you may need to install additional software or extensions for some native access disclosure plugins to work. This section shows you how to install and run access disclosure plugins using:
Internet Explorer 11 and Microsoft Edge Legacy
Firefox
Google Chrome and Microsoft Edge Chromium
One-time disclosure method
Internet Explorer 11 and Microsoft Edge Legacy
In order to view access disclosure plugins on Internet Explorer 11 and Microsoft Edge Legacy, an ActiveX extension needs to be downloaded from the Bravura Privilege server. This needs to be done for each disclosure plugin that will be accessed.
Using the Active X controls requires these browsers to be in IE mode.
To install access disclosure plugins on Internet Explorer 11 and Microsoft Edge Legacy:
On the Internet Explorer browser, select an access disclosure plugin in the Check-outs screen.
Click Install.
An ActiveX component extension installation window should appear.
Click Allow for the web page to run the ActiveX add-on.
Click Install to install the ActiveX extension.
The access disclosure plugin should now be available.
After an upgrade if controls are not installed close all IE browsers, delete all CONFLICT directories found in C:\Windows\Downloaded Program Files\ and attempt the control installation again.
Mozilla Firefox
A Firefox extension as well as a native browser extension is required to view access disclosure plugins on Firefox. A download link will be available to install the browser extension if it has not been installed yet.
To install the Firefox and native browser extension:
On the Firefox browser, select an access disclosure plugin in the Check-outs screen.
Click Install firefox extension.
A prompt to allow and install the Bravura Security Browser Add-On is displayed in the browser.
In the Check-outs screen, click Install native extension.
Run the
firefox-extension-x86.msiorfirefox-extension-x64.msifile. Alternatively, download and save the file onto your workstation and run the file.If you are logged in as an administrator, you can choose to install the browser extension for yourself or for all users on the workstation.
The access disclosure plugins should now be available.
If a previous version of native browser extensions for Firefox is already installed on the workstation (11.1.x or older) you must uninstall and install the current version.
Google Chrome and Microsoft Edge Chromium
A Chrome extension as well as a native browser extension is required to view access disclosure plugins on Chrome. A download link will be available to install the extensions if it has not been installed yet.
To install the Chrome and native browser extension:
On the Chrome browser, select an access disclosure plugin in the Check-outs screen.
Click Install Chrome extension.
This will open a new browser tab to the Bravura Security Browser Extension in the Chrome web store.
Click Add to Chrome.
Click Add extension.
In the Check-outs screen, click Install native extension.
Run the
browser-extension-win-x86.msifile, or download and save the file onto your workstation and run the file.If you are logged in as an administrator, you can choose to install the browser extension for yourself or for all users on the workstation.
When the installation completes, go to the Extensions Manager on the Chrome browser.
Locate 'Bravura Security Browser Extension' in the Plugins section and select the checkbox beside Enabled.
The access disclosure plugins should now be available.
One-time disclosure method
You can view access disclosure plugins using the one-time disclosure method. These have the same functionality as the native access disclosure plugins and do not require additional software, however they are good for one-time use only. The one-time disclosure is available as an executable that can be run directly or downloaded to be run on a different workstation. A new executable needs to be generated in order to view the access disclosure plugin again.
The one-time disclosure option is only available if the product administrator has enabled it, otherwise you will see this option grayed out.
To run the one-time disclosure:
On a browser, select an access disclosure plugin in the screen.
Click One-time disclosure.
Run the executable, or download and save the file onto your workstation, and run the file.
The access disclosure plugin should be available after running the executable.
Make sure you do not modify the file name of the one-time disclosure, otherwise the executable will not work properly.
Saving sessions
If you are able to modify attributes on a disclosure plugin, you can save your preferences to save time and avoid errors next time you want to access a managed account.
This capability is not available for Copy, Display, and Run command plugins.
To save session settings:
Select the access disclosure plugin from the Actions panel.
If attribute override is allowed, you can edit values.
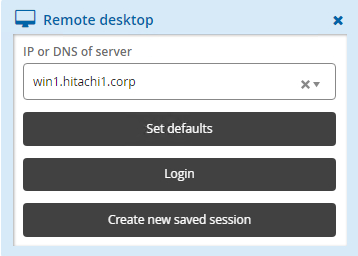
Click:
Set defaults to save values as default for the next time you use this plugin.
Login to launch the plugin and save the values for the next time you use this plugin. This option is only available for in-browser disclosures or where a browser extension or ActiveX control is installed.
Create new saved session to create a named saved session.
If you chose to create a saved session:
Type a New saved session name.
Select an existing category or type a new category.
Type Notes about your settings.
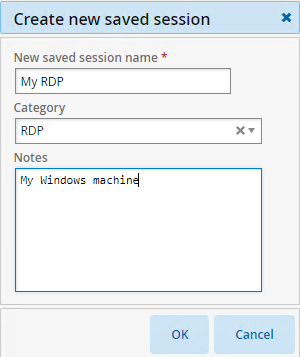
Click OK.
The saved session is added to the menu in the Filter panel.
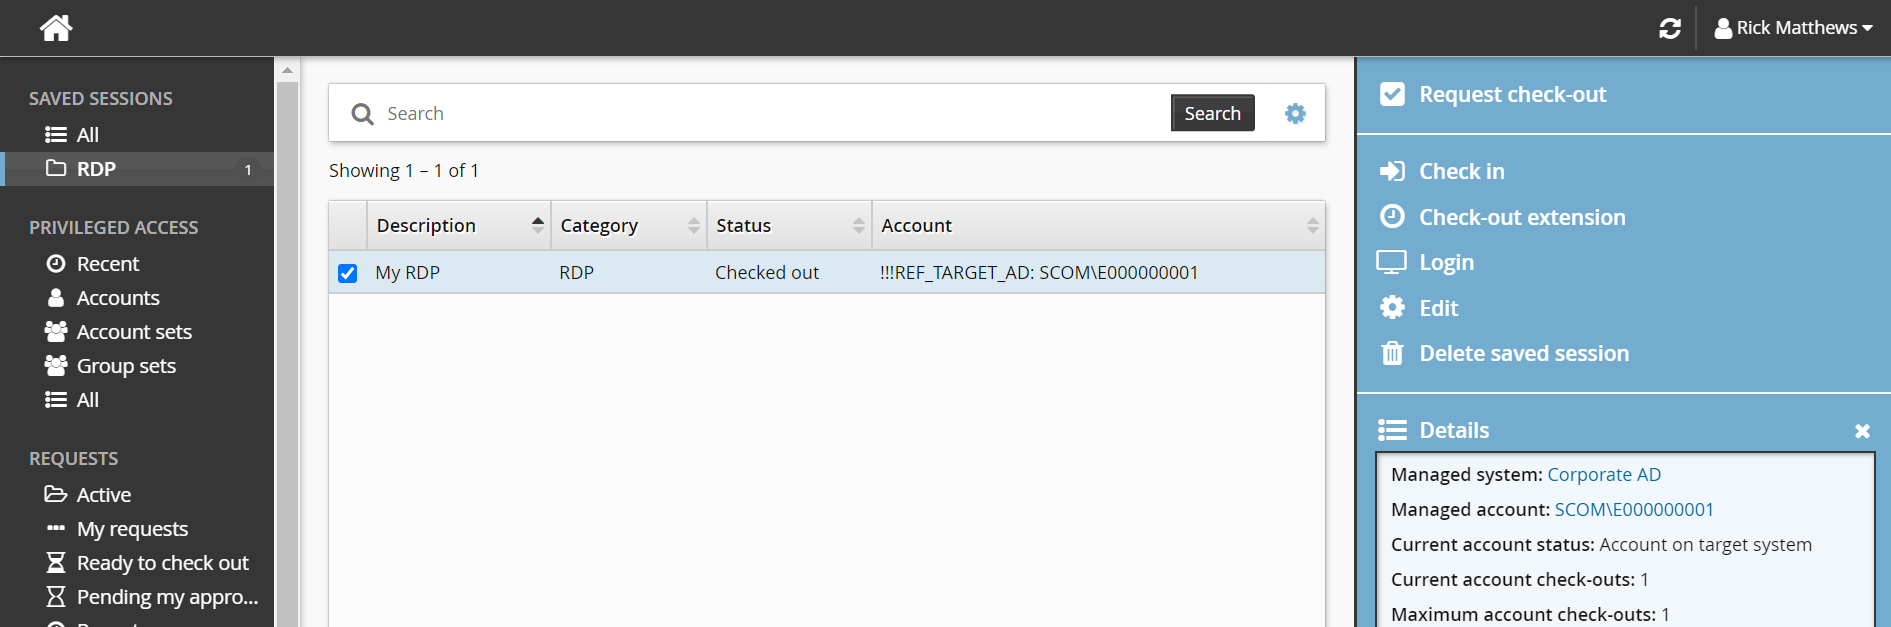
When you select the saved session, options are presented in the Actions panel:
Request check-out You can request access to the managed account the saved session was created for, if it is available.
Check in
Check-out extension
Login This launches the disclosure plugin using the saved attribute values.
Edit You can edit information and attributes, and save as the current session or create a new one.
Delete saved session You can delete one or more saved sessions.
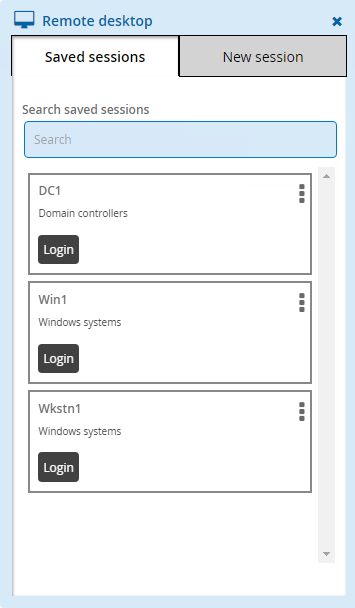
Using saved sessions
Click Privileged access on the home page.
Click All or a category group under the SAVED SESSIONS heading in the Filter panel.
The Results panel will list the available saved sessions.
Select a saved session.
Click Request check-out to request access to the managed account the saved session was created for.
Click Check out.
Click Login.
The disclosure plugin will be launched using the saved attribute values
Click Edit to edit information and attributes, and save as the current session or create a new one.
Click Privileged access on the home page.
Request and check out privileged account access.
Select an available access disclosure plugin.
Click the Login button on the saved session you want to use.
Configuration notes
Product administrators can configure the interface as described in this section.
Permissions
Users must belong to a user group that has permission to access accounts or groups that belong to a managed system policy.
Checkout age and time remaining thresholds
The default thresholds are defined by the following system variables, which can be set in Manage the system > Modules > Privileged access:
PSW CHECKIN CHECKOUT AGE ALERT THRESHOLD
PSW CHECKIN CHECKOUT AGE WARNING THRESHOLD
PSW CHECKIN TIME REMAINING ALERT THRESHOLD
PSW CHECKIN TIME REMAINING WARNING THRESHOLD
Recent requests
You can configure the number of days that an account, account set or group set is considered recent by setting the PSW RECENT ACCESS option for the Privileged access app.
Password override
Users who have been granted the "Randomize/override password of managed accounts" permission to the vault-only managed system policy of the checked out password have the option to override the stored vault-only password.