Active Directory DN
Connector name |
|
Connector type | Executable |
Type (UI field value) | Active Directory DN |
Target system versions supported/tested | Active Directory installed on Windows 2008R2/2012/2016/2019/2022 servers and Active Directory forests. |
Connector status / support | Bravura Security-Verified This connector has been tested and is fully supported by Bravura Security. |
Upgrade notes | The |
This connector uses protocols and interfaces built into the Windows server operating system to update and retrieve information from Microsoft Active Directory.
Connection to the domain can either be made using a domain administrator account or delegated ID. ADSI services are used to connect to the domain. The connector uses ADSI LDAP provider for all operations using the distinguished name. If the target system is configured to use SSL, an LDAP SSL connection is used. Otherwise, a secure connection using Kerberos is made over LDAP.
The Bravura Security Fabric Active Directory DN connector can dynamically identify the most suitable domain controllers on which to make password updates in order to expedite replication of the new password and intruder lockout flag for the user. For example, a password update and cleared lockout may be set on a DC in the same site as the user’s current workstation (identified by IP address), or nearest the user’s home directory file server. In either case, no connector software must be installed on the target Windows domain controllers.
The following Bravura Security Fabric operations are supported by this connector on user, account and account group-type objects (depending on your product license and version):
user verify password
get server information
user change password
administrator reset password
expire password
check password expiry
administrator verify password
enable account
disable account
check account enabled
unlock account
check account lock
create account
delete account
rename account
update attributes
move contexts
add user to group
delete user from group
add group to group
remove group from group
add owner (user) to group
remove owner (user) from group
add owner (group) to group
remove owner (group) from group
create group
update group
delete group
check account expiry
unexpire account
expire account
List:
accounts
attributes
groups
members
computer objects
member groups
persistent listing
The connector supports following operations when managing contacts (depending on your product license and version):
get server information
create account
delete account
rename account
update attributes
list account attributes
move contexts
add user to group
delete user from group
add group to group
remove group from group
add owner(user) to group
remove owner(user) from group
add owner(group) to group
remove owner(group) from group
create group
delete group
List:
accounts
attributes
groups
members
computer objects
member groups
For a full list and explanation of each connector operation, see Connector operations.
When Bravura Identity is licensed, the connector can be configured with the nrcifs program to:
List network resources
List permissions for each network resource
List the owners of a network resource
Add or delete owners for a network resource
List the ACLs on a directory or share
The connector is called by the Transaction Monitor Service (idtm). When Bravura Identity is installed, the connector is run by the View and update profile (IDR) module whenever users view resource details or manage group owners.
The following sections show you how to:
Define an account for the target system administrator in Active Directory
Create a delegated ID and modify the AdminSDHolder object.
Enable SSL connections
Create template accounts in Active Directory
Set the Active Directory target system address in Bravura Security Fabric
Set up Active Directory so that network resources can be managed in Bravura Identity
This chapter also describes how Bravura Security Fabric handles special attributes used when creating or modifying accounts on an Active Directory target.
See also
adtoaddn.exe utility to learn how to convert a Legacy Active Directory target system over to using the Active Directory DN
agtaddn.execonnector and target system.Windows Server to learn how to target Windows NT compatible servers and workstations.
Transparent Password Synchronization to learn how to implement transparent synchronization on an Active Directory domain.
Preparation
Before Bravura Security Fabric can perform operations in Active Directory, you must:
Know the name of the Active Directory top domain where Bravura Security Fabric performs operations.
Optional: Enable SSL connections .
Configure a target system administrator and at least one test account on each Active Directory domain.
Alternatively, you can set up a delegated ID and modify the AdminSDHolder object .
Enabling SSL connections
You can configure the Active Directory connector so that all connections to the ADSI LDAP Provider are made over SSL (using server certificates). Encryption strength depends on the certificate strength.
To do this, you must:
Configure server certificates on all domain controllers (that the Bravura Security Fabric server could communicate with).
Consult your product documentation to ensure Domain controllers have certificates installed. This can vary between Windows 2008R2, 2012, 2016, 2019, and 2022, and deployment method; for example, whether you have manually deployed certificates or auto-enrollment.
For an example of Windows Server 2008 certificate services deployment, see:
https://technet.microsoft.com/en-us/library/cc772393%28WS.10%29.aspx
For an example of Windows Server 2012 certificate services deployment, see:
Install CA certificates on all Bravura Security Fabric servers that validate the Server certificates.
Instructions for the installation of the CA certificates can be found here:
https://technet.microsoft.com/en-us/library/cc754841.aspx
All Bravura Security Fabric servers require the trusted CA certificates installed for the local computer store.
Enable the SSL option in the target system address.
Configuring a target system administrator
Bravura Security Fabric uses a designated account (for example, psadmin) on the Active Directory target system to perform operations.
The target system administrator should be a member of the Domain Admins group to list users, and should have the following permissions for password and account operations:
Read All Properties
Write All Properties
Modify Permissions
All Extended Rights
The administrator should also be able to enumerate domain controllers in the domain.
If you are targeting multiple domains in an Active Directory forest with this connector, the target system administrator should be a member of the Enterprise Admins group in the forest root, and the username should be entered into Bravura Security Fabric in UPN format. In this case, while the target system administrator does not need to be a user in the forest root domain, the forest root domain or a domain controller in that domain should be specified in the target address.
Ensure that you set and note the account’s password. You will be required to enter the login ID and password when you add the target system to Bravura Security Fabric .
If you want to configure this account with control limited to the users and services needed by Bravura Security Fabric rather than full administrative control, see Minimizing administrative account rights .
If you want to configure an account with specific delegated control, see Delegating control .
Minimizing administrative account rights
In most cases, you include the target system administrator account (such as psadmin) as part of the Domain Admins group; however, it is possible to set up this account not to have full control over the server and only to have control over the users and services that it needs. This involves removing the target system administrator account from the Domain Admins group and adding it to its own group, then giving that group control over users. Because this involves modifying settings for each user, you might want to set up a script to do this work.
The following instructions are for Windows 2012 Active Directory. Details may vary depending on your version of the software.
To minimize administrative account rights:
Log into an Active Directory Domain Controller as a member of the Domain Admins group.
Launch .
Remove the target system administrator for Bravura Security Fabric (for example, psadmin) from the Domain Admins group, and the Enterprise Admins group as applicable.
Create a group (for example, psadmingrp) and set the scope to
Globaland type toSecurity.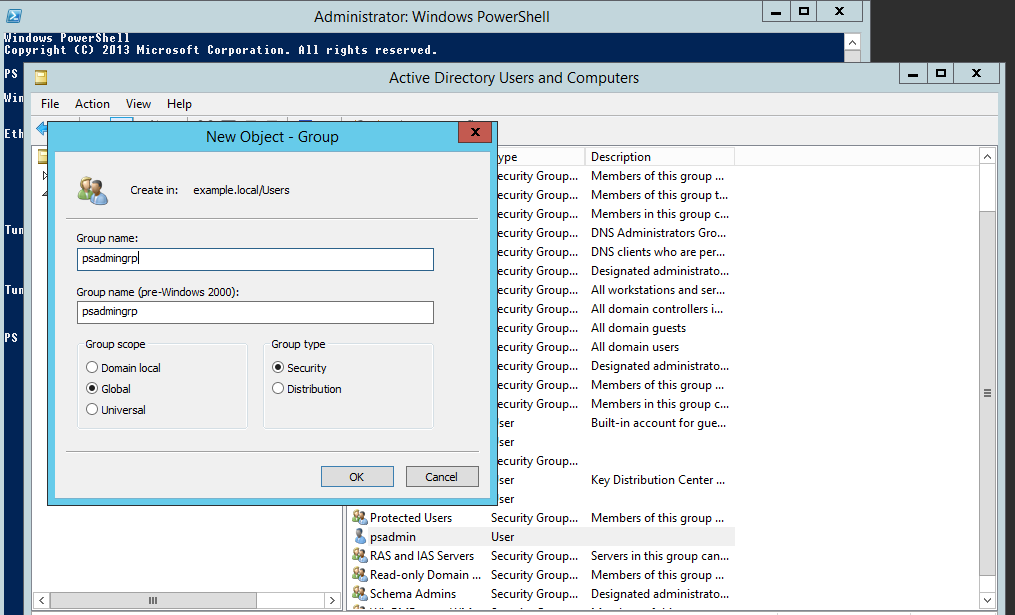
Add the target system administrator to the group you just created.
Set the permissions for the new group that you created:
Ensure that View > Advanced Features is selected.
Right-click on the "user" container that the new group will be used to manage, and select Properties from the pop-up menu.
Click the tab.
Add the group to the list of Group or user names.
Enable the Full Control checkbox in the Allow permissions column.
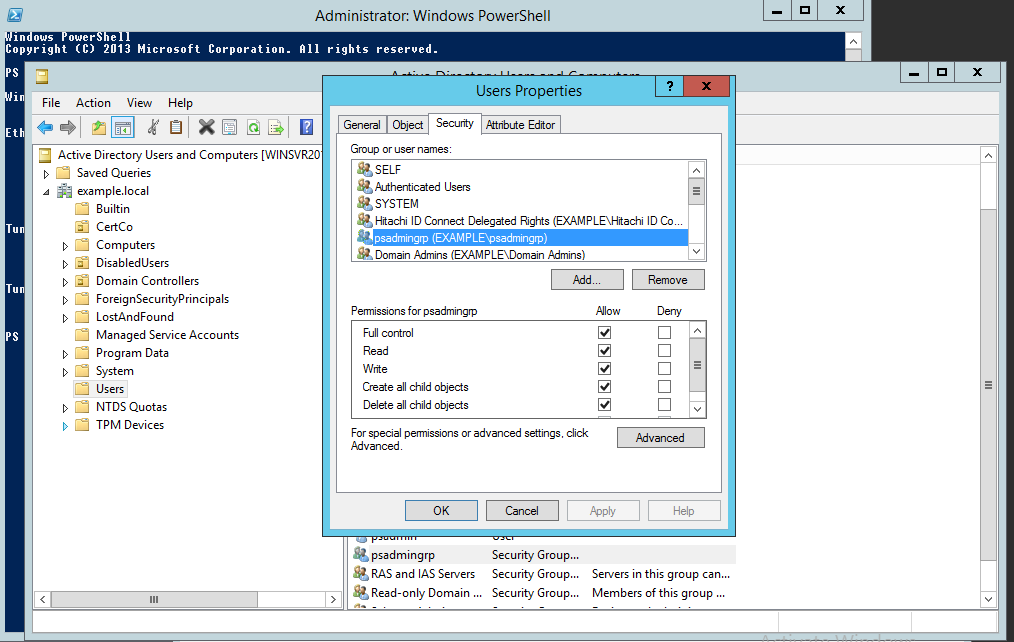
Apply the changes, then click OK to close the dialog box.
If you are targeting multiple domains in an Active Directory forest, you must grant the created group permissions on each domain being targeted. Alternatively, create a new group with permissions in each domain, and add the target system administrator to each group.
The target system administrator must be the same user in all targeted domains, have permission on each targeted domain, and be specified in UPN format in Bravura Security Fabric .
Delegating control
In Active Directory, you can delegate administration of users to a specific individual or group, eliminating the need for the Bravura Security Fabric target system administrator to have authority over an entire domain. We refer to the user as the delegated ID.
If you use a delegated ID, you may also need to configure the AdminSDHolder object .
It is highly recommended that you enable SSL between domain controllers and the Bravura Security Fabric server.
The following steps are used in Windows Server 2012. The steps may vary in other versions.
To create a target system administrator with delegated control, also known as a delegated ID :
Log into a domain controller as an administrator.
Launch .
Create a user in the Users container (or some other container if necessary).
Create a security group to which you can grant delegated control
This allows you to delegate control to members of the group, rather than to an individual user.
Set the scope to
Global, and type toSecurity.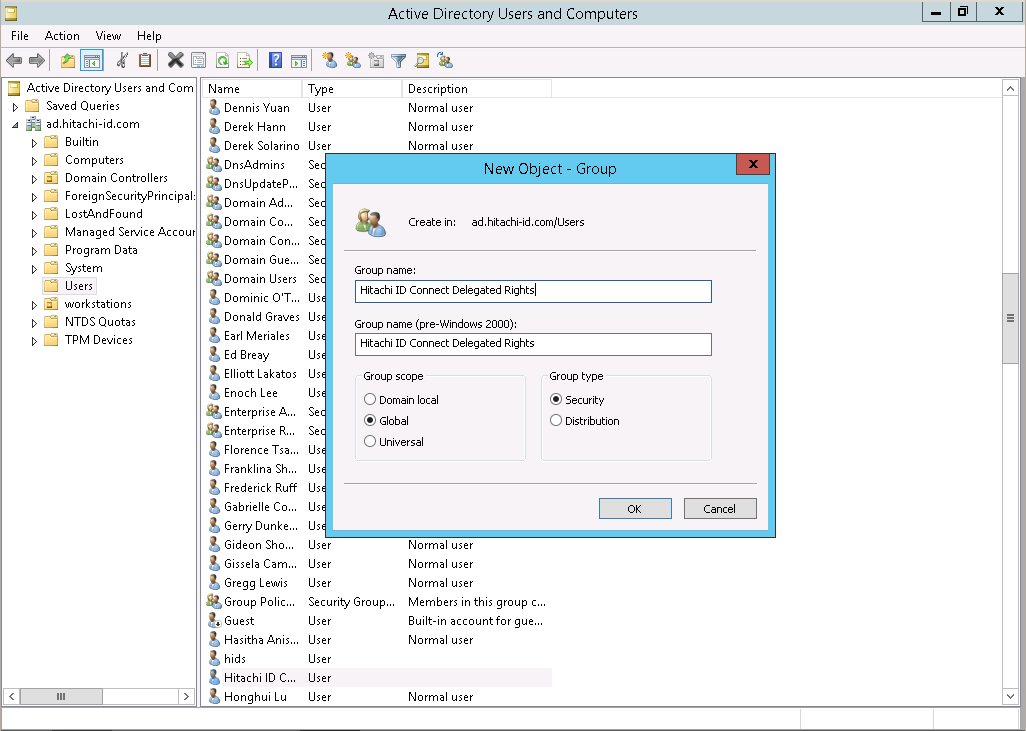
Add the user you created in step 3 as a member of the group.
Right click on the container in which you created the user, and select "Delegate Control…".
Click Next .
Click Add… and select the group.
Click OK.
Click Next.
Provide the group with required permissions.
If your license includes Bravura Identity , include "Create, delete, and manage users accounts", "Create, delete and manage groups", and "Modify the membership of groups" in the tasks to delegate. If your license does not include Bravura Identity , you do not need to check those items unless there is a customization; for example, modifying an extra attribute when doing a password reset could require the ability to manage a user account.
Click Next, then Finish.
For setting more granular permissions, use the ADSI Edit tool. See your Windows documentation for detailed information.
Configuring the AdminSDHolder object
The following applies to Server 2003, Windows Server 2003 R2, Windows Server 2003 with SP1, and Windows Server 2003 with SP2.
The default owner for AdminSDHolder is the Domain Admins group. If your target system administrator is a member of this group, Bravura Security Fabric can reset domain administrator accounts. If you chose to delegate administration of users to a specific individual or group, the AdminSDHolder container will need to be modified.
In order to reset domain administrator accounts using a Delegated ID, configure permissions on the AdminSDHolder object to allow the management account group, created when you created the delegated ID, to reset passwords on AdminSDHolder.
Refer to the following link for detailed instructions:
https://technet.microsoft.com/en-us/library/cc772662%28v=ws.10%29.aspx
Creating a template account
Bravura Security Fabric uses template accounts as models or "blueprints" for creating new accounts in Active Directory. The following example illustrates how you can create a template account in Active Directory:
The following instructions are for Windows 2012 Active Directory. Details may vary depending on your version of the software.
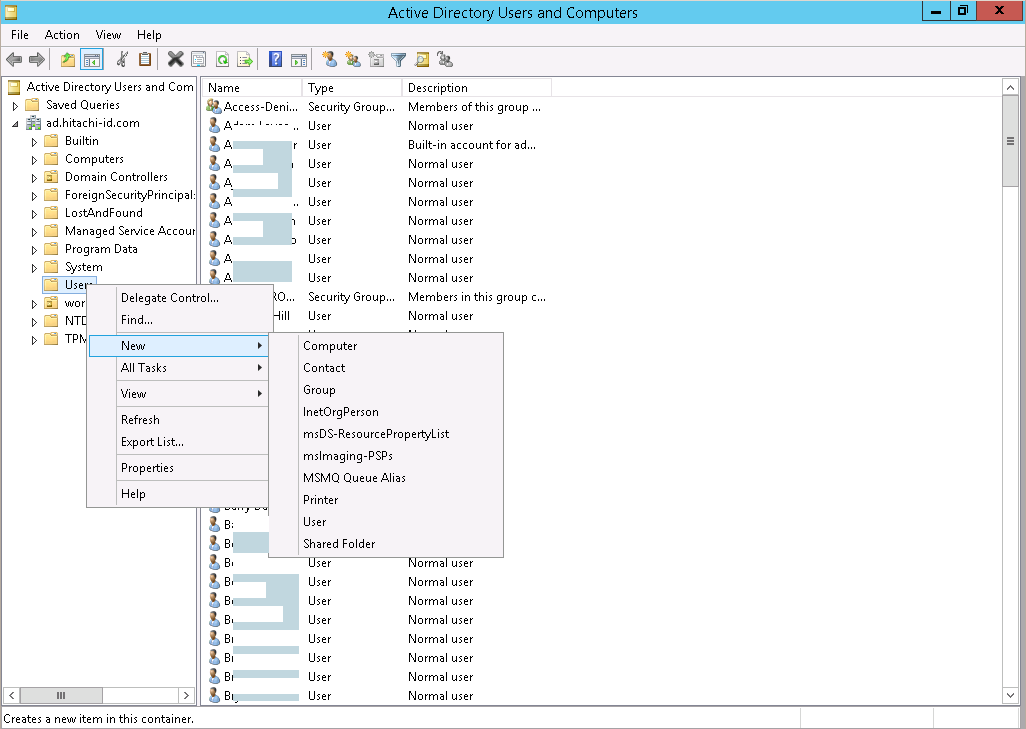
Log into an Active Directory domain controller as a member of the Domain Admins group.
Launch Server Manager.
Select Tools > Active Directory Users and Computers.
Right-click on the Organizational Unit where you want the template account to exist. For example, the Users OU.
Select New >User.
Windows displays the New Object-User dialog box.
Enter the account names and User logon name.
When creating a template account, ensure that the User logon name and User logon name (pre-windows 2000) fields match, or new accounts created using this template may be created with an incorrect value.
If you wish to use different Active Directory and pre-Windows 2000 logon names, you must modify the configured action for the corresponding attributes in Bravura Security Fabric (see Account attributes in the Bravura Security Fabric configuration documentation).
Click Next .
Enter the new user’s password in the Password and Confirm Password fields, and set other options as you require.
You can disable the account if it is to be used only as a template account or enabled later.
Click Next to confirm the user’s account details.
Click Finish to close the dialog box.
Defining properties
By default, Bravura Security Fabric copies many properties (attributes) when creating a new user.
Note
It is recommended that you do not add template accounts to Bravura Security Fabric managed groups. Managed group memberships should be handled by including them in roles.
Without the use of roles, it may be necessary to create multiple template accounts depending on the needs of your organization, because group membership generally denotes resources (such as printers, file shares) to which a user has access.
To define additional properties for the template account:
Open the Users folder and locate the template user.
If you want to set the logon hours and account options:
Select the tab.
Set the following account parameters:
Logon Hours (Optional)
To restrict the hours during which the user can connect to a server. This setting does not affect a user’s ability to use a workstation.
Log On To (Optional)
To restrict the workstations from which a user will be permitted to log on to this domain account.
Account options
To manage the account expiration date and other options.
If you want to configure a logon script or home directory:
Select the tab.
Type the full path for the user’s profile in the Profile path field and the logon script to be used by the account in the Logon script field.
Type the location of the user’s Home folder in the Connect: To: fields.
When creating the template account’s home folder, ensure that the folder name matches the template account ID (required so that Bravura Security Fabric can replace the ID with the ID of the new user). No home directory is created for the recipient account if the template account has their Home folder defined on the DC (the Local Path), the home folder must be located on a network drive (Connect drive: to).
Configure other properties as you require.
Click OK to close the window.
Close the window.
Renaming template accounts
If a template account is renamed on the target system, account creation behaves differently depending on whether the target system is a source of profiles:
If the target is a source of profiles, then nothing changes. Bravura Security Fabric can continue to use the template account as is to create accounts.
If the target system is not a source of profiles, when you rename the template account (for example, cn or distinguishedName) ensure that userPrincipalName is also renamed or emptied out. If userPrincipalName is not renamed nor emptied, account creation will fail.
Setting up network resources
This section shows you how to set up network resources for management via Bravura Identity .
All shared resources to which users are going to request access must be correctly configured on the target system. Bravura Identity ’s ability to successfully control access to the resources depends heavily on how the resources are configured on the target system.
Some thought must be given to planning how many groups need to be created and what resources they will have permission to access, so that adding/removing a user’s membership in a group provides them with the exact access to network resources that they need. To provide access to resources on a resource by resource basis, you need to create a group for each resource.
In general, you must do the following:
Create groups with appropriate permissions to control access to the resources that are going to be managed by Bravura Identity .
Ensure that each group has an owner (recommended).
Bravura Identity can use group owners as authorizers for requests to join the group. See Groups for more information.
Ensure that all resources to be managed have the correct groups assigned to them.
The nrcifs program, shipped with Connector Pack in the agent directory, binds Bravura Identity to a specific resource whose access is mediated by membership in an Active Directory group. Before Bravura Identity can administer user access to resources you must configure the resources in the domain. This section details how to configure:
The following instructions are for Active Directory running on Windows Server 2012. Details may vary depending on your version of the software.
Shares/folders
To set up shares/folders in your Active Directory domain:
Configure the groups that will be granted access to the share; ensure that each group has a description and an owner.
Using :
Right-click the group, then select Properties.
The window appears.
Click the General tab. If required, type a Description that will be displayed to users.
Click the Managed By tab. If required, click Change, then type the name of the user you want to designate as the group owner, then click OK to return to the Managed By tab.
Alternatively, you can type the name of a group. See Groups as owners for special considerations.
Click OK to close the window.
Set up shared folder permissions to restrict the folder’s availability over the network.
Using Windows Explorer:
Right-click the folder you want to share, then select Properties.
The <folder> Properties window appears.
Click the Sharing tab, and click Advanced Sharing....
Check Share this folder.
Click Permissions.
The window appears.
Select the Everyone group and click Remove (recommended).
Click Add, type the user ID of the target system administrator, then click OK to return to the permissions window.
Set the permissions for the target system administrator to Full Control.
Click Add, type the name of the groups you configured in step 1, then click OK to return to the permissions window.
Set the permissions for each of the groups you added to Full Control.
Click OK to close the window.
Click OK to close the window.
Click OK to close the window.
Configure the NTFS permissions for the folder object and any subfolders that are not set up to inherit from the folder.
Using Windows Explorer:
Right-click the folder, then select Properties.
The window appears.
Click the Security tab.
The tab displays a list of users and groups who have permissions assigned to them for the folder object.
Verify that the target system administrator has permissions to the folder either explicitly or through group membership; for example, ensure that the Administrators group is listed.
This allows subfolders to viewed properly in Bravura Identity . You only need to perform this step on the parent folder.
Click Edit....
Click Add....
Type the name of the groups you configured in step 1, then click OK.
Set the permissions for each group.
Be careful about which groups you grant full control over folders. Members of these groups will be able to change the folder permissions. As a general rule, only allow Administrators full control.
Remove the default "Users" group.
Click OK to close the window.
The share is now available to be managed by Bravura Identity .
Publishing shares
If you want to use the listadresources program to list the share, you must publish the share in the directory. To do this:
Open .
Right-click the location in which you want to publish the share, then select New >Shared Folder.
Type the name of the share and the network path.
Click OK.
See the listadresources usage information .
Printers
In order to manage printers as network resources in Bravura Security Fabric, the server to which the printer is attached must be a member of the domain.
To set up printers in your Active Directory domain:
Configure the groups that will be granted access to the printer; ensure that each group has a description and an owner.
Using :
Right-click the group, then select Properties.
The window appears.
Click the General tab. If required, type a Description that will be displayed to users.
Click the Managed By tab. If required, click Change, then type the name of the user you want to designate as the group owner, then click OK to return to the Managed By tab.
Alternatively, you can type the name of a group. See Groups as owners for special considerations.
Click OK to close the window.
Ensure that the printer Bravura Identity will manage is listed in the directory.
Using Printers and Faxes on the server where the printer is attached:
Right-click the printer, then select Printer properties.
Click the Sharing tab, and ensure that the Share this printer and List in the directory options are selected.
Click OK.
Add the group so that it has permissions to the printer:
Using Devices and Printers on the server where the printer is attached:
Right-click the printer, then select Printer properties.
The <printer> Properties window appears.
Select the Security tab, then click Add.
Type the name of the groups you configured step 1, then click OK.
Set the permissions for each group. For example allow the group to print.
Click OK to close the <printer> Properties window.
The printer is now available to be managed by Bravura Identity .
Mail distribution lists
To set up mail distribution lists in your Active Directory domain, using the Exchange Management Console:
Launch the Exchange Management Console.
Expand Microsoft Exchange On-Premises on the left hand side.
Expand Recipient Configuration on the left hand side.
Select Distribution Group from the left hand side.
Right click the distribution group and select Properties.
Select the Group Information tab.
Click Add.. .
Search for, and select the user you want to designate as the group owner, then click OK.
Click OK to close the Bravura Identity Properties window.
The distribution groups will propagate to Active Directory and can be managed by Bravura Identity .
Alternatively, you can manage the Exchange distribution groups using the Exchange connector.
Groups as owners
Active Directory allows groups to be managed by other groups. If you configure a group with access to a network resource to be managed by another group, all members of the managing group will become group owners in Bravura Identity .
You can limit the list of group owners presented to users by selecting a managing group that contains fewer members, or use an IDACCESS OWNERS PLUGIN plugin (Manage the system > Workflow > Options > Plugins).
Configuration notes
If a managed group does not have a description entered, then the group name is displayed by default when requesting access to network resources.
listadresources
Use the listadresources program to list network resources (shares, printers, mail distribution lists) in a Microsoft Active Directory domain .
You can then use the resulting output file with the loadnetres program to import the resources into Bravura Security Fabric .
Usage
listadresources -hostid <target ID> -outfile <filename> [-validateperm]
Option | Description |
|---|---|
-hostid <target ID> | The target ID of the Active Directory domain in Bravura Security Fabric. |
-outfile <filename> | The output filename. |
-validateperm | Determines the value of the Users are only allowed to see sub-resources when they read permission for a resource checkbox for a share/folder resource. Including this option sets -validateperm to true. If unspecified, the value is false; the default value is false. |
Output file format
The output file format for listadresources is the same as the input file format for loadnetres.
The file is written in KVGroup format:
"" "" = {
  "<resource type>" "<publish name>"= {           # required
    "Address" = "<UNC path of the resource>"        # required for shares and printers
    "TargetId" = "<target ID>"                       # required
    "Description" = "<description>"  # not required
    "ValidatePermissions" = "<true|false>"          # not required
  }
 ...   # You can specify multiple KVGroups, one for each resource.
}
The <resource type> is one of:
F – share/folder resource
M – mail distribution list
P – printer resource
ValidatePermissions determines the value of the Users are only allowed to see sub-resources when they have read permission for a resource checkbox for a share/folder resource. The default is false.
Example
The following is an example of the file format:
# KVGROUP-V1.0
"" "" = {
  "F" "share1" = {
    "Address" = "\\\\10.0.26.115\\share1"
    "Description" = "A shared folder"
    "TargetId" = "ADDOM"
  }
  "M" "AllSalesGroup" = {
    "Description" = "Distribution list for sales"
    "TargetId" = "ADDOM"
  }
  "P" "COMPUTERNAME-Printer1" = {
    "Address" = "\\\\computername.example.com\\Printer1"
    "Description" = "First floor printer"
    "TargetId" = "ADDOM"
  }
  "F" "share2" = {
    "Address" = "\\\\10.0.26.115\\share2"
    "Description" = "Another shared folder"
    "TargetId" = "ADDOM"
    "ValidatePermissions" = "true"
  }
}
loadnetres
Use loadnetres to import information about network resources to Bravura Security Fabric.
This program can use the output file created by listadresources, the diffs of two files, or your own customized file.
loadnetres [<FILE1>] <FILE2>
If <FILE1> is specified, loadnetres compares the two files and adds, removes, or modifies resources as appropriate.
The file is written in KVGroup format:
"" "" = {
  "<resource type>" "<publish name>"= {           # required
    "Address" = "<UNC path of the resource>"        # required for shares and printers
    "TargetId" = "<target ID>"                       # required
    "Description" = "<description>"  # not required
    "ValidatePermissions" = "<true|false>"          # not required
  }
 ...   # You can specify multiple KVGroups, one for each resource.
}
The <resource type> is one of:
F – share/folder resource
M – mail distribution list
P – printer resource
ValidatePermissions determines the value of the Users are only allowed to see sub-resources when they have read permission for a resource checkbox for a share/folder resource. The default is false.
The following is an example of the file format:
# KVGROUP-V1.0
"" "" = {
  "F" "share1" = {
    "Address" = "\\\\10.0.26.115\\share1"
    "Description" = "A shared folder"
    "TargetId" = "ADDOM"
  }
  "M" "AllSalesGroup" = {
    "Description" = "Distribution list for sales"
    "TargetId" = "ADDOM"
  }
  "P" "COMPUTERNAME-Printer1" = {
    "Address" = "\\\\computername.example.com\\Printer1"
    "Description" = "First floor printer"
    "TargetId" = "ADDOM"
  }
  "F" "share2" = {
    "Address" = "\\\\10.0.26.115\\share2"
    "Description" = "Another shared folder"
    "TargetId" = "ADDOM"
    "ValidatePermissions" = "true"
  }
}
Targeting Active Directory DN
For each Active Directory domain or forest, add a target (Manage the system > Resources > Target systems):
Type is Active Directory DN, listed under "Network Operating Systems" in the drop-down list.
Address uses syntax described in Table 1, “Active Directory DN address configuration”
When listing contacts Custom LDAP search expression for filtering users should be set to filter contacts.
Administrator ID and Password are the credentials for the target system administrator you configured earlier.
It is recommended that you write the administrator ID in the format:
NETBIOS\userid
or
userid@domain.com
This is required in some cases, including where:
Bravura Security Fabric is installed on a Windows XP workstation
The
plugin-winsvcplugin is configured to update service, scheduled task, and iis directory credentials (Bravura Privilege)The
nrcifsprogram is configured to manage resources whose access is mediated by membership in Active Directory groups (Bravura Identity)The List entire forest target address option is specified and Bravura Security Fabric will be acting on objects outside the domain specified in the Domain or domain controller target address option.
Set Program to generate a list of target systems to
dcselectto accelerate password replication in Active Directory domains.By default, all connectors run the Bravura Security Fabric processes on the Bravura Security Fabric server, as the local psadmin account. To enable the target system administrator to run those processes, select the Run as? checkbox.
The full list of target parameters is explained in Target System Options.
Option | Description |
|---|---|
Options marked with a | |
Domain or domain controller | The DNS domain name, the domain controller’s FQDN, a custom DNS name to target or IP address; for example: globaldomain.example.com or \\mydomaincontroller.example.com or \\mydomaincontroller or \\customdnsname Use the IP address only if DNS is not resolving, otherwise avoid using the IP address of the domain controller. The DNS domain name or the FQDN should be specified. A custom DNS name should only be used if absolutely necessary. (key: server) |
Connection over SSL | Select to enforce SSL connections. (key: ssl) |
Custom LDAP search expression for filtering users | Restrict user listing by using LDAP search filters. (key: userFilter) |
Custom LDAP search expression for filtering groups | Restrict group listing by using LDAP search filters. (key: groupFilter) |
OUs to list users from | List only those users who exist in one or more containers . (key: listOUs) |
Groups to list users from | List only those users who exist in one or more groups. (key: listGroups) |
OUs to list groups from | List only those groups that exist in one or more containers. (key: listGroupOUs) |
Groups to list member groups from | List only those groups that exist in one or more groups. (key: listGroupGroups) |
OUs to list computers from | List only those computer objects that exist in one or more containers. (key: listComputerOUs) |
Groups to list computers from | List only those computer objects that exist in one or more groups . (key: listComputerGroups) |
OUs to exclude from listing | Exclude certain OUs to further restrict listing. (key: excludeOUs) |
List nested groups | Recursively list all users and computers contained within groups specified by the " Groups to list. ." options. (key: listNestedGrps) |
List members for nested groups | Recursively list users’ group membership for groups contained within groups specified by the Groups to list users from option. (key: listNestedNOSGrps) |
Abort listing when an invalid group is encountered | Return failure when a group list includes an invalid group. (key: listFailOnNonExistentGrp) |
Abort listing when an invalid OU is encountered | Return failure when an OU list includes an invalid OU. (key: listFailOnNonExistentOU) |
When listing group members and managers, list groups as their individual user members | Depending on the version of Bravura Security Fabric you have installed, you may need to list groups and group managers in flattened form if nested groups are not supported. Bravura Security Fabric versions 9.0.1 or earlier do not support nested groups . (key: listFlatGroups) |
List entire forest | List objects outside the domain specified in the Domain or domain ontroller target address option. (key: listForest) |
Delete users with sub objects | Delete users with leaf objects. In some environments, Active Directory accounts will have a leaf object created, for example Exchange with ActiveSync. By default these users will not be deleted. (key: deleteSubs) |
Create an OU when creating user if it does not already exist | If enabled, when an account is being created, and a non-existing OU is specified , the OU will be created instead of giving an error. (key: createOU) |
List deleted users on supported systems | Choose whether to list only regular users (default), only deleted users, or both. Deleted users are listed in NT4 format. Active Directory moves deleted accounts to a "recycle bin". If enabled in Bravura Security Fabric , these accounts are restrored. (key: listDeleted) |
Name format | Use NT4 format or fully qualified domain name (FQDN). (key: nameFormat) |
Group Name format | Use NT4 format or fully qualified domain name (FQDN). (key: groupNameFormat) |
Attribute specifying group owners | The attribute name that specifies the owner or list of owners for a group. The default value is managedBy. When set to a single valued attribute such as managedBy, the Target system supports multiple owners on groups target system option should be unchecked. Only one group owner is supported in this case. A multi-valued attribute may also be specified in order to support multiple group owners. In this case, the Target system supports multiple owners on groups target system option should be checked. (key: grpowner_attr) |
Persistent list search wait time (in seconds) | The interval time in seconds that the connector will wait to search for changes in the native target. The default value is 7,200 seconds (2 hours). If this value is set too small for a large native target, the connector may not be able to retrieve changes completely in the native target. Setting the value too small will also impose excess load on related services, which drag down the system performance. (key: persistentSearchWait) |
Disable recursive searches of members in domain groups to improve nr performance | Recursively traverse all groups contained with groups when checking permissions in the network resources sub folder operation. Turning this option on is more precise for the checking of permissions, however it will have a performance impact. Default is false. (key: nrIsMemberOfDomainGroupRecursive) NoteThe option Disable recursive searches of members in domain groups to improve nr performance was added in Connector Pack 4.6.0. |

The Active Directory DN target system address syntax is as follows:
{server=(<DNS domain name> | \\<DC's FQDN or host name>);

 [userFilter=<LDAP search filter>;]

 [grpFilter=<LDAP search filter>;]

 [listOUs={<OU>;<OU>;...};]

 [listGroups={Bravura Group;Bravura Group;...};]


 [listGroupOUs={<OU>;<OU>;...};]

 [listGroupGroups={Bravura Group;Bravura Group;...};]


 [listComputerOUs={<OU>;<OU>;...};]

 [listComputerGroups={Bravura Group;Bravura Group;...};]


 [excludeOUs={<OU>;<OU>;...};]

 [listNestedGrps=<true|false>;]

 [listNestedNOSGrps=<true|false>;]

 [listFlatGroups=<true|false>;]

 [ssl=<true|false>;]

 [listFailOnNonExistentGrp=<true|false>;]

 [listFailOnNonExistentOU=<true|false>;]

 [listForest=<true|false>;]

 [deleteSubs=<true|false>;]

 [listDeleted=NODELETED|ONLYDELETED|BOTH;]

 [nameFormat=<NT4|DN>;]

 [groupNameFormat=<NT4|DN>;]

 [persistentSearchWait=<seconds>;]

 [nrIsMemberOfDomainGroupRecursive=<true|false>;]

 }
Note
Options are an intersection of the two when used together.
LDAP search filters
You can restrict user, contact and group listing by using LDAP search filters. On the Target system address configuration page, add a search filter; for example:
Custom LDAP search expression for filtering users
(&(objectCategory=person)(objectClass=user)(sAMAccountType=805306368))Custom LDAP search expression for filtering contacts
(&(objectCategory=person)(objectClass=contact))Custom LDAP search expression for filtering both users and contacts
(|(objectClass=user)(objectClass=contact))Custom LDAP search expression for filtering groups
(&(objectClass=group))
Targeting a specific container or containers
You can restrict Bravura Security Fabric to list only those users, groups and computer objects that exist in one or more named containers; for example, if your Active Directory is divided into organizational units. To do this, on the Target system address configuration page, specify:
OUs to list users from
OUs to list groups from
OUs to list computers from
These fields allow multiple values. To fill in multiple values, select List from the drop-down list box displaying in front of these fields, and use the More button to add additional input boxes when more than one value is given. The value in each input box is treated as a single value, for example:
CN=myusers,DC=example,DC=com
*,OU=Groups,DC=example,DC=com
OU=people,OU=hr,DC=example,DC=com
CN=Computers,OU=it,DC=example,DC=com;CN=Computers,OU=hr,DC=example,DC=com
You can also exclude OUs to further restrict the listing of users. This option will remove all users that match the OU listed. To do this, specify OUs to exclude from listing. When the exclude OUs option and any of the list OUs options are used together, the listing process will list OUs first and then remove objects that match the exclude criteria.
If there are many OUs to list, there is an option to include all OUs in a file. To use the file, select File option from the drop-down list and specify file name in the field.
These files must be located in the \<instance>\script\ directory and contain a list of OUs to list or exclude users from. They cannot be combined into one file and must be separate.
For listing users from OUs:
# KVGROUP-V2.0

   listOUs = {

     "OU=people,OU=it,DC=example,DC=com";

     "OU=people,OU=hr,DC=example,DC=com";

   }
For listing groups from OUs:
# KVGROUP-V2.0

   listGroupOUs = {

     "OU=Groups,OU=it,DC=example,DC=com";

     "OU=Groups,OU=hr,DC=example,DC=com";

   }
For listing computers from OUs:
# KVGROUP-V2.0

   listComputerOUs = {

     "OU=ComputerOU,OU=it,DC=example,DC=com";

     "OU=ComputerOU,OU=hr,DC=example,DC=com";

   }
For excluding OUs:
# KVGROUP-V2.0

   excludeOUs = {

     "OU=disabled,OU=it,DC=example,DC=com";

     "OU=disabled,OU=hr,DC=example,DC=com";

   }
Some default Active Directory OUs require a different notation when listing from them. If the OU is a "Container" type instead of an "Organizational Unit" type, use ’CN’ instead of ’OU’ before the name. For example, the default Computers and Users OUs are "Container" types. To list from these OUs, the KVG would look like "CN=Users,OU=it,DC=example,DC=com";
The connector will not list any OU if an OU file is empty.
By default if an OU list includes invalid OUs the list will return success. You can cause the listing to abort when invalid OUs are detected by setting Abort listing when an invalid OU is encountered.
Targeting groups
You can restrict Bravura Security Fabric to list only those users, groups and computer objects who exist in one or more named groups. To do this, on the Target system address configuration page, specify:
Groups to list users from
Groups to list member groups from
Groups to list computers from
These fields allow multiple values. To fill in multiple values, select List from the drop-down list box displaying in front of these fields, and use the More button to add additional input box(es) when more than one value is given. Value in each input box is treated as a single value, for example:
CN=IT,OU=Groups,DC=domain,DC=local
OU=Groups,OU=IT,DC=domain,DC=local
OU=Computers,OU=IT,DC=domain,DC=local
If there are many groups to list, there is an option to include all groups in a file. To use the file, select the File option from the drop-down list and specify file name in the field.
These files must be located in the \<instance>\script\ directory and contain a list of groups to list from. They cannot be combined into one file and must be separate.
For listing users from groups:
# KVGROUP-V2.0

   listGroups = {

     "CN=IT,OU=Groups,DC=domain,DC=local";

     "CN=Sales,OU=Groups,DC=domain,DC=local";

     "CN=Finance,OU=Groups,DC=domain,DC=local";

   }
For listing member groups from groups:
# KVGROUP-V2.0

   listGroupGroups = {

     "OU=Groups,OU=IT,DC=domain,DC=local";

     "OU=Groups,OU=Sales,DC=domain,DC=local";

     "OU=Groups,OU=Finance,DC=domain,DC=local";

   }
For listing computers from groups:
# KVGROUP-V2.0

   listComputerGroups = {

     "OU=Computers,OU=IT,DC=domain,DC=local";

     "OU=Computers,OU=Sales,DC=domain,DC=local";

     "OU=Computers,OU=Finance,DC=domain,DC=local";

   }
Active Directory DN connector will not list any group if the group file is empty.
By default if a group list includes invalid groups the list will return success. You can cause the listing to abort when invalid groups are detected by setting Abort listing when an invalid group is encountered.
Listing group membership recursively
You can recursively list all users and computers contained groups specified by the " Groups to list …" options.
To list user and computer objects recursively, select the List nested groups option.
If specified, the connector recursively searches for groups managed by the groups specified in the address, then constructs a user list search based on all groups.
If not specified, only immediate members of a specified group are listed.
Listing managed group membership recursively
You can recursively list users’ group membership for groups contained within groups specified by the Groups to list users from option. To list group membership recursively, select the List members for nested groups option.
If selected, the connector recursively searches for groups managed by the groups specified in the address, then constructs a user list search based on all managed groups.
If not selected, only immediate members of a specified group are listed.
Depending on the version of Bravura Security Fabric you have installed, you may need to list groups and group managers in flattened form if nested groups are not supported. Bravura Security Fabric versions 9.0.1 or earlier do not support nested groups.
To list nested groups recursively in flattened form, select When listing group members and managers, list groups as their individual user members.
If selected, the list of groups constructed will list all the immediate members of the specified group and all the members of the groups nested within the specified group.
Caution
If your Bravura Security Fabric version does support nested groups (9.0.2 or later) the use of the listFlatGroups option is strongly discouraged.
Selecting the long ID name format
You can specify the format of the users long ID during listing. The default long ID listed is the NT4 domain name format.
You can select the fully qualified domain name (FQDN) name format as an alternative. To do this, select "DN" from the Name format list on the Target system address configuration page.
The fully qualified domain name (FQDN) long IDs have the potential to be longer than the 200 characters allowed by the Bravura Security Fabric.
Use the default NT4 name format when there are domain accounts that run a service, scheduled task, DCOM object, COM+ application, or IIS anonymous access on a managed target system.
Selecting the long ID group name format
You can specify the format of the groups long ID during listing. The default long ID listed is the fully qualified domain name (FQDN) name format.
Use the NT4 domain name format when there are nested domain groups within local groups of a member server. To do this, select "NT4" from the Group Name format list on the Target system address configuration page.
The fully qualified domain name (FQDN) long IDs have the potential to be longer then the 200 characters allowed by the Bravura Security Fabric .
Using sub-hosts to replicate password changes
In a global, native-mode Active Directory domain, password resets may take a long time to replicate from the domain controller serving the Bravura Security Fabric server to domain controllers accessed by users.
Bravura Security Fabric can bypass this replication process by directly setting a user’s new password and account status flags (intruder lockout, change password flag and expiry time/date) on each DC that the user might access. This includes DCs in the site from which the user’s web browser connected to Bravura Security Fabric , DCs in the site housing the user’s home directory, and regional DCs accessed by mail, database or other systems that the user might access.
To accelerate password replication in this way, set the Program to generate a list of target systems on the Target system information page for your Active Directory domain to dcselect.exe.
The sub-host plugin adds a list of DCs and sites to the help desk password reset screen, so that a help desk user can reset passwords on specific domain controllers. The plugin also automatically selects domain controllers for all self-service functions, based on the user’s web browser IP address and home directory server IP address.
To specify additional domain controllers for users of certain sites, edit the text file dc.man in the \<instance>\script\ directory. This file has the format:
domain domain-name site site-name DC1 DC2
Site names may contain the wild cards ? (any single character) and ⋆ (any sequence of characters).
An example of dc.man follows:
domain example.com

# Every user should get a password reset on this central DC:

site ⋆ centraldc.example.com

# Users in Madrid should get a reset in London too:

site madrid.⋆ londondc1.example.com londondc2.example.com

# Users in Hong Kong should get a reset in Tokyo:

site hk.example.com tokdc1.example.com tokdc1.example.com
Handling account attributes
When a new account is created using Bravura Security Fabric , most of the attributes in the User Class schema object are copied from the template account. However, in some cases it is necessary for other actions be performed.
Attributes may not be copied for one or more of the following reasons:
The attribute can only be set by the system.
The attribute is binary and cannot be copied by Bravura Security Fabric .
The attribute was inserted into the schema by Exchange 2000. The Exchange 2000 agent is responsible for copying these attributes.
Since Bravura Security Fabric queries the Active Directory schema for the User Class attributes, if you add any attributes to the User Class, Bravura Security Fabric also copies those attributes.
You can view the complete list of attributes that Bravura Security Fabric can manage, including native and pseudo-attributes, using the Manage the system (PSA) module. To do this, select Active Directory DN from the Manage the system > Resources > Account attributes > Target system type menu.
This section describes the attributes that Bravura Security Fabric uses to compose values, set flags, or control behavior in Active Directory. For information about the native Active Directory attributes managed by Bravura Security Fabric , consult your Active Directory documentation.
cantChangePassword
Bravura Security Fabric can copy from the template or set the value of the U ser Cannot Change Password checkbox in Active Directory, using the attribute cantChangePassword . Setting this attribute takes several seconds and is not recommended for general use. groups By default, new accounts are created with the same group membership as the template account. The attribute groups determines group membership.
When setting this attribute, the account’s primary group must be the first element in the list.
Note
You cannot remove a user from their primary group.
Extension attributes
Extension attributes 1 to 15 are supported (extensionAttribute1 - extensionAttribute15), and can be used to store extra information. The AD server must be Exchange enabled for the attributes to be available.
_operationDC
Note
Implemented in Connector Pack 4.3.
The domain controller the account is created on will be outputted to this pseudo attribute during account creation and update operations. This attribute can be used to:
Check if the newly created user exists on the domain controller being operated on, or is delayed, often due to replication issues, before running subsequent operations.
Orchestrate blackboard rules using the same DC in multiple operations.
Setting dates
Dates are stored in Active Directory in two formats.
Large Integer (nano seconds from 1601-01-01 00:00:00)
UTC Coded time
The dates in Bravura Security Fabric are stored in ISO standard format (YYYY-MM-DD HH24:MI:SS). The conversion between ISO format and native Active Directory format is handled by the agent. A request attribute only needs to accept the ISO format.
Dates displayed and set must be in Coordinated Universal Time (UTC).
Forcing users to change their password at next logon
To force users to change their password the next time they log into Windows, set the pwdLastSet attribute to 0. This value corresponds to the User must change password at next logon checkbox in . Note that Bravura Security Fabric does not copy this property from the template account.
The pwdLastSet attribute cannot be set if the template account has the Password never expires checkbox enabled. You can clear the Password never expires attribute by clearing the corresponding UF_DONT_EXPIRE_PASSWD flag of the userAccountControl attribute.
Using Windows Terminal Services attributes
These settings can be found in the Environment, Sessions, Remote Control, and Terminal Services Profiles of Active Directory users.
By default, the Windows Terminal Services attributes are set to ignore. To use these attributes to perform an action other than ignore, you must configure Active Directory to run through a proxy on the target system.
_wts_initialProgram A string that contains the path of the initial program that Terminal Services runs when the user logs in.
_wts_workingDirectory A string that contains the path of the working directory for the initial program.
_wts_inheriteInitialProgram A numerical value that indicates whether the client can specify the initial program. If set to 0, the client cannot specify the initial program. Instead, the _wts_initialProgram string identifies an initial program that runs automatically when the user logs into a remote computer. Terminal server logs the user off when the user exits that program. If set to 1, the client can specify the initial program.
_wts_allowLogonTerminalServer A numerical value that indicates whether the user is permitted to log into a terminal server. If set to 0, the user cannot log in. If set to 1, the user can log in.
_wts_timeoutSettingsConnections A numerical value that specifies the maximum connection duration, in milliseconds. If set to 0, the connection timer is disabled.
_wts_timeoutSettingsDisconnections A numerical value that specifies the maximum duration, in milliseconds that a terminal server retains a disconnected session before the logon is terminated. A value of 0 indicates the disconnection timer is disabled.
_wts_timeoutSettingsIdle A numerical value that specifies the maximum idle time, in milliseconds. A value of 0 indicates that the idle timer is disabled.
_wts_deviceClientDrives Used by Citrix ICA clients. A numerical value that indicates whether the terminal server automatically reestablishes client drive mappings at logon. If set to 0, the server does not automatically connect to previously mapped client drives.
_wts_deviceClientPrinters Used by RDP 5.0 clients and Citrix ICA clients. A numerical value that indicates whether the terminal server automatically reestablishes client printer mappings at logon. If set to 0, the server does not automatically connect to previously mapped client printers.
_wts_deviceClientDefaultPrinter Used by RDP 5.0 clients and Citrix ICA clients. A numerical value that indicates whether the client printer is the default printer. If set to 0, the client printer is not the default printer.
_wts_brokenTimeoutSettings A numerical value that indicates what happens when the connection or idle timers expire or when a connection is lost due to a connection error. If set to 0, the session is disconnected. If set to 1, the session is terminated.
_wts_reconnectSettings A numerical value that indicates how a disconnected session for this user can be reconnected. If the value is 0, the user can log into any client computer to reconnect to a disconnected session. If set to 1, the user can reconnect to a disconnected session by logging onto the client computer used to establish the disconnected session. If the user logs on from a different client computer, the user gets a new Logon session.
_wts_modemCallbackSettings Used by Citrix ICA clients. A numerical value that indicates the callback settings for dial-up connections in which the terminal server hangs up and then calls back the client to establish the connection. If set to 0, callback connections are disabled. If set to 1, the server prompts the user to enter a phone number and calls the user back at that phone number. The _wts_modemCallbackPhoneNumber attribute is used to specify a default phone number. If set to 2, the server automatically calls the user back at the phone number specified by the _wts_modemCallbackPhoneNumber value.
_wts_modemCallbackPhoneNumber Used by Citrix ICA clients. A string containing the phone number used for callback connections.
_wts_shadowingSettings Used by RDP 5.0 clients and Citrix ICA clients. A numerical value that indicates whether the on-screen operations of a user session can be remotely monitored by another user (shadowed). If set to 0, disable shadowing. If set to:
1 - enable input and notify the user
2 - enable input, do not notify the user
3 - disable input, notify the user
4 - disable input, do not notify the user
_wts_terminalServerProfilePath A string that contains the path of the user’s profile for terminal server logon. The directory the path identifies must exist prior to the logon.
_wts_terminalServerHomeDir A string that contains the path of the user’s home directory for terminal server logon.
_wts_terminalServerHomeDirDrive A string that contains a drive specification (a drive letter followed by a colon) to which the UNC path specified in the _wts_terminalServerHomeDir string is mapped.
Allowing users to specify the container DN
You can configure Bravura Security Fabric to use a profile/request attribute to prompt users for the destination container when creating or moving accounts on a target system that supports contexts.
When the Profile/request attribute to use as the container DN option is configured on the page (Manage the system > Resources > Target systems), users can:
Set the destination container when creating new accounts.
Users do this by setting the profile/request attribute value in the request form. By default, Bravura Security Fabric creates new accounts in the same container as the template. Without the profile/request attribute, you may need to set up identical templates for each container.
If enabled when setting the target system address, Bravura Security Fabric can also create a container if a non-existing one is specified.
Move existing accounts on the target system to a different container.
Users do this by setting the To container value – which is actually the profile/request attribute, but with a different name – on the move accounts page. Bravura Security Fabric only displays the move operation (the Move button) for users with accounts that can be moved between containers.
To allow users to select a container for a create account or move context operation:
Add a profile attribute to provide a place to prompt the user for this information. To learn how to do this, see Profile and request attributes .
It is recommended that you configure the profile attribute to have a set of restricted values, so that the requester or product administrator can select from a drop-down list.
Ensure that you set read/write permissions for the profile attribute.
To learn how to do this, see Attribute groups .
Provide a group of users the "Move user from one context to another" rule.
To learn how to do this, see User types and access rules.
Update the Target system information page (Manage the system >Resources >Target systems) by typing the name of the profile attribute in the Profile/request attribute to use as the container DN field.
This allows Bravura Security Fabric to use the profile attribute for this purpose.
Updating group attributes
Group attributes may be mapped for the _container_dn pseudo-attribute on the Active Directory server so that users can move a group to a different container to move contexts.
The _container_dn group attribute is mapped to the GROUP_OU resource attribute by default. The group attribute may be overridden to allow for a new container to be specified when updating the group by setting the value for ’Action when updating group’ from ’None’ to ’Set to specified value when mapped profile attribute changes’.
The GROUP_OU resource attribute is then added as a member for the GROUP_INFO_UPDATE resource attribute group. A user may then specify a new container for the group when making a request to update attributes for a group.
Group attributes may also be mapped for attributes on the Active Directory target system such as cn and sAMAccountName so that users can rename a group id. In this case, new resource attributes may be added for the custom attributes and added as members to the GROUP_INFO_UPDATE resource attribute group.
The cn and sAMAccountName group attributes for the Active Directory target may be overridden to allow for the group id to be renamed when updating the group by setting the value for ’Action when updating group’ from ’None’ to ’Set to specified value when mapped profile attribute changes’ for each of the two attributes. Also set the value for ’Map group attribute to resource attribute’ to each of their respective resource attributes.
A user may then specify a new group id for these two attributes for the group when making a request to update attributes for a group.
Active Directory ports
Communication from clients to Active Directory domain controllers (AD DCs) and between AD DCs can use a variety of TCP and UDP port numbers.
Note
Do not open all these ports in a production environment to determine which one of them is required, other than for testing purpose. Open only the required ports, and if possible only for the binaries of the services required.
The Active Directory connector (agtaddn) uses published Microsoft ADSI and related APIs. According to Microsoft documentation, these APIs may use any of the following port numbers:
Protocol | TCP # | UDP # |
|---|---|---|
DNS | 53 | 53 |
Kerberos | 88 | 88 |
NetBIOS | 137-139 | 137-139 |
LDAP or LDAPS | 389 or 636 | 389 |
SMB | 445 | |
Kerberos password change | 464 | 464 |
RPC | 1025-5000 and/or 49152-65535 | |
Additional services available on AD DCs, which the APIs leveraged by the Bravura Security Fabric connector likely do connect to, include:
Protocol | TCP # | UDP # |
|---|---|---|
25 | ||
Replication | 135 | |
File replication | 5722 | |
AD web services | 9389 | |
Replication 3268-9 | ||
DHCP | 672,535 | |
GPO | Any port |
There is nothing preventing Microsoft from modifying API or protocol behaviour, such that some of the above ports may start getting connections after a patch is applied to clients and servers. Moreover, Microsoft may introduce new services or further expand the port numbers used by the RPC services mentioned above. As a result, the best practice is to avoid firewall restrictions based on TCP or UDP port numbers between Bravura Security Fabric server and AD DCs.
Troubleshooting
Test for DNS access
On all Windows targets, possible issues with "Failed to connect" can be traced to the failure of the operating system on which the target agent runs (application server or proxy), to resolve the name of the target, or of a domain controller on which to execute the agent operations.
To verify for failure to resolve domain controllers, run the following command on the target system:
nltest /DCLIST:domain.used.in.target.address
To check what domain controller a domain-joined system is communicating with at the moment, run the following command on the target system:
nltest /DSGETDC:domain.used.in.target.address
The latter can be used on a Bravura Security Fabric application server or proxy or even on a workstation from where a password change request the originates.
If the operating system fails to resolve the address of the target or find a domain controller, check with the relevant Windows or Active Directory administrators to set up correct DNS resolution (add trust between domains or DNS forwarding, or run required services on the affected domain controllers). The server on which Bravura Security Fabric 's connector runs asks its own (joined domain) DNS for information on the other domains, so DNS forwarding or trust between the domains must be configured.