Azure Active Directory
Connector name |
|
Connector type | Executable |
Type (UI field value) | Azure Active Directory |
Connector status / support | Bravura Security-Verified This connector has been tested and is fully supported by Bravura Security. |
Upgrade notes | The connector for Microsoft Office 365 Online Service, |
The following Bravura Security Fabric operations are supported by the agtazure connector (depending on your product license and version):
get server information
user change password
reset and expire password
check password expiry
administrator reset password
create account
delete account
disable account
enable account
create group
update group
delete group
add user to group
delete user from group
add group to group
remove group from group
add owner(user) to group
remove owner(user) from group
check account enabled
update attributes
List:
accounts
attributes
groups
members
roles
For a full list and explanation of each connector operation, see Connector operations.
Preparation
Before Bravura Security Fabric can perform operations in Microsoft Azure Active Directory, you must:
On Bravura Security Fabric server, ensure winhttp proxy is correctly configured if proxy is in use. You can do that by running the command:
netsh winhttp set proxy <ipaddress:port>See Proxy servers for more information.
You can configure a proxy in the target's configuration as well, but that will not be enough to make the integration work; In fact, this parameter will not need to be configured at all, once you configure the Azure service correctly for integration.
Set up an Application on the Microsoft Azure Active Directory for the administrative credentials .
Know the domain name for the Microsoft Azure Active Directory.
Setting up a target system administrator
Bravura Security Fabric uses a designated account on Microsoft Azure Active Directory to perform Bravura Security Fabric operations.
Create an app registration in Azure
Log into the Microsoft Azure Active Directory portal.
On the Azure Active Directory main page, under Manage click App registrations.
Click New registration at the top of the screen.
Enter a value for the Name field.
Choose a value for Supported account type such as the default value of "Accounts in this organization directory only".
Click Register.
Set the secret of the application (client) ID
From the Azure Active Directory main page, go to the App Registrations page then choose the app configured earlier in Create an app registration in Azure .
Under Manage, click on Certificates and Secrets.
Click New client secret.
Enter a value for the Description field.
Choose a duration for when the client secret expires.
Click Add.
Take note of the value for the client secret as this will be the target administrator’s password.
On the page for the new application, click Overview.
Take note of the value for the Application (client) ID as this will be the target administrator’s username.
Set up permissions
From the Azure Active Directory main page, go to the page then choose the app configured earlier.
Under Manage click on API permissions.
Click Add a permission.
Click Microsoft Graph.
Click Delegated permissions.
Search then add the following permissions:
User.Read
User.Read.All
User.ReadBasic.All
User.ReadWrite
User.ReadWrite.all
After adding the permissions a warning may appear under the Status column in the page specifying
Not granted for .....These warnings should be addressed when executing Step 9.Click Application Permissions.
Search then add the User.ReadWrite.all permission.
In the page, click the button to Grant admin consent for .... then click Yes to confirm.
Expose an API
From the Azure Active Directory main page, go to the page then choose the app configured earlier.
Under Manage click Expose an API.
Click Set next to Application ID URI.
If necessary, edit the value for Application ID URI, then click Save.
Click Add a scope.
Enter a value for the Scope name field.
Set Who can consent? to "Admins and users".
Enter a value for the Admin consent display name and Admin consent description fields.
Click Add scope.
Creating a template account
Bravura Security Fabric uses template accounts as models or "blueprints" for creating new accounts in Microsoft Azure Active Directory. The following example illustrates how you can create a template account in Microsoft Azure Active Directory:
Log into the Microsoft Azure Active Directory portal.
On the Azure Active Directory main page, click Users.
Click New user at the top of the screen.
Enter a value for the "User name", "Name", "First name", and "Last name" fields.
If needed, change the value for "Roles" to another directory role.
Click Create.
Click Reset password to assign a temporary password for the user.
You can disable the account if it is to be used only as a template account or enabled later. You can do this by clicking user under the Users tab, and selecting
Blockfor Allow the user to sign in and access services?.
Targeting the Microsoft Azure Active Directory system
For each Microsoft Azure Active Directory system, add a target system in Bravura Security Fabric (Manage the system >Resources >Target systems):
Type is Azure Active Directory, listed under "Network Operating Systems" in the drop-down list.
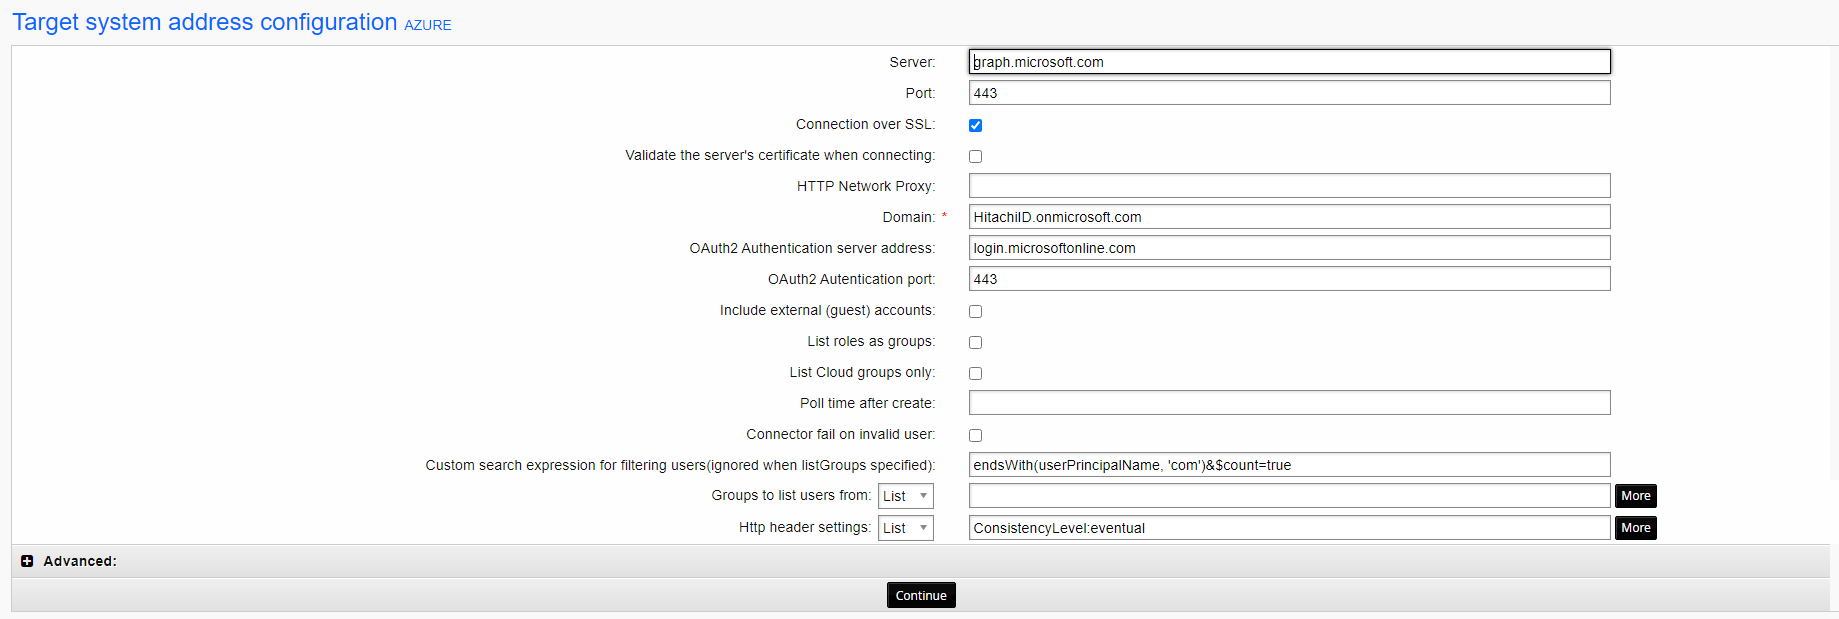
Address is formed using the options listed in the table below.
The Administrator ID and Password for the target system administrator are the client ID and key generated in Setting up a target system administrator .
Check the checkbox for Target system supports multiple owners on groups to allow for multiple owners for the Microsoft Azure Active Directory groups.
Note
Microsoft Azure Active Directory requires that a group have at least one owner. If a group already has an owner assigned and you wish to replace them with a new owner, this should be done in separate requests: add a new owner, then remove the previous owner.
The full list of target parameters is explained in Target System Options.
Option | Description |
|---|---|
Options marked with a | |
Server | graph.microsoft.com (key: server) |
Port | 443 (key: port) |
Connection over SSL | Select to enforce SSL connections. Default is "true". (key: ssl) |
Validate the server’s certificate when connecting | Determines whether to validate the server’s security certificate for SSL connections. Default is "true". (key: checkCert) |
HTTP Network Proxy | Specifies a proxy URL to use for connecting. (key: proxy) |
Domain | The FQDN of the Azure domain. (key: domain) |
Oauth2 Authentication server address | login.microsoftonline.com (key: authsvr) |
Oauth2 Authentication port | 443 (key: authport) |
Include external (guest) accounts | Select to list external accounts. (key: listexternal) |
List roles as groups | This option is to be able to also list Azure roles for the managed groups. The account group memberships are based on the "Active assignments" list for the Azure role. (key: listRoleAsGroup) |
List Cloud groups only | Select to only list cloud groups. (key: cloudgrouponly) |
Poll time after create | Time in seconds, the product server will check the Azure server for a new account creation. (key: polltime) |
Connector fail on invalid user | If the server does not find the new account within the poll time, a message will appear in the system log: user creation in Azure failed, please re-try later. (key: failOnInvalidUser) |
Custom search expression for filtering users(ignored when listGroups specified) | Restrict user listing by using the search filters . (key: userFilter) |
Groups to list users from | Restrict user listing from the specified groups, using the group name. (key: listGroups) |
Http header settings | Set this as part of the advanced query parameters for Microsoft Entra ID objects. This is also used in combination with the Custom search expression for filtering users option. (key: headersettings) |

User search filters
You can restrict user listing by using the search filters.
Navigate to the page and enter a valid search filter expression in the Custom search expression for filtering users field.
Examples:
startsWith(displayName, 'M')not(startsWith(displayName, 'M'))&$count=trueendsWith(userPrincipalName, '.com')&$count=truenot(endsWith(userPrincipalName, '.com'))&$count=true
The userFilter parameter should follow Microsoft’s graph API requirement: https://docs.microsoft.com/en-us/graph/query-parameters#filter-parameter
If you use anything other than startsWith in your search, it is considered an advanced filter, and additional parameters and settings are required:
$count=truemust be appended for the search filterThe Http header settings option must be set to
ConsistencyLevel:eventual
Below is a working example of an advanced filter configuration:
See more on advanced search queries (Implemented in Connector Pack 4.3): https://docs.microsoft.com/en-us/graph/aad-advanced-queries?tabs=http
Example:
Administrators; Sales
Custom search expression for filtering users is superseded when both this option and Groups to list users from are specified.
Handling account attributes
You can view the complete list of attributes that Bravura Security Fabric can manage, including native and pseudo-attributes, using the Manage the system (PSA) module. To do this, select Azure Active Directory from the Manage the system > Resources > Account attributes > Target system type menu.
For information about the native Microsoft Azure Active Directory attributes managed by Bravura Security Fabric , consult your Microsoft Azure Active Directory documentation.
DisplayName The account attribute is required to create new users in Azure Active Directory.
To allow users to create new accounts:
Add a profile and request attribute to provide a place to prompt the user for the display name.
Ensure that you set read/write permissions to the attribute.
Map the newly created profile and request attribute to the displayName account attribute. To learn how to do this, see the "Base Configuration Guide".
Licenses A read-only attribute which retrieves licensed products and service plans from accounts. The attribute contains product licensing information in format like following:
Licenses =

{AAD_PREMIUM_P2={EXCHANGE_S_FOUNDATION=PendingProvisioning;ADALLOM

_S_DISCOVERY=PendingInput;MFA_PREMIUM=Success;AAD_PREMIUM=Success;AAD_PREMIUM_P2=Disable

d;};}
The service plan is listed in raw KVG format.
LIC_PLAN A pseudo attribute which is used to write licensing assignment to account on the target system. The attribute contains licensed product name and corresponding service plans in a product. By default, the service plan list is empty; it is set to {} , which enables all service plans in a licensed product.
To enable all service plans under the AAD_PREMIUM_P2 package enter:
AAD_PREMIUM_P2={};To only enable the MFA_PREMIUM service plan under the AAD_PREMIUM_P2 package add the following:
AAD_PREMIUM_P2={MFA_PREMIUM};The AAD_PREMIUM_P2 entry relates to the Azure Active Directory Premium P2 MS product name and the MFA_PREMIUM entry is the service plan name. Refer to the Microsoft documentation for more descriptions of their products and service plans.
Using the LIC_PLAN attribute
In the scenario where you create an Office 365 user using the Azure connector, the connector will create an Azure account and assign an Exchange Office 365 license. If you remove the Office 365 account, both the Azure account and its assigned licenses are deleted.
You can customize which license plan you want removed when an account is removed by using the LIC_PLAN attribute. The plan entered in the LIC_PLAN attribute will also be the plan that is removed.
For example, if you want to remove the Exchange Office 365 license for a specific user when the Office 365 account is removed you would enter the following in the attribute field:
EXCHANGESTANDARD={EXCHANGE_S_STANDARD;}The LIC_PLAN attribute can contain multi-values, where each of the specified values should bear the same form, and each is specifying the granular license for a specific package.
For example, if you want to remove the Exchange Office 365 standard license and the Azure Active Directory Premium P2 license when the Office 365 account is removed, you would enter the following in the attribute field:
"EXCHANGESTANDARD={};" "AAD_PREMIUM_P2={EXCHANGE_S_FOUNDATION;ADALLOM_S_DISCOVERY;MFA_PREMIUM;AAD_PREMIUM_P2;};"LIC_PLAN only updates licenses directly assigned to individual account, it can not update licenses assigned to account via groups or organization.
usageLocation The account attribute is required when updating licensed product for users. License assignment fails without usageLocation properly configured to corresponding location to the licensed product.
For more details on licensed product names and service plan identifiers, please check Microsoft document:
Handling group attributes
You can view the complete list of attributes that Bravura Security Fabric can manage, including native and pseudo-attributes, using the Manage the system (PSA) module. To do this, select Azure Active Directory from the Manage the system > Resources > Group attributes > Target system type menu.
For information about the native Microsoft Azure Active Directory attributes managed by Bravura Security Fabric , consult your Microsoft Azure Active Directory documentation.
Troubleshooting
Test for DNS access
On all Windows targets, possible issues with "Failed to connect" can be traced to the failure of the operating system on which the target agent runs (application server or proxy), to resolve the name of the target, or of a domain controller on which to execute the agent operations.
To verify for failure to resolve domain controllers, run the following command on the target system:
nltest /DCLIST:domain.used.in.target.address
To check what domain controller a domain-joined system is communicating with at the moment, run the following command on the target system:
nltest /DSGETDC:domain.used.in.target.address
The latter can be used on a Bravura Security Fabric application server or proxy or even on a workstation from where a password change request the originates.
If the operating system fails to resolve the address of the target or find a domain controller, check with the relevant Windows or Active Directory administrators to set up correct DNS resolution (add trust between domains or DNS forwarding, or run required services on the affected domain controllers). The server on which Bravura Security Fabric 's connector runs asks its own (joined domain) DNS for information on the other domains, so DNS forwarding or trust between the domains must be configured.