Inventory Templates
Bravura Identity uses inventory templates to attach inventory items to user profiles. The following sections show you how to use the Manage the system module to:
Add inventory templates
Configure template-level authorization
Configure template-level resource operations
Getting started
Requirements for inventory templates
Before you add templates for inventory management:
If you will be using Bravura Identity to provision SecurID tokens, read the Connector Pack documentation for requirements.
Add a target system for inventory provisioning .
You can add target system from the Resources > Target systems or the Inventory > Target systems menu. For the provisioning of:
Items such as computers and other equipment, set up a NULL type target system.
SecurID tokens, set up an RSA Authentication Manager 7.1/8.2 type target system.
Vasco IDENTIKEY tokens, set up an Vasco IDENTIKEY Server type target system.
Optional: Set up model accounts to use as templates.
You do not need to set up model accounts to provision tokens or other inventory. Inventory templates are used to attach inventory items to user profiles rather than create new accounts.
Optional: Define static authorizers in the Manage the system > Workflow > Authorizers menu so that you can assign them to templates as approvers or implementers.
Navigation steps
Use the page to configure general inventory template information and to access additional configuration settings. To navigate to this page:
Click Manage the system > Inventory > Template accounts.
To define :
A new template – click Add new…
An existing template – search for, or select the template you want to view or modify.
From an existing template’s information page, you can click the Authorization tab or the Resource operations tab . To return to the template information page, click the General tab.
Adding templates
To add an inventory template:
Configure the options in Inventory Template options as required.
Click Add.
If you are implementing a role-based access control system , it is recommended that inventory templates are not themselves members of managed groups. This allows you to control group membership by including the group as a member of a role.
Option | Description |
|---|---|
ID | A unique identifier for the template. |
Description | The description to display to users. |
Target system | Search for, or type the ID of the target system you want. For inventory templates, the list of systems is limited to those on which a user does not require an account to be provisioned inventory. |
Password required | Deselect this checkbox if accounts created from this template do not require a password. |
Location | Select a location for the template |
Item Type | Select a type for the template |
Override implementation configuration | Determine whether to inherit implementation configuration from the target system, specify template-specific implementers, or a combination of both. |
Account to clone when creating a new user | Search for, or type the login ID of the account you want to use as a model or blueprint. This is optional for inventory templates. |
Configuring template-level authorization
Define authorization information for templates to:
Set the number of approvals or denials required for requests involving the template.
Assign static authorizers to define who can approve account requests based on the template.
Users must be loaded into the Bravura Security Fabric database before you can define them as authorizers.
You must assign enough authorizers to meet the minimum number of authorizers requirement. If you do not do this, requests involving the resource are automatically denied unless authorizers are assigned by a workflow plug-in.
Inheriting authorization configuration from the target system
You can configure target systems so that templates inherit the authorization configuration settings of the target system. You can also override the configuration for a template, or add authorizers.
Enable inheritance by selecting the Default authorization for child resources, including templates and managed groups, will be inherited from the target system option on the relevant Target system information page .
To override or add to the configuration for a template:
Set Override authorization configuration to:
Only use inherited configuration
Do not inherit any configuration
Add to inherited configuration (default)
Click the Authorization tab.
If you choose not to inherit authorization, then the page shows authorization explicitly set up for the template; no authorization from the target system should display.
If you choose to add to inherited authorization, then the page displays settings that are both inherited and explicitly set for the template.
When you choose to add to inherited authorization, the minimum number of required authorizers will be determined by the larger value set for the template or target system.
Proceed to configure authorization as described in the rest of this section.
Configuring phased authorization
If phased authorization is enabled, navigate to the template’s Authorization page then:
Click Add new… if you want to add a phase.
To change the order of phases, change the numbers in the Authorization phase column and click Update.
Select a phase to define authorizers and settings.
Determining number of required approvals
To set authorization thresholds for a template:
Click the Authorization tab.
Select a phase if phased authorization is enabled.
Type a value for the:
Minimum number of authorizers – A value of 0 means requests for the resource are auto-approved.
The default value is set by the MIN AUTHORIZERS policy.
Number of denials before a change request is terminated – A resource request is canceled when this number of authorizers deny it, as long as the Minimum number of authorizers has not been reached.
The default value is set by the MAX REJECTIONS policy.
Click Update.
Assigning static authorizers
To assign static authorizers to a template:
Click the Authorization tab.
Select a phase if phased authorization is enabled.
Click Select… at the bottom of the Authorizers table.
Search for, or enable the checkboxes next to the authorizers that you want to assign.
Click Select at the bottom of the page.
Assigning authorizers by user class
To assign authorizers to a template based on user class:
Click the Authorization tab.
The Users must be in the following user classes table allows you to define membership criteria.
To define membership criteria:
Select existing user classes: Click Select… and enable the checkboxes for the user classes you want to add, then click Select.
Create new user classes: Click
 Add new… . See Adding user classes for full details on how to create a new user class.
Configure Participant mapping for each user class that you add.
Select and create user classes until you have defined membership.
If your membership criteria includes multiple user classes, define whether users are required to match All of the user classes or Any of the user classes .
Removing users from membership
To remove users from membership, you can:
Edit user classes to change the participants.
Delete user classes from the membership criteria.
Navigate to the membership criteria page where user classes are listed.
Enable the checkbox next to the user classes you want to delete.
Click Delete.
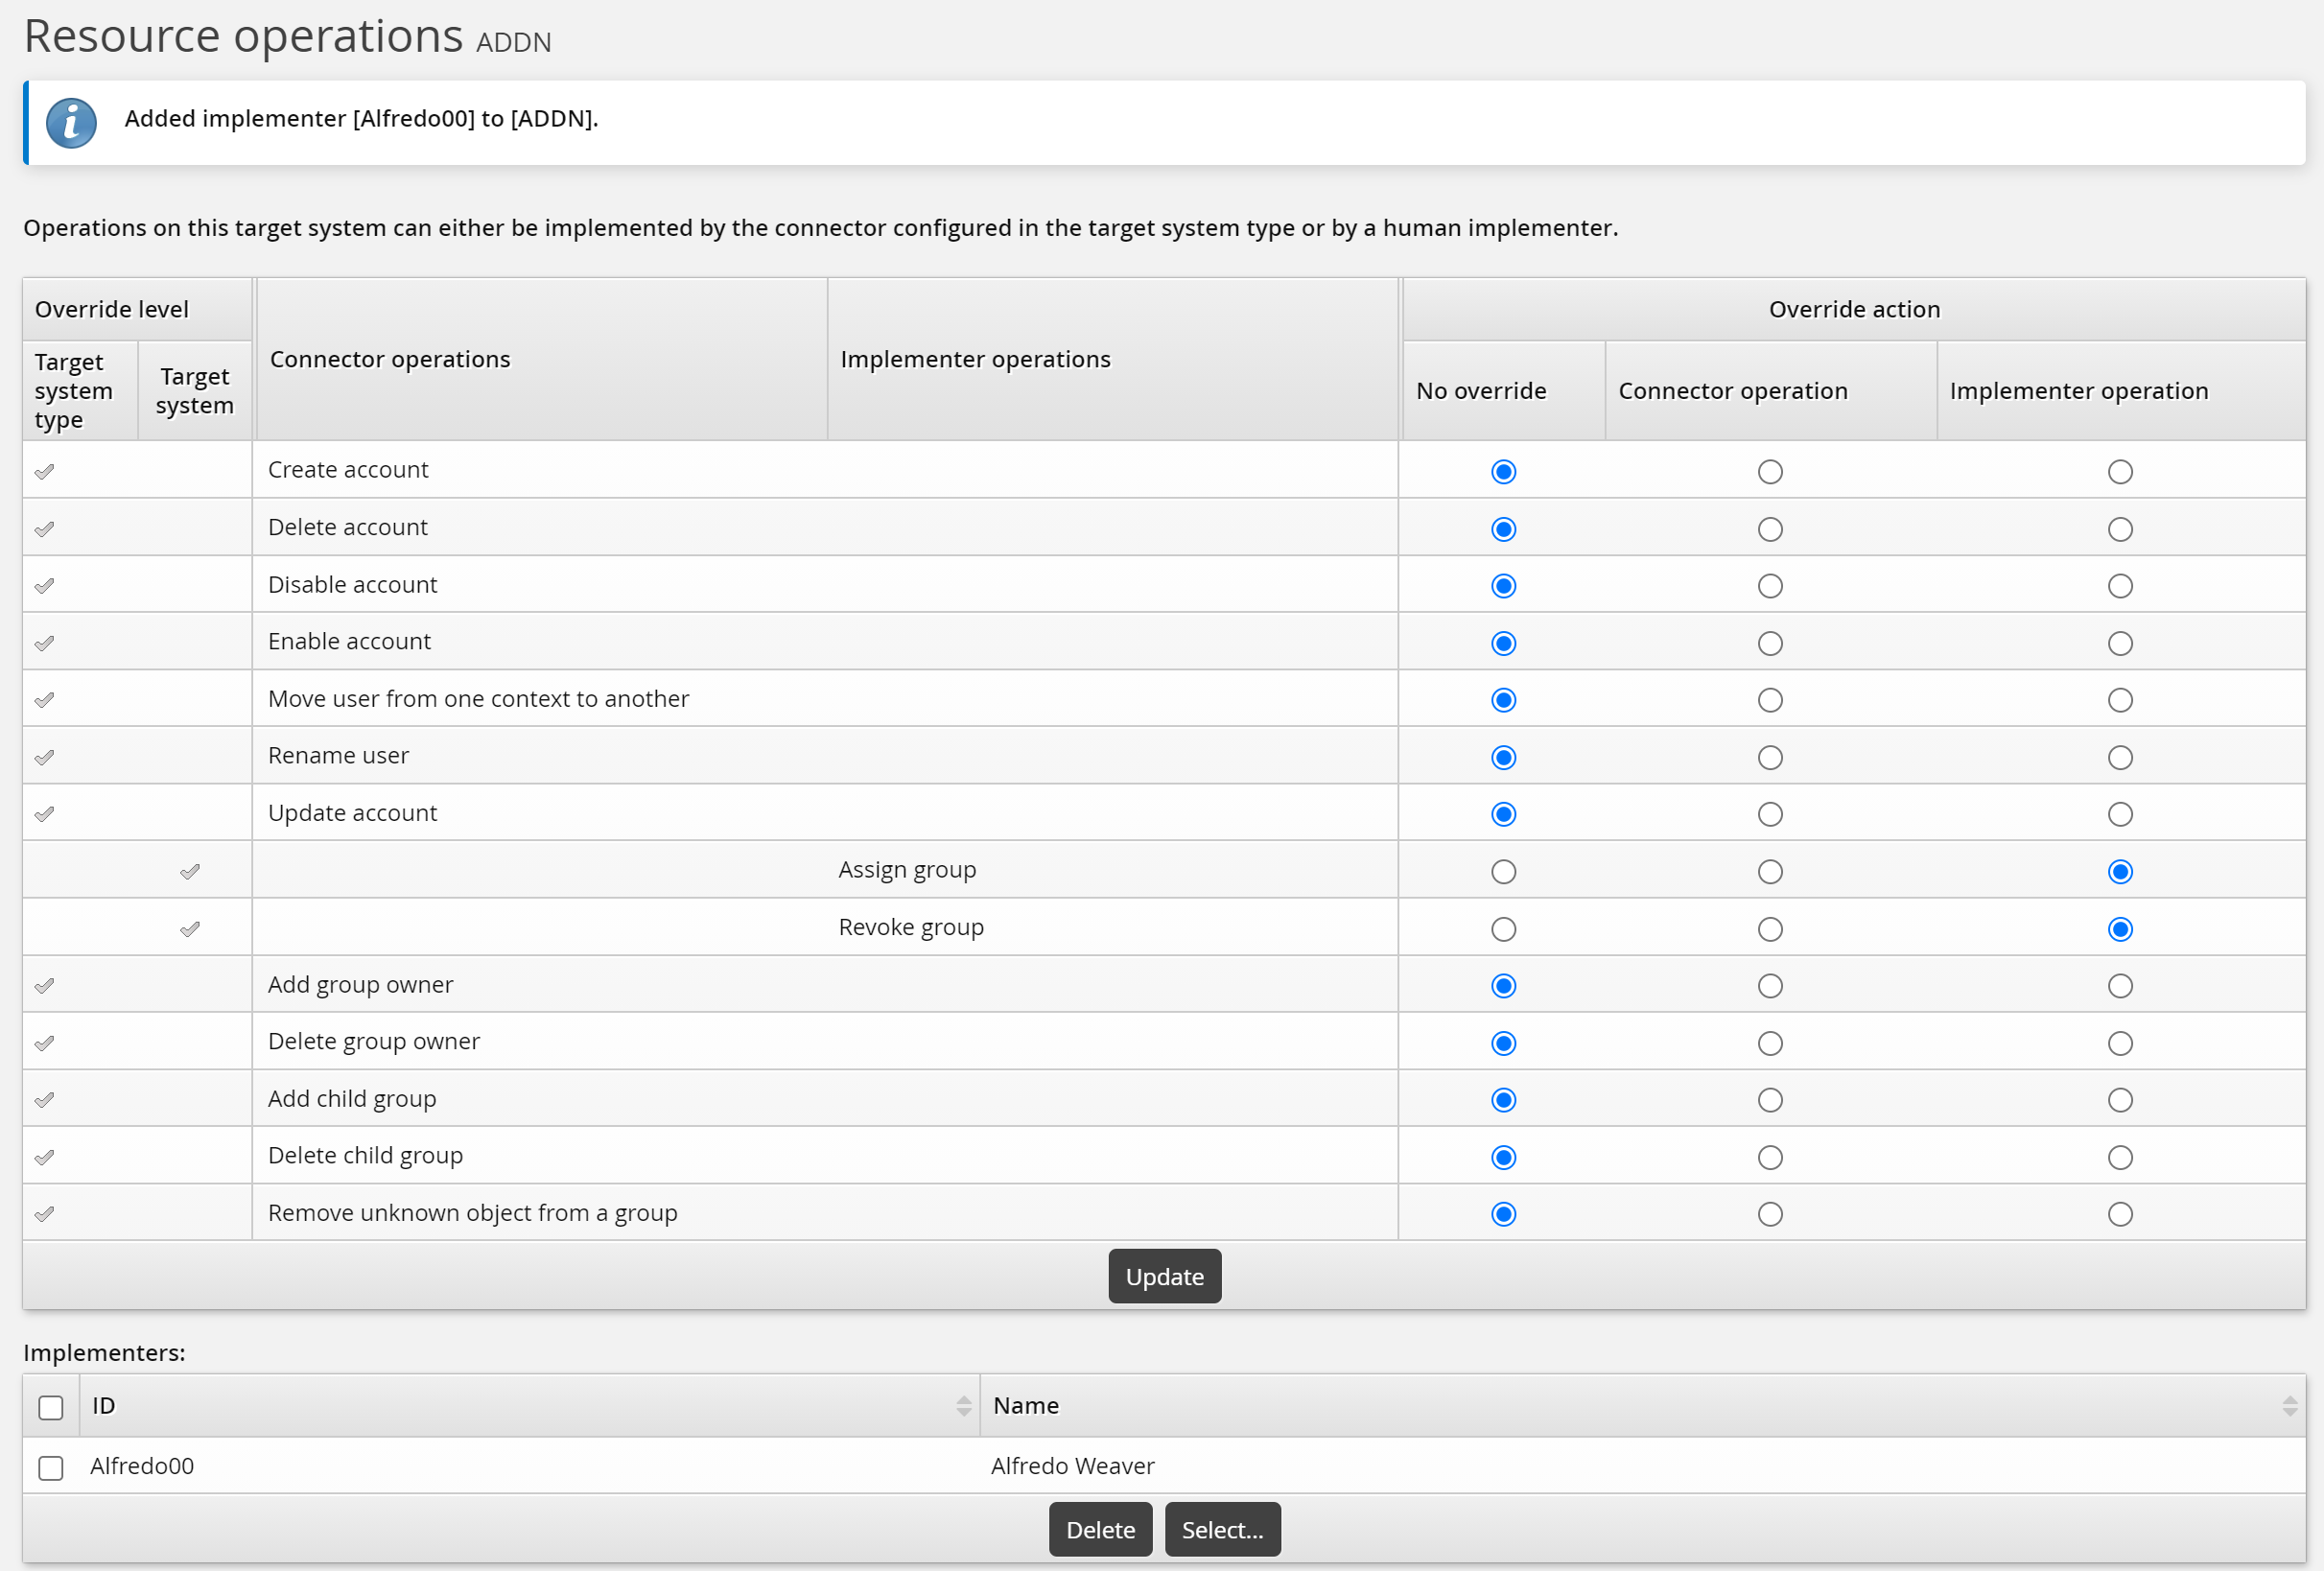
Configuring template-level resource operations
You can define resource operations for inventory templates to:
Determine whether Bravura Security Fabric agents automatically fulfill requests or whether human agents will carry out tasks to fulfill the requests.
Add implementers to a template to define who fulfills requests based on the template if an Bravura Security Fabric connector is not used.
You can override resource operations at the target system and template level. If the operation is set at either of those levels to be carried out by an implementer, you must assign at least one implementer. If you do not do this, requests involving the template will be put on hold unless implementers are dynamically assigned by a plugin. See Determining implementers for details.
Inheriting resource operation configuration from the target system
You can configure target systems so that templates inherit the resource operation configuration settings of the target system. You can also override the configuration for a template, or add implementers.
Enable inheritance by selecting the Default authorization for child resources,including templates and managed groups, will be inherited from the target system option on the relevant Target system information page .
To override or add to the configuration for a template:
Set Override implementation configuration to:
Use only inherited configuration
Do not inherit any configuration
Add to inherited configuration (default)
Click the Resource operations tab.
If you choose not to inherit the configuration, the page displays the resource operations explicitly set up for the template; no settings from the target system should be displayed.
If you choose to add to inherited configuration, then the page displays settings that are both inherited and explicitly set for the template.
Proceed to configure resource operations as described in the rest of this section.
Determining override levels
To set resource operation override levels for a template:
Select the Resource operations tab.
Select:
No override – the operation is inherited from the target system.
Connector operation – the operation will be connector-enacted, regardless of the target system setting.
Implementer operation – the operation will be implementer-enacted, regardless of the target system setting.
Click Update.
Assigning static implementers
When the template-level operation is carried out by an implementer, whether by inheriting the setting from the target system or being explicitly set, an Implementers table is included on the page. If implementers are assigned to the target system, they are inherited by the template. You can remove or keep the inherited implementer, or add new implementers for the template.
If you choose not to inherit the configuration from the target system, you cannot assign the same implementer that is assigned at the target system level.
To assign static implementers to a template:
Select the Resource operations tab.
Click Select… at the bottom of the Implementers table.
Search for, or select the checkboxes next to the implementers that you want to assign to the resource.
Click Select at the bottom of the page.
To remove static implementers from a template:
Click Remove implementer in the same row as the user’s ID.
Click Update at the bottom of the page.
Assigning implementers by user class
To assign implementers to a template based on user class:
Select the Resource operations tab, then click the User classes sub-tab.
To define membership criteria:
Select existing user classes: Click Select… and enable the checkboxes for the user classes you want to add, then click Select.
Create new user classes: Click
Add new… . See Adding user classes for full details on how to create a new user class.
Configure Participant mapping for each user class that you add.
Select and create user classes until you have defined membership.
If your membership criteria includes multiple user classes, define whether users are required to match All of the user classes or Any of the user classes .
Removing users from membership
To remove users from membership, you can:
Edit user classes to change the participants.
Delete user classes from the membership criteria.
Navigate to the membership criteria page where user classes are listed.
Enable the checkbox next to the user classes you want to delete.
Click Delete.
Deleting templates
When you delete a template in the Manage the system (PSA) module, it is flagged as disabled in the Bravura Security Fabric database. It is maintained for audit purposes.
Once a template is flagged as disabled in the Bravura Security Fabric database, you can delete objects associated with the template; for example, authorizers, target systems.
Configuring resource attributes
You can use resource attributes to create and set attribute values for individual resources. Before you can do this, you must add the resource attributes to at least one resource attribute group, and configure access to resource attributes.