Building user profiles
Bravura Security Fabric stores the following information about users:
Profile IDs
Owned accounts
Group memberships
Profile attributes
Access controls
OrgChart data
Security question data
Inventory items
Most of this information is gathered during auto discovery. Other information must be input manually by end users. The following sections give an overview of how user profiles are built and the ways that you can modify and control how and what information is stored in user profiles.
Profile IDs
A profile ID is a unique identifier for a user in Bravura Security Fabric . Profile IDs are assigned when you import users into Bravura Security Fabric , when you create a new user in the View and update profile (IDR) module, or when you create a new product administrator with console-only access. Bravura Identity automated administration can also trigger the creation of a new profile ID.
All users who need to login to Bravura Security Fabric need to have at least one profile ID. Bravura Security Fabric preserves the case of what is imported or entered, (it can create two different profiles for IDs that only differ in case), although the usage of profile names in the Web interface is case insensitive; for example a search for user1 will also list User1 .
Designating a source of Profile IDs
Select a system or set of systems to designate as your Bravura Security Fabric profile ID source, by selecting the Source of profile IDs checkbox on a target system's General page . This system or set of systems should contain a login ID for all, or most, of the Bravura Security Fabric users in your organization. If possible, designate a system that uses the most common or standardized naming convention.
By default, Bravura Security Fabric automatically uses the short ID on a Source of Profiles to define the profile name. If you want to use a different account attribute to create the profile ID, type the name of the account attribute in the Account attribute to use as profile ID field. Make sure the chosen attribute is loaded from the target system and that it is populated for all accounts with a unique value. The accounts for which this attribute is blank or doesn’t exist won’t create a profile. If the attribute has the same value for more than one account, no profile will be created and an error notice about "duplicate accounts" will be logged. If the attribute has the same value for more than one account, all of those accounts will be associated with the first profile to be created (usually in alphabetical order).
Renaming accounts on target systems
Renaming an account on a target system that is a source of profiles (SoP) may trigger a renaming of the user’s Profile ID. The following table outlines the result of renaming accounts in various cases:
Case | Result |
|---|---|
If the user has a single account on an SoP target system: | Renaming the account on the target system will trigger a renaming of the user’s profile ID. If the user is logged in, he should log out and log back in. |
If the user has multiple accounts on an SoP target system: | Renaming only one of the accounts will not trigger a profile ID rename. The renamed account will still be associated with the user. |
If the user has an account on an SoP target system, and an auto-associated account on a non-SoP target system: | Renaming the account on the SoP target system will trigger a renaming of the user’s profile ID. The auto-associated account will be detached from the user’s profile. |
Renaming an auto-associated account by renaming attributes used for auto-association – such as logon name on Active Directory – will cause the account to be detached from the user’s profile. | |
Renaming an auto-associated account by renaming attributes not used for auto-association – such as first name or last name on Active Directory – will not cause the account to be detached from the user’s profile. | |
If the user has a single account on an SoP target system, and an manually-associated account on a non-SoP target system: | Renaming the account on the target system will trigger a renaming of the user’s profile ID. The manually-associated account will remain attached to the user’s profile. |
If the user has accounts of the same name on multiple SoP target systems: | Renaming the account on one of the SoP target systems will not trigger a profile ID rename. All accounts will remain attached to the user. |
Renaming the accounts with different IDs will not trigger a profile ID rename. All accounts will remain attached to the user. | |
Renaming all account with the same ID will trigger a profile ID rename. | |
If the user has an account on a non-SoP Active Directory target system: | The user logon name and the userPrincipalName attribute must both be renamed. |
Automatically attaching accounts to Profile IDs
Target systems with Source of Profile IDs enabled (source target systems) will create profiles named after their accounts' Login IDs (short IDs). This default behavior is configurable via the Account attribute to use as profile ID on the target system's general tab. Accounts on non-source target systems (those with Source of Profile IDs disabled) are attached to a profile when their login id (short ID) matches the login id (short ID) on a source target system. This default behavior is configurable via Automatically attach accounts on the target system's general tab.
Alternatively, you can specify an Account attribute to automatically attach accounts to user profiles, rather than use the short ID. If the target system is a:
Source of profile IDs, other systems will match their short ID values to this specified attribute value. An attribute value example for a source of profile target would be a mail attribute or employee ID.
Non-source, the specified attribute value is what the non-source target tries to match to the profile IDs in the system. For example, in a system where the source of profile IDs is in the format jsmith@example.com, you would set the specified attribute value of a non-source Lotus Domino target system to InternetAddress, which matches the jsmith@example.com format.
Ensure the chosen attribute is loaded from the target system and populated for all accounts; the accounts for which this attribute is blank or doesn’t exist won’t be attached to any profile. If the attribute has the same value for more than one account, all of those accounts will be attached to a single profile
Demo: Automatic account attachment
Click below to view a demonstration of automatically attaching accounts to profiles using employee number. This demonstration includes the following steps:
Add a new account to a Linux target system
Identify the attribute for non-source targets to match against
Verify the Linux target system is configured to automatically attach accounts
Run auto discovery to automatically attach Linux accounts to profiles
Verify the new account has been added to the Linux system and auto-associated
Verify the new account is listed for the associated user
Remove the employee number as an attribute for account association
Automatic account attachment examples
The following use cases show you how to configure targets systems and a scenario component to achieve automatic account association.
Account name on the secondary target matches the user profile ID
In this example, Active Directory is configured as a source of profiles and a Linux system is configured as a secondary (non-source of profiles) target system. The Active Directory account name is "johndoe", and the Linux target account name is "johndoe".
No additional configuration is required for this scenario. Run auto discovery to associate accounts with user profiles. Click Manage the system > Maintenance > Auto discovery > Execute auto discovery.
Account name on secondary target matches account attribute on source of profiles
In this example, Active Directory is configured as a source of profiles and LDAP is configured as a secondary target. Active Directory accounts have an email address stored in the "mail" account attributes, whereas LDAP target uses the same email address as an account name.
AD account name: johndoe
Email address stored in the "mail" attribute of the AD account: john.doe@organization.com
LDAP account name: john.doe@organization.com
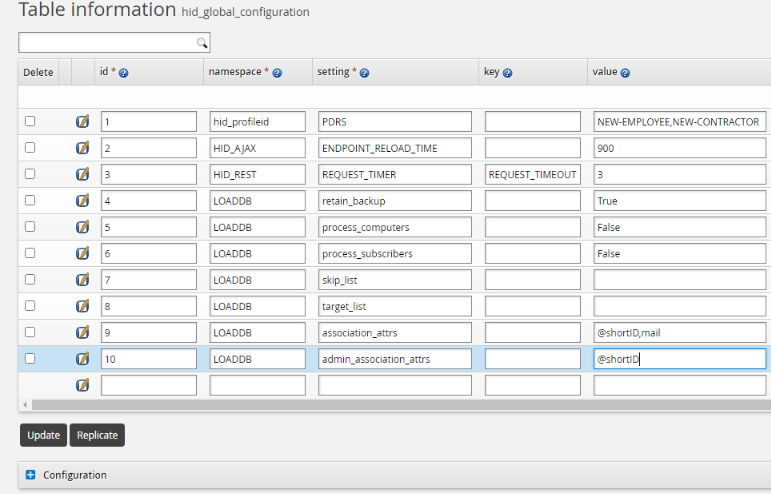
Configure the AssocID attribute
Log in to the Bravura Security Fabric Front-end (PSF) as superuser .
Install the Scenario.im_corp_loaddb component .
From the main click Manage external data store.
Configure the assocID attribute in the hid_global_configuration extdb table as shown below.
Configure the Active Directory mail account attribute
Navigate to Manage the system > Resources > Account attributes > Target system > AD > Defaults.
Find the "mail" account attribute.
Click Override.
Enable the Load attribute values from target system option.
Click Update to save the changes.
Run auto discovery to associate accounts with user profiles. Click Manage the system > Maintenance > Auto discovery > Execute auto discovery .
Account attribute on the secondary target matches an account attribute value on source of profiles
In this example, Active Directory is configured as a source of profiles (non-source of profiles) and LDAP is configured as a secondary target. Active Directory accounts have an employee ID stored in the "employeeID" account attribute, whereas the LDAP target has the same attribute value in the "employeeNumber" account attribute.
AD account name: johndoe
Employee ID stored in the employeeID attribute of the AD account: 123456
LDAP account name: jdoe
Employee ID stored in the employeeNumber attribute of the LDAP account: 123456
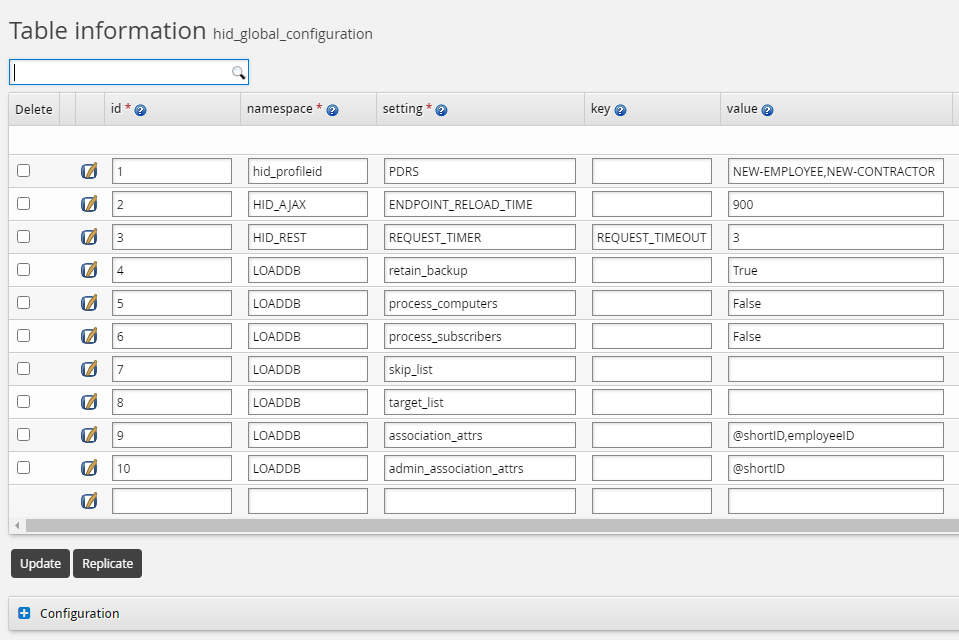
Configure the AssocID attribute
Log in to the Bravura Security Fabric Front-end (PSF) as superuser .
Install the Scenario.im_corp_loaddb component.
From the main click Manage external data store.
Configure the assocID attribute in the hid_global_configuration extdb table as shown below.
Configure the mail attribute on Active Directory
Navigate to Manage the system > Resources > Account attributes > Target system > AD > Defaults.
Find the "employeeID" account attribute.
Click Override.
Enable the Load attribute values from target system option.
Click Update to save the changes.
Configure the employeeNumber attribute on LDAP
Navigate Manage the system > Resources > Account attributes > Target system > LDAP.
Click Add new on the Target system level overrides tab.
Set the attribute ID to
employeeNumber.Enable the Load attribute values from target system option.
Click Update to save the changes.
Configure the LDAP target association setting
Navigate to Manage the system > Resources > Target systems > Manually defined > LDAP.
Set the Account attribute to automatically attach accounts to user profiles parameter to
employeeNumber.Click Update to save the changes.
Run auto discovery to associate accounts with user profiles. Click Manage the system > Maintenance > Auto discovery > Execute auto discovery .
Troubleshooting automatic account assignment
In any of the above scenarios, if account association fails for any reason after running auto discovery, use the following command "force" the account association recalculation. From the util directory:
dbcmd -call -p LoaddbResyncAdd -param "\"A\" \"AD\" \"\" \"\" \"\" \"\" \"\" \"\""
Note that the command is not supposed to return any message, unless there was an error.
This command should be used only once; it should raise an internal flag for the Bravura Security Fabric to clear any caches and skip any standard performance optimization logic the next time it runs the auto discovery. if after the next auto discovery account association is not established, contact Bravura Security support.
Manually attaching accounts
Bravura Security Fabric can assign alternate accounts from multiple systems to a single user through a manual process to attach other accounts.
When targets are not set to automatically attach accounts during discovery, Bravura Security Fabric allows for user-directed or help desk attachment of accounts to the proper users through the use of the Attach other accounts (PSL) module .
Allowing other users to attach automatically attached accounts
To allow a user to attach a non-standard login ID that is associated with another user, enable the Allow other users to attach auto-associated IDs setting on the target system’s page.
A user can only attach an account that is associated with another user if the account exists on an auto-associated target system. A user cannot attach an account that has been manually attached to another user’s profile.
Note
In the Attach other accounts (PSL) module’s default simplified mode, users cannot attach accounts that exist on a target system that is a source of profile IDs.
Allowing users to detach accounts
Set the default behavior for detaching accounts by enabling or disabling the PSL ALLOW DELETE option on the Attach other accounts (PSL) module configuration page.
You can override the default behavior for individual target systems. To do this, set the Allow users to detach manually-attached accounts option on the page. Select:
Yes to allow users to detach accounts.
No to prevent users from detaching accounts.
Note
Users cannot detach auto-associated accounts from their profiles.
Forcing users to attach accounts
You can enable the Users must have accounts setting for a target system so that if the Attach other accounts (PSL) module is enabled (it is by default), the user must either already have an account associated with this target system or must attach an account on this target system before other self-service functionality is made available.
When the PSF FORCE ENROLLMENT setting includes the psl value (default), users are redirected to the Attach other accounts (PSL) module to complete their profile when they login. This is useful during the enrollment phase in particular. If this setting is disabled for the Attach other accounts (PSL) module by removing the psl code from PSF FORCE ENROLLMENT, users are reminded that they require an account on the specified target system, but compliance is not enforced.
Enforcing a minimum number of accounts
You can set a minimum number of accounts that users must have registered in their profiles by typing an appropriate value in the PSL MIN ACCOUNTS field.
If users have not registered enough accounts, Bravura Security Fabric can enforce this requirement by directing users to the Attach other accounts (PSL) module after they log in, and displaying an error message.
When you change this setting, Bravura Security Fabric
Bravura Security Fabric automatically schedules the psdonechk program to run once to check compliance. To modify the scheduled job, click Manage the system > Maintenance > Scheduled jobs, then select PSDONECHK.
Preventing invalid claims on accounts
To prevent users from attempting to attach accounts that do not belong to them, the logged-in user is locked out of Bravura Security Fabric after a pre-defined number of password authentication failures. An authentication failure is counted only if an ID/password pair fails to match any account. For example, if there are two accounts called “user1” on different systems, and the password “mypassword” succeeds on one account but not the other, no authentication failure is counted. If the password does not succeed on both accounts, an authentication failure is counted.
This is controlled by the PSL VERIFY COUNTS option, which is enabled by default. If you disable this option, no failure is counted when an ID/password pair fails for all claimed accounts, and users are not locked out of Bravura Security Fabric.
Manual account attachment examples
When users have account names on systems that do not align with their chosen profile ID, you may need to develop a process to manually associate accounts from those multiple targets with the single user.
For the following examples it is assumed:
Bravura Security Fabric is installed and includes a Bravura Pass license.
An Active Directory target system is added as a source of profiles.
A Linux target system is also added that is not a source of user profiles and does not automatically attach accounts.
Batch loading
Attaching other accounts can be achieved by use of a text file that maps the accounts to each other. During discovery, if <instance>\psconfig\malias.txt exists, accounts will be attached according to the contents of that file.
For this example, we will be assigning the adm account from the Linux target to the user abbiel from the AD target.
Account entries in the malias.txt file must be made in the following format:
"<Target system ID>" "<Login ID>" "<Profile ID>"
So for this example, enter the following into the text file:
"AD" "abbiel" "abbiel"
"LINUX" "adm" "abbiel"
Click below to view a demonstration of this example:
Attach using text file
Log in to the instance server as an administrator.
Navigate to the \<instance>\psconfig\ directory.
Open a text editor and enter the account entries described above.
Save the file as
<instance>\psconfig\malias.txt.Log in to the Bravura Security Fabric server as a superuser.
Navigate to Manage the system > Maintenance > Auto discovery > Execute auto discovery.
Click the Continue button and wait until discovery is completed.
Log into Bravura Security Fabric as ABBIEL.
Click Attach other accounts.
Confirm that adm has been added to attached accounts and the proper Linux target is specified.
Return to the main user page by clicking the Home icon.
Click Change Passwords.
Specify a new password and confirm. Click Change passwords to proceed.
Verify that both passwords on the AD and Linux target are changed.
Log in to Linux as adm to confirm that the password has been changed.
Now we will use the help desk user to detach the adm account to set up the next example. We must also remove the association from the malias.txt file, so that it is not re-added the next time auto discovery runs.
Detach account
Log into Bravura Security Fabric as the help desk user.
Click Help users.
Find and select ABBIEL.
Click Skip authentication when prompted for a security question and click Continue.
Click the Attach other accounts tab.
Click the checkbox next to adm to detach the account.
Click Update.
Open the
malias.txtfile and remove the entry for ABBIEL. Save the file.Confirm that adm is no longer attached to ABBIEL.
Attach accounts - simplified
This example demonstrates the attachment of an account from the Linux system to an existing Active Directory account using the PSL simplified mode. Unlike the advanced mode example, the simplified mode does not require information about the target for the attached account to proceed.
Click below to view a demonstration:
Configuration
Log in to the Front-end (PSF) as
superuser.Navigate to Manage the system > Modules > Attach other accounts (PSL).
Ensure that PSL ENABLED and PSL SIMPLIFIED are set to
Enabled.Click Update if any changes are made to the settings.
For this example, a user with an AD account named ABBIEL will add an account named "adm" on the Linux system to their attached accounts. The account will then be detached by the help desk user to reset for the advanced example.
Attach in simple mode
Log into Bravura Security Fabric as ABBIEL.
Click Attach other accounts.
Enter
admand the current password in the Account and Password fields.Click Attach.
Confirm that adm has been added to attached accounts and the proper Linux target is specified.
Return to the main user page by clicking the Home icon.
Click Change Passwords.
Enter a new password and confirm. Click Change passwords to proceed.
Verify that both passwords on the AD and Linux target are changed.
Log into Linux as adm to confirm that the password has been changed.
Detach account
Log into Bravura Security Fabric as the help-desk user.
Click Help users.
Find and select ABBIEL.
Click Skip authentication when prompted for a security question.
Click the Attach other accounts tab.
Click the checkbox next to adm to detach the account.
Click Update.
Confirm that
admis no longer attached to ABBIEL.
Attach account - advanced
This scenario demonstrates the attachment of an account from the Linux system to an existing Active Directory account using the PSL advanced mode. The account will then be detached by the help desk user to reset.
Click below to view a demonstration:
Configuration
Log in to the Front-end (PSF) as
superuser.Navigate to Manage the system > Modules > Attach other accounts (PSL).
Ensure that PSL ENABLED is enabled.
Set PSL SIMPLIFIED to disabled.
Click Update.
Method of Use
This example demonstrates using the advanced mode to attach the same adm account to ABBIEL.
Attach in advanced mode
Log into Bravura Security Fabric as ABBIEL.
Click Attach other accounts.
Notice that the Linux target is now specified.
Enter
admand the password into the Account and Password fields for the Linux target row.Click Update.
Confirm that adm has been added to attached accounts and the proper Linux target is specified.
Return to the main user page by clicking the Home icon.
Click Change Passwords.
Enter a new password and confirm. Click Change passwords to proceed.
Verify that both passwords on the AD and Linux target are changed.
Log into Linux as adm to confirm that the password has been changed.
Detach account
Log into Bravura Security Fabric as the help desk user.
Click Help users.
Find and select ABBIEL.
Click Skip authentication when prompted for a security question.
Click the Attach other accounts tab.
Click the checkbox next to
admto detach the account.Click Update.
Confirm that
admis no longer attached to ABBIEL.
Attach account as a help desk user
In this scenario, the help desk user attaches the adm account to abbiel. The account will remain attached for the following example.
Click below to view a demonstration.
Attach account
Log into Bravura Security Fabric as the help desk user.
Click Help users.
Find and select ABBIEL.
Click Skip authentication when prompted for a security question.
Click the Attach other accounts tab.
Enter
admin the Account field for the Linux target row.Click Update.
Confirm that
admis now attached to ABBIEL.
Account attachment when account is already assigned
In this scenario, there is an attempt to attach the adm account to user ADAMC while it has already been attached to ABBIEL.
Click below to view a demonstration.
Attempt to attach an assigned account
Log into Bravura Security Fabric as ADAMC .
Click Attach other accounts.
Enter
admand the password in the Account and Password fields for the Linux target row.Click Update.
Verify that the attempt to attach the account fails with the following message:
Account [adm] on [Linux lab server] is already attached to someone else.
Group memberships
Most systems support the concept of groups. In its most basic form, a group is a collection of accounts and possibly other groups. Access privileges for accounts are often determined by their memberships in one or more groups.
During auto discovery, Bravura Security Fabric connectors list memberships in managed groups . If you want Bravura Security Fabric to extract group memberships, you must first select the groups that you want Bravura Security Fabric to manage.
By default, managed group membership is listed during auto discovery . You can disable this listing operation can by disabling the List groups option on the page. This can be done to improve the performance of listing operations. However, disabling the List groups option does not remove any existing managed groups; groups must be manually unmanaged.
If any of a user’s accounts are listed as belonging to a managed group, this relationship is stored in the user’s profile. Bravura Security Fabric also updates user profiles with changes to group memberships that are made from within Bravura Security Fabric .
Account attributes
The term account attributes refers to the attributes of user accounts on target systems. For example, most systems store the “first name” and “last name” of the end users that own the accounts. Other examples of attributes include access controls, home drives, last logon times, account and password expiry times.
To list attributes for accounts on a particular target system during auto discovery , the List attributes setting must be enabled for the target system. By default, this setting is enabled, only lists account attributes that are mapped to profile and request attributes, and loads all attributes as single-valued. You can override the behavior for individual account attributes .
Attribute lists can be very large. Bravura Security Fabric supports incremental, or differential, listing on some target system types, such as LDAP and Active Directory. For these targets, once the initial discovery has been run, Bravura Security Fabric generates an incremental list on subsequent runs of auto discovery. You can generate a full list during the next auto discovery by clicking Generate full list on the page. You must confirm your request before the change takes effect.
Bravura Security Fabric keeps a “catalog” of supported attributes for each target type. Some target systems support dozens of attributes, while other systems do not provide a default method for Bravura Security Fabric to list attributes. Among other things, this cataloger controls which of the listed attributes should be loaded into the Bravura Security Fabric database during auto discovery .
Example: Loading SSH public keys in profiles
Depending on the target system type, you can configure Bravura Security Fabric to automatically load users’ SSH public keys in their profiles.
See the Connector Pack documentation to determine which connectors have the option to enable SSH key discovery.
Only valid SSH public keys files on servers are loaded when running auto discovery. A SSH public key file must be less than the maximum file size to parse (default is 100,000 KB) and it must be in OpenSSH format in order to be valid.
By default, the public_keys attribute is mapped to the built-in ssh_public_keys profile and request attribute.
To enable users to view and update their SSH public keys in their profile:
Click Manage the system > Workflow > Attribute groups.
Select the SSH_PUBLIC_ATTRS attribute group.
Click Display criteria tab.
Select ’Main’ or ’Subsidiary’ for Display type.
Click Update.
Note
For security reasons, Bravura Security Fabric does not support modifying SSH public keys on the target system if updated from the user’s profile.
Profile attributes
The term profile and request attributes refers to the attributes of Bravura Security Fabric user objects. Information for existing users is often built by auto discovery , which loads account attribute information into mapped profile and request attributes. Profile and request attribute information can also be built by:
A plugin that automatically collects and/or validates information.
Users who enter the information when requesting accounts for themselves or others.
Users who update the information for themselves or others.
Automated user administration.
Force users to update profile information
You can force users to update profile information as part of the enrollment process. You can configure this individually for each profile and request attribute.
To force users to update their profile information:
For each attribute for which you require users to provide values, set the Minimum required number of values to
1or greater.See more information on defining profile and request attributes .
Add the attribute to the BASE_ATTRIBUTES attribute group.
See more information on attribute groups .
Configure the Front-end to redirect users to the View and update profile (IDR) module if they have not provided values for required attributes.
To do this, include the idr value in PSF FORCE ENROLLMENT. See also Enforced enrollment.
Access controls
Users’ access in Bravura Security Fabric is controlled by their permissions and capabilities :
Permissions are the rules that determine whether users can access certain objects, such as profile and request attributes or Bravura Privilege managed system policies.
Capabilities are the tasks that individual users are permitted to perform in Bravura Security Fabric .
Access controls affect API users as well as normal users.
There are many ways to assign access controls in Bravura Security Fabric . Refer to:
Attribute groups to learn how to assign permissions to users.
User types and access rules to learn how to assign product administrator and authorizer capabilities to users.
Authorization workflow options for more information about how access controls can be assigned to users dynamically.
There are also ways to filter access without configuring users’ access controls. Refer to:
Resource filtering for more information about filtering objects available to users.
Plugins for more information about restricting the operations that end users can request.
OrgChart data
In general, organizational chart data represents how authority and responsibility is distributed within an organization. Bravura Security Fabric can store OrgChart data for each user, including who that user reports to, and who that user’s subordinates are.
Bravura Security Fabric implements OrgChart data by examining users’ profile and request attributes to determine their primary managers. If a suitable ”manager” attribute exists on a target system, Bravura Security Fabric can import pre-existing OrgChart data during auto discovery .
You can also leverage Bravura Security Fabric 's user interface to build upon or maintain OrgChart data, or to build an OrgChart from scratch.
Security question data
Bravura Security Fabric allows you to define multiple question sets that can be used in a variety of ways: to gather information from users, to authenticate users when they attempt to log into Bravura Security Fabric , or to authenticate callers when they ask the help desk for assistance.
Users can add security questions, or just the answers to pre-defined questions, to their profiles in one of two ways:
For themselves, using the Update security questions (PSQ) module
Assisted by a help desk user , using the Help users (IDA) module
Additionally a plugin program can be configured to define users’ questions, answers, or both in an external source.
Forcing users to complete security questions
When the PSF FORCE ENROLLMENT setting includes the psq value (default), users are redirected to the Update security questions (PSQ) module to complete their security question profile when they login. This is useful during the enrollment phase in particular. If the psq value is removed from PSF FORCE ENROLLMENT, then this setting is disabled.
Inventory items
Bravura Security Fabric can track and manage inventory items, such as hardware tokens and office equipment. Inventory is assigned to users in the following ways:
In batches using the manageinv program
Using Bravura Identity ’s inventory provisioning process
Roles
Roles provide a way of assigning requirements for a set of users. They are a part of a role-based access control system, along with segregation of duties rules.
Roles can be assigned to users via authorization workflow, or in batches using the userrole program.
Forcing users to activate a mobile device
You can force users to register and activate a mobile device as part of the enrollment process. Users are redirected to the Mobile devices page when forced enrollment for mobile devices has been enabled.
To force users to activate a mobile device:
Ensure that the Bravura Security Fabric and Bravura One proxy servers have been configured for Bravura One.
See the Mobile access for more information about how to configure the servers for Bravura One.
Add the mobiledevice value to PSF FORCE ENROLLMENT .
Ensure that a self-service rule has been configured so that the users have the ”Manage mobile devices” privilege. This may be configured either for a new self-service rule or ALL_SELF_REQUEST for all users.