Upgrading an instance
This section shows you how to use setup to upgrade Bravura Security Fabric, or apply a patch provided to you by Bravura Security support.
Unless specified, "upgrade" can also refer to a patch in the following instructions.
Warning
Using setup to perform patches is simple; however, proper research, analysis, and planning are required to ensure that it works. This should be carried out by someone familiar with deploying Bravura Security Fabric . Contact support@bravurasecurity.com for assistance.
If using the command line, the installer will restart services once it completes, as there's no way to pause the setup. In this case, remember to manually stop services if required (as stated in the playbooks).
Caution
In cases where your instance contains data or schema customizations the installer does not expect, and setup rolls back the installation. You may have to perform a version migration process.
It is strongly recommended that you work with Bravura Security professional services in these cases. Contact your account manager to arrange this.
Caution
If upgrade attempts fail for any reason, do not continue the process, because a failed upgrade may leave the instance in an unknown state. Instead, collect the relevant upgrade data, rollback the VM, fix the original issue (with the help of Support if needed) and then run the installer again to upgrade. Check the troubleshooting section ahead of time.
Preparation
This section covers steps to complete before making any changes to upgrade a Bravura Security Fabric instance.
It is highly recommended that you:
Carry out research and analysis of your environment to ensure upgrading or patching would be successful.
Design plans for testing, change control, and communication .
Choose your upgrade path / playbook to customize and record your process.
Review and verify
Before upgrading, review and verify the information gathered during research and analysis.
Verify operating system and SQL server configuration
Verify that the Windows operating system and database are the same versions and have the same configuration as existing nodes. Review:
Verify system requirements
For Bravura Security Fabric 12.6+, the following are required:
Python 3.11.2+.
Microsoft OLE DB Driver for SQL Server
.NET Core Hosting Bundle 8.0.23+ and
.NET Desktop Runtime 8.0.23+
Supported database management systems
For details for 12.7-12.9 see Server requirements.
For older versions see:
Verify product build version
The Bravura Security Fabric build version should match the version on the primary node.
Check availability of database credentials
Ensure that there is DBA-level access to all databases both to take backups and to apply the backups.
Check availability to database backup locations
Make sure suitable space exists to hold the database backups
Check ability to transfer database backups to secondary sites
Ensure that its known how the database backups will be transferred between the nodes.
Review customizations
Confirm customizations that will need to be ported.
Run the Instance customizations report:
Log into Bravura Security Fabric as an user with the "Run reports" administrative privilege.
Click Manage reports > Reports > System operation > Instance customizations.
Review previous changes to list all custom components.
As discussed in research and analysis, review:
Note
Keep the old version of Python to uninstall the old version of Bravura Security Fabric. If the old version of Python is removed, then the location for the new version must be added to the system path.
Run the installer for pre-upgrade checks
Run setup to check for errors or warnings. The steps vary according to your upgrade path/playbook:
Before you start the upgrade or patching process, start the setup program so that it can perform pre-upgrade checks:
Copy the installation package to all application servers.
Check out administrator access as required.
Ensure access to <ADMIN> accounts.
Run
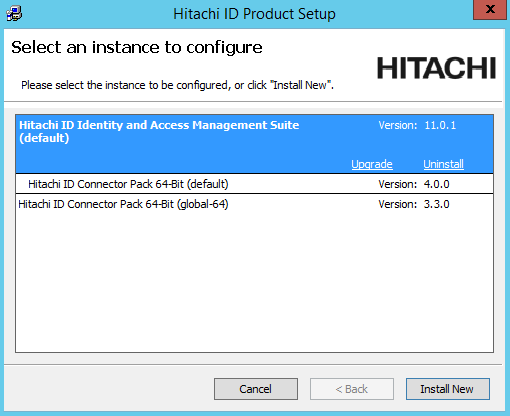
setupwith the latest MSI.Select the instance you want to upgrade or patch, then click the Upgrade link for that instance.
If the instance you want is not listed, ensure the
instance.cfgfile exists in the root folder of the instance on the disk. This file is a text file containing the following entries, which you would have to modify to fit your own instance:[Config] INSTANCENAME=bsf1220 INSTANCEDESCRIPTION=BSF 12.2.0 with MSSQL Standard backend REGISTRY=SOFTWARE\Bravura Security\Bravura Security Fabric\default
Confirm that pre-upgrade checks pass.
The database configuration check verifies:
The current windows user is the same user that is used for Windows authentication by the instance.
The SQL server login for the windows user still has the same default database that is used by the instance.
The connectivity to the database that the instance uses.
Abort the upgrade.
Ensure all health checks pass on all nodes. Confirm that:
Windows updates are applied.
There are no critical problems in the Windows event log.
There are no critical problems in Bravura Security Fabric health checks.
The node has at least 50GB free.
The database server has at least 50GB free.
The database server has at least 25GB free for the transaction log.
Before you start the upgrade or patching process, start the setup program so that it can perform pre-upgrade checks:
Copy the installation package to all application servers.
Check out administrator access as required.
Ensure access to <ADMIN> accounts.
Run
setupwith the latest MSI.Select the instance you want to upgrade or patch, then click the Upgrade link for that instance.
If the instance you want is not listed, ensure the
instance.cfgfile exists in the root folder of the instance on the disk. This file is a text file containing the following entries, which you would have to modify to fit your own instance:[Config] INSTANCENAME=bsf1220 INSTANCEDESCRIPTION=BSF 12.2.0 with MSSQL Standard backend REGISTRY=SOFTWARE\Bravura Security\Bravura Security Fabric\default
Confirm the correct upgrade process is triggered. Verify the following options are available:
Perform a standard upgrade by flushing queue files beforehand (this may take some time)
Delete queue files and accept the data lost and/or desynchronization that is extremely likely to occur
Confirm that pre-upgrade checks pass.
The database configuration check verifies:
The current windows user is the same user that is used for Windows authentication by the instance.
The SQL server login for the windows user still has the same default database that is used by the instance.
The connectivity to the database that the instance uses.
Abort the upgrade.
Ensure all health checks pass on all nodes. Confirm that:
Windows updates are applied.
There are no critical problems in the Windows event log.
There are no critical problems in Bravura Security Fabric health checks.
The node has at least 50GB free.
The database server has at least 50GB free.
The database server has at least 25GB free for the transaction log.
Before you start the upgrade or patching process, start the setup program so that it can perform pre-upgrade checks:
Copy the installation package to all application servers.
Check out administrator access as required.
Ensure access to <ADMIN> accounts.
Run
setupwith the latest MSI.Select the instance you want to upgrade or patch, then click the Upgrade link for that instance.
If the instance you want is not listed, ensure the
instance.cfgfile exists in the root folder of the instance on the disk. This file is a text file containing the following entries, which you would have to modify to fit your own instance:[Config] INSTANCENAME=bsf1220 INSTANCEDESCRIPTION=BSF 12.2.0 with MSSQL Standard backend REGISTRY=SOFTWARE\<Company Directory>\<Product Directory>\default
Confirm the correct upgrade process is triggered. Verify the following options are available:
Perform a standard upgrade by flushing queue files beforehand (this may take some time)
Delete queue files and accept the data lost and/or desynchronization that is extremely likely to occur
Confirm that pre-upgrade checks pass.
The database configuration check verifies:
The current windows user is the same user that is used for Windows authentication by the instance.
The SQL server login for the windows user still has the same default database that is used by the instance.
The connectivity to the database that the instance uses.
Abort the upgrade.
Ensure all health checks pass on all nodes. Confirm that:
Windows updates are applied.
There are no critical problems in the Windows event log.
There are no critical problems in Bravura Security Fabric health checks.
The node has at least 50GB free.
The database server has at least 50GB free.
The database server has at least 25GB free for the transaction log.
Before you start the upgrade or patching process, start the setup program so that it can perform pre-upgrade checks:
Copy the installation package to all application servers.
Check out administrator access as required.
Ensure access to <ADMIN> accounts.
Run
setupwith the latest MSI.Select the instance you want to upgrade or patch, then click the Upgrade link for that instance.
If the instance you want is not listed, ensure the
instance.cfgfile exists in the root folder of the instance on the disk. This file is a text file containing the following entries, which you would have to modify to fit your own instance:[Config] INSTANCENAME=bsf1240 INSTANCEDESCRIPTION=BSF 12.4.0 with MSSQL Standard backend REGISTRY=SOFTWARE\<Company Directory>\<Product Directory>\default
Confirm the correct upgrade process is triggered.
Confirm that pre-upgrade checks pass.
The database configuration check verifies:
The current windows user is the same user that is used for Windows authentication by the instance.
The SQL server login for the windows user still has the same default database that is used by the instance.
The connectivity to the database that the instance uses.
Abort the upgrade.
Ensure all health checks pass on all nodes. Confirm that:
Windows updates are applied.
There are no critical problems in the Windows event log.
There are no critical problems in Bravura Security Fabric health checks.
The node has at least 50GB free.
The database server has at least 50GB free.
The database server has at least 25GB free for the transaction log.
Services are stopped during the runtime install portion of the pre-upgrade checks.
It is recommended that you run pre-install checks on each node sequentially to avoid downtime of the full environment.
Verify current instance versions
To determine if the current version and version/build that is being upgraded to is compatible for rolling upgrade, check setup.log for the message Replication queues are compatible and will be preserved.
Reduce sources of change
The following steps are required to reduce sources of change before upgrading in a replicated environment.
Prepare custom component upgrade
Depending on the specific customizations identified in Review customizations , carry out steps to prepare for custom component upgrade; for example, this may include running custom upgrade scripts, and/or removing custom components in favor of base product new features.
Disable OTP randomization (Rolling upgrade)
If you are following the rolling upgrade path, disable password randomization for all OTP API accounts:
Create a DWORD entry (DisableAllOTP) in the IDAPI directory of the instance registry key.
HKEY_LOCAL_MACHINE\SOFTWARE\Bravura Security\Bravura Security Fabric\<instance>\
Set DisableAllOTP to 1.
Allow check-outs while randomization is disabled
When you disable randomization, Bravura Security Fabric ’s default behavior is to check in and block any check-outs for accounts, account sets, or group sets that are members of the affected managed system policies. You can choose to allow check-outs while randomization is disabled.
Check-ins will not cause the password to be randomized; this could present a security risk if users have access to account passwords, as they will not be randomized until randomization is re-enabled.
After a managed system policy is enabled, passwords must be randomized initially before any accounts are available for check-out. You can do this either by waiting for the managing service to poll the member systems, or by manually randomizing them.
To allow check-outs for all policies while randomization is disabled:
Click Manage the system > Maintenance > System variables.
Set RES DISABLE RANDOMIZATIONS ALLOW CHECKOUTS to Enabled.
Click Update.
Replication will propagate the setting to secondary nodes automatically.
To allow check-outs for selected policies instead of all policies:
Click Manage the system > Privileged access > Managed system policies.
Select the managed system policy.
In the General tab, select the checkbox for Allow check-outs when randomization is disabled.
Click Update.
If the Allow check-outs when randomization is disabled option for the managed system policy is deselected, the global setting RES DISABLE RANDOMIZATIONS ALLOW CHECKOUTS applies.
Disable automatic password randomization system-wide
Disable the system variable RESOURCE AUTOMATICALLY RANDOMIZE PASSWORDS (Manage the system > Privileged access > Options > Password randomization).
The local workstation service immediately randomizes the initial passwords for local workstation service mode resources where there is no known password at the next poll. Randomization in response to events such as manual randomization, overrides or check-ins are not affected by this variable.
When disabled, passwords are not initialized and cannot be randomized in response to events until they have been initialized.
The setting will be replicated to secondary nodes.
Disable all password randomizations in all policies
Temporarily disable password randomization for all managed system policies. This will override all other randomization settings, including scheduled randomization or randomization after an account is checked in. During this time, passwords that need to be randomized or overridden will be blocked and queued until password randomization is re-enabled.
Log in to Bravura Security Fabric .
Click Manage the system >Privileged access >Managed system policies.
Scroll to the bottom of the page.
Select Disable all password randomizations in all policies.
Click OK to confirm the selection.
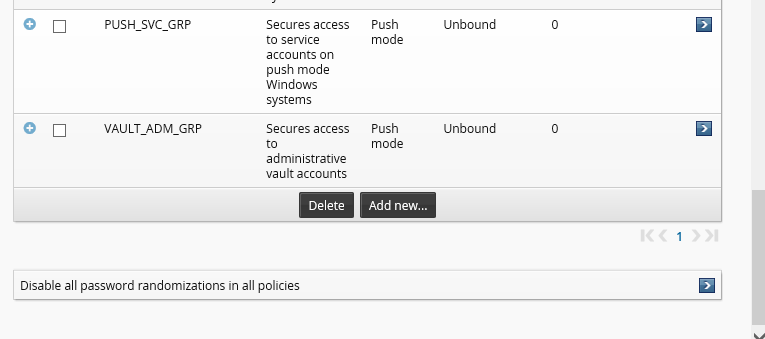
Replication will propagate the disabled password randomization policy to all other nodes automatically. It is recommended to double-check on each node manually or at least check the nodes which have managed system policies configured to run on them.
Note
This setting does not actually disable randomization inside each managed system policy; it simply stops any randomization from happening.
Disable auto discovery
Disable the PSUPDATE scheduled job:
Log into Bravura Security Fabric as an administrator with the "Maintain servers" administrative privilege.
Click Maintenance > Scheduled jobs.
Select PSUPDATE and disable.
Ensure that auto discovery has finished running. Do not kill the processes if they are running and just allow them to complete.
Ensure no maintenance tasks scheduled on SQL nodes (Not Rolling upgrade path)
Check with your DBA to ensure that database maintenance tasks, such as a database reindex, will not be running during patching.
Disable Bravura Security tasks
Disable Bravura Security tasks in the operating system task scheduler.

Verify Bravura Security processes are no longer running.
While logged into each application node, use Task Manager and verify no processes are running under the Bravura Security service user (psadmin), other than the Bravura Security instance services; in particular the following processes should not be running:
psupdateidtrack
autores
pwdconficts
This program should not run until all nodes are operational, otherwise it will identify a range of issues since the nodes are in a problematic state due to the database resynchronization being done
Heath checks
Upgrade steps
Following preparation and reducing sources of change, upgrade steps depend on your upgrade path/playbook:
Carry out the steps described in the sections below when upgrading a Bravura Security Fabric instance from 12.3 or earlier to 12.4 or newer.
Restrict access
Restrict access via a global load balancer
Restrict access via a global load balancer and direct people to maintenance page.
Restrict access to the IIS server
Restrict access to the IIS server to only a local IP address and the loopback interface by using the IP and Domain Restrictions IIS feature.
You may need to install the IP and Domain Restrictions security feature for IIS.
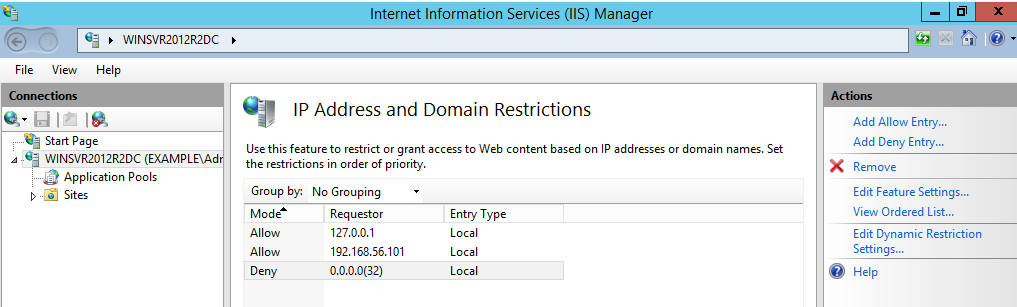
IP and Domain Restriction settings:
Mode | Requestor | Entry type |
Allow | 127.0.0.1 | Local |
Allow | Local IP address of IIS server | Local |
Deny | 0.0.0.0/32 | Local |
If a load balancer or round-robin DNS has been configured in front of the Bravura Security Fabric , remove all application nodes from availability to the load balancer to stop new user sessions from being created (and avoid interrupting them when services go down). Optionally, redirect users to a static web page that mentions the cause and duration of the outage (and can be updated with notes if the outage takes longer than expected).
Update components if required
Update custom components if they need to be upgraded to accommodate functionality in the upgrade version.
Upgrade proxy servers
Currently, you can only upgrade minor versions of the proxy server. For example, 12.4.1 to 12.4.3. Major version changes require an uninstall of the previous version and a new install of the new version.
To upgrade or patch a proxy server using the setup installer:
Run
setupwith the 12.x msi.Setup shows you the list of existing instances on the server. Select the one you want to upgrade or patch, then click the
Upgradelink for that instance.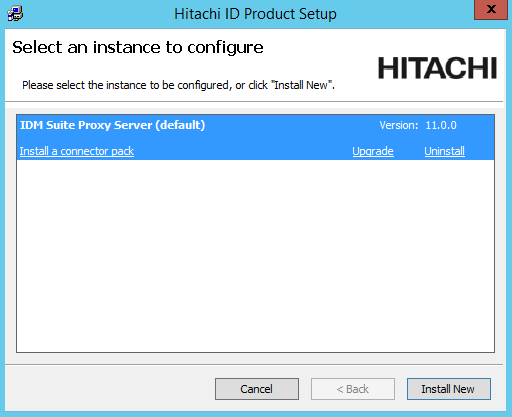
Click Yes to confirm.
Enter the password for the service account.
The setup program performs a pre-installation check and verifies all of the requirements for the installation.
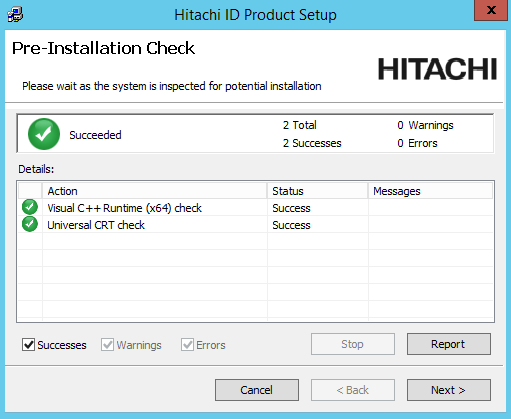
If all of the checks are successful, click Next to proceed with the upgrade or patch.
Click Next .
Click Finish to exit once the proxy server has been upgraded or patched.
Ensure IIS is off on each node after the proxy server upgrade.
Upgrade Connector Pack
Upgrade Connector Pack if necessary.
This step may not be necessary if no connector changes are made. It is not necessary for a build patch.
If custom connectors are used, they may need to be manually reloaded.
If Connector Pack is 3.1.x or older, you need to uninstall the old Connector Pack , and install a new one.
Note
The loadplatform program may fail, since the Database Service has been stopped; however the program will run as part or the post-installation tasks once Bravura Security Fabric has been upgraded.
Ensure services and IIS are off on each node after the Connector Pack upgrade.
Shut down services
Shut down services to manually flush the replication queues:
Stop and disable Bravura Security Fabric services on all shared schema or replicated nodes, except for Database Service (
iddb) and Logging Service (idmlogsvc).During the upgrade process from 12.3.0 to 12.3.x, the installer will attempt to complete a post upgrade synchronization with the primary server. When this happens, turn on the Database Service (
iddb) and the File Replication Service (idfilerep) on the primary server.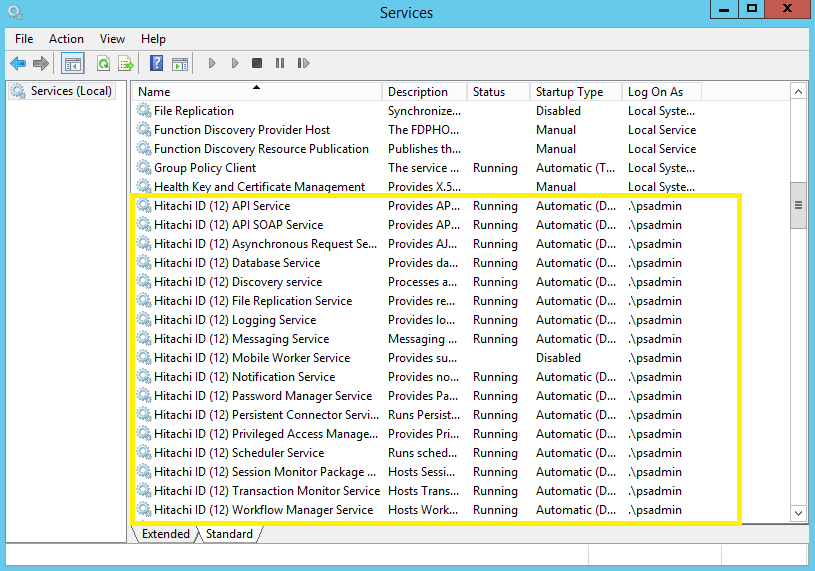
Take note of which services are configured as "Manual" or "Disabled" so they can be returned to the same state after the upgrade or patch.
Verify no processes are running under the Bravura Security Fabric service user (psadmin) account other than
iddbandidmlogsvc.
Leave the Database Service running to allow flushing of the replication queue.
This will also allow all gathered requests and other database activity to finish trickling through from one node to another, so all source of operations are removed.
Verify database replication queues are flushed. See Data Replication Queue for details.
Data from the secondary servers must be transmitted to the primary otherwise it will be lost.
To view status information about a replication node:
Log into Bravura Security Fabric as an administrator.
Click Manage the system > Maintenance > Database replication.
Select a node.
Select the Status tab.
Warning
Do not set the database replication mode to "Disabled" when patching. Disabling replication will prevent application nodes from queuing replication events for other replicated nodes (potentially resulting in node desynchronization for data and configuration).
It is recommended that each server be sequentially upgraded or patched to prevent overlap of database updates.
Suspend replication between primary and existing secondary nodes.
Navigate to the Database replication page and select the node.
Select the Configuration tab.
Set Mode to Suspended
Accept default queue sizes.
Click Update.
Click Propagate and reload replication configuration on all servers (without resynchronizing).
Stop the remaining Database Service.
All product services other than the Logging Service should be stopped at this point. The Logging Service can remain on during the upgrade.
Ensure that you close the services.msc console after stopping all services. If you don’t, it can hold a lock on one or more services, preventing them from being uninstalled.
All services other than the Logging Service depend on the Database Service. Disabling the Database Service and the other services will ensure that nothing other than the installer will be able to start the service before the patch is over. The Logging Service is left running so that any errors or attempts to start binaries will be logged.
Back up all nodes and proxies
Back up all nodes and proxies.
Virtualized servers If you are using a virtualization solution to run your Bravura Security Fabric nodes as virtual machines, create a snapshot of each of node. Create a snapshot of each node’s corresponding database server if the application and database are not on the same server.
Physical servers If you are running the application and database nodes on bare-metal, image the server disks, including all disks where Bravura Security Fabric and its backend database files are stored. To determine the paths, you can check in the Windows registry:
HKEY_LOCAL_MACHINE\SOFTWARE\Bravura Security\Bravura Security Fabric\<instance>\PsInstallDir
HKEY_LOCAL_MACHINE\SOFTWARE\Bravura Security\Bravura Security Fabric\<instance>\PsTempDir
Backup the database.
Regardless of the chosen backup strategy, create an explicit SQL backup. A database backup provides additional flexibility in some recovery scenarios. It can potentially allow an administrator to quickly re-run a patch after fixing issues that may have caused it to fail.
If the database is hosted on a SAN or a shared database cluster where a snapshot or disk image is impossible, create a database backup to accompany the snapshot or disk image made for the application.
Start setup on the primary node
To run the installer:
Run
setupas an Administrator with the latest MSI.The
setupprogram shows you the list of existing instances on the server.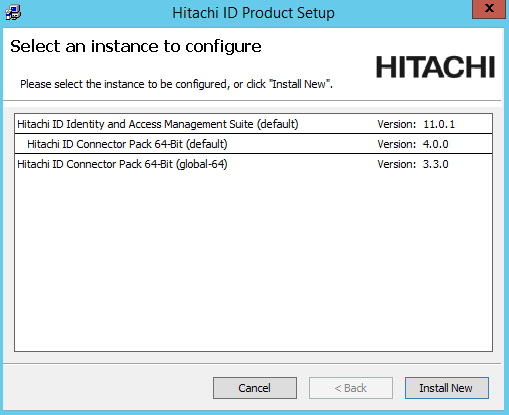
Select the instance you want to upgrade or patch, then click the Upgrade link for that instance.
If the instance you want is not listed, refer to Run installer for pre-upgrade checks.
Read the product setup warning and click Yes to continue.
Enter the psadmin credentials.
Complete pre install checks.
Click Next after the pre-installation check.
Select Backup files if you want the installer to backup the files.
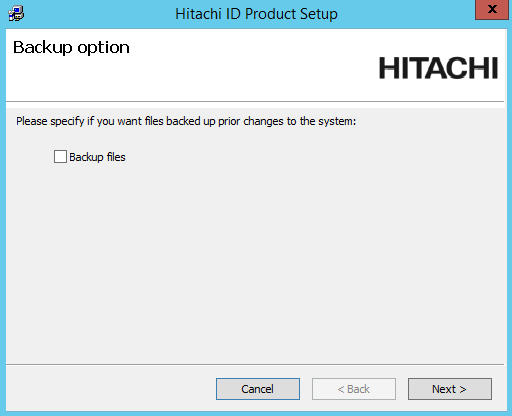
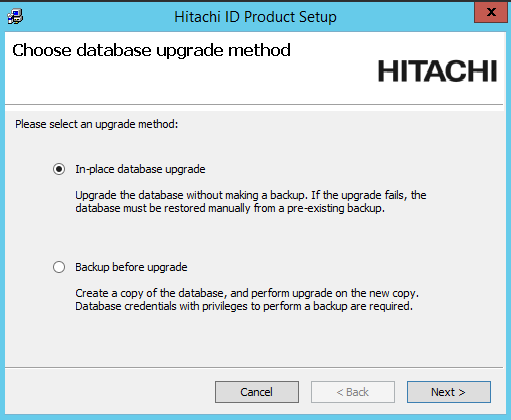
Choose if you want the installer to backup the database before the upgrade or patch.
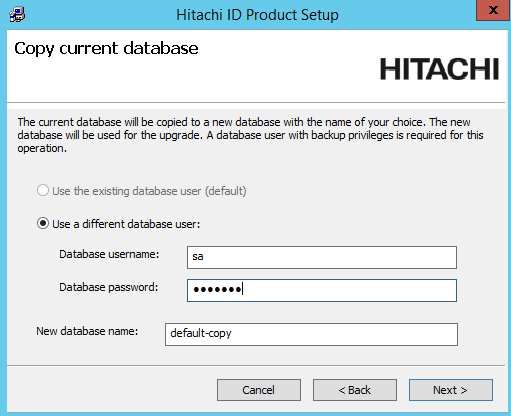
If you chose to do a database backup, enter the database user’s password and a name for the backup database.
During the upgrade, if prompted, update or add new encryption keys.
Bravura Security Fabric uses several encryption keys to ensure your data is secure.
If you want to install the Analytics app, configure options to connect with SQL Server Reporting Services (SSRS) .
Click Skip if you do not want to install this feature now. Skip to Step 12.
If you skip SSRS setup now you can set it up after installing Bravura Security Fabric software, as documented in Reports.
You must have access to SQL Server Reporting Services to use this feature.
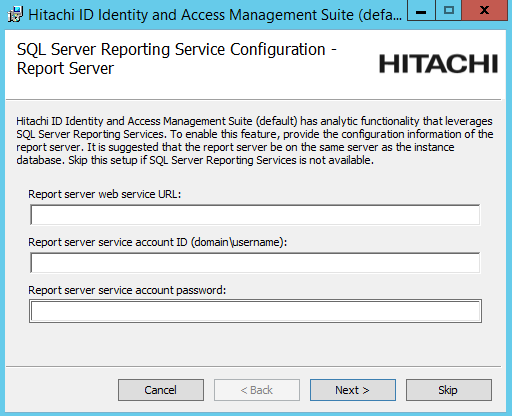
To configure SSRS options and install the Analytics app:
Enter the Report Servers web service URL.
Enter the SSRS service username and password.
Click Next .
The SQL Server Reporting Service Configuration - Database User page is displayed.
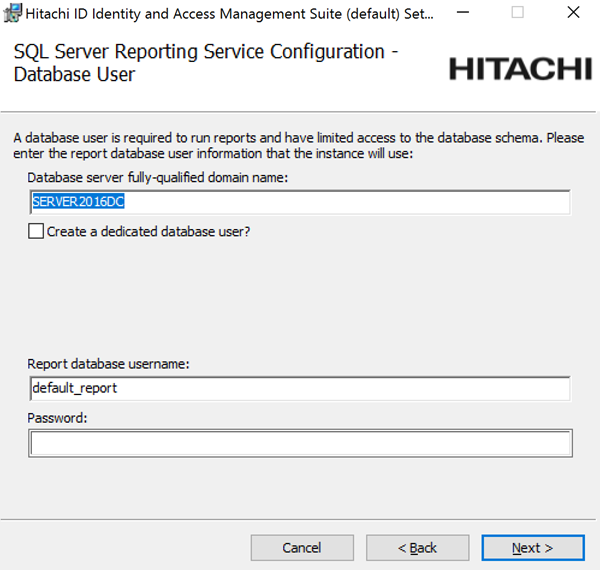
Enter the name of server where your instance database resides.
If you want
setupto create and configure a new dedicated database user that can query the instance database, enable the Create a dedicated database user? option.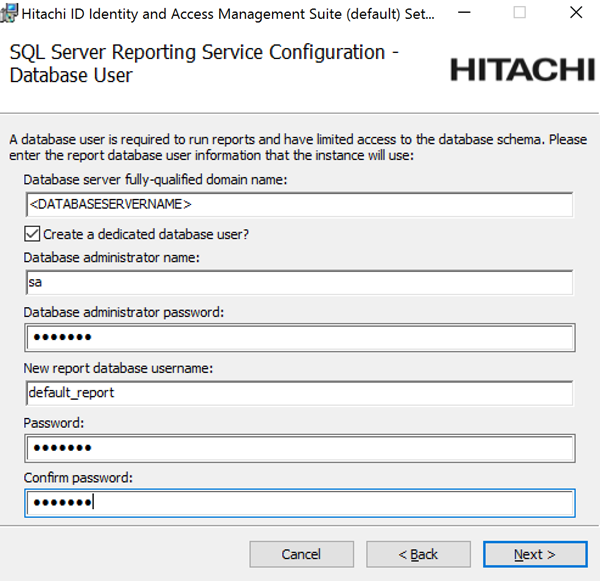
Enter the database administrator name and password so the installer can create the new dedicated database user.
If you already have a dedicated database user created and configured, enter those details and click Next, otherwise, add a password for the new dedicated database user.
Enter a valid license for the upgrade if prompted.
Click Install to start the upgrade or patch.
The installer begins copying files to your computer. The Completed the Bravura Security Fabric (<instance>) Setup Wizard page appears after the Bravura Security Fabric features have been successfully installed.
Remain on the page until after you run the installer on each secondary node.
Caution
Do not stop the post-installation tasks. The installer is attempting to load connectors from the Connector Pack, language tags, and reports.
The Database service (
iddb) and File replication service (idfilerep) need to be running on the primary node for post upgrade tasks to properly sync files on secondary nodes.
Start upgrade on secondary nodes
After starting the upgrade on the primary node, upgrade the instance on each secondary node:
Run
setupas an Administrator with the latest MSI.After pre-installation checks, continue through upgrade steps.
Click Install to start the upgrade or patch.
The installer begins copying files to your computer. The page appears after the Bravura Security Fabric features have been successfully installed.
Remain on the page.
Caution
Do not stop the post-installation tasks. The installer is attempting to load connectors from the Connector Pack, language tags, and reports.
The Database service (
iddb) and File replication service (idfilerep) need to be running on the primary node for post upgrade tasks to properly sync files on secondary nodes.Repeat for each secondary node.
Start services
Start up services on the primary node
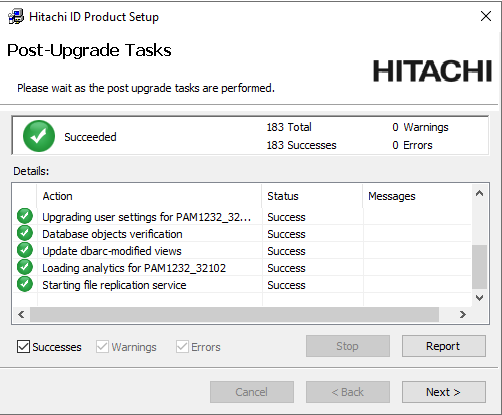
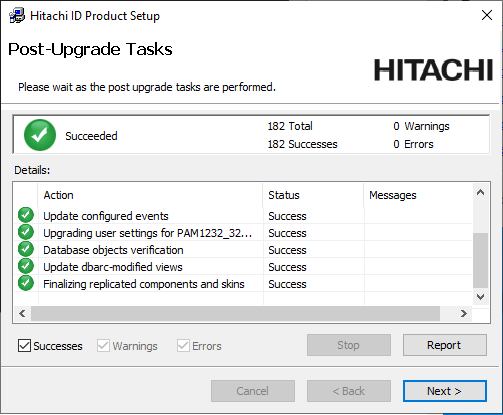
After you have run the installer on each secondary node, return to the primary node and continue past the Post-Upgrade Tasks page.
If any of the post-installation tasks produce warnings or errors, click:
Report for details on all post-installation tasks
or,
Messages... for details on a specific post-installation task
Otherwise, wait until the status changes to success, then click Finish.
If connectors (agents) were not installed successfully, see Troubleshooting installation or upgrade.
Turn on IIS service
Before running the installer on the primary node, you turned of the IIS service. You should now remove the IIS server access restrictions to localhost, or re-enable completely.
Start up all services
Return to each secondary node to continue past the page in the installation process.
Do not enable or start services that were originally disabled before the patch or upgrade.
Add custom components
If you upgraded custom components, add them to the new instance.
Manually rebuild skins if required
The Bravura Security Fabric installer normally rebuilds user interface skins during post-upgrade tasks. If the skins failed to rebuild or there were issues, rebuild the skins manually.
See Customization for more information.
For secondary nodes, you have the option to resynchronize files from primary.
Manually reload connector pack if required
The Bravura Security Fabric installer normally loads connectors during post-upgrade tasks. If loading connectors failed or there were issues, reload connectors using the command:
loadplatform -target
See loadplatform usage for information.
Manually reload components if required
The Bravura Security Fabric installer normally reloads components during post-upgrade tasks. If component initialization fails or has issues during the upgrade:
From a command prompt, navigate to the instance directory.
Run the command:
instance.bat
Run the command:
script\manage_components.py load --upgrade
Confirm they succeed.
The API service (idapi) is required for this step.
Enable replication
Enable replication between primary and secondary nodes:
Navigate to the page and select the node.
Select the Configuration tab.
Set Mode to Enable
Accept default queue sizes.
Click Update.
Click Propagate and reload replication configuration on all servers (without resynchronizing) .
Test replication
Carry out the following to test replication on the upgraded instance:
Test replication by making a change, for example, increment/decrement the DEFAULT EXPIRY SECOND S value, on one node and verify that the change is propagated on other nodes.
Verify that database replication queues all report running of stored procedures being replicated recently. This can be verified from the primary to make sure all nodes are reporting as replicating with each other.
Trigger file replication from the primary to secondary nodes. If any of the secondary nodes failed the "Finalizing replicated components and skins" post-upgrade task, run this command from the primary node command line:
updinst.exe -syncreg -syncfile -serverid <serverid>
If the primary node in each instance has the Connector Pack installed as global (no agents in the instance's agent\ directory), add the -globalcp option to the command.
File replication may take longer (an hour or two) since it has to interrogate the entire state of the secondary node and this notably depends on network latency to check the file system state.
Enable access via global load balancer to the primary node only
Enable access via global load balancer to the primary node only.
If you cannot do this, extend the system-wide outage until the secondary nodes can be added to the load balancer.
Re-enable schedule jobs
Re-enable scheduled jobs in the product, except for the PSUPDATE job.
From the main menu, click Manage the system > Maintenance > Scheduled jobs.
See Scheduling maintenance for more information.
Enable privilege access features
Carry out the following steps if privileged access features were configured in the old version.
Ensure correct nodes are doing password management.
Ensure the correct nodes continue to own managed system policies and drive randomization.
If any changes are required, do this after all nodes are replicating with each other so the primary is aware of the existence of the two secondary nodes via the servicelist table.
Enable automatic password randomization
You can temporarily disable password randomization for some or all managed system policies. This will override all other randomization settings, including scheduled randomization or randomization after an account is checked in. During this time, passwords that need to be randomized or overridden will be blocked and queued until password randomization is re-enabled.
Before upgrade, you temporarily disabled password randomization for all managed system policies. During this time, passwords that needed to be randomized or overridden were blocked and queued until password randomization is re-enabled.
To enable password randomization for all managed system policies:
Log in to Bravura Security Fabric .
Click Manage the system > Privileged access > Managed systems.
Scroll to the bottom of the policies list.
Select Allow policies to randomize passwords.
Click OK to confirm the selection.
Settings will be replicated to secondary nodes.
Note
Selecting this option will override the randomization setting of the individual managed system policies.
Warning
Make sure that you re-enable password randomization when it is safe to do so. Affected passwords may be immediately reset.
Disallow check-outs while randomization is disabled
Before starting the upgrade, you allowed check-outs while randomization is disabled.
To disallow check-outs for all policies while randomization is disabled:
Click Manage the system > Maintenance > System variables .
Set RES DISABLE RANDOMIZATIONS ALLOW CHECKOUTS to Disabled.
Click Update.
To disallow check-outs for selected policies instead of all policies:
Click Manage the system > Privileged access > Managed system policies.
Select the managed system policy.
In the General tab, deselect the checkbox for Allow check-outs when randomization is disabled.
Click Update.
Settings will be replicated to secondary nodes.
Note
If the Allow check-outs when randomization is disabled option for the managed system policy is deselected, the global setting RES DISABLE RANDOMIZATIONS ALLOW CHECKOUTS applies.
Enable RESOURCE AUTOMATICALLY RANDOMIZE PASSWORDS
Enable the system variable RESOURCE AUTOMATICALLY RANDOMIZE PASSWORDS (Manage the system > Privileged access > Options > Password randomization).
The setting will be replicated to secondary nodes.
Run smoke tests
Carry out the following tasks:
Test connection to target systems.
End users can authenticate.
Request to access a password - auto approved.
Request to access a password - with authorization.
Randomize password.
Override password.
Confirm passwords are replicating between secondary nodes and the primary.
Include additional test plan use cases to the smoke testing as needed.
Allow access
Remove global load balancer restrictions that you added before the upgrade.
Confirm end users can access from globally available URLs.
Next
Carry out further post upgrade steps as necessary.
Carry out the steps described in the sections below when upgrading a Bravura Security Fabric instance from 12.4 or newer to 12.4 or newer, using the queue flush method.
Restrict access
Restrict access via a global load balancer
Restrict access via a global load balancer and direct people to maintenance page.
Restrict access to the IIS server
Restrict access to the IIS server to only a local IP address and the loopback interface by using the IP and Domain Restrictions IIS feature.
You may need to install the IP and Domain Restrictions security feature for IIS.
IP and Domain Restriction settings:
Mode | Requestor | Entry type |
Allow | 127.0.0.1 | Local |
Allow | Local IP address of IIS server | Local |
Deny | 0.0.0.0/32 | Local |
If a load balancer or round-robin DNS has been configured in front of the Bravura Security Fabric , remove all application nodes from availability to the load balancer to stop new user sessions from being created (and avoid interrupting them when services go down). Optionally, redirect users to a static web page that mentions the cause and duration of the outage (and can be updated with notes if the outage takes longer than expected).
Update components if required
Update custom components if they need to be upgraded to accommodate functionality in the upgrade version.
Upgrade proxy servers
Currently, you can only upgrade minor versions of the proxy server. For example, 12.4.1 to 12.4.3. Major version changes require an uninstall of the previous version and a new install of the new version.
To upgrade or patch a proxy server using the setup installer:
Run
setupwith the 12.x msi.Setup shows you the list of existing instances on the server. Select the one you want to upgrade or patch, then click the
Upgradelink for that instance.Click Yes to confirm.
Enter the password for the service account.
The setup program performs a pre-installation check and verifies all of the requirements for the installation.
If all of the checks are successful, click Next to proceed with the upgrade or patch.
Click Next .
Click Finish to exit once the proxy server has been upgraded or patched.
Ensure IIS is off on each node after the proxy server upgrade.
Upgrade Connector Pack
Upgrade Connector Pack if necessary.
This step may not be necessary if no connector changes are made. It is not necessary for a build patch.
If custom connectors are used, they may need to be manually reloaded.
If Connector Pack is 3.1.x or older, you need to uninstall the old Connector Pack , and install a new one.
Note
The loadplatform program may fail, since the Database Service has been stopped; however the program will run as part or the post-installation tasks once Bravura Security Fabric has been upgraded.
Ensure services and IIS are off on each node after the Connector Pack upgrade.
Start setup on the primary node
To run the installer:
Run
setupas an Administrator with the latest MSI.The
setupprogram shows you the list of existing instances on the server.Select the instance you want to upgrade or patch, then click the Upgrade link for that instance.
If the instance you want is not listed, refer to Run installer for pre-upgrade checks.
Read the product setup warning and click Yes to continue.
Enter the psadmin credentials.
Select Perform a standard upgrade by flushing queues beforehand (this may take some time).
Complete pre install checks.
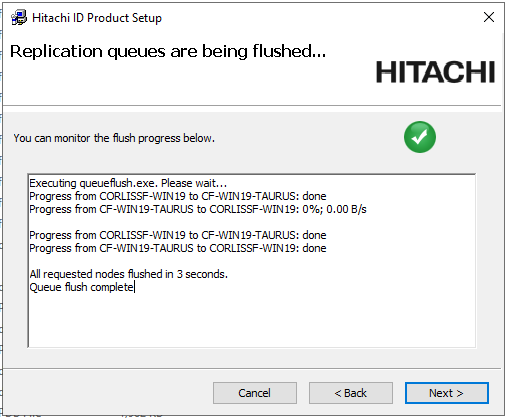
Wait for the
Queue flush completeconfirmation.
Back up all nodes and proxies
Back up all nodes and proxies.
Virtualized servers If you are using a virtualization solution to run your Bravura Security Fabric nodes as virtual machines, create a snapshot of each of node. Create a snapshot of each node’s corresponding database server if the application and database are not on the same server.
Physical servers If you are running the application and database nodes on bare-metal, image the server disks, including all disks where Bravura Security Fabric and its backend database files are stored. To determine the paths, you can check in the Windows registry:
HKEY_LOCAL_MACHINE\SOFTWARE\Bravura Security\Bravura Security Fabric\<instance>\PsInstallDir
HKEY_LOCAL_MACHINE\SOFTWARE\Bravura Security\Bravura Security Fabric\<instance>\PsTempDir
Backup the database.
Regardless of the chosen backup strategy, create an explicit SQL backup. A database backup provides additional flexibility in some recovery scenarios. It can potentially allow an administrator to quickly re-run a patch after fixing issues that may have caused it to fail.
If the database is hosted on a SAN or a shared database cluster where a snapshot or disk image is impossible, create a database backup to accompany the snapshot or disk image made for the application.
Continue installation on the primary node
Click Next after the pre-installation check.
Select Backup files if you want the installer to backup the files.
Choose if you want the installer to backup the database before the upgrade or patch.
If you chose to do a database backup, enter the database user’s password and a name for the backup database.
During the upgrade, if prompted, update or add new encryption keys.
Bravura Security Fabric uses several encryption keys to ensure your data is secure.
If you want to install the Analytics app, configure options to connect with SQL Server Reporting Services (SSRS) .
Click Skip if you do not want to install this feature now. Skip to Step 7.
If you skip SSRS setup now you can set it up after installing Bravura Security Fabric software, as documented in Reports.
You must have access to SQL Server Reporting Services to use this feature.
To configure SSRS options and install the Analytics app:
Enter the Report Servers web service URL.
Enter the SSRS service username and password.
Click Next .
The SQL Server Reporting Service Configuration - Database User page is displayed.
Enter the name of server where your instance database resides.
If you want
setupto create and configure a new dedicated database user that can query the instance database, enable the Create a dedicated database user? option.Enter the database administrator name and password so the installer can create the new dedicated database user.
If you already have a dedicated database user created and configured, enter those details and click Next, otherwise, add a password for the new dedicated database user.
Enter a valid license for the upgrade if prompted.
Click Install to start the upgrade or patch.
The installer begins copying files to your computer. The Completed the Bravura Security Fabric (<instance>) Setup Wizard page appears after the Bravura Security Fabric features have been successfully installed.
Remain on the page until you run the installer on each secondary node.
Caution
Do not stop the post-installation tasks. The installer is attempting to load connectors from the Connector Pack, language tags, and reports.
The Database service (
iddb) and File replication service (idfilerep) need to be running on the primary node for post upgrade tasks to properly sync files on secondary nodes.
Start upgrade on secondary nodes
After starting the upgrade on the primary node , upgrade the instance on each secondary node:
Run
setupas an Administrator with the latest MSI.Select the replication upgrade strategy.
After pre-installation checks, continue through upgrade steps.
Click Install to start the upgrade or patch.
The installer begins copying files to your computer. The page appears after the Bravura Security Fabric features have been successfully installed.
Remain on the page.
Caution
Do not stop the post-installation tasks. The installer is attempting to load connectors from the Connector Pack, language tags, and reports.
The Database service (
iddb) and File replication service (idfilerep) need to be running on the primary node for post upgrade tasks to properly sync files on secondary nodes.Repeat for each secondary node.
Start services
Start up services on the primary node
After you have run the installer on each secondary node, return to the primary node and continue past the Post-Upgrade Tasks page.
If any of the post-installation tasks produce warnings or errors, click:
Report for details on all post-installation tasks
or,
Messages... for details on a specific post-installation task
Otherwise, wait until the status changes to success, then click Finish.
If connectors (agents) were not installed successfully, see Troubleshooting installation or upgrade.
Turn on IIS service
Before running the installer on the primary node, you turned of the IIS service. You should now remove the IIS server access restrictions to localhost, or re-enable completely.
Start up all services
Return to each secondary node to continue past the page in the installation process.
Do not enable or start services that were originally disabled before the patch or upgrade.
Add custom components
If you upgraded custom components, add them to the new instance.
Manually rebuild skins if required
The Bravura Security Fabric installer normally rebuilds user interface skins during post-upgrade tasks. If the skins failed to rebuild or there were issues, rebuild the skins manually.
See Customization for more information.
For secondary nodes, you have the option to resynchronize files from primary.
Manually reload connector pack if required
The Bravura Security Fabric installer normally loads connectors during post-upgrade tasks. If loading connectors failed or there were issues, reload connectors using the command:
loadplatform -target
See loadplatform usage for information.
Manually reload components if required
The Bravura Security Fabric installer normally reloads components during post-upgrade tasks. If component initialization fails or has issues during the upgrade:
From a command prompt, navigate to the instance directory.
Run the command:
instance.bat
Run the command:
script\manage_components.py load --upgrade
Confirm they succeed.
The API service (idapi) is required for this step.
Test replication
Carry out the following to test replication on the upgraded instance:
Test replication by making a change, for example, increment/decrement the DEFAULT EXPIRY SECOND S value, on one node and verify that the change is propagated on other nodes.
Verify that database replication queues all report running of stored procedures being replicated recently. This can be verified from the primary to make sure all nodes are reporting as replicating with each other.
Trigger file replication from the primary to secondary nodes. If any of the secondary nodes failed the "Finalizing replicated components and skins" post-upgrade task, run this command from the primary node command line:
updinst.exe -syncreg -syncfile -serverid <serverid>
If the primary node in each instance has the Connector Pack installed as global (no agents in the instance's agent\ directory), add the -globalcp option to the command.
File replication may take longer (an hour or two) since it has to interrogate the entire state of the secondary node and this notably depends on network latency to check the file system state.
Enable access via global load balancer to the primary node only
Enable access via global load balancer to the primary node only.
If you cannot do this, extend the system-wide outage until the secondary nodes can be added to the load balancer.
Re-enable schedule jobs
Re-enable scheduled jobs in the product, except for the PSUPDATE job.
From the main menu, click Manage the system > Maintenance > Scheduled jobs.
See Scheduling maintenance for more information.
Enable privilege access features
Carry out the following steps if privileged access features were configured in the old version.
Ensure correct nodes are doing password management.
Ensure the correct nodes continue to own managed system policies and drive randomization.
If any changes are required, do this after all nodes are replicating with each other so the primary is aware of the existence of the two secondary nodes via the servicelist table.
Enable automatic password randomization
You can temporarily disable password randomization for some or all managed system policies. This will override all other randomization settings, including scheduled randomization or randomization after an account is checked in. During this time, passwords that need to be randomized or overridden will be blocked and queued until password randomization is re-enabled.
Before upgrade, you temporarily disabled password randomization for all managed system policies. During this time, passwords that needed to be randomized or overridden were blocked and queued until password randomization is re-enabled.
To enable password randomization for all managed system policies:
Log in to Bravura Security Fabric .
Click Manage the system > Privileged access > Managed systems.
Scroll to the bottom of the policies list.
Select Allow policies to randomize passwords.
Click OK to confirm the selection.
Settings will be replicated to secondary nodes.
Note
Selecting this option will override the randomization setting of the individual managed system policies.
Warning
Make sure that you re-enable password randomization when it is safe to do so. Affected passwords may be immediately reset.
Disallow check-outs while randomization is disabled
Before starting the upgrade, you allowed check-outs while randomization is disabled.
To disallow check-outs for all policies while randomization is disabled:
Click Manage the system > Maintenance > System variables .
Set RES DISABLE RANDOMIZATIONS ALLOW CHECKOUTS to Disabled.
Click Update.
To disallow check-outs for selected policies instead of all policies:
Click Manage the system > Privileged access > Managed system policies.
Select the managed system policy.
In the General tab, deselect the checkbox for Allow check-outs when randomization is disabled.
Click Update.
Settings will be replicated to secondary nodes.
Note
If the Allow check-outs when randomization is disabled option for the managed system policy is deselected, the global setting RES DISABLE RANDOMIZATIONS ALLOW CHECKOUTS applies.
Enable RESOURCE AUTOMATICALLY RANDOMIZE PASSWORDS
Enable the system variable RESOURCE AUTOMATICALLY RANDOMIZE PASSWORDS (Manage the system > Privileged access > Options > Password randomization).
The setting will be replicated to secondary nodes.
Run smoke tests
Carry out the following tasks:
Test connection to target systems.
End users can authenticate.
Request to access a password - auto approved.
Request to access a password - with authorization.
Randomize password.
Override password.
Confirm passwords are replicating between secondary nodes and the primary.
Include additional test plan use cases to the smoke testing as needed.
Allow access
Remove global load balancer restrictions that you added before the upgrade.
Confirm end users can access from globally available URLs.
Next
Carry out further post upgrade steps as necessary.
Carry out the steps described in the sections below when upgrading a Bravura Security Fabric instance from 12.4 or newer to 12.4 or newer, using the queue flush method.
Restrict access
Restrict access via a global load balancer
Restrict access via a global load balancer and direct people to maintenance page.
Restrict access to the IIS server
Restrict access to the IIS server to only a local IP address and the loopback interface by using the IP and Domain Restrictions IIS feature.
You may need to install the IP and Domain Restrictions security feature for IIS.
IP and Domain Restriction settings:
Mode | Requestor | Entry type |
Allow | 127.0.0.1 | Local |
Allow | Local IP address of IIS server | Local |
Deny | 0.0.0.0/32 | Local |
If a load balancer or round-robin DNS has been configured in front of the Bravura Security Fabric , remove all application nodes from availability to the load balancer to stop new user sessions from being created (and avoid interrupting them when services go down). Optionally, redirect users to a static web page that mentions the cause and duration of the outage (and can be updated with notes if the outage takes longer than expected).
Update components if required
Update custom components if they need to be upgraded to accommodate functionality in the upgrade version.
Upgrade proxy servers
Currently, you can only upgrade minor versions of the proxy server. For example, 12.4.1 to 12.4.3. Major version changes require an uninstall of the previous version and a new install of the new version.
To upgrade or patch a proxy server using the setup installer:
Run
setupwith the 12.x msi.Setup shows you the list of existing instances on the server. Select the one you want to upgrade or patch, then click the
Upgradelink for that instance.Click Yes to confirm.
Enter the password for the service account.
The setup program performs a pre-installation check and verifies all of the requirements for the installation.
If all of the checks are successful, click Next to proceed with the upgrade or patch.
Click Next .
Click Finish to exit once the proxy server has been upgraded or patched.
Ensure IIS is off on each node after the proxy server upgrade.
Upgrade Connector Pack
Upgrade Connector Pack if necessary.
This step may not be necessary if no connector changes are made. It is not necessary for a build patch.
If custom connectors are used, they may need to be manually reloaded.
If Connector Pack is 3.1.x or older, you need to uninstall the old Connector Pack , and install a new one.
Note
The loadplatform program may fail, since the Database Service has been stopped; however the program will run as part or the post-installation tasks once Bravura Security Fabric has been upgraded.
Ensure services and IIS are off on each node after the Connector Pack upgrade.
Shut down services
Shut down services to manually flush the replication queues:
Stop and disable Bravura Security Fabric services on all shared schema or replicated nodes, except for Database Service (
iddb) and Logging Service (idmlogsvc).Take note of which services are configured as "Manual" or "Disabled" so they can be returned to the same state after the upgrade or patch.
Verify no processes are running under the Bravura Security Fabric service user (psadmin) account other than
iddbandidmlogsvc.
Leave the Database Service running to allow flushing of the replication queue.
This will also allow all gathered requests and other database activity to finish trickling through from one node to another, so all source of operations are removed.
Verify database replication queues are flushed. See Data Replication Queue for details.
Data from the secondary servers must be transmitted to the primary otherwise it will be lost.
To view status information about a replication node:
Log into Bravura Security Fabric as an administrator.
Click Manage the system > Maintenance > Database replication.
Select a node.
Select the Status tab.
Warning
Do not set the database replication mode to "Disabled" when patching. Disabling replication will prevent application nodes from queuing replication events for other replicated nodes (potentially resulting in node desynchronization for data and configuration).
It is recommended that each server be sequentially upgraded or patched to prevent overlap of database updates.
Stop the remaining Database Services.
All product services other than the Logging Service should be stopped at this point. The Logging Service can remain on during the upgrade.
Ensure that you close the services.msc console after stopping all services. If you don’t, it can hold a lock on one or more services, preventing them from being uninstalled.
All services other than the Logging Service depend on the Database Service. Disabling the Database Service and the other services will ensure that nothing other than the installer will be able to start the service before the patch is over. The Logging Service is left running so that any errors or attempts to start binaries will be logged.
Back up all nodes and proxies
Back up all nodes and proxies.
Virtualized servers If you are using a virtualization solution to run your Bravura Security Fabric nodes as virtual machines, create a snapshot of each of node. Create a snapshot of each node’s corresponding database server if the application and database are not on the same server.
Physical servers If you are running the application and database nodes on bare-metal, image the server disks, including all disks where Bravura Security Fabric and its backend database files are stored. To determine the paths, you can check in the Windows registry:
HKEY_LOCAL_MACHINE\SOFTWARE\Bravura Security\Bravura Security Fabric\<instance>\PsInstallDir
HKEY_LOCAL_MACHINE\SOFTWARE\Bravura Security\Bravura Security Fabric\<instance>\PsTempDir
Backup the database.
Regardless of the chosen backup strategy, create an explicit SQL backup. A database backup provides additional flexibility in some recovery scenarios. It can potentially allow an administrator to quickly re-run a patch after fixing issues that may have caused it to fail.
If the database is hosted on a SAN or a shared database cluster where a snapshot or disk image is impossible, create a database backup to accompany the snapshot or disk image made for the application.
Start setup on the primary node
To run the installer:
Run
setupas an Administrator with the latest MSI.The
setupprogram shows you the list of existing instances on the server.Select the instance you want to upgrade or patch, then click the Upgrade link for that instance.
If the instance you want is not listed, refer to Run installer for pre-upgrade checks.
Read the product setup warning and click Yes to continue.
Enter the psadmin credentials.
Select Delete queue files and accept the data lost and/or desynchronization that is extremely likely to occur.
Complete pre install checks.
Click Next after the pre-installation check.
Select Backup files if you want the installer to backup the files.
Choose if you want the installer to backup the database before the upgrade or patch.
If you chose to do a database backup, enter the database user’s password and a name for the backup database.
During the upgrade, if prompted, update or add new encryption keys.
Bravura Security Fabric uses several encryption keys to ensure your data is secure.
If you want to install the Analytics app, configure options to connect with SQL Server Reporting Services (SSRS) .
Click Skip if you do not want to install this feature now. Skip to Step 13.
If you skip SSRS setup now you can set it up after installing Bravura Security Fabric software, as documented in Reports.
You must have access to SQL Server Reporting Services to use this feature.
To configure SSRS options and install the Analytics app:
Enter the Report Servers web service URL.
Enter the SSRS service username and password.
Click Next .
The SQL Server Reporting Service Configuration - Database User page is displayed.
Enter the name of server where your instance database resides.
If you want
setupto create and configure a new dedicated database user that can query the instance database, enable the Create a dedicated database user? option.Enter the database administrator name and password so the installer can create the new dedicated database user.
If you already have a dedicated database user created and configured, enter those details and click Next, otherwise, add a password for the new dedicated database user.
Enter a valid license for the upgrade if prompted.
Click Install to start the upgrade or patch.
The installer begins copying files to your computer. The Completed the Bravura Security Fabric (<instance>) Setup Wizard page appears after the Bravura Security Fabric features have been successfully installed.
Remain on the page until you run the installer on each secondary node.
Caution
Do not stop the post-installation tasks. The installer is attempting to load connectors from the Connector Pack, language tags, and reports.
The Database service (
iddb) and File replication service (idfilerep) need to be running on the primary node for post upgrade tasks to properly sync files on secondary nodes.
Start upgrade on secondary nodes
After starting the upgrade on the primary node , upgrade the instance on each secondary node:
Run
setupas an Administrator with the latest MSI.Select the replication upgrade strategy.
After pre-installation checks, continue through upgrade steps.
Click Install to start the upgrade or patch.
The installer begins copying files to your computer. The page appears after the Bravura Security Fabric features have been successfully installed.
Remain on the page.
Caution
Do not stop the post-installation tasks. The installer is attempting to load connectors from the Connector Pack, language tags, and reports.
The Database service (
iddb) and File replication service (idfilerep) need to be running on the primary node for post upgrade tasks to properly sync files on secondary nodes.Repeat for each secondary node.
Start services
Start up services on the primary node
After you have run the installer on each secondary node, return to the primary node and continue past the Post-Upgrade Tasks page.
If any of the post-installation tasks produce warnings or errors, click:
Report for details on all post-installation tasks
or,
Messages... for details on a specific post-installation task
Otherwise, wait until the status changes to success, then click Finish.
If connectors (agents) were not installed successfully, see Troubleshooting installation or upgrade.
Turn on IIS service
Before running the installer on the primary node, you turned of the IIS service. You should now remove the IIS server access restrictions to localhost, or re-enable completely.
Start up all services
Return to each secondary node to continue past the page in the installation process.
Do not enable or start services that were originally disabled before the patch or upgrade.
Add custom components
If you upgraded custom components, add them to the new instance.
Manually rebuild skins if required
The Bravura Security Fabric installer normally rebuilds user interface skins during post-upgrade tasks. If the skins failed to rebuild or there were issues, rebuild the skins manually.
See Customization for more information.
For secondary nodes, you have the option to resynchronize files from primary.
Manually reload connector pack if required
The Bravura Security Fabric installer normally loads connectors during post-upgrade tasks. If loading connectors failed or there were issues, reload connectors using the command:
loadplatform -target
See loadplatform usage for information.
Manually reload components if required
The Bravura Security Fabric installer normally reloads components during post-upgrade tasks. If component initialization fails or has issues during the upgrade:
From a command prompt, navigate to the instance directory.
Run the command:
instance.bat
Run the command:
script\manage_components.py load --upgrade
Confirm they succeed.
The API service (idapi) is required for this step.
Test replication
Carry out the following to test replication on the upgraded instance:
Test replication by making a change, for example, increment/decrement the DEFAULT EXPIRY SECOND S value, on one node and verify that the change is propagated on other nodes.
Verify that database replication queues all report running of stored procedures being replicated recently. This can be verified from the primary to make sure all nodes are reporting as replicating with each other.
Trigger file replication from the primary to secondary nodes. If any of the secondary nodes failed the "Finalizing replicated components and skins" post-upgrade task, run this command from the primary node command line:
updinst.exe -syncreg -syncfile -serverid <serverid>
If the primary node in each instance has the Connector Pack installed as global (no agents in the instance's agent\ directory), add the -globalcp option to the command.
File replication may take longer (an hour or two) since it has to interrogate the entire state of the secondary node and this notably depends on network latency to check the file system state.
Enable access via global load balancer to the primary node only
Enable access via global load balancer to the primary node only.
If you cannot do this, extend the system-wide outage until the secondary nodes can be added to the load balancer.
Re-enable schedule jobs
Re-enable scheduled jobs in the product, except for the PSUPDATE job.
From the main menu, click Manage the system > Maintenance > Scheduled jobs.
See Scheduling maintenance for more information.
Enable privilege access features
Carry out the following steps if privileged access features were configured in the old version.
Ensure correct nodes are doing password management.
Ensure the correct nodes continue to own managed system policies and drive randomization.
If any changes are required, do this after all nodes are replicating with each other so the primary is aware of the existence of the two secondary nodes via the servicelist table.
Enable automatic password randomization
You can temporarily disable password randomization for some or all managed system policies. This will override all other randomization settings, including scheduled randomization or randomization after an account is checked in. During this time, passwords that need to be randomized or overridden will be blocked and queued until password randomization is re-enabled.
Before upgrade, you temporarily disabled password randomization for all managed system policies. During this time, passwords that needed to be randomized or overridden were blocked and queued until password randomization is re-enabled.
To enable password randomization for all managed system policies:
Log in to Bravura Security Fabric .
Click Manage the system > Privileged access > Managed systems.
Scroll to the bottom of the policies list.
Select Allow policies to randomize passwords.
Click OK to confirm the selection.
Settings will be replicated to secondary nodes.
Note
Selecting this option will override the randomization setting of the individual managed system policies.
Warning
Make sure that you re-enable password randomization when it is safe to do so. Affected passwords may be immediately reset.
Disallow check-outs while randomization is disabled
Before starting the upgrade, you allowed check-outs while randomization is disabled.
To disallow check-outs for all policies while randomization is disabled:
Click Manage the system > Maintenance > System variables .
Set RES DISABLE RANDOMIZATIONS ALLOW CHECKOUTS to Disabled.
Click Update.
To disallow check-outs for selected policies instead of all policies:
Click Manage the system > Privileged access > Managed system policies.
Select the managed system policy.
In the General tab, deselect the checkbox for Allow check-outs when randomization is disabled.
Click Update.
Settings will be replicated to secondary nodes.
Note
If the Allow check-outs when randomization is disabled option for the managed system policy is deselected, the global setting RES DISABLE RANDOMIZATIONS ALLOW CHECKOUTS applies.
Enable RESOURCE AUTOMATICALLY RANDOMIZE PASSWORDS
Enable the system variable RESOURCE AUTOMATICALLY RANDOMIZE PASSWORDS (Manage the system > Privileged access > Options > Password randomization).
The setting will be replicated to secondary nodes.
Run smoke tests
Carry out the following tasks:
Test connection to target systems.
End users can authenticate.
Request to access a password - auto approved.
Request to access a password - with authorization.
Randomize password.
Override password.
Confirm passwords are replicating between secondary nodes and the primary.
Include additional test plan use cases to the smoke testing as needed.
Allow access
Remove global load balancer restrictions that you added before the upgrade.
Confirm end users can access from globally available URLs.
Next
Carry out further post upgrade steps as necessary.
Carry out the following tasks on the primary node before moving on to each secondary node.
Restrict access
Restrict access via a global load balancer to the upgrading node
Restrict all traffic to and from the primary node.
Configure firewalls to isolate upgrading node
Block all Bravura Security traffic to and from the upgrading node.
For example, in Windows Firewall, configure rules to block Bravura Security outbound traffic from upgrading node to other nodes, and rules to block inbound Bravura Security traffic from other nodes to the upgrading node.
Ensure Bravura Security traffic is isolated between the old version, upgraded and upgrading node.
Any changes made on nodes of differing states will be delayed until all nodes are upgraded and thus on the same build version.
Restrict access to the IIS server
Restrict access to the IIS server to only a local IP address and the loopback interface by using the IP and Domain Restrictions IIS feature.
You may need to install the IP and Domain Restrictions security feature for IIS.
IP and Domain Restriction settings:
Mode | Requestor | Entry type |
Allow | 127.0.0.1 | Local |
Allow | Local IP address of IIS server | Local |
Deny | 0.0.0.0/32 | Local |
If a load balancer or round-robin DNS has been configured in front of the Bravura Security Fabric , remove all application nodes from availability to the load balancer to stop new user sessions from being created (and avoid interrupting them when services go down). Optionally, redirect users to a static web page that mentions the cause and duration of the outage (and can be updated with notes if the outage takes longer than expected).
Backup the primary application node and database
Back up the application node
Virtualized servers If you are using a virtualization solution to run your Bravura Security Fabric nodes as virtual machines, create a snapshot of each of node. Create a snapshot of each node’s corresponding database server if the application and database are not on the same server.
Physical servers If you are running the application and database nodes on bare-metal, image the server disks, including all disks where Bravura Security Fabric and its backend database files are stored. To determine the paths, you can check in the Windows registry:
HKEY_LOCAL_MACHINE\SOFTWARE\Bravura Security\Bravura Security Fabric\<instance>\PsInstallDir
HKEY_LOCAL_MACHINE\SOFTWARE\Bravura Security\Bravura Security Fabric\<instance>\PsTempDir
Backup the database on the primary node
Regardless of the chosen backup strategy, create an explicit SQL backup. A database backup provides additional flexibility in some recovery scenarios. It can potentially allow an administrator to quickly re-run a patch after fixing issues that may have caused it to fail.
If the database is hosted on a SAN or a shared database cluster where a snapshot or disk image is impossible, create a database backup to accompany the snapshot or disk image made for the application.
Upgrade Connector Pack
Upgrade Connector Pack if necessary.
This step may not be necessary if no connector changes are made. It is not necessary for a build patch.
If custom connectors are used, they may need to be manually reloaded.
If Connector Pack is 3.1.x or older, you need to uninstall the old Connector Pack , and install a new one.
Note
The loadplatform program may fail, since the Database Service has been stopped; however the program will run as part or the post-installation tasks once Bravura Security Fabric has been upgraded.
Ensure services and IIS are off on each node after the Connector Pack upgrade.
Add custom components
If you are adding component customizations for this upgrade, add or remove updated files as applicable. You may need to uninstall previous custom components. Back up custom components if this is not already done.
Do not load components after modifying them at this time. The installer will complete this in the following step.
Start setup on the primary node
To run the installer:
Run
setupas an Administrator with the latest MSI.The
setupprogram shows you the list of existing instances on the server.Select the instance you want to upgrade or patch, then click the Upgrade link for that instance.
If the instance you want is not listed, refer to Run installer for pre-upgrade checks.
Read the product setup warning and click Yes to continue.
Enter the psadmin credentials.
Select Proceed with a rolling upgrade.
Complete pre install checks.
Click Next after the pre-installation check.
Select Backup files if you want the installer to backup the files.
Choose if you want the installer to backup the database before the upgrade or patch.
If you chose to do a database backup, enter the database user’s password and a name for the backup database.
During the upgrade, if prompted, update or add new encryption keys.
Bravura Security Fabric uses several encryption keys to ensure your data is secure.
If you want to install the Analytics app, configure options to connect with SQL Server Reporting Services (SSRS) .
Click Skip if you do not want to install this feature now. Skip to Step 13.
If you skip SSRS setup now you can set it up after installing Bravura Security Fabric software, as documented in Reports.
You must have access to SQL Server Reporting Services to use this feature.
To configure SSRS options and install the Analytics app:
Enter the Report Servers web service URL.
Enter the SSRS service username and password.
Click Next .
The SQL Server Reporting Service Configuration - Database User page is displayed.
Enter the name of server where your instance database resides.
If you want
setupto create and configure a new dedicated database user that can query the instance database, enable the Create a dedicated database user? option.Enter the database administrator name and password so the installer can create the new dedicated database user.
If you already have a dedicated database user created and configured, enter those details and click Next, otherwise, add a password for the new dedicated database user.
Enter a valid license for the upgrade if prompted.
Click Install to start the upgrade or patch.
The installer begins copying files to your computer. The Completed the Bravura Security Fabric (<instance>) Setup Wizard page appears after the Bravura Security Fabric features have been successfully installed.
Remain on the page until you run the installer on each secondary node.
Caution
Do not stop the post-installation tasks. The installer is attempting to load connectors from the Connector Pack, language tags, and reports.
The Database service (
iddb) and File replication service (idfilerep) need to be running on the primary node for post upgrade tasks to properly sync files on secondary nodes.
Manually rebuild skins if required
The Bravura Security Fabric installer normally rebuilds user interface skins during post-upgrade tasks. If the skins failed to rebuild or there were issues, rebuild the skins manually.
See Customization for more information.
For secondary nodes, you have the option to resynchronize files from primary.
Manually reload connector pack if required
The Bravura Security Fabric installer normally loads connectors during post-upgrade tasks. If loading connectors failed or there were issues, reload connectors using the command:
loadplatform -target
See loadplatform usage for information.
Manually reload components if required
The Bravura Security Fabric installer normally reloads components during post-upgrade tasks. If component initialization fails or has issues during the upgrade:
From a command prompt, navigate to the instance directory.
Run the command:
instance.bat
Run the command:
script\manage_components.py load --upgrade
Confirm they succeed.
The API service (idapi) is required for this step.
Turn on IIS Service
Before running the installer on the node, you turned off the IIS service. You should now remove the IIS server access restrictions to localhost or re-enable completely.
Run smoke tests
Carry out the following tasks:
Start the Asynchronous Request, Messaging, API and API SOAP services
Verify skins.
Verify that end users can authenticate.
Start the Workflow Manager service and Privileged Access Manager service
Verify workflow.
Verify requests to access a password using an auto-approved case.
Verify requests to access a password using an authorization case.
Start the rest of the services
Use the installer to continue past the page.
If any of the post-installation tasks produce warnings or errors, click:
Report for details on all post-installation tasks
or,
Messages... for details on a specific post-installation task
Otherwise, wait until the status changes to success, then click Finish.
If connectors (agents) were not installed successfully, see Troubleshooting installation or upgrade.
Restore access
Restore access to the upgraded node via the load balancer. This step will put the upgraded node back into production.
Any changes made on nodes of differing states will be delayed until all nodes are upgraded and thus on the same build version.
Remove all traffic restrictions to and from upgraded node.
Confirm end users can access nodes from globally available URLs.
Next
Carry out further post upgrade steps as necessary.
Carry out the following steps for each node. Ensure that each step is addressed for a node before proceeding to the next step. The first two nodes should be completed in succession and in production. The remaining nodes can be done in parallel, as long as at least two other nodes have been successfully upgraded and are running in production.
Upgraded nodes should always be isolated (for example, via firewalls) from non-upgraded and upgrading nodes.
Restrict access
Restrict access via a global load balancer to the upgrading node
Restrict all traffic to and from the primary node.
Configure firewalls to isolate upgrading node
Block all Bravura Security traffic to and from the upgrading node.
For example, in Windows Firewall, configure rules to block Bravura Security outbound traffic from upgrading node to other nodes, and rules to block inbound Bravura Security traffic from other nodes to the upgrading node.
Ensure Bravura Security traffic is isolated between the old version, upgraded and upgrading node.
Any changes made on nodes of differing states will be delayed until all nodes are upgraded and thus on the same build version.
Restrict access to the IIS server
Restrict access to the IIS server to only a local IP address and the loopback interface by using the IP and Domain Restrictions IIS feature.
You may need to install the IP and Domain Restrictions security feature for IIS.
IP and Domain Restriction settings:
Mode | Requestor | Entry type |
Allow | 127.0.0.1 | Local |
Allow | Local IP address of IIS server | Local |
Deny | 0.0.0.0/32 | Local |
If a load balancer or round-robin DNS has been configured in front of the Bravura Security Fabric , remove all application nodes from availability to the load balancer to stop new user sessions from being created (and avoid interrupting them when services go down). Optionally, redirect users to a static web page that mentions the cause and duration of the outage (and can be updated with notes if the outage takes longer than expected).
Backup the application node
Back up the application node
Virtualized servers If you are using a virtualization solution to run your Bravura Security Fabric nodes as virtual machines, create a snapshot of each of node. Create a snapshot of each node’s corresponding database server if the application and database are not on the same server.
Physical servers If you are running the application and database nodes on bare-metal, image the server disks, including all disks where Bravura Security Fabric and its backend database files are stored. To determine the paths, you can check in the Windows registry:
HKEY_LOCAL_MACHINE\SOFTWARE\Bravura Security\Bravura Security Fabric\<instance>\PsInstallDir
HKEY_LOCAL_MACHINE\SOFTWARE\Bravura Security\Bravura Security Fabric\<instance>\PsTempDir
Upgrade Connector Pack
Upgrade Connector Pack if necessary.
This step may not be necessary if no connector changes are made. It is not necessary for a build patch.
If custom connectors are used, they may need to be manually reloaded.
If Connector Pack is 3.1.x or older, you need to uninstall the old Connector Pack , and install a new one.
Note
The loadplatform program may fail, since the Database Service has been stopped; however the program will run as part or the post-installation tasks once Bravura Security Fabric has been upgraded.
Ensure services and IIS are off on each node after the Connector Pack upgrade.
Start setup on the secondary node
Upgrade the instance on each secondary node:
Run
setupas an Administrator with the latest MSI.After pre-installation checks, continue through upgrade steps.
Click Install to start the upgrade or patch.
The installer begins copying files to your computer. The page appears after the Bravura Security Fabric features have been installed.
Do not proceed to the s page.
Remove the firewall between the primary and node.
Firewalls should isolate upgraded nodes from non-upgraded/upgrading nodes.
Remain on the page.
Caution
Do not stop the post-installation tasks. The installer is attempting to load connectors from the Connector Pack, language tags, and reports.
The Database service (
iddb) and File replication service (idfilerep) need to be running on the primary node for post upgrade tasks to properly sync files on secondary nodes.
Manually rebuild skins if required
The Bravura Security Fabric installer normally rebuilds user interface skins during post-upgrade tasks. If the skins failed to rebuild or there were issues, rebuild the skins manually.
See Customization for more information.
For secondary nodes, you have the option to resynchronize files from primary.
Manually reload connector pack if required
The Bravura Security Fabric installer normally loads connectors during post-upgrade tasks. If loading connectors failed or there were issues, reload connectors using the command:
loadplatform -target
See loadplatform usage for information.
Manually reload components if required
The Bravura Security Fabric installer normally reloads components during post-upgrade tasks. If component initialization fails or has issues during the upgrade:
From a command prompt, navigate to the instance directory.
Run the command:
instance.bat
Run the command:
script\manage_components.py load --upgrade
Confirm they succeed.
The API service (idapi) is required for this step.
Trigger file replication
Trigger file replication from the primary to secondary nodes. If any of the secondary nodes failed the "Finalizing replicated components and skins" post-upgrade task, run this command from the primary node command line:
updinst.exe -syncreg -syncfile -serverid <serverid>
If the primary node in each instance has the Connector Pack installed as global (no agents in the instance's agent\ directory), add the -globalcp option to the command.
File replication may take longer (an hour or two) since it has to interrogate the entire state of the secondary node and this notably depends on network latency to check the file system state.
Turn on IIS Service
Before running the installer on the node, you turned off the IIS service. You should now remove the IIS server access restrictions to localhost or re-enable completely.
Run smoke tests
Carry out the following tasks:
Start the Asynchronous Request, Messaging, API and API SOAP services
Verify skins.
Verify that end users can authenticate.
Start the Workflow Manager service and Privileged Access Manager service
Verify workflow.
Verify requests to access a password using an auto-approved case.
Verify requests to access a password using an authorization case.
Start the rest of the services
Use the installer to continue past the page.
If any of the post-installation tasks produce warnings or errors, click:
Report for details on all post-installation tasks
or,
Messages... for details on a specific post-installation task
Otherwise, wait until the status changes to success, then click Finish.
If connectors (agents) were not installed successfully, see Troubleshooting installation or upgrade.
Restore access
Restore access to the upgraded node via the load balancer. This step will put the upgraded node back into production.
Any changes made on nodes of differing states will be delayed until all nodes are upgraded and thus on the same build version.
Remove all traffic restrictions to and from upgraded node.
Confirm end users can access nodes from globally available URLs.
Next
Carry out further post upgrade steps as necessary.
Troubleshooting
Download Troubleshooting playbooks that complement the content on this site.
Do not execute the installer from a network share.
If the installer opens a window with an error like "You did not provide a database name", contact support@bravurasecurity.com .
If the installer does not provide the option to upgrade and instead shows setup screens for a new install, start setup from the command line:
setup -opts PREVIOUSVERSIONFOUND=11.1.0
If the Bravura Security service account is a domain account and you are not currently logged into the server using the service account directly, use the following command:
runas /user:<domain\service-account> setup -opts PREVIOUSVERSIONFOUND=11.1.0
If the upgrade or patch introduces database changes and stored procedures made it into the
iddbqueues before patching started, any resulting failed stored procedures will show up after the database serviceiddbis started:As a summary in the instance's db\iddb-failed-procs*.log files.
With details, in <instance>\logs\<instance-name>\idmsuite.log.
If the upgrade or patch fails on any node, collect the upgrade log and send it to support@bravurasecurity.com or reply to a related open Zendesk ticket.
The
setup.logcan be found in the same directory as the installer (setup). Insidesetup.logfile there is a msiexec command that specifies the exact location of the patch installer log is located.Do not run setup a second time, as it may overwrite the patch installer log containing the original issue details. If the upgrade fails again, it will leave the node in an unknown state.
If the upgrade or patch failed with a database error, make a backup of that database on the affected node before reverting the instance. Bravura Security developers may need to inspect the database state at the time of the error to provide a fix or workaround. Name the backup file "backup-failed-<node-designation>-<timestamp>.bak"; do not send the database backup file to Bravura Security support unless requested.
If the upgrade or patch failed on a production instance, revert it using the backups created during preparation .
If the upgrade or patch failed on a test instance, leave it as is (make sure the services are off and the Database Service is disabled), in case Bravura Security developers need to look at it.
If a node could not be backed up completely in preparation , it could be restored from a database backup. This is the least recommended recovery version, because it involves re-installing the instance, its prerequisites, and all target system client software. Contact support@bravurasecurity.com for help with this.
If reports are inaccessible and your browser console shows a "502 (Bad Gateway)" error after a recent Bravura Security Fabric installation or upgrade, reboot all affected instance servers to allow PATH changes to take effect.
If login fails after upgrading to 12.9 or later and the
<instance>-identityapplication pool stops immediately upon receiving its first request:Verify that the
IIS_IUSRSgroup has the "Log on as a batch job" user right assigned in Local Security Policy (or the applicable Group Policy Object for domain-joined servers).On domain-joined servers where Group Policy explicitly defines this policy,
IIS_IUSRSmay be excluded from the assignment. This cannot be corrected via Local Security Policy when the setting is controlled by GPO.Check the Windows System event log for an error stating "The identity of application pool <instance>-identity is invalid. The user name or password that is specified for the identity may be incorrect, or the user may not have batch logon rights."
To resolve, add
IIS_IUSRSto the "Log on as a batch job" policy in the governing Group Policy Object (GPO), then run iisreset on the affected server.
Post upgrade
Cleanup tasks
Carry out the following tasks once system-wide access is restored.
Enable Bravura Security tasks
Enable Bravura Security tasks in the operating system task scheduler
Enable auto discovery on the primary node
Enable the PSUPDATE scheduled job on the primary node:
Log into Bravura Security Fabric as an administrator with the "Maintain servers" administrative privilege.
Click Maintenance > Scheduled jobs.
Select PSUPDATE and enable it.
For Bravura Security Fabric versions 12.1.5 and 12.2.0, run psupdate.exe -schedule .
Follow up tests
After running setup to upgrade to the latest version or patch to a new build, verify that the upgrade or patch was successful; for example:
If you patched to a new build, make note of the patch build number to ensure it has been updated to reflect the new patch number.
Verify that services are started.
Verify that replication is working, and all replication nodes are replicating and are functional.
Navigate the user interface. Check whether web interface customizations were applied. You may need to reapply the customizations and reload the skin files.
Follow an upgrade plan based on the configured capability of the old version.
Verify that the following are correctly configured:
Target systems configuration
Target systems administrator credentials
Target system groups
Password policies
User classes
Authentication/identification priority
User notifications
Authentication chains
Product administrators
User access rules
Managed system policies
Import rules
Custom plugins and exit traps
Verify email configuration.
Links in emails sent prior to upgrade may no longer work.In this case users will need to manually log into Bravura Security Fabric to view request details or perform actions.
Confirm that:
Managed passwords have have been upgraded properly.
Scheduled password resets are still occurring normally for both push and local workstation service mode managed systems.
Managed accounts belong to the correct policy.
Session monitoring managed system policy and self-service rules are cleared.
Review log files
Review log files from for the last three days including 12 hours of hours of usage from all three nodes to allow for health check of system operation
Additional steps to consider
New features may be included in the upgraded version of the product that has not been enabled during the upgrade process or may require additional configuration. If you require assistance, contact support@bravurasecurity.com .
Remove old installation files
Remove old installation files to avoid confusing with new upgrade/patch files. Bravura Security recommends keeping only the last two copies of installation files (previous install and current install).
Post upgrade notes
REST API authorization policies
If you upgraded to 12.6.0 before revision 36570, run the PolicyUpgrade stored procedure manually following upgrade to add REST API authorization policies.
Access to user profiles
By default, the "View profile information" privilege is granted to Access to user profiles rules - ALLREQUESTERS, API_REQUEST, and ALL_SELF_REQUEST. However, this privilege is not granted to rules created before upgrading.
Privileged access to systems
By default, permission for users to "Request check-out to managed group sets" are granted to Privileged access to systems groups - ALLREQUESTERS and ALLRECIPIENT. However, this permission is not granted to managed system policies created before upgrading.
Import rules
Managed account import rules created before the upgrade cannot be associated with local workstation service managed system policies. All newly created managed account import rules can be associated with local workstation service managed system policies.
Local workstation service
You must uninstall the Bravura Privilege Local Workstation Service (hipamlws) and re-install and re-register a 12.x version of the service.
Managed accounts
As of 10.x, managed accounts can only belong to a single policy. Run the Managed systems and accounts -import method report to verify if accounts are attached to multiple policies:
You will need to manually select which policy managed accounts should belong to.
If accounts still belong to more than one policy at upgrade, the following rules will be applied to them:
If an account belongs to only one policy, it will be left as a member of that policy.
If an account belongs to more than one policy, it will be removed from all policies and added to its managed system’s primary policy.
In other words, 1) if you have a managed account on multiple policies, regardless of whether it’s on the primary policy, it will be moved to the primary policy, and 2) if you have an account that belongs on a single policy, it will be left on that policy, regardless of whether it’s the primary policy.
Disclosure plugins
If upgrading from 9.x or older to 12.x, you must manually update the Remote Desktop access disclosure plugin. To do this, remove the legacy Remote Desktop disclosure plugin from existing managed system policies and replace it with the new one.
If you want to continue to use the legacy Remote Desktop disclosure plugin, you must update the following disclosure attributes:
’encryption’ is now a boolean attribute type. Delete the existing ’encryption’ disclosure attribute and replace it with the new attribute type. This value should be set to ’False’ by default.
’host’ should be updated to match that of the new Remote Desktop disclosure plugin. If there are managed systems that still follow the old format of ’\\<server>’, leave this value untouched.
’multimon’ and ’smartsizing’ attributes are set to ’False’; however the values will only take effect when the Update button is clicked.
Uninstall any versions of Firefox native browser extensions 11.1.x or older on the instance server and client workstations, and install the latest version, which is located in the \<instance>\addon\idarchive directory.
Note
Firefox support was removed in Bravura Security Fabric 12.10
Guacamole
As of 12.x, previous versions of Guacamole will no longer work. You must upgrade Guacamole with the latest RPMs in the idmunix*.tar.gz file located in \<instance>\addon\idmunix. As well, you have the option of installing Guacamole using Docker.
When Guacamole is upgraded, you will no longer need to configure an API user or modify the guacamole.properties file.
Database encryption
If upgrading from 9.x or older, you should run update_db_crypto on relevant tables. As of Bravura Security Fabric 9.0, the database encryption key was updated from using AES-128 to AES-256 encryption. This will affect answers to security questions and other information.
See Migration for more information.
Detection of attribute names conflict
If name conflicts between resource attributes and profile attributes are detected, post upgrade steps should contain this message: "Resource attribute conflict resolution". The post-upgrade report will contain this message about the resource attribute name changes: "Resource attribute <resourceAttrName> renamed to <resourceAttrName_RESATTR>."
Language packs
The upgrade process only upgrades the US English (en-us) language pack. If other language packs are installed before the upgrade, you must install the language packs again after the upgrade.
See Supporting multiple languages and locales for more information regarding installing language packs.
Browser caching
Using the same desktop browser that was used to log in to the instance before the upgrade and then logging in again after the upgrade is complete may sometimes not render correctly. For example, the user ID in the top right may have a dot where an icon should be, and you cannot click on the user name (it does nothing).
You must refresh and reload the browser to display it properly.
Logging Service (idmlogsvc) configuration file
When upgrading Bravura Security Fabric , the idmlogsvc.cfg configuration file will be retained from the previous version. A new configuration file named idmlogsvc.bak will be created and will contain the configuration settings of idmlogsvc.cfg for the newer version of Bravura Security Fabric .
This configuration file should be reviewed for any changes between idmlogsvc.cfg (configuration settings from the previous version) and idmlogsvc.bak (configuration settings for new version) after the upgrade is complete.