Emergency access
Emergency access allows you to designate and manage trusted emergency contacts (for example, your immediate supervisor or manager), who can request access to your safe (with a configurable level of permissions) in the event of an emergency.
How emergency access works
Setting up emergency access
You submit an invite to a trusted person to become your emergency access contact.
That person accepts the invitation, and Bravura Safe learns that their encryption keys are established and working.
You confirm the emergency contact; your master password key is encrypted with the invited emergency contact's public encryption key.
The encrypted master password key is stored in escrow on the server.
When to use emergency access
Emergency access should only be used in emergency situations; examples include:
Extreme illness, injury or death.
Severe business disruption while key resources are unavailable or unable to be contacted (e.g. leave of absence or remote vacations).
User has left the company and was unable to take steps to share access before leaving.
Who to invite?
Invite your supervisor, manager and/or the person who covers for you when you are sick or on vacation.
Note
There is no limit to the number of emergency contacts you can have.
Using emergency access
When a trusted emergency contact initiates emergency access to your safe:
An email is sent to you asking if you would like to deny or approve this request.
If you approve, the emergency contact gets immediate access to your safe.
If you deny, the request is denied immediately; the emergency contact cannot access your safe.
After a specified wait time (set by you), if you have not responded, the trusted contact is allowed to read your encrypted master password key stored in escrow.
The trusted emergency contact can then decrypt (and view) your safe and optionally reset your master password for future access.
Note
You can reject an emergency access request by your trusted emergency contact at any time before the configured wait time lapses.
Notes
A user's status as a trusted emergency contact is tied to a unique Bravura Safe account ID; therefore, if a trusted emergency contact changes their email address, no reconfiguration is required to maintain their emergency access.
If a trusted emergency contact creates a new Bravura Safe account and deletes the old account, they will automatically be removed as a trusted emergency contact and must be re-invited.
If the trusted emergency contact is not an existing Bravura Safe user, they will be prompted to create a Bravura Safe account before they can accept an invitation.
Set up emergency access for your safe
Setting up emergency access follows the invite > accept > confirm protocol:
Log in to Bravura Safe via the web interface.
Click the profile menu (your initials/avatar) and select Account settings.
Select Emergency Access from the ACCOUNT SETTINGS menu.
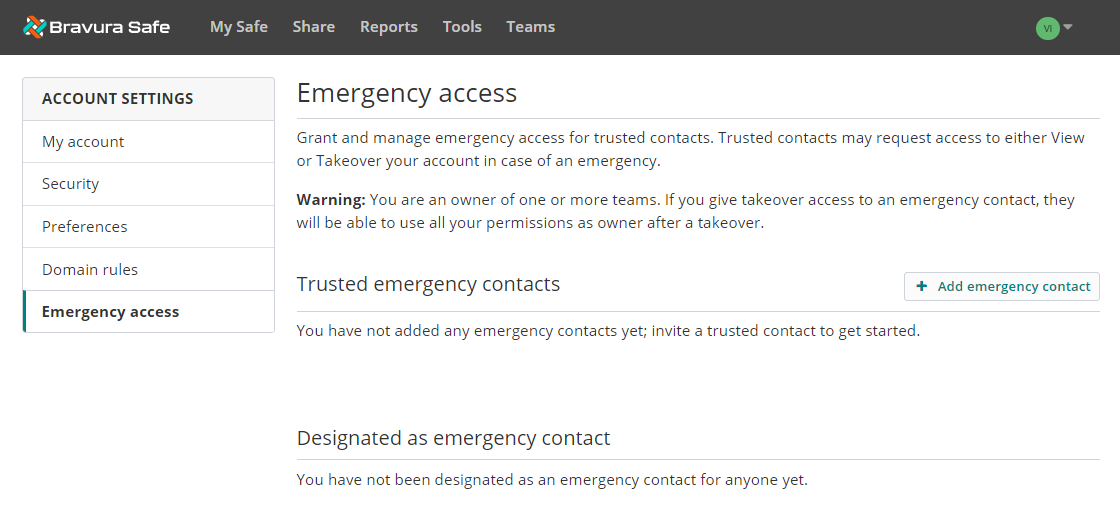
Click + Add emergency contact.
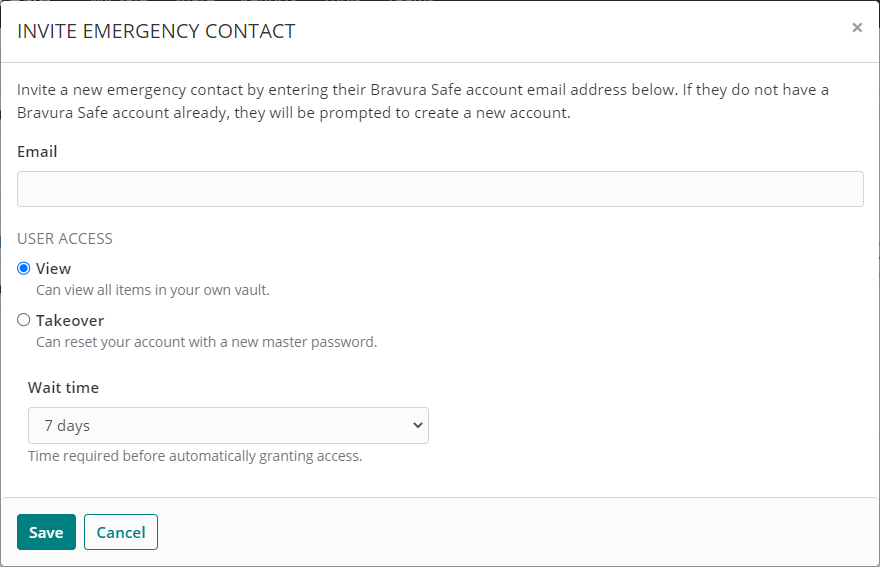
Enter your trusted contact's Email address.
If your contact does not have a Bravura Safe account when they receive your invitation, they will be prompted to create one.
Choose the desired USER ACCESS:
View - Can view and use all items in your own personal safe/vault (but cannot edit them).
Takeover - Can reset your account with a new master password, which will replace your previous master password.
See Emergency user access levels below.
Select a Wait Time.
This is the time required before automatically granting access. You can approve or reject an emergency access request at any time before the configured wait time lapses. Select 1/2/7/14/30/90 days.
Click Save.
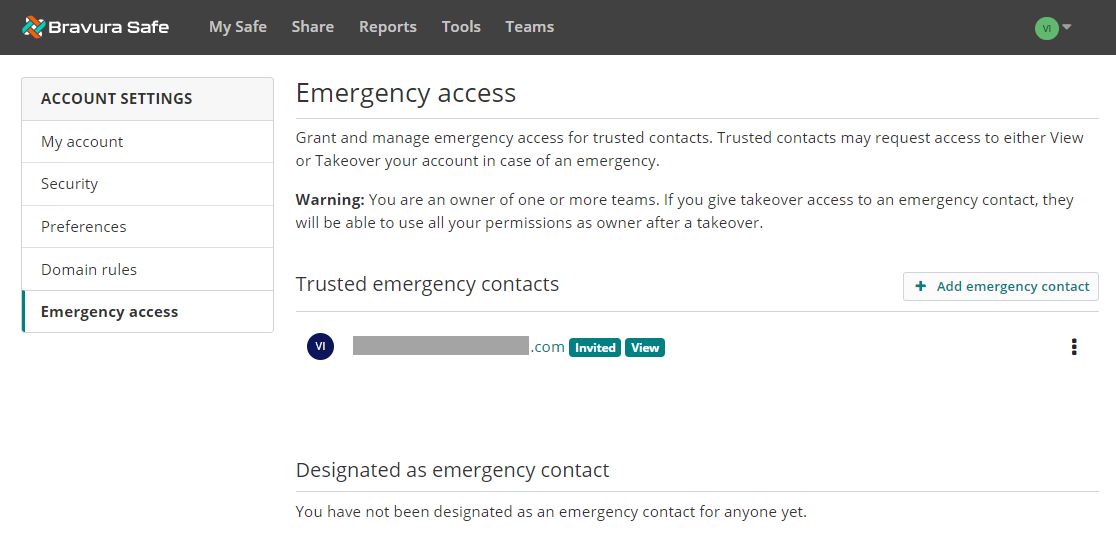
The contact now appears under Trusted emergency contacts with an "Invited" status card and their user access level (in the above example, "View").
The contact receives an invitation to become a trusted emergency contact.
Once your trusted emergency contact has accepted the invitation, confirm their acceptance.
Emergency user access levels
If you are granting emergency access and are a member of a Team:
"Takeover" access will disable any two-step login methods enabled on your account.
On takeover, you are automatically removed from any Teams for which you are not an owner.
If you are an owner, you will not be removed from or lose permissions to your Team.
Policies that do not usually apply to owners of a Team will not be enforced on takeover.
Accept an invitation to become a trusted emergency contact
When a user invites you to become a trusted emergency contact:
Check your email for the invitation.
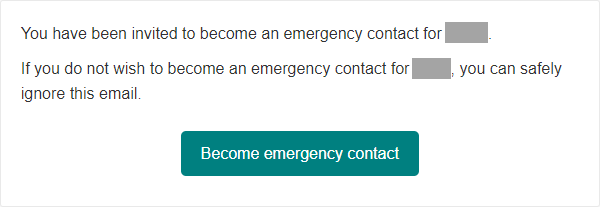
If desired, click Become emergency contact.
A Bravura Safe Emergency Access acceptance page opens in your browser:
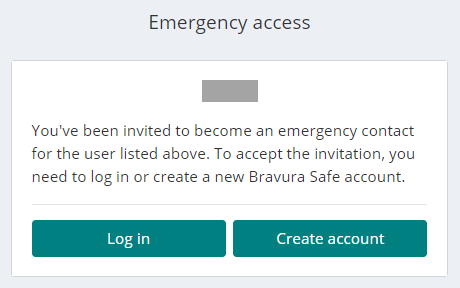
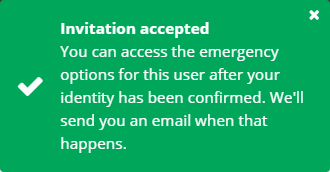
Log in to your Bravura Safe account to accept the invitation. A notification appears:
If you do not have a Bravura Safe account, click Create account and create one.
Once you have accepted the invitation, the inviting user must confirm your acceptance before you can initiate emergency access requests.
Once confirmed, you will receive an email.

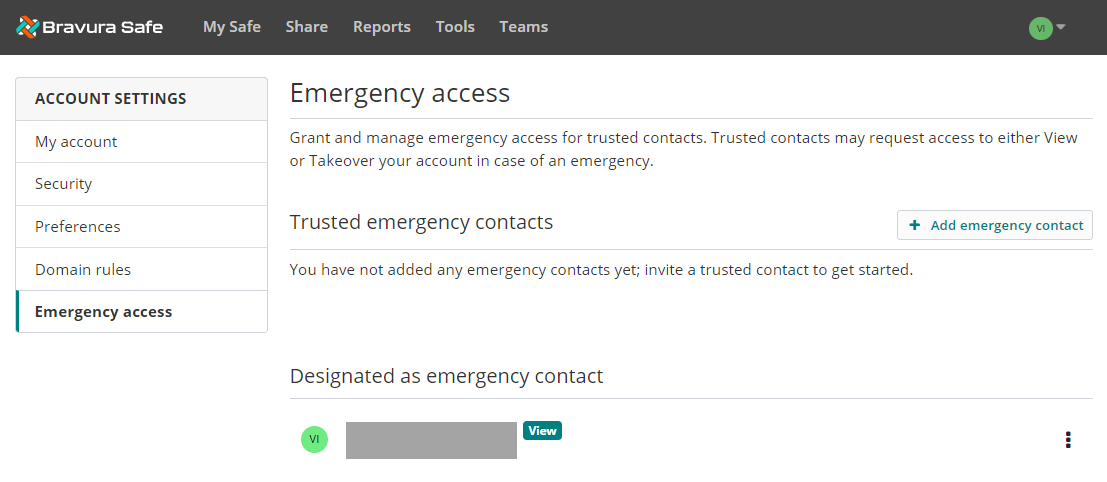
The name of the user for whom you are a confirmed emergency contact appears under Designated as emergency contact with the access level you have been granted (View or Takeover). In the case of an emergency, you can request emergency access to their safe.
Request emergency access
Complete the following steps to request emergency access to another user's Bravura Safe account.
Log in to Bravura Safe via the web interface.
Click the profile menu (your initials) located at the top right and select Account settings.
Select Emergency Access from the ACCOUNT SETTINGS menu.
In the Designated as emergency contact section, locate the user whose safe you wish to access.

Click the corresponding Options
 icon and select Request access.
A confirmation message appears showing the user's name and your specified wait time.
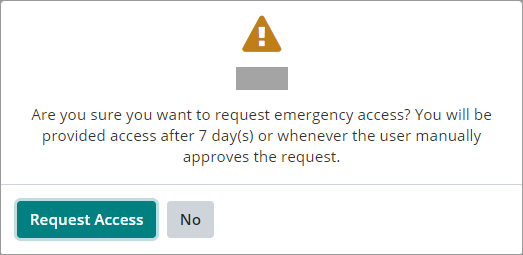
To proceed, click Request Access.
The user's name for whom you are an emergency contact now includes an
Emergency access initiatedstatus card along with the access type (View or Takeover).
The user receives an email with your request for emergency access to their safe.

You are provided access to the user's safe only after the configured wait time, or when they manually approve the emergency access request.
You will receive an email indicating whether they have approved, rejected or removed your request. Examples below:


Approve or reject emergency access
To manually approve, reject or remove an emergency access request before the configured wait time lapses:
Log in to Bravura Safe via the web interface.
Click the profile menu (your initials/avatar) located at the top right and select Account settings.
Select Emergency Access from the ACCOUNT SETTINGS menu.

For the user with the
Emergency Access Initiatedstatus card:Click the Options
 icon.
icon.Select one of the following:
If Approve is selected, a confirmation message appears:
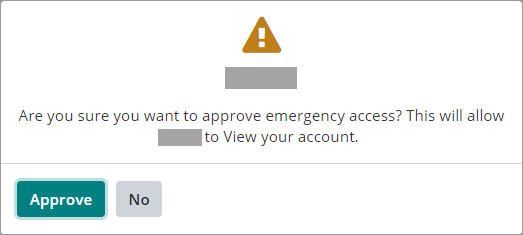
To proceed, click Approve.
The emergency contact's status changes to Emergency access approved:

The trusted emergency contact can now Access a safe using emergency access.
Click the Options  icon and select Reject or Remove at any time.
If Reject is selected, the Emergency access initiated status card is removed (leaving only the user access level). The user remains listed under Trusted emergency contacts.

Click the Options  icon and select Remove at any time.
If Remove is selected:
A confirmation message appears.
To remove the user as a trusted emergency contact, click Yes.
The user is no longer listed under your Trusted emergency contacts.
The user does not receive an email notifying them that they have been removed as your trusted emergency contact.
Confirm a trusted emergency contact
You will receive an email that your invited contact has accepted:
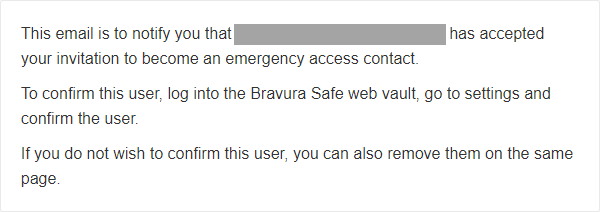
Log in to Bravura Safe via the web interface.
Click the profile menu (your initials/avatar) located at the top right and select Account settings.
Select Emergency Access from the ACCOUNT SETTINGS menu.
In the Trusted emergency contacts section, the invited user appears with an
Acceptedstatus card and user access level tag.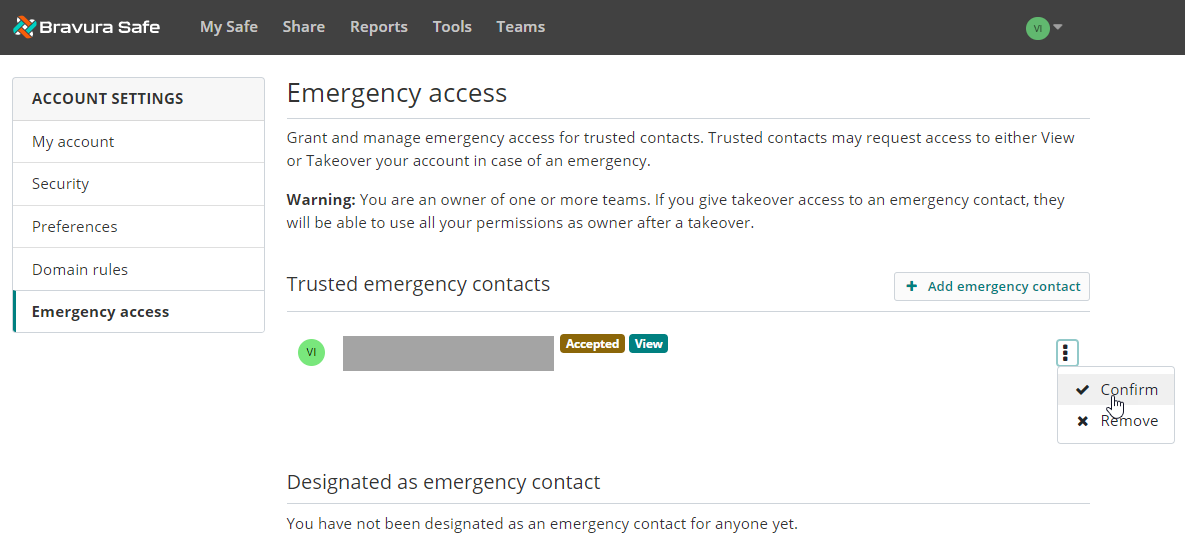
Click the corresponding Options
 icon and select Confirm.
Alternatively, select Remove to remove the user as a trusted emergency contact.
A CONFIRM USER pop-up appears.
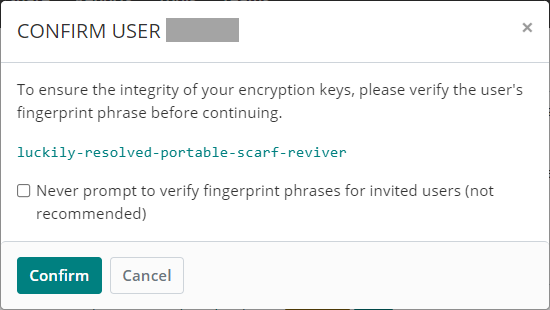
Confirm the user's fingerprint phrase (contact them to ask for it and compare to what you see on your end).
The invited/accepted emergency contact can click their profile menu (their initials/avatar) and select Account settings to view and provide their fingerprint phrase.
If their fingerprint phrase matches the one you see, click Confirm.
In your Trusted emergency contacts section, invited user now appears with only a user access level tag (the
Acceptedstatus card is removed).The user receives an email indicating that they have been confirmed.

Access a safe using emergency access
To access a safe once your request has been approved:
Log in to your Bravura Safe via the web interface.
Click the profile menu (your initials/avatar) located at the top right and select Account settings.
Select Emergency Access from the ACCOUNT SETTINGS menu.
Next to the name of the person with an
Emergency access approvedstatus card, click the corresponding Options icon.
icon.

Select the option that corresponds with your assigned access:
View - Selecting this option immediately displays the users's personal [unshared] safe items.
You can view, copy and use their personal items and credentials; however, you cannot edit any of them.
Note
If you are not seeing any items, this means all of the user's items are owned by a Team and collection (i.e. they are shared).
Takeover - Selecting this option opens the TAKEOVER dialog box.
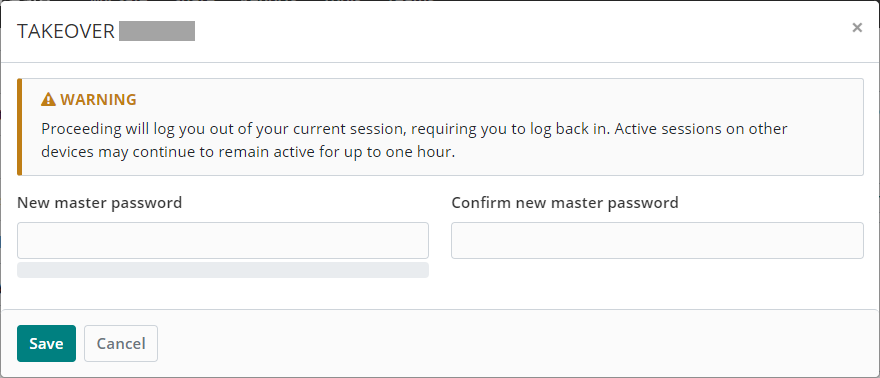
Enter and confirm a New master password for their account.
Note
Bravura Safe will assess the strength of the new master password as you enter it; indicating Weak, Good, Strong, etc. Use a strong and memorable but complex master password using letters (upper/lower case), numbers and special characters.
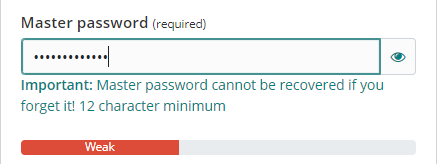
Click Save.
Log in to their Bravura Safe as normal, entering the their email address and the newly created master password.
Edit emergency contact
A trusted emergency contact's user access level and wait time can be modified:
Log in to Bravura Safe via the web interface.
Click the profile menu (your initials/avatar) located at the top right and select Account settings.
Select Emergency Access from the ACCOUNT SETTINGS menu.
Under Trusted emergency contacts, locate and click on the email address link of the contact you want to modify.
The EDIT EMERGENCY CONTACT dialog appears.
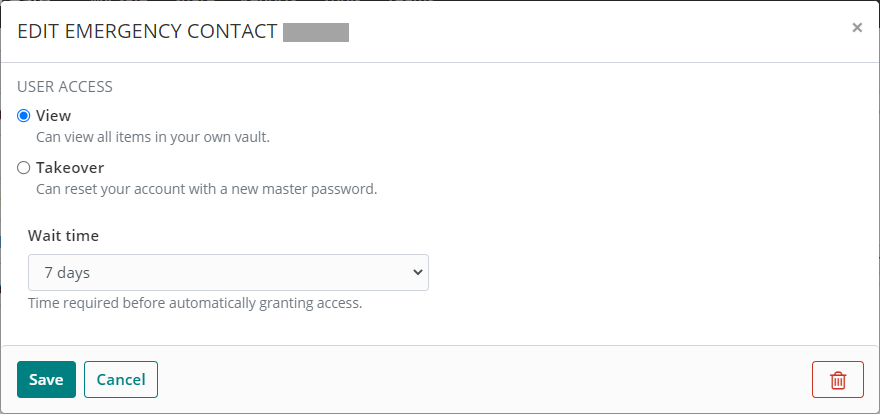
Make changes as desired. See Set up emergency access for your safe for details.
Note
If emergency access for the contact has already been approved and you change from View to Takeover access, the contact's approved status remains. The status card is updated on their end to reflect the change. No email is sent to notify about the change.
Click Save.
Revoke emergency access
Regaining exclusive access to your safe depends on which user access level was granted:
Revoke Takeover access
Approved emergency contacts given Takeover access will have created a new master password for your account when they used takeover access.
The only way to revoke access is to:
Get the new master password they created for your account.
Use it to log in to Bravura Safe via the web interface.
Change your master password to one that they do not know.
Revoke View access
Approved emergency contacts with View access can view your safe items until their access is manually revoked.
To revoke View access:
Log in to Bravura Safe via the web interface.
Click the profile menu (your initials/avatar) located at the top right and select Account settings.
Select Emergency Access from the ACCOUNT SETTINGS menu.

For the user with
Emergency access approved(for View level access), click the corresponding Options icon.
icon.Select Reject.
The
Emergency access approvedstatus card is removed (leaving only the user access level) and the user remains listed under Trusted emergency contacts.The contact receives the following email:

Click the Options
 icon and select Remove at any time.