SAML 2.0 implementation
SAML 2.0 implementation consists of six steps:
Communicate to any users onboarded prior to implementing SSO that they must Link Bravura Safe account to SSO.
Create a Team SSO identifier
To authenticate using SSO, a Team SSO Identifier is required, which indicates the Team to authenticate against.
To create an SSO Identifier:
Log in to Bravura Safe via the web interface.
Click Teams.
From the Team drop-down, select your Enterprise Team.
Click the Settings tab.
The Team info page appears.
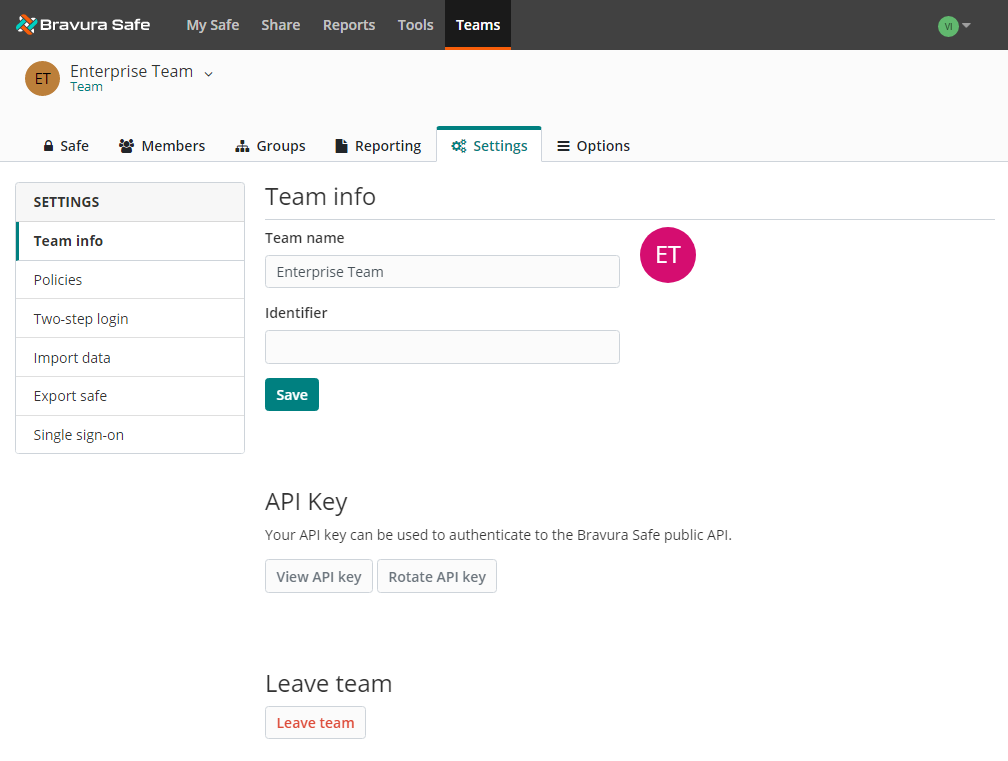
In the Identifier field, enter a unique identifier for your Enterprise Team.
Click Save.
Next
Once you have your Enterprise Team identifier, proceed with enabling, optionally requiring, and configuring your integration.
Enable single sign-on
To enable single sign-on:
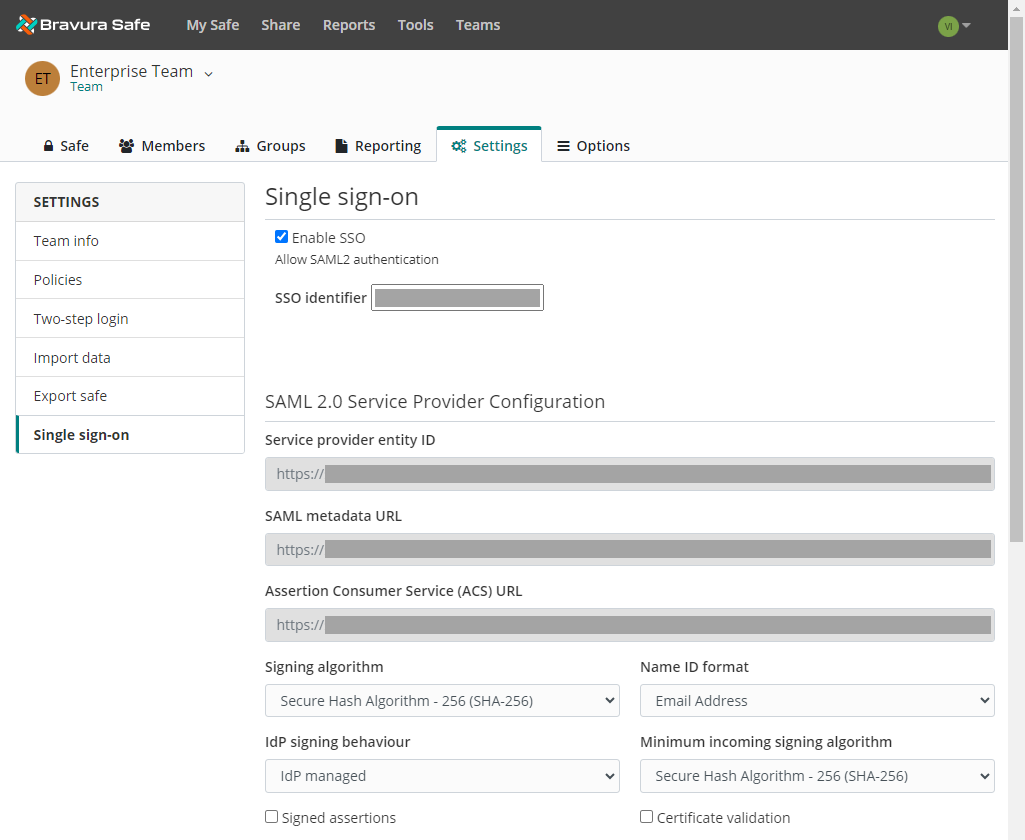
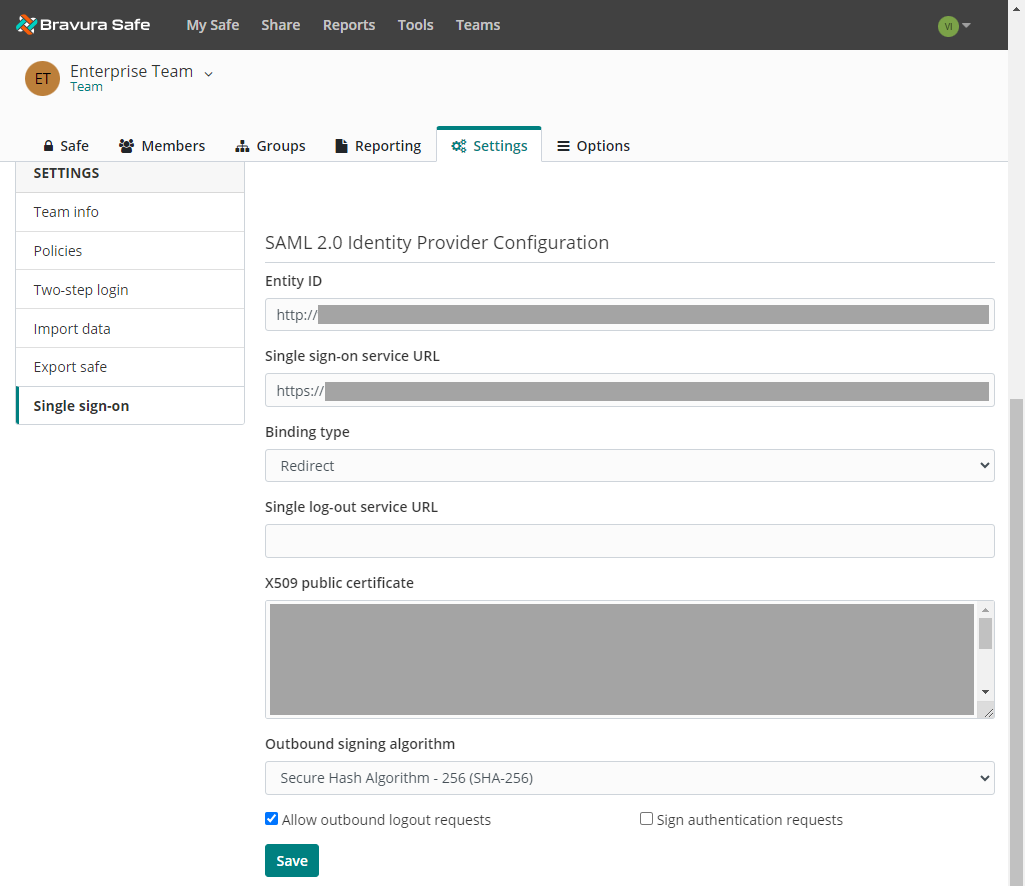
Select Single Sign-On from the SETTINGS menu.
Select Enable SSO.
Page 1:
Page 2: (Scroll down)
Caution
In order to streamline user login when using SSO, you may wish to also enable the Bypass personal two-step login when using SSO policy if your Identity Provider (IdP) will enforce multi-factor authentication (MFA). This will prevent the user from having to additionally authenticate using a configured personal two-step login provider (e.g. Authenticator app).
Next
After enabling single sign-on, Configure a service provider.
Configure a service provider
Implementation varies by provider. Follow the instructions for your specific provider below:
Bravura Security Fabric can act as an IdP for any SAML-compliant application. As an identity provider, Bravura Security Fabric provides unified third-party authentication for a variety of federation-capable applications using the Bravura Security Fabric login process, reducing the burden of managing multiple app-specific credentials. Once users authenticate, they are redirected back to the application along with a cryptographically-signed SAML assertion indicating who they are (identity) and what they may access (authorization).
To configue Bravura Security Fabric SAML, work simultaneously with Bravura Safe and Bravura Security Fabric. Have the Bravura Safe Single Sign-On page open for reference while you configure Bravura Security Fabric .
Open the Bravura Safe Single sign-on page
Log in to Bravura Safe via the web interface.
Click Teams.
From the Team drop-down, select the the enterprise Team.
Click the Settings tab.
Select Single sign-on from the SETTINGS menu.
You do not need to make any changes on this screen yet, but keep it open for reference.
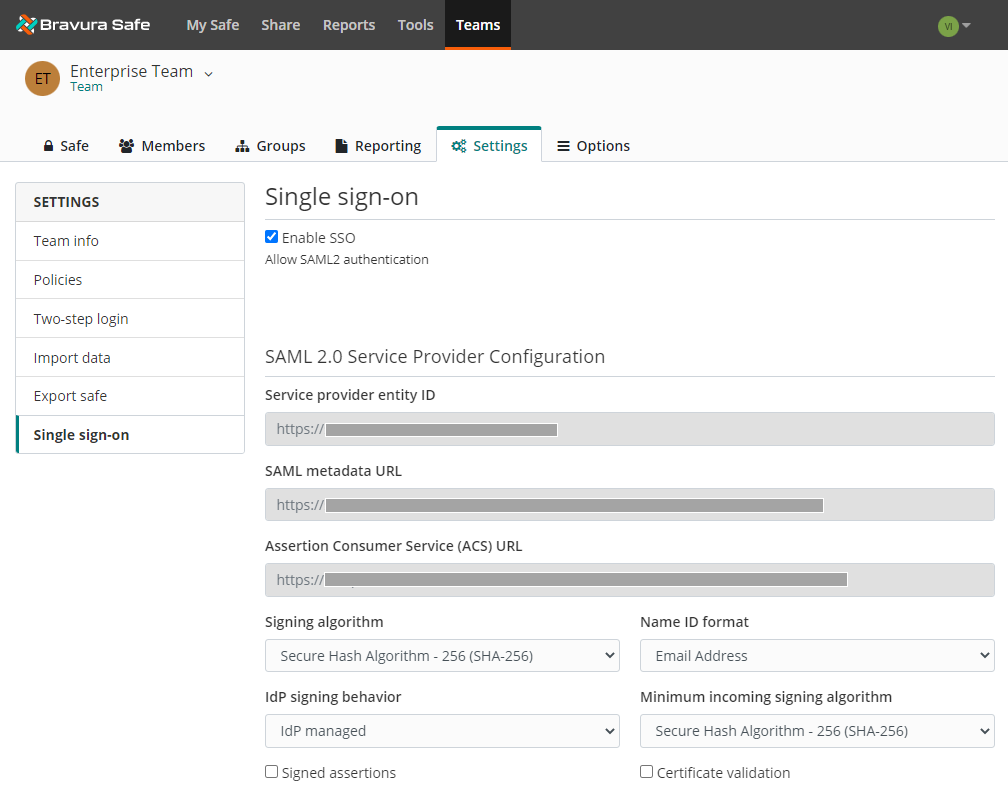
Configure Bravura Security Fabric as an identity provider
Log in to Bravura Security Fabric as a superuser.
Navigate to the Manage Components page and install the following component:
Scenario.hid_saml_idp
Navigate to the Manage external data store page and open the sp_mapping table.
Add a new row with the following fields populated:
issuer =
<https://domain.name.com/sso/saml2>sp_folder =
<BravuraSafe>acs_url =
<https://domain.name.com/sso/saml2/org-id/Acs>idp_url =
<https://bravura.security.fabric/idp/sso/>enabled =
<1>idp_initiated =
<1>disp_name =
<BravuraSafe>default_pin =
<1>relay_state = blank
sig_loc =
<assert>
Click Done and then Update.
Open the sp_access table and add a new row with the following fields populated:
sp_folder =
<BravuraSafe>userclass =
<_ALLUSERS_>deny_acl =
<0>
Click Done and then Update.
Open the sp_authchain table and add a new row with the following fields populated:
sp_folder =
<BravuraSafe>userclass = blank
authchain =
<REGUSER>
Click Done and then Update.
Open the
<Program Files path>\Bravura Security\Bravura Security Fabric\<instance>\idpfolder and make copy of thewebexfolder and rename it Bravura Safe.
See Authentication chains: SAML for more information.
Configure Bravura Safe
Navigate to your Enterprise Team’s Single Sign-On page.
Update fields in the SAML Service Provider Configuration area:
Field
Description
Name ID format
By default, Bravura Security Fabric will use email address.
Signing algorithm
The algorithm Bravura Safe will use to sign SAML requests.
Idp signing behavior
Whether/when SAML requests will be signed.
Minimum incoming signing algorithm
By default, Bravura Security Fabric will sign with RSA SHA-1. Select
rsa-sha1from the drop-down.Signed assertions
Whether Bravura Safe expects SAML assertions to be signed.
Certificate validation
Check this box when using trusted and valid certificates from your IdP through a trusted CA. Self-signed certificates may fail unless proper trust chains are configured.
In the SAML Identity Provider Configuration area populate the following fields:
Field
Description
Entity ID
Enter your Bravura Security Fabric Identifier. Example:
https://bravura.security.fabric/<instance>/sso/Binding type
Set to HTTP POST or Redirect.
Single sign-on service URL
Enter your Login URL. Example:
https://bravura.security.fabric/<instance>/sso/?baseurl=/<instance>/sso/Single log-out service URL
Login with SSO currently does not support SLO. This option is planned for future development, however you may preconfigure it with your
LogoutURLif you wish.X509 public certificate
Paste the certificate (
public.cer) located in the idp folder on Bravura Security Fabric side, removing the following:-----BEGIN CERTIFICATE----- and -----END CERTIFICATE-----Outbound signing algorithm
Select
rsa-sha256from the drop-down.Allow outbound logout requests
Login with SSO currently does not support SLO.
Sign authentication requests
Whether Bravura Security Fabric expects SAML requests to be signed.
Click Save.
Test the configuration
Navigate to your Bravura Safe server URL.
Enter your Email address and click Continue.
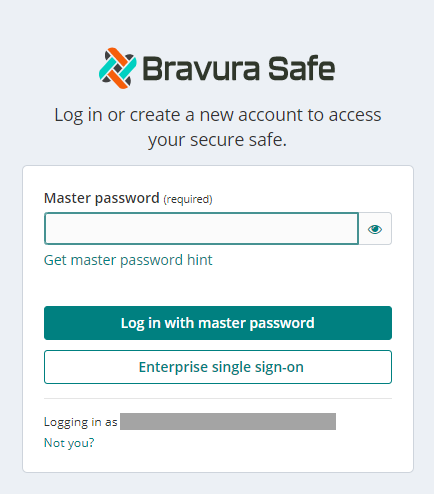
Click Enterprise single sign-on.
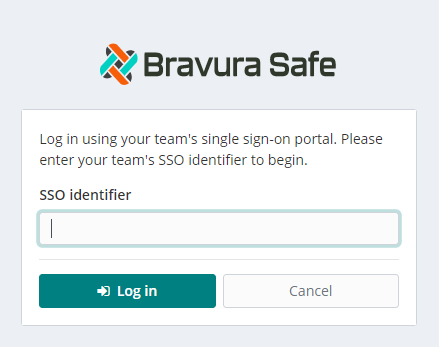
Enter the configured Team SSO Identifier.
Click Log in.
If your configuration is correct, you will be redirected to the Bravura Security Fabric login screen.
After you authenticate with your credentials, enter your Bravura Safe master password to decrypt your safe.
Next
After configuring Bravura Security Fabric as a service provider, you may want to require all members to use Enterprise SSO and Bypass personal two-step login when using SSO.
To configure Azure SAML, work simultaneously with Bravura Safe and the Azure Portal. Have the Bravura Safe Single sign-on page open for reference while you configure Azure.
Open the Bravura Safe Single sign-on page
Log in to Bravura Safe via the web interface.
Click Teams.
From the Team drop-down, select the the enterprise Team.
Click the Settings tab.
Select Single sign-on from the SETTINGS menu.
You do not need to make any changes on this screen yet, but keep it open for reference.

Create an Enterprise Application in Azure
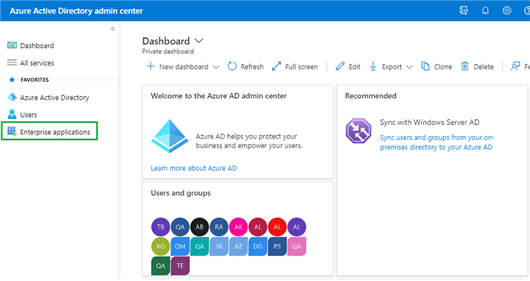
In the Azure Portal, navigate to Azure Active Directory and click Enterprise applications from the navigation menu.
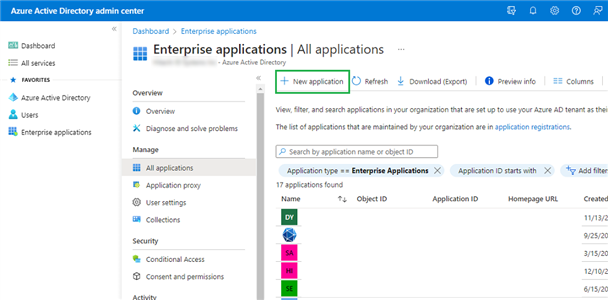
Click + New application.
Click + Create your own application.
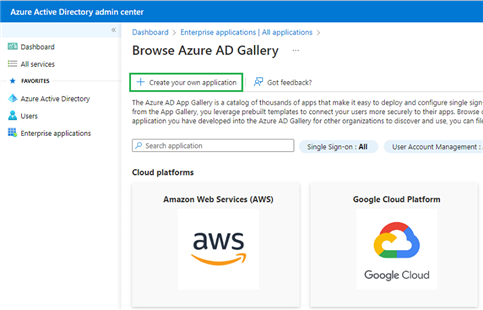
Enter a unique, Bravura Safe-specific name and click Create.
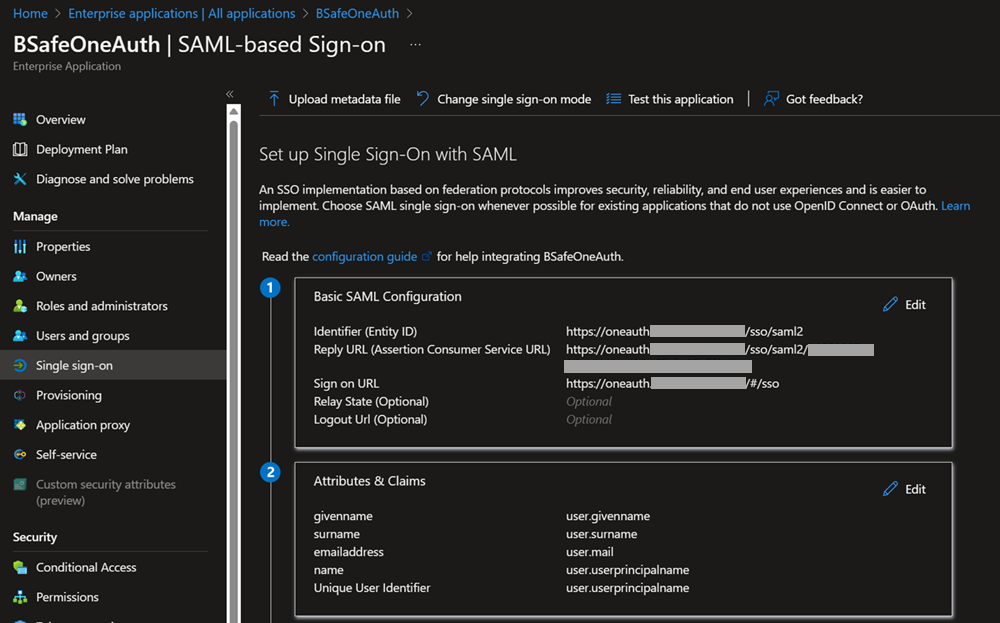
Click Single sign-on from the navigation on the left and select SAML.
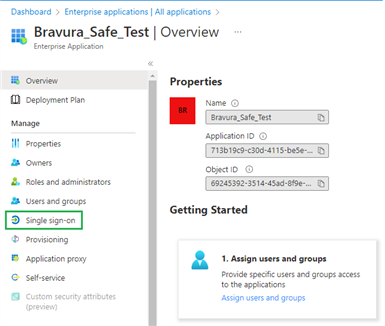
Click Edit and configure the following fields:
Field
Description
Identifier (Entity ID)
Set this field to the pre-generated Service provider entity ID retrieved from the Bravura Safe Single sign-on page.
Reply URL (Assertion Consumer Service URL)
Set this field to the pre-generated Assertion Consumer Service (ACS) URL retrieved from the Bravura Safe Single sign-on page.
Sign on URL
Set this field to the login URL from which users will access Bravura Safe. For example,
https://<tenant>.safe.bravurasecurity.net/#/sso.
User Attributes & Claims
The default claims built by Azure will work with SSO; however, you can optionally configure the NameID format used by Azure in SAML responses:
Click Edit and select the Unique User Identifier (Name ID) entry to edit the NameID claim. Options: Default, Email Address, Persistent, Unspecified, and Windows qualified domain name.
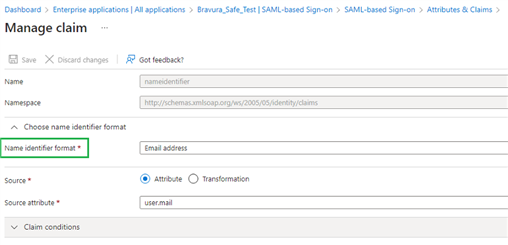
For more information, refer to Microsoft Azure documentation.
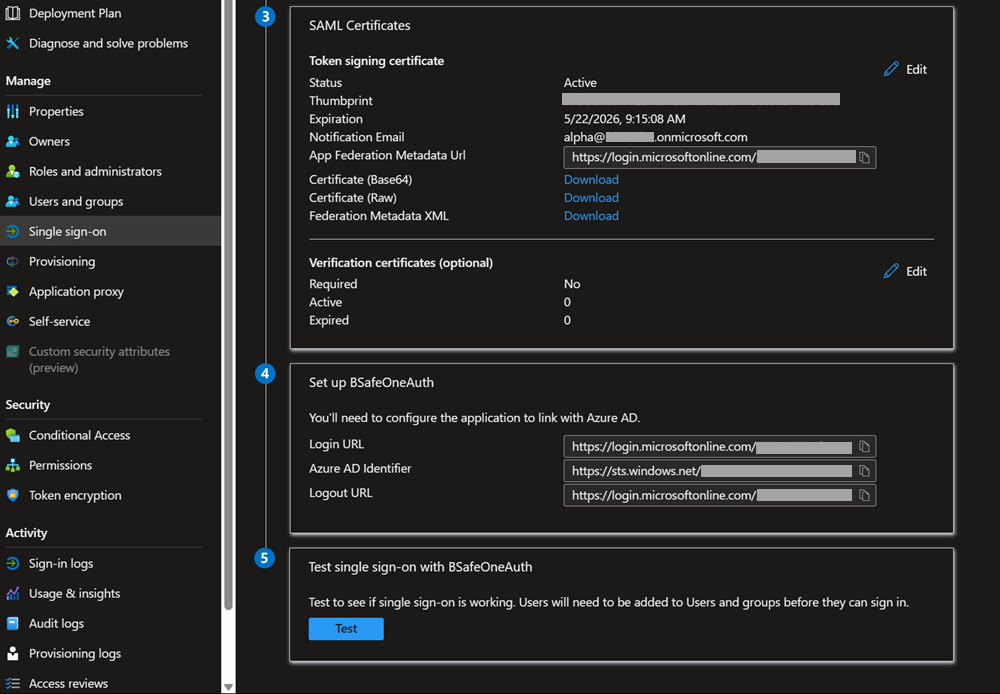
SAML Signing Certificate
Download the Base64 Certificate for use in a coming step.
Set up your Application
Note the Login URL and Azure AD Identifier for use in a coming step.

Users and Groups
Click Users and groups from the navigation bar on the left.
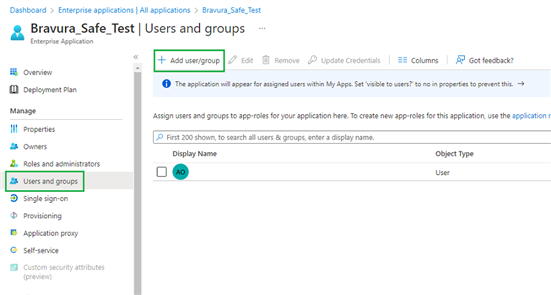
Click + Add user/group to assign access to the SSO application on a user or group-level.
Example
Configure Bravura Safe
You are done with the Azure Portal. Return to the Bravura Safe web interface to complete the configuration.
The Single sign-on page is separated into two configuration sections:
SAML Service Provider Configuration determines the format of SAML requests.
SAML Identity Provider Configuration determines the format to expect for SAML responses.
Service Provider configuration
Configure the following:
Field | Description |
Name ID format | By default, Azure will use Email Address. If you changed this setting, select the corresponding value. Otherwise, set this field to Unspecified or Email Address. |
Signing algorithm | The algorithm Bravura Safe will use to sign SAML requests. |
Idp signing behavior | Whether/when SAML requests will be signed. |
Minimum incoming signing algorithm | Selection required. Must match the Azure setting. By default, Azure will sign with RSA SHA-256. Select rsa-sha256 from the drop-down. |
Signed assertion | Whether Bravura Safe expects SAML assertions to be signed. |
Certificate validation | Check this box when using trusted and valid certificates from your IdP through a trusted CA. Self-signed certificates may fail unless proper trust chains are configured. If the certificate is not trusted or you are uncertain, please leave unchecked. |
Click Save after completing the above configuration.
Identity Provider configuration
Refer back to the Azure Portal to configure the following values:
Field | Description |
Entity ID | Enter your Azure AD Identifier from the Azure Portal's Set up your Application section. |
Binding type | Set to HTTP POST or Redirect. |
Single sign-on service URL | Enter your Login URL from the Azure Portal's Set up your Application section. |
Single log-out Service URL | Login with SSO currently does not support SLO (planned for future development). Pre-configure with your LogoutURL if desired. |
X509 public certificate | Open the certificate in a text editor (like Notepad) and copy/paste the contents. Then, remove the following:
and
The certification value is case sensitive. Extra spaces, carriage returns, and other extraneous characters will cause certificate validation to fail. |
Outbound signing algorithm | Select rsa-sha256 from the drop-down. By default, Azure will sign with RSA SHA-256. |
Allow outbound logout requests | Leave unchecked. Login with SSO currently does not support SLO (planned for future development). |
Sign authentication requests | Whether Azure expects SAML requests to be signed. |
Click Save after completing the above configuration.
Test the configuration
Navigate to your Bravura Safe server URL.
Enter your Email address and click Continue.

Click Enterprise single sign-on.

Enter the configured Team SSO Identifier.
Click Log in.
If your configuration is correct, you will be redirected to the Microsoft login screen.
After authenticating with your Azure credentials, enter your Bravura Safe Master password to decrypt your safe.
Next
After configuring Azure as a service provider, you may want to require all members to use Enterprise SSO.
To configure Okta SAML, work simultaneously with Bravura Safe and Okta. Have the Bravura Safe Single sign-on page open for reference while you configure Okta.
Open the Bravura Safe Single sign-on page
Log in to Bravura Safe via the web interface.
Click Teams.
From the Team drop-down, select the the enterprise Team.
Click the Settings tab.
Select Single sign-on from the SETTINGS menu.
You do not need to make any changes on this screen yet, but keep it open for reference.

Create an Okta App
In the Okta Admin Portal:
Select Applications > Applications from the left menu.
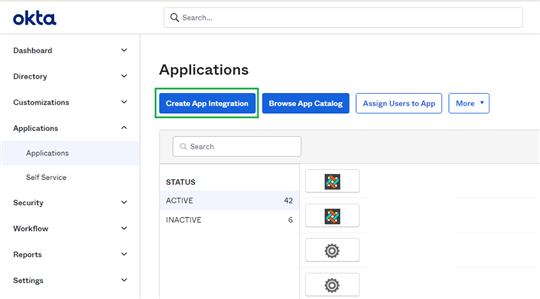
Click Create App Integration.
Choose SAML 2.0.
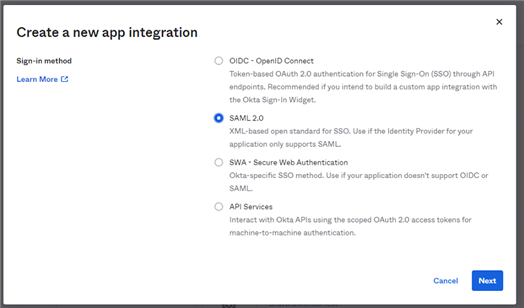
Click Next.
On the General Settings screen, give the application a unique, Bravura Safe-specific name.
Click Next.
On the Configure SAML screen, configure the following:
Field
Description
Single sign on URL
Set this to the pre-generated Assertion Consumer Service (ACS) URL from the Bravura Safe Single sign-on page.
Audience URI (SP Entity ID)
Set this to the pre-generated Service provider entity ID from the Bravura Safe Single sign-on page.
Name ID format
Select the SAML NameID format to use in SAML assertions. By default, Unspecified.
Application username
Select the Okta attribute users will use to login to Bravura Safe.
Click the Show Advanced Settings link and configure the following:
Field
Description
Response
Whether the SAML response is signed by Okta.
Assertion Signature
Whether the SAML assertion is signed by Okta.
Signature Algorithm
The signing algorithm used to sign the response and/or assertion, depending on which is set to Signed. By default, rsa-sha256.
Digest Algorithm
The digest algorithm used to sign the response and/or assertion, depending on which is set to Signed. This field must match the selected Signature Algorithm.
In the Attribute Statements section, construct the following SP → IdP attribute mappings:
Name
Name format
Value
email
Unspecified
user.emailfirstname
Unspecified
user.firstNamelastname
Unspecified
user.lastNameOnce configured, click Next.
The Feedback screen appears.
Click Finish.
Get IdP Values
Click the Sign On tab.
Click View SAML setup instructions.

The setup instructions are displayed.
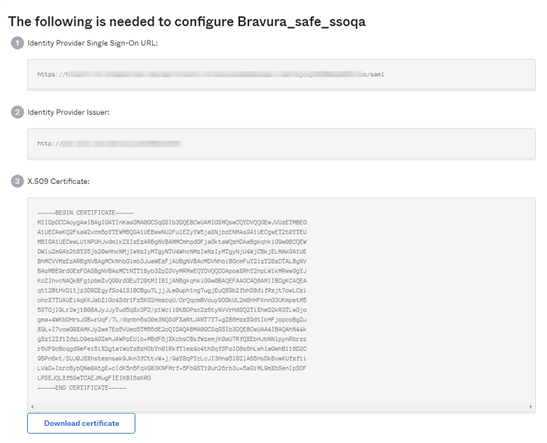
Leave this page open if desired, or do the following:
Copy the Identity Provider Single Sign-On URL
Copy the Identity Provider Issuer
Download the X.509 Certificate
Assignments
Click the Assignments tab.
Click Assign.
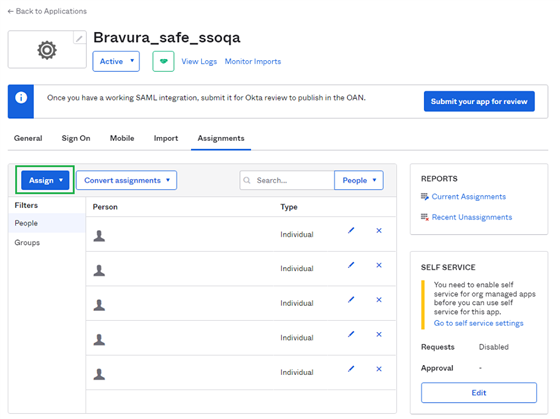
Assign access:
By individual user via Assign to People
In bulk via Assign to Groups
Configure Bravura Safe
You are done with the Okta Admin Portal. Return to the Bravura Safe web interface to complete the configuration.
The Single sign-on page is separated into two configuration sections:
SAML Service Provider Configuration determines the format of SAML requests.
SAML Identity Provider Configuration determines the format to expect for SAML responses.
Service Provider configuration
Configure the following based on your selections in the Okta Admin Portal:
Field | Description |
Name ID format | Set this to the Name ID format specified in Okta; otherwise, leave Unspecified. |
Signing algorithm | The algorithm Bravura Safe will use to sign SAML requests. |
IdP signing behavior | Whether/when SAML requests will be signed. |
Minimum incoming signing algorithm | Set this to the Signature Algorithm specified in Okta. |
Signed assertions | Check this box if you set the Assertion Signature field to Signed in Okta. |
Certificate validation | Check this box when using trusted and valid certificates from your IdP through a trusted CA. Self-signed certificates may fail unless proper trust chains are configured. |
Click Save after completing the above configuration.
Identity Provider configuration
Refer back to the Okta Admin Portal to retrieve application values:
Field | Description |
Entity ID | Enter your Identity Provider Issuer from the Okta Sign On Settings screen by clicking View Setup Instructions. This field is case sensitive. |
Binding type | Set to Redirect. Okta currently does not support HTTP POST. |
Single sign-on service URL | Enter your Identity Provider Single Sign-On URL from the Okta Sign On Settings screen. |
Single log-out service URL | Login with SSO currently does not support SLO (planned for future development). Pre-configure with your LogoutURL if desired. |
X509 public certificate | Paste the downloaded certificate, removing: -----BEGIN CERTIFICATE----- and -----END CERTIFICATE----- The certificate value is case sensitive. Extra spaces, carriage returns, and other extraneous characters will cause certificate validation to fail . |
Outbound signing algorithm | Select the Signature Algorithm selected for the Okta application. If you not change the Signature Algorithm , leave the default (rsa-sha256 ). |
Allow outbound logout requests | Login with SSO currently does not support SLO. |
Sign authentication requests | Whether Okta expects SAML requests to be signed. |
Click Save after completing the above configuration.
Test the configuration
Navigate to your Bravura Safe server URL.
Enter your Email address and click Continue.

Click Enterprise single sign-on.

Enter the configured Team SSO Identifier.
Click Log in.
If your configuration is correct, you will be redirected to the Okta login screen.
After authenticating with your Okta credentials, enter your Bravura Safe Master password to decrypt your safe.
Next
After configuring Okta as a service provider, you may want to require all members to use Enterprise SSO.
To configure Google SAML, work simultaneously with Bravura Safe and the Google Workspace Admin console. Have the Bravura Safe Single sign-on page open for reference while you configure Google.
Open the Bravura Safe Single sign-on page
Log in to Bravura Safe via the web interface.
Click Teams.
From the Team drop-down, select the the enterprise Team.
Click the Settings tab.
Select Single sign-on from the SETTINGS menu.
You do not need to make any changes on this screen yet, but keep it open for reference.

Create a SAML app
In the Google Workspace Admin console, click Apps > Web and mobile apps.
Click Add App > Add custom SAML app.
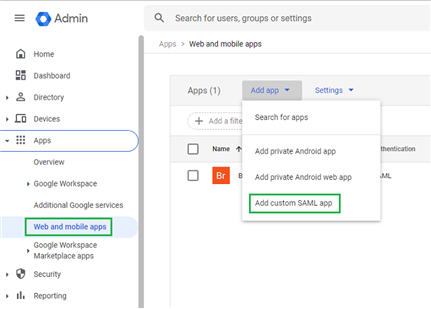
Give the application a unique Bravura Safe-specific name and click Continue.
Copy your SSO URL, Entity ID, and Certificate for use in a coming step.
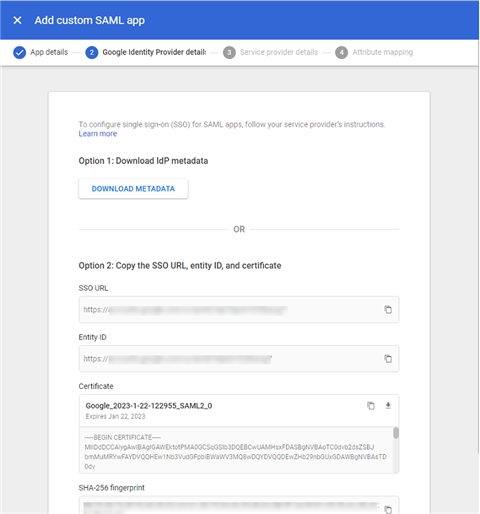
Click Continue.
On the Service provider details screen, configure the following:
Field
Description
ACS URL
Set this to the pre-generated Assertion Consumer Service (ACS) URL from the Bravura Safe Single sign-on page.
Entity ID
Set this to the pre-generated Service provider entity ID from the Bravura Safe Single sign-on page.
Start URL
Optionally, set this field to the login URL from which users will access Bravura Safe.
Signed response
Check this box if you want Workspace to sign SAML responses. If not checked, Workspace will sign only the SAML assertion.
Name ID format
Set this field to Persistent.
Name ID
Select the Workspace user attribute to populate NameID.
Click Continue.
On the Attribute mapping screen, click Add Mapping and map as follows:
Google Directory attributes
App attributes
Primary email
emailClick Finish.
Turn On the App
By default, Workspace SAML apps will be set to OFF for everyone.
Open the User Access section for the SAML app and set to ON for everyone (or for specific groups, as required).
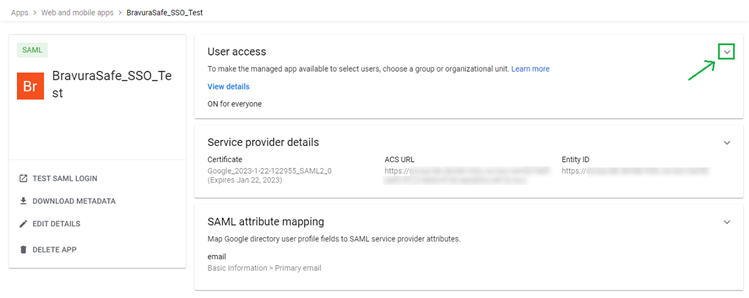
Configure Bravura Safe
Return to the Bravura Safe web interface to complete the configuration.
The Single sign-on page is separated into two configuration sections:
SAML Service Provider Configuration determines the format of SAML requests.
SAML Identity Provider Configuration determines the format to expect for SAML responses.
Service Provider configuration
Configure the following based on selections in the Google Workspace Admin console:
Field | Description |
Name ID format | Set this field to the Name ID format selected in Workspace. |
Signing algorithm | The algorithm Bravura Safe will use to sign SAML requests. |
IdP signing behavior | Whether/when SAML requests will be signed. |
Minimum incoming signing algorithm | By default, Google Workspace will sign with RSA SHA-256. Select sha-256 from the drop-down. |
Signed assertions | Whether Bravura Safe expects SAML assertions to be signed. Uncheck this option. |
Certificate validation | Check this box when using trusted and valid certificates from your IdP through a trusted CA. Self-signed certificates may fail unless proper trust chains are configured. |
Click Save after completing the above configuration.
Identity Provider configuration
Refer back to the Google Workspace Admin console for values:
Field | Description |
Entity ID | Set this field to Workspace's Entity ID from the Google Identity Provider details section or using the Download Metadata button. This field is case sensitive. |
Binding type | Set to HTTP POST or Redirect. |
Single sign-on service URL | Set this field to Workspace's SSO URL from the Google Identity Provider details section or using the Download Metadata button. |
Single log-out service URL | Login with SSO currently does not support SLO (planned for future development). Pre-configure with your LogoutURL if desired. |
X509 public certificate | Paste the downloaded certificate, removing:
and
The certification value is case sensitive. Extra spaces, carriage returns and other extraneous characters will cause certificate validation to fail. |
Outbound signing algorithm | By default, Google Workspace will sign with RSA SHA-256. Select sha-256 from the drop-down. |
Allow outbound logout requests | Login with SSO currently does not support SLO (planned for future development). |
Sign authentication requests | Whether Google Workspace expects SAML requests to be signed. |
Click Save after completing the above configuration.
Test the configuration
Navigate to your Bravura Safe server URL.
Enter your Email address and click Continue.

Click Enterprise single sign-on.

Enter the configured Team SSO Identifier.
Click Log in.
If your configuration is correct, you will be redirected to the Google Workspace login screen.
After authenticating with your Workspace credentials, enter your Bravura Safe Master password to decrypt your safe.
Next
After configuring Google as a service provider, you may want to require all members to use Enterprise SSO.
Require all members to use Enterprise SSO (Optional)
To require all members to use Enterprise SSO:
For the Enterprise Team, select Policies from the SETTINGS menu.
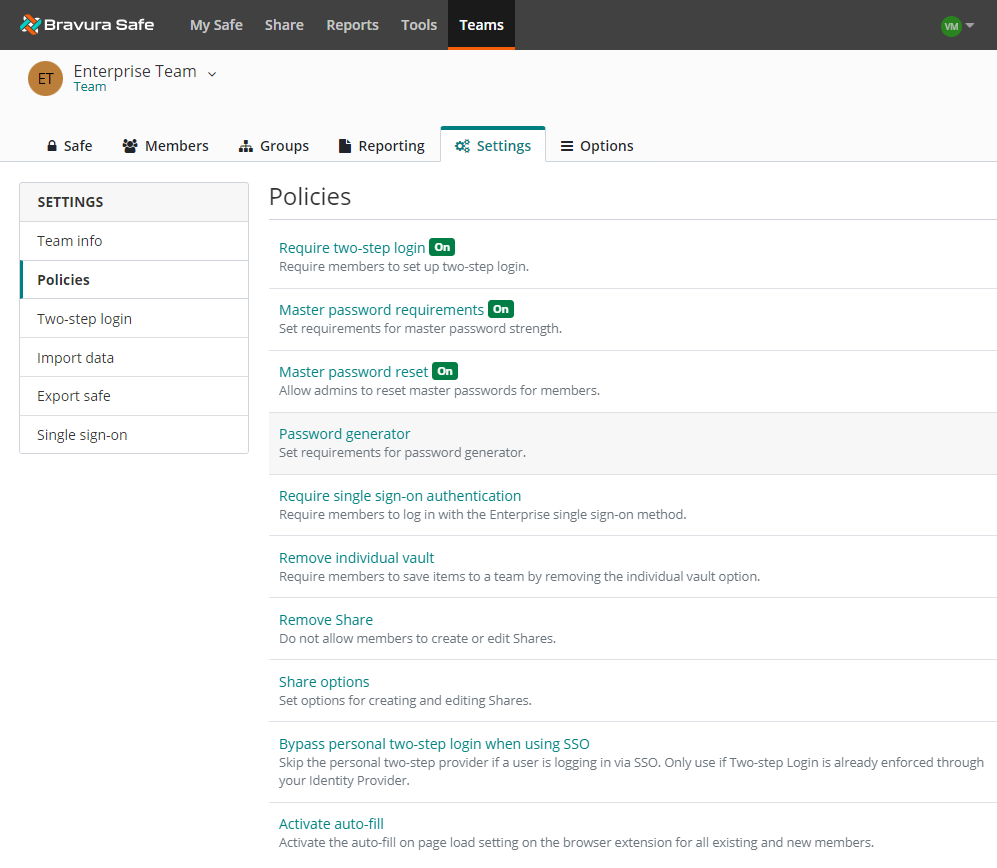
Click Require single sign-on authentication.
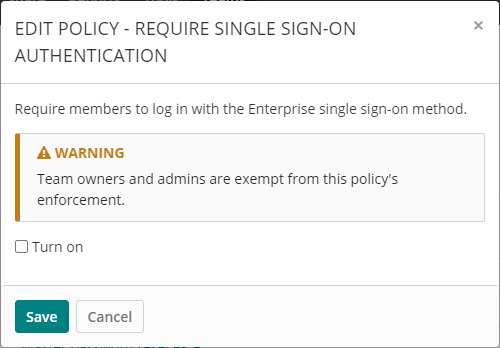
Select Turn on.
Click Save.
All users who are not a Team owner or admin will now be required to log in using Enterprise single-sign on.
If they try to log in using only their master password (and any enforced enterprise two-step login methods), they will receive the following error:

Bypass personal two-step login when using SSO
Warning
Skipping the Bravura Safe personal two-step login provider is less secure. Before enabling this policy, ensure that your SSO identity provider enforces multi-factor authentication.
To bypass a user's configured personal two-step login method (e.g. Authenticator app) when they are logging in via SSO:
For the Enterprise Team, select Policies from the SETTINGS menu.

Click Bypass personal two-step login when using SSO.
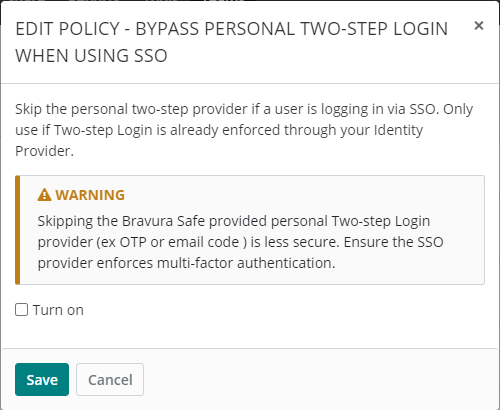
Read the warning and information shown.
Select Turn on.
Click Save.
The user will no longer be prompted for additional authentication using one of their configured personal two-step login methods when they log in to Bravura Safe via SSO.
Link Bravura Safe account to SSO
If you were onboarded (i.e. you have a Bravura Safe account and you are a member of the Enterprise Team) prior to your product administrator implementing single sign-on (SSO), you will be requested to link your existing Bravura Safe account to single-sign-on (SSO) authentication. If you are onboarded after SSO is implemented, this procedure is not required.
Note
This task can only be performed using the Bravura Safe web interface.
To link your account to your company's single sign-on (SSO) Identity Provider (IdP):
Log in to Bravura Safe via the web interface.
Click Teams.
From the Team drop-down, select the Enterprise Team.
Click the Options tab.
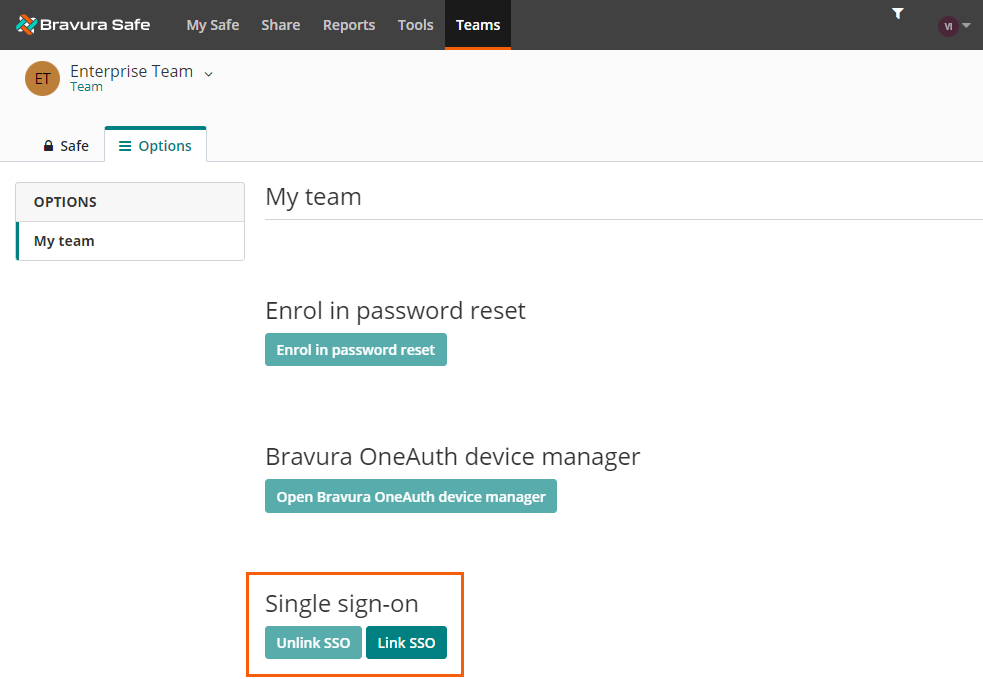
Click Link SSO.
You are redirected to your company's chosen Identity Provider (IdP). The example below shows Okta.
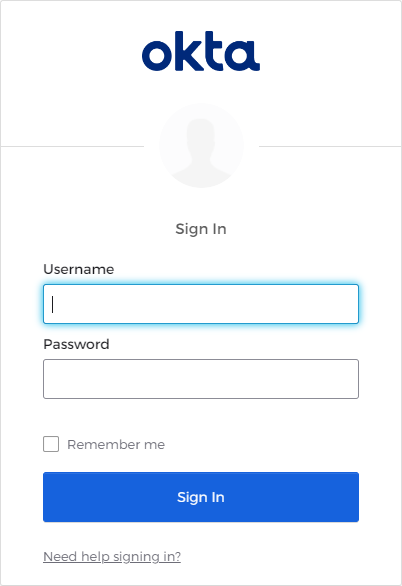
Log in to your IdP with the appropriate credentials for that provider.
It is likely that your IdP prompts you for a second authentication factor (as in the example below).
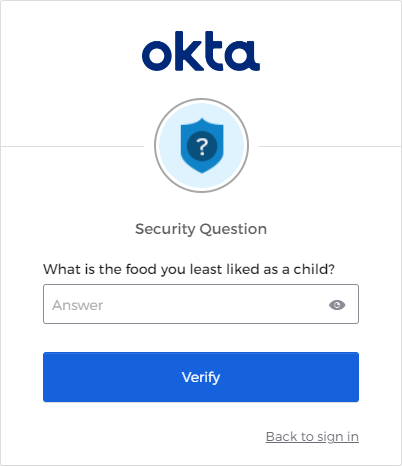
Complete the second authentication factor as required.
You are logged in to Bravura Safe and your account is now linked to your company's single sign-on (SSO).
You can now access Bravura Safe by logging in using the Enterprise single sign-on button. See Log in with SSO.