Installing and configuring Microsoft SQL Server
This section provides basic instructions for use with a Microsoft SQL Server database and the corresponding client software. These instructions are based on a "standard” configuration. If you want to use a non-standard configuration, or if you experience errors, consult the documentation provided with the SQL Server software.
Warning
When setting up SQL Server, avoid using non-alphanumeric characters in your server name, users’ passwords, or any other names (instance, database, schema).
Overview for setting up Microsoft SQL Server
The following is an overview of required and optional tasks for setting up Microsoft SQL Server to work with Bravura Security Fabric . The tasks are detailed in the sections that follow.
Caution
Express editions should only be used for evaluation purposes. Bravura Security strongly recommends that, whenever possible, you use an enterprise or standard edition rather than the express database edition. Bravura Security does not provide support for product issues resulting from clients upgrading their database edition.
Read Supported database management systems and Best practice: Where to install the Bravura Security Fabric and database software to determine appropriate version for your organization.
To set up Microsoft SQL Server :
Install the SQL Server software if you haven’t already.
Optional: Create a dedicated database, user, and schema .
Alternatively, you can allow Bravura Security Fabric setup to do this for you, as described in Configure a dedicated database user .
Optional: Create a dedicated report database user .
You can allow Bravura Security Fabric setup to do this for you, as described in SSRS settings .
Optional: Remove public/guest permissions .
If you will be using multiple Bravura Security Fabric instances or servers (replication), read Working with multiple installations for additional considerations.
Follow Microsoft’s best practice guide when setting up your SQL server.
Install Microsoft SQL Server
You should install Microsoft SQL Server on Windows Server 2012 R2, 2016, 2019, 2022, or 2025.
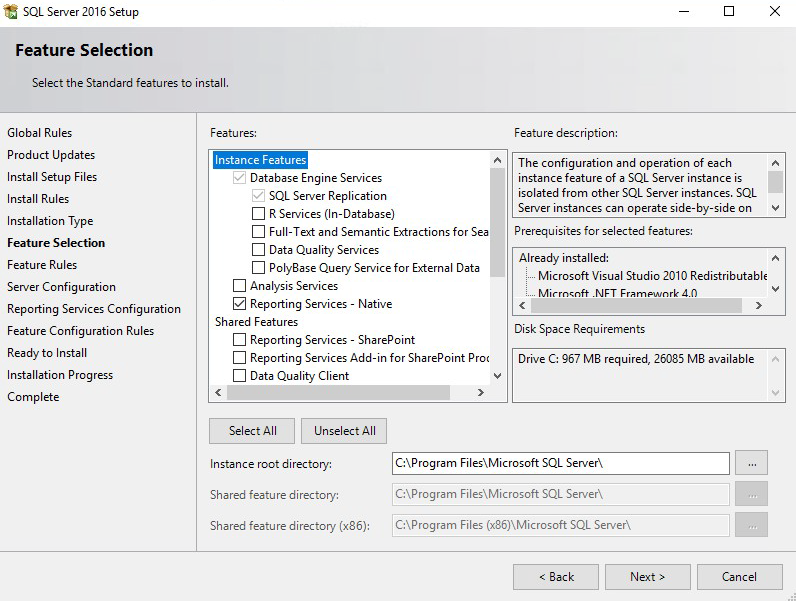
Install Microsoft SQL Server with the following settings:
Feature Selections
Database Engine Services
Optional: Reporting Services - Native
This feature is a requirement to use the Analytics app.
Client Tools Connectivity
Management Tools - Basic
Management Tools - Complete
If the footprint of Client Tools Connectivity and the Management Tools sets is too large, the minimum requirement on the application node is the SQL Server Native Client (sqlncli).
Installing SQL Server Management Studio (SSMS) on the application node is strongly recommended for application database troubleshooting. SSMS can be installed on another server, but this would make the application database troubleshooting harder.
Server Configuration
SQL Server Agent NT AUTHORITY \ SYSTEM (not available in Microsoft SQL Server Express Edition)
SQL Server Database Engine NT AUTHORITY \ SYSTEM
SQL Server Browser NT AUTHORITY \ LOCAL SYSTEM
SQL Server Reporting Services NT SERVICE \ ReportServer
(Only available if you chose to install reporting services)
Startup Type Automatic for all services
The server collation type must be SQL_Latin1_General_CP1_CI_AS, and the database collation type must be set to Latin1_General_BIN when the database is created later.
Database Engine Configuration Mixed Mode (SQL Server authentication and Windows authentication).
Enter and confirm the password. Optionally, you can specify SQL Server Administrators, which use Windows authentication to manage SQL Server.
If you chose to install reporting services , click Install and configure on the page.
This removes the need for the SSRS post installation steps.
Caution
If you are installing SQL Server Reporting Service (SSRS) to use the Analytics app ensure the server is not a Domain Controller.
Verify the features to be installed on the page.
Click Install.
Consult Microsoft’s documentation for detailed installation instructions.
Next
If you decide to install SQL Server Reporting Services after installing SQL Server, complete SSRS post-installation steps .
Information for product installation
You need the following information about your SQL Server database before installing Bravura Security Fabric:
IP address or DNS name of the server that SQL Server is installed on.
You should verify that you can reach this address from the machine that will host Bravura Security Fabric.
For Microsoft SQL Server Express Edition this is usually
localhost.SQL Server instance name.
Typically, SQL Server is installed in the default instance, and the instance name is
MSSQLSERVER.Clients that connect to the default instance, including Bravura Security Fabric, do not require
\MSSQLSERVERin their server address lines.For Microsoft SQL Server Express Edition this is usually
SQLEXPRESS.Name and password of a system administrator (sysadmin role) login.
For Microsoft SQL Server Express Edition this is usually
sa.
Encrypted communication with iddb
In most cases the SQL Server is local to the Bravura Security Fabric instance. If this is not the case, you may want to set up encryption to ensure that communication between the Database Service (iddb) and SQL Server takes place over an encrypted channel.
To set up encryption on SQL Server:
Obtain a certificate.
Install the certificate with its private key on the SQL Server.
Install the certificate (without private key) at the appropriate place on your instance server, if necessary.
Under the instance's SQL Server registry key, create a DWORD called FORCEENCRYPT and set its value to 1.
On SQL Server, in the certificate's snap-in of mmc.exe, right click the appropriate certificate > all tasks > manage private keys … and add read access to the account that runs the SQL Server service (by default,
NT Authority\MSSQLSERVER)In the SQL Server Configuration Manager, expand SQL Server Network Configuration on the left-hand pane, then right click Protocols for <mssql instance name> and click Properties. Choose the appropriate certificate under the Certificates tab
Restart the SQL Server service.
Restart
iddb.
Notes:
FORCEENCRYPT requires certificate validation; it cannot be turned off if you want encryption. You can use a self-signed cert, and install it as a trusted root certificate on the instance.
FORCEENCRYPT will use TDS 7.3 rather than 8.0, meaning that TLS will be used only for certificate negotiation (with application-layer encryption) rather than fully encapsulating the traffic. Bravura Security Fabric not support TDS 8.0 currently.
Since
setupcurrently does not use the OLE DB driver, encryption will be on during install/patch only if the server is set to require it, and even then certificates will not be validated. During initial installation, if encryption is mandatory on the server side,iddbwill fail to start. When presented with the error prompt, set the FORCEENCRYPT registry value and click Retry.Take care not to allow the certificate to expire without rotating it. Your instance will stop working once it expires.
SSRS post installation
The SQL Server Reporting Services feature is a requirement to use the Analytics app in Bravura Security Fabric . The following steps are only required if you add the SSRS feature after you have already installed SQL Server; you do not need to do these steps if you installed SSRS during the SQL server install.
The version of SSRS must be the same version as the SQL Server for the instance. For example; SQL Server 2016 and SSRS 2016.
If you are installing SQL Server Reporting Service (SSRS) to use the Analytics ensure the server is not a Domain Controller.
Launch Reporting Services Configuration Manager.
Click the Web Service URL button on the left. Change settings if required.
Click Apply (whether you change the settings or not).
Take note of the Report Server Web Service URL. You will need this when you install Bravura Security Fabric .
Click the Database button on the left.
If you do not have a database:
Click Change Database.
Select Create a new report server database.
Click Next.
Follow the prompts to create a database.
This initial database will not be used; however, SSRS requires an initial database to connect to as part of the install process.
Create a dedicated database, user, and schema
Bravura Security Fabric requires a dedicated database, user and schema in SQL Server in order to connect to and install schema objects.
When using the Bravura Security Fabric setup installer, you can:
Allow
setupto do this for you, when asked to enter the database connection and user information;Or
Use the following instructions to pre-configure the user and schema, then enter database server connection settings when configuring the installation.
If you choose to pre-configure the user and schema:
Start Microsoft SQL Server Management Studio.
Connect to the server as a system administrator (sysadmin role).
You can do this using SQL Server authentication and the sa account, or using Windows authentication if the Windows user has the sysadmin role.
For example, to connect to the server using the sa account, set:
Server type: Database Engine
Server name: <host name or IP address> \ <instance>
Authentication: SQL authentication
Login: sa
Password <password for sa>
Click Connect.
Create a new database for Bravura Security Fabric :
In the (left) pane, right-click Databases, then click New Database….
Type the Database name .
Click Options .
Select Recovery model and choose Simple.
Note
Ensure that an appropriate database backup policy is in place. See https://learn.microsoft.com/en-us/sql/relational-databases/backup-restore/recovery-models-sql-server for more information.
Select Compatibility level and ensure that this is set to a minimum value of.
The compatibility level for the installed version of Microsoft SQL Server is suitable.
Select Auto Create Statistics and choose True.
Select Auto Update Statistics and choose True.
Select Auto Update Statistics asynchronously and choose False.
Click OK.
Create a new login:
In the Object Explorer pane, expand Security.
Right-click Logins, then click New Login….
On the page, type the Login name.
Select:
SQL Server Authentication
Type and confirm the password for the new login. Deselect the User must change password at next login and Enforce password expiration checkboxes.
Or
Windows authentication
Pick a local or domain account or group.
Set Default database to the database that you created in Step 3.
Click OK.
Create a new schema in the database:
In the Object Explorer pane expand Databases > < Newdatabase > > Security.
Where <New database> is the database that you created in Step 3.
Right-click Schemas, then click New Schema….
Type the Schema name.
Click OK.
Set the user in the database:
In the Object Explorer pane, expand Databases > <Newdatabase> > Security.
Where <New database> is the database that you created in Step 3.
Right-click Users, then click New User…
Type the User name.
Set the Login name to the user you created in Step 4.
Set the Default schema to the schema you created in Step 5.
In the Database role membership area, enable:
db_datareader
db_datawriter
db_ddladmin
db_owner
Click OK.
Close the connection to the schema by collapsing the database tree and highlighting the root of the SQL Server management interface.
This ensures that the database can be locked to perform the following operation.
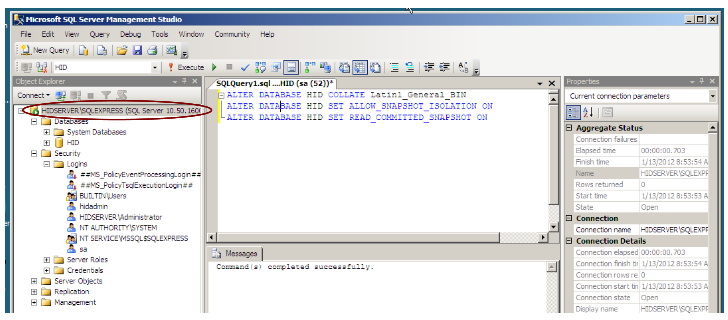
Alter the database collation:
In the toolbar, click New Query.
In the new query window, type the following:
ALTER DATABASE <database name> SET SINGLE_USER WITH ROLLBACK IMMEDIATE
ALTER DATABASE <database name> COLLATE Latin1_General_BIN
ALTER DATABASE <database name> SET ALLOW_SNAPSHOT_ISOLATION ON
ALTER DATABASE <database name> SET READ_COMMITTED_SNAPSHOT ON
ALTER DATABASE <database name> SET MULTI_USER
If the database name is "default", enclose it in square brackets:
[default].Click Execute.
Exit SQL Server Management Studio.
Note the database name, and the name and password of the login that you create. You will need these values, as well as the information you gathered earlier, when you install Bravura Security Fabric .
Create a dedicated report database user and schema
The optional Analytics app requires a dedicated report database user and schema.
When using the Bravura Security Fabric setup installer, you enter SSRS settings and:
Allow
setupto create the user for you;Or
Use the following instructions to pre-configure the user and schema.
If you choose to pre-configure the report user and schema:
Start Microsoft SQL Server Management Studio.
Connect to the server as a system administrator (sysadmin role).
You can do this using SQL Server authentication and the sa account, or using Windows authentication if the Windows user has the sysadmin role.
For example, to connect to the server using the sa account, set:
Server type: Database Engine
Server name: <host name or IP address> \ <instance>
Authentication: SQL authentication
Login: sa
Password <password for sa>
Click Connect.
Create a new schema in the database:
In the Object Explorer pane expand Databases > <instancedatabase> > Security.
Right-click Schemas, then click New Schema….
Type the Schema name.
Set the Schema owner to
dbo.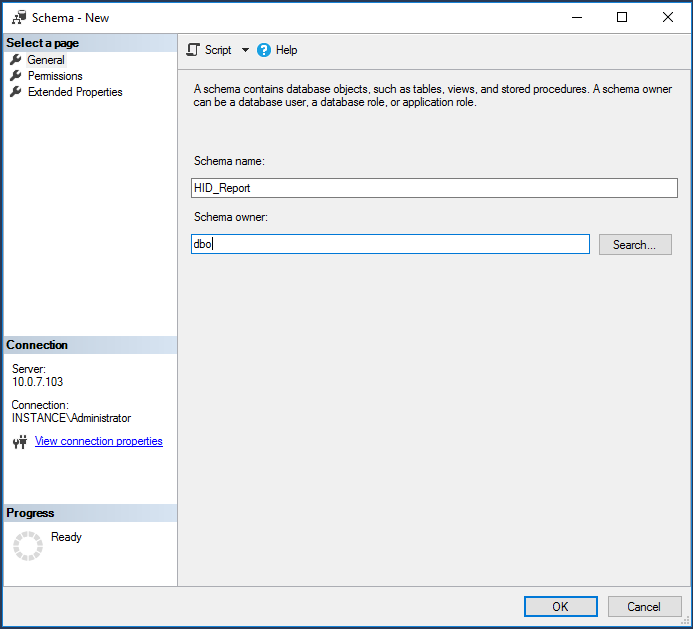
Click OK.
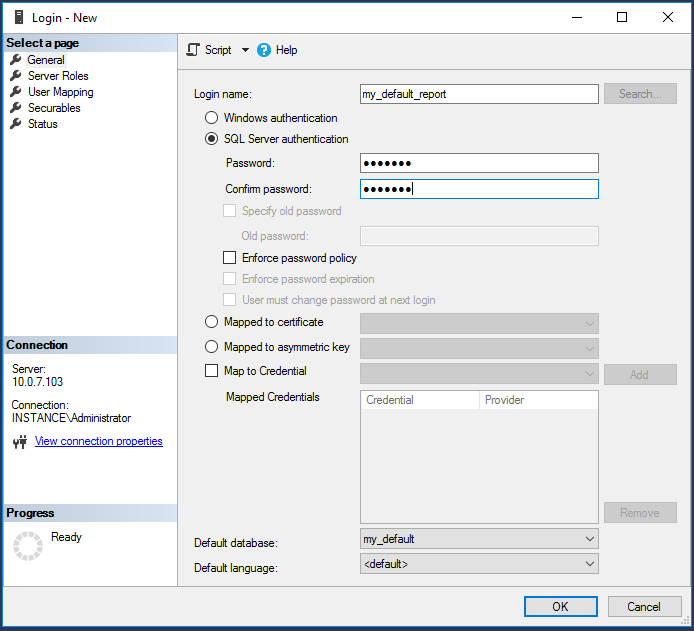
Create a new login:
In the Object Explorer pane, expand Security.
Right-click Logins, then click New Login…
On the General page, type the Login name.
Select SQL Server Authentication.
Type and confirm the password for the new login.
Deselect the User must change password at next login and Enforce password expiration checkboxes.
Set Default database to the instance database created either in a previous install or in Step 3.
Click User Mapping on the left.
Map the <instance database> to this new user and set the default schema to the schema created in the previous step.
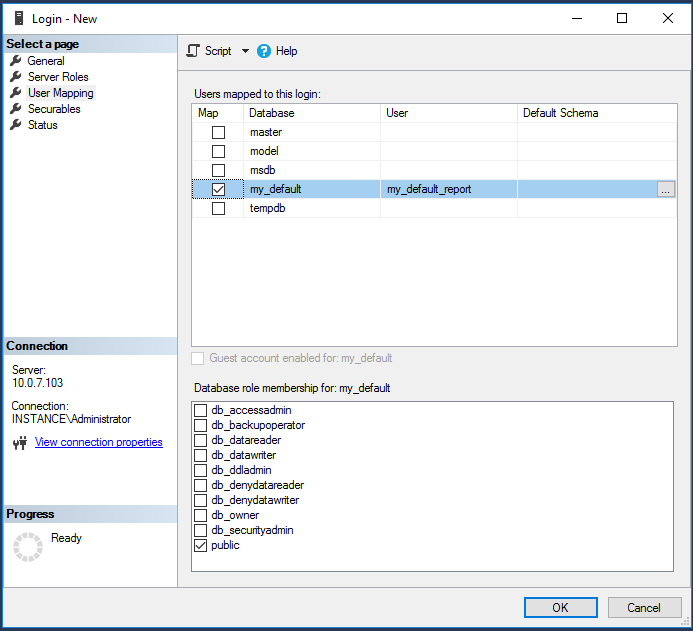
Click OK.
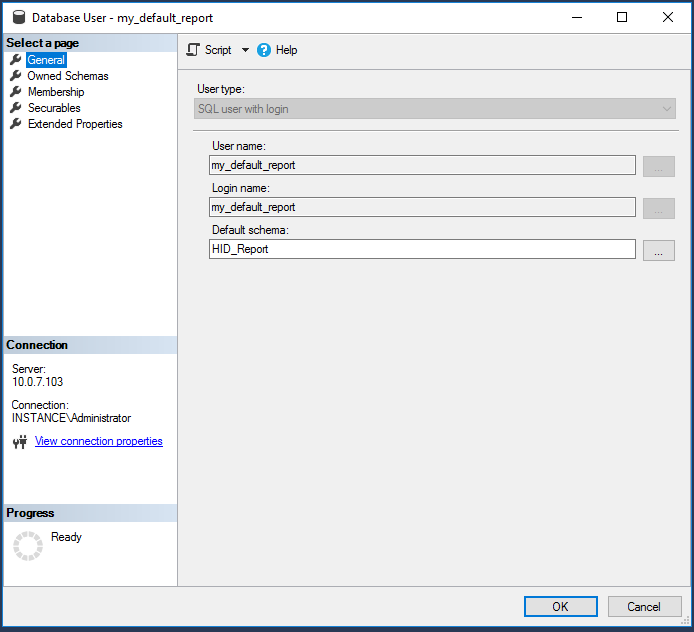
Set the user in the database:
In the Object Explorer pane, expand Databases > <instancedatabase> > Security > Users.
Right-click the user created in Step 4 and click Properties.
Click General on the left.
Set the Default schema to the schema you created in Step 3.
In the Membership area, enable:
db_datareader
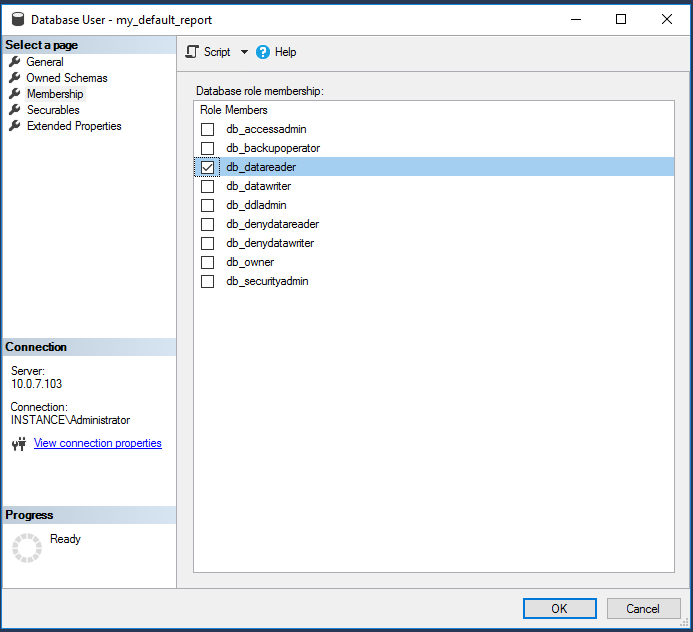
Click Securables on the left.
Search and select Schema object types.
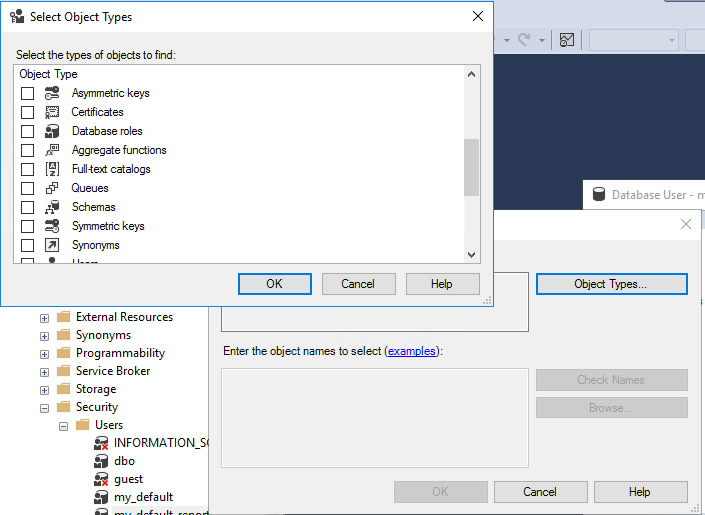
Select the instance database's schema.
Deny this user access to the instance database's schema.
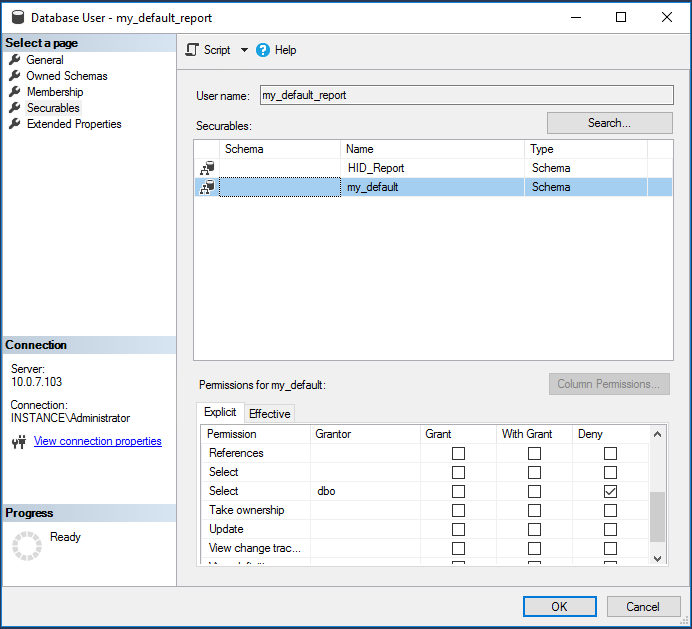
Search and select the report schema you created in Step 3.
Grant Execute and Select permissions.

Click OK.
Removing public/guest permissions
By default, in SQL Server, most objects have public permissions granted. If you remove the default public and guest permissions from your database, for example in SQL server and after, you must ensure the following steps are performed to ensure Bravura Security Fabric operates correctly:
Start Microsoft SQL Server Management Studio.
Connect to the server as a system administrator (sysadmin role).
For example, to connect to the server using the sa account, set:
Server type: Database Engine
Server name: <host name or IP address> \ <instance>
Authentication: SQL authentication
Login: sa
Password <password for sa>
Click Connect.
Create a new user:
In the Object Explorer (left) pane, expand Databases > SystemDatabases > master > Security , right-click Users, then select New User….
Type the User name.
Select Login name created in Creating a dedicated database, user, and schema .
Select Default schema (for example, sys).
Select Securables to search and grant select permission on schemas sys and INFORMATION_SCHEMA.
Click OK.
Create a new database role for sp_describe_first_result_set:
In the Object Explorer (left) pane, expand Databases > System Databases > master > Security > Roles, right-click Database Roles, then select New Database Role….
Type the Role name.
Add user created in previous step to Role Members.
Select page, and click Search.
Select sp_describe_first_result_set (Extended Stored Procedures).
Grant Execute permission, and click OK.
Repeat last step to create a new database role for sp_executesql.
For upgrade or migration, repeat to create a new database role for sp_rename.
For upgrade or migration, ensure your login user can connect:
In the Object Explorer (left) pane, expand Security > Logins, and select your login user.
Select Securables page, and click Search.
Select your server.
Under the Permissions for <server> check the following permissions:
Connect SQL
Control server
Create any database
Create availability group
Create DDL event notification
Create endpoint
Create server role
Create trace event notification
External access assembly
View any definition
View server state
Click OK.
Advanced configuration
If you require that the dedicated user works with fewer permissions, you can do one of the following:
Modify installation options so that Bravura Security Fabric installs to a named schema owned by a different user.
The ”schema install user” requires all of the roles described in the above procedure.
Modify installation options so that Bravura Security Fabric does not install the schema, and instead uses a schema already set up by your database administrator.
Remove extra permissions from the dedicated user after Bravura Security Fabric is installed.
In the above cases, the dedicated user requires at least the db_datareader and db_datawriter database roles, as well as permissions to the schema objects. This includes: EXECUTE permission on the stored procedures, VIEW DEFINITION permission on the stored procedures and views. To learn how to grant permissions to schema objects, contact your database administrator or refer to your database documentation.
See Pre-configured database server settings for more information about advanced installation options.
Working with multiple installations
Instances
If you are installing multiple Bravura Security Fabric instances, ensure that you create and use a separate database and user for each instance.
Database replication
If you will be using Bravura Security Fabric database replication, ensure that you create and use a separate database and user for each replicated server installation.
Schema
During installation, you can modify options so that Bravura Security Fabric does not install the schema, if:
The schema is set up by your database administrator ahead of time.
In this configuration, you must set up database replication between instances. See Database Replication for more information.
The schema is shared from a previous installation.
This means both instances work against the same schema and no database replication is required between them.
See Installing with a Shared Schema for details on shared schema server setup.
Troubleshooting
Errors
If you experience errors, verify that:
You can connect to SQL Server using the login that you created.
You can verify the connection using the SQL Server Command Line Tool.
If the login uses SQL Server authentication:
sqlcmd.exe -S <server name>\<instance> -U <login ID> -P <password>
If the login uses Windows authentication, and the current Windows user is the same as the SQL Server login:
sqlcmd.exe -S <server name>\<instance>
Your system meets the recommended installation requirements.
For example, 1 GB RAM is recommended (512 MB is the minimum) for Microsoft SQL Server.
If you continue to experience errors with Microsoft SQL Server :
Ensure that the server is set up to allow remote connections.
If you are connecting to a named instance, try specifying the TCP port number along with the server and instance name: < servername > \ < instance >, < port >.
For example, using sqlcmd.exe:
sqlcmd.exe -S sqlserver\mycorp2,1433 -U sa -P letmein!
If you continue to experience errors with Microsoft SQL Server , try the following:
Start the SQL Server Configuration Manager (Start > All Programs > Microsoft SQL Server 2008 > Configuration Tools)
Select SQL Server Network Configuration > Protocols for < SQLServer instance > and enable Shared Memory, TCP/IP, and Named Pipes protocols.
Select SQL Native Client Configuration > Client Protocols and enable protocols with the following order:
Shared Memory 1
TCP/IP 2
Named Pipes 3
Restart the server to apply your settings.
User mapping
Check if user mapping is correct and places the DBUser login in the context of the application database. In SSMS or sqlcmd execute:
select count(1) from sesslog_full;
You need to fix user mapping if you get "no such table" or zero rows. For example in SSMS:
Click Server > Security > Logins.
Right-click the DBUser then select Properties> User mapping.
Ensure that the correct Login is mapped to the database schema and user, and has correct privileges granted, as in Step 6.
Verify or update current backend database connection settings
Use the iddbadm utility to verify or update current backend database connection settings.
You can see and change the details of the application connection to its database, in the Windows registry (HKLM\SOFTWARE\Bravura Security\Bravura Security Fabric\<instance>\MSSQL)
Any change to that key's values can be made directly, other than the password, which is encrypted and requires running iddbadm to be changed (showconfig will not expose its plaintext value).
Services
Under certain circumstances, Bravura Security Fabric services may fail to start after a server reboot. This problem may occur if the database is unavailable, or the database services and/or other dependent services have not started completely when the Bravura Security Fabric services attempt to start. There are two methods for resolving this problem.
Method 1: Manually start the services
If Bravura Security Fabric services fail to start, you can manually start all required services. To do this:
Before you begin, ensure the database is available.
Log on to the affected server.
On the Start menu, click Run , type
services.msc, Click OK.In the results pane, find the Bravura Security Logging Service.
Right-click the service, then select Restart.
In the results pane, find the Bravura Security Database Service .
Right-click the Service, then select Start.
Repeat steps 6 and 7 for all Bravura Security services that did not start.
Method 2: Set Bravura Security Fabric services to Automatic (Delayed Start)
To ensure that the database and all required services have started completely before the Bravura Security Fabric services have started, you can set them to Automatic (Delayed Start). To do this:
Log on to the affected server.
On the Start menu, click Run, type
services.msc, Click OK.In the results pane, find the Bravura Security services.
Right-click the service, then select Properties….
Change the Startup Type to Automatic (Delayed Start).
Click Apply , then click OK.
Repeat steps 4-6 for all Bravura Security services that are installed.
Restart the server.