Configuring ticket updates
You can use the Configure event (ITSM) module to quickly configure your event actions to integrate with Remedy AR (Action Request) System 7.5.x, 7.6.x, 8.0.x
Preparation
Before configuring an event action for Remedy AR System 7.5.x, 7.6.x, 8.0.x:
Target a Remedy AR System 7.5+ (Ticket) system.
On the Target system information page, select the appropriate target listed under IT Service Management Systems. Note the target system ID.
Use the schmrem program, located in the <Program Files path>\Bravura Security\Bravura Security Fabric\<instance>\ util\ directory, to generate the schema file following the syntax:
schmrem*.exe -l <outputFile> -s <server>[:<port>] -u <userid> -p <password>
For example:
schmrem.exe -l REMTICKET.scm -s 10.10.60.65 -u remadmin -p rempassword
generates a file REMTICKET.scm in the util directory, where REMTICKET has the same target system ID as configured in Step 1.
Copy the generated
scmfile to the pscfg directory.
The schmrem program is used to generate a file containing the schema information for the forms on the Remedy ARS server.
This program is useful in the configuration of exit traps for events on Remedy ARS targets. The Configure event (itsm) module also uses the schema information file.
The form’s field names, and the following data when available, are extracted for each field:
Default value
Help text
Requirement (optional or required only)
Type
Limits
Enumeration list
Only optional or required modifiable fields are extracted. All other fields are ignored and not written to the file.
Requirements
schmrem is a Win32 executable and is run on the Bravura Security Fabric server. The Remedy ARS server must already be available.
To enable logging for schmrem , you must add a system environment variable, IDM_SUITE_INSTANCE, to define the instance to log; for example: IDM_SUITE_INSTANCE = default. See your operating system documentation to learn how to do this. The program will be logged in:
<Program Files path>\Bravura Security\Bravura Security Fabric\Logs\<instance> idmsuite.log
Usage
schmrem.exe -l <outputFile> -s <server>[:<port>] -u <userid> -p <password>
Argument | Description |
|---|---|
-l <output filename> | The name of the file to which the schema information will be written in KVGroup format. |
-s <server>[:<port>] | The Remedy ARS server (port). |
-u <userid> | Remedy ARS administrator ID. |
-p <password> | Remedy ARS administrator password. |
Examples
Use the following command to send the schema information from your server to a file.
schmrem.exe -l REMTICKET.scm -s 10.10.60.65 -u remadmin -p rempassword
This generates REMTICKET.scm in the util directory.
The following is an example of format of entries in the file:
   "Priority" "Priority" = {
       "default value" = "1"
       "helptext" = "Priority of the approval detail record.  This priority
                     is primarily used to determine which set of escalation
                     conditions attached to the process record will be used."
       "requirement" = "required"
       "type" = "enumeration"
       "enum" "" = {
       "0" = "Urgent"
       "1" = "Normal"
       "2" = "Low"
       }
     }
Configuring events for Remedy Action Request System
To configure an event action to integrate with Remedy AR System 7.5.x, 7.6.x, 8.0.x, using the Configure event (ITSM) module:
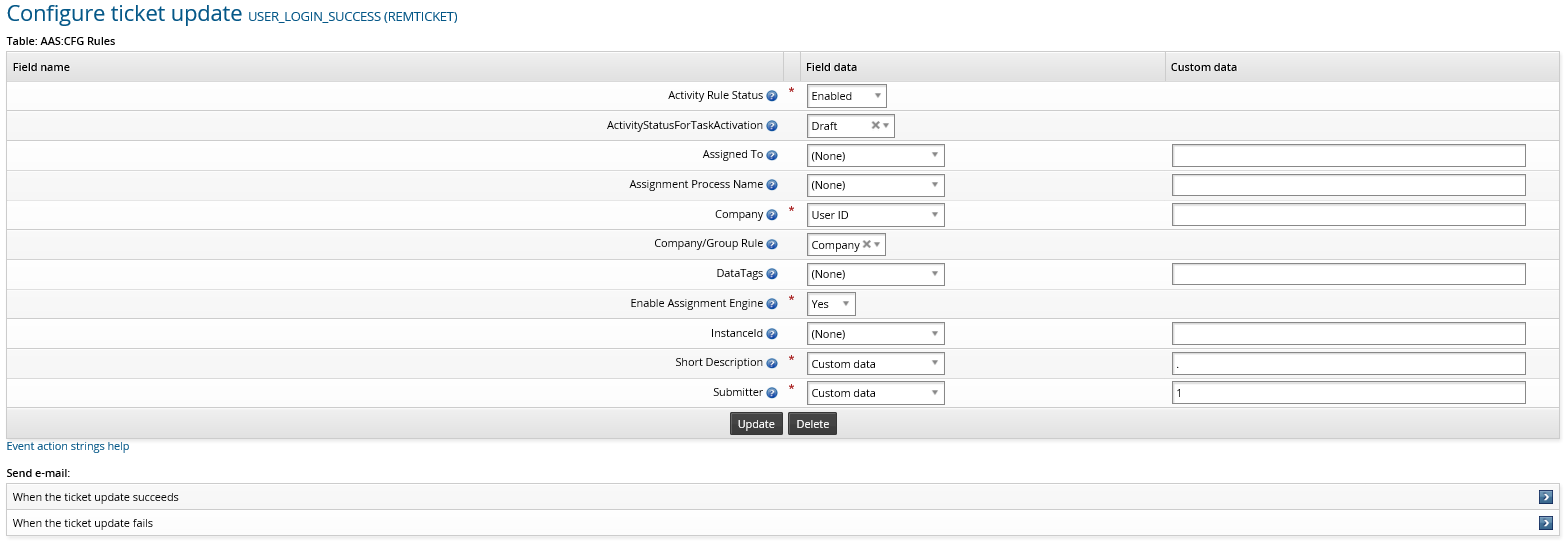
In the Configure event (ITSM) module , select the target system ID in the Configure ticket update row.
The page is displayed:

Select the target system’s schema table that you want to update when this event occurs, then click Continue.
Update fields as appropriate by selecting from the Field data drop-down lists for each field name.
If you want to specify data that is not in the drop-down lists, select Specify manually and type the data in the Custom data field. Fields marked with a red asterisk are required.
Any of the variable strings listed in Table 1, “Event action variable strings” can be used in the custom data field.
Click Update.
Bravura Security Fabric automatically configures the appropriate interface program (
pxrem) and lists it in the Run programs section.If required, set up email to be sent when the ticket update succeeds or fails.
In the Send email table at the bottom of the page, click Add in the appropriate row.
Type text into each field, using the strings described in Table 1, “Event action variable strings” as placeholders for variable text.
Click Update.