Session monitoring
The session monitoring feature enables the monitoring, recording, searching, and viewing of actions performed during administrative sessions using Bravura Privilege credentials.
Session monitoring can be configured to record screen video, keyboard input, clipboard contents, window metadata, and other data while users are connected to login sessions using privileged accounts. The recording may capture just the window launched to connect a user to a privileged account, or the user's entire desktop.
When configured, session monitoring works in the following way:
A self-service user logs in and requests privileged access via command-prompt or remote desktop control.
The user checks out access, triggering a monitoring session.
Data is captured and streamed to the Bravura Security Fabric server. Captured data includes screen video, keystrokes, clipboard contents, and window metadata (process names, window titles). When recording is in progress, an indicator is displayed in the system tray or HTML5 canvas.
Users with appropriate permissions can search files and download recorded sessions.
Playback and review
Recorded session data can be replayed in two modes:
Real-time monitoring — An authorized user watches another user's current session as it happens. The reviewer may be granted the right to terminate the session at any time if suspicious or unauthorized activity is detected.
Post-session review — Recorded sessions are reviewed after the fact, subject to request/approval workflows and privacy protection measures. Auditors can jump directly to points of interest within a session using time-stamped metadata and events.
Access to both live monitoring and session playback is controlled through a combination of access control policies and workflow approvals, designed to safeguard user privacy.
Tamper resistance
The session recording system is tamper-resistant. If users attempt to interrupt recording, their login sessions to privileged accounts are disconnected, and an alarm is raised. This ensures that all privileged activity is captured throughout the session without gaps.
Storage and protection
Session metadata is stored in the database, while screen recordings are stored on the file system.
Data at rest is protected at the database and file-system levels. Sensitive items such as password values are explicitly encrypted.
Recordings are replicated across nodes for resilience and transmitted over encrypted channels.
Access to search or playback is logged, requires explicit authorization, and generates an audit trail for compliance.
Session recordings can be archived indefinitely and serve purposes ranging from knowledge sharing and training to forensic audits and compliance.
Storage requirements depend on variables such as frame rate, resolution, recording scope, and screen activity. As a planning reference, continuous recording of 100 IT staff for 8 hours per day at 10% screen activity equates to approximately 24 TB per year. Real-world storage needs are typically lower, as not all sessions are recorded, and usage patterns vary.
Terminology
The following terms are relevant to session monitoring:
Monitored session: A session that has been monitored and recorded. A monitored session may process specific or full system content.
User device: The device from which the privileged session was initiated.
User login: The login used for the User device. This is often the requester’s login.
Managed system: The managed system the privileged access was checked out from.
Access: The privileged access checked out.
Monitored user: Uses Bravura Privilege credentials to perform administrative tasks on sensitive servers. They are often administrators.
Requester: Issues requests to search for and review monitored sessions. They are also called auditors.
Authorizer: Authorizes requests to search for and review of monitored sessions.
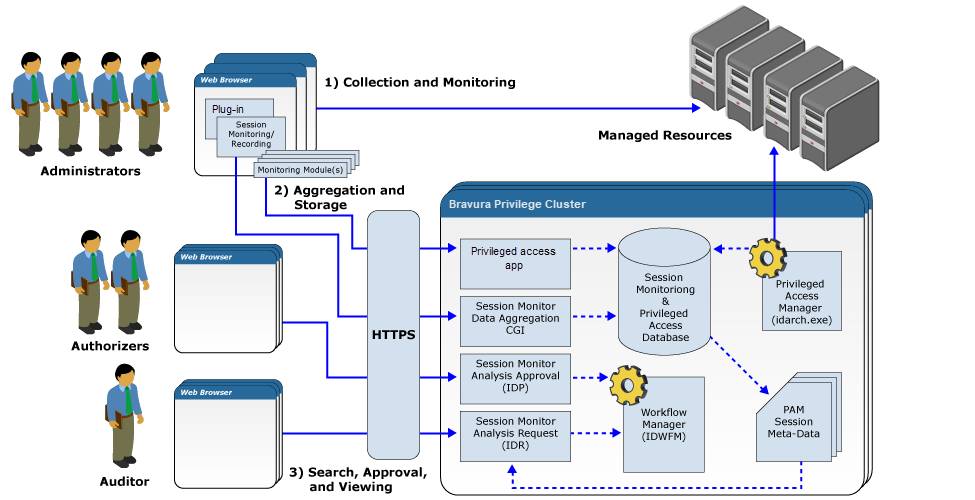
Session monitoring architecture
The architecture for Session Monitoring and Recording includes three primary interfaces (one client side and two server side):
Collection and Monitoring (Client Side)
Aggregation and Storage (Server Side)
Searching and Viewing (Server side)
Collection modules
You can configure Bravura Privilege session monitoring to use one or more collection modules :
Key stroke capture – to record keys that were pressed during a session.
Screen capture – to periodically capture screen shots during a session.
Clipboard capture – to collect copy/paste information during a session.
Process name – to capture process created.
User interface editable data capture – to capture editable data from user interface elements during a recorded session.
User interface selectable meta data recording – to capture selected data from user interface elements during a recorded session.
User interface title meta data recording . – to capture title data from user interface elements during a recorded session.
Webcam data capture – to periodically capture images from any attached web cams during a recorded session.
Aggregation and storage
When session monitoring is enabled, the smonprocessmeta program processes harvested data and inserts the data into the database in a series of batch operations. If a significant amount of data has been collected, this could result in significant work for the database. smonprocessmeta executes periodically while a session monitoring session is active. Text-based data such as keystroke, clipboard and UI data will not be available to search engines or in zip packages until smonprocessmeta is executed.
The smonsavemeta program creates session data packages when requested, and fires any additional utilities such as smonavi or another video generation utility. Screenshots are aggregated into hour-long video segments.
You can use the Manage the system > Modules > Session monitor menu to control:
Recorded session file storage locations
Video data is not replicated. The server that collects the data is responsible for storing the data.
Searching and viewing
Regular users, with appropriate permissions, use the Session monitor app to request and download recorded sessions of activity requiring privileged credentials. They may be able to access recorded data related to their own or another users’ activity. Depending on access controls, they may be able to search and view session data without approval, or via authorization workflow.
Click below to view a demonstration of setting up permissions and authorization for searching, viewing and downloading recorded sessions:
Click below to view a demonstration of viewing and downloading monitored sessions:
The Session monitor app is paired with smonc , which is the high performance CGI program that receives information from workstations .
The Session monitor app uses a powerful search engine to search recorded session data. You control various options for the search engine in the Manage the system > Modules > Session monitor menu.
You can control the range of data that users can search in the Recorded sessions request options tab. See Configuring recorded session access request options for details.
Recorded session data, depending on which recorded session modules are enabled, is compiled into a zip file when requested. The zip file to be downloaded is named as follows: <username> - <target computer name> - <CCYYMM-HHMMSS start time> .zip.
The zip archive includes a general.xml file, at its root, that contains general information about the recorded session; including:
Privileged account
Source computer
Profile ID of the user who initiated the session
Duration of the whole session (start time and end time)
NetBIOS name of the workstation where Bravura Security Fabric software executed
Accounts (local and/or domain) that were used on the workstation where the software was executed
The zip archive contains the following folders and files, depending on which data collection modules are enabled:
video \ – contains movie files compiled from screenshots
webcam \ – contains image files taken from a webcam
text \ – contains XML files:
clipboard-data.xml– data copied and saved on the clipboardkeystroke-data.xml– keys pressed during a sessionprocess-name-data.xml– process meta dataui-editable-data.xml– editable data from a user interfaceui-focusable-data.xml– data focused on a (selected) user interfaceui-title-data.xml– titles from user interface pages
Planning session monitoring
Before implementing session monitoring, determine who can do what with recorded sessions:
Who should be able to search their own recorded sessions?
Who should be able to search other people's recorded sessions?
Who can be auto-approved to search or download recorded sessions?
Who requires approval from an authorizer?
In general, requesters are given permission to search, view and download their own sessions. This is so they can review their own work or, if there is an error in the system, they can see what might have gone wrong in their last session. Requesters cannot usually see other people’s sessions. Auditors are usually given permission to search, view and download other people’s recorded sessions. It is also possible for auditors to view a session that is being monitored live. So while an account is checked out and in use an auditor can log onto Bravura Privilege and watch the user make changes on the system.
Users that need to review recorded sessions on a regular basis will be auto-approved to view them so that it will not slow down their work. Generally, 80% of requests should be auto-approved in Bravura Privilege to avoid approver fatigue. Only users that do not require consistent access to recorded sessions should require authorization.
Security and privacy considerations
Carefully consider the consequences of enabling each of these modules. Enabling all modules would provide the most comprehensive session data; however, this would have the greatest potential impact on user privacy. For example, the web cam module can collect information from the users surroundings. If the user can access managed systems from uncontrolled environments, such as public places or their home, enabling this module may not be appropriate.
You can also tailor access to recorded session data depending upon security policy. For example, you may want to ensure that users know what is being monitored, when monitoring is active, and that they will be able to review recorded sessions of their own activity. Other security policies may require covert monitoring which can be enabled through configuration options. By default, covert monitoring is disabled. Review security and user monitoring policies before enabling covert monitoring.
In addition, Bravura Security Fabric , by default, restricts the screen-shot and keystroke-data-monitoring scope to the terminal only, to protect the privacy of the user; for example, when remote users or contractors are accessing monitored systems from public or personal computers, personal data and applications could also be active. This behavior is controlled by the SMON RESTRICT SCOPE setting, which can be applied globally or per managed system policy.
For disclosure options that allow session recording, having SMON RESTRICT SCOPE enabled would mean:
Child processes of the process that receives disclosed access are not recorded.
Local workstation tools opened via
pswxcmd(which open new sessions in the same process as additional tabs) will record all tabs only in the first open session on a workstation; additional simultaneous sessions open to the same tool will record black rectangles.
Disabling this setting allows you to monitor the user’s display and keystrokes on their whole system both inside and outside the terminal when they initiate a privileged session. This provides better security; for example, if a user starts remote desktop, they may be able to copy sensitive data from the remote terminal to an email or another application outside the terminal.
Warning
Clipboard data is not restricted when SMON RESTRICT SCOPE is enabled. Bravura Security Fabric will continue to collect clipboard data inside and outside the terminal for the user's whole system.
Hardware requirements
Before calculating the hardware requirements for your organization, you should consider:
What business drivers you have for recording sessions
What login sessions should be recorded
What type of data should be captured
Which login sessions should be recorded?
When deploying a session recording system, the first question is which sessions to record. There are several possibilities:
All sessions, by all users
All sessions to sensitive systems, but any user with access to those systems
All sessions by high-risk users; that is, users whose actions could cause harm
The cost and impact of session recording technology directly affects how this question is answered. If capturing more sessions is relatively inexpensive and does not noticeably slow down the work of the affected users, then it makes sense to record more sessions. Conversely, as the costs of capture, transmission and storage rise, the motivation to more carefully target what is and what is not recorded rises.
In the context of session recording of system administrators, Bravura Security recommends that all logins to sensitive accounts should be recorded.
In the context of session recording of high-risk business users – for example, HR staff or financial trader – Bravura Security recommends that all logins by those users, to any system, should be recorded.
Over time, as the cost of storage and bandwidth continue to decline, it may make sense to record all login sessions by all users to all systems.
Determining required storage capacity
Storage capacity requirements can vary greatly depending on:
Number of sessions recorded
Type of data captured
Frame rate used
Session duration
How often content is being updated on the screen
Number of monitors used per session
Storage capacity requirements are also affected by the following session monitoring options:
Color depth
Capture video type
Resolution, frame height/width, pixel density
What data should be captured
The data that can be recorded from a graphical user interface is extensive. It includes:
Screen captures – image files of the contents of a single application or a user’s graphical desktop
Process information, such as the names of arguments passed to a running program
User interface elements, such as window titles, labels and text from input fields
Keyboard events, such as key presses and releases
Pointer device (mouse) events, such as movement and button clicks
The contents of the operating system copy buffer
File system events, such as mounting or detaching network drives or removable media
File transfers, such as copying files from one file system to another
Video or image streams from a video capture device such as a webcam
Network data transfers, such as emails or web pages
At a minimum, when recording the login sessions of a user into an administrator-level account, it makes sense to capture what they typed and what the system displayed. This means video capture as well as capture of input from both the keyboard and copy buffer.
Regarding video capture, it may make sense to capture the user’s entire desktop, so that – in the event that the user downloaded a file with sensitive data to his computer – the recording will show what he then did with that file. For instance, if a sensitive file was briefly examined – as would be normal in the context of troubleshooting – and then deleted, the action can be taken to be innocuous. On the other hand, if a sensitive file was copied to a USB flash drive or sent to the user’s personal email account, the action can be interpreted as malicious.
Regarding input capture, it makes sense to capture both keyboard events and copy buffer contents. This is because the user may have constructed commands in advance and pasted them into the login session, without generating any keyboard events.
Finally, it may make sense to capture webcam video. This is useful in the event of serious misconduct leading to legal proceedings. When this happens, the user in question is likely to claim that the recorded actions were taken by someone else who stole their access. Webcam capture will show who was performing those actions.
Note
Most corporate privacy regulations will prevent the use of webcam recording.
Ensure file updates availability in the Windows OS
The session monitoring service (idsmpg) attempts to keep a mutex on the recorded session file storage location . That storage location must be accessible to the application in general, and the incoming file updates must be available on that mutex.
For example, when a storage location is mounted as a share (\\server\location) without being assigned to a logical disk drive letter, the OS cannot signal to the session monitoring service when files are being written, so their metadata will not be processed.
When that happens, the sessions' data will not be available for viewing or downloading.
In such cases, smonprocessmeta can be executed manually or on a scheduled task.
Screen capture trend analysis
Screen captures (including webcam captures), are the most intensive session recording both in terms of storage and network usage. For this reason, the following is an analysis of a variety of variables and how they affect the total storage and network usage.
Unless otherwise specified, Remote desktop / Remote APP RDP (pswxtsvc) is configured. Guacamole uses considerably less disk space, and is not directly analyzed here.
Resolution trend analysis
Resolution does not greatly affect the performance of sessions or their recordings.
The maximum dimension supported is 1280 x 720.
Color depth comparison
By default, sessions are recorded at 32-bit color depth. This can be reduced to 16-bit, and will reduce the raw disk space required by approximately 60%. The compressed disk space, however, will be only slightly less than that of 32-bit.
Frame rate trend analysis
The frame rate directly affects how much storage is required. When the frame rate is doubled (twice as many screenshots are taken per second), the storage required is roughly doubled as well.
Restricted scope comparison
When restricted scope is disabled, more than one monitor can be recorded per session. In this case, the storage is directly proportional to the increase in the area recorded.
The storage required is doubled when two monitors are recorded instead of one, assuming the same frame height and width for both monitors.
Concurrent session trend analysis
The amount of storage required is directly related to the number of sessions being recorded. Recording 100 sessions will require 10 times more storage than recording 10 sessions.
Usage trend
Storage required is strongly related to activity within a session. Activity can range from being idle (0%, where nothing on the screen changes) to constant changes (100%, such as watching a video or running a living screen-saver).
The average user will likely use no more than 10-20%. However, since it is difficult to guess what is changing on a user’s screen, a sample of routine sessions should be measured.
Case studies
Assuming the following:
Default frame rate of 1/second
Frame width x height of 1280 x 960
Video capture
RDP disclosure
The following formula can be used to estimate the storage required for raw video:
S = N * (0.5 * A + 2.2)
where
S = Storage in MB/min
N = total sessions
A = percentage of screen activity
Forensic audits
In the event that an IT user is under suspicion or has been found to act unethically or illegally, it is helpful to be able to play back all of that user’s activity, to see what inappropriate actions they may have taken. This data may be required as supporting evidence if the user must be terminated and may be needed in the course of legal proceedings thereafter. This data may also be needed to find and reverse any harmful changes the user has made to systems or data.
In this case, you may consider capturing video data for all IT staff only.
Assuming there are 100 staff in the IT department, and each runs one 8-hour session per day, with 10% screen activity, use the equation above to determine the storage required for 1 year:
S = N * (0.5 * A + 2.2) MB/min
= 100 * (0.5 * 0.1 + 2.2) MB/min
= 225 MB/min
= 225 MB/min * 60 min/hr * 8 hr/day * 220 work days/year
= 23760000 MB/year
= 23760 GB/year
Load balancing considerations
It is recommended that you provision several load balancing replicated servers accessible by a single URL. Multiple replicated servers are required to carry the data load created by the monitored sessions and ensure a quality service. A single URL simplifies configuration and failover situations if a monitoring server needs to be taken down for maintenance or replaced.
Note that an end user needs to be able to access both the direct URL of the server and the load-balanced URL in order to download packages containing video data. When the user attempts to download a session, Bravura Privilege uses the direct URL (not the load-balancing one) to trigger the downloading of the package to the user’s workstation. This means that the user must be able to connect to the direct Bravura Privilege URL using their browser, without it being blocked by a firewall.
Getting started
Configuration requirements
Before configuring session monitoring options, you should:
Set up Managed Systems and Managed System Policies .
If you want users’ requests for searching recorded session data to be authorized, assign authorizers to managed system policies.
Configure Access Disclosure Plugins .
The command prompt (
pswxcmd), remote desktop (pswxtsvc), secure browser (securebrowser), and all Guacamole controls are compatible with session monitoring.Configure user access rules to allow users to access recorded data related to their own or another users’ activity.
The following privileges are available:
Manage recorded sessions. In order to have access to the Session monitor app, users must be granted this privilege. The Session monitor app allows users to submit requests to search, view and download recorded sessions. In addition, users can be granted the following:
Pre-approved search of my recorded sessions
Pre-approved search of all recorded sessions
Pre-approved download of recorded sessions
Pre-approved view of recorded sessions
Optional: Configure additional access controls.
Pre-approved search recorded sessions
Pre-approved download recorded sessions
Pre-approved view of recorded sessions
It is recommended that you plan how you will implement session monitoring .
Navigation
To configure session monitoring options click Manage the system > Privileged access > Options to configure global options, or click Manage the system > Privileged access > Managed system policies > <Policy> > Options to configure policy-level options
Select the Recorded sessions tab to set options for configuring:
Select the Recorded session access request tab to set options for configuring recorded session access request options .
To configure web module options click Manage the system > Modules > Session monitor for:
Initial configuration
As long as you have prepared your system to meet the requirements listed on on the current page, you can get started with testing the session monitoring feature by setting the following on the Recorded sessions tab:
SMON HTTP URL – The session monitor client connects using this fully qualified URL to the
smoncCGI program on a Bravura Security Fabric server.At least one of the following:
SMON KEYSTROKE ENABLE to capture keystrokes
SMON SCREENSHOT ENABLE to take periodic screenshots
SMON WEBCAM ENABLE to record webcam images
SMON UI ENABLE to capture user interface information
SMON CLIPBOARD ENABLE to capture clipboard data
The default SMON HTTP URL is <BASE IDSYNCH URL>/<virtualdirectory>/smonc.exe. The BASE IDSYNCH URL is set at Manage the system > Workflow > Email configuration .
The following sections describe these options and more in detail.
Scope and display of monitoring
Bravura Security Fabric , by default, restricts the screen-shot and keystroke-data-monitoring scope to the terminal only, to protect the privacy of the user; for example, when remote users or contractors are accessing monitored systems from public or personal computers, personal data and applications could also be active. This behavior is controlled by the SMON RESTRICT SCOPE setting, which can be applied globally or per managed system policy.
For disclosure options that allow session recording, having SMON RESTRICT SCOPE enabled would mean:
Child processes of the process that receives disclosed access are not recorded.
Local workstation tools opened via
pswxcmd(which open new sessions in the same process as additional tabs) will record all tabs only in the first open session on a workstation; additional simultaneous sessions open to the same tool will record black rectangles.
Disabling this setting allows you to monitor the user’s display and keystrokes on their whole system both inside and outside the terminal when they initiate a privileged session. This provides better security; for example, if a user starts remote desktop, they may be able to copy sensitive data from the remote terminal to an email or another application outside the terminal.
Warning
Clipboard data is not restricted when SMON RESTRICT SCOPE is enabled. Bravura Security Fabric will continue to collect clipboard data inside and outside the terminal for the user's whole system.
The following options on the Recorded session tab control the scope of what is monitored:
Option | Description |
|---|---|
SMON RESTRICT SCOPE | When disabled, the user’s entire system is monitored when the user starts a privileged session. When enabled, monitoring is restricted to the process created by the access disclosure plugin; for example, when the command prompt control ( This should always be disabled when recording user interface meta data. |
When a user initiates a monitored session, an  icon is displayed in the user’s task bar with a customizable message to notify the user that he or she is being monitored. You can disable this if your security policy requires covert monitoring. It is recommended that you review security and user monitoring policies before enabling covert monitoring.
The following options on the Recorded session tab control how users know their session is being recorded:
Option | Description |
|---|---|
SMON DISPLAY RECORDING ACTIVE TASK BAR ICON | When enabled, an icon is displayed in the user’s desktop task bar to indicate that their session is being recorded. |
SMON DISPLAY RECORDING ACTIVE TASK BAR MESSAGE | The message that is displayed when the user hovers the cursor over the session recording task bar icon. |
Session monitor connectivity
The following options on the Recorded session tab control how the session monitoring clients connects with the Bravura Security Fabric server.
Option | Description |
|---|---|
SMON HTTP CERT VALIDATION | When enabled, the session monitoring client will validate the certificate from the Bravura Security Fabric server when connecting over an SSL connection. |
SMON HTTP HEART BEAT FREQUENCY | Frequency in seconds that the client will send a signal to the server to indicate that it is still running. The default is 30 seconds. |
SMON HTTP POST SIZE LIMIT | The limit on data sent from the ActiveX control or persistent client to |
SMON HTTPP ROXY SERVER | The proxy server used by the session monitor client when trying to connect to the server. |
SMON HTTP TIMEOUT | The time in seconds that the session monitor client will try to establish a connection with the server before giving up. The default is 30 seconds. |
SMON HTTP URL | The session monitor client connects using this fully qualified URL to The default SMON HTTP URL is If this is incorrect, ActiveX controls will not be able to connect to the server, and as a result, will not allow the remote connection to the managed resource to proceed. For troubleshooting tips, see Troubleshooting . |
SMON NETWORK FAILURE RETRY LIMIT | The number of failed connection attempts that a session monitor client can make before Bravura Security Fabric determines there is a network failure. The default is two attempts. |
SMON NETWORK FAILURE TERMINATE | When enabled, terminates the remote connection if the network fails; that is, collected data can no longer be sent to Bravura Security Fabric server. This is disabled by default. |
SMON STALE SESSION TIMEOUT | Mark sessions as stale if they have not contacted the server in this many seconds. The default is 120 seconds. |
Connectivity messages
The following settings affect messages displayed to users when certain events occur when session monitoring is initiated:
Option | Description |
|---|---|
SMON NETWORK FAILURE TERMINATE MSG | Message to display to users when their connection is terminated due to a network failure. The message is controlled by the |
SMON NETWORK NO CONNECTION MSG | Message to display to users when the client cannot contact the Bravura Security Fabric server, and access is not granted. The message is controlled by the |
SMON TERMINATE BY ADMINISTRATOR MSG | Message to display to users when their connection is terminated by an administrator. The message is controlled by the |
Troubleshooting session monitor connectivity
If you have trouble connecting to the monitoring server when initiating a session, try using the process explorer program, procexp.exe, to analyze processes on the system. You can download this program from live.sysinternals.com.
If you have trouble connecting to the monitoring server when initiating a session, try using the logutil program to collect logging information from the ActiveX controls. To do this, run the following command on the system where the ActiveX controls are being run from:
logutil.exe -instance "PPM Client ActiveX Controls" -level 6 -maxdelay 2 -makekey
Confirm the URL used in the connection. Most connection failures are the result of a misconfiguration in the URL, SSL, certificate validation, or proxy settings.
If the SMON HTTP URL is incorrect, the ActiveX controls will not be able to connect to the server, and as a result, will not allow the remote connection to the managed resource to proceed.
When a client using pswxcmd or pswxtsvc cannot communicate with the server via the SMON HTTP URL, the following message is displayed on the client:
"Failed to connect to Bravura Security Fabric server. Please contact the Bravura Security Fabric administrator."
Fix the URL so that it resolves for all client workstations. You can test it by copying and pasting the value into the web browser location field in the web browser. If a page loads with an encrypted blob then it worked (encrypted blobs start with {AES} ). Typical errors would be: server not found, or 404 Page Not Found.
The server not found error means the first part of the SMON HTTP URL does not resolve correctly; the hostname or IP of the server is not accessible from client.
The 404 Page Not Found error typically means that the wrong hostname or IP was used (it went to a web server other than the one with the Bravura Security Fabric instance installed). It could also hint that the virtual directory is incorrect, or that HTTP/HTTPS is incorrectly specified. The virtual directory is set during setup.
In order to download a session package, the client workstation must be able to resolve the URL of the server on which the package was created. If clients connect to the server using a load balancer, the client may not be able to download the package.
Alternatively, you can provide a separate, externally addressable name of the server.
Recorded session data collection modules
This section shows you how to configure the Bravura Privilege recorded session data collection modules. Navigate to the Recorded session tab to configure data capture methods including:
Key stroke capture
The key stroke capture module records keys pressed during a session. When process-specific monitoring is enabled, only the keys pressed in the target process window are recorded. When full system monitoring is enabled, all key strokes are captured.
To enable Bravura Privilege to record keys that were pressed during a session, configure the following in the Recorded sessions options tab:
Option | Description |
|---|---|
SMON KEYSTROKE ENABLE | Enables Bravura Privilege to capture key strokes during recorded sessions. |
The information is compiled into a keystroke-data.xml file in the directory set by Manage the system > Modules > Session monitor > SMON TEXT STORAGE PATH.
The following options on the Recorded sessions tab control which keystroke types generate new events:
Option | Description |
|---|---|
SMON KEYSTROKE SPLIT ENTER | Generate a new keystroke event when the user presses the Enter key. This is enabled by default. |
SMON KEYSTROKE SPLIT ESC | Generate a new keystroke event when the user presses the escape key. This is disabled by default. |
SMON KEYSTROKE SPLIT LMB | Generate a new keystroke event when the user clicks their left mouse button. This is disabled by default. |
SMON KEYSTROKE SPLIT TAB | Generate a new keystroke event when the user presses the tab key. This is disabled by default. |
Screen capture
The screen capture module can take periodic screenshots of either the target process, in the case of process-specific monitoring , or the entire desktop, in the case of full system monitoring.
The module is able to handle multiple monitors, the removal and addition of monitors during recording, and screen savers.
To enable Bravura Privilege to periodically capture screenshots during a session, configure the following in the Recorded sessions options tab:
Option | Description |
|---|---|
SMON SCREENSHOT COLOR QUALITY | The colour quality at which screenshots will be captured and stored. The value can be either 16 or 32 bits. The default is 32 bits. |
SMON SCREENSHOT ENABLE | Enables Bravura Privilege to periodically capture screenshots during a recorded session. |
SMON SCREENSHOT FRAME RATE | Interval, in milliseconds, at which screenshots are taken during a recorded session. The default is 1000 milliseconds, or 1 second. |
SMON SCREENSHOT MAX COUNT PER ARCHIVE | Maximum number of screenshots per archived file. This must be a number between 1 and 65535. |
To help limit storage and network bandwidth requirements, screenshots are aggregated into hour-long videos, which are stored in the path set by Manage the system > Modules > Session monitor > SMON SCREENSHOT STORAGE PATH.
User interface meta data recording
Note
This is not compatible with Guacamole access disclosure plugins.
The user interface meta data recording module provides meta data that you can use to enhance the data collection abilities of other modules.
To enable Bravura Privilege to gather data from user interface elements during a session, configure the following in the Recorded sessions options tab:
Option | Description |
|---|---|
SMON RESTRICT SCOPE | Ensure this is disabled to allow the user interface meta data to be recorded. See Configuring scope and display of monitoring for more information about this setting. |
SMON UI COLLECT EDITABLE | When the user interface module is enabled, collect editable text data, such as in form and location bars. |
SMON UI COLLECT SELECTABLE | When the user interface module is enabled, collect text from elements that are focused or clicked. |
SMON UI COLLECT TITLES | When the user interface module is enabled, collect the titles of windows that users work in. |
SMON UI ENABLE | Enables Bravura Privilege to capture text data from user interface elements during a recorded session. |
The information is compiled into ui-editable-data.xml, ui-focusable-data.xml, and ui-title-data.xml files in the directory set by Manage the system > Modules > Recorded session management > SMON TEXT STORAGE PATH.
Clipboard capture
The clipboard capture module collects copy/paste information during a privileged session.
To enable Bravura Privilege to capture clipboard data during a session, configure the following in the Recorded sessions options tab:
Option | Description |
|---|---|
SMON CLIPBOARD ENABLE | Enables Bravura Privilege to capture clipboard data during recorded sessions. |
The information is compiled into a clipboard-data.xml file in the directory set by Manage the system > Modules > Session monitor > SMON TEXT STORAGE PATH.
Webcam capture
Note
This is not compatible with Guacamole access disclosure plugins.
To enable Bravura Privilege to periodically capture still images from any attached webcams during a session, configure the following in the Recorded sessions options tab:
Option | Description |
|---|---|
SMON WEBCAM CAPTURE FREQUENCY | Frequency in seconds that webcam snapshots should be taken (Default once every 30 seconds). |
SMON WEBCAM ENABLE | Enables Bravura Privilege to periodically capture images from any attached web cams during a recorded session. |
SMON WEBCAM ENABLE CIDR | Enables the webcam module only if the workstation’s IP address falls within the specified CIDR rule. |
SMON WEBCAM ENABLE DOMAIN | Enables the webcam module only if the workstation is a member of the specified domain. |
SMON WEBCAM MAX COUNT PER ARCHIVE | Maximum number of webcam images per archive file. This must be a number between 1 and 65535. |
The webcam images are stored in the directory path set by Manage the system > Modules > Recorded session management > SMON WEBCAM STORAGE PATH.
See also
Session monitor app to learn how to set options for storing recorded data, search engine controls, and other module behaviors.
Session monitoring utilities for information about session data processing utilities, including
smonprocessmeta,smonsavemeta, andsmonavi.
Recorded session access request options
You can control how users can access recorded sessions by setting options, globally or per policy. Some options can be overridden by the user when issuing their requests.
The following options are located on the Recorded session access request tab :
Option | Description |
|---|---|
SMON DEFAULT REQ PACKAGE LIFE | The number of days before a generated package is deleted. This value can be overridden per request. The default value is 7. |
SMON DEFAULT REQ PACKAGE LIFE MAX | The maximum number of days a package will remain available. The default value is 30. |
SMON DEFAULT REQ SESSION ACTIVE BEGIN | Search for sessions active starting this number of days relative to the day the request is issued, where a negative number represent days before the request is issued and a positive number represent days after the request was issued. This value can be overridden per request. The default value is -30. |
SMON DEFAULT REQ SESSION ACTIVE END | Search for sessions active until this number of days relative to the day the request is issued, where a negative number represents days before the request is issued and a positive number represents days after the request was issued. This value can be overridden per request. The default value is 0. |
SMON DEFAULT REQ SESSION ACTIVE MAX | The maximum range (in days) of recorded sessions the user will be able to search. The default is 200. |
SMON DEFAULT REQ SESSION BROWSER VIEW BEGIN | The user can start viewing the recorded session this number of days relative to the day the request is issued. This value can be overridden per request. The default value is 0. |
SMON DEFAULT REQ SESSION BROWSER VIEW END | The user can view the recorded session until this number of days relative to the day the request is issued. This value can be overridden per request. The default value is 7. |
SMON DEFAULT REQ SESSION BROWSER VIEW MAX | The maximum range (in days) a recorded session can be viewed. The default is 31. |
SMON DEFAULT REQ SESSION SEARCH BEGIN | The user can start searching this number of days relative to the day the request is issued. This value can be overridden per request. The default is 0. |
SMON DEFAULT REQ SESSION SEARCH END | The user can search until this number of days relative to the day the request is issued. This value can be overridden per request. The default is 7. |
SMON DEFAULT REQ SESSION SEARCH MAX | The maximum duration (in days) the user will be able to search. The default is 31. |
See also
Session monitor app to learn how to set options for the storage of recorded data, and other module behavior.
Profile and Request Attributes for information about built-in attributes related to requests for recorded session data.
Cross-origin resource sharing for session recording
When an auditor or someone with appropriate privileges requests a session recording package, the package is stored in the SMON PACKAGE STORAGE PATH on the Bravura Security Fabric server where that auditor's WebUI session is running. When that created package is downloaded during a WebUI session connected to other servers, Cross-origin resource sharing (CORS) must be configured in order for the downloader's browser to allow retrieval of the compiled video or recording archive. You configure CORS by listing ALLOWED ORIGINS (Manage the system > Maintenance > System variables). Enter a comma-separated list of node-specific URLs of all the user-accessible nodes (see example below).
CORS blocks the retrieval operation -- the HTTP(s) request going to a different server than the one where the rest of the current WebUI is rendered. It is not required for search, nor for viewing recorded session metadata that's loaded in the backend database tables after the session is closed and processed by smonprocessmeta .
The following is an example of the process in detail:
The auditor wanting to request a package connects to the application URL.
The load balancer sends them to one node (server1).
The user session is created on that node and a well-configured load balancer keeps all HTTP requests from that session going to that same server1 node.
SMON HTTP URL can be configured so that session monitoring files go to a dedicated application node, or via a separate load balancer, to a subset of dedicated nodes not encumbered by automation or by processing user sessions.
If that's not the case, and session recording is using the same load balancer that the users and application administrators WebUI use, review the settings required for the load balancer to send all recorded remote session data to the same application node that is rendering the user's WebUI session.
The auditor requests a session recording package.
The package is written on that server at the SMON PACKAGE STORAGE PATH.
The path has to be available on every node exactly the same, including the drive letter, even if the actual storage location is different; for example, different directories of the same Network Attached Storage (NAS) or Storage Area Network (SAN) can be mounted to the same location on every application node:
SAN has directory server1\packages\ mapped as S:/privilege/packages/ on the node whose hostname is server1.
The same SAN has directory server2\packages\ mapped as S:/privilege/packages/ on the node whose hostname is server2.
In this case SMON PACKAGE STORAGE PATH can be S:/p rivilege/packages /.
When a downloader user connects from another workstation, the load balancer can place their session on another node (server2) and keep it serving from there.
In order for the packages to be accessible for download from server2, the CORS setting has to allow users' browsers to collect resources from the node-specific URLs of all the user-accessible nodes.
In the case described above, that value would be:
https://server1.domain.com/,https://server2.domain.com/
Censoring recorded data
When the Session monitor app is collecting keystroke and clipboard data, users may be required to enter personal data that should not be visible. You can restrict sensitive data from being shown by using Recorded data censorship rules. These rules use a regular expression that, when satisfied, will replace any data captured from keystrokes and clipboard with a series of repeating characters.
There are four shipped censorship rules:
CC – censors credit card numbers
PASSWORD – censors passwords with at least 7 characters, mixed case, 3 letters, 1 digit
SIN – censors social insurance numbers
SSN – censors social security numbers
To add a new censorship rule:
Navigate to Manage the system > Privileged access > Recorded data censorship rules.
Click Add new… button.
Configure the following information:
Provide a unique ID for the rule
Provide a Description for the rule
Set a Regular expression for the types of strings to censor.
(Optional) Set a character to censor the value in the Replace with field.
Select the Enabled checkbox.
Click Add.
By default, the shipped censorship rules are enabled. You can modify these rules to not censor data by deselecting the Enabled checkbox.
After a session has been captured, when users request and view the keystrokes and clipboard values of the session, all instances where the censorship rules are applied to display the Replace with character. For example, the SIN number 123-456-789 will be set to ###########. This process is done when smonprocessmeta is run.
Integrating with Hitachi Content Platform (HCP)
Bravura Security Fabric can be integrated with the Hitachi Content Platform object storage system to store and retrieve video-based session monitoring data. Rather than keeping the data on the instance server, Bravura Security Fabric can archive it in the Hitachi Content Platform using smonprocessmeta , and remove the data from the instance server’s local file system. When a user submits a request to view a session, smonsavemeta retrieves the data from the object storage system and generates the data for download.
To integrate Bravura Security Fabric with Hitachi Content Platform:
Ensure that either SMON SCREENSHOT ENABLE or SMON WEBCAM ENABLE is enabled. See Configuring recorded session data collection modules for more information.
Add a new NULL target system for Hitachi Content Platform.
Specify the address of the target system as
{server=https://[namespace].[tenant].hcp.hcpdomain.com;dir=[directory];}server is a URL to an Hitachi Content Platform namespace to store the data. Ensure that this URL is resolvable from the SMON server.
dir is a directory under that namespace to store information into.
Specify the credentials for the target system. This is the username and password of the tenant.
Add the target ID of the Hitachi Content Platform to Manage the system > Modules > Session monitor > SMON HCP TARGET ID.
Best practices and troubleshooting
Recommended configuration
For replicated instances, ensure that:
The External address of each node is configured to match the TLS certificate used by end-user browser.
Those servers must be directly reachable from the end-user's browser, not only via the load balancer.
The CORS (cross-origin resource sharing) ALLOWED ORIGINS on the instance mut cover the URLs of all nodes as the end-user's browser sees them.
The file storage needs to allow the WebUI of all nodes to reach all files from each of them, so that disaster recovery can happen fast, without having to move large amounts of data.
Keep the files on shared storage.
Use one folder for each node.
On the nodes themselves, symlink the file storage paths configured in Privilege to each node's own folder.
Recording write performance
The recommended storage method may be more complicated when nodes from different data centers need to reach it.
At "write" time, the latencies and access delays between data centers need to be as small as possible. The smonc CGI that writes the files needs to serialize the writes, and a slow write can be interpreted by the Operating system as a failed write even if it succeeds.
The memory footprint and duration of execution of smonc can increase if it has to "buffer" the writing of the "frames" it receives from the disclosure plugins.
IIS has a limited number of CGI threads that it can keep active at any given time. Any dropped "frames" in the recording tend to interrupt the recording, and with it, the recorded session.
A large number of concomitant sessions sending data to the same Privilege node can overwhelm the node's IIS with incoming calls. If this issue affects your instance, consider reducing the frame rate of the recording or the size of the captured "frames".
Session recording process
The following is a description of the recording process, as illustrated in Session monitoring architecture . This is useful when checking the application logs for issues.
The end user (system administrator) triggers a disclosure plugin that is configured for session recording.
Native disclosures, except for view and copy, and guacamole disclosures allow for session recording.
Web application disclosures do not allow for session recording.
The disclosure plugin calls into the application via the IIS CGI module and our application's cgi-bin\smonc.exe
If something goes wrong with the session recording, the session is interrupted. This includes:
The disclosure being cancelled by an authorized application user (like a manager or IT admin or site or application administrator, removing access to a specific MSP to the current session owner)
Application errors like session recording files not being allowed by the Operating System to be written to the configured storage.
While the session data is being written to the configured storage location, that server's session monitoring service (
idsmpg) detects the new files and triggers smonprocessmeta to update the application's database with the metadata of the collected session details.Later, when an Auditor (someone with session view, search or export privileges) has to, they can export a "package" that can contain one or more captured data set from one or more sessions
That package is processed with utility
smonsavemeta, and saved on the server where the session data was recorded originally. This is done only from the WebUI; it cannot be done manually.The browser displays a link to download the resulting zip archive. The link can lead to another node, which is why CORS configuration is recommended .
Session files storage
Do not configure the session data storage on the same drive or partition where the application is installed, to prevent it from running out of space and going into DB COMMIT SUSPEND mode.
The text data captured (keyboard and clipboard data), is tiny in comparison with screenshots and packages (zip files) containing videos compiled from those screenshots.
The text data is stored only temporarily on disk; after smonprocessmeta runs, that data is removed and kept only in the application's backend database.
See Screen capture trend analysis for formulas for deciding how much space to set aside in the storage locations for screenshots.
The session monitoring service uses a mutex on the storage location to determine when new files are saved. If the storage method doesn't update the application's mutex when files are being added, smonprocessmeta won't run. If that issue cannot be solved at the operating system level, smonprocessmeta must be scheduled separately to run (every 5 minutes or on the customer-required schedule), in a Windows Scheduler Task similar to the default ones which provide healthcheck monitoring and external database replication.
Data collection for issues
If there is an issue with session recording or processing:
Check the network architecture - what sort of storage, with details, is being used in the location that stores the session recording files?
Increase logging to Verbose to
smonc,idsmpg,smonprocessmeta,smonclean,smonsavemeta.Trace-restart the logging so the session service can start logging at the increased level.
Use Task Manager's Details page to right-click on the
idsmpgprocess and collect a memory dump.Check with sysinternals' procexp64.exe or handle.exe if other processes than the ones described in this topic keep handles on the location where the session files are stored.
If there's no relevant output from those tools, collect a procmon.exe trace while
smoncwrites session files and the end of a session.To save RAM and trace file size, configure procmon to drop all entries other than file operations on the location where the session files are written.
Disaster recovery
If the recommended configuration was followed, when a replicated node becomes unavailable, the data it collected will still be available on the shared storage location.
Move the data to another folder, one symlinked from a surviving node, or from the new node supposed to replace the old one.
The move on the same storage is orders of magnitude faster than if it was supposed to move between storage locations
Use Bravura Privilege 's
smonmoveutility to change in the backend database the "owning" node of the data, from the old/decommissioned node, to the new one or the one taking over that data.This is in addition to "moving" the execution of services performed by the old/decommissioned node, to that other node that replaces it.
See the Replication and Recovery documentation for more information on recovery.
Use cases and examples
This section outlines demonstrations of how session monitoring may be implemented.
Monitor access to a privileged application using BravuraPrivilege Auto-Connect Plugin
In this use case, Bravura Privilege is actively managing the credentials for a privileged financial application running on a Oracle server database normally only accessible by high-level employees in the Finance department.
A problem has occurred on the system that requires investigation by an Oracle server administrator. In order to diagnose the issue, the Oracle server administrator requires system access. System access leaves the sensitive financial information vulnerable.
In order to ensure that any attempts to view and/or copy the sensitive information are recorded, the company has deployed session monitoring for this resource.
The process flows as follows:
Administrator checks out access to Oracle System credentials.
The command-line-based auto-connect plugin is used to launch a SQL*Plus session.
Session monitoring logic begins as soon as the plugin is launched; no pre-existing client software required.
As the administrator does his work, keystrokes, copy-and-paste items, textual UI elements and screen captures are collected for the SQL*Plus instance and sent to a central server.
The administrator finishes his work and closes SQL*Plus; the session monitoring terminates.
Since all information regarding the session's activities was recorded, it is possible for an auditor to view the session to ensure that the administrator was not stealing information.
Rogue Administrator attempts to tamper with session monitor
In this situation, a rogue administrator – who is aware of the fact that session monitoring is installed – attempts to prevent recording in order to perform illicit activities:
The rogue administrator checks out credentials to a sensitive system in order to steal information.
The administrator sets a proxy that routes all traffic bound to the session monitoring data collection server to ”/dev/null”.
The administrator uses the Bravura Privilege terminal services auto-connect plugin to log in to the system. This triggers session monitoring to begin.
Before launching the terminal-services connection, the session monitor attempts to contact the data collection server. Since the server cannot be contacted, the auto-connect plugin refuses to launch the terminal services client.
The administrator’s efforts are blocked, preventing access to the sensitive resource.
Auditor investigating security breach on monitored resource
In this situation, a security breach has been detected on a protected resource. The security investigation team knows that the breach occurred over the past month, but a number of people have had access to the server. The breach consisted of the release of three bank account numbers.
Because the resource was protected with session monitoring, the security investigation team can track down the source of the security breach:
The security investigator logs in to Bravura Privilege and performs a request to search for monitored sessions.
The investigator enters the time frame and resource name into the search criteria. Since the involved account and suspect are unknown, these fields are left blank.
The request to search is sent to the appropriate authorizers and they either approve or deny this request.
Once approved, the investigator uses the session monitoring interface to further narrow the search results. He searches for one of the bank account numbers using the available meta-data search parameters.
This query returns two matching sessions for different individuals. In order to see which of these individuals had malicious intent, the investigator requests a video and full meta-data to be generated for both sessions.
This request is sent to another set of authorizers for approval.
Once approved, the video and meta-data are generated and an email with download details is sent to the investigator.
Using the data, the investigator is able to pinpoint the source of the security breach and appropriate action can be taken against that individual.
Example: Configure session monitoring
Click below to view a demonstration:
This example demonstrates how to enable session monitoring and restrict the scope of the session recording so that only the Remote Desktop session is recorded; not the user's desktop.
Requirements
This example assumes:
Bravura Privilege Pattern is installed.
Global Team Groups and Privileges are set up
In order to configure and enable session monitoring, the Scenario.pam_sessmon_full component must be installed. To install the component:
Log in to the Bravura Security Fabric Front-end (PSF) as superuser.
Click Manage Components > Scenario.
Select
Scenario.pam_sessmon_full.Click Install component(s) from the Actions panel on the right.
You should see a Completed install for component message for the selected component in the TASK STATUS section of the Actions panel .
When session monitoring is enabled, it records any visible desktop around the open RDP session by default. This could be a privacy issue.
To restrict the recording only to monitor screens within the RDP session:
As superuser, click Home
 .
.Click Manage external data store > pam_session_monitor_policy.
Click the Edit icon
 next to the following existing rule in the table:
StageNumber 1
RuleNumber 80
Comment Capture Everything
Change the RestrictScopeEnabled value to True.
Click Done.
Click Update.
When onboarding managed accounts, the option to include session monitoring is offered. In this example they were not turned on when accounts were onboarded. To enable these session monitoring options for Windows managed accounts, the existing managed accounts must be modified using the team trustee.
Open another browser tab to Bravura Security Fabric .
Log in to the Front-end (PSF) as CORDEH , since she is the trustee for the Windows Account Admins team.
In the REQUESTS section of the main menu, click Manage Resources .
Select Account: Update .
Select the WINNT:wkstn1.bravura.corp: Administrator account.
Click Next .
Skip the page by clicking Next.
Skip the page by clicking Next .
On the page select the checkboxes to opt into Clipboard, Keystroke and Screen recording .
Click Submit.
View the request and ensure the operation was successful.
Example: Check out a monitored account
Click below to view a demonstration:
This example demonstrates how users request to check out a monitored account, approve the request and then check out the account using the remote desktop disclosure option.
Open another browser tab to Bravura Security Fabric .
Log in to the Front-end (PSF) as the standard user BILLIG .
On the main menu click Privileged access.
Click Accounts under the PRIVILEGED ACCESS heading from the Filter panel to see available accounts.
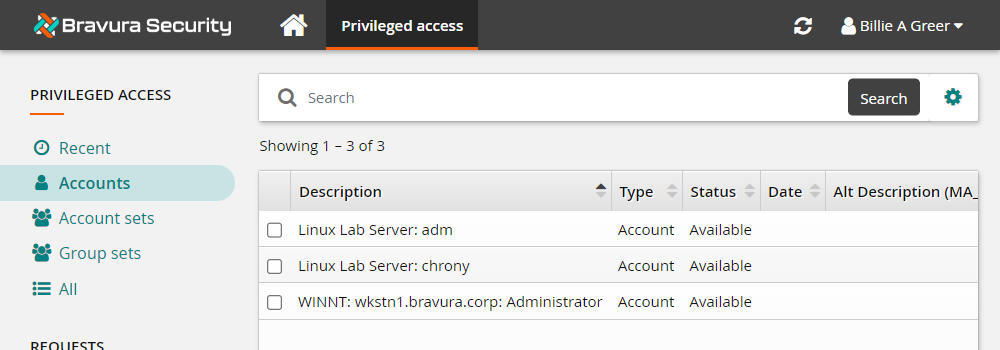
Select the WINNT:wkstn1.bravura.corp: Administrator account.
Click Request check-out from the Actions panel .
Click the Submit button at the bottom of the request details form.
Open a new browser tab to Bravura Security Fabric .
Log in to the Front-end (PSF) as harolr.
Authorize the Windows Administrator account check-out request.
Return to the browser tab where you are acting as BILLIG.
Click Refresh , or, in the Privileged access app, click Ready to check out under REQUESTS in the Filter panel .
Select the WINNT:wkstn1.bravura.corp: Administrator account.
Click Check out from the Actions panel .
Click on the Remote desktop disclosure option.
This will open an RDP session window to the Windows server.
Create a text file on the desktop of the server and type something in it.
Log off the server by closing the remote desktop session window.
Leave the Administrator account checked out for the next lab.
Keystroke data is compiled into a
keystroke-data.xmlfile. The default path for this file is<install path>\smon\text. This can be changed in Manage the system > Modules > Recorded session management (SMON) > SMON TEXT STORAGE PATH.To help limit storage and network bandwidth requirements, screenshots are aggregated into hour-long videos, which are stored in the path set by Manage the system > Modules > Recorded session management (smon) > SMON SCREENSHOT STORAGE PATH. The default location is
<install path>\smon\package\.