Authentication chains: Bravura Security Fabric as service provider
Many organizations that leverage federated authentication already have a solution in place. This could include:
Active Directory Federated Services
Microsoft Azure
Okta Single Sign-On
PingFederate
One of many other IdP solutions
Bravura Security Fabric can be configured to operate as a service provider, accepting third-party authentication assertions from a trusted IdP.
Configuring Bravura Security Fabric as a service provider requires the following administrator rights:
"Manage policies", to configure the SAML_SP custom Authentication chain, and the SAML_USERS User class.
"Manage external data store", to configure authentication chain logic using the hid_authchain_select table.
To configure Bravura Security Fabric as an SP:
Prepare the Identity Provider. The steps will be different for each vendor. Refer to your vendor's instructions to prepare your IdP.
See the following examples to:
See also
Prepare Bravura Security Fabric as an SP
The Scenario.hid_authchain_saml_sp component installs the functionality to allow Bravura Security Fabric to act as service provider, accepting third-party authentication assertions from a trusted IdP.
To prepare Bravura Security Fabric as an SP:
Log in to the front end as superuser.
Click Manage the system > Workflow > Email configuration .
Set BASE_IDSYNCH_URL to the servername used in the IIS TLS certificate, which is the URL seen by the end users' browsers.
Click Home
 > Manage components.
Install the
Scenario.hid_authchain_saml_spcomponent.Configure which users in Bravura Security Fabric you want enabled for SAML Authentication.
Click Manage the system > Policies > User classes > SAML_USERS.
Add the users you want to authenticate against the IdP to this user class. You can add explicit users, a domain group or other criteria.
IdP-initiated SSO is supported only when the profile IDs match the IdP account names.
Recalculate the user class cache.
Component deployment
Installing Scenario.hid_authchain_saml_sp automatically installs and configures the following:
User class - SAML_USERS used to control which users can login using SAML
Notes:
Additional configuration is required to:
Set up appropriate login processes into Bravura Security Fabric and;
Establish a trust relationship between the IdP and Bravura Security Fabric .
This component does not provide single sign-on functionality.
Federated login event actions (exit traps) can also be configured.
User class
Installing this component adds the SAML_USERS user class. By default, members of this user class attempting to authenticate to Bravura Security Fabric will be directed to the federated authentication login process, via the SAML_SP authentication chain.
fedsp-util.exe
This utility is executed by the Scenario.hid_authchain_saml_sp component in order to generate a PFX signing certificate and public certificate pair and is located in the util directory
When installing through the component, this utility generates the following files:
saml.pfx, used to sign SAML SP assertions.public.cer, the public certificate file that can be passed to the Identity provider to add the Bravura Security Fabric instance as a trusted authority.
Both files are added to the <instance>\sp\directory.
Read more about fedsp-util usage.
Authentication chains
SAML_SP
Custom authentication chain SAML_SP is responsible for redirecting users to the identity provider, as well as granting them Bravura Security Fabric access once they have successfully authenticated. This authentication chain is configured to call the Fedidp_samlauth authentication module, and must be manually configured before use.
Fedidp_samlauth
Installing Scenario.hid_authchain_saml_sp creates a skeleton authentication chain module called SAML_SP that contains the Fedidp_samlauth module. This authentication chain module is responsible for generating the SAML authentication request, redirecting users to the identity provider, and granting access to successfully authenticated users upon their return.
External database tables
hid_authchain_select
Installing Scenario.hid_authchain_saml_sp:
Adds a row to the hid_authchain_select table that automatically selects SAML_SP if the user is a member of SAML_USERS.
Adds a row to the hid_authchain_select table to continue SAML authentication requests if SAMLResponse is in the session.
This table is used by several Bravura Security Fabric component installations, and overrides the normal authentication chain selection process. With the SAML SP configuration installed, this table directs members of the SAML_SP user class, or any user that has provided a SAML_RESPONSE POST parameter to the SAML_SP authentication chain.
Federated login configuration options
Installing Scenario.hid_authchain_saml_sp sets the following federated login configuration options (Manage the system > Modules > Federation / Web Single Sign-on):
Sets the FEDSP CERT FILE system variable with a generated PFX file
Sets the FEDSP CERT PASS system variable to be the password of the generated PFX file.
Sets the FEDSP CERT STORE system variable to be the PFX file store.
Sets the FEDSP CERT SUBJECT system variable to be "BravuraSecuritySpSaml".
Federated login event actions (exit traps) can also be configured.
Example: Integrate with an Okta IdP
Requirement
Organizations that use Okta Single Sign-On solution to leverage federated authentication require Bravura Security Fabric to authenticate with their current IdP solution.
See Okta integration strategy: SAML or API for information about SAML versus API integration.
Solution
Bravura Security Fabric can be configured to operate as a SAML v2 Service Provider, allowing it to integrate with Okta Single Sign-On IdP to authenticate its users. Once authenticated with the IdP, or even before authenticating with the IdP, additional authentication chains may or may not be run.
Bravura Security Fabric can be configured to authenticate users directly against Okta by redirecting them to the Okta Sign-In page. When this method is used, the authentication requirements for the authenticating application are configured within Okta.
Prepare Bravura Security Fabric as a service provider
Install Scenario.hid_authchain_saml_sp component to prepare Bravura Security Fabric as an SP.
Prepare Okta
Steps are subject to change; please refer to the official Okta documentation if there are any discrepancies.
To configure Okta to allow integration with Bravura Security Fabric:
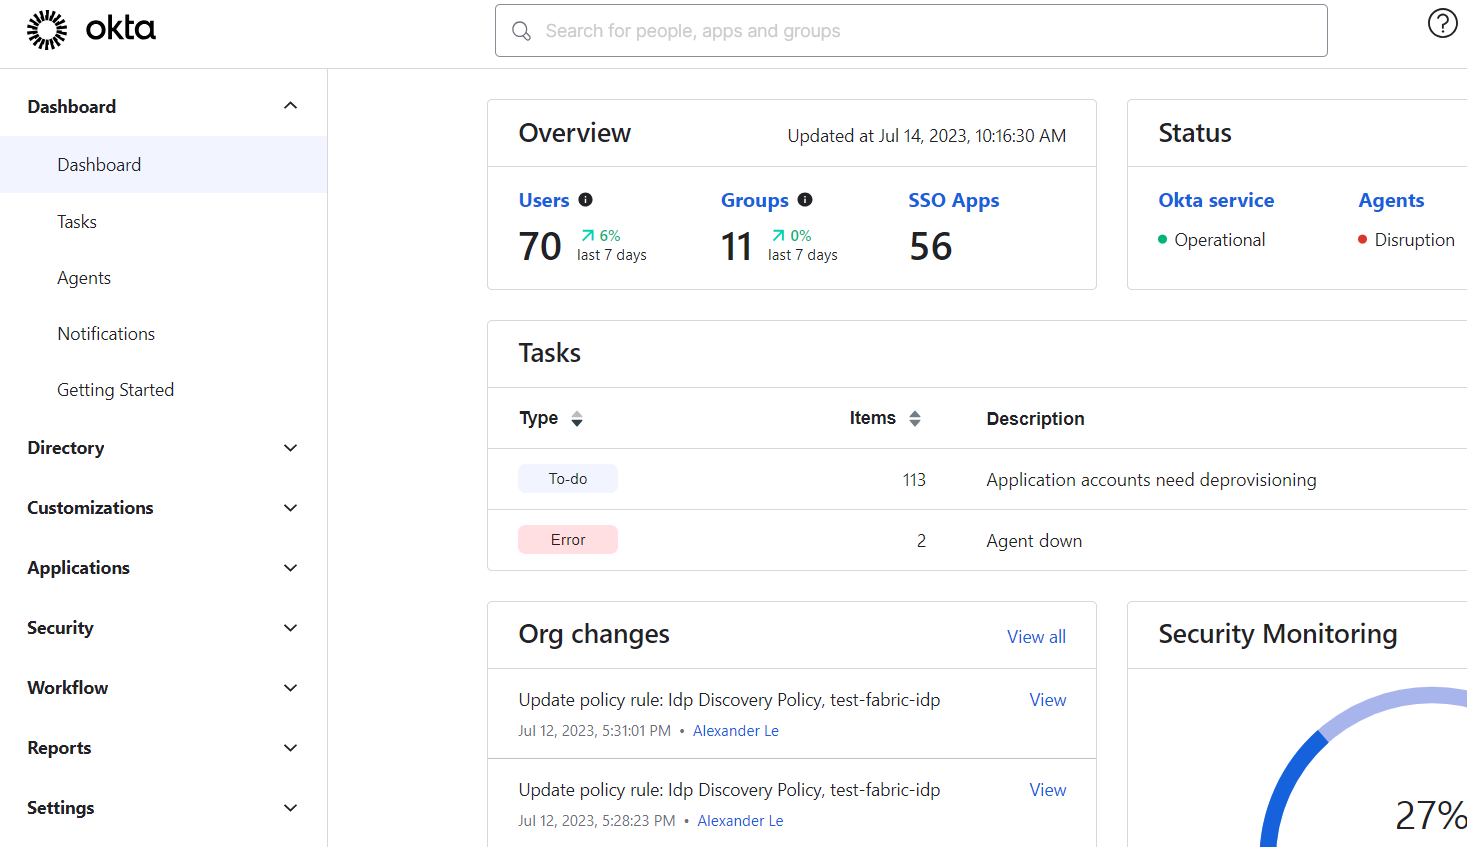
Sign in to your Okta instance as a system administrator.
Navigate to the Administrator Dashboard.
On the left navigation pane, expand Applications, then click on Applications.
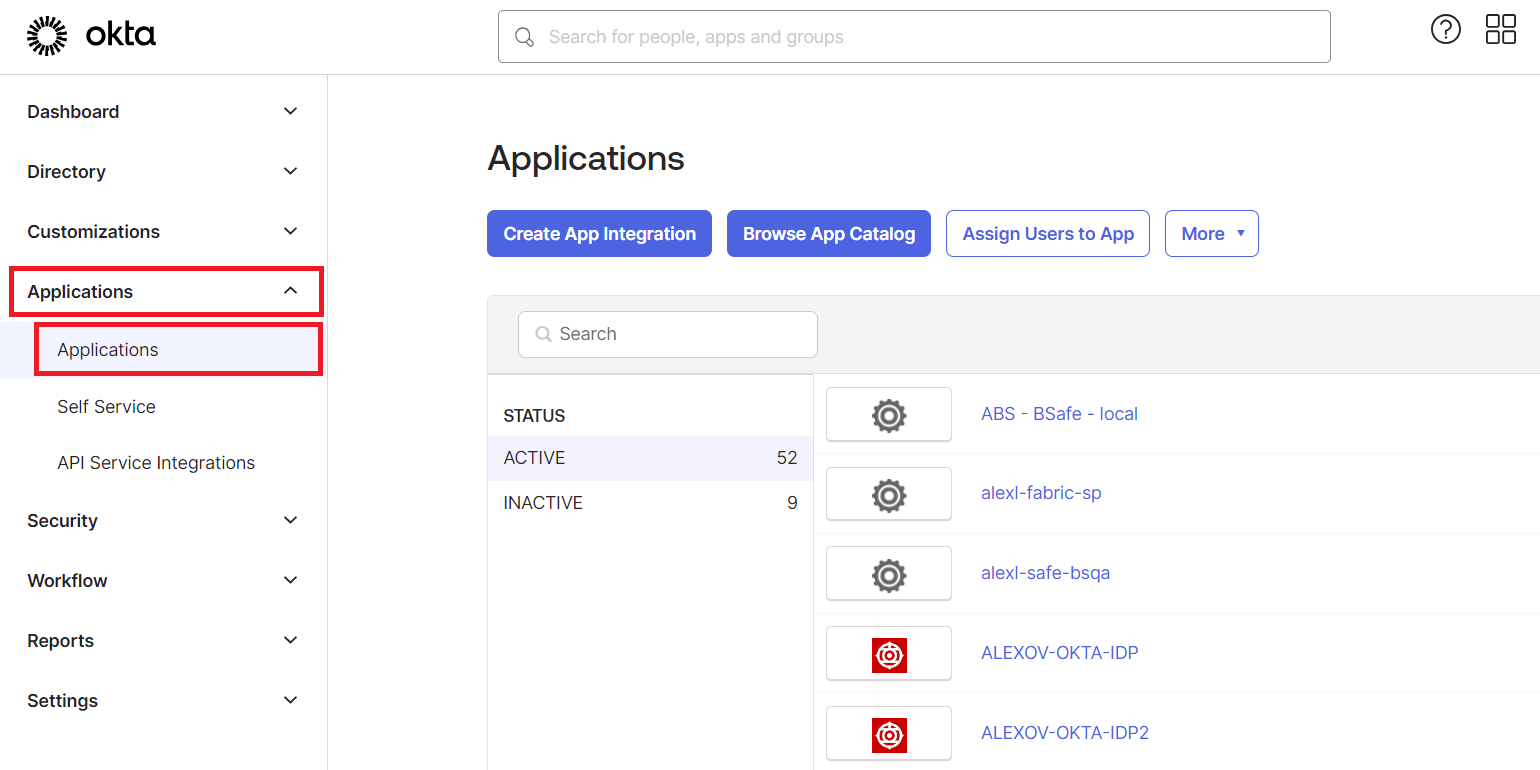
This pane may be hidden unless you click on the Menu icon on the top left.
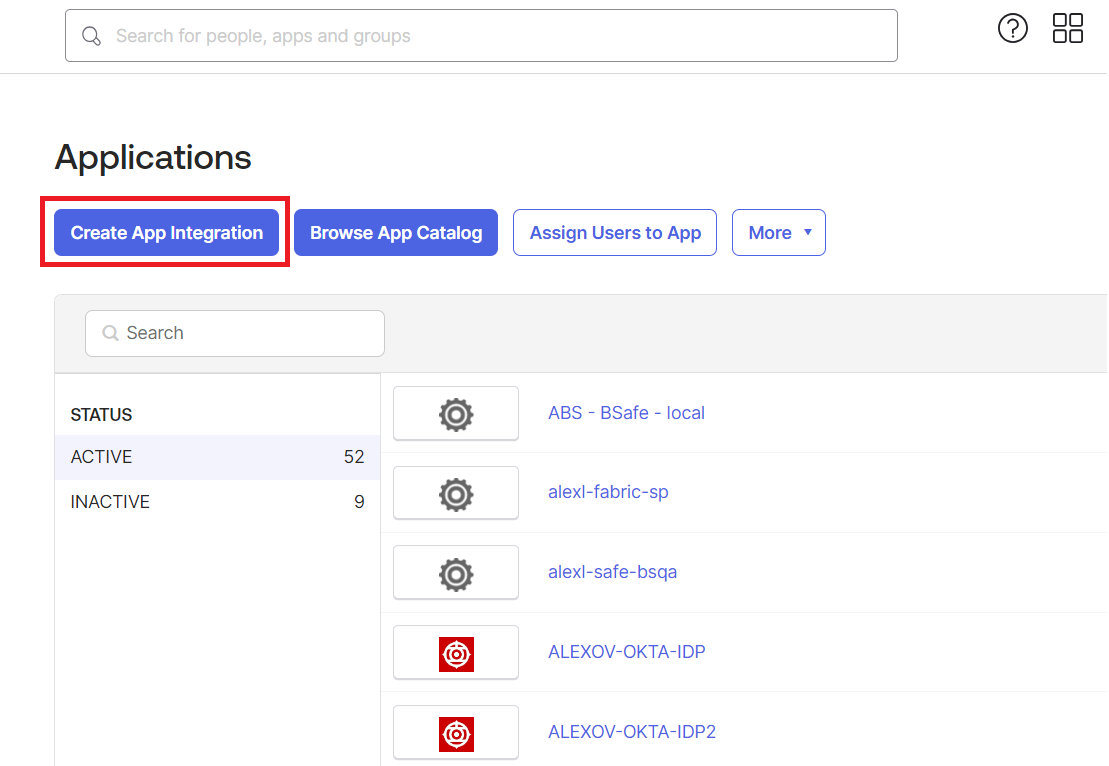
Click Create App Integration.
For Sign-in method, select SAML 2.0.
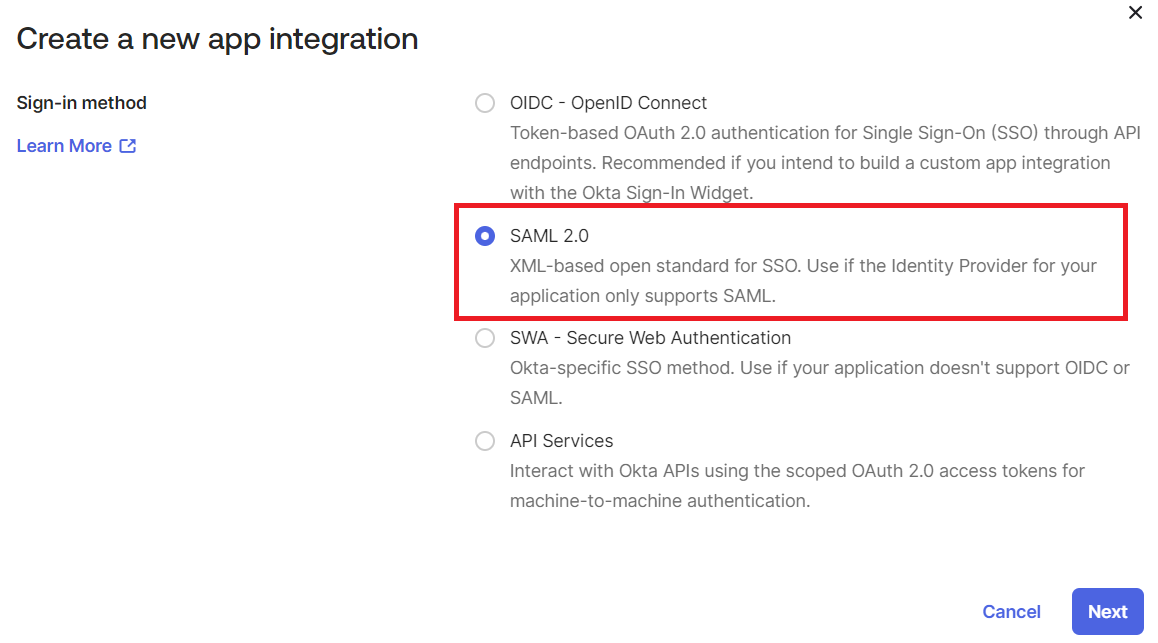
Click Next .
Configure General Settings for the SAML Integration:
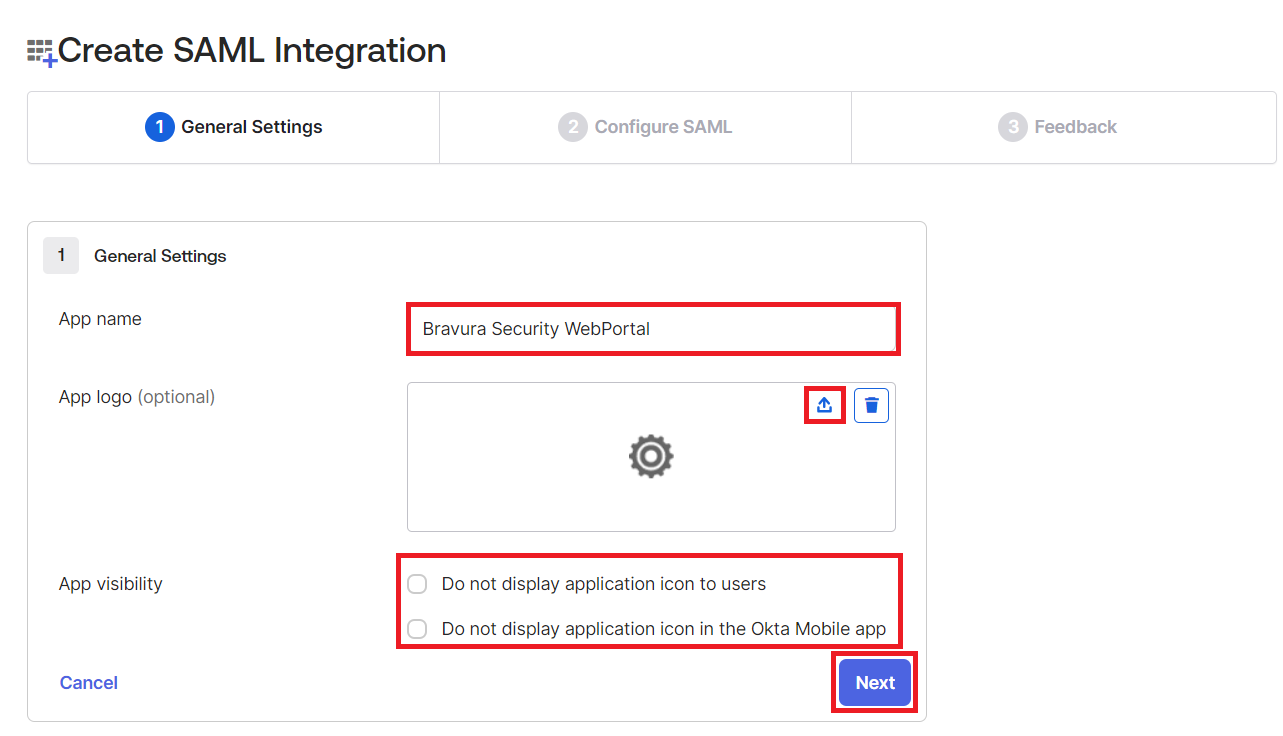
Give your new application a name; for example Bravura Security WebPortal.
Select a logo for the application.
Configure the application visibility settings.
Click Next .
Configure SAML Settings for SAML integration:
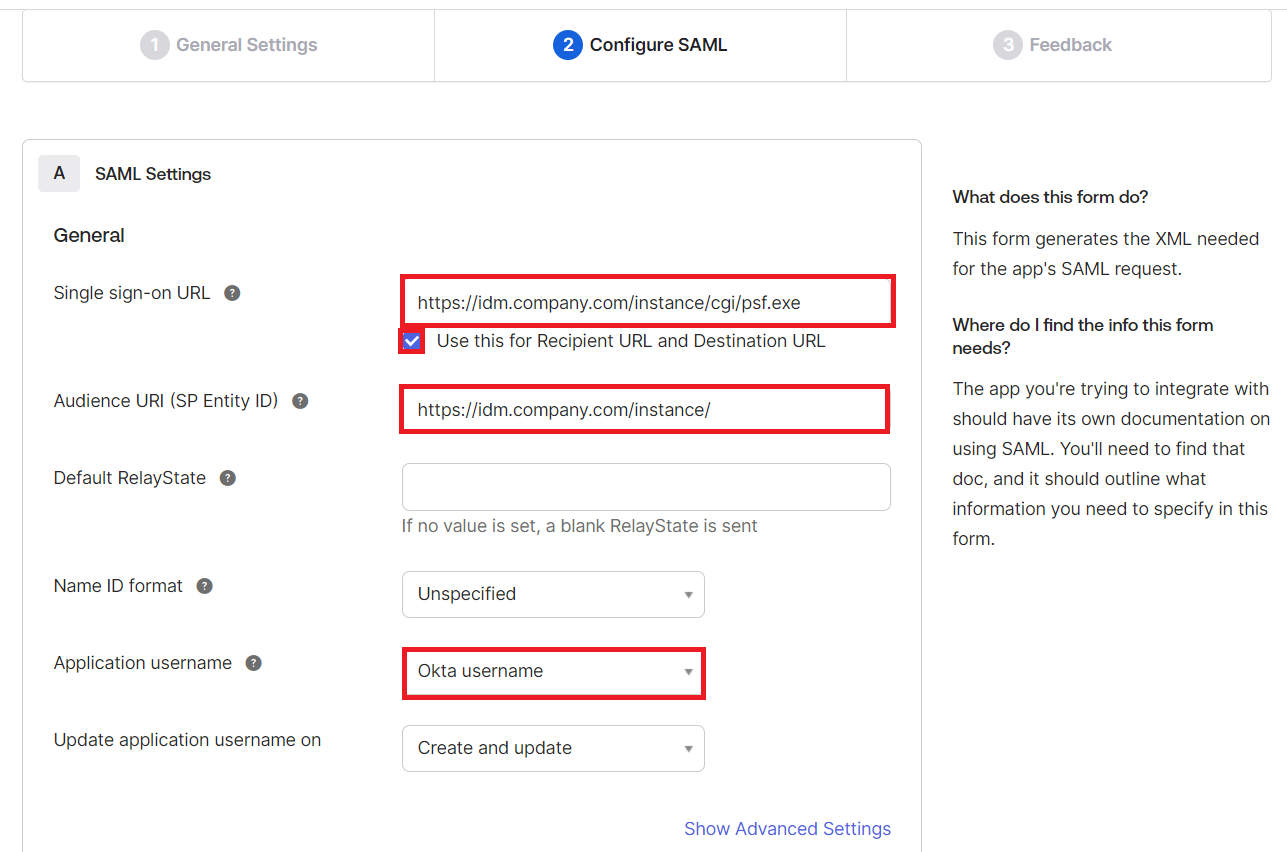
Set the Single-Sign-On URL for the Bravura Security Fabric SP, in the format:
https://<bravura-fabric-server>/<instancename>/cgi/psf.exe.For example
https://idm.company.com/instance/cgi/psf.exeEnsure that Use this for Recipient URL and Destination URL is enabled.
Set the Audience URI (SP Entity ID) for the Bravura Security Fabric SP, in the format:
https://<bravura-fabric-server>/<instancename>/.For example
https://idm.company.com/instance/.Leave the Default RelayState blank.
Set Name ID format to "Unspecified".
Map profile attributes between Okta and Bravura Security Fabric users.
In order for Okta to authenticate Bravura Security Fabric users, it needs to have a means of associating Bravura Security Fabric users to existing Okta users. This is done via attribute mapping, where Okta will compare the two profiles’ attributes to see if they match. In the Application username field, you must select an attribute which can be mapped to Bravura Security Fabric user profiles. This is used to link Okta and Bravura Security Fabric user profiles.
If the Okta username matches the Bravura Security Profile name then select Okta username.
Otherwise, an attribute within Okta can be used to match either the Bravura Security Fabric user profile name, or a user attribute within Bravura Security Fabric . You will need to mirror these attribute mappings when you configure the authentication chain in Bravura Security Fabric .
Warning
It is important to ensure that only a single profile within Bravura Security Fabric matches the selected value. Ensure that the attributes selected will be an exact match.
The attribute mapping between Okta and Bravura Security Fabric must be 1:1. If there are multiple attributes configured in Okta under Application username, Bravura Security Fabric acting as an SP will not be able to distinguish between them and will redirect back to Okta, which combined with active Okta SSO is likely to cause an infinite redirect loop.
Click Show Advanced Settings.
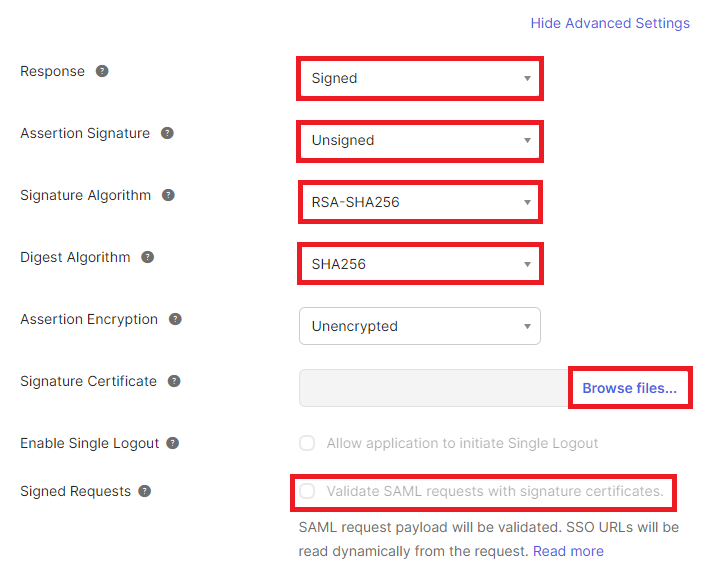
Choose whether the Response or Assertion Signature is "Signed":
You can choose to have either the response or the assertion be signed by the IDP, but not both.
You can choose to have both the response and the assertion be unsigned, however this not recommended.
Choose the Signature Algorithm used to digitally sign the response or assertion. By default, RSA-SHA256 will be used.
Ensure the Digest Algorithm matches the one specified for the Signature Algorithm.
Leave Assertion Encryption as "Unencrypted".
If you want SAML assertions to be assigned and have configured Bravura Security Fabric to require SAML assertions to be assigned (AuthRequest setting in SAML_SP) click Browse files… for Signature Certificate and set it to public.cer , located in <instancedir>\sp
The directory may appear empty but the certificate is present; ensure that All Files are displayed instead of Custom Files.
Leave Enable Single Logout unchecked.
Choose whether Signed Requests will be validated.
Leave all other options untouched and click Next .
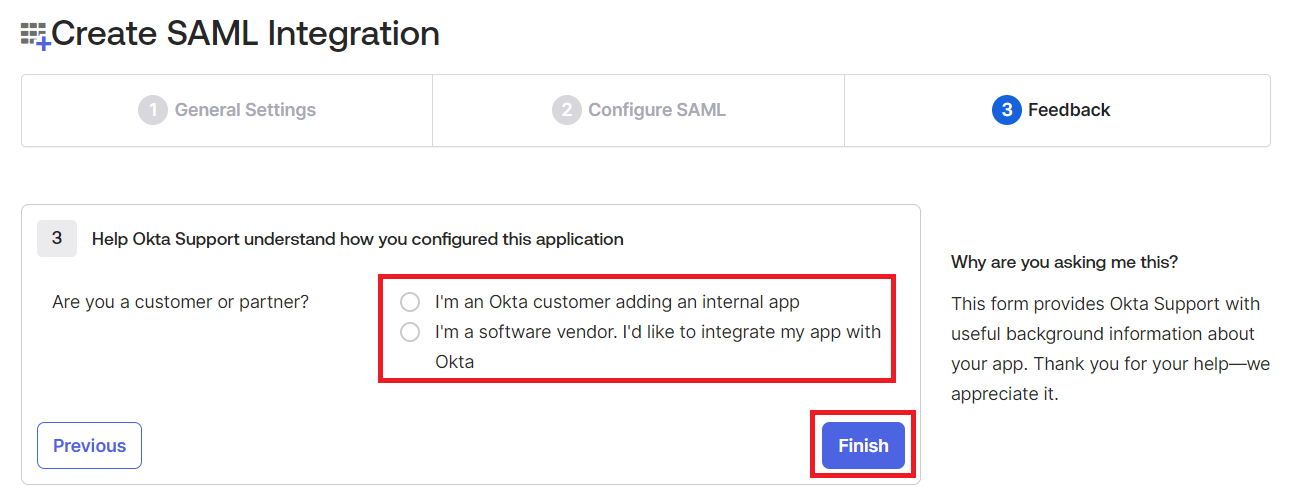
Fill out the Feedback section, and click Finish.
Click on Assignments.
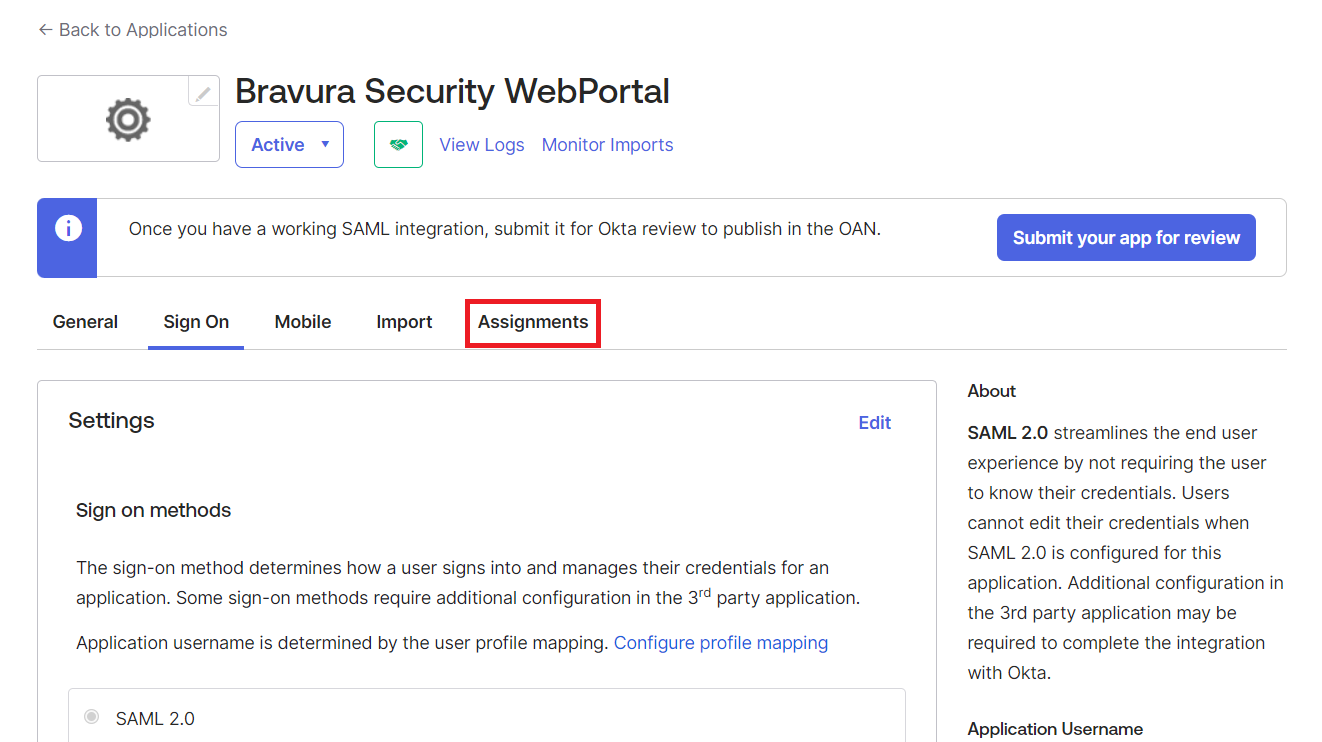
Specify users or groups who will access this application.

Next:
Set up Bravura Security Fabric to authenticate with the IdP
See also
Okta in the Connector Pack Documentation for details on how to add an Okta target.
Example: Integrate with a Microsoft Azure IdP
Requirement
Organizations that use Microsoft Azure Single Sign-On solution to leverage federated authentication require Bravura Security Fabric to authenticate with their current IdP solution.
Solution
Bravura Security Fabric can be configured to operate as a SAML v2 Service Provider, allowing it to integrate with a Microsoft Azure Single Sign-On Identity Provider (IdP) to authenticate its users. Once authenticated at the IdP, or even before authenticating with the IdP, additional authentication chains may or may not be run.
Bravura Security Fabric can be configured to authenticate users directly against Azure by redirecting them to the Azure Sign-In page. When this method is used, the authentication requirements for the authenticating application are configured within Azure.
Prepare Bravura Security Fabric as a service provider
Install Scenario.hid_authchain_saml_sp component to prepare Bravura Security Fabric as an SP.
Prepare Azure
Steps are subject to change; refer to the official Azure documentation for any discrepancies.
Sign in to Azure Portal as a system administrator.
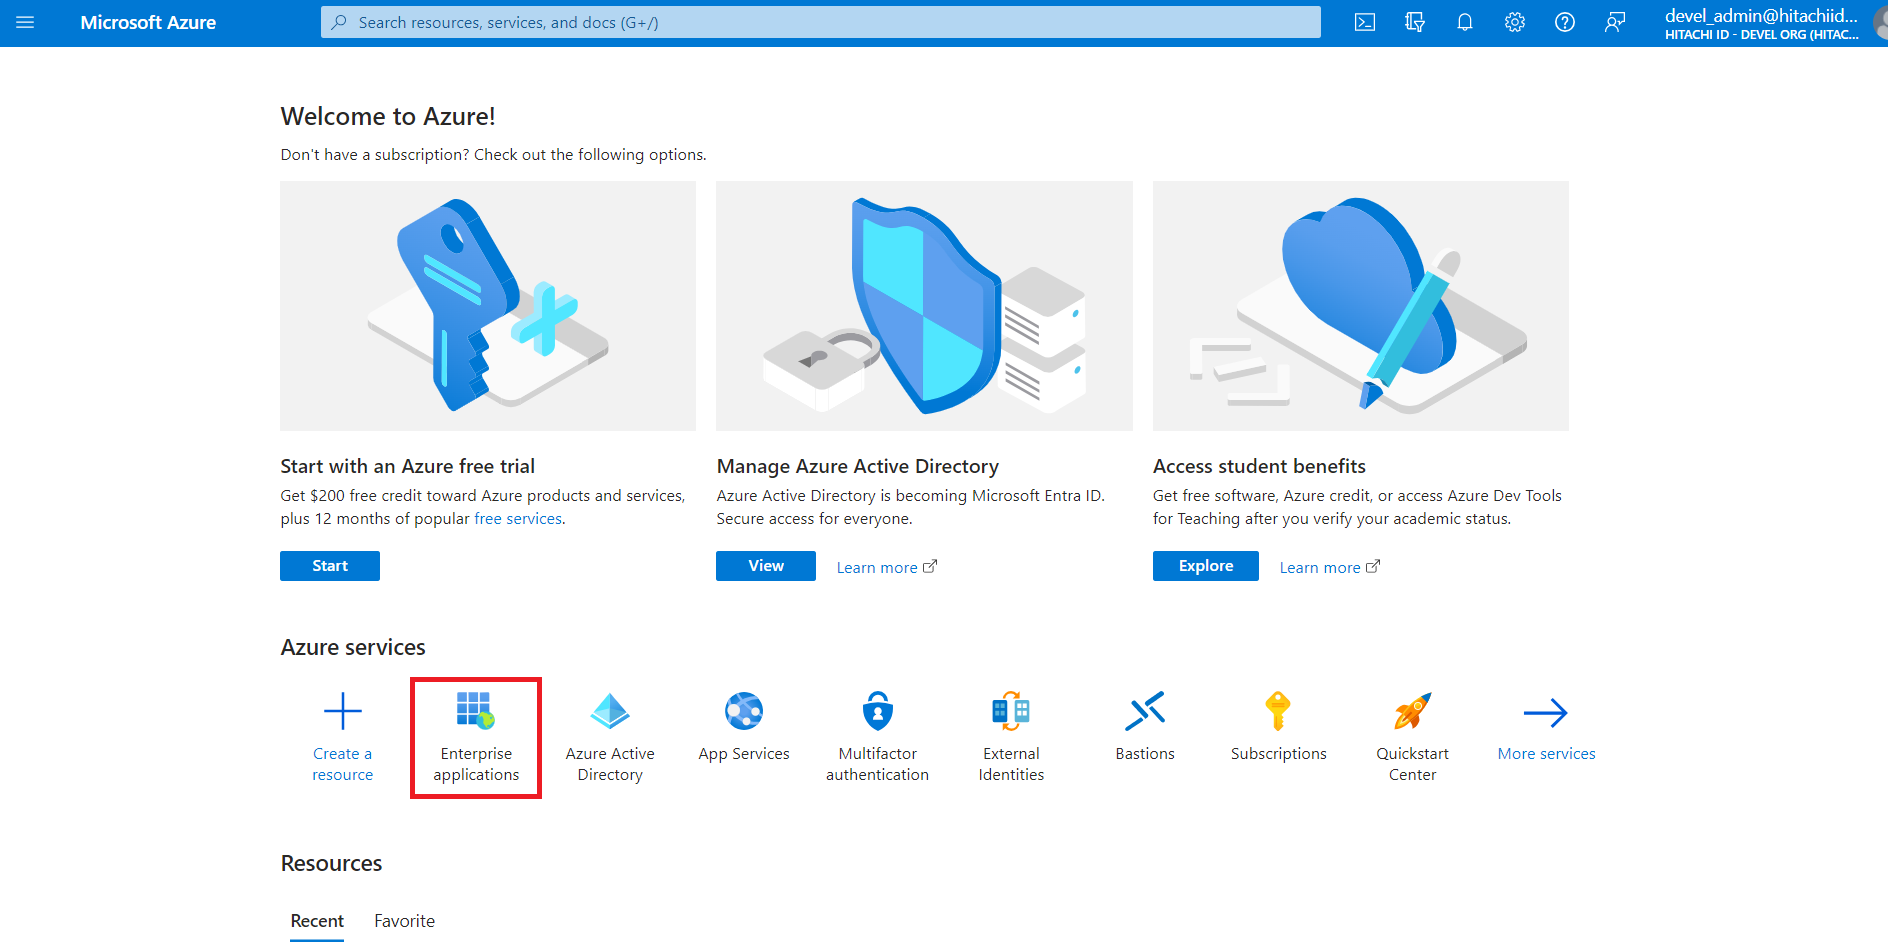
Under Azure services, click Enterprise applications.
Alternatively, you can search for "Enterprise applications" using the search bar.
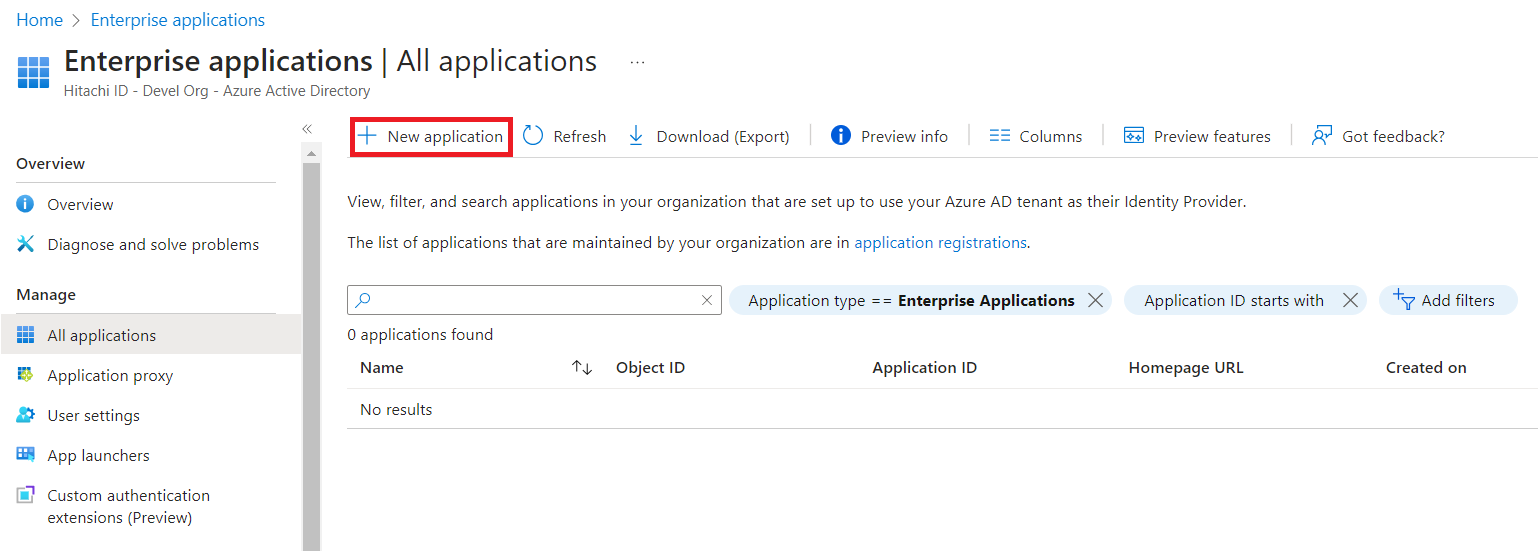
Click New application.
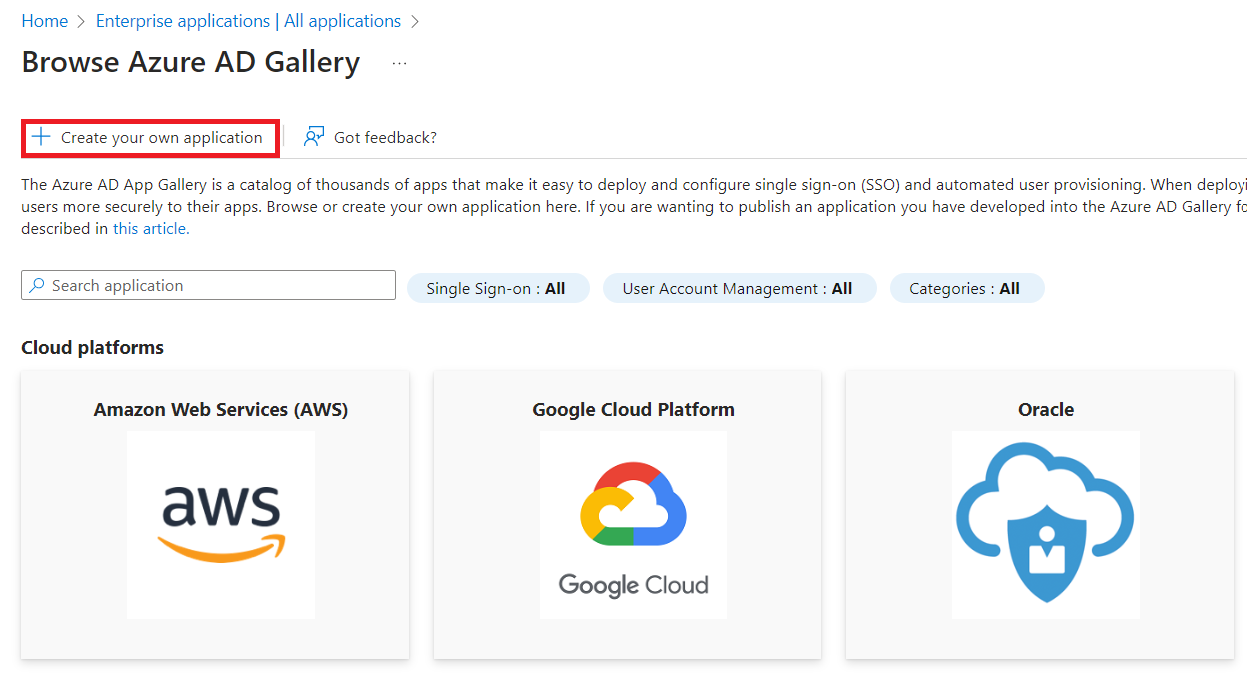
Click Create your own application.
In the action pane on the right:
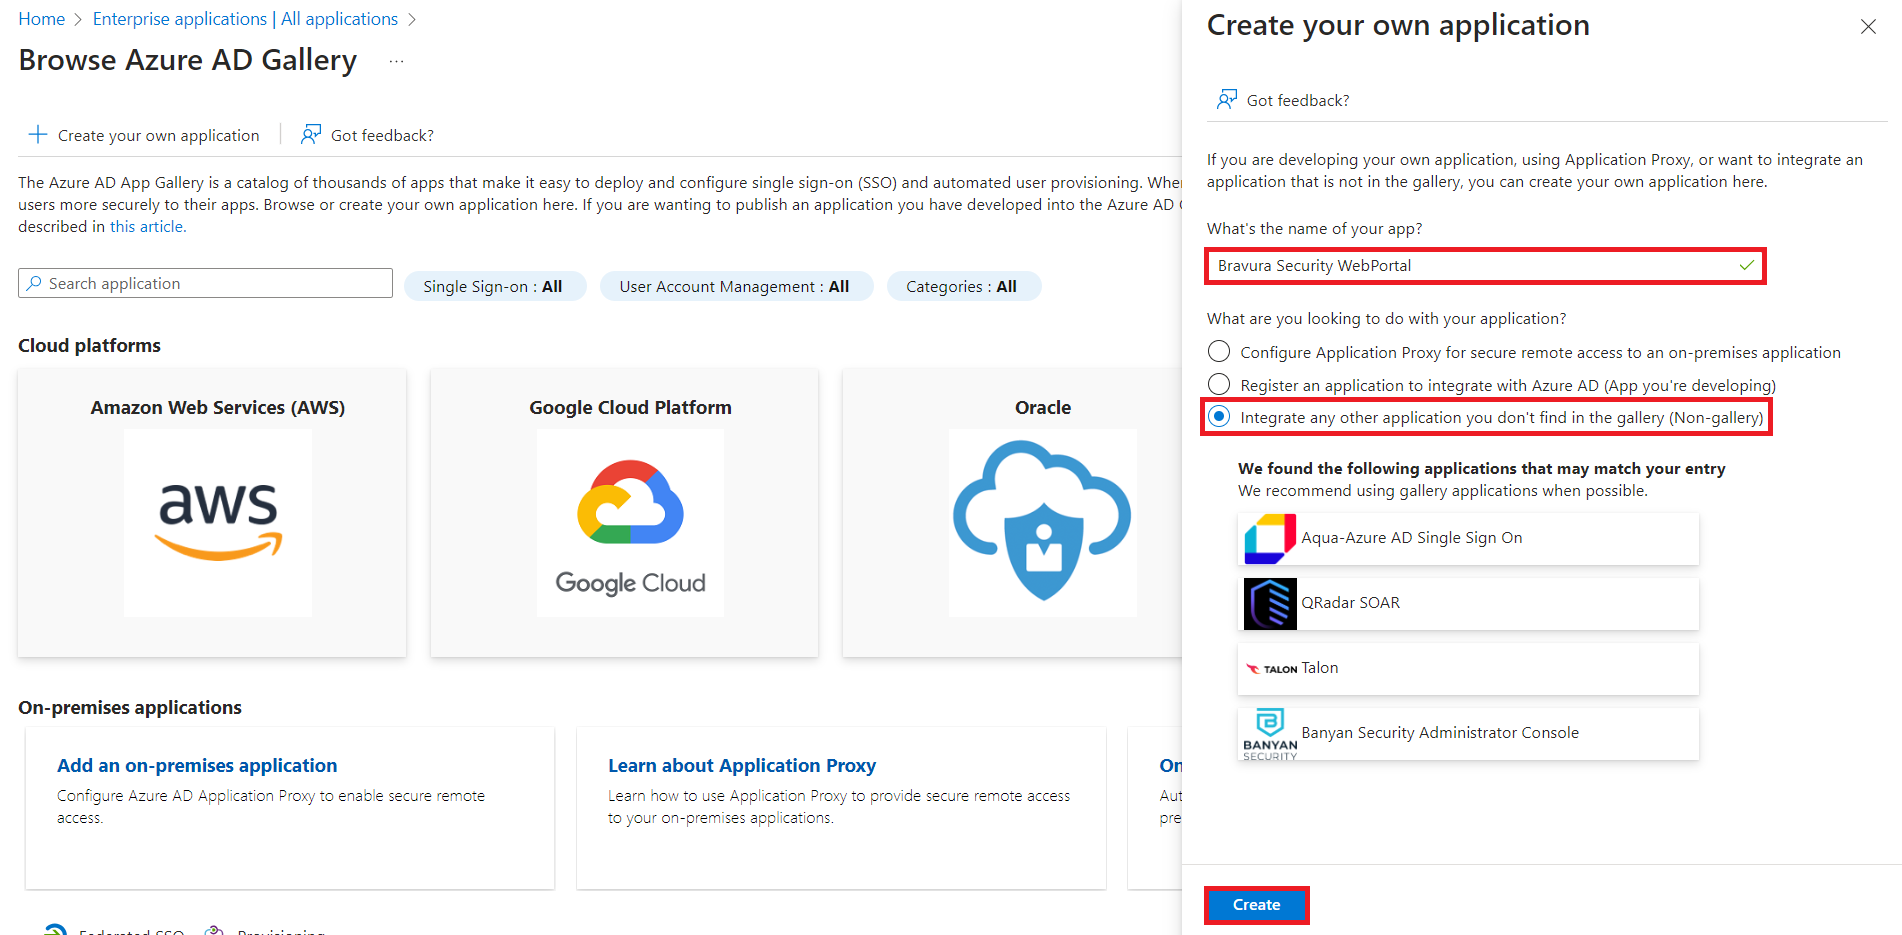
Specify the name of the app, for example Bravura Security WebPortal.
The Integrate any other application you don't find in the gallery (Non-gallery) option should already be selected. If not, select it.
Click Create.
The creation process may take a few moments. The Overview page for the application is displayed upon successful creation.
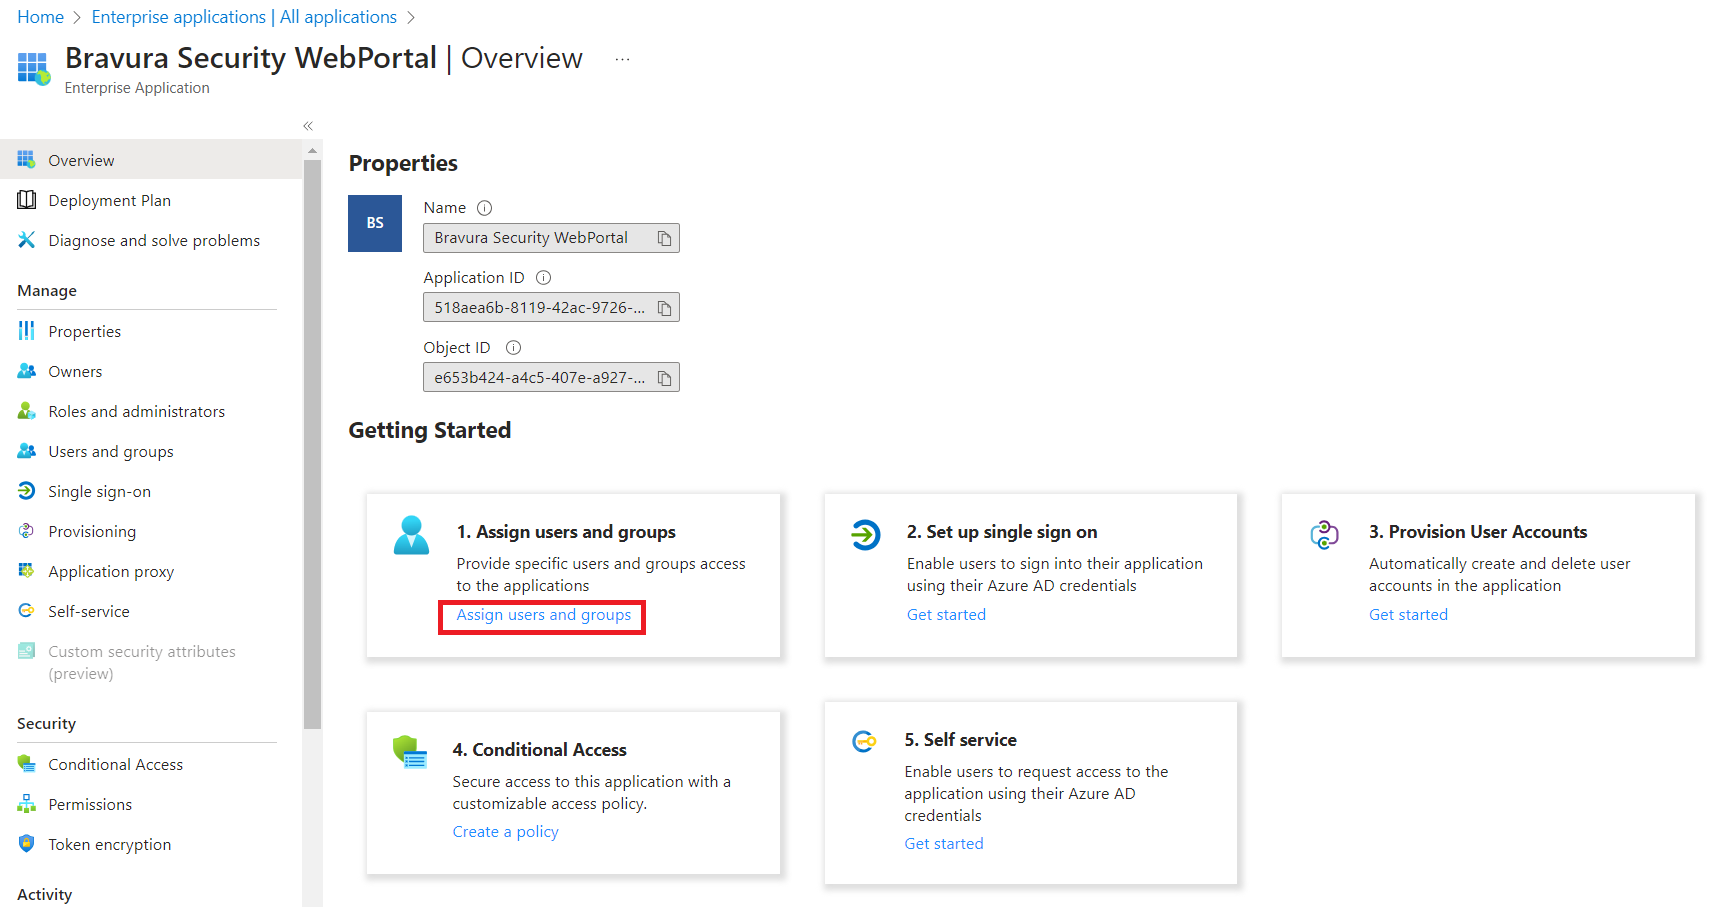
Click Assign users and groups.
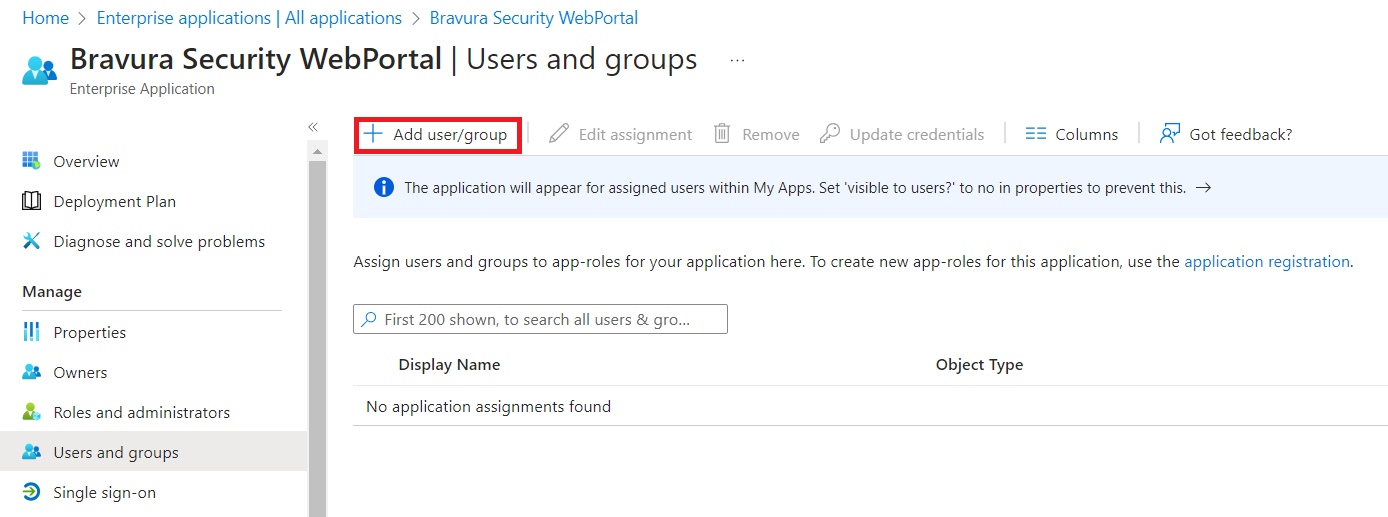
Click Add user/group.
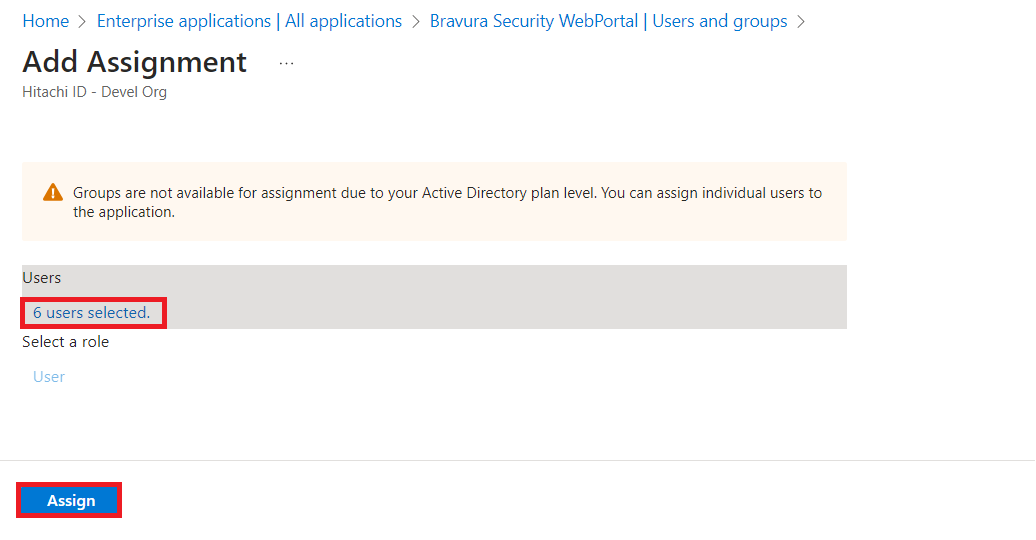
Specify the users or groups that will access this application. When complete, click Assign on the bottom left.
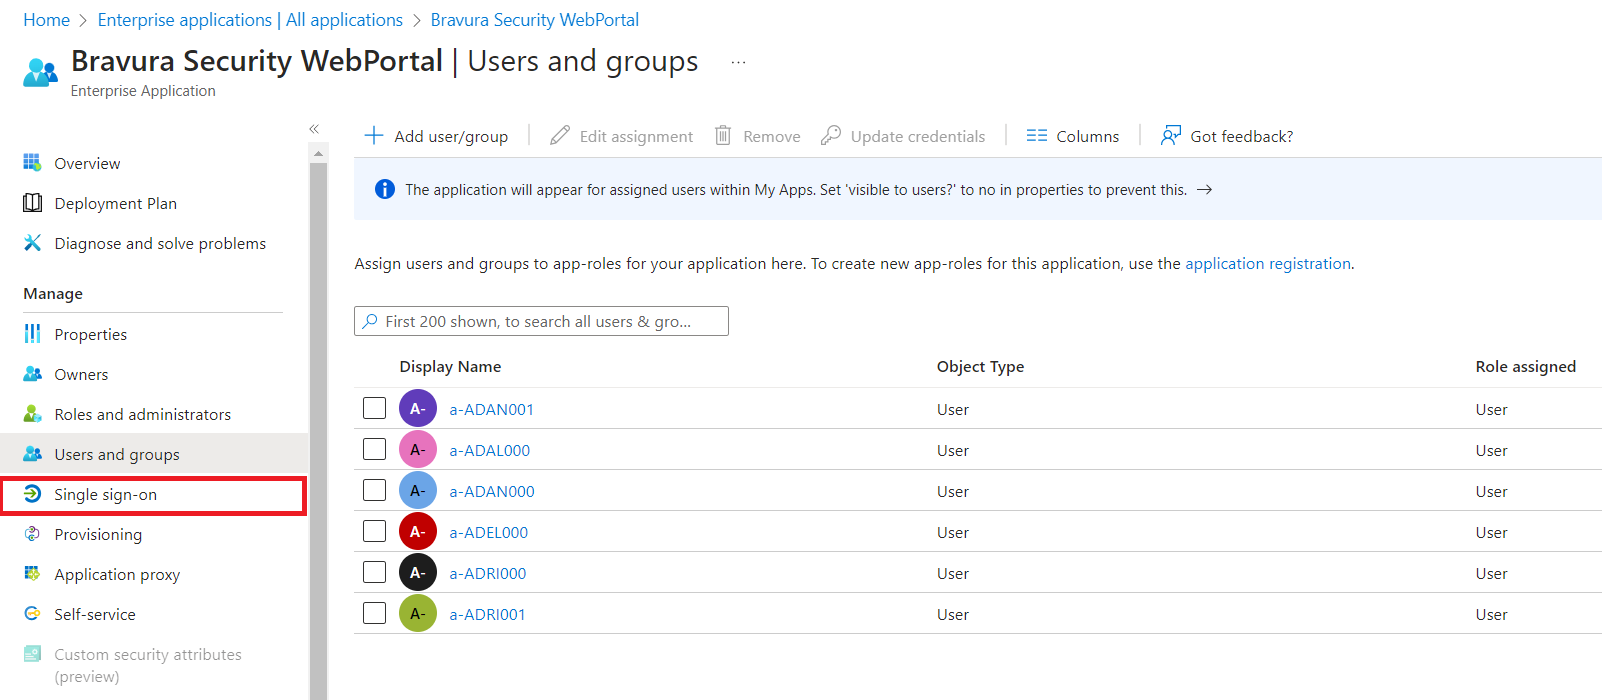
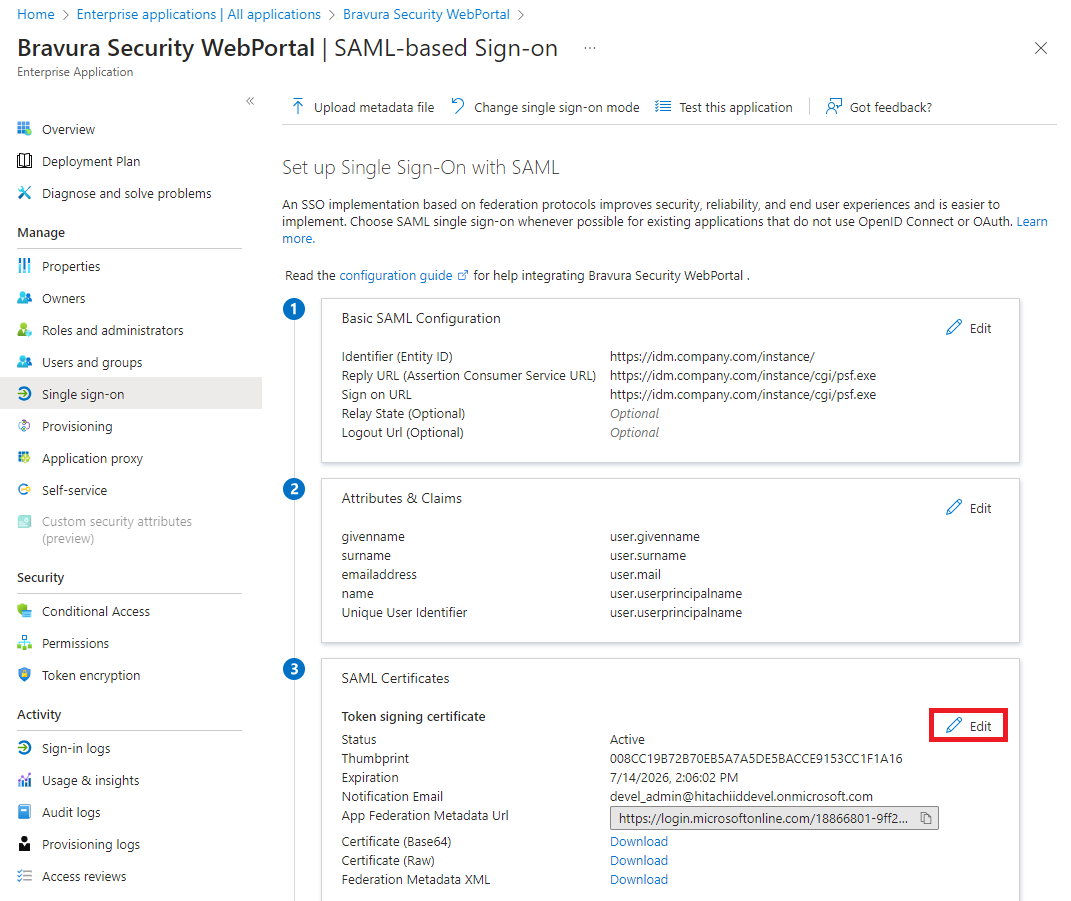
On the left menu, click Single sign-on.
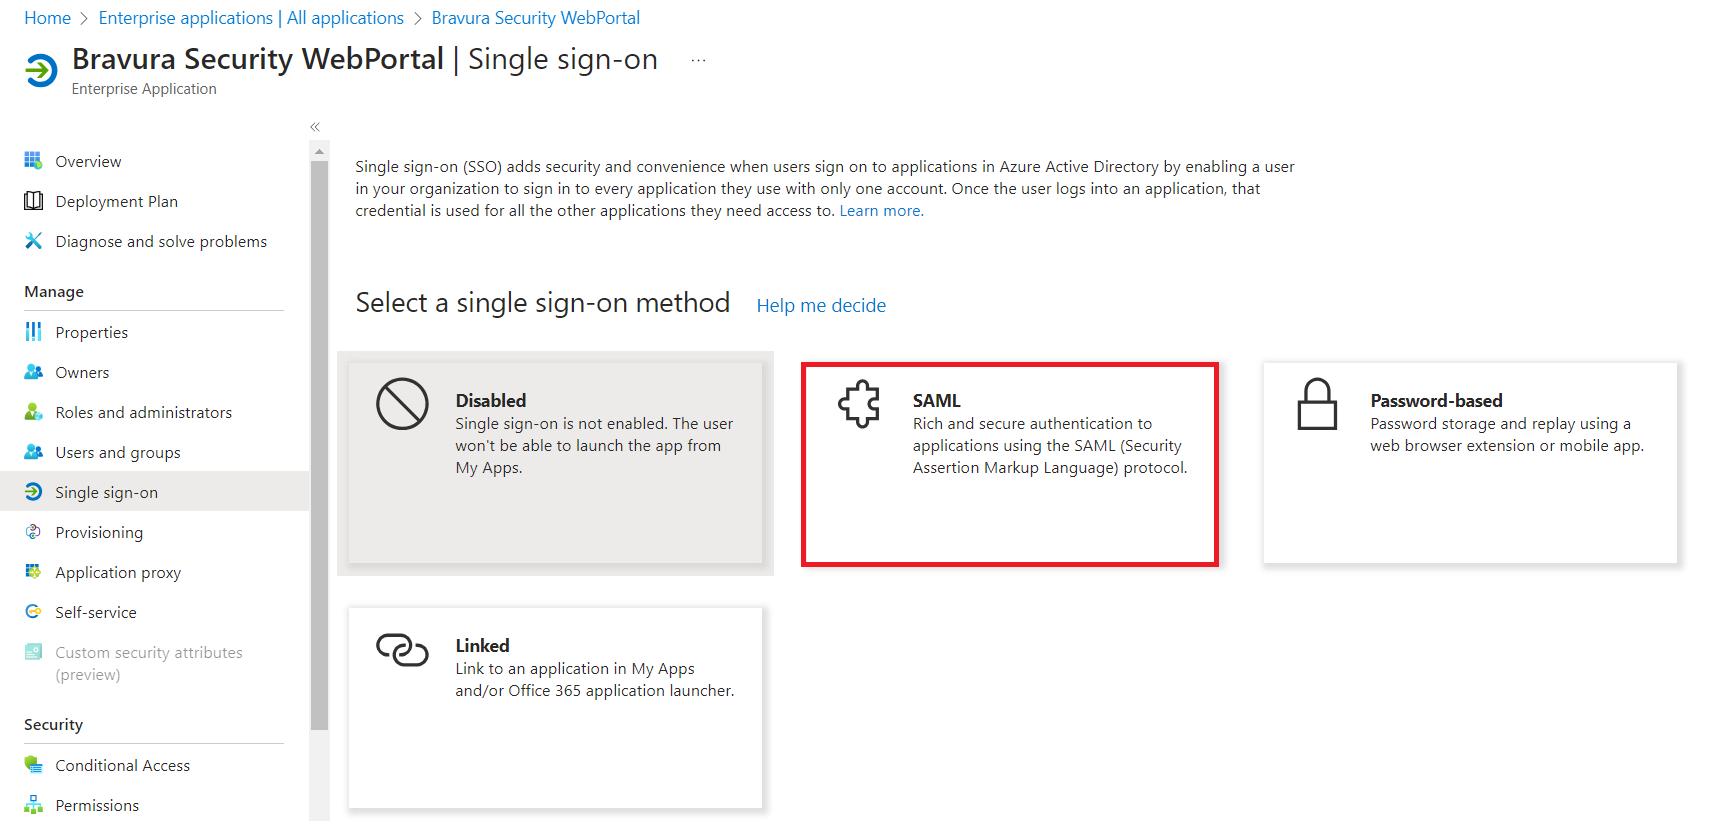
Select SAML.
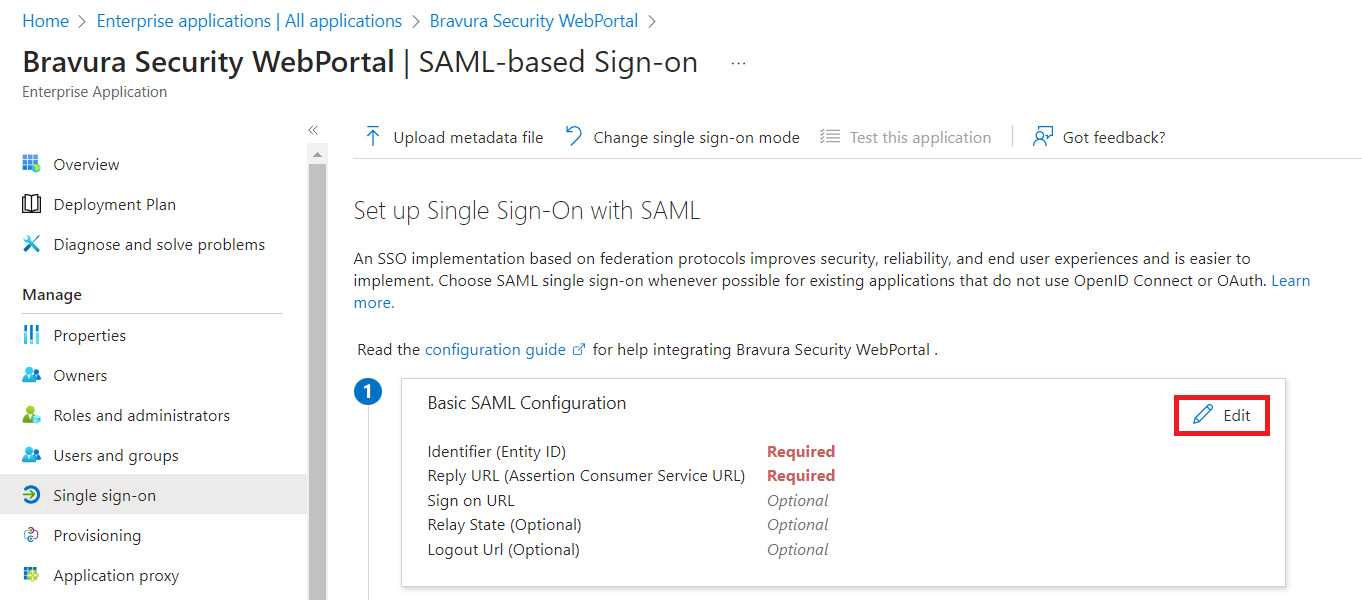
For , click Edit.
In the action pane on the right:
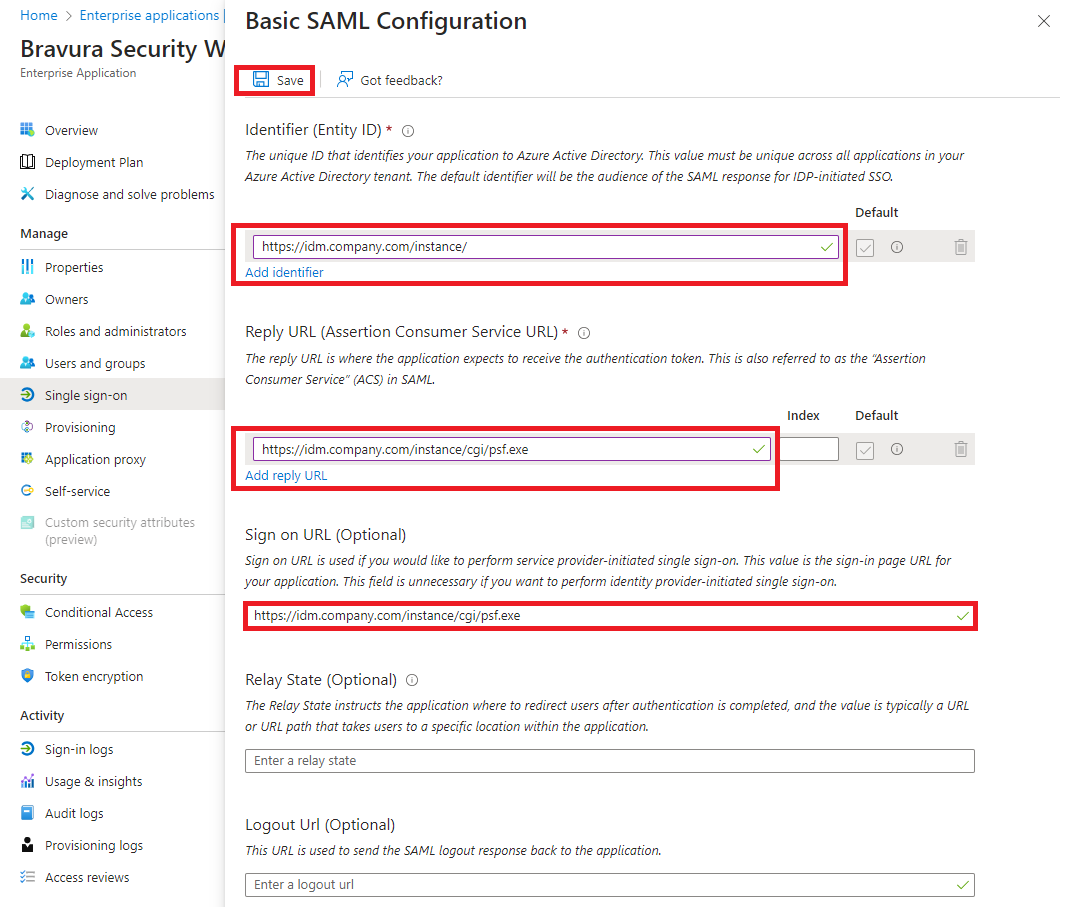
Click Add identifier and provide the Entity ID for the Bravura Security Fabric SP, in the format:
https://<bravura-fabric-server>/<instancename>/For example:
https://idm.company.com/instance/Click Add reply URL and provide the Reply URL for the Bravura Security Fabric SP, in the format:
https://<bravura-fabric-server>/<instancename>/cgi/psf.exeFor example:
https://idm.company.com/instance/cgi/psf.exeProvide the Sign on URL for the Bravura Security Fabric SP, in the format:
https://<bravura-fabric-server>/<instancename>/cgi/psf.exeFor example:
https://idm.company.com/instance/cgi/psf.exeClick Save.
The process may take a few moments.
Close the pane by clicking the X button on the top right.
Note
The Identifier (Entity ID) configured in the Azure must exactly match the Issuer to send to Identity Provider field in the SAML_SP authentication chain in Bravura Security Fabric. If the Issuer to send to Identity Provider field is left blank, Bravura Security Fabric defaults to the BASE_IDSYNCH_URL system variable value. If these values do not match, Azure returns an error similar to: AADSTS700016: Application with identifier '...' was not found in the directory.
For , click Edit.
In the action pane on the right, provide the Unique User Identifier (Name ID).
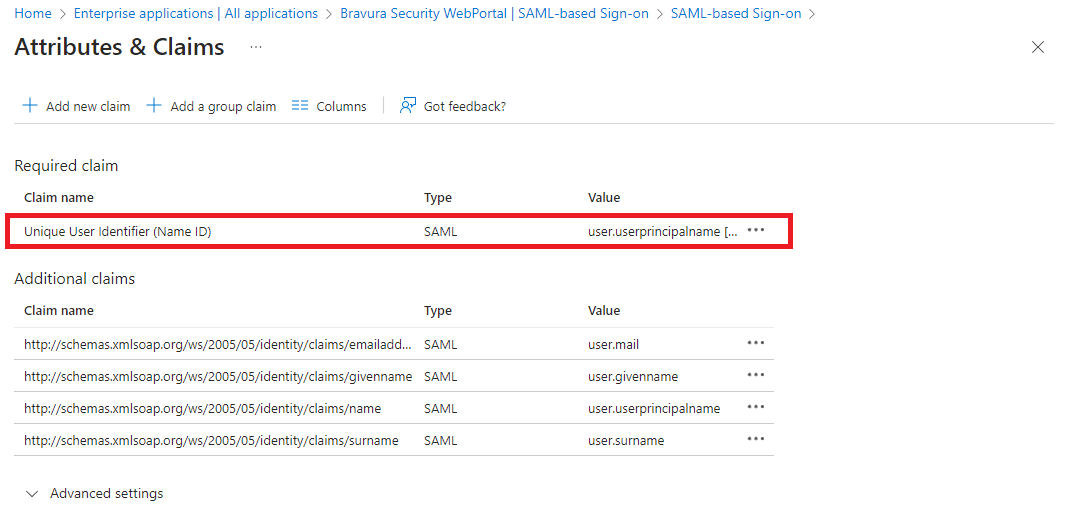
For Azure to authenticate Bravura Security Fabric users, it needs a means of associating Bravura Security Fabric users to existing Azure users. This is done through attribute mapping, where Azure compares the two profiles' attributes to see if they match. You must choose an attribute that can be mapped to Bravura Security Fabric user profiles.
The attribute mapping between Azure and Bravura Security Fabric must be 1:1. For example, if the profile ID of a user on Bravura Security Fabric is "JDoe", the unique user identifier on Azure must be an attribute that matches "JDoe" exactly.
Close the pane by clicking the X button on the top right.
For , click Edit.
In the action pane on the right:
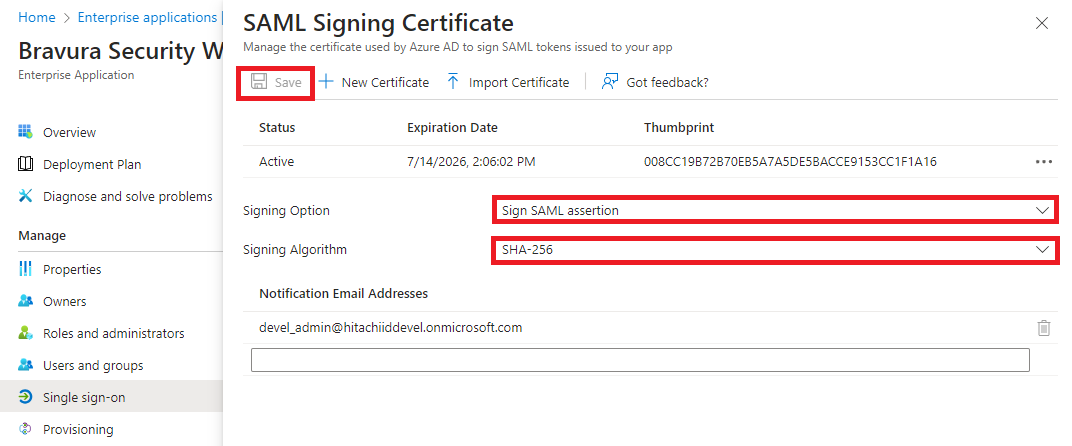
Choose the Signing Option.
"Sign SAML response" or "Sign SAML assertion" are supported options, but not "Sign SAML response and assertion".
Choose the Signing Algorithm. Available options are SHA-256 or SHA-1.
If changes were made, click Save.
Close the pane by clicking the X button on the top right.
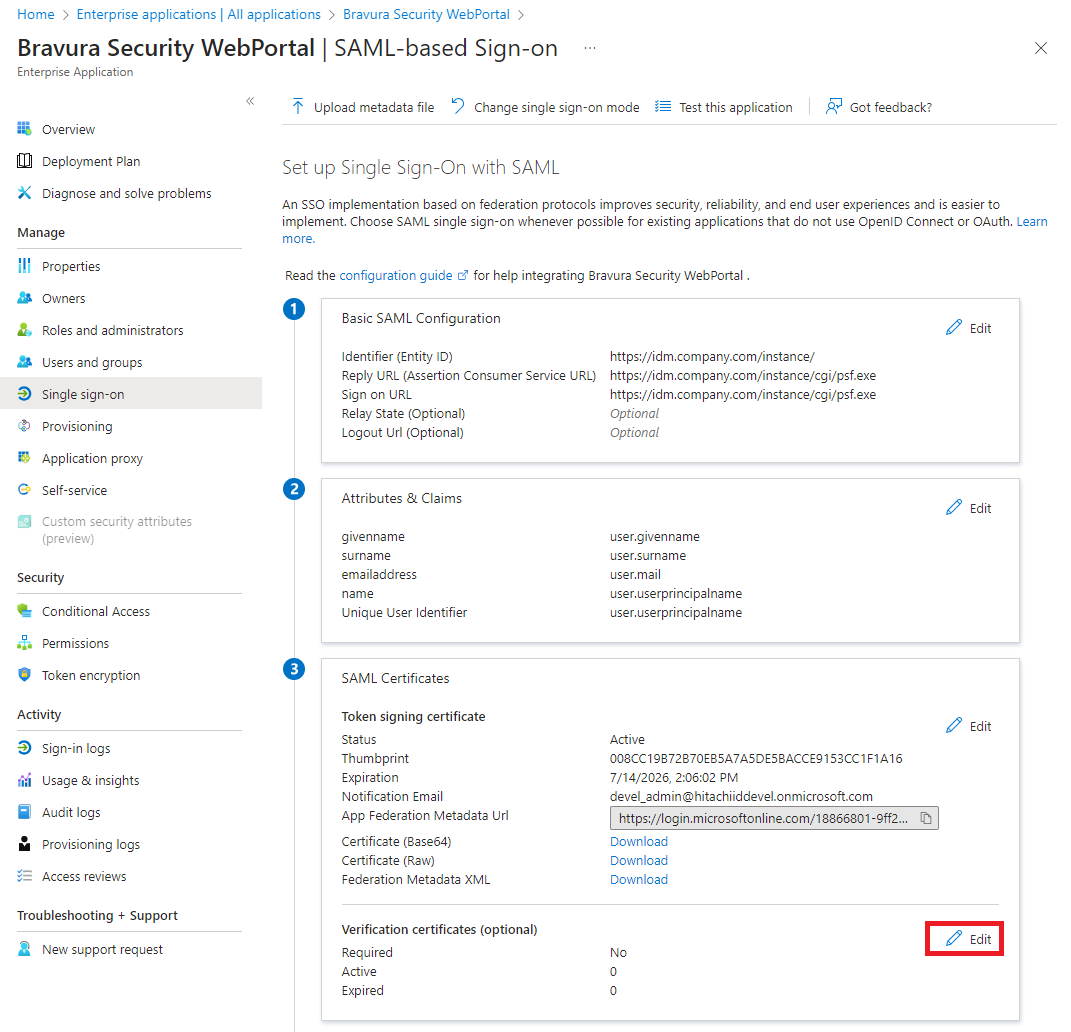
For , click Edit.
In the action pane on the right:
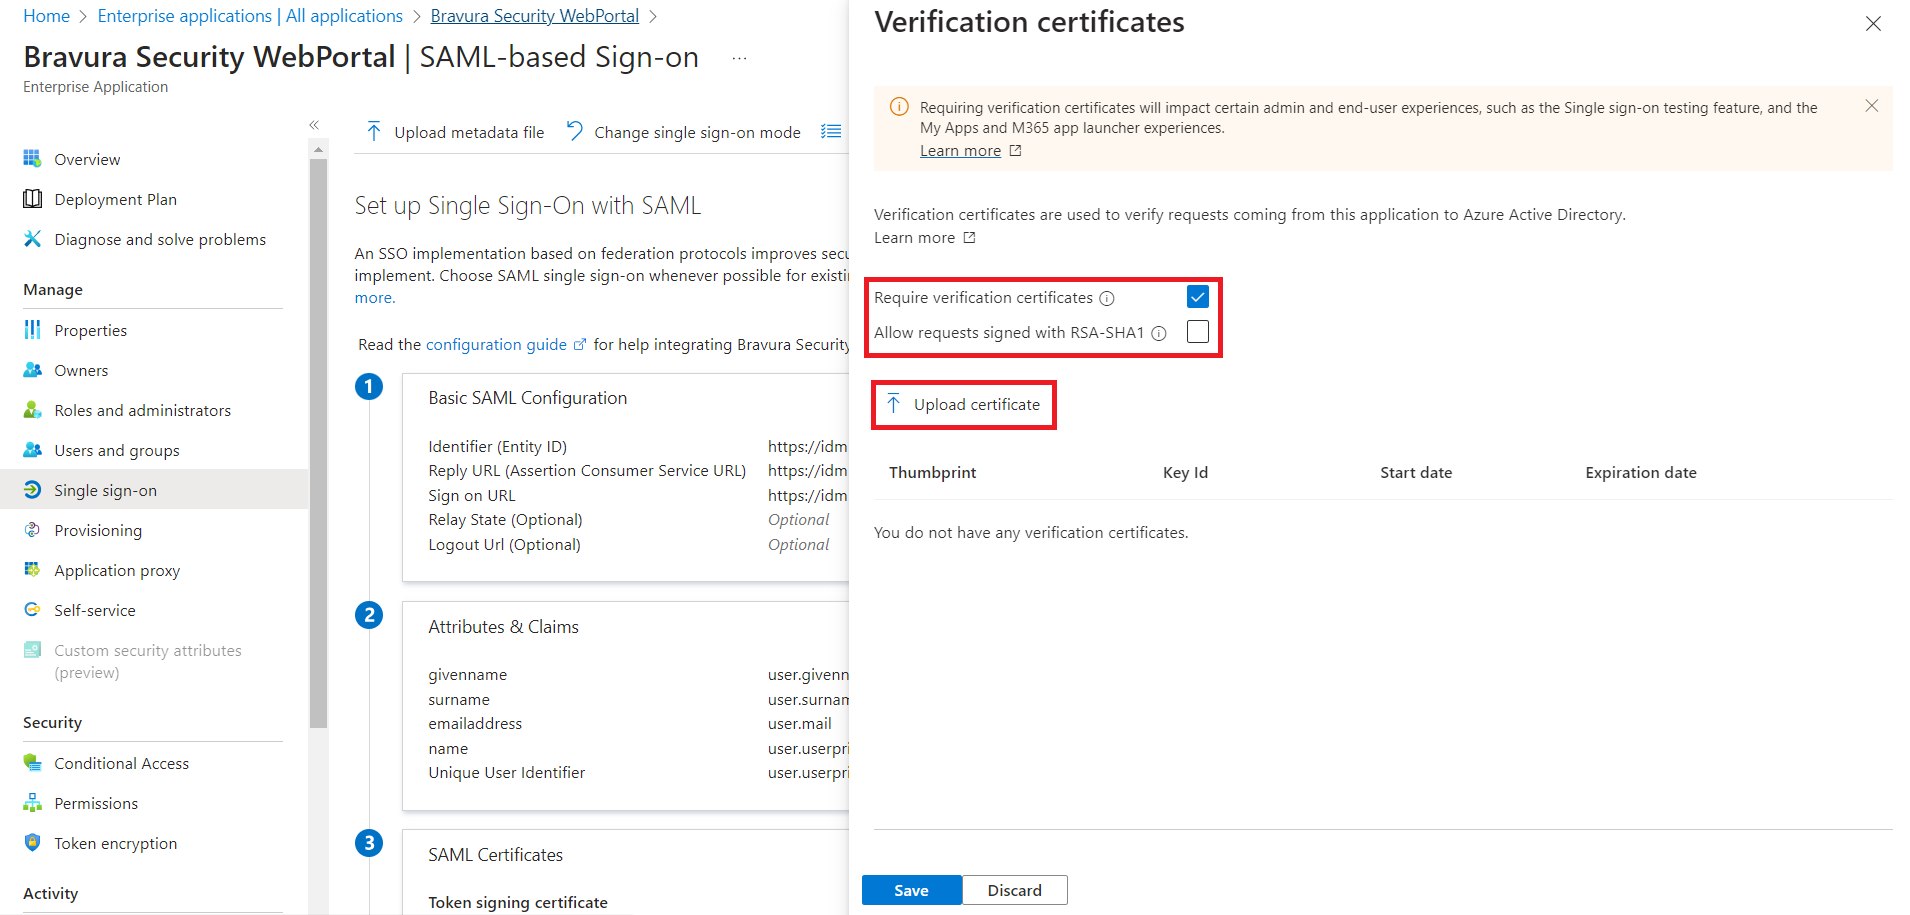
Choose whether to select Require verification certificates. If you select this option, you need to upload the certificate from Bravura Security Fabric:
Click Upload certificate.
Choose the
public.cercertificate, located in <instancedir>\sp.Click OK.
Choose whether to select Allow requests signed with RSA-SHA1.
Click Save.
Close the pane by clicking the X button on the top right.
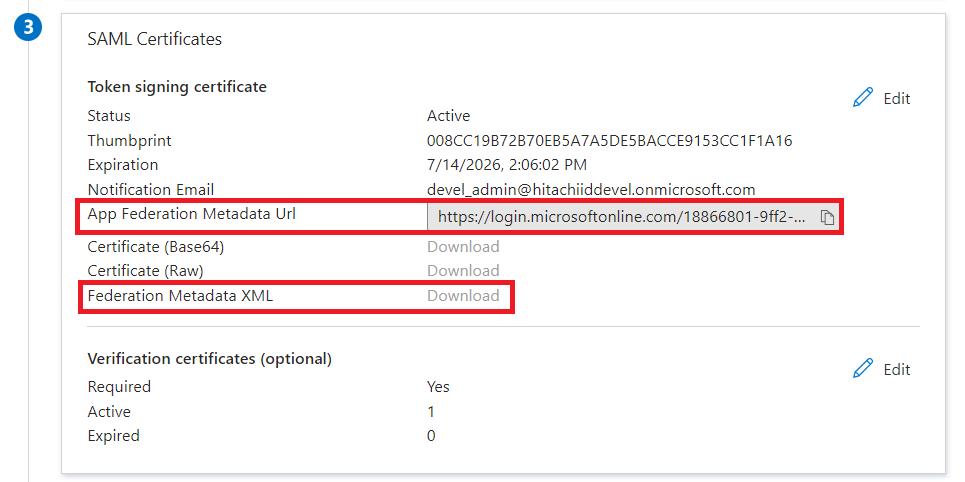
Download the Federation Metadata XML. This is used to configure the SAML_SP authentication chain later.
If the option is greyed out, you can retrieve the metadata by navigating to the URL provided in App Federation Metadata Url and saving the metadata from there.
Next:
Set up Bravura Security Fabric to authenticate with the IdP
Important
When configuring the SAML_SP authentication chain, set the Single sign-on binding to HTTP POST. The default value (HTTP Redirect) causes Azure to append the instance name at each SSO redirect stage, resulting in a malformed URL (for example, https://idm.company.com/pass/pass/pass/). Azure requires the HTTP POST binding per the SAML protocol specification. For more information, see Single sign-on SAML protocol in the Microsoft documentation.
See also
Azure Active Directory in the Connector Pack documentation for details on how to add an Azure target.
Example: Integrate with a Ping IdP
Requirement
Organizations that use Ping Single Sign-On solution to leverage federated authentication require Bravura Security Fabric to authenticate with their current IdP solution.
Solution
Bravura Security Fabric can be configured to operate as a SAML v2 Service Provider, allowing it to integrate with a Ping Single Sign-On Identity Provider (IdP) to authenticate its users. Once authenticated at the IdP, or even before authenticating with the IdP, additional authentication chains may or may not be run.
Bravura Security Fabric can be configured to authenticate users directly against Ping by redirecting them to the Ping Sign-In page. When this method is used, the authentication requirements for the authenticating application are configured within Ping.
Prepare Bravura Security Fabric as a service provider
Install Scenario.hid_authchain_saml_sp component to prepare Bravura Security Fabric as an SP.
Prepare Ping
To configure Ping to allow integration with Bravura Security Fabric :
Log into the Ping administrative console as a system administrator.
Navigate to Server Configuration > Server Settings > Roles & Protocols and ensure Ping has been established as an identity provider.
If required, navigate to Server Configuration > Password Credential Validators and click Create new Instance to create a new credential validator.
Ensure that this credential validator contains account information that corresponds to user profiles in Bravura Security Fabric .
Configure the mapping relationship that will be used to compare Bravura Security Fabric accounts to those stored on Ping.
Navigate to IdP Configuration > Application Integration > Adapters and click Create new instance.
Follow the on-screen instructions to configure the adapter for Bravura Security Fabric.
Navigate to IdP Configuration and click Create a connection.
Follow the on-screen instructions of the SP connection wizard to configure the connection to Bravura Security Fabric .
Export the IdP meta-data for this application and save the file in a location where it can be accessed by Bravura Security Fabric in order to finish configuring the authentication chain module.
Next:
Example: Integrate with Active Directory Federation Services IdP
In this example, we use two endpoints for the federation integration:
The SP, Bravura Security Fabric : https://app.demo.local/instance/
The IdP, Active Directory Federation Services: https://adfs.demo.local/adfs/ls/
The domains and instance name have to be changed to fit the instances being integrated. The rest of the paths are fixed.
Configure Relying Party Trust in Active Directory Federation Services (AD FS)
Open the AD FS Management Tool in Server Manager.

Click on Add Relying Party Trust in Actions.
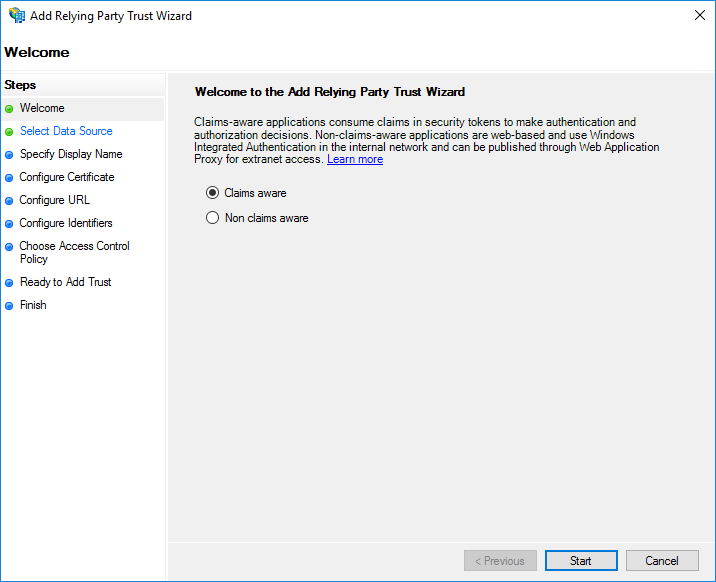
Keep the default "Claims aware" option and click Start.

Choose the "Enter data about the relying party manually" option, and click Next .
Type the name by which the instance of our product being added as Service Provider is known in the customer's infrastructure, for example “Bravura Security Fabric” in the Display name field and click Next .
Click Next on the page to accept defaults.
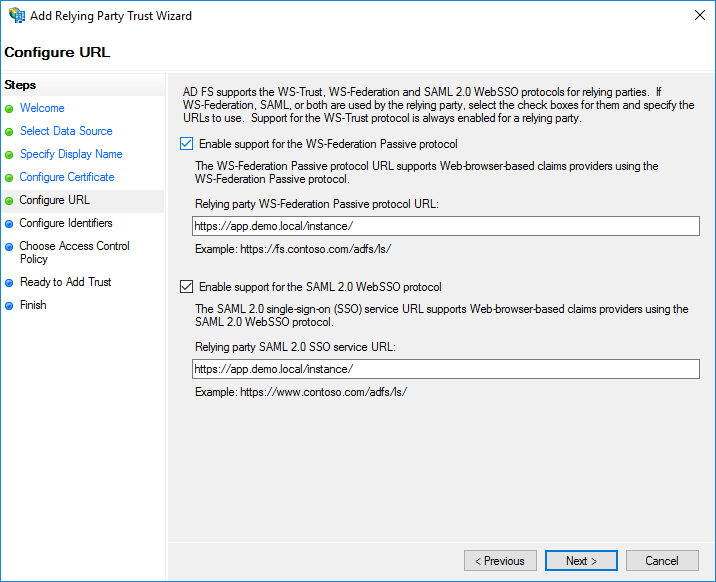
Select "Enable support for the WS-Federation and SAML" in the Configure URL field, type
https://app.demo.local/instance/then click Next .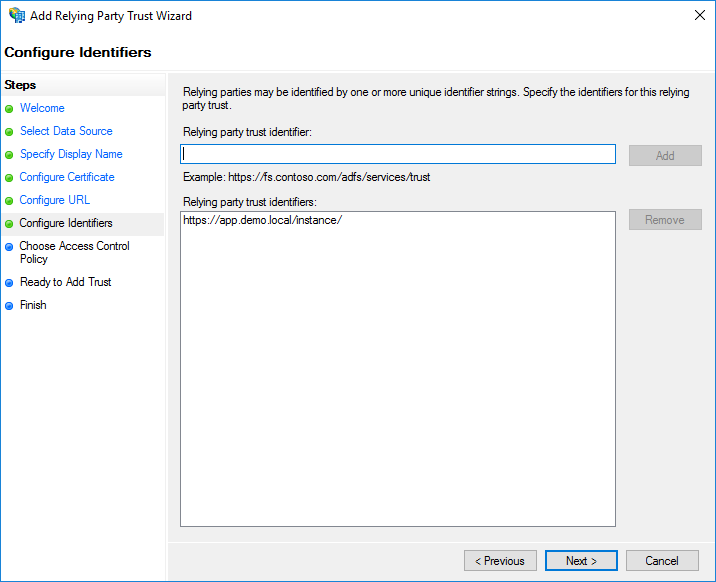
If there is no entry in the Relying party trust identifiers list on the page, type
https://app.demo.local/instance/in the identifiers field and click Add, then Next.Click Next in the page to accept defaults.
Click Next in the page to accept defaults.
Click Close.
In the AD FS Management tool navigate to and select "Bravura Security".
Click on the Edit Claim Insurance Policy.
Click Add Rule.
Keep default "Send LDAP Attributes as Claims" in the page, then click Next .
Type
send LDAP attributesin the Claim rule name field, select "Active Directory" in Attribute Store, select "SAM-Account-Name" in LDAP Attribute and "Name ID" in the Outgoing Claim Type, then click OK.
Export signing certificate from AD FS
Open the AD FS Management Tool in Server Manager.
Navigate to Services > Certificates.
Select Token Signing certificate and then select View Certificate from the menu (or right click > View).
Click the Details tab.
Click Copy to File and click Next .
Select "Base64 encoded X.509" in the page.
Add a descriptive Name (for example "adfs-domain-name-environment.cer" - with the actual domain name being integrated and environment type [dev, uat, prod]), then save the exported file into the Temp folder and click Next .
Click Finish to complete the export process.
Copy the exported certificate into the plugin\ folder of the Bravura Security Fabric instance.
Configure SAML Authentication in Bravura Security Fabric
See generic instructions in Set up Bravura Security Fabric to authenticate with an IdP .
The instance profiles must be created from the Active Directory domain being integrated, or at least a profile attribute has to be populated with that Active Directory's UPN.
When editing the fedidp_samlauth module options ( Step 3-Step 5 ), enter details of the AD FS server in the page:
Single sign-on URL:
https://adfs.demo.local/adfs/ls/ (this is the AD FS endpoint)Issuer to send to identity provider:
https://app.demo.local/instance/(this is the Relying party identified configured in AD FS)Single sign-on binding:
HTTP POSTIdentity provider issuer:
http://adfs.demo.local/adfs/services/trustIdentity provider public certificate file (.cer):
adfs-domain-environment.cer(the one saved from AD FS)Identity provider subject type:
Profile ID(if the profile name matches the AD UPN, otherwise choose "Profile attribute").Subject profile attribute: Leave blank if ProfileID above, otherwise the name of the profile attribute containing the AD UPN - usually EMAIL.
Set up Bravura Security Fabric to authenticate with an IdP
After you have prepared Bravura Security Fabric as SP and set up an IdP, configure the SAML_SP authentication chain to complete the integration.
Before you begin
Have an identity provider prepared that implements SAML to authenticate users on behalf of other service providers, and configure it to provide authentication for Bravura Security Fabric .
Ensure that user profiles that will use Bravura Security Fabric as a service provider exist in the databases of both the identity provider as well as Bravura Security Fabric . Mappings between the Bravura Security Fabric and identity provider profiles must be configured in the identity provider.
Export the IdP metadata from the IdP and save the file in a location where it can be accessed by Bravura Security Fabric in order to finish configuring the authentication chain module.
Collect the following information that will be required to establish the SAML trust relationship:
idp-metadata.xmlOR
The individual endpoints and certificate the IdP makes available in that metadata file:
Single sign-on URL for the identity provider.
Identity provider issuer, a URL for your IdP that may or may not match the SSO URL.
Identity provider public certificate file (.cer), a copy of which should be placed in the instance's plugin directory.
Issuer to send identity provider, typically the URL for the Bravura Security Fabric instance.
Single sign-on binding format as required by your IdP, either HTTP POST or HTTP Redirect.
All URLs must use HTTPS where applicable.
Configure the SAML_SP authentication chain
As superuser in the SP instance, click Manage the system > Policies > Authentication chains > custom > SAML_SP.
Disable this authentication chain so it can be edited.
Click the
fedidp_samlauthmodule to open it for editing.Ensure the Control Type is set to "Required".
Add information. Either:
Click Choose file next to Import metadata, and upload the
idp-metadata.xmlfile you copied earlier.OR
Populate the following fields manually:
Single sign-on URL: the URL of the identity provider
Issuer to send identity provider: typically the URL for the Bravura Security Fabric instance
Single sign-on binding: the format as required by your IdP, either HTTP POST or HTTP Redirect.
Identity provider issuer: a URL for your IdP that may or may not match the SSO URL.
Identity provider public certificate file (.cer): a copy of which should be placed in the instance's plugin directory.
Choose the correct Identity provider signature location.
"Assertion" is set by default. If you are using an IdP configured to sign the response, change this to "Response" (or adjust the IdP signature settings, if desired). The response value must match what is selected on the IDP side.
Optional: Choose the correct AuthnRequest signature.
Modify the value to either RSA-SHA1 or RSA-SHA256 (recommended if enabling this feature) if your organization requires SAML AuthnRequests to be signed.
Note
When your signing certificate is configured in the FEDSP system variables and you select RSA-SHA256, the RSA key-pair must be generated using a CNG-based private key (for example, using the "Microsoft Enhanced RSA and AES Cryptographic Provider" on Windows). Certificates generated with legacy Cryptographic Service Providers (such as "Microsoft Strong Cryptographic Provider" or "Microsoft RSA SChannel Cryptographic Provider") do not support SHA-256 signing and will produce an "Invalid algorithm specified" error.
Configure the Identity provider subject type, which is used to map user profiles in Bravura Security Fabric to their counterparts on the IdP. When the IdP authenticates a user, it sends a subject attribute in the SAML assertion that is used to identify which user was authenticated:
Select "Profile ID" if the subject attribute will be identical to the user's Bravura Security Fabric profile ID.
Select "Profile attribute" if the subject can be mapped to a user attribute instead of the profile ID.
Bravura Security Fabric as a SP only supports IdP initiated SSO if the Bravura Security Fabric profile ID is used.
If you selected "Profile attribute" as the Identity provider subject type, you must also enter the Subject profile attribute, which specifies the ID of the profile attribute that can be mapped to the SAML subject.
Optional : Select the Allow IdP initiated SSO checkbox to allow users to start at the IdP log in and be redirected to the SP, where they will be automatically authenticated.
Optional: Select the Force IdP authentication checkbox to allow the IdP to re-authenticate the user even if the user has an existing session.
Some IdPs do not support the Force IdP authentication option.
Click Update, then Enable to enable this authentication chain.
Verify that the Front-end login authentication chain includes SAML_SP as an available chain for the chain selector module.
Test the configuration
Bravura Security Fabric should now be configured to authenticate with an IdP. To test this setup:
Open the SP instance login page.
Submit the username of one of the test accounts that is a member of SAML_USERS.
You should be redirected to IdP's login page.
Complete the authentication process, using valid credentials.
Login uses the SAML authentication chain.
Upon successful authentication, the user's web browser is redirected back to the service provider, where they are logged in automatically.
Replacing certificate files in the plugin directory
When you need to replace an expired identity provider public certificate file, no restart of any services is needed. The certificate is used each time it has to be checked against the certificate coming from the IdP in the SAMLResponse. There may be minor caching of the file in the psf.exe CGI loaded into IIS.
Collect the certificate file from the IdP and put it in the instance plugin directory.
You may want to verify against the format of the previous certificate, which you can compare in a text viewer with the new certificate you exported from the IdP.
It is recommended that you back up the old certificate in case the new one has an issue and you must revert.
SAML certificates are not used in the transport layer (TLS) or in OS and IIS handshaked with the browser, so they do not have to be Trusted by the OS, nor used in IIS. They are merely used at the Application level, to verify the SAML assertion coming from the IdP.
Troubleshooting Bravura Security Fabric as a service provider
SP-initiated SAML authentication workflow breaks when reaching the Bravura Security Fabric server
If you receive a 404.15 error when trying to access Bravura Security Fabric 's UI (usually in a Saml context: a SAMLRequest from an SP being too long), increase the IIS limit for the URL length, as described in https://www.syncfusion.com/kb/5051/how-to-resolve-the-http-error-404-15-not-found
See also
For more information on HTTP status codes see https://learn.microsoft.com/en-us/troubleshoot/developer/webapps/iis/www-administration-management/http-status-code .