Lotus Domino Server
Connector name |
|
Connector type | Executable |
Type (UI field value) | Lotus Domino Server |
Target system versions supported/tested | The |
Connector status / support | Customer-Verified Clients may contact Bravura Security support for assistance with this connector. Troubleshooting and testing must be completed in the client's test environment as Bravura Security does not maintain internal test environments for the associated target system. |
The Lotus Notes product runs on a special applications and messaging server called the Lotus Domino Server. Lotus uses the Domino name to refer to a set of Notes server applications. Notes itself refers to the overall product.
There are two types of users for Lotus Notes:
Lotus Notes client users People who use the Notes client to access Domino servers and databases and have a Notes ID file, a Person document, and optionally a mail file.
ID files are containers of private and public encryption keys. The ID file itself is encrypted using the user’s password. Users authenticate to a Domino server and the databases it houses, using certificates found in their ID file. Users have access to their own private and public keys, while servers only know a given user’s public key.
Bravura Pass manages passwords used to decrypt users’ personal Notes ID files.
non-Notes, Internet-only users People who do not own a Notes ID file and therefore cannot use the Lotus Notes client; these users may instead have web access to Domino servers and databases. Lotus Domino users have a Person document, and optionally a mail file.
Bravura Pass manages passwords stored on a Notes / Domino server. These are a straight-forward password hash in a field in an .nsf database on the server.
Bravura Security Fabric uses the Lotus Domino Server agent (agtdmno) to perform operations for both types of user. For non-Notes users, the agent performs operations in a names.nsf database.
If you require greater flexibility, and need to create and manage accounts in a generic Domino database, see Lotus Domino Server (Script) .
The following Bravura Security Fabric operations are supported by this agent:
user verify password
get server information
user change password
administrator reset password
verify+reset password
create account
delete account
disable account*
enable account*
check account enabled*
add user to group
delete user from group
create group
delete group
rename account
update attributes
list account attributes
move contexts**
List:
accounts
attributes
groups
members
Note
Operations marked with * require special configuration. For details, see Configuring a deny-access group.
** MoveContext requires special configuration, For details, see Implementing cross certification.
The following sections show you how to:
Define an account for the target system administrator in the Domino Directory
Configure the Lotus Notes ID Files client on the Bravura Security Fabric server
Create template accounts
Set the Domino target system address in Bravura Security Fabric
Configure batch files to retrieve and deliver ID files
Configure agent behavior
This chapter also describes how Bravura Security Fabric handles special attributes, used when creating or modifying accounts on a Lotus Domino Server target.
See also
Bravura Security Fabric can also send email via the Lotus Notes / Domino mail system using the plugin-email-domino plugin program. See Plugins in the Bravura Security Fabric documentation for details.
Preparation
Before Bravura Security Fabric can perform operations, you must:
Configure a target system administrator
Install the client software
Install the lcppn.dll
Create at least one template account
Set up a certifier repository for ID files
Implement cross certification
Configure a deny access group
Configure default mail file ACLs
Note
The following instructions are for Lotus Notes 6.5. Details may vary depending on your version of the software.
Configuring a target system administrator
Bravura Security Fabric uses a designated account (for example, psadmin) on the Lotus Domino Server target system to perform operations.
Create an administrative account for the Domino Directory on each target server.
Ensure that you copy the designated administrator’s ID file to a directory on the Bravura Security Fabric server. You will be required to enter the path to the ID file and its password when you add the target system to Bravura Security Fabric .
Configuring the Lotus Notes client
You must install the Lotus Notes client on the Bravura Security Fabric server. It is recommended that you choose a single-user installation, which installs the notes.ini file in the install directory.
On the Bravura Security Fabric server:
Update the system PATH to include the directory in which you installed the Lotus Notes client.
If you run IIS, reboot the server to ensure that the new path information is loaded.
Set the target system administrator account as the default user on the Lotus Notes client.
Choose: File > Security > Switch ID.
Copy the files
getpass.dllandpsynchpwd.dllfrom the util directory into the same directory that contains the nnotes.dll file.For Lotus Notes version 6.x and 7.x, the default location is C:\Program Files\lotus\notes.
For Lotus Notes version 8 and 8.5, the default location is C:\Program Files\IBM\lotus\notes.
For Lotus Notes version 9, the default location is C:\Program Files\IBM\notes.
Edit the notes.ini file in that same directory. At the end of the file add this line followed by a blank line:
EXTMGR_ADDINS=psynchpwd.dllIf this line already exists, then add psynchpwd.dll to the beginning of the list (after the = symbol) and separate it from the other processes with a comma:
EXTMGR_ADDINS=psynchpwd.dll,process2.dll,process3.dllEnsure that the permissions on the notes.ini file allow all users to read and write.
Locate
nnotes.dll. Include the path to nnotes.dll in the path environment variable:Open Control Panel > System > Advanced > Environment Variables.
Click on the Path variable, under System variables, and click Edit.
Enter the path to
nnotes.dllin the Variable value field. Be sure to separate the paths with a semicolon.Click OK, then click OK again to close Environment Variables.
If the Lotus Notes client is open, close it and start it again so it re-loads the latest notes.ini file.
Note
Ensure that the Lotus Notes client is not used by human users on the Bravura Security Fabric server and that the last user to have logged in was the administrative account. Never log into Lotus Notes from the Bravura Security Fabric server using any login ID other than the one which is used by Bravura Security Fabric to manage accounts and/or passwords.
Installing lcppn.dll
After installing the Lotus Notes client, obtain the lcppn.dll and move it to the same location as the notes.ini file.
Note
Contact your Lotus Notes solution provider to obtain the lcppn.dll. The 32-bit version is required.
Creating the administrative account
To create an administrative account for Bravura Security Fabric , first create an administration group that can manage the Domino Directory. When creating an administration group, you must:
Name the group
Grant access to the database
Define the type of access being granted
To create an administration group with Domino Administrator:
From a Windows workstation, select Programs > Lotus Applications > Lotus Domino Administrator.
Log into Lotus Domino Administrator by typing your login ID and password in the appropriate fields.
Select the People & Groups tab.
Select Domino Directories > Groups > Add Group.
Type a name for the new group in the Group Name field of the Basics tab. Complete the remaining fields as necessary.
Click Save and Close to close the New Group window.
To give the group administrative rights to the Domino Directory:
Select the Files tab in the Lotus Domino Administrator window.
Right-click the
names.nsffile in the middle pane and select Access Control > Manage.The Access Control List dialog box displays.
Click Add.
The Add User dialog box displays.
Click the user icon to view the Names dialog box.
Select the name of the new administration group from the left pane. Click Add to move it to the right pane.
Click OK to close the Names dialog box.
Select the name of the new administration group in the left pane of the Access Control List tab.
Set the Access drop-down list to
Manager.In the Roles list box ensure
User Creator,User Modifier, andGroup Modifierare selected.Click OK.
After you create the administration group, create the target system administrator account then add it to the group. To do this:
Create a new account.
See Creating a template account for more information.
From the Lotus Domino Administrator window, select the People and Groups tab, then select Groups to view the list of administration groups in the right pane.
Right-click the group name to which you want to add the account and select Manage Groups.
The Manage Groups window displays.
Select the name of the account from the left pane.
Select the name of the administration group to which you want to add the account from the right pane.
Click Add.
The name of the target system administrator account displays under the name of the administration group in the right pane.
Click Done to close the Manage Groups window.
The administrative account also requires appropriate permissions to access the certifier repository for ID files, which is named pscert.nsf by default, in order to be able to create new Lotus Notes users on the Domino server. In the access control list for pscert.ntf, set the account’s permissions as:
User type : Person
Access : Manager
and select Delete documents and Replicate or copy documents checkboxes.
See your Lotus Notes system administrator or Lotus Notes documentation for more information if necessary.
Creating a template account
Bravura Identity uses template accounts as models or "blueprints" for creating new accounts on Lotus Domino Server targets.
The following illustrates an example of how you can create a template account:
From a Windows workstation, select Programs > Lotus Applications > Lotus Domino Administrator.
Log into Lotus Domino Administrator by typing your user name and password in the appropriate fields.
Select the People and Groups tab and expand Domino Directories.
Right-click People and select Register Person to view the Choose a Certifier dialog box.
Enter the Certifier password.
Click OK to view the Register Person – New Entry dialog box.
Type the new account’s names and password in the appropriate fields.
For Lotus Notes users, ensure that the Create a Notes ID for this person checkbox is selected.
Click the checkbox next to Advanced in the left section of the dialog box.
For a Lotus Notes user:
Click ID Info to view the Location for storing user ID section of the dialog box.
Ensure the checkboxes next to In Domino Directory and In file are selected.
Click Set ID File to search for and select the ID file location.
Click the check mark
 button (add user).
The account’s name displays in the User Registration Queue.
Click Register.
A message is displayed to confirm if the registration is successful.
Click Done to close the Register Person window.
Configure any additional attributes in the template account that you want to be automatically set for new accounts.
For non-Notes Internet-only users:
Double-click the user you just created.
The Person Record for:<User Name> window displays.
Click Edit Person to edit the user’s details.
Click the Basics tab.
Type an Internet Password for the user.
Click Save and Close to close the Person Record for:(User Name) window.
See your Lotus Notes system administrator or Lotus Notes documentation for more information if necessary.
Enabling certification authority
If you are using the CA (Certification Authority) process, edit agtdmno.cfg and set:
"certificate-authority = yes"
When this is set, the default CA server will be selected when creating accounts or enabling cross-certification (rename). You do not have to set up the certifier repository as outlined in Setting up a certifier for ID files.
Follow Lotus Notes Domino documentation for setting up CA. Start the CA process by doing the following on the Lotus Notes server:
From Domino Administrator, click the Server - Status tab.
Select a task in the top pane.
Click Start and choose Certificate Authority (CA) Process, then start the task.
Setting up a certifier repository for ID files
Newly provisioned ID files must be certified with an appropriate certifier ID before they can connect to the Domino server. Bravura Security Fabric houses these ID files in a certifier repository to use during provisioning. The certifier repository must be configured before a new user can be created.
You can use an existing certifier repository by defining database options in the configuration file that is specified in the target address. Configuration options are defined in Writing a configuration file for Lotus Domino target systems .
Alternatively, you can create a certifier repository with the default settings used by Bravura Security Fabric .
Note
You do not need to do this if you are using the CA process.
To create a certifier repository:
From a Windows workstation, select Programs > Lotus Applications> Lotus Domino Designer.
The Lotus Domino Designer window displays.
Log into Lotus Domino Designer by typing your login ID and password in the appropriate fields.
Click Create a New Application to open the New Application window.
Select the appropriate server, not the local server.
In the Title field, type a description of the repository.
Type
pscert.nsfin File Name field.The default file name is
pscert.nsf. If you use a different file name, you must specify it in the target configuration file .Select Blank from the list box.
Click OK to open the Design-Forms window.
Create a new form:
Click New Form.
In the Name field, type
CertifierForm, then close the dialog box.In the new form, type
CertifierNameand then a space.Right-click after the space and select Create Field to open the Field dialog box.
In the Name field, type
CertifierName, then close the dialog box.Click in the new form (after the newly created CertifierName field) to return focus to Design Forms and press Enter to add a new line.
On the new line, type Password and then a space.
Right-click after the space and select Create Field to open the Field dialog box.
In the Name field, type
Password, then close the dialog box.Select File > Save.
Create a new view:
Select Views from the bookmark.
Double-click the untitled view, then right-click the # column, then select View Properties, type
CertifierViewin the Name field, then close the dialog box.Right-click the # column, then select Column Properties, type
CertifierNamein the Title field, then close the dialog box.Right-click next to CertifierName and select Append New Column.
The newly created column displays.
Right-click on the new column and select Column Properties to display the Column dialog box.
Type
Passwordin the Title field and then close the dialog box.Select the
CertifierNamecolumn.In the CertifierName (column): Column Value pane, select the Field radio button and click CertifierName.
Select the Password column.
In the Password (column): Column Value pane, select the Field radio button and click Password.
Select File > Save to save the view.
See below for more information about adding a certifier’s ID file to the Bravura Security Fabric Certifier Repository, for integration with a Lotus Notes target system.
Use the addcert program to add a certifier’s ID file to the Bravura Security Fabric Certifier Repository, for integration with a Lotus Notes target system.
Usage
addcert.exe -s <ServerAddress> -i <adminIDfile> -p <password>
             -certid <certifierID> -certp <password> -idfile <path>
             [--instance <instance>]
Argument | Description |
|---|---|
-i <adminIDfile> -p <password> | Identifies the credentials to be used by the connector to log in before starting. |
-s <ServerAddress> | Specifies the server address. Use the format: <server>[/<config-file.cfg>] |
-certid <certifierID> | Specifies the certifier’s short name. |
-certp <password> | Specifies the current password for the certifier’s ID file. |
-idfile <path> | Specifies a full path to the certifier’s ID file. |
–instance <instance> | The name of the Bravura Security Fabric instance on which to run this utility to get log information. If not specified, the program looks for the default instance. |
Examples
To add a certifier’s ID file by supplying the target system administrator credentials and server address:
addcert.exe -i c:\admin.id -p haikou02 -s 10.10.77.188 -certid /bravura
-certp haikou02 -idfile c:\cert.id
Note
Ensure that every certifier added is also copied to Administrators address book. To do this, launch the Notes client then select File > Open > IBM Notes Application > Server DB > Server’s Directory (names.nsf) > Security > Certificates > Notes Certifiers and select all of the certifiers and click Copy to Personal Address Book.
Implementing cross certification
In order to enable the MoveContext operation for Lotus Notes targets, you must implement cross certification on the Domino server.
Cross certification is a process within Lotus Notes where one certifier is given permission to be able to certify operations under another organization or organizational unit.
There is a certifier ID file for each organization and organizational unit. This file is modified during the cross certify process.
In order for the cross-certify process to work, it has to be completed two ways. For example, if you want to cross certify "A" and "B", complete the cross-certify process from "A" to "B", then complete the process again from "B" to "A".
To implement cross certification:
From a Windows workstation, select Programs > Lotus Applications > Lotus Domino Administrator.
Enter your login ID and password to log into Lotus Domino Administrator.
Click the Configuration tab.
Select Tools > Registration > Organizational Unit.
Enter your server name in the Server field.
Select the radio button for Supply certifier ID and password.
Click Certifier ID, then browse to select the ID you want to use.
Click OK.
Type the certifier’s password, then click OK.
In the Register organizational unit certifier window:
Click Registration Server, then select the correct server name instead of the default (local).
Enter the organizational unit name and password.
Click Register to complete the ou registration.
Select Tools > Certification > Cross certify.
Type your server name in the Server field.
Select radio button for Supply certifier ID and password.
Click Certifier ID, then browse to select the ID you want to use.
Click OK.
Input certifier’s password, then click OK.
Choose the ID to be cross certified. The Issue Cross Certificate window loads.
Select Subject name, then click Cross certify.
Repeat this procedure for the second certifier to complete two-way certification.
Configuring a deny-access group
Lotus Domino servers do not provide a native disable user operation. The most common solution to this problem is for you to create a "deny access" group on the Domino server with no access to any of the server’s resources. You can then move users in and out of this group, thus enabling or disabling their access to the server’s resources. The agtdmno agent uses the Disable and Enable account operations to move users in and out of the "deny access" group. By default, these operations are disabled and must be configured once the group is created.
Warning
If a deny-access group is present in the agtdmno.cfg file but not on the server, all users will be denied access.
To create the deny access group on the Domino server:
Log into the server with administrative privileges.
Select the People and Groups tab.
Click on Deny Access Groups, then use Add Group to add a new group.
Set the group’s Category to "Administrator" and Group Type to "Deny List only".
Select the Configuration tab.
Select Server > Current server document.
Select the Security tab.
In the Server Access section, set Not Access server to the new deny access group you just created.
Ensure that your changes are saved.
To configure the Disable, Enable, and IsEnabled account operations for agtdmno on the Bravura Security Fabric server: edit the "deny-access" option in the Domino server configuration file to include the name of the deny-access group. See Writing a configuration file for Lotus Domino target systems for details.
Note
If the user is an administrator that is listed or is part of a group that is listed in the "Full Access administrators" field in the Domino server’s Security tab, then that user can not be disabled using this method.
Configuring default mail file ACL settings
The following procedure details how to set the default access control list (ACL) attributes on a new Domino/Notes user’s mail file. The purpose of this procedure is to make sure that mail files created by the Bravura Security Fabric contain the required access rights. By default Bravura Security Fabric only gives the new user access to the new mail file. If additional ACL’s are required, you can add them to the mail file template using the square bracket (for example, [a user]) notation. This tells Domino that any databases created using this template should have "a user" in the ACL’s. A common use for this is to give Bravura Security Fabric access to delete the user’s mail file, but any ACL that you require can be added to the mail file this way.
To set default mail file ACL attributes:
Using Lotus Domino Administrator, open the access control dialog box for the appropriate mail file template; for example mail7.ntf.
Add the required accounts or groups to the access control list.
Ensure that the user or group is surrounded by square brackets; for example,
[psadmin/domain]. This tells Domino to apply the ACL to databases created from the template, and not the template itself. You can add the square brackets by clicking Rename after adding the user or group.Define the access control level for the users or groups added previously; for example, if Bravura Security Fabric will be used to de-provision users and delete their mail file, set permissions as:
User type: Person
Access : Manager
and select Delete documents and Replicate or copy documents checkboxes.
Click OK to close the access control list dialog.
Targeting Lotus Domino
For each Domino domain, add a target system in Bravura Security Fabric (Manage the System > Resources > Target systems).
Type is Lotus Domino Server .
Address uses the following options:
Server - The name (or IP address) of the domino server or servers.
Config file - The name of file used to manage Lotus Notes client users, or to specify additional parameters for non-Notes users.
See Writing a configuration file for Lotus Domino target systems to learn how to write the configuration file.
The address syntax is entered as:
{server={<server>;[<server>...];};config=<cfgfile>;}Administrator ID is the path to the administrator’s Notes ID file on the Bravura Security Fabric server you configured in earlier.
Note
Multiple Domino replication servers are supported, which allows Bravura Security Fabric to carry out operations on the first available Domino server relative to the Bravura Security Fabric server. The Domino server uses replication to propagate the changes made on the first available Domino server to all other servers, providing them with the most up-to-date information.
The full list of target system parameters is explained in Target System Options .
Writing a configuration file for Lotus Domino target systems
If you are managing Lotus Notes client users, write the configuration file in KVGroup format and add it to the <Program Files path>\Bravura Security\Bravura Security Fabric\<instance>\ script\ directory. The sample agtdmno.cfg is included in the <instance>\samples\ directory.
If you cannot find the sample file, try re-running setup to modify your installation. Sample files are automatically installed with complete (typical) installations. You can select them in custom installations.
If you only want to manage the HTTP password, a configuration file is not necessary.
Text inside <angle brackets> indicates variables.
Unused settings on lines without {curly braces} must be commented out.
#KVGROUP-V2.0
hid:domino = {
target = {
# Name of the names.nsf like database to target
#database = <name>;
};
views = {
# Name of the user view defaults to "People"
#user       = <name>;
# Name of the group view defaults to "Groups"
#group      = <name>;
# Name of the deny group view defaults to "Server/Deny Access Groups"
#deny-group = <name>;
};
short-id = {
# Name of the short id field or column name used to derive the short id
# defaults to "ShortName"
#field           = <name>;
# Name of the sort-column field used in searching for the short id
# defaults to "Name"
#sort-column     = <name>;
# Flag used to indicate whether to derived the short id from a view value
# defaults to "no"
#use-view-value = <yes|no>;
# Flag used to indicate whether to treat short IDs as unique
# values when creating users. Note that Lotus Domino does not
# require short IDs to be unique.
# defaults to "no"
# unique = <yes|no>;
certifier = {
# A Certificate Authority can be used to register new users.  If
# the "certificate-authority" value is set, the registration
# process will attempt to obtain the CA context.
# If the "certificate-authority" value is not set, the certifier
# database will be used.
# certificate-authority = <yes|no>;
# Name of the certificate authority server (defaults to the target
# system's server)
# certificate-authority-server = <servername>;
# -- OR --
# Name of the certifier database defaults to "pscert.nsf"
#database            = <name>;
# Name of the field used to hold the certifier's name
# defaults to "CertifierName"
#name-field          = <name>;
# Name of the field used to hold the certifier's password
# defaults to "Password"
#password-field      = <name>;
# Flag used to indicate whether the password stored in the
# password field is encrypted defaults to "yes"
#password-encrypted  = <yes|no>;
# Name of the field where the id-file is stored
# defaults to "Certifier"
#id-file-field       = <name>;
 };
mail = {
# Used to indicate if and how to delete a user's mailfile
# defaults to "adminp"
#delete-mailfile = <adminp|force|no>;delete-mailfile = force;
# Flag used to indicate whether to look up the mail server
# defaults to "no"
#lookup-mail-server = <yes|no>;
 };
delete = {
# Used to indicate if and how to delete a user's record
# defaults to "adminp"
# delete-user = <adminp|force>;
delete-user = force;
 };
groups = {
# Name of the deny access group which needs to be set by the user
#deny-access = <name>;
  };
  password-management = {
# Clear the password digest. Defaults to "yes".
#clear-password-digest       = <yes|no>;
id-file = {
# Flag used to indicate whether or not to manage a user's
# note id file password defaults to "no"
#reset                       = <yes|no>;
# Flag used to indicate whether or not to update the password
# change date. Defaults to "yes".
#update-password-change-date = <yes|no>;
# Flag used to indicate whether or not to manage a user's
# note id file password located in a user's note
# defaults to "no"
#usernote-attachment-update  = <yes|no>;
# Used to indicate the name of the id file located in a user's note
# which needs to be specified by the user
#usernote-attachment-name    = <%shortid%|%existing%|<name>>;
# Flag used to indicate whether or not to manage a user's note id
# file password located in a user's mailfile defaults to "no"
#mailfile-attachment-update  = <yes|no>;
# Flag used to indicate that if updating the mail file copy of a
# users id file, if we should do so under the context of the admin
# user or the target user.  In order to be able to do this as the
# admin user, the admin user id must have sufficient privileges to
# every users mail file.  If set to 'yes', the connector will temporally
# switch to the target user's id file in order to update the attachment
# on the mail file.  This setting defaults to "yes"
#mailfile-attachment-switchid  = <yes|no>;
# Name of the batch file to run which needs to be specified
# by the user#batch-file                  = <name>;
# Flag used to indicate that the Notes ID Vault is being
# used to store user ID files (available in Lotus 8.5 or
# later); defaults to no
# use-vault = <yes|no>;
# Name of the server on which the ID Vault resides; defaults to
# the target system's server
# vault-server = <name>;
# Name of the id vault database
# vault-database = <name>;
# The number of ID downloads available from the vault after a reset;
# defaults to 0 (unlimited)
# download-count = <number>;
# List users from the id vault.  Listing will only be done either from
# the id vault or from the main database, as specified in the "target"
# section above, not from both databases# list-vault = <yes|no>;
# Delete id file backups from the id vault during the delete operation
# vault-delete = <yes|no>
# List inactive accounts from the ID Vault; defaults to "no"
# list-inactive = <yes|no>;
# This flag controls if the reset operation should fail or succeed, when
# we are unable to reset the ID file password AND both the idfile is being
# managed (password-management/id-file/reset = yes), and the web password
# (password-management/web-password/reset = yes) is also being managed.
#
# NOTE: if the web-password is being managed, and updating it fails, the
#       operation will fail regardless of this setting.
#
# The default value for this flag is 'yes', so id file reset failures will
# be treated as operation failures.
#
# fail-idfile-reset-error = <yes|no>;
 };
#Used to manage the HTTP/Internet password
web-password = {
# Flag used to indicate whether or not to manage a user's web
# password. Defaults to "yes"
#reset = <yes|no>;
# Flag used to indicate whether or not to update the password
# change date. Defaults to "yes".
#update-password-change-date = <yes|no>;
  };
 };
attributes = {
# Marks the listed attributes as "multi-valued", allowing the agent to
# read and write more than one value to the field.
# By default, all attributes are viewed as single-valued.    multivalued = {
# attrname1;
# attrname2;
  };
   };
};
Avoiding replication delays
In a large Lotus Notes/Domino network, network replication delays are very high. Under normal operation Bravura Security Fabric targets a single server (for example, the hub server). It may take a long time to replicate changes from the hub to all mail servers, and the user may not be able to log in to the mail server during this time.
In order to avoid problems caused by network latency, you can configure the Lotus Domino agent to locate a user’s designated mail server, so that Bravura Security Fabric can perform operations directly on that server.
To configure the Lotus Domino password agent to locate a user’s mail server include the following option within the mail KVGroup in the configuration file:
"lookup-mail-server" = "yes"
If this option is not included or the value is no, the agent uses the default mail server.
Configuring Disable, Enable, and IsEnabled account operations
To configure the Disable, Enable, and IsEnabled account operations for agtdmno on the Bravura Security Fabric server:
Configure a "deny access" group on the Domino server.
See Configuring a deny-access group for details.
Edit the deny-access option in the Domino server configuration file to include the name of the group.
  groups = {
    # Name of the deny access group which needs to be set by the user
    #deny-access = <name>;
  };
You can also edit the name of the group in the views section of the configuration file.
Managing a user’s note ID file password
In Lotus Notes there are four places where a user’s ID file is stored:
In a user’s document
In an ID file stored in the mailfile
In a location accessible to a batch file
The Notes ID vault
The following are some of the options for managing a user’s note ID file password in different locations. These and other options are located within the id-file KVGroup in the configuration file :
resetdetermines whether or not to manage a user’s note ID file password. If set to yes , Bravura Pass is able to manage, reset and verify passwords on an ID file. The default is no.The ID file must also exist in the DID table before it can be managed by Bravura Pass . There are two ways to add a user’s note ID file to the DID table:
Using the Bravura Security s Lotus Notes Extension. For details, see Lotus Notes Extension .
Using
upddid.
usernote-attachment-updatedetermines whether or not to manage a user’s note ID file password within the user’s document. If set to yes , Bravura Pass is able to manage, reset and verify passwords on the ID file in a user’s document. The default is no .batch-fileSpecify the name of a batch file to enable this option. If a batch file is specified,agtdmnoattempts to run the batch file and perform the operations contained within. This is often used to run copy operations and copy changes to other ID files. There is a sample batch file in the samples.If you cannot find the sample file, try re-running
setupto modify your installation. Sample files are automatically installed with complete (typical) installations. You can select them in custom installations.For more information, see Configuring Bravura Pass batch files .
Use the upddid program to add, delete, or update entries in the Bravura Security Fabric did table (the digital ID repository). This program is installed with Bravura Security Fabric .
Requirements
Note the following:
Use double quotes (
") to specify -didloc, -idfileloc, and -idfiledir arguments.Escape backslashes in file names. That is, write
\\.
Usage
upddid.exe -cmd get|put|delete -password <password> -target <target ID> [-workstnid <workstation ID>] [-nosid <NOS ID>] [-account <account ID>] [-didloc <digital ID path>] -idfileloc <filename> [-serverid <domino server>]
Argument | Description |
|---|---|
-cmd <command> | The command to execute. Possible values are: get Retrieve an ID file from the did table. put Add or update an ID file in the did table. delete Remove an ID file from the did table. |
-password <password> | The password for the new digital ID. |
-target <target ID> | The Lotus Notes target ID for the new digital ID. |
-nosid <network operating system ID> | The user’s network account ID. This argument is required for a put operation. |
-account <account ID> | The account ID for the stored digital ID. This argument is optional for the put command, but required for the get and delete commands. |
-workstnid <workstation ID> | The ID of the client workstation on which the update is taking place. |
-didloc <digital ID path> | The location path of the digital ID on the client workstation. |
-idfiledir <folder> | The folder used to store retrieved digital ID files. |
-idfileloc <filename> | The input or output location of the digital ID, including full path and the ID file name. |
-serverid <serverid> | The ID of the Lotus Domino server. If not specified, the serverid field in the did table will be empty. |
The upddid program verifies the supplied password before adding entries to the did table. It extracts the account name from the digital ID file.
Examples
To get a digital ID file from the repository and place it in the c:\ directory, type on one line:
upddid.exe -cmd get -account "CN=test 1/O=hitachi-id" -target DD -nosid test -workstnid WINxp206 -idfileloc "c:\psns\t1.id"
To get a digital ID file from the repository and place it in the current working directory, type on one line:
upddid.exe -cmd get -account "CN=test 1/O=hitachi-id" -target DD -nosid test -workstnid WINxp206 -idfiledir "."
To put a digital ID file from the c:\ directory into the did table, type on one line:
upddid.exe -cmd put -password haikou02 -target DD -nosid test -workstnid WINXP206 -didloc "c:\\id7\\t1.id" -idfileloc "c:\\id7\\t1.id" -serverid "domino7r"
To delete a digital ID file:
upddid.exe -cmd delete -account "CN=test 1/O=hitachi-id" -target DD -nosid test -workstnid WINXP20
Managing passwords and accounts in the vault
To configure Bravura Security Fabric to reset passwords and create user accounts in the Notes ID vault:
Your Lotus Notes server must use version 8.5 or newer
The Bravura Security Fabric server must use Notes client version 8.5.2 or newer
The vault must have a policy configured
The configuration file must have
resetanduse-vaultenabledIf the vault is located on a different server than the one you are targeting, then set the vault-server value in the configuration file
Once you have configured the vault-related values in the configuration file, run auto discovery.
If you are experiencing any issues with Notes ID vault, disable clear-password-digest and update-password-change-date settings.
Specifying the name of the ID file in a user’s note
The usernote-attachment-name setting can be used to set the name of the id file in a user’s note to the %shortid%, %existing%, or a custom <name>.
This setting is not enabled unless the usernote-attachment-update setting is set to yes.
There is no default setting. The options are:
%shortid%– sets the ID file in a user’s note to the users’ Bravura Security Fabric Short ID name.%existing%– does not rename the ID file in a user’s note.You must include the
%symbols when using either the%shortid%or%existing%settings.<name> – sets the ID file to whichever custom name you supply.
Recommended use:
Creation operations – only use the %shortid% or <name> options.
Reset operation – use the %existing% option.
Caution
Do not use the %existing% option if you plan to create users and use the reset operation.
Updating ID files attached to mail files
The mailfile-attachment-update option enables the agent to update ID files that are attached to a user’s mail file. The default is no.
The name of the ID file attached to the mail file is always UserID .
This option is only supported for Lotus Domino version 7.x and for mail files that are created using the dwa.ntf template.
Only a mail file created by Lotus Notes and stored in the mail file will allow a user to read encrypted emails on the Domino Web Access web page.
For example, to update ID files attached to mail files, set mailfile-attachment-update in the id-file KVGroup of the agtdmno.cfg file to:
"mailfile-attachment-update"= "yes"
Deleting a user’s mail file
The deletemail-file setting determines how a user’s mailfile is handled when the user’s account is deleted. When the value is:
no– the mailfile is not deleted when the account is deleted.adminp– (default) the mailfile deletion request is queued in the Domino administrative process. The Domino administrator must manually approve the deletion request before the mailfile is deleted.force– the mailfile is deleted immediately by the agent.
In order to give the psadmin user permission to open a user’s mailfile, and delete it, you must set the proper mail file ACL settings.
Handling multi-valued attributes
The multivalued setting determines which attributes are multi-valued. By default, all attributes are treated as single-valued.
An example of setting PhoneNumber to a multi-valued attribute:
  multivalued = {
    PhoneNumber;
  };
Handling account attributes
You can view the complete list of attributes that Bravura Security Fabric can manage, including native and pseudo-attributes, using the Manage the system (PSA) module. To do this, select Lotus Domino Server from the Manage the system > Resources > Account attributes > Target system type menu.
For information about the native Lotus Domino Server attributes managed by Bravura Security Fabric , consult your Lotus Domino documentation.
Bravura Security Fabric explicitly handles the following attributes and pseudo-attributes when creating or modifying recipient accounts for Lotus Domino Server targets:
_CertifierName Use _CertifierName to define the certifier to be used for creating the account. The certifier indicates what organizational unit (OU) the account should be in. A certifier must be created for each OU that Bravura Security Fabric could create an account in. In order for this attribute to be passed through, ensure the sequence number is set to -1.
_CN_FirstName, _CN_MiddleName, _CN_LastName These three pseudo-attributes can be used to build a CN that is separate from the First, Middle, and Last profile attributes. The default values are the same as the FirstName , MiddleName , and LastName attributes. Using these separate pseudo-attributes means that Bravura Security Fabric can create a CN without interfering with the FirstName , MiddleName , and LastName attributes. It also allows you to use a different naming policy for the CN – for example with no middle name – while still being able to populate the MiddleName attribute in the person record.
_CreateMailFile Use _CreateMailFile during account creation to control whether a mail file is created for the account. You must create the attribute as type "string", and assign it one of the following values. The default value is "T".
Tcreate the accountFdo not create the account_DeleteAdminP Use _DeleteAdminP attribute to control if to use adminP process when deleting user, it overrides delete settings in configuration file. _DeleteAdminP pseudo-attribute can be configured with one of following three values:
TrueUse adminP processFalseDon’t use adminp processUnsetOr if it is not defined then settings in configuration file will be used._DenyAccessGroup You can use the _DenyAccessGroup pseudo-attribute to specify deny access group, which overrides deny access group setting in the configuration file. If _DenyAccessGroup is not defined the deny access group will be read from configuration file.
_FullNameAppend which can be used to append a value to the FullName attribute.
groups You can use the groups pseudo-attribute to set group membership on this target system type. You can add new or existing users to a group, or remove an existing user from a group.
_IDExpiryTime Use _IDExpiryTime to define the account’s ID file expiry date and time. The date-time value format is "Y-M-D H:M:S" If only the date is provided, Bravura Security Fabric will set the time portion to midnight (00:00:00).
_IDFileLocation The _IDFileLocation pseudo-attribute specifies the path in which to place the user’s newly created ID file, or the full path including ID file name. If not specified, the default log directory is used (for example, <Program Files path>\Bravura Security\Bravura Security Fabric\<instance>\ <psxxxx>). Ensure the sequence number is set to -1.
For example, set the value type to "PSLang Expression" and set the value to
"c:\\idfiles\\" + $USERID[0] + "\\user.id"will create the ID file in the location of c:\idfiles\someuser\user.idIf the value of the _IDFileLocation attribute is set to a directory that doesn’t exist, Bravura Security Fabric tries to create the specified directory.
Alternatively, you can use an existing certifier repository by defining database options in the configuration file that is specified in the target address. Configuration options are defined in Writing a configuration file for Lotus Domino target systems.
MailFile The short name of the template user is replaced with the short name of the new user when this attribute is set. A mail file is created on the same server as the template’s mail file unless the MailServer attribute specifies something different.
If you Set the MailFile attribute, the mail file is created in the root directory (usually C:\Lotus\ Domino\Data) unless the path is prepended to the file name. For example, mail/janed is created as:
C:\Lotus\Domino\Data\mail\janed.nsf.
_MailOwnerAccess Controls the ACL level that is given to a new user’s mailbox. _MailOwnerAccess can be assigned the following values:
Editor
Designer
Manager
The default ACL (Editor) will be assigned when the attribute is unset or if set to an invalid value.
MailServer By default, Bravura Security Fabric copies the mail server from the template account. To specify a different mail server, write the value of MailServer in the format:
CN=<server>/O=<organization>_MailTemplate You can Set the _MailTemplate to determine which mail file template to use when creating a new user’s mail file. If a template is not specified, the Notes configured default template is used.
The _MailTemplate must be a NTF file located in the Lotus Notes root directory.
_MoveMailFile If this pseudo-attribute is Set to true, Bravura Security Fabric makes a request to admin4.nsf to move the user’s mail file when either the MailServer or MailFile attribute changes.
It may take up to several hours for Notes to move a user’s mail file once the request has been made. For more information, consult your Lotus Notes documentation.
_MailFileQuotaSizeLimit Use _MailFileQuotaSizeLimit during account creation to control the mail file quota size limit. The value is an integer measured in KB; 0 means unlimited. If this attribute is not specified, the mail template quota size limit is used.
_MailFileQuotaWarningThreshold Use _MailFileQuotaWarningThreshold during account creation to control the mail file quota warning threshold. The value is an integer measured in KB; 0 means unlimited. If this attribute is not specified, the mail template quota warning threshold is used.
_ReplicaServers This is a multi-valued pseudo-attribute used to specify additional servers in a clustered Lotus Domino environment. The
agtdmnoagent creates mail file replicas on each of the listed servers when a new user is created, and deletes mail file replicas on each of the servers when a user is deleted.For example, in order to configure _ReplicaServers for two additional Lotus Domino servers:
Navigate to the account attribute configuration page for _ReplicaServers and click Override.
Choose Set for the action to perform.
Set the Maximum number of values to 2.
Set the Attribute value to the host name of the second Lotus Domino server.
Click Update.
In the Add a new value row, set the Attribute value to the host name of the third server and provide it with an appropriate sequence number.
Click Update.
domino_dacl Use domino_dacl during nrattributes or nrupdate operations. The nrattributes operation is used for viewing the access level and sub-permissions on a resource whereas nrupdate modifies the user access level and sub-permissions.
The syntax for calling the nrupdate operation is as follows:
{[grant][remove]=<userName>;mask={[<level>;][[-]<subperm>;...]};};The list of possible access levels:
M - Manager
D - Designer
E - Editor
A - Author
R - Reader
P - Depositor
N - No Access
The list of possible sub-permissions:
CD - Create Documents
CS - Create Lotus Scripts
CPA - Create Personal Agents
CPF - Create Personal Folders
CSF - Create Shared Folders
DD - Delete Documents
RD - Read Public Documents
WD - Write Public Documents
RP - Replicate or Copy Documents
To remove a permission, affix ’-’; for example: -CD .
Synchronizing Lotus Notes ID Files for Password Management
Changing passwords on Lotus Notes ID Files offers many challenges. These include:
There is no mechanism for an administrative password reset. If a user forgets their password, a new ID file must be issued – therefore any certificates in their current ID file are lost.
Once a new ID file is issued, it must be delivered to the user. Since ID files can be located anywhere, such as a floppy disk, local hard-drive, or network share, this can be quite difficult.
Bravura Pass includes a Lotus Notes Extension to solve both these problems. The Bravura Security s Lotus Notes Extension successfully simulates an administrative reset using a copy of the ID file and its known (archived) password, and transparently delivers it to the user. This solution uses Bravura Pass’s password reset technology, an internal ID file repository, and a delivery DLL which is installed on each workstation.
To learn how to install and configure the Notes Extension DLL (psns.dll), see Lotus Notes Extension .
Configuring Bravura Pass batch files
Depending on your infrastructure, you may need to write a batch file to retrieve and deliver ID files from users’ PCs or a network share. You include the batch file as an option in the target configuration file .
Note
This is not required if you are using the Bravura Security s Lotus Notes extension.
Write a batch file to match your local business process, and copy it into the \<instance>\script\ directory. The batch file will be invoked by Bravura Pass during password and reset operations with three arguments:
%1 The word GET or PUT . GET means that Bravura Pass needs to retrieve an ID file from the user (for example, to help construct the repository), and PUT means that Bravura Pass needs to deliver a new ID file to the user.
%2 The user’s network login ID (short name).
%3 The location on the Bravura Pass server where the ID file is temporarily kept.
The following is an example of a batch file that Bravura Pass will run to publish ID files to a local web site on the Bravura Pass server:
NET USE x: \\FILESERVER\%2$ /user:psadmin psadminpassword
if /I %1==GET  (
copy /Y "x:\%2.id" "%3"
) else (
if /I %1==PUT (
copy /Y "%3" "x:\%2.id"
) else (
echo "Action must be GET or PUT."
)
)
NET USE x: /delete /yes
In the example, Bravura Pass retrieves ID files from a specified network share when it updates the repository (for example, during a verify or reset operation), and installs new ID files in the specified network share after extracting them from the repository and changing their password. If successful, Bravura Pass resets the password against the retrieved ID file; otherwise the password is reset against the repository’s ID file.
The file assumes that each user has a hidden share named after their Lotus Notes ShortName and that share already exists on the FILESERVER , and it also assumes that the Bravura Pass IDs are the same as the Lotus Notes ShortName.
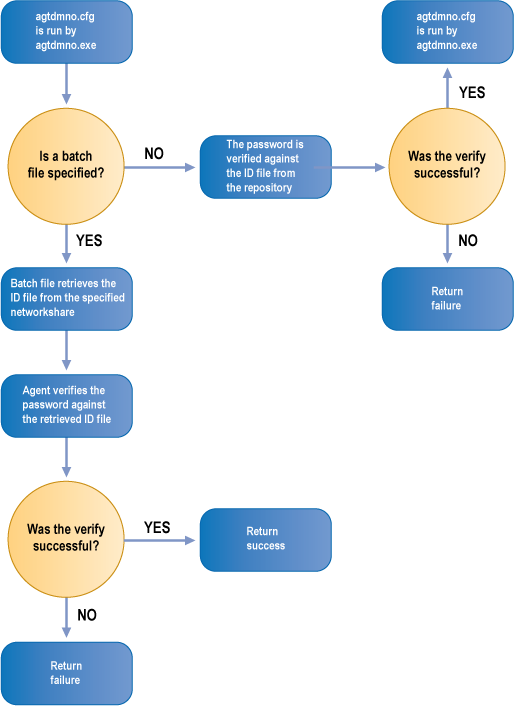
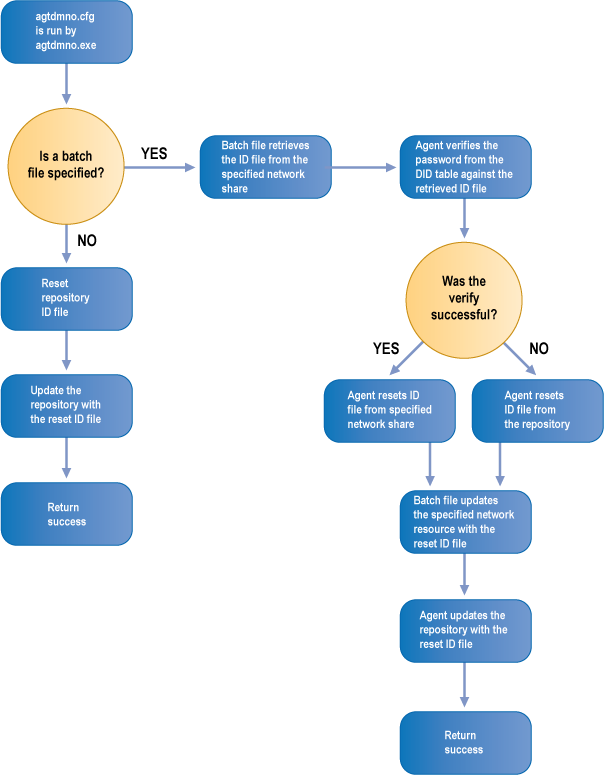
See the figures below for details on the verify and reset processes when using a batch file.
Verify operation via batch file
Reset operation via batch file
Creating or modifying network login scripts
Retrieving new ID files from a web server
Users can automatically receive new ID files from the Bravura Pass web server by adding the urlget command to their network login scripts, as follows:
\\ mercury\public\urlget -user -url http://mercury/idfiles/-file c:\notes\data%u.id
Retrieving new ID files from a home directory
The nidcopy command can be used to synchronize a user’s ID file on his PC with his ID file on a network home directory. If one of the files changes (for example, due to a local or Bravura Pass password change), the other can be automatically updated. The nidcopy command is normally invoked from the user’s network login script, as follows:
rem The following line maps the shared folder to the local workstation rem so that nidcopy can access that shared folder.

net use <drive letter> \\<server>\<shared folder> <user password> /user:<user>

rem The following command should be made as a single line:

\\<server>\<shared folder>\nidcopy -i 1 ’c:\Program Files\lotus\notes\’ -server 10.0.45.1 sharedIDfolder
Testing
Batch file testing
Do the following to test your configuration:
Before testing, ensure that:
At least one test record has been added to the repository.
The Lotus Notes client is not open on the Bravura Pass server and the last user who did log into the Lotus Notes client on the Bravura Pass server was on the administrative account.
You run auto discovery before testing to associate accounts with the new server.
Use Bravura Pass’s help desk program to reset the test user’s password.
Verify that the new ID file appears in the expected location (which will vary depending on your batch file).
If you use
nidcopy, verify that the network login script works with the changes you make, and automatically download/upload a new ID file from the network when one is created.
Extension DLL testing
Install/Configure the DLL on a workstation with Notes.
Open/Close the Notes client to "register" the user’s ID file.
Perform a password reset with Bravura Pass.
Open the Lotus Notes client. When prompted for the ID file password, the new password should now be accepted.
Troubleshooting
The following issue could occur:
Mail files not being properly replicated In order for a user’s mail file to be properly replicated to the additional Lotus Domino servers listed in _ReplicaServers , the administrator must have at least Reader access to the mail file. The easiest way to accomplish this is to modify the mail file ACLs of the user template. If this isn’t done, then the mail file will not be replicated on the scheduled replication updates and as a consequence will not store any of the email messages that were sent to the primary mail file.
To learn how to set mail file ACLs, refer to Configuring default mail file ACL settings .
No longer able to list for the target system The
notes.inifile may have been modified on the line containing EXTMGR_ADDINS=psynchpwd.dll . If multiple processes are listed on this line, ensure that "psynchpwd.dll" is the first process listed in the comma-separated list.If a program that uses this line was installed after Lotus Domino Server was integrated, this line may have been modified. It is imperative that "psynchpwd.dll" is the first listed process.
Unable to reset or verify a user Ensure that the user is in the DID table.
Agent
agtdmnoaborts execution Ensure that the filesgetpass.dllandpsynchpwd.dllhave been copied into the same directory that contains the nnotes.dll file.Ensure that the
notes.inifile contains the following line:EXTMGR_ADDINS=psynchpwd.dllUnable to create users Ensure that the correct certifier name was entered while adding a certifier to the
pscert.nsfdatabase.See addcert for information about using the
addcertprogram.Also ensure that you have a separate certifier for every organization or OU.
The following lists possible Bravura Security Fabric error messages and suggests resolution for each one:
Unable to find path to server Ensure that:
The server’s address, and in particular the server name that is the first part of the address, is correct.
The server is up. Try logging into it with the administrative ID you created, using the Notes client installed on the Bravura Pass server.
User not found This means the user has no account on the Domino server. Ensure that an alternate login ID is defined in the Bravura Security Fabric database, which associates the user with an account on the Domino server.
Failed with no specific error message Ensure that the path to nnotes.dll is in the path environment variable. See Configuring the Lotus Notes client .