Authorization workflow
Bravura Security Fabric provides an authorization authorization engine to receive, validate, and route access change requests to the appropriate individuals. Within the authorization workflow process there are a number of actors including:
The requester – who is submitting the request.
The recipient – who the request is submitted for. In many cases the requester is the same as the recipient.
The authorizer – who is responsible for reviewing the request.
Read the following sections to learn more about authorization workflow and the different ways in which it can be implemented.
Workflow logic and process
The Workflow Manager Service is responsible for implementing authorization logic and orchestrating workflow processes. In general, the workflow process operates as follows:
A user logs into the Bravura Security Fabric web application and submits a change request.
Alternatively, an automated process may submit the change request.
Bravura Security Fabric validates the input and forwards the request to the Workflow Manager Service (
idwfm).The
idwfmservice determines authorizers for the request using static authorization or dynamic authorization rules, and notifies them of their assignments by email.Caution
Assigning too many authorizers could affect performance. When the number of authorizers assigned to a resource exceeds the value of MAX AUTH ALLOWED (default 20), the request is put on hold. If you increase this value, ensure that you test the configuration for performance issues.
Authorizers log in to the Bravura Security Fabric web application, usually after following a URL embedded in the email, where they log in and either approve or deny the request.
If authorizers do not respond in a timely manner,
idwfmcan send reminder emails or take other actions like denying or escalating the request.The
idwfmservice determines if input received from authorizers is sufficient to approve or deny the request. If the request is:Denied,
idwfmcloses the request.Approved,
idwfmforwards the request to the Transaction Monitor Service to carry out changes on target systems.The fulfillment engine can be configured to run connectors directly or to use human implementers.
The
idwfmservice also updates the Bravura Security Fabric database and informs the appropriate users.
Types of authorization workflow
Two types of authorization are available within the Bravura Security Fabric workflow engine:
Static authorization | Requests involving resources (target systems, templates, roles or groups) are routed to pre-defined authorizers mapped directly to the objects. This type of authorization is static because the list of authorizers is configured in advance. It is generally not used in Bravura Privilege implementations. |
Dynamic authorization | Authorizers are determined and assigned at the time the request is submitted, using criteria based on properties of the request (relationship to the recipient, value of a particular request attribute, access requested and so on). This type of authorization is dynamic because the list of authorizers changes depending on details of the request. The Bravura Workforce Pattern installs a rule-based policy table i |
Static authorization is straightforward to configure but requires manual maintenance. In Bravura Identity implementations, it is usually sufficient for small to medium-size organizations, where a small number of employees are responsible for reviewing and authorizing requests to access a resource. In Bravura Privilege implementations, Bravura Privilege Pattern makes it easier to use team management (which uses dynamic workflow).
In large enterprise environments, selecting resource authorizers is more complex. Static authorization is not feasible; the maintenance required would make it impractical. Dynamic authorization addresses this challenge and offers greater flexibility in configuring the workflow. Many businesses implement a combination of static and dynamic authorization. You can apply relational user classes and security rules so that the authorizer is determined by the request type, the resources associated with the request, and who is making the request (and for whom).
You can also use plugins or Bravura Workforce Pattern policies to dynamically assign authorizers instead of, or in addition to, static authorizers. In some enterprise environments, the authorization process is serial; for example, the request is first reviewed by the employee’s manager, followed by a security group member or resource owner. The authorization engine is flexible enough to accommodate most authorization scenarios.
Single resource approval
You can configure workflow so that it sends parts of the request for fulfillment as soon as they are approved. This is controlled via the IDP APPROVE SINGLE RESOURCE option at Manage the system > Workflow Options > General. This option is disabled by default.
Example: Configure static authorization
Any regular user with a valid profile can be assigned as a static authorizer. Static authorizers can be mapped directly to resources or policies.
The types of requests that static authorizers can review, and the actions they can take, depend on the privileges granted to them by user access rules.
Requirements
This use case assumes that:
There is an Active Directory target system set up as a source of profiles.
The Active Directory target system is configured so that groups with owners are automatically managed by Bravura Security Fabric , to be moderated by owners. This means that Bravura Security Fabric assigns the owners of those groups as the authorizers.
Click below to view a demonstration:
Configure status authorizers for groups
You can assign static authorizers to a resource in the configuration settings for the resource.
The AD target system is configured so that groups with owners are automatically managed by Bravura Security Fabric , to be moderated by owners. This means that Bravura Security Fabric assigns the owners of those groups as the authorizers of any requests pertaining to their groups.
In this example, you will add one extra static authorizer for the ENG-MANAGERS-owners group:
Log in to the Front-end (PSF) as
superuser.Click Manage the system > Resources > Groups.
Select the AD target system to view its listed groups.
Search for and select the ENG-MANAGERS-owners group and take note of its settings.
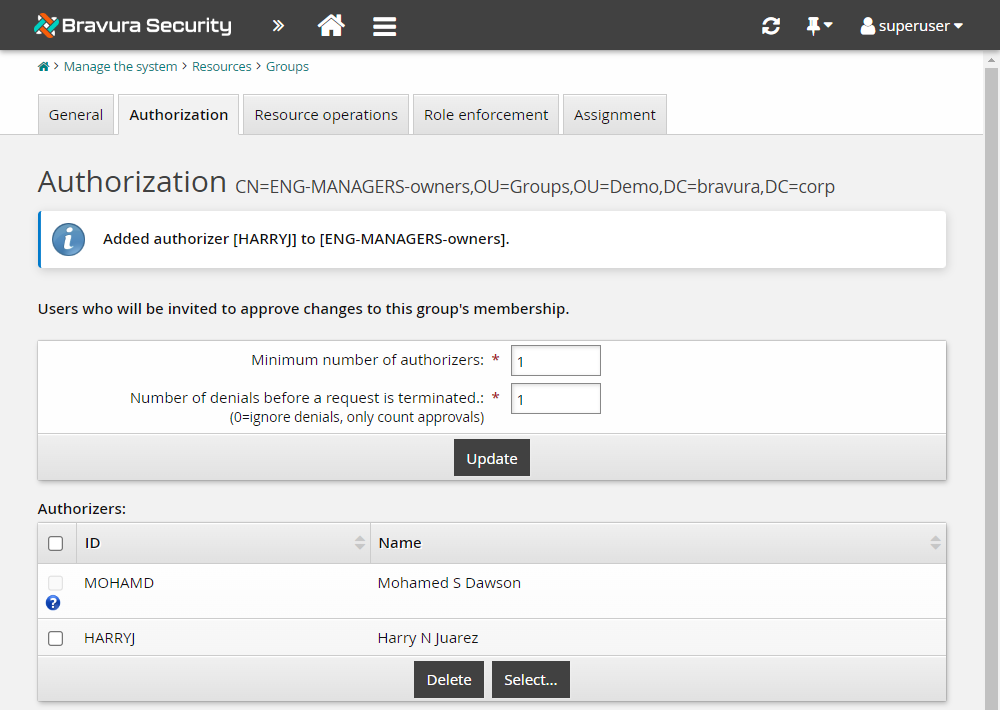
Click the Authorization tab.
Set the Minimum number of authorizers to
1.This means that any one of the authorizers you map to this target may approve the request.
Set the Number of denials before a change request is terminated to
1.This means that a change to an existing account is canceled if one of the authorizers deny the request.
Notice that the owner of the ENG-MANAGER-owners group has already been added as an authorizer.
In the Authorizers table, click Select… .
Search for and select HARRYJ.
Click Select .
The ENG-MANAGERS-owners group now has one additional authorizer added so that requests to join or leave the group can be approved or denied by either one of the two authorizers listed; MOHAMD or HARRYJ.
Configure authorizers from the workflow menu
All authorizers that are mapped to resources are listed in Manage the system > Workflow > Authorizers. From here, you can select individual authorizers to configure notification and additional security settings, and view the resources to which they are assigned.
Let’s assume you want to give the company president, BRYANW, additional authority when assigned as authorizer:
Click Manage the system > Workflow > Authorizers.
Bravura Security Fabric displays a list of authorizers. So far, all group authorizers are listed.
Search for and select BRYANW.
Select the Denial blocks entire request checkbox to allow the authorizer to block an entire request, rather than just part of a request.
Select the Input is required before request can be approved checkbox to require the authorizer’s approval before any request to which he or she is assigned can proceed, regardless of the number of authorizers who have already approved the request.
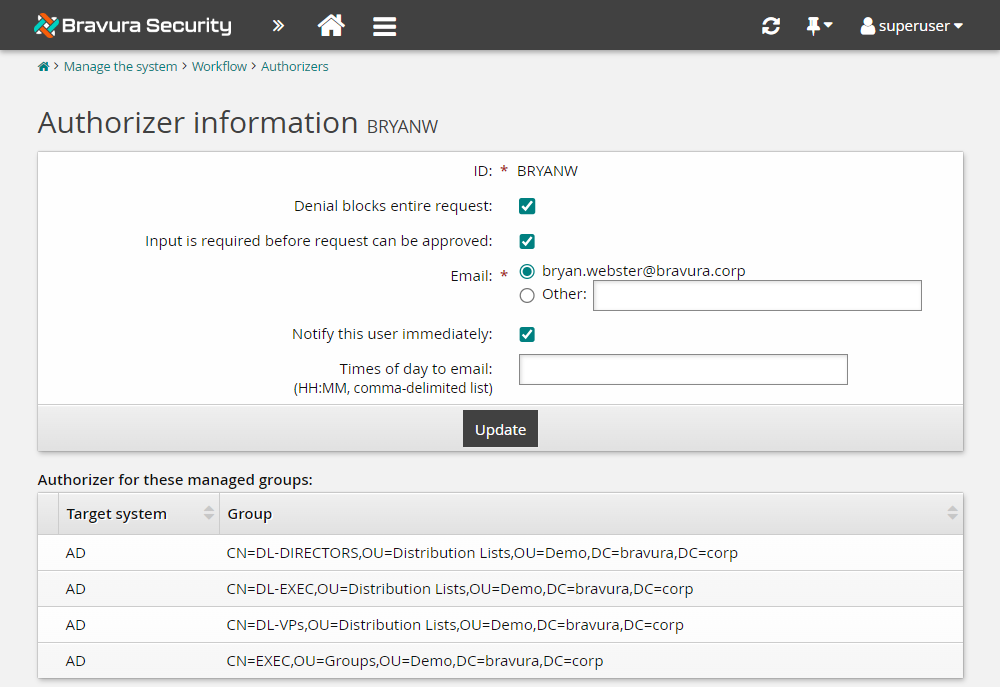
Click Update.
For requests where BRYANW is an authorizer, the request will not be approved until BRYANW has provided his authorization. If BRYANW denies the request, the whole request will be denied instead of only the part that required his authorization.
Here is an example of how the denial process works for this advanced privilege:
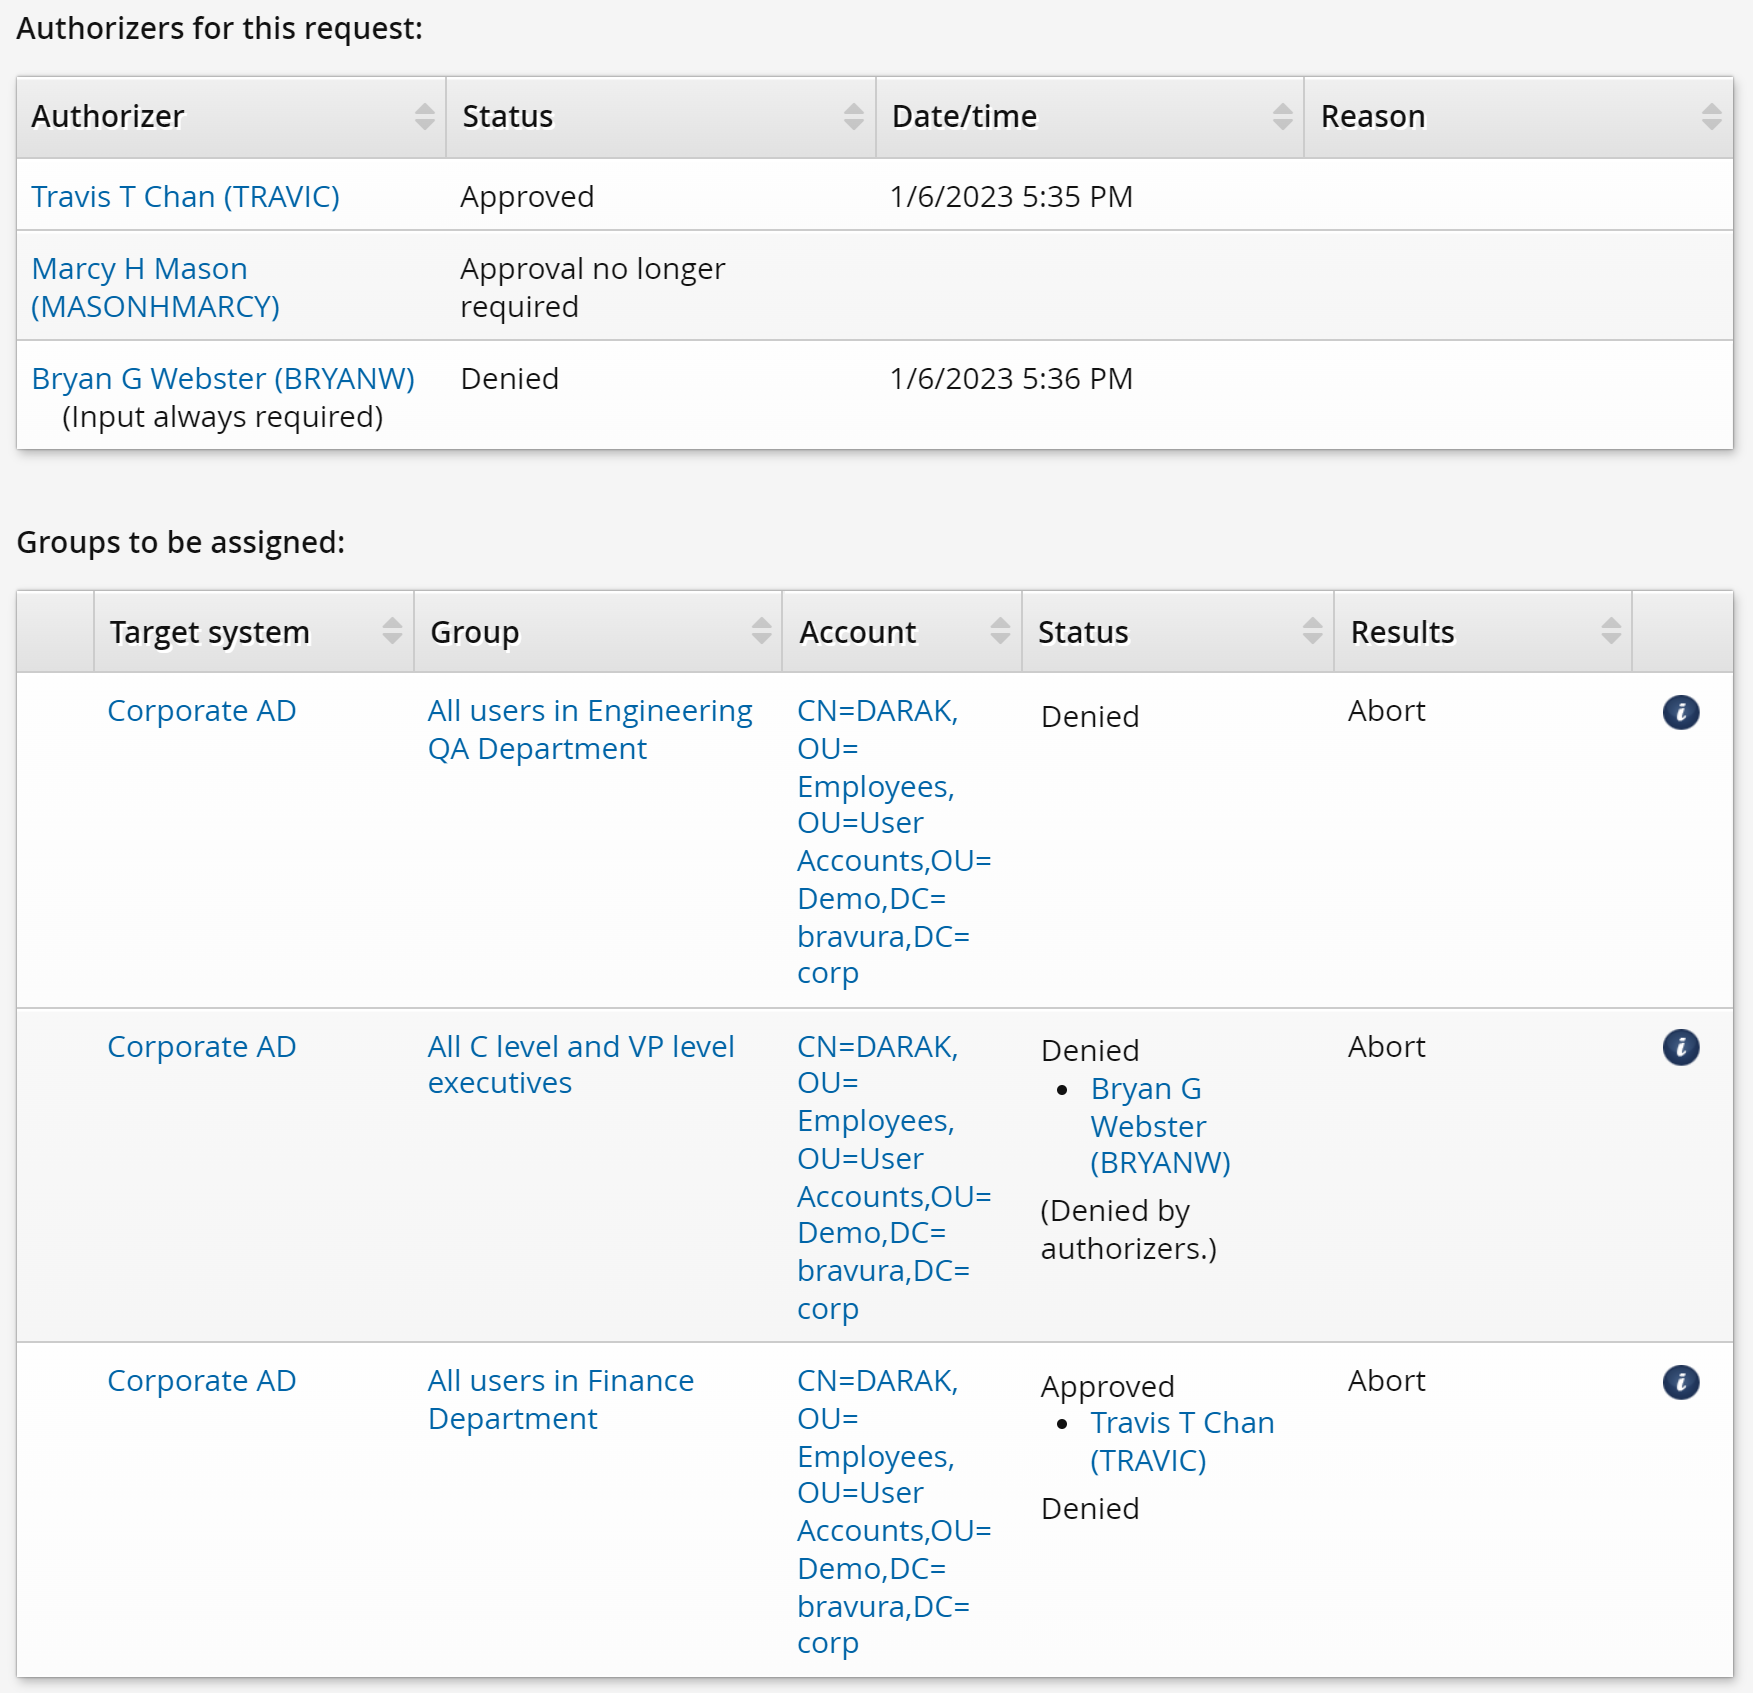
DARAK puts in a request to join the following groups:
Group
Authorizer
ENG-QA-GENERAL
No approval required
FIN-GENERAL
TRAVIC
EXEC
BRYANW
Even though the ENG-QA-GENERAL group does not require authorization, the membership is not added until the authorizers for other groups approve or deny the request.
TRAVIC decides to approve the request. The membership for the FIN-GENERAL group is also not added yet because the request is still waiting for approval from BRYANW.
BRYANW denies the request and so none of the three group memberships are added.
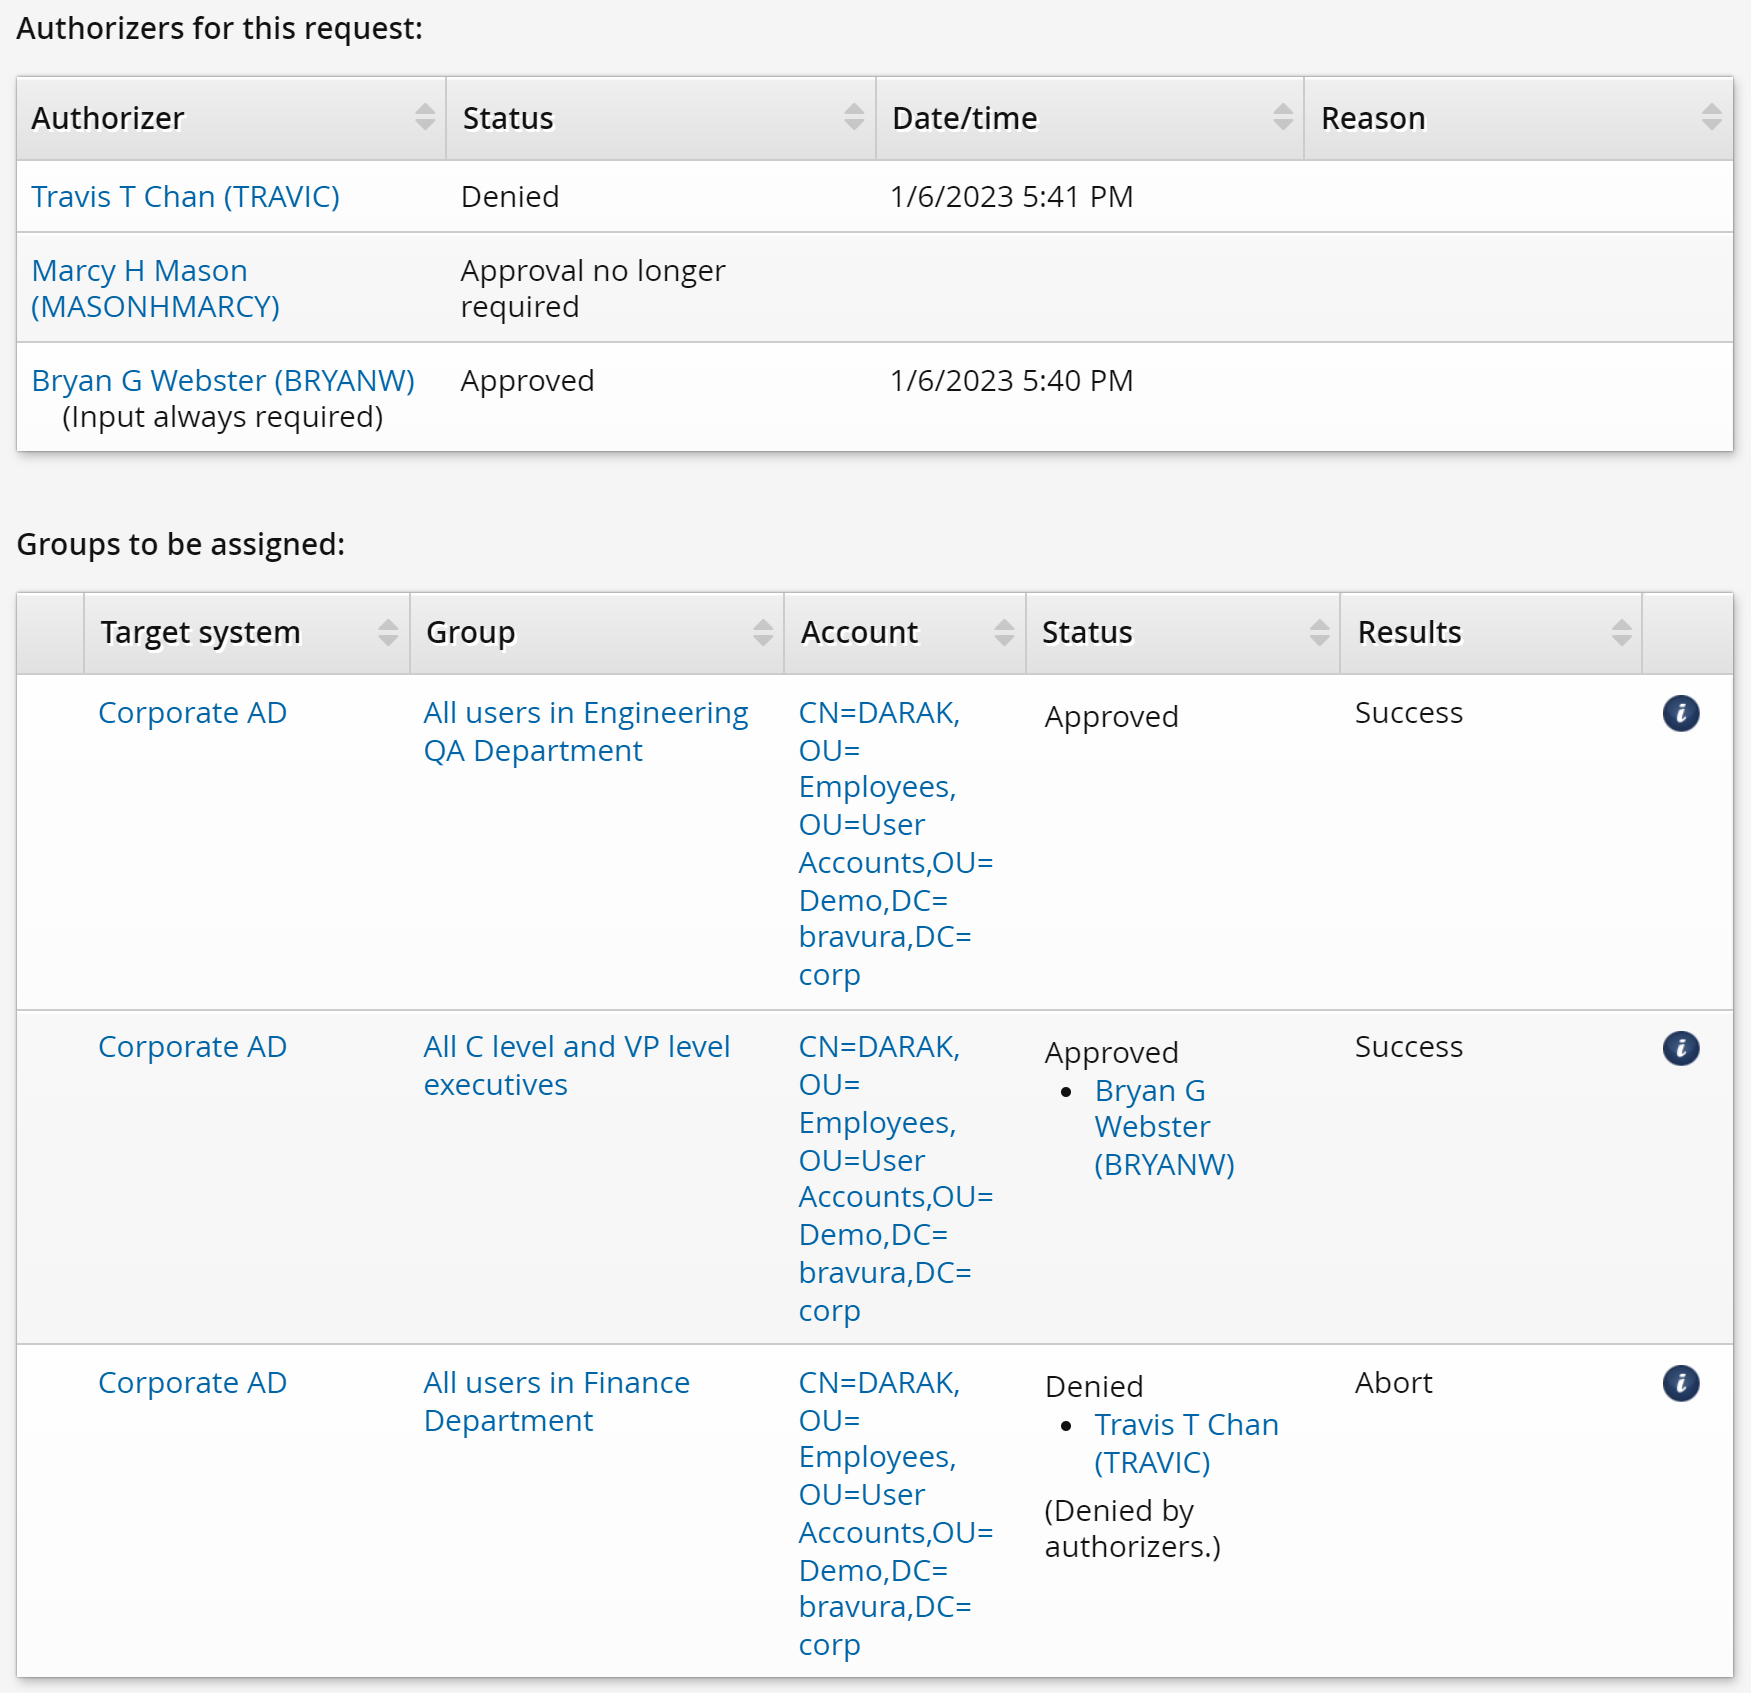
If we were to consider the alternative scenario where BRYANW approves the request and TRAVIC denies it, you will see how the denial privilege is only partial for TRAVIC. Here is the same example, but with BRYANW approving the request and TRAVIC denying it:
DARAK puts in a request again to join the following groups:
Group
Authorizer
ENG-QA-GENERAL
No approval required
FIN-GENERAL
TRAVIC
EXEC
BRYANW
Even though the ENG-QA-GENERAL does not require authorization, the membership is not added until the authorizers for other groups approve or deny the request.
BRYANW decides to approve the request. The memberships for the EXEC and ENG-QA-GENERAL groups are not added yet because the request is still waiting for a response from TRAVIC.
TRAVIC denies the request, so only the membership for the FIN-GENERAL group that he is responsible for gets denied. This demonstrates how regular authorizers only partially deny requests where there are multiple authorizers required, since they only deny the resources that they are authorizers of. Both the ENG-QA-GENERAL and EXEC group memberships get added successfully as only approval from BRYANW is necessary.
Example Configure dynamic authorization via relational user class
In this example, you will set up authorizers for the target systems, so that when a user requests a change to an existing account, the recipient’s direct or indirect manager can authorize the request. An indirect manager could be the manager’s manager, and so on, up the chain of command.
Requirements
This use case assumes:
Bravura Workforce Pattern is installed.
There is an Active Directory target system set up as a source of profiles.
User BERNAP manages user DARAK.
BRYANW's input is required for any group requests to which he is assigned, as configured in Example: Configure static authorization
Click below to view a demonstration.
Assign dynamic authorizers to resources
To set up authorizers for existing accounts:
Log in to the Front-end (PSF) as
superuser.Click Manage the system > Resources > Target systems > Manually defined .
Select the AD target.
Click the Authorization tab.
Change the Minimum number of authorizers to
1.Change the Number of denials before a change request is terminated to
1.Click Update for the updated section.
In the user classes table at the bottom of the form, click Select… .
Select the checkbox for _MANAGER_INDIRECT_ , and click Select.
Bravura Security Fabric displays an error because you have not mapped the participants in the user class yet.
Under Participant mapping for MANAGER, select AUTHORIZER.
Under Participant mapping for SUBORDINATE, select REQUESTER.
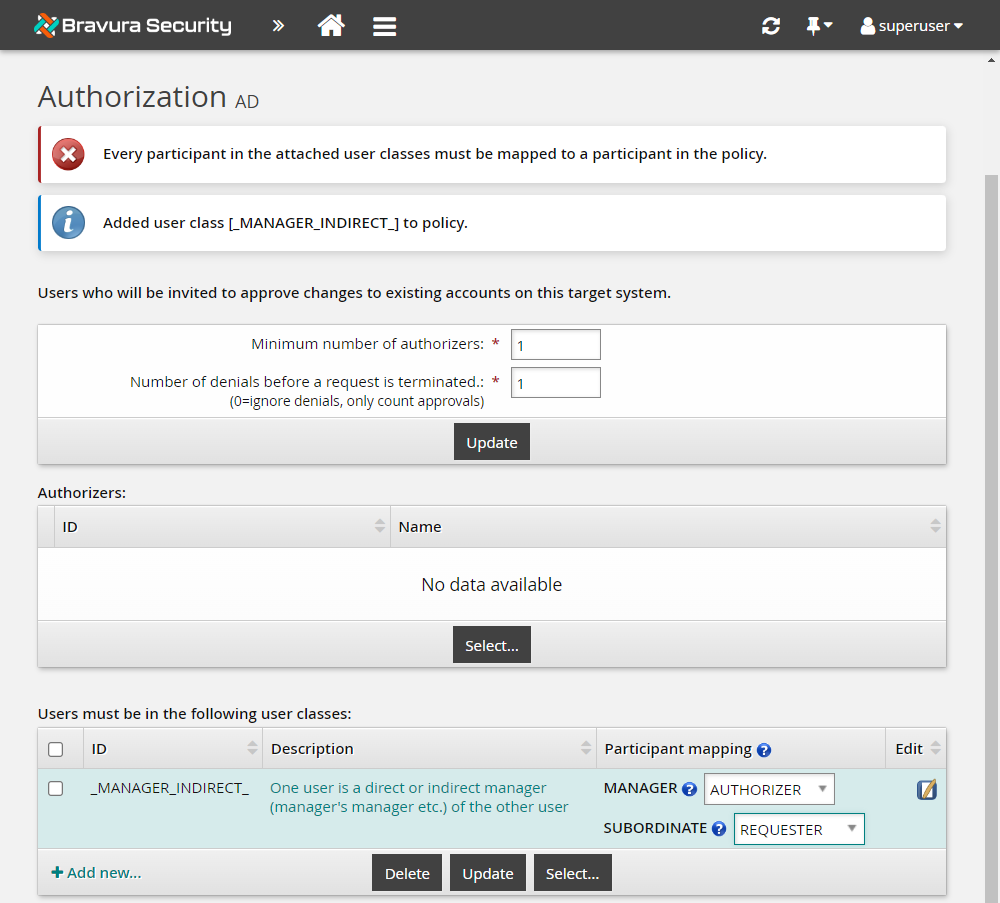
Click Update.
Test the user class participant mapping
To test if a change request will have enough authorizers:
Click Test… in the user class table.
In the List matching users: section, select AUTHORIZER from the List: drop down.
In the REQUESTER field, also under List matching users: , type DARAK .
Click List.
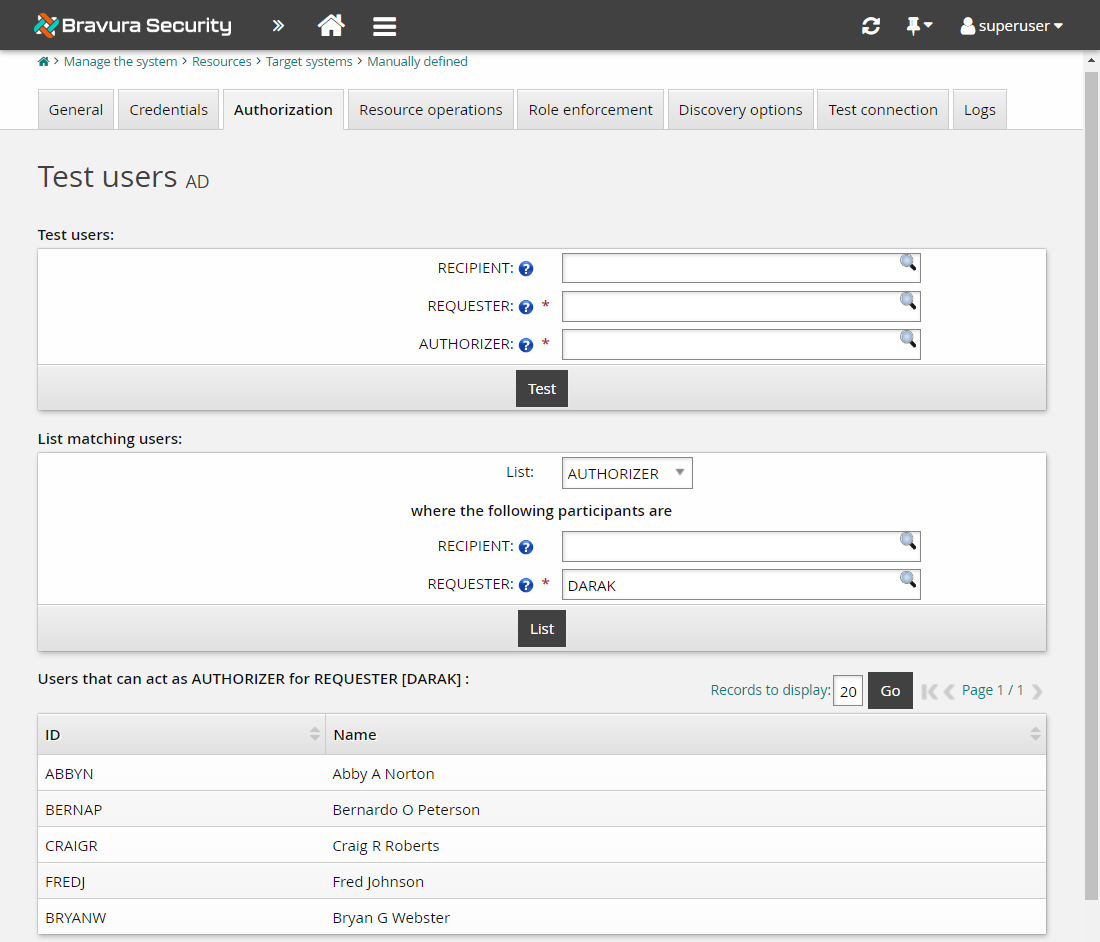
Bravura Security Fabric will list DARAK’s manager, BERNAP, and all the managers in the chain of command above BERNAP as well.
You have now set up dynamic authorization for change requests related to existing accounts.
Submit a request to change attributes
Log in to the Front-end (PSF) as DARAK .
Click View and update profile in the MY PROFILE section.
Select Update attributes near the bottom of the page.
The request wizard opens.
Fill in the following information:
Other names Barb
Click Submit.
Review the request details and authorizers. You should see that the request is pending approval from BERNAP and the managers in the chain of command above him.

Approve the attribute request
Log in to the Front-end (PSF) as BERNAP .
Click There are 1 request(s) awaiting your approval.
The Requests app opens.
Select the Update attributes request from the Results panel.
The details of the request will appear in the Actions panel.
Click Approve.
Click the Approve button to confirm.
Final approval
Even though the authorization requirements for the target system are met, BRYANW’s approval is still required because we set the Input is required before request can be approved option when we configured static authorization .
Log in to the Front-end (PSF) as BRYANW .
Click There are 1 request(s) awaiting your approval.
The Requests app opens.
Select the Update attributes request from the Results panel.
The details of the request will appear in the Actions panel .
Click Approve .
Click the Approve button to confirm.
The status of the request should change to "Approved, performing requested operations".
Navigate back to DARAK’s home page.
Click View and update profile in the MY PROFILE section.
The Other names field will now be populated with our change.
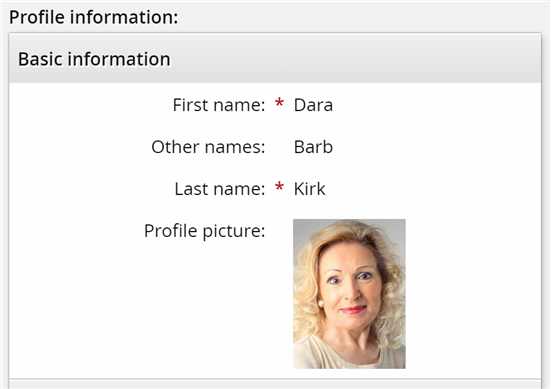
If you can see that the change to Barb has been made successfully to the Other names field for Dara, you have completed the lab properly.
Configuring phased authorization
You can configure Bravura Security Fabric to subject requests to multiple phases of authorization. The WF PHASED AUTH option enables the phased authorization functionality (Manage the system > Workflow > Options > General).
Once WF PHASED AUTH is enabled, the Authorization phase setting appears when assigning static authorizers and when assigning authorizers by user class.
The phased authorization configuration is separate from the non-phased authorization configuration. When phased authorization is enabled, the authorization requirements set up previously are no longer accessible. However, this configuration persists, and will apply again if phased authorization is disabled. Similarly, if phased authorization is disabled after configuration is done, that configuration is kept and will be used immediately if phased authorization is again enabled.
The Minimum number of authorizers and Number of denials before a change request is terminated settings apply to each individual authorization phase.
When enabled, navigate to the page for a resource or policy, then:
Click Add new… if you want to add a phase.
To change the order of phases, change the numbers in the Authorization phase column and click Update.
Select a phase to define authorizers and settings.
Determining when to add group owners
If supported by the target system, you can specify the phase in which group owners should be added as authorizers. If phased authorization is enabled, navigate to the target system’s information page and update The phase to which group owner should be added when being automatically added as authorizer.
Example: Configure phased authorization
You can configure Bravura Security Fabric to subject requests to multiple phases of authorization. This means that even if a request is approved in phase one, it must be reviewed by another set of authorizers, perhaps from another department or level of management. There is no limit to the number of phases.
The WF PHASED AUTH option enables the phased authorization functionality (Manage the system > Workflow > Options > General) .
The Minimum number of authorizers and Number of denials before a change request is terminated settings apply to each individual authorization phase. If an authorizer is configured to be in more than one phase, then he must review the request in each phase. You can enable IDWFM AUTH PHASE PROPAGATION (Workflow > Options > General) to allow the authorizer’s response in the first phase in which he appears to be propagated to later phases.
In this example, you will enable phased authorization, then require new account requests to be approved by a member of a user class, followed by the requester’s direct manager.
Requirements
This use case assumes that:
Bravura Security Fabric and Connector Pack are installed.
An Active Directory target system is added as a source of profiles.
Enable phased authorization
Log in to the Front-end (PSF) as
superuser.Click Manage the system > Workflow > Options > General.
Enable WF PHASED AUTH.
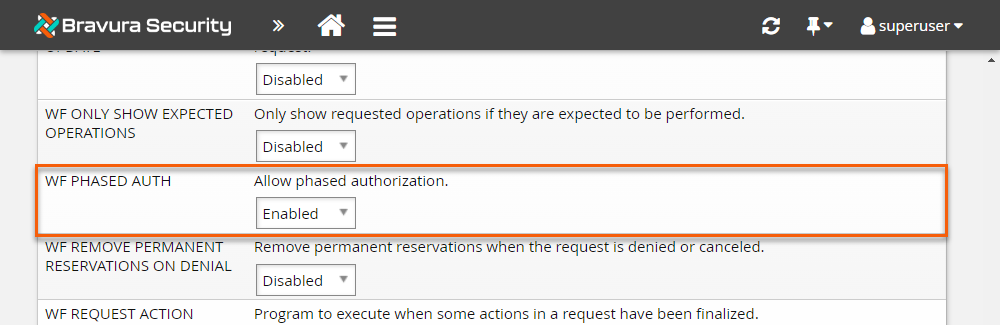
Click Update.
Assign authorizers to resources
To set up phased authorization for new accounts:
Click Manage the system > Resources > Template accounts.
Select AD_TEMPLATE .
Click the Authorization tab.
Note that the authorization page for resources now lists configured authorization phases. So far, only one phase has been configured.
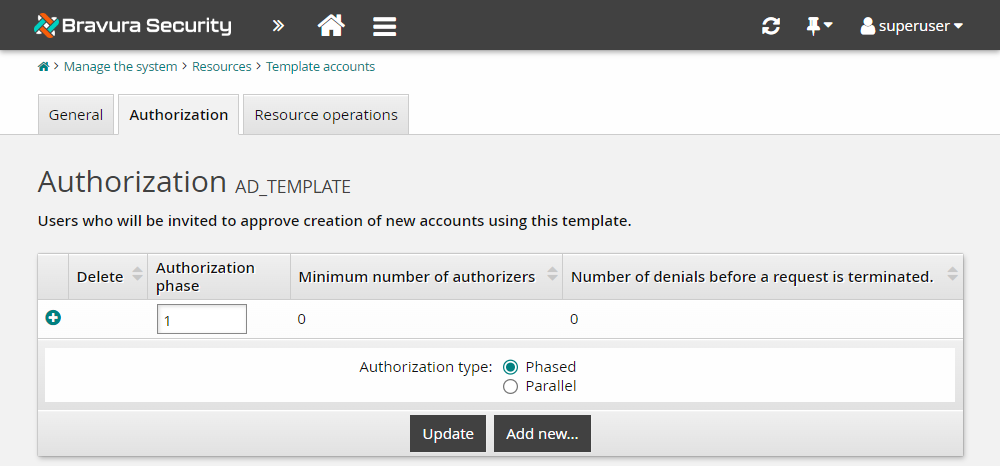
Select the Authorization phase
1row.Set the Minimum number of authorizers to
1.Set the Number of denials before a change request is terminated to 1 .
Click Update.
In the user class table, click Select… .
Click the edit icon
 next to _IT_SECURITY_ .
Bravura Security Fabric displays the User class definition page in a pop-up window.
Check which users are part of this user class by clicking on the Test tab and clicking List .
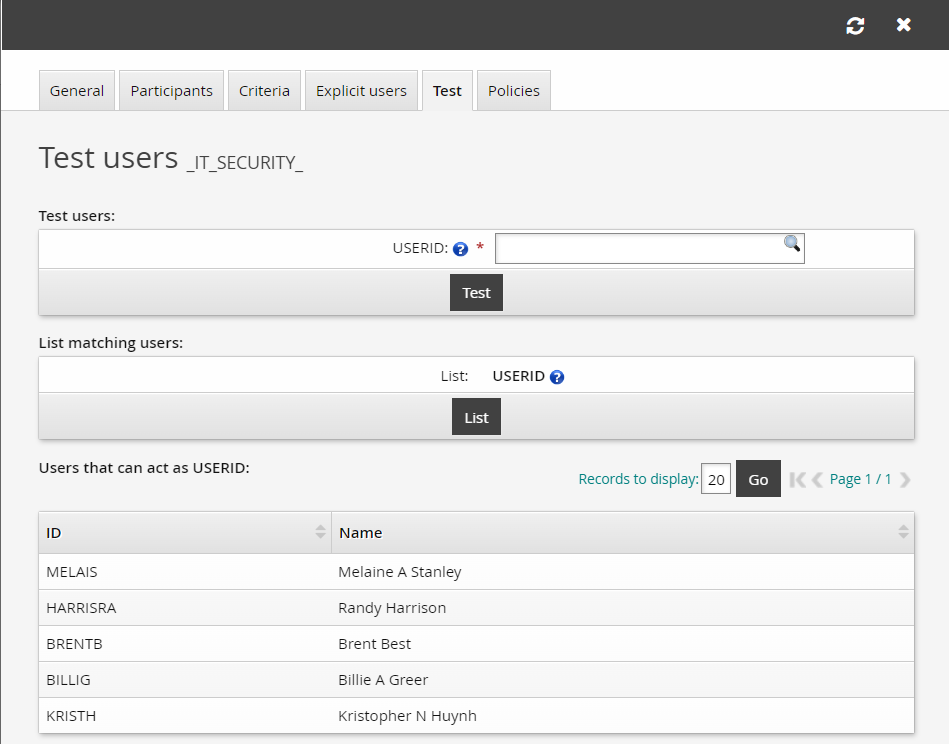
Close the user class configuration window.
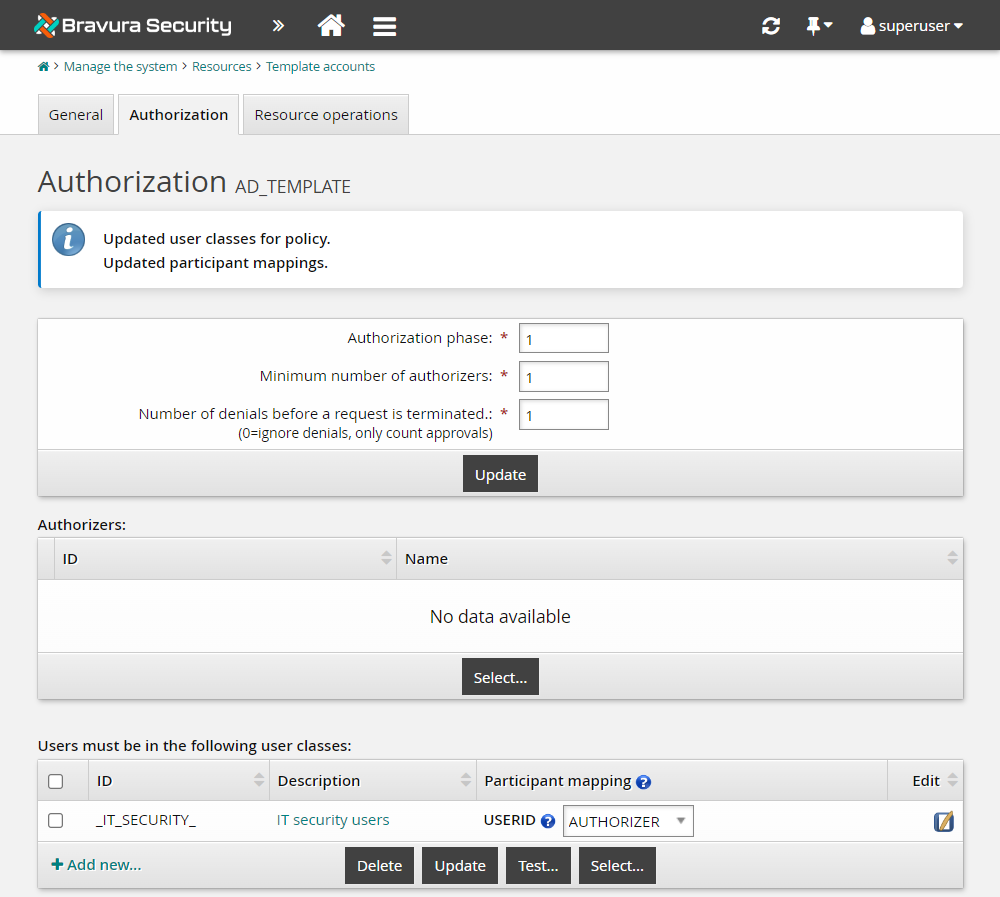
Select the checkbox next to the _IT_SECURITY_ user class and click Select.
Bravura Security Fabric displays an error because you have not mapped the participants in the user class yet.
Under Participant mapping for USERID, select
AUTHORIZER.Click Update.
Add an authorization phase
To add a second authorization phase to enable the direct manager to authorize all requests using the template:
Navigate back to Manage the system > Resources > Template accounts.
Select AD_TEMPLATE.
Click the Authorization tab.
Click Add new… .
A second phase is added to the Authorization table.
Select the second phase row to edit it.
Leave the Minimum number of authorizers as
1.Leave the Number of denials before a change request is terminated as
1.In the user classes table at the bottom of the form, click Select… .
Select the checkbox next to the _MANAGER_DIRECT_ user class.
Note
Ensure you select _MANAGER_DIRECT, not _MANAGER_INDIRECT.
Click Select .
Bravura Security Fabric displays an error because you have not mapped the participants in the user class yet.
Under Participant mapping for MANAGER, select
AUTHORIZER.Under Participant mapping for SUBORDINATE, select
REQUESTER.Click Update.
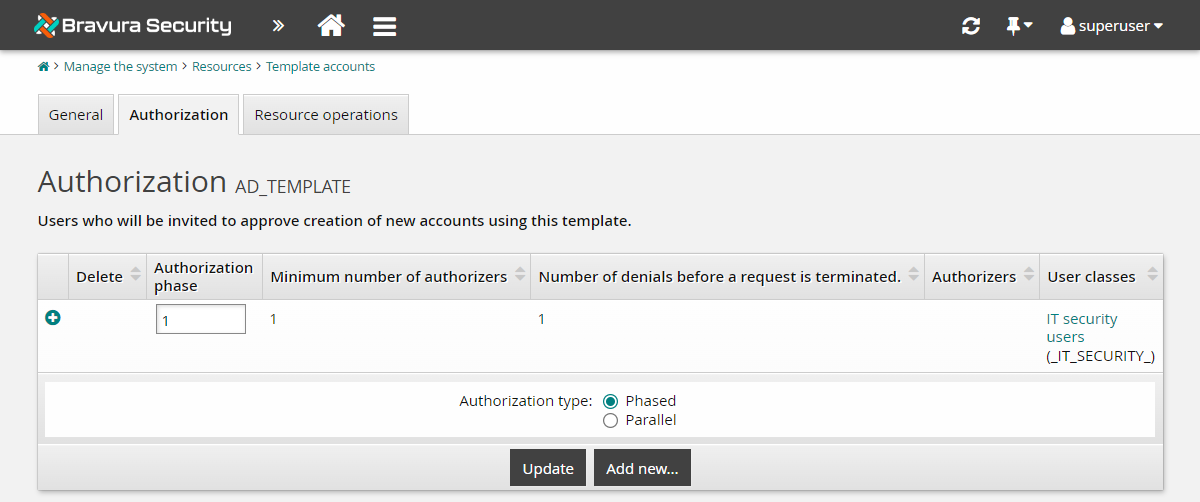
Click the Authorization tab to see the configured phases.
Here, you could re-order phases, by changing the numbers in the Authorization phase column and clicking Update. Leave the order as is for this lab.
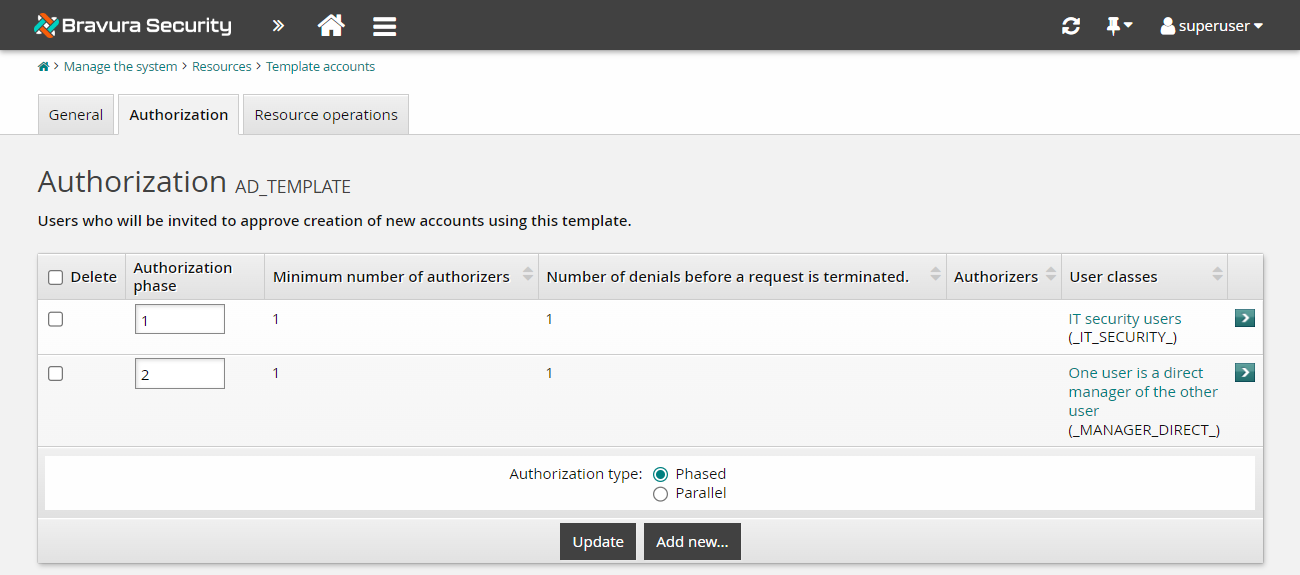
You have now set up dynamic phased authorization for requests for new accounts. In the next example, we will use our new phased authorization to approve a request for a new hire.
Demos: Phased authorization
Click below to view a demonstration.
Configuring phased authorization
Approve changes
Approve then deny changes
Selecting authorizers using a plugin
When a user submits a request, Bravura Security Fabric can use a plugin to dynamically assign authorizers in addition to, or instead of, those assigned to a workflow object or resource.
Bravura Security Fabric allows for flexibility as the authorization process progresses. You can implement a sequential approval process that allows authorizers or other criteria to be added or removed at each step, or for responses to be overruled.
For example, an organization may have 'weighted authorizers', where a request could move to the next stage if enough high-ranked authorizers approved it; overriding the minimum required authorizers.
Higher-ranked authorizers could also overrule the response of lower-ranked authorizers. The weighting would be determined by business logic, such as OrgChart data, and built into the plugin.
The plugin is run after each authorization step, accepting all information about the:
Current authorizers
Requester/Recipient
Requested resources and attributes
The plugin can override and update:
Request approval criteria (minimum authorizers)
Authorizers assigned to the request
Authorization response (approved, denied) for each authorizer
The number of authorization phases (add, remove)
The authorizers within each phase (add, remove)
Bravura Security Fabric sends email to affected authorizers and their delegates when the plugin is run.
The plugin is not run during certification campaigns. Authorization is completed by the reviewer only.
To set the plugin point, type the name of the plugin in the IDSYNCH AUTH CRITERIA MOD PLUGIN field in the Workflow > Options > Plugins menu.
There is no shipped plugin in use with this plugin point. A basic sample plugin script, plugin-authmod.psl, is located in the samples\ directory. An advanced sample plugin script, idsynch_auth_criteria_mod.psl, is located in the samples\plugin directory.
Planning and testing
The plugin for the Authorizer modification plugin point must be carefully crafted because it is being executed multiple times during the authorization process.
Proper testing is considered best practice while developing these plugins.
The Bravura Security Fabric administrator should document the expected authorization workflow behavior prior to the creation of the plugin. The documented behavior should then be used as a guidance tool while developing and testing the authorization plugin.
Requirements
See Writing plugins for general requirements.
Execution points
This plugin is run by idwfm for every new request and then every time there is an action on the request. It is not run when the requester or recipient cancels a request.
If the plugin causes any changes to a request, those changes are written to the database and the plugin is executed again. The process repeats until the plugin no longer causes any changes.
Input
Input to the plugin includes:
"" "" = {
  "sessionid" = "<session ID>" # The session ID
  "extras" "" = {
    "actor" = "<Profile ID>" # The user causing the event
    "event" = "<EVENT_POST_BATCH|EVENT_AUTH_REJECTED|EVENT_AUTH_APPROVED|EVENT_BATCH_ATTRS_UPDATE>" # The event causing the plugin to be called
    "numrerun" = "<#>" # The number of times the plugin has run in the event
    "primary" = "<Profile ID>" # The user that is involved with the event

    "firstrun" = "<true|false>" # True if the plugin is run for the first time for the request.
                                # Otherwise, false or the key is not prsent.
  } # Extra information about when it is executed
  "event" = "<EVENT ID>" # The chain of events being evaluated.  1 or more keys are present.
  "request" "" = { # Standard request data listing resources
    "resource" "" = {} # 0 or more
  }
}
Output
Output to the plugin includes:
 "" "" = {
    "errmsg" = "<text>"
    "infomsg" = "<text>" # Optional; Appends message to the request notes.
    "retval" = "<N>" # Mandatory; zero is success and non-zero is failure
    "runWizardPlugin" = "true|false" # true means wizard plugin will run after
                                     # authmod plugin is completed
                                     # false or missing this flag in kvg file
                                     # means that wizard plugin will not run
                                     # after authmod plugin is completed
    "request" = "<Batch ID>" = {
        "batchauthnote" = "<authorization note for the batch>"
    }
    "authorizer" "<authorizer's profile ID>" = { # 0 or more to add or reset

                                                 # authorization status.
       # Authorizer KVGroups as detailed below in
       # Subsubsection 6.3.7.1 .
   }
    "resource" "<Resource ID from the request>" = {
       "finalized" = <true|false>
               # All attached resources are not finalized by default.  By
               # default, resource operations wait for the request to be
               # decided (all authorizations received) on all resources.  If
               # the plugin sets a resource to be finalized (true) and the
               # approvals are received for the resource, the operations are
               # executed before other resource approvals are received.
               #
               # When finalizing roles, all role member/entitlements must be

               # finalized, and all authorizations for the role must be
               # received before processing role members/entitlements.
       "authorizationsRequired" = "<N>" #Optional, no change if omitted
               # If 0, the resource is auto-approved.
               # If greater than the number of resource authorizers,
               # insufficient approval will deny the request
               # immediately.
       "acctauthnote" = "<authorization note for resource>"
       "phase" "<phase number>" = { #Required; 1 or more phases
         "authorizationsReceived" = "<N>"
         "authorizationsRequired" = "<N>"
         "authorizer" = "<profile id>" #
               # One entry per authorizer is required.
               # If an authorizer is attached in the input and
               # not listed here, then they will be removed from the list
               # of authorizers.
               # If a new authorizer is listed here and not on the resource input,
               # they will be attached to the resource for authorization.
         "rejectionsReceived" = "<N>"
         "rejectionsRequired" = "<N>"
       }
    }
}
Authorizer KVGroups
On output, the following authorizer KVGroups format is expected:
   "authorizer" "<authorizer id>" = {
      "resource" "<resource id>" = {
          "reason" = "<reason for being assigned>"
          "status" = "<resource authorization status>"
          "authauthnote" = "<authorization note for authorizer>"
      } # one or more
  } # one per authorizer
Status can be:
"O" – open
"A" – approved
"D" – denied
"I" – irrelevant
"P" – pending phase
When a resource needs 1 of 3 authorizers to approve, and one does, the other two are set to "irrelevant" since their answer (approve or reject) is not required any more. "P" is similar to "I" (irrelevant) in that they are not notified or expected to provide their approval. Once a phase is satisfied by the required authorizations, the status of the next phase of authorizers changes from "P" to "O".
Examples
The following are examples of KVGroup plugin output:
To leave a request unchanged, simply return success:
"" "" = {
  "errmsg" = ""
  "retval" = "0"
}
To reset an approval to open, and add a second authorizer, and increase the minimum number of approvals to 2:
"" "" = {
  "errmsg" = ""
  "retval" = "0"
  "authorizer" "fredrick.rahardja" = {
    "resource" "4F12FA11531BCBC574BC4C4295D4872E" = {
       "reason" = "Approval required"
       "status" = "O"
     }

  }
  "authorizer" "crysta.soria" = {
    "resource" "4F12FA11531BCBC574BC4C4295D4872E" = {
       "reason" = "Approval required"
       "status" = "O"
    }
  }
  "resource" "4F12FA11531BCBC574BC4C4295D4872E" = {
    "finalized" = "false"
    "phase" "1" = {
      "authorizationsRequired" = "2"
      "authorizer" = "crysta.soria"
      "authorizer" = "fredrick.rahardja"
    }
  }
}
To finalize the update portion of the request while group approval is still pending:
"" "" = {
  "errmsg" = ""
  "retval" = "0"
  "authorizer" "alyce.costa" = {
     "resource" "5A32EZ11531AB34574AB4B42953421AE" = {
        "status" = "O"
      }
  }
  "authorizer" "fredrick.rahardja" = {
     "resource" "4E12EZ11531ABAB574AB4B4295C4872D" = {
        "status" = "A"
     }
  }
  "authorizer" "crysta.soria" = {
     "resource" "4E12EZ11531ABAB574AB4B4295C4872D" = {
        "status" = "A"
     }
  }
  "resource" "4E12EZ11531ABAB574AB4B4295C4872D" = {
    "phase" "1" = {
      "authorizationsReceived" = "2"
      "authorizationsRequired" = "2"
      "authorizer" = "crysta.soria"
      "authorizer" = "fredrick.rahardja"
    }
    "finalized" = "true"
    "implicit" = "false"
    "itemType" = "accountID"
    "notes" = ""
    "operation" = "UPDT"
    "parentRole" = ""
    "pseudoData" = ""
    "pseudoOp" = "false"
    "pseudoTag" = ""
    "reason" = ""
    "result" = "O"
    "accountID" = "steve.benes"
    "targetid" = "NORSE"
  }
  "resource" "5A32EZ11531AB34574AB4B42953421AE" = {
    "phase" "1" = {
      "authorizationsReceived" = "0"
      "authorizationsRequired" = "1"
      "authorizer" = "alyce.costa"
    }
    "accountID" = "steve.benes"
    "finalized" = "false"
    "itemType" = "groupID"
    "operation" = "GRUA"
    "targetid" = "NORSE"
    "groupID" = "CN=FIN-AR,OU=resources,OU=staff,DC=norse,DC=bravurasecurity,DC=com"
   }
}
Static authorizers
In Bravura Security Fabric , an authorizer is a user who can review and act on security change requests. Regular users with valid profiles can be assigned as static authorizers. Static authorizers can be mapped directly to resources or policies.
The types of requests that static authorizers can review and the actions they can take depend on the privileges granted to them by user access rules.
All authorizers that are mapped to resources are listed in Manage the system > Workflow. From here, you can select individual authorizers to:
Define when and how they are notified of pending requests
Determine whether their approval is required before a request can be approved
Determine whether their denial of any part of a request blocks the entire request
View the resources and policies to which they are assigned
Configuring static authorizers
Before you begin, ensure that requirements are met for email notification :
Bravura Security Fabric can determine users’ email addresses (highly recommended).
The required workflow settings have values under Manage the system > Workflow > Email configuration .
To configure static authorizers from the workflow menu:
Click Manage the system > Workflow > Authorizers.
Select or search to select the user whose authorizer settings you want to configure.
Select the Denial blocks entire request checkbox if you want the authorizer to be able to block an entire request, rather than just part of a request.
Select the Input is required before request can be approved checkbox if you want the authorizer’s approval to be required before any request to which he is assigned can proceed, regardless of the number of authorizers who have already approved the request.
Click Update at the bottom of the form.
Option | Description |
|---|---|
Email address | If Bravura Security Fabric is:
|
Notify this user immediately | Select this checkbox if you want this authorizer to be notified immediately as each stage of a request is reached. |
Times of day to email | If you want to override the global email notification setting, type the regular times, in 24-hour format, that this authorizer should receive email reminders. For example, type |
Note
If you alter the reminder times or interval, messages that have already been queued will be sent at the previously set time. The new time values apply to messages triggered after you make the changes.
Assigning authorizers to a resource or policy
To assign static authorizers to a resource or policy, navigate to the authorization tab or section of the information page for the resource or policy.
If phased authorization is enabled (WF PHASED AUTH), you can assign authorizers to phases.
When you assign a static authorizer to a resource or policy, those objects are listed on the individual authorizer’s information page.
Deleting authorizers
Deleting an authorizer from a resource or policy only removes the user from the list of authorizers for that resource or policy. The user and their accounts still exist in the Bravura Security Fabric database.
Components for authorization workflow
The Functional.im_policy_authorization component, installed with Bravura Pattern, provides a policy framework to determine authorizers for different types of requests.
When installed, Functional.im_policy_authorization automatically sets the Bravura Security Fabric IDSYNCH AUTH CRITERIA MOD PLUGIN to control\plugin_authmod.py.
The im_policy_authorization table aggregates authorization rules that are set up by components. Product administrators can add new authorization rules and modify existing ones by modifying this table; to add or remove authorizers based on request attributes, requester or recipient information, and operations requested.
The rules set in the im_policy_authorization table override any settings made in the Manage the system (PSA) module.
Key parameters to set in the table include:
PDRIdThe pre-defined request ID that this rule should apply to.ActionWhether to add, flush (remove), or replace authorizers.AuthUserclassThe user class used to attach or replace authorizers.MinAuthorizersThe required number of approvals for a request.PhaseThe authorization phase the rule applies to.AuthnoteA note with the reason to be appended to this request.
The component-based policy approach to authorization workflow supersedes the plugin functionality. You can access the policy via the external data store (extdb) module , rather than needing to edit script files on the Bravura Security Fabric server.
The business logic and all its effects can be analyzed in smaller cross-sections by filtering it with searches down to:
Specific use cases (scenarios and functional components),
Specific effects on Bravura Identity objects.
Component details
Every external database table is defined in the model.py script of the functional component, usually installed as a dependency of a scenario component.
The default component's script is component/Default/Functional/im_policy_authorization/model.py , which also imports component/Default/Functional/hid_policy_authmod/model.py .
The table model of im_policy_authorization adds columns to the ones imported from hid_policy_authmod
The names of columns can be found in the _column_order attribute of the policy class (in this case, PolicyAuthorization).
The default data that the component brings to the solution is usually in CSV files provided as part of either a functional, scenario, or pattern component. Component data at component install time can be further modified with differences specific to each environment where the instance is to be installed, in the instance's environment\ directory.
The default policy data is loaded by other components which depend on Functional/im_policy_authorization:
Scenario components like: component/Default/Scenario/im_corp_loa/data/policy_authorization.csv
Functional components like: component/Default/Functional/im_profile_risk_policy_core/data/policy_authorization.csv
Data components for the Resource Management System (RMS): component/Default/Data/
extdb_corp_onboard/policy_authorization.csvTo check what Authorization policy use cases are available out-of-the-box, search the component\ directory for files named: policy_authorization.csv.
To check which of these are installed, one can look at the last column of the policy table.
The functional component does not add any policy data of its own; instead it adds two options to the hid_global_configuration table:
component/component/Default/Functional/im_policy_authorization/manifest.xml , which loads
component/Default/Functional/im_policy_authorization/data/initial_data.csv
The raw data of the policy table at any given point after component install can be found in the instance's db\extdb.db file, which is a sqlite3 database.
For troubleshooting purposes, you can view and search the database directly if needed from the command line or from a sqlite GUI like Sqlite Studio. In everyday use, it is recommended that any changes be applied through the product Manage external data store module .
Caution
Do not edit the default components; if component customization is required, copy them as custom and edit those.
Setting authorization rules via the im_policy_authorization table
As detailed in Components for authorization workflow , installing the component sets up authorization rules in the im_policy_authorization table in the external data store (extdb) . Product administrators can add new authorization rules and modify existing ones by modifying this table; to add or remove authorizers based on request attributes, requester or recipient information, and operations requested.
To access the authorization policy, log in as an administrator and navigate to Manage external data store > im_policy_authorization.
The authorization policy is a single SQL table with many columns to provides the "structure" of the policy. Not all columns need to be filled for each rule; they are present in order to provide a large degree of granularity and flexibility to the access approval solution.
This is in support of any combination of use cases in the Bravura Identity life cycle (like Leave of Absence, Rehire or Name change after a marriage). These use cases are brought into the policy by a combination of scenario components.
Each row of the table is a policy "rule", made up of three types of columns:
"match" (which determine in which cases, and for which objects the rule will be active)
"action" (which determine what action will be done when a rule matches a specific object being
"policy-wide" (which are used to determine functional, rule-use and rule-provenience)
The policy table acts like a snowball:
Each rule is evaluated in turn, for each Request in the order of 'RuleNumber' for stage 1, then all 'RuleNumbers' for stage 2, and so on.
When a rule "matches", its "actions" are added to the snowball.
You need to make changes only on the instance's primary server in a replicated environment.
Search the policy
In-depth authorization policies can be quite large. You can use the Search field on the top left side of the table view where you can add SQL WHERE clauses to filter the records, for example:
Only rules that apply to a specific Predefined Request:
where "PDRId" = 'UPDATE_ACCOUNT'
All rules which cause Requesters and Recipients to not be allowed as their own Approvers:
where "RemoveAuthorizerIf"='is both'
All rules which match a Role that contains HR in its ID (like HR_ADMIN):
where "Role" like '%HR%'
See External Data Store for general information on using the interface.
Example Configure dynamic authorization via the im_policy_authorization table
As you build your authorization rules for roles, groups, targets, templates and so on, you may want to remove authorization for particular pre-defined requests or other situations. You can do this by setting rules in the im_policy_authorization table. In this example, we will override the entitlement authorization that was set up for the NEW-ENGINEER pre-defined request, and only require that the request be authorized by users within the CONTRACT-HIRE-APPROVAL user class.
Requirements
This use case assumes that:
Bravura Security Fabric and Connector Pack are installed.
An Active Directory target system is added as a source of profiles.
Security questions are set up.
A NEW-ENGINEER pre-defined request is set up to create a new user from a role.
Authorization for groups has been set up as shown in Example: Configure static authorization .
Click below to view a demonstration:
Add rule to im_policy_authorization table
Log in to the Front-end (PSF) as
superuser.Click Manage external data store.
Select the im_policy_authorization table.
Click the Edit icon
next to an empty row.Add the following rule to the table:
StageNumber
1RuleNumber
29SkipRemaining
StagePDRid
NEW-ENGINEERResourcesOnly
FalseAction
replaceAuthUserclass
CONTRACT-HIRE-APPROVALMinAuthorizers
1AutoReject
FalsePhase
1Authnote
Authorization required from users who approve contracts
Click Done.
Click Update at the bottom of the table once you have added your entry.
The rule may appear on the second page of the rules table.
The rule you have just added for the NEW-ENGINEER PDR tells Bravura Security Fabric that when a user submits a request using the NEW-ENGINEER PDR, it needs to replace any authorizers from the template, managed groups, roles...etc. in phase 1 authorization, with members of the CONTRACT-HIRE-APPROVAL user class. The request will only require 1 user to approve the request for phase 1 authorization from the CONTRACT-HIRE-APPROVAL user class before moving to phase 2 authorization logic. Phase 2 authorization will progress requiring ABBYN's approval, as previously set in the product UI.
Modify the CONTRACT-HIRE-APPROVAL user class
Currently, participants for the CONTRACT-HIRE-APPROVAL user class are specified as users whose department is HR-RECRUIT. You will modify the profile attribute value to use HR-ADMIN instead.
Log in to the Front-end (PSF) as
superuser.Click Manage the system > Policies > User classes .
Search for and select the CONTRACT-HIRE-APPROVAL user class.
Click on the Criteria tab.
Under Participants have profile attributes matching: , select the USERID row.
Change the Value to
HR-ADMIN.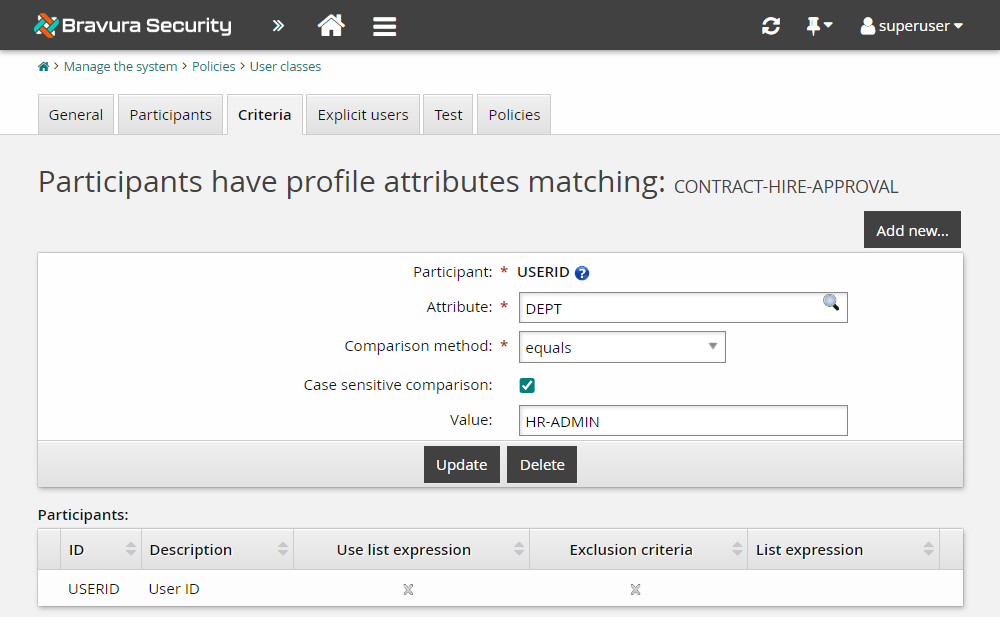
Click Update.
Test the new authorization
Log in to the Front-end (PSF) as BERNAP .
Click Create a new user profile.
Select the Hire a new engineer pre-defined request.
On the request wizard pages, enter the following information:
First name
EngineerLast name
AuthorizationType of user
EmployeeEmployee number
E1234567Department
ENG-PMMother's maiden name
Bravura
After entering the Mother's maiden name on the page, click Submit to skip the page.
View the request details and the authorizers assigned.
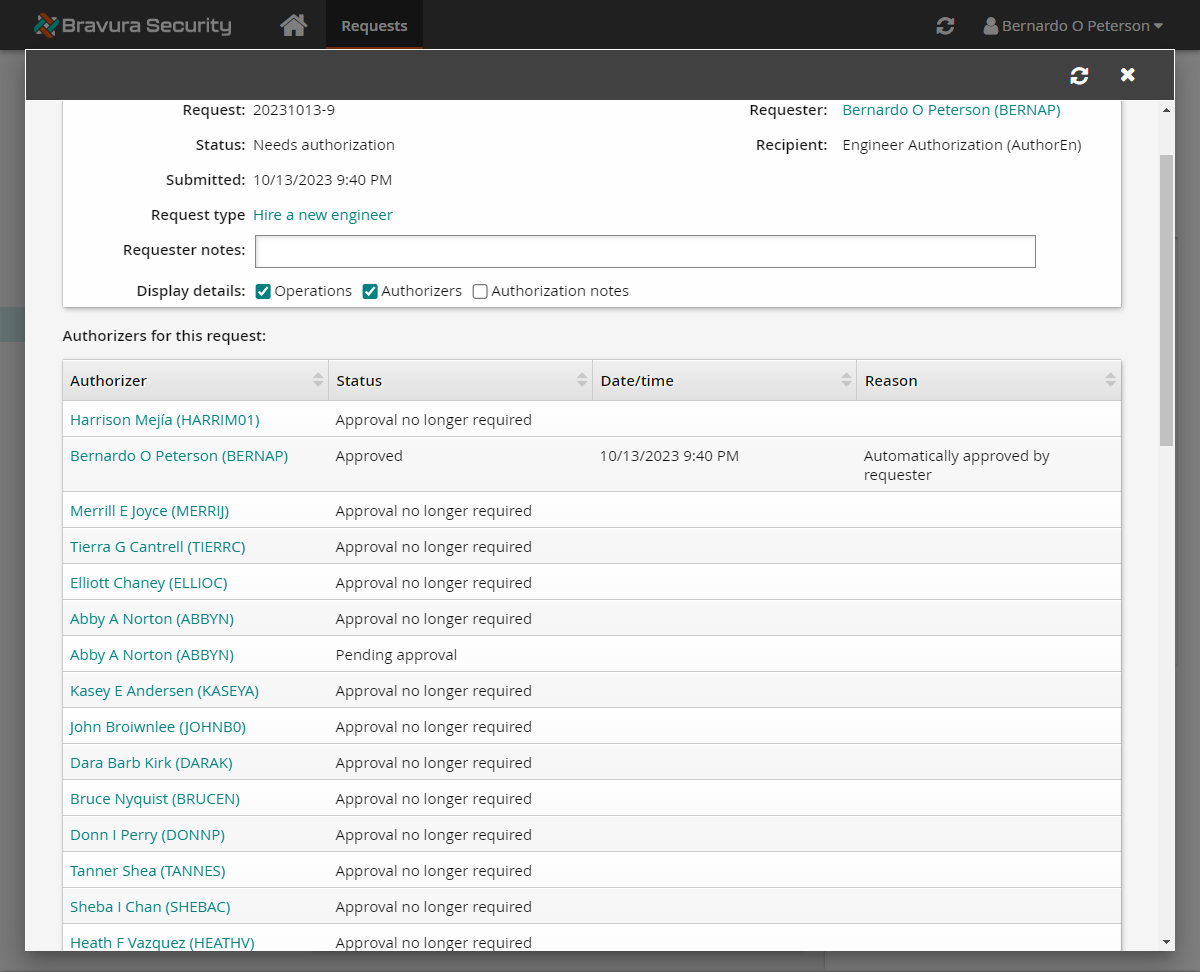
The request will have multiple authorizers:
BERNAP and other members of the CONTRACT-HIRE-APPROVAL user class (MERRIJ, BRUCEN, HEATHV, DARAK, KASEYA, SHEBAC, HARRIMO1, ABBYN, TIERRC, TANNES, ELLIOC, JOHNBO, DONNP) are added as authorizers.
Phase one authorization is already complete since the system has automatically provided approval for BERNAP's authorization. This is because the product is configured for authorizations to auto-approve for the authorizer if they are also the requester, as BERNAP is. Due to BERNAP's approval, authorization from other members of his user class is no longer needed.
The rule set in the im_policy_authorization extdb table is only applied to phase one authorization. This means that phase two authorization is still taken from our authorization rules set for templates, groups, roles...etc.
We set up the AD_TEMPLATE template account to require authorization from the requester’s direct manager; therefore, ABBYN, as direct manager for BERNAP, is also added for phase two authorization.
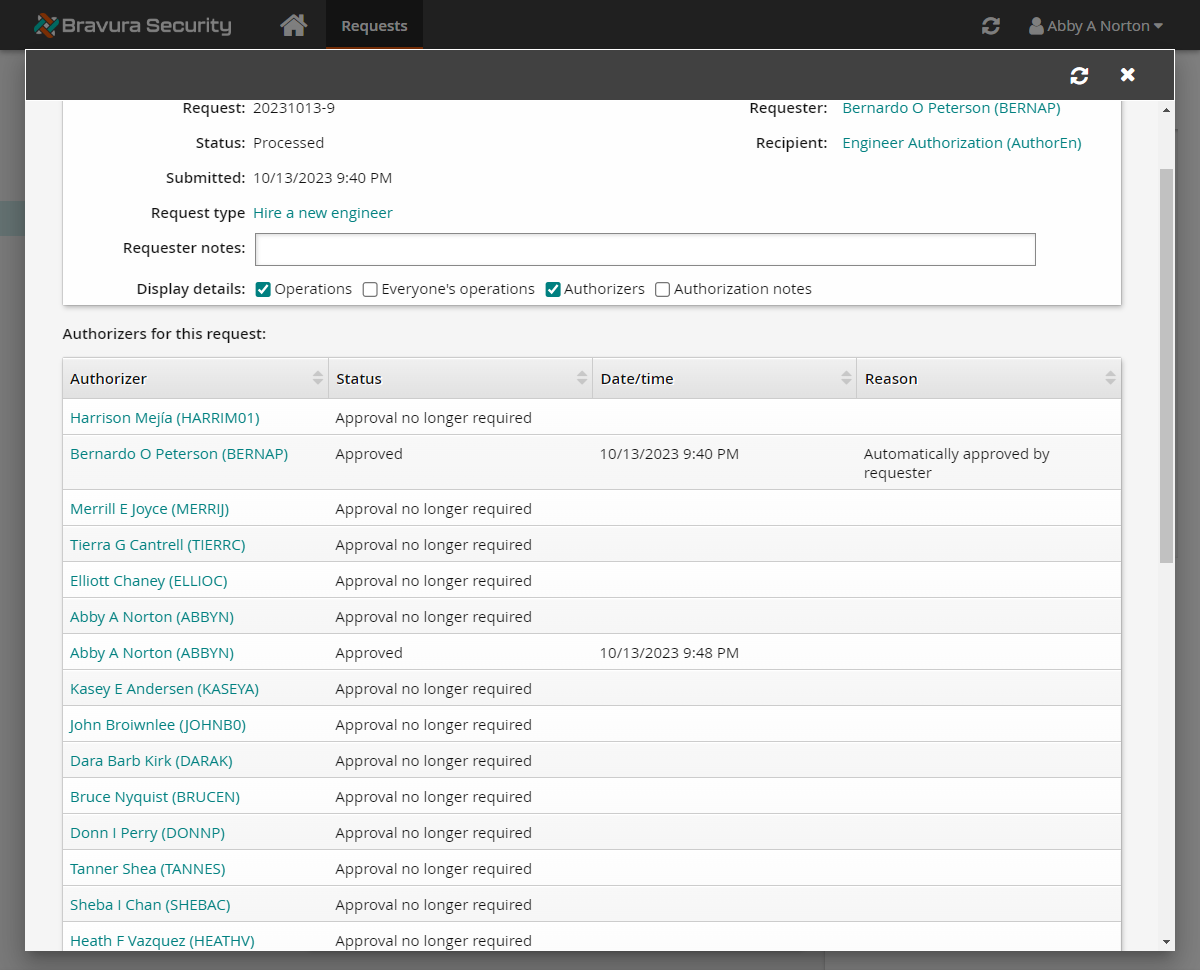
Complete the second authorization phase of the AuthorEn request by logging in to Bravura Security Fabric as ABBYN and approving the request.
Review the request and you will see the status of the request should change to "Approved, performing requested operations" and then to "Processed".
Example: Assign workflow managers
Workflow managers are users who can act on any authorization request, including those not explicitly assigned to them. See User types and access rules for more information on user types.
Click below to view a demonstration:
In this example, a workflow managers user group will be defined within Bravura Security Fabric and then, a request will be managed using the workflow manager.
Requirements
This example assumes that:
The component Data.hid_usergroup_workflow_managers is installed. This component is part of Bravura Workforce Pattern , and configures the WORKFLOW-MANAGERS user class. See Installing components.
Pre-defined request New employee basic setup has been configured. See Create a new user using a standard pre-defined request.
Define a workflow manager group
To define a workflow manager group:
Log in to the Front-end (PSF) as
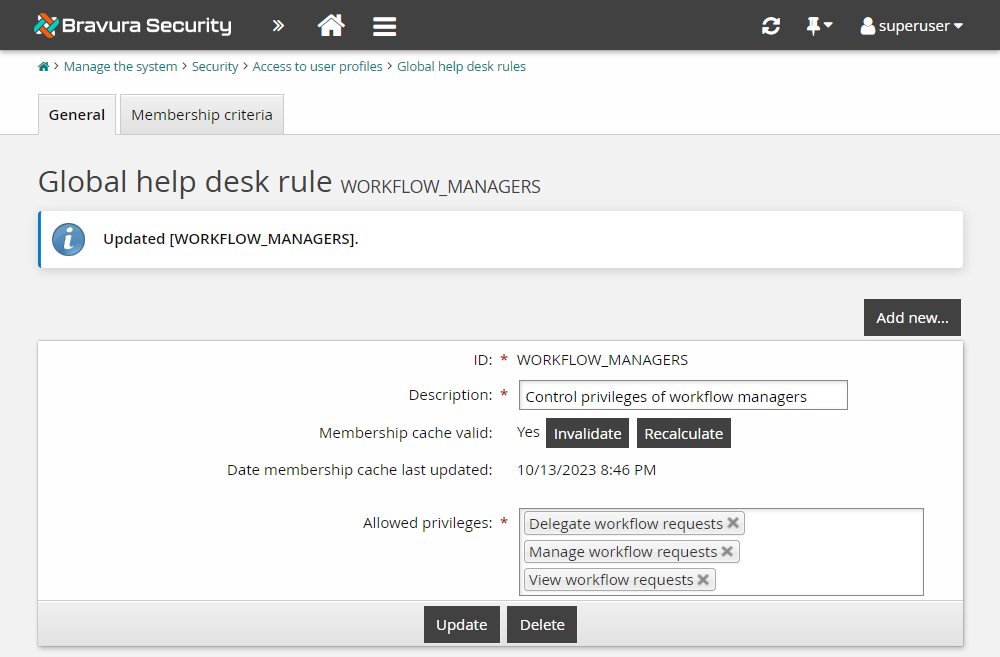
superuser.Click Manage the system > Security > Access to user profiles > Global help desk rules.
Click WORKFLOW_MANAGERS.
In the Allowed privileges list, add the privilege for:
"Delegate workflow requests"
Click Update.
Click the Membership criteria tab.
Click the edit icon
next to the WORKFLOW-MANAGERS user class.Click the Explicit users tab.
Click Select… .
Select the checkbox next to ABBYN , and click Add .
Close the user class configuration window.
Click the General tab of the WORKFLOW_MANAGERS user group.
For Membership cache valid, click Recalculate.
Click Refresh to check if the recalculation is complete (Membership cache valid value = "Yes").
Click Update.
You have now defined the workflow managers user group that provides users the privileges to delegate and manage workflow requests submitted by other users. From the user group membership, ABBYN is now a workflow manager.
Submit a request
Submit a new employee request to test ABBYN's new workflow manager privileges.
As CELESH, request a new employee:
Log in to the Front-end (PSF) as CELESH.
Click Create a new user profile.
Select New employee basic setup.
Since it is the only PDR available to this user, it will open automatically.
In the request wizard, enter the following information:
First name
UserLast name
WorkflowEmployee type
EmployeeEmployee number
E1234567Department
IT-DBYou can leave other attribute values as default.
Click Submit.
Review request details.
Review the request as a workflow manager
Let’s assume that a temporary hiring freeze has been announced. Review all pending requests as the workflow manager and cancel all employee creation requests:
Log in to the Front-end (PSF) as ABBYN.
Click Requests in the REQUESTS section.
The Requests app opens.
Click Open under WORKFLOW MANAGER from the Filter panel.
Select the most recent request from the Results panel.
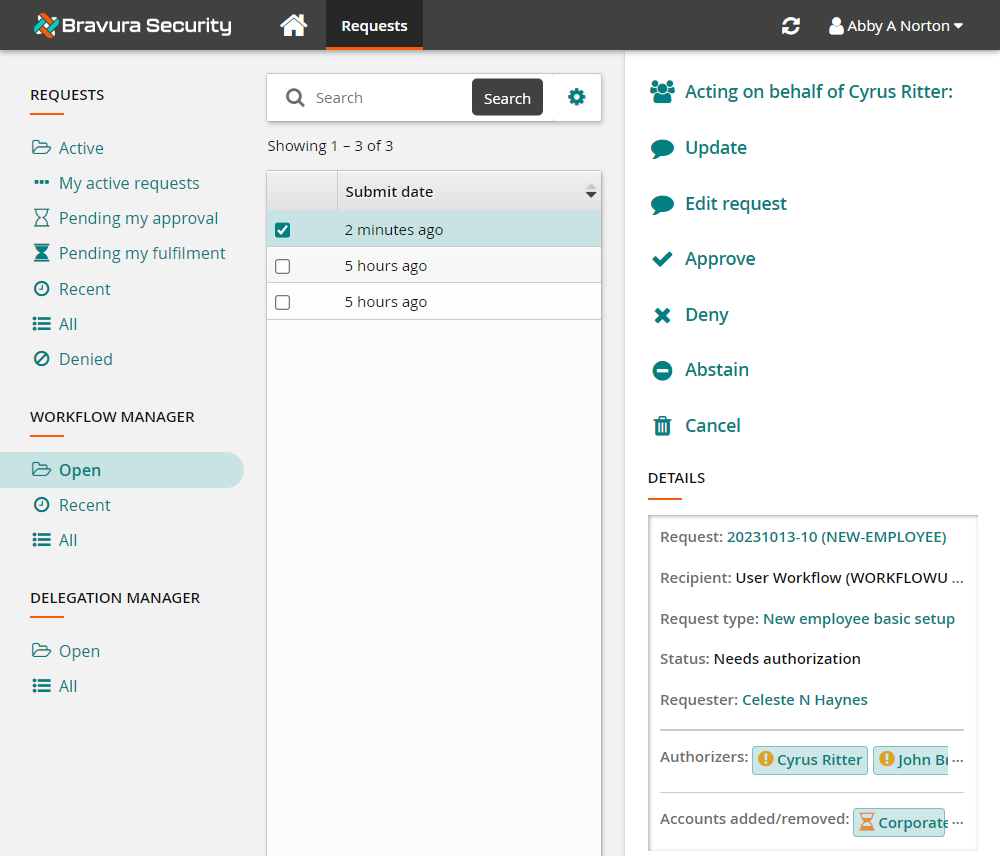
Note the action options available to ABBYN, even though she is not listed as an authorizer for this request.
Click Cancel from the Actions panel .
Type
Hiring freeze.Click Cancel to confirm the action.
The request has now been canceled.
Example: Assign workflow managers in bulk
Delegation and escalation
About delegation
Bravura Security Fabric users can act on behalf of other users in one of two ways:
A user’s responsibilities can be delegated to another user.
By failing to act on a workflow request in a timely manner, the request can be escalated to another user.
A user who initially holds a responsibility is known as the primary. A user who acts on behalf of another is known as a delegate. Delegations can be indefinite or for a limited time, and can be canceled at any time. Any user can become a delegate. Both the primary and the delegate must have an email address configured in Bravura Security Fabric .
Users with the ”Delegate workflow requests” permission are known as delegation managers. These users can delegate another user’s responsibilities. They can also use API Service requests (DelegationCancel and DelegationList) to clean obsolete delegations. To send these API Service requests, a delegation manager also needs the "IDAPI caller" privilege. For details on the DelegationCancel and DelegationList requests, see the api.pdf.
Any user can request that all of their own responsibilities be delegated. They can also delegate responsibilities for a single request. The recipient of the request for delegation follows a link in their email invitation or uses an option on the Home Dashboard to respond.
When a delegate accepts a delegation request, they are granted the same permissions as the primary. For example, if the primary can access reports, this right will be passed on to the delegate. When a delegation ends or is canceled, those options are no longer available to the delegate.
Note
Network resource ownership managed by Bravura Security Fabric is not delegable.
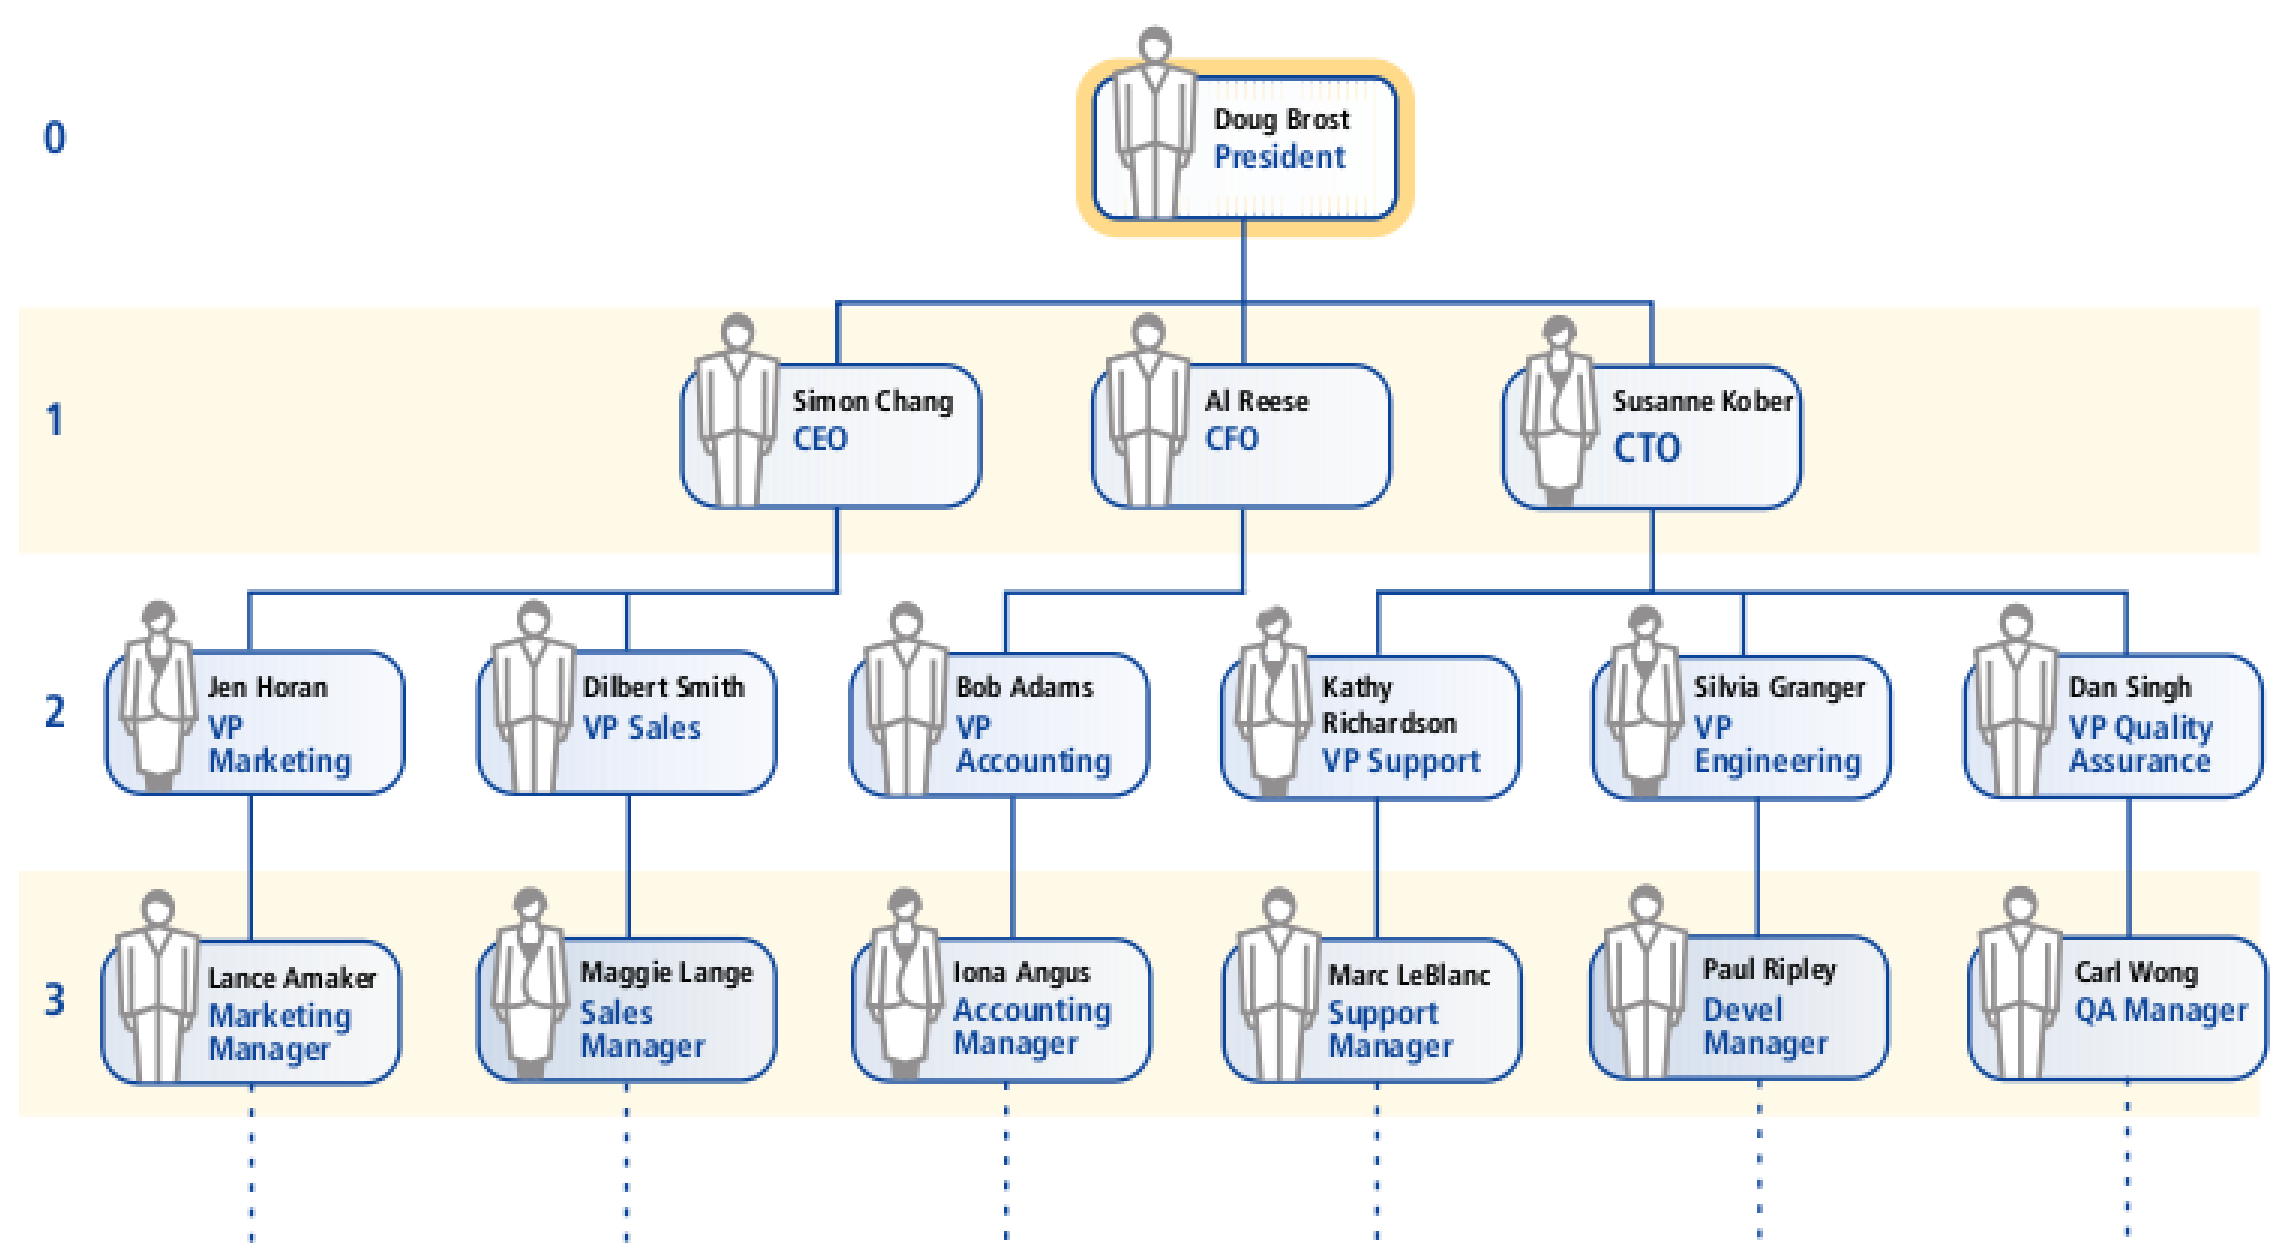
In some cases, a delegate authorizer may have to review a request sent to them for approval more than once, as themselves and then as another primary, or if they have accepted multiple delegation requests. The delegate can choose who they are acting as when they review a request for approval. This is necessary because users may have different access to attributes. For example, using the figure below, if Carl Wong is a delegate for Sylvia Granger and Dan Singh, and a request is made that requires the approval of both authorizers, then Carl Wong (as their delegate) must review and approve the request, first as Sylvia Granger, then again as Dan Singh, before it will be considered authorized.
Users may be allowed to delegate responsibilities that have, in turn, been delegated or escalated to them. This is referred to as sub-delegation. It is controlled by the user requesting the delegation, or by a plugin.
Configuring a delegation plugin
You can use a plugin to determine:
To whom primaries can delegate
Whether they should be able to sub-delegate by default
Whether they should be able to override the sub-delegation default
The default delegation timeout for no response
A minimum and maximum delegation timeout that they can request
The default action to perform upon a timeout
The actions they can specify to be performed upon a timeout (accept, reject, escalate)
The default plugin is delegation-default.psl. You can modify delegation-default.psl to customize it for your environment. Rename the plugin so that it cannot be overwritten during a Bravura Security Fabric upgrade. Alternatively, you can copy the sample plugin-delegation.psl from the <instance>\samples\ directory to the <instance>\plugin\ directory and modify it for your environment.
The delegation options plugin must be listed in the DELEGATION OPTIONS PLUGIN field in the Workflow > Options > Delegation menu.
Requirements
It is recommended that the plugin be written in PSLang, which has functions to automatically deal with the input and output protocol (KVGroups). The plugin must be placed in the \<instance>\plugin\ directory.
See Writing plugins for general requirements.
Execution points
This plugin is run by the View and update profile (IDR) module and Requests app.
Input
The input to this plugin consists of:
"" "" = {
  "primary" "<primary's ID>" = {

    "id" = "<primary ID>" # The user who is having their authorizations delegated
    "name" = "<primary's full name>"
    "account" "" = { ... }
        # Present when PLUGIN DATA USER ATTRIBUTE DETAILS enabled
        # See Optional user attribute, account and role detail KVGroups.

    "attribute" "<attribute ID>" = { ... }
        # Present when PLUGIN DATA USER ACCOUNT DETAILS enabled
        # See Optional user attribute, account and role detail KVGroups.

  }
  "defaultAct" = "A"  # Default action to take at timeout (from the CGI)
  "endDate" = "2147410800"  # Specified end date (from the CGI)
  "needAccept" = "F" # Must accept (from the CGI)
  "responseTime" = "1122825420" # Timeout (from the CGI)
  "subDelegable" = "F"  # Sub delegate (from the CGI)

  "delegate" "<delegate's ID>" = {
    "id" = "<delegate's ID>" # The user specified as the delegate (from CGI)
    "name" = "<delegate's full name>"
    "account" "" = { ... }
        # Present when PLUGIN DATA USER ATTRIBUTE DETAILS is enabled
        # See  Optional user attribute, account and role detail KVGroups.

    "attribute" "<attribute ID>" = { ... }
        # Present when PLUGIN DATA USER ACCOUNT DETAILS is enabled
        # See Optional user attribute, account and role detail KVGroups.

    # Note that this KVGroup will only be present after the primary

    # has entered a delegate.
  }
}
Output
The output of this plugin should consist of:
"" "" = {
   "errmsg" = "<error message>"
   "retval" = "<number>"      # 0 is success, anything else failure
   "delegates" "" = {
     "allUsers" = "true|false" # true means the primary can delegate
                               # to any user.  False will restrict the
                               # list to the ones specified...  Lack
                               # of this key will be interpreted as
                               # "false".
     "delegate" = "<a user to whom the primary can delegate>" ⋆
     "validdelegate" = "true|false" # False means that the chosen delegate
                                    # is not valid; the text will be
                                    # cleared from the 'Delegate' field
                                    # on the 'Delegation information' page.
   }
   "subDelegation" "" = {
     "enabled" = "true|false"    # enable sub-delegation when they come

                                 # to the page initially
     "modifiable" = "true|false" # allow/disallow  the primary to enable
                                 # or disable sub-delegation
   }

   "timeouts" "" = {
     "enabled" = "true|false"    # enable/disable timeout of
                                 # delegation requests when the
                                 # primary initially comes to the page
     "modifiable" = "true|false" # allow/disallow the primary to
                                 # enable or disable timeouts
     # If the proposed delegate does not respond to the delegation
     # request in a given amount of time, 3 actions can be taken.
     # accept   -> The delegation is automatically accepted
     # reject   -> The delegation is automatically rejected
     # escalate -> The delegation is escalated

     "allowableAction" = "accept|reject|escalate" ⋆ # a list of actions
                                                    # that are allowable
     "action" = "accept|reject|escalate" # the action that will be
                                         # initially selected
     "timeout" = "<seconds since the epoch>" # Number of minutes that must elapse
                                 # before the action is taken
     "timeoutMin" = "<seconds since the epoch>" # The user will not be able to
                                    # specify a timeout less than this.
     "timeoutMax" = "<seconds since the epoch>" # The user will not be able to
                                    # specify a timeout greater than this.
   }
   "times" "" = {
     "startDate" = "<seconds since the epoch>"    # Initially filled in
                                                  # delegation begin time.
     "startDateMin" = "<seconds since the epoch>" # Primary cannot specify
                                                  # a value less than this
     "startDateMax" = "<seconds since the epoch>" # Primary cannot specify
                                                  # a value greater than this
     "endDate" = "<seconds since the epoch>"      # Initially filled in
                                                  # delegation end time.
     "endDateMin" = "<seconds since the epoch>"   # Primary cannot specify
                                                  # a value less than this
     "endDateMax" = "<seconds since the epoch>"   # Primary cannot specify
                                                  # a value greater than this
     "defaultEndDate" = "<seconds since the epoch>" # Return a default end
                                                    # date which will be used
                                                    # by the GUI if endDate
                                                    # returned by the plugin is 0.
   }
 }
About escalation
If an assigned authorizer does not respond to a request in time, Bravura Security Fabric can escalate the request to other authorizers. An authorizer who initially holds a responsibility is known as the primary. An authorizer who acts on behalf of another is known as a delegate.
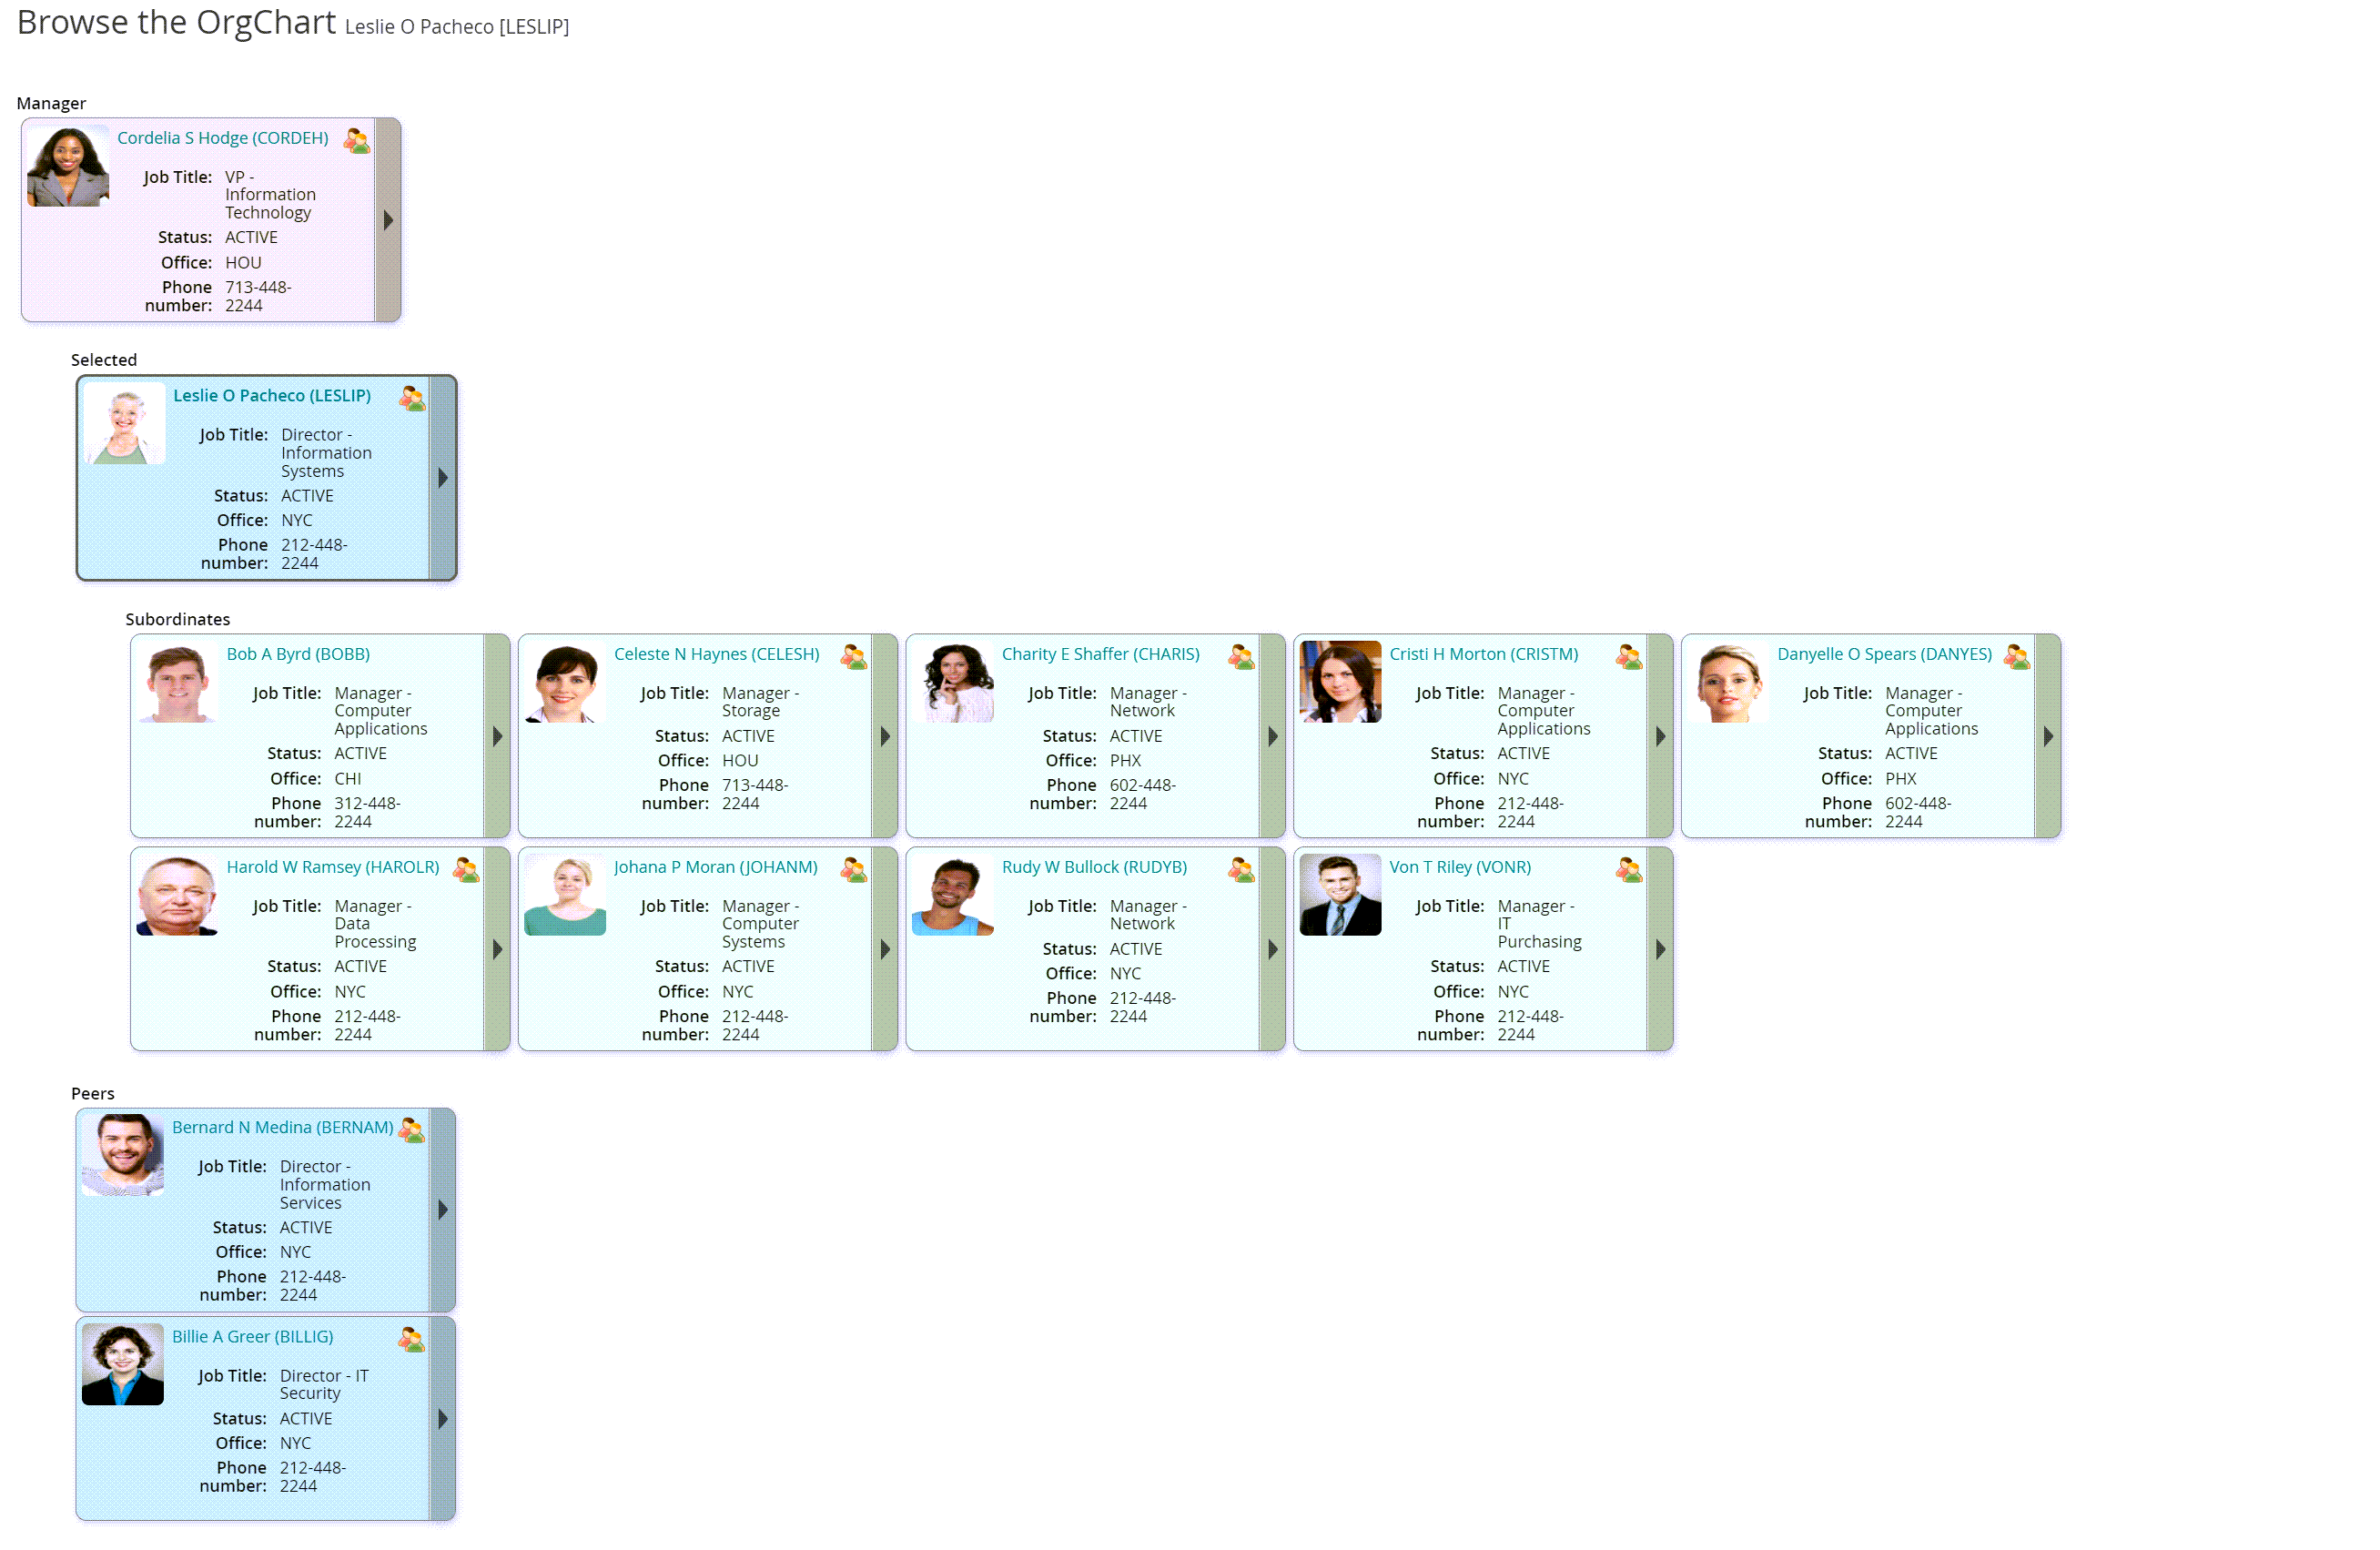
Bravura Security Fabric includes a built-in program, escorgchart.pss , that uses the authorizer’s calculated level in the OrgChart to escalate a request to the next authorizer in the reporting chain. See Implementing organization chart management for information about importing OrgChart data. You can also write a custom plugin to escalate requests using other sources.
Bravura Security Fabric can also utilize user classes to determine how to escalate a request. You can configure user classes instead of, or in conjunction with, an escalation plugin. If both are used, the user class point runs first, and passes a short list of delegates to the plugin, which determines the final delegates to return. See more information on using user classes with these plugin points .
The following is an example of how an escalation might proceed using the escorgchart.pss plugin, based on the figure below:
Marc LeBlanc submits a request that requires Kathy Richardson's authorization.
Kathy is notified that she needs to review the request.
Kathy does not act within the set 3-day time period.
The escalation plugin escalates the request to Susanne Kober.
Susanne is notified that a request has been escalated to her.
Susanne does not act within the set 3-day time period.
The escalation plugin escalates the request to Doug Brost.
Doug is notified that a request has been escalated to him.
Doug logs into Bravura Security Fabric , and chooses to review the request originally assigned to Kathy.
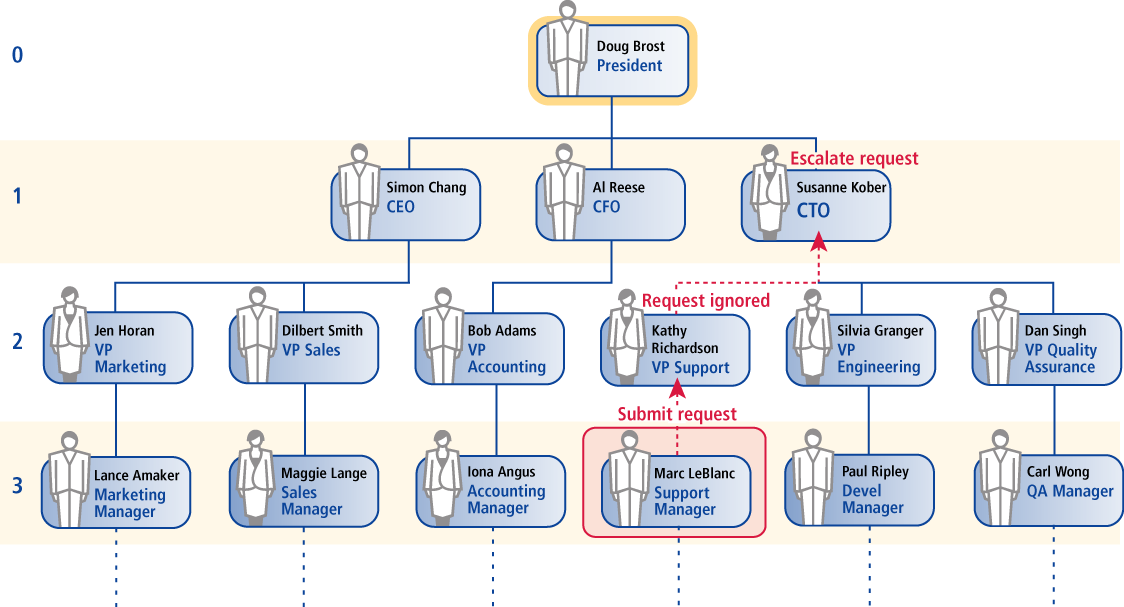
Doug Brost, the delegate, is granted the same access rights as Kathy Richardson for the relevant request. For example, if Kathy is normally the authorizer for new account requests, the Authorize requests option appears on Doug’s self-service menu until he has acted on the escalated request. In other words Doug reviews the request as if he is Kathy. When a delegate authorizer views a list of pending requests, a drop-down list appears at the top of the page so that they can choose who they want to act as.
If a delegate authorizer has already been assigned to a delegated request, they must act on their own behalf and for the primary authorizer (the authorizer who initially did not act in time). For example, based on the figure above:
Marc LeBlanc submits a request that requires authorization from Kathy Richardson and Susanne Kober.
Kathy and Susanne are notified that they need to review the request.
Susanne logs into Bravura Security Fabric and approves the request.
Kathy does not act within the set 3-day time period.
The escalation plugin escalates the request to Susanne.
Susanne is notified that a request has been escalated to her.
Susanne logs into Bravura Security Fabric, and chooses to review the request originally assigned to Kathy.
Susanne can modify, or even deny the request (for a business reason, for example) on Kathy’s behalf, even though Susanne has already approved the request on her own behalf.
If a primary requests a delegation, and the potential delegate does not respond in time, the delegation request is escalated to the primary’s superior. In effect, the primary’s manager becomes the delegate.
When a delegation is in place, and a delegate authorizer does not respond to a request on time, the workflow request is escalated to both the primary manager and the delegate’s manager.
In cases where escalation would violate service-level agreements, a preferred approach is to assign the users to whom you would escalate as the original approvers. This way, all authorizers receive the request for approval, and the time it takes to get approval is reduced. For example, if you would assign group A to authorize a request, then escalate to group B, you should assign both group A and group B to the original request.
Requirements
See Writing plugins for general requirements.
Execution points
The escalation plugin is run by the Workflow Manager Service service when:
A new authorizer, implementer, reviewer, or escalate is added to the request
The authorizer, implementer, reviewer, or escalate fails to act on the request for ESCALATION TIMEOUT seconds
The requester forces an escalation after EARLY ESCALATE TIME seconds have elapsed, by logging in to Bravura Security Fabric and clicking Escalate now on his request.
The FIRST CHANCE ESCALATION PLUGIN runs and determines that immediate escalation is required.
The time has lapsed for a previous plugin retryInXSeconds value.
The dynamic escalation time, set in the output of the plugin, is reached for the request.
Input
The input is structured as follows:
"" "" = {
   "checkWillHaveEscalates" = "<true|false>"
      # true, if the escalate is just added to the request
      # false, if the timeout or early escalation occurs
   "escalatetimes" = "<N>"
      # The number of times the plugin has run for the request
   "escalatingEarly" = "<true|false>"
      # true, if the request is escalated early
      # false, otherwise
   "sessionid" = "<Session ID>"
      # the session ID which spawned this request
   "escalate" "<Username>" = {
      "allowDelegatesToAuthorize" = "<true|false>"
      "timetorerun" = "20"
    }
      # escalation rules defined by a user class attached to this plugin.
      # this group may appear several times

   "firstEscalatedTime" = "<time since Jan 1, 1970 in seconds>"
      # time the request was first escalated.
   "lastEscalatedTime" = "<time since Jan 1, 1970 in seconds>"
      # time the request was escalated last.
   "oldEscalate" "user" = { ... } # The current escalate to evaluate
     # See User data.

   "path" "" = {
     "<primary's Profile ID>" "" = {

       "subsidiary" = "<person to whom request was delegated/escalated>"
       "action" = "<how this person got the power>"
         # Optional; is either delegation or escalation
      }
      # and then that subsidiary escalated/delegated to...
      "<subsidiary's Profile ID>" "" = {
        "subsidiary" = "<person to whom request was delegated/escalated>"
        "action" = "<how this person got the power>"
          # Optional; is either delegation or escalation
      }
   } # the path of escalation/delegation
   "primary" "user" = { ... } # authorizer or implementer that requires action
     # See User data.

   "request" "" = { ... }
     # See Request data.

}primaryis the authorizer who was initially in charge of doing something about the request. This will not change for each subsequent escalation.oldEscalateis the authorizer that did not act and caused this plugin to run. This can be the primary if the primary had no delegates and did not act. This will change at each subsequent escalation.subsidiaryis a general term for someone’s delegate (from either a requested delegation or automated escalation).
Output
Output to attach new escalates:
"" "" = {
  "errmsg" = "<message>"
  "retval" = "<number>"   # 0 means success, otherwise failure
  "timetorerun" = "60" #set the initial timeout value
  "escalate" "<escalate Profile ID>" = {
    "primary"    = "<primary>" # the primary authorizer of the request
    "oldEscalate"  = "<oldEscalate>" #the previous user escalated from
    "escalateType" = "user"
    "allowDelegatesToAuthorize" = "true|false|default"
    "timetorerun" = "60" #dynamic timeout value
  } # Optional; 0 or more escalates
}
Valid values for allowDelegatesToAuthorize include default which uses the value of the ESCALATION IS DELEGABLE system variable.
Output to set early escalation:
"" "" = {
  "errmsg" = "<message>"
  "retval" = "<number>"   # 0 means success, otherwise failure
  "canEscalateEarly" = "<true|false>"
}
Output to deny the request and end escalation:
"" "" = {
"errmsg" = "<message>"
"retval" = "<number>" # 0 means success, otherwise failure
"canEscalateEarly" = "<true|false>"
}
Output to postpone escalation and reevaluate it after a set interval:
"" "" = {
  "errmsg" = "<message>"
  "retval" = "<number>"   # 0 means success, otherwise failure
  "retryInXSeconds" = "<seconds from now to escalate>"
}
Escalating requests immediately when authorizers are assigned
You can use a first chance escalation plugin to determine whether a request should be escalated at the time an authorizer is first assigned to a request. If, for example, the authorizer is away, Bravura Security Fabric can then run the escalation plugin to determine to whom the request should be escalated. The most common way of determining that an authorizer is away is to check the out-of-office status of the mail account of the authorizer.
Bravura Security Fabric can also utilize user classes with this plugin point, so that if an authorizer is included in a defined user class, the request is automatically escalated.
The executable plugin-fce-exchange is a shipped first-chance escalation plugin.
Requirements
See Writing plugins for general requirements.
Execution points
The escalation plugin is run by the Workflow Manager Service when authorizers are assigned to a request.
Input
The plugin receives standard input for Request data and User data.
Output
If the output includes:
 "" "" = {
   "errmsg" = ""
   "retval" = "0"
   "authorizer" = "<authorizerID>" = {

      "doFirstChanceEscalation" = "true"
     } # for each authorizer
}
then escalation occurs immediately. If doFirstChanceEscalation is empty or set to false, escalation occurs after the escalation timeout expires.
Configuring escalation options
To configure Bravura Security Fabric to use escalation:
If you are using a custom plugin instead of
escorgchart.pssensure that your plugin program or script is located in the plugin directory.Click Workflow > Options > Escalation.
Define one or both methods for selecting delegates:
Click Use user classes and follow the procedure outlined in Using user classes with plugin points
Type the name of the escalation plugin program, built-in plugin, or script in the ESCALATION PLUGIN field.
Type values in the following fields to control how requests can be escalated:
ESCALATION IS DELEGABLE
allows subsidiary authorizers to delegate an escalated request to another user.
ESCALATION TIMEOUT
is the time in seconds that an authorizer has to act before a request is escalated.
EARLY ESCALATE TIME
determines how soon requesters and recipients can choose to escalate the request early, by clicking an Escalate now button in the Requests app, before the ESCALATION TIMEOUT ends.
If required, define whether requests should be escalated as soon as certain authorizers are assigned, using one or both of the following methods:
Click Use user classes and follow the procedure outlined in Using user classes with plugin points .
Type the name of the escalation plugin program, built-in plugin, or script in the FIRST CHANCE ESCALATION PLUGIN field.
For the FIRST CHANCE ESCALATION PLUGIN, the plugin takes precedence over user classes if both are defined.
Click Update.
Any action assigned to a disabled user profile in Workflow Manager Service would be automatically escalated at assignment time
Example: Configure escalation
This example shows you how to configure escalation to occur 10 seconds after a request is issued if the original authorizer has not responded. The escorgchart.pss plug-in will use the OrgChart to escalate to the original authorizer’s direct manager. It then shows the effect of the configuration when submitting a request. Note that this is not a realistic time period; it is for demonstration only.
Requirements
This use case assumes:
Bravura Workforce Pattern is installed.
There is an Active Directory target system set up as a source of profiles.
The Active Directory target system is configured to create the OrgChart based on the manager attribute.
User CELESH is the manager of the IT-DB-READWRITE group.
The OrgChart looks something like this illustration , where user CELESH reports to LESLIP, who reports to CORDEH, who reports to HANKB, who reports to BRYANW.
Click below to view a demonstration:
Configure escalation
To configure Bravura Security Fabric to use escalation:
Log in to the Front-end (PSF) as
superuser.Click Manage the system > Workflow > Options > Escalation .
Enter the following values:
ESCALATION PLUGIN
escorgchart.pssESCALATION TIMEOUT
10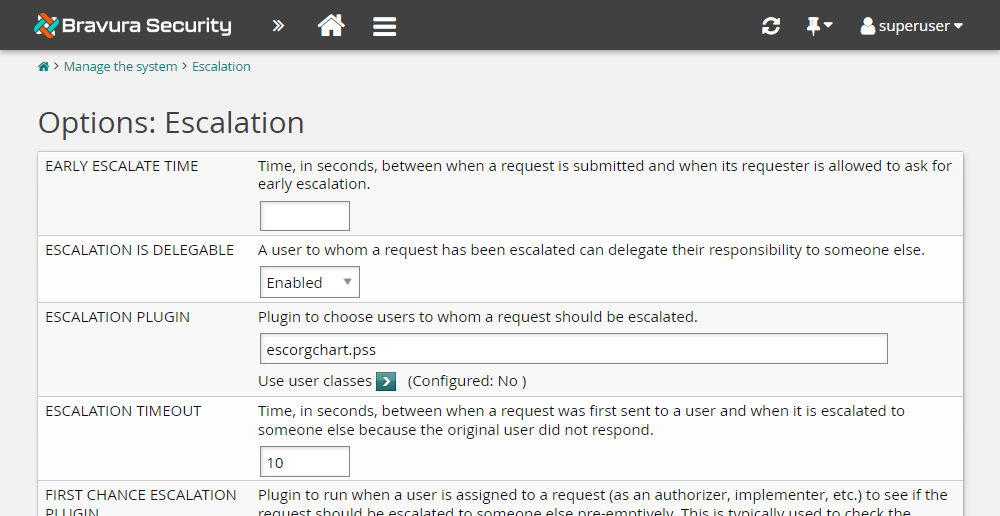
Click Update.
You have now configured escalation.
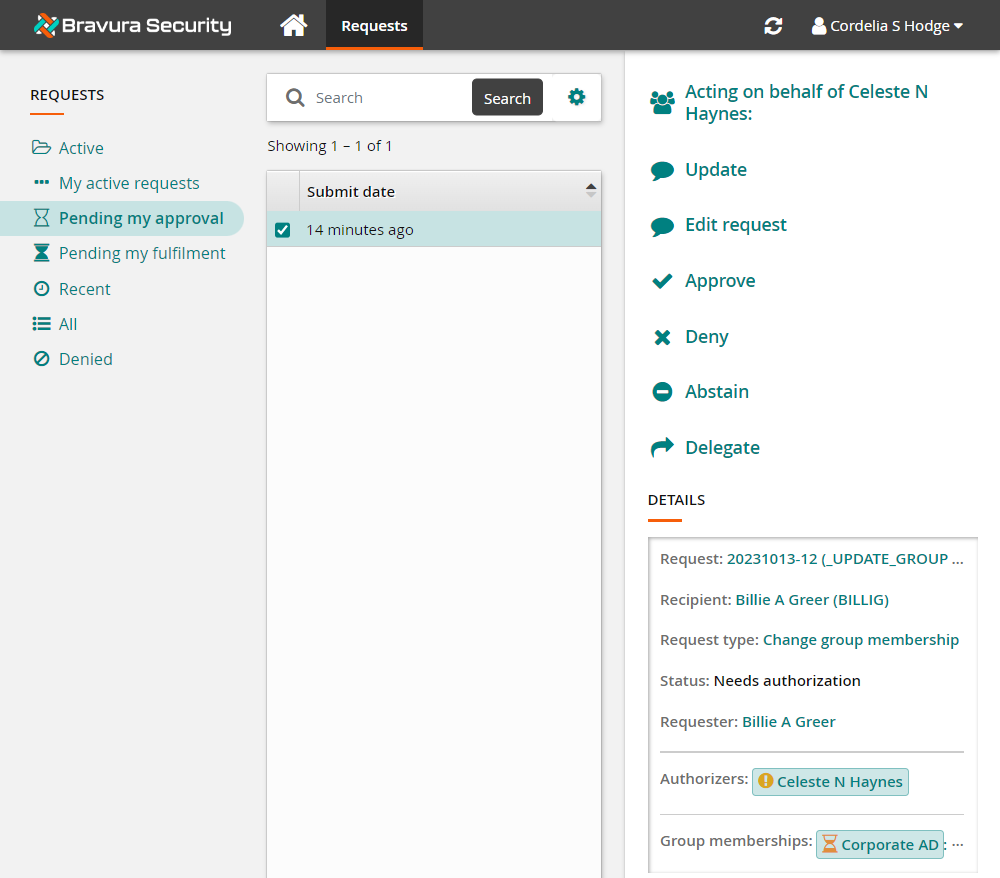
Issue a request
As an end user, issue a request to join the IT-DB-READWRITE group, which must be approved by the group’s manager:
Log in to the Front-end (PSF) as
BILLIG.Click View and update profile in the MY PROFILE section.
Click Change group membership near the bottom of the page.
Search for and select the IT-DB-READWRITE group.
Click Submit.
View the request.
The Requests app opens.
Bravura Security Fabric has issued the request and is waiting on approval from CELESH.
Wait 10 seconds.
View request details and authorizers.
After every 10 seconds the request will show CELESH’s authorization delegated further and further up the management chain in the order: LESLIP, CORDEH, HANKB, and BRYANW.
Even after the request authorization is escalated up several levels of management, any one of the original authorizers or new authorization escalates can approve the request. In this case, CELESH, LESLIP, CORDEH, HANKB, and BRYANW all have the ability to approve/deny the request.
Open the Mail folder in the <Program Files path>\Bravura Security\Bravura Security Fabric\Logs\<instance> directory.
You should see e-mail messages sent to BILLIG and CELESH when the request was issued labeled with " Request submitted ..." and " Please approve ...", respectively. Additional messages are shown to have been sent in order to LESLIP, CORDEH, HANKB, and BRYANW with the subject line of " Escalation ..." when the request was escalated every ten seconds after.
Act as a delegate
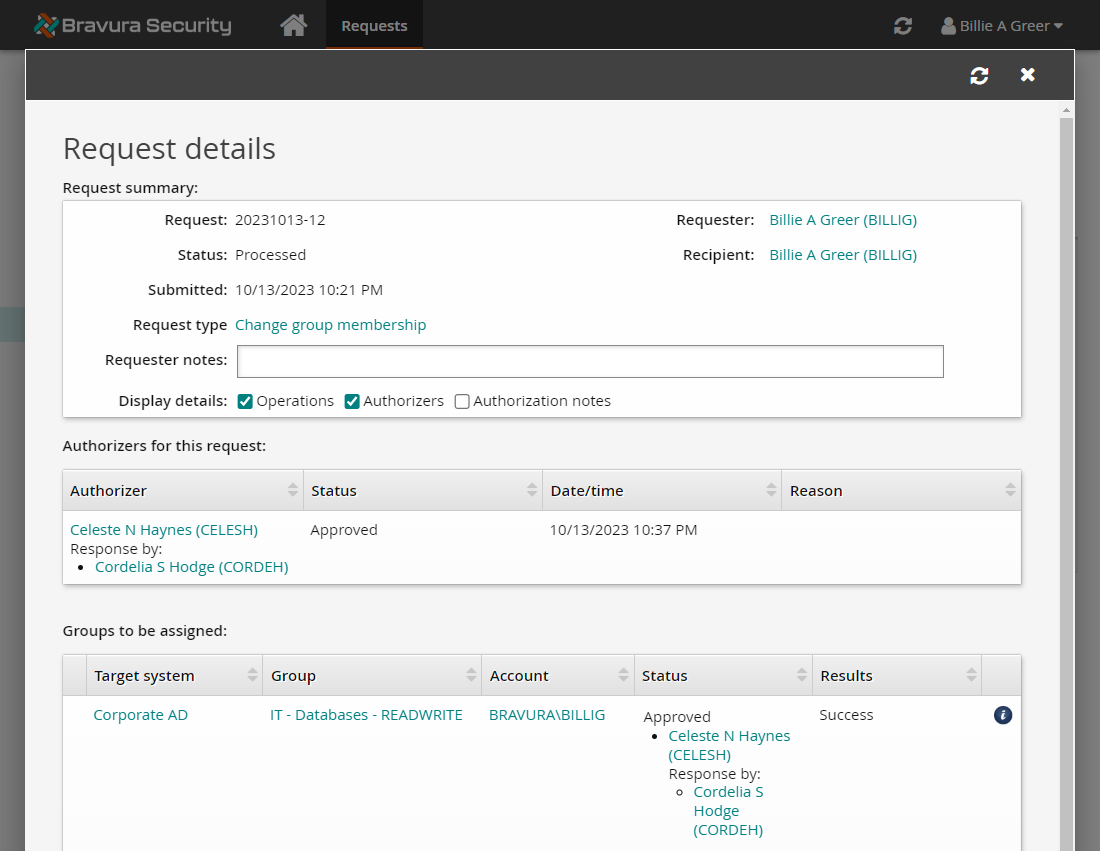
Open a new tab and as CORDEH, approve the request on behalf of the group’s manager:
Log in to the Front-end (PSF) as
CORDEH.Click the link: There are 1 request(s) awaiting your approval as a delegate.
Select the request.
Click Approve.
Confirm the action by clicking Approve again.
Return to the browser tab where BILLIG is logged in.
Click Refresh
 to view the request details.
You can now see that the request has been approved and processed.
Update escalation timeout
Now that you have seen how escalation works, the escalation timeout will be adjusted to a more realistic value of one hour.
Log in to the Front-end (PSF) as
superuser.Click Manage the system > Workflow > Options > Escalation .
Change the ESCALATION TIMEOUT to
3600.Click Update.
Example: Assign a delegation
In this example you will delegate the responsibilities of the Manager of IT to another IT team member. This will allow the team member to approve or deny requests on the manager’s behalf while she is on leave.
This example assumes that:
Bravura Workforce Pattern and Connector Pack are installed.
There is an Active Directory target system set up as a source of profiles.
The Active Directory target is configured to create the OrgChart based on the manager attribute.
User Adam is the manager of the IT-DB-READWRITE group.
Click below to view a demonstration showing how you can delegate the responsibilities of a Manager to another team member, allowing the delegate to approve or deny requests on the manager’s behalf while they are on leave.
Request a delegation
Log in to Bravura Security Fabric as Adam.
On the main menu , click Delegate authority in the My profile section.
Bravura Security Fabric displays the Delegation information page.
Set the following options:
Delegate Search for and select Ken
Start date Now (default)
End date Select a date two weeks in the future (default)
Ask the delegate before starting Selected
Reason Manager will be on leave
Response required by Set a day in the future
Default action Accept delegation
Delegation type All
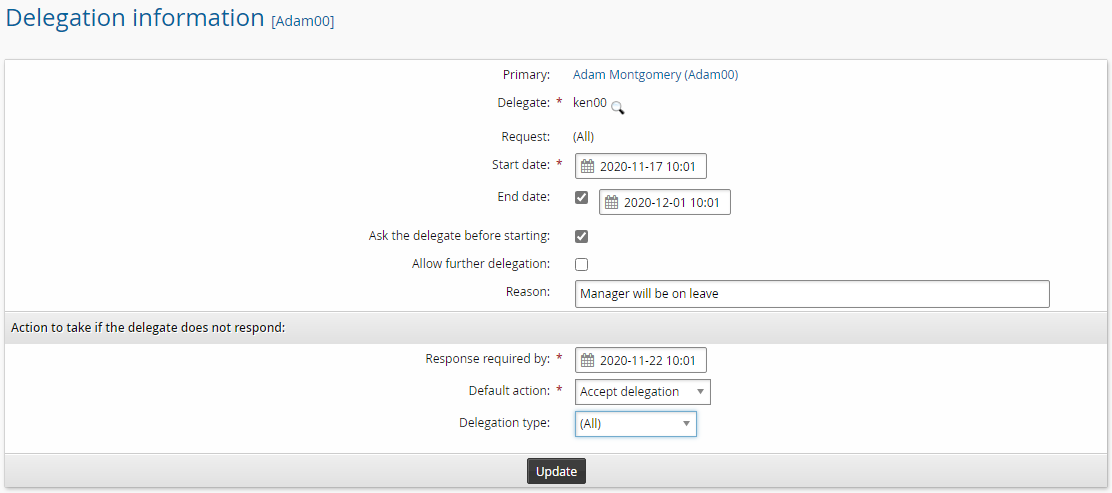
Click Update.
Bravura Security Fabric displays the delegation on the main Delegations page.

You can return to this page to review, update, or cancel delegations. You can update a delegation that you have made while it is pending. You can cancel a delegation that you have made at any time. This applies to delegations of your own authority as well as delegations of other users’ authority that you have made for others.
The Show all icon allows you to see expired delegation requests.
You can also request delegations for:
One or more individual requests, when you are reviewing requests
Implementation tasks
Certification campaigns, when you are reviewing users and privileges
Respond to the request
When you receive a request for delegation, you will see a Manage delegation link on the main menu the next time you log into Bravura Security Fabric .
To respond to the request:
Log in to Bravura Security Fabric as Ken.
On the main menu click the link: There are 1 delegation(s) awaiting your acceptance.
Click Accept.
Click Home, then click Manage delegations tab in the Requests to go back to the Delegations page.
From the Delegations page, you can also select a request to view the request details.

Test the delegation
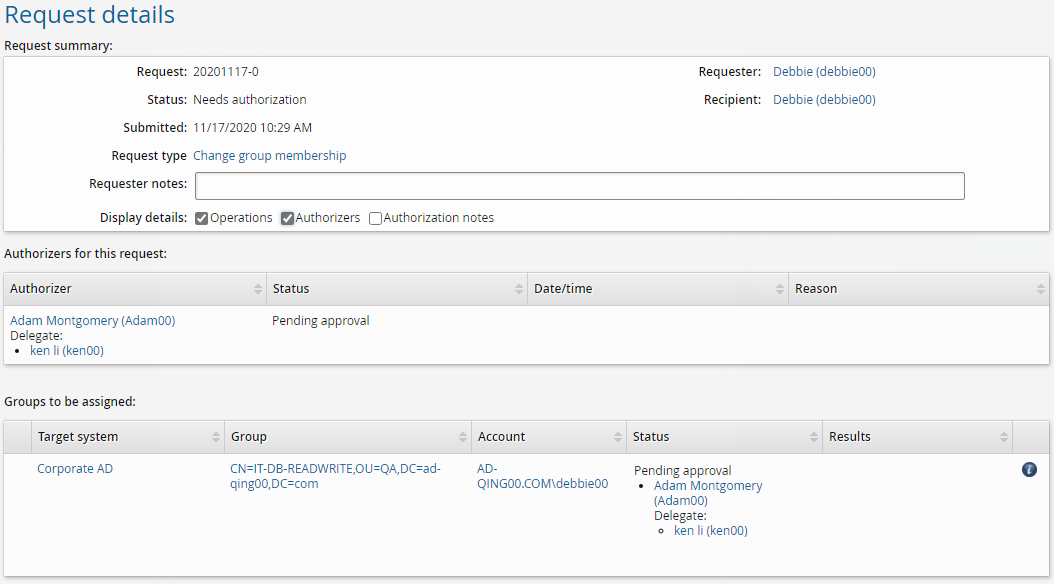
To test the delegation, login as Debbie and request to join the IT-DB-READWRITE group. Adam is the authorizer, however, you have delegated this responsibly to Ken which means, you can authorize the request as Ken.
Log in to Bravura Security Fabric as Debbie.
Click View and update profile in the My profile section.
Click Change group membership near the bottom of the page.
Search for and check the box for the IT-DB-READWRITE group.
Click Submit.
If you view the request details you should see the request requires authorization from Ken as a delegate for Adam.
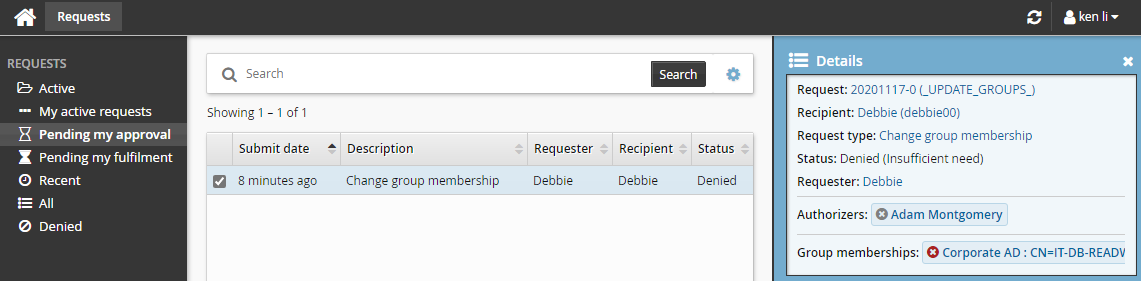
Deny the request
Log in to Bravura Security Fabric as Ken.
Click the There are 1 request(s) awaiting your approval as a delegate link or click Requests in the Requests section.
The Requests app will open.
Select the checkbox next to the request.
Click Deny.
Type Insufficient need in the box provided.
Click Deny.
Cancel the delegation
Sometimes it may be necessary to cancel the delegation before the end date. In this scenario Adam has returned from holidays a week early.
Log in to Bravura Security Fabric as Adam.
Click Delegate authority.
Select the Ken delegation request.
Click Cancel and confirm that you want to cancel the selected item.
The delegation has now been canceled and Adam will be reinstated as the appropriate authorizer.
Example: Delegate a single request
The Scenario.im_corp_delegate_filter_orgchart component provides functionality which filters the list of available users who may be delegated authorization authority based on their level in the OrgChart.
This implements an OrgChart-based filtering of potential delegates. When installed, it allows a primary to delegate only to someone on the same level (same manager) or higher on the OrgChart.
This example assumes that:
Bravura Workforce Pattern and Connector Pack are installed.
There is an Active Directory target system set up as a source of profiles.
The Active Directory target is configured to create the OrgChart based on the manager attribute.
User Adam is the manager of the IT-DB-READWRITE group.
The OrgChart looks something like the following:
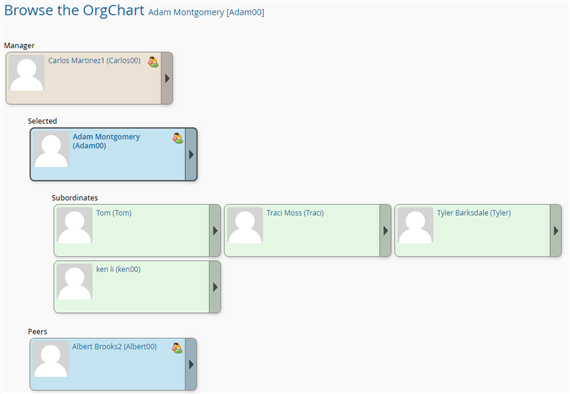
Delegate a single request
Login as Debbie to request to join the IT-DB-READWRITE group.
Log in to Bravura Security Fabric as Debbie.
Click View and update profile in the My profile section.
Click Change group membership near the bottom of the page.
Search for and check the box for the IT-DB-READWRITE group.
Click Submit.
Adam is the authorizer. Login as Adam, then check the request and search for a possible delegate. You will find all the users in the organization are listed.
Log in to Bravura Security Fabric as Adam.
Click the There are 1 request(s) awaiting your approval link or click Requests in the Requests section.
The Requests app opens.
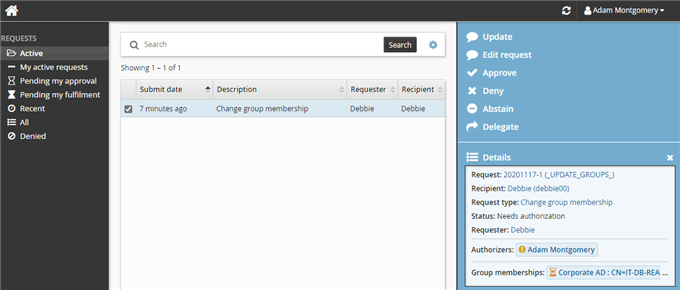
Click the request and click Delegate.
Search for the Delegate . Note the search finds all the users in the organization.
Install the Scenario.im_corp_delegate_filter_orgchart component
To install the component:
Log in to Bravura Security Fabric as superuser.
Click Manage components.
Search and select Scenario.im_corp_delegate_filter_orgchart.
Click Install component(s).
Wait until Installed becomes "True".
Login as Adam again, then check the request for delegation. When searching for the possible delegate, you will find only his manager and peers are listed.
Log in to Bravura Security Fabric as Adam.
Click the There are 1 request(s) awaiting your approval link or click Requests in the Requests section.
The Requests app opens.
Click the request and click Delegate.
Search for the Delegate.
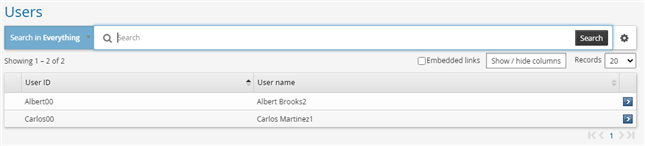
Select Carlos.
Set the following options:
Ask the delegate before starting Unselected
Allow further delegation Uselected
Reason Please review the request
Click Update.
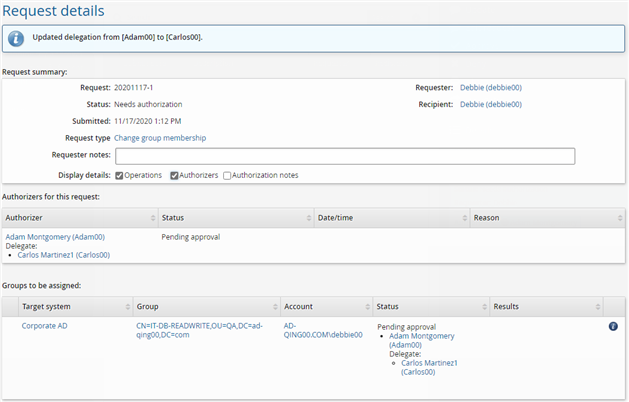
If you view the request details you should see the request requires authorization from Carlos as a delegate for Adam.
Approve the request
Log in to Bravura Security Fabric as Carlos.
Click the There are 1 request(s) awaiting your approval as a delegate link or click Requests in the Requests section.
The Requests app opens.
Select the checkbox next to the request.
Click Approve.
Type
Approvedin the box provided.Click Approve.
Verify the request is processed
Log in to Bravura Security Fabric as Debbie.
Click View and update profile in the My profile section.
Check Debbie’s Accounts/Managed groups.
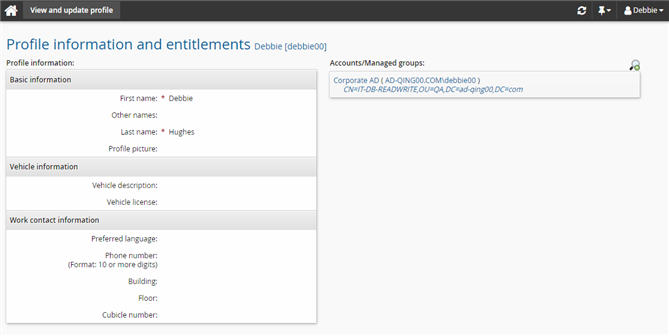
Example: Delegate a certification segment when the reviewer is invalid
Business requirement
Organizations require the ability to sign off on a certification campaign when the initial reviewer is no longer a valid user.
Solution
A superuser can create delegation administration rules in Bravura Security Fabric to enable a certification segment to be delegated to a valid user. The valid user can then complete the certification round.
The following demonstrates how to configure delegated administrative rules using the Delegation authority privilege to delegate an invalid user’s certification segment to a valid user.
In this example, a superuser creates two delegated administrative rules with the Delegation authority privilege:
One rule specifying NEWUSER as the RECIPIENT. This rule enables the Delegate authority link under Other users .
Another rule specifying ALLUSERS as the RECIPIENT. This rule enables the Show invalid icon
 to display when selecting the user whose authority you need to delegate.
Note
This setup is for demonstration purposes only; in a production environment it is recommended that you restrict access to the "Delegate authority" privilege to specific users through a global helpdesk rule.
Pre-requisites
This example assumes that:
Bravura Security Fabric and Connector Pack installed.
An Active Directory target system is added as a source of profiles.
There is an active certificate segment where the reviewer has been deleted in the target system.
Configure the first delegated administrative rule
Log in to the front-end as superuser.
Click Manage the system > Security> Access to user profiles> Delegated administration rules.
Click Add new.
ID: Rule 1
Description: Rule 1
Select
Delegate authorityfor Allowed privileges.Click Add.
Click Membership criteria tab.
Click Select.
Select the _ALLUSERS_ user class.
Select
RECIPIENTfor Participant mapping.Click Select.
Select the _ALLUSERS_ user class.
Select
REQUESTERfor Participant mapping.Set The participants have to match which of the user classes to All of the user classes .
Configure the second delegated administrative rule
Log in to the front-end as superuser.
Click Manage the system > Security> Access to user profiles > Delegated administration rules.
Click Add new.
Click Add new.
ID: Rule 2
Description: Rule 2
Select
Delegate authorityfor Allowed privileges.Click Add.
Click Membership criteria tab.
Click Select.
Select the _NEWUSER_ user class.
Select
RECIPIENTfor Participant mapping.Click Select.
Select the _ALLUSERS_ user class.
Select
REQUESTERfor Participant mapping.Set The participants have to match which of the user classes to All of the user classes .
Delegate an invalid user’s certificate segment to a valid user
Log in to the front-end as an end user.
Click Delegate authority in the Other users section.
Click Show invalid .
Click the deleted reviewer link to open the delegation page.
On the delegation page, select a valid user as the delegate.
Tracking requests
Self-service users, including authorizers, requesters, and recipients, can track the status of their requests if they have the ”View open requests” right. By default, requesters can cancel their own requests before they are authorized, and recipients can view and cancel requests that apply to them as long as the requests are not termination requests.
Self-service users with the ”View archived requests” right can view their closed requests.
Workflow viewers – help desk users with the ”View workflow requests” right – can view requests of other users. Workflow managers – help desk users with the ”Manage workflow requests” right – can also act on requests, including those not explicitly assigned to them as authorizer.
You can use the FILTER REQUEST PLUGIN plugin point (Modules > Options) to hide specific types of requests from recipients. For example, you might want to hide account deletion requests from recipients. See Filter requests.
You can use the AUTHORIZATION DETAIL MASK PLUGIN plugin point (Workflow > Options > Plugins) to determine whether authorization details about the request should be displayed to the user viewing the request. For example, you might want to hide authorization details from request recipients. See Hiding authorization details.
When users make a request, they can use a temporary ”toast message” link, displayed after the final step, to access the status page for the request. In some browsers, a JavaScript link may allow them to bookmark the status page or they may be able to right-click the link to bookmark it. Later, they can access the status page by clicking the Requests option on the main menu, or by following a link in the email they received from the workflow engine.
Note
In some cases, Bravura Security Fabric will display the status of a request as “Processed, informing authorizers”, even though it has been processed by authorizers and emails have already been sent. Requests remain in this status until all workflow events handled by the Workflow Manager Service service have passed. This includes reminder email times and the escalation timeout period. At this point, the Workflow Manager Service realizes there is nothing left to do and moves the request into its final “Processed” state.
Allowing automatic approval for authorizer requests
Bravura Security Fabric can automatically approve a request if the requester is also an authorizer assigned to the affected resource.
To turn on this option enable IDWFM AUTO APPROVE on the Workflow > Options > General menu. Installing Bravura Pattern sets the value for this option as "enabled".
A request will not be auto-approved if:
Authorizers must enter values for required attributes when a request is reviewed.
Or,
More than one authorization is required to approve the request.
Unapproving requests
Bravura Security Fabric authorizers can "unapprove" privileged access requests if they are originally listed as an authorizer for the request.
Unapproving a request cancels the request. The request is treated as denied. The "unapprove" action only affects the specific request; user privileges, user access, and other requests are unaffected.
A privileged access check-out request can be unapproved when:
It has been approved by an authorizer.
It is in the ’Pending’ check-out status.
A privileged access check-out request cannot be unapproved when:
It is in the process of being checked out.
The request has been processed.
A privileged access extension request can be unapproved when:
It has been approved by an authorizer.
The request has been processed.
The check-out will still have time remaining once the extension is removed.
A privileged access extension request cannot be unapproved when:
The check-out will no longer have time remaining if the extension was removed.
If you want to cancel a check-out or extension request that can no longer be unapproved, you must terminate the user’s privileged access instead. To do this, you must grant the “Check-in access” privilege to the appropriate users.
Rewriting pre-defined requests
A request can be updated and controlled using the WF WIZARD PLUGIN. The plugin can:
Update the request’s attributes
Update the request’s resources
Update the pages displayed
Provide a list of restricted values for an attribute
Control which attributes are displayed
Control which attributes can be edited
Provide the profile ID of the new user
Provide the initial password for new accounts
Validate the request and provide feedback to the user
This plugin applies only to pre-defined requests. Custom requests or legacy requests do not execute this plugin.
To use this plugin, type the name of the plugin in the WF WIZARD PLUGIN field on the Workflow > Options > Plugins configuration page.
There are no shipped plugins in use with this plugin point.
Requirements
See Writing plugins for general requirements.
Execution points
The plugin is run by the Workflow Manager Service and Asynchronous Request Service. The plugin is called when a request is:
Initiated by the user when selecting a request type
Updated by the user
Submitted by the user
Submitted via the API Service
Input
Input to the plugin includes:
"" "" = {
        sessionid = <id>;
        extras = { ... }; # Present when run by idwfm
        module = <ajaxsvc|idwfm>; # Program that is running the plugin

        wizard "" = {
                prequest "" = { ... }; # Provides the pre-defined request information
        lastRequest "" = { ... }; # Not present on initial load
        attributes "" = { ... }; # Provides recipient attribute information

        request "" = { ... }; # Provides request details
        }
}
New users include a blank recipientname. When this is provided by the plugin, the profile ID provided will be used. If the recipientname matches an existing invalid user, the request will restore the user and update attributes and resources that are included the request.
Output
The request rewrite plugin returns the following output:
"" "" = {
  wizard "" = {
    prequest "" = { ... };  # Optional, omission indicates no changes
    request "" = { ... }; # Optional, omission indicates no changes
  }; # Optional, omission indicates no changes
  changed = <false|true>; # Optional, if false, any changes are ignored.
                          # Default is true
  retval = <N>; # Required, non-zero indicates a plugin failure
}
Rewriting custom requests
You can use a plugin to rewrite custom or legacy requests to dynamically attach or detach resources. This plugin works in a similar way to the operation rewrite plugin . Alternatively use the workflow wizard plugin to rewrite pre-defined requests.
The request rewrite plugin is suited to situations where authorizers need to see the implications of a request, and to audit access changes before and after a request.
The request rewrite plugin allows the attached resources to be mandatory or optional. Optional resources can be unselected by the requester. Mandatory resources remain selected and cannot be removed by the requester.
The request rewrite plugin allows the auto-selection of resources. This auto-selection relies on profile and request attributes.
The request rewrite plugin executes whenever a change to the request is made. These changes can come from profile and request attribute changes, resource selection, or when resources are added or removed by the CGIs. The request rewrite plugin also runs when the Bravura Security Fabric API submits a request to Workflow Manager Service (idwfm).
The following use cases demonstrate how the request rewrite plugin might be used:
Use case 1: Map location and job code changes to account and group changes
A request to change “Job code” or “Location” attributes for an existing user is submitted, either by a requester or the automated user administration system (
idtrack)The company’s business rules state that a change to either of these attributes means that the user’s accounts and group memberships also have to change.
The Workflow Manager Service (
idwfm) calls the request rewrite plugin so that the authorizer can see what the full impact of the request will be. For auditing purposes, the resulting connector operations can be traced back to the original request.Use case 2: Event actions based on new IDTM operations
A single delete operation on a target system that is a source of Profile IDs is converted into disable operations on all accounts owned by the user. The USER DELETE SUCCESS exit trap needs to be configured to update the database with information about the disabled accounts.
If the operation is “fanned out” after authorization by the operation rewrite plugin, the exit trap can only act on the single delete operation.
If the request is converted before authorization by the request rewrite plugin, information about multiple disable account requests can be used by the exit trap.
These cases require a plugin that can translate a request into 0 or more operations before the request is approved and transferred to the Transaction Monitor Service. The request rewrite plugin is used by the Workflow Manager Service, which is responsible for handling the authorization workflow, and receives feedback from the Transaction Monitor Service.
Once the request is posted, authorizers are attached to authorize the resources of the request. If the plugin modifies the posted request to:
Remove resources, the attached authorizers are reviewed. Any authorizers are detached if there are no resources that require their authorization. Bravura Security Fabric sends detached authorizers an email to notify them that their authorization is no longer required.
Add resources, then Bravura Security Fabric determines what authorizers need to be attached to the request for the new resources. Bravura Security Fabric sends newly attached authorizers an email to notify them that their authorization is required for the request.
To use this plugin, type the name of the plugin in the IDWFM REQUEST REWRITE PLUGIN field on the Workflow > Options > Plugins configuration page. For Bravura Privilege requests, type the name of the plugin in the PAM IDWFM REQUEST REWRITE PLUGIN field instead.
There are no shipped plugins in use with this plugin point.
Requirements
See Writing plugins for general requirements.
Execution points
The plugin is run by the Workflow Manager Service:
When a requester updates profile and request attributes
Before requests have been submitted, when requests are created
After requests have been submitted
After the attribute validation plugin has run and before the ID assignment plugin has run
If an authorizer modifies attributes
Input
Input to the plugin includes:
"" "" = {
  "module" = "idwfm"

  "sessionid" = "<session ID>" # The session ID of the logged in viewer/requester
  "navigation" "" = { ... } # User navigation data
  "firstrun" = "<true|false>" # If this is the first run of the plugin for the request
                              # the value will be true; Otherwise, false.
  "preselect_role" = "1" # Sent to the plugin before users make a role selection
                         # in the CGIs.
  "postselect_role" = "1" # Sent to the plugin after changes to the
                          # roles are made by the CGIs.
  "preselect_template" = "1" # Sent to the plugin before users make a template
                             # selection in the CGIs.
  "postselect_template" = "1" # Sent to the plugin after changes to the
                              # templates have been made by the CGIs.
  "preselect_nosgroup" = "1" # Sent to the plugin before a managed groups selection
                             # displayed by the CGIs.
  "postselect_nosgroup" = "1" # Sent to the plugin after changes to managed
                              # groups have been made by the CGIs.
  "recipient" "user" = { } # Recipient's data if they are an
                           # existing user.
  "model" "user" = {} # Data of the model user used in profile comparison.
  "request" "" = { # Standard request data listing resources
    "resource" "" = {}
  }
  "recipient" "user" = {} # Recipient's data.
  "requester" "user" = {} # Requester's data.
}
Note
Authorizer-related parameters are place holders for future extension. Do not use them for this plugin.
The request rewrite plugin is launched before parameters such as authorization are committed; for example, when the plugin launches during request submission, it may modify some actions, requiring authorizers to be assigned after it is run.
The following is an example of the input to the request rewrite plugin:
# KVGROUP-V1.1
"" "" = {
  "sessionid" = "Scf7e0618-8b44-4304-aed0-cabd17e45ed2"
  "module" = "idwfm"
  "firstrun" = "false"
  "navigation" "" = {
    "wfpage" = "requestsubmitpredefinedrequest"
    "prequest" = "UPD-SELF-CONTACT"
  }
  "event" = "EVENT_POST_BATCH"
  "request" "" = {
    "requestID" = "5488CCB03DB901864DE53DDB63695AE7"
    "macroStatus" = "U"
    "requester" = "WOOD0000"
    "requesterName" = "Maddox, Woodrow"
    "requesterEmail" = "woodrow.maddox@norse.bravurasecurity.com"
    "recipient" = "WOOD0000"
    "recipientEmail" = "woodrow.maddox@norse.bravurasecurity.com"
    "entryDate" = "1418251465"
    "notes" = ""
    "reason" = ""
    "segment" = ""
    "reservationid" = "00000000-0000-0000-0000-000000000000"
    "autoressig" = ""
    "prequest" = "UPD-SELF-CONTACT"
    "resource" "5488CCB5CEA4B8264491733F52D03D02" = {
      "longIDSet" = "false"
      "itemType" = "accountID"
      "targetid" = "AD"
      "accountID" = "WOOD0000"
      "userid" = "WOOD0000"
      "enact" = "true"
      "pseudoOp" = "false"
      "pseudoTag" = ""
      "pseudoData" = ""
      "finalized" = "false"
      "authtype" = "P"
      "operation" = "UPDT"
      "status" = "O"
      "statusreason" = ""
      "notes" = ""
      "reason" = ""
      "result" = "I"
      "implicit" = "true"
      "groupApproval" = "00000000-0000-0000-0000-000000000000"
      "parentRole" = ""
      "autoselect" = "none"
    }
    "attribute" "EXCHANGE-ALIAS" = {
      "value" "" = {
        "value" = "WOOD0000"
      }
    }
    "attribute" "HOME-COUNTRY" = {
      "value" "" = {
        "value" = "United States"
      }
    }
    "attribute" "PROFILEID" = {
      "value" "" = {
        "value" = "WOOD0000"
      }
    }
    "attribute" "WORKLOC-AD" = {
      "value" "" = {
        "value" = "Building  Floor  Cubicle "
      }
    }
  }
  "recipient" "user" = {
    "id" = "WOOD0000"
    "name" = "Maddox, Woodrow"
  }
  "requester" "user" = {
    "id" = "WOOD0000"
    "name" = "Maddox, Woodrow"
  }
}
Output
The request rewrite plugin returns the following output:
"" "" = {
  "changed" = "true|false" # Indicates whether request has changed.
                 # Default value is true if the key is missing.
  "rerun" = "true|false|auto" # If present in the KVGroup and set to true

                   # the script will be rerun.  When set to false, the
                   # script will not be rerun and when set to auto, the
                   # script will be rerun if changes are detected from the
                   # previous run.
  "infomsg" = ""   # Informational message returned, if any.
                   # The value is displayed in the CGIs if this is returned.
  "errmsg" = ""    # Error message returned, if any.
                   # The value is displayed in the CGIs if this is returned.
                   # This represents an error in the request that
                   # the requester needs to correct.
  "retainResources" = "<true|false>" # If true, only resources returned will be added, removed, updated.
                                     # If false, resources not returned will be removed.
  "retval" = "<N>" # Mandatory; zero is success and non-zero is failure
  "password" = "<newpassword>" # This is now obsolete and has been moved to
                               # resource section
  "skip_role" = "1" # If returned when preselect_role is passed in,
                    # role selection will be skipped by the CGIs.
  "skip_template" = "1" # If returned when preselect_template is passed in,
                        # template selection will be skipped by the CGIs.
  "skip_nosgroup" = "1" # If returned when preselect_nosgroup is passed in,
                        # managed group selection will be skipped by the CGIs.

  "skip_summary_pdr" = "1" # If set during a pre-defined request,
                           # the final summary page will be skipped by the CGIs.
  # Followed by any number of resource entries.
  # When retainResources is true, resources that are updated, added, or removed
  # are the only that need to be returned.
  # When retainResources is omitted or false, resources that are not returned
  # are considered removed.  All resources will be added or changed on the request.
  "resource" "<resource id from input>|<empty>" = {
    "remove" = "true" # If present in the KVGroup, the resource is removed
                      # from the request.
  } # 0 or more
}
The follow are examples of KVGroup plugin output:
To add a group membership add to the request:
"" "" = {
  "changed" = "true"
  "infomsg" = ""
  "retval" = "0"
  "resource" "4E12EZ11531ABAB574AB4B4295C4872D" = {
    "authorizationsReceived" = "0"
    "authorizationsRequired" = "1"
    "authorizer" = "crysta.soria"
    "implicit" = "false"
    "itemType" = "accountID"
    "notes" = ""
    "operation" = "UPDT"
    "parentRole" = ""
    "pseudoData" = ""
    "pseudoOp" = "false"
    "pseudoTag" = ""
    "reason" = ""
    "result" = "O"
    "accountID" = "steve.benes"
    "targetid" = "NORSE"
  }
  "resource" "" = {
    "accountID" = "steve.benes"
    "itemType" = "groupID"
    "operation" = "GRUA"
    "targetid" = "NORSE"
    "groupID" = "CN=FIN-AR,OU=resources,OU=staff,DC=norse,DC=bravurasecurity,DC=com"
    "autoselect" = "true"
   }
}
To add a group membership add to the request and retain resources:
"" "" = {
  "changed" = "true"
  "infomsg" = ""
  "retval" = "0"
  "retainResources" = "true"
  "resource" "" = {
    "accountID" = "steve.benes"
    "itemType" = "groupID"
    "operation" = "GRUA"
    "targetid" = "NORSE"
    "groupID" = "CN=FIN-AR,OU=resources,OU=staff,DC=norse,DC=bravurasecurity,DC=com"
    "autoselect" = "true"
   }
}
To add a group membership add to the request and role:
# KVGROUP-V1.0
"" "" = {
  "changed" = "true"
  "infomsg" = ""
  "retval" = "0"
  "resource" "3G34GB22672CDCD574BC4C4295D5983F" = {
    "authorizationsReceived" = "0"
    "authorizationsRequired" = "0"
    "autoselect" = "none"
    "groupApproval" = "00000000-0000-0000-0000-000000000000"
    "implicit" = "false"
    "itemType" = "template"
    "notes" = ""
    "operation" = "ACUA"
    "parentRole" = ""
    "pseudoData" = ""
    "pseudoOp" = "false"
    "pseudoTag" = ""
    "reason" = ""
    "result" = "O"
    "template" = "NORSE_TEMPLATE"
    "targetid" = "NORSE"
  }

 "resource" "" = {
    "itemType" = "groupID"
    "operation" = "GRUA"
    "targetid" = "NORSE"
    "groupID" = "CN=FIN-AR,OU=resources,OU=staff,DC=norse,DC=bravurasecurity,DC=com"
    "autoselect" = "true"
    "template" = "NORSE_TEMPLATE"
   }
  "resource" "" = {
    "itemType" = "role"
    "operation" = "RLUA"
    "pseudoOp" = "false"
    "autoselect" = "mandatory"
    "role" = "EXCHANGE_ROLE"
  }
}
To remove a resource and retain resources:
# KVGROUP-V1.0
"" "" = {
  "changed" = "true"
  "infomsg" = ""
  "retval" = "0"
  "retainResources" = "true"
  "resource" "3G34GB22672CDCD574BC4C4295D5983F" = {
    "removed" = "true"
  }
}
To set a default password for the resources in the request:
# KVGROUP-V1.0
"" "" = {
  "changed" = "true"
  "infomsg" = ""
  "retval" = "0"
  "resource" "3G34GB22672CDCD574BC4C4295D5983F" = {
    "autoselect" = "none"
    "enact" = "true"
    "finalized" = "false"
    "groupApproval" = "00000000-0000-0000-0000-000000000000"
    "implicit" = "false"
    "itemType" = "template"
    "longIDSet" = "false"
    "itemType" = "template"
    "notes" = ""
    "operation" = "ACUA"
    "parentRole" = ""
    "password" = "defaultPassword"
    "pseudoData" = ""
    "pseudoOp" = "false"
    "pseudoTag" = ""
    "reason" = ""
    "result" = "O"
    "template" = "NORSE_TEMPLATE"
    "targetid" = "NORSE"
  }
}
Setting the password using the request rewrite plugin causes Bravura Security Fabric to bypass the password entry page in View and update profile (idr) module. This overrides PASSWORD GEN PLUGIN.
The request parameter groupApproval is used to group resource authorization. Each unique groupApproval value represents a group of common resources.
For all request resources, that share the same groupApproval value, the following is true:
If one resource authorization request is denied, then the other resources are denied. The other resources are denied once authorization for the entire request is completed.
If all resources are approved, then the group of resources can be processed.
If the request rewrite plugin omits the groupApproval or clears the value with "00000000-0000-0000-0000-000000000000", any authorization dependency is removed. If a value is set for groupApproval on an added resource, it will require authorization of other resources with the same value in addition to its own authorization.
The following is an output example of rewriting the request so that the group add operation requires the user creation to be approved in tandem:
"" "" = {
  "changed" = "true"
  "infomsg" = ""
  "retval" = "0"
  "resource" "3G34GB22672CDCD574BC4C4295D5983F" = {
    "authorizationsReceived" = "0"
    "authorizationsRequired" = "0"
    "autoselect" = "none"
    "groupApproval" = "49583745-3242-6364-3453-384850692934"
    "implicit" = "false"
    "itemType" = "template"
    "notes" = ""
    "operation" = "ACUA"
    "parentRole" = ""
    "pseudoData" = ""
    "pseudoOp" = "false"
    "pseudoTag" = ""
    "reason" = ""
    "result" = "O"
    "template" = "NORSE_TEMPLATE"
    "targetid" = "NORSE"
  }
  "resource" "" = {
    "itemType" = "groupID"
    "groupApproval" = "49583745-3242-6364-3453-384850692934"
    "operation" = "GRUA"
    "pseudoOp" = "false"
    "accountID" = "cecil.crysta"
    "targetid" = "NORSE"
  }
  "resource" "" = {
    "itemType" = "role"
    "operation" = "RLUA"
    "pseudoOp" = "false"
    "autoselect" = "mandatory"
    "role" = "EXCHANGE_ROLE"
  }
}
Hiding authorization details
You can control whether authorization details about the request should be displayed to the user viewing the request. By default, all request viewers can view authorization details for all requests. Alternatively you can write a plugin that will mask authorization details for a specific type of viewer (such as recipient), or a specific type of request.
You can also Use user classes instead of using a plugin to hide authorization details to users within a specified user class. See Using user classes with plugin points for details.
The plugin is set by the Workflow > Options> Plugins >AUTHORIZATION DETAIL MASK PLUGIN field.
There are no shipped plugins for use with this plugin point.
Requirements
See Writing plugins for general requirements.
Execution points
This plugin is called by Requests app before request details are displayed on Bravura Security Fabric module pages or written in email.
Input
The input presented to the plugin during the initial call includes the viewer information and the request information.
    "" "" = {
        "viewer" "user" = {
            "id" = "<Profile ID>"
            "name" = "<Alias>"
            "viewas" "" = "<DMANAGER|WMANAGER|AUTHORIZER|REQUESTER|RECIPIENT|DELEGATE|IMPLEMENTER>"
        }
        "request" ""= {...}
    }
Output
The plugin can provide the option to display authorization details about the request. If the option returned is true, the authorization details will be hidden.
output AuthMask = {
hideAuthDetails = "<true|false>";
};
Modifying how operations are viewed
You can use the workflow view modification plugin to modify which operations are visible to viewers of workflow requests in Bravura Security Fabric . This is useful in cases where access changes such as account creation, additions to groups, or role changes are known only at an abstract level. This plugin can be used where:
Viewing operation details may be excessive or confusing
Details should be accessible but a summary would be more appropriate
Some details are irrelevant to an authorizer who is authorizing a single group addition
It may be inappropriate for an authorizer of one operation to see what else is being requested
This is an alternative to mapping several operations to a single request using the operation rewrite plugin. The following use cases demonstrate how the operations view modification plugin might be used:
Use case 1: Showing authorizers only what they are authorizing
Normally, authorizers can see all operations that are part of a request, including those that they are not required to authorize. This may be confusing for an authorizer who only needs to authorize part of a request, and may even lead them to mistakenly deny the request.
The workflow view modification plugin can run to only display operations for which the viewer is the authorizer.
Use case 2: Abstract modifications
The requester wants to remove a user’s “floor fire marshal” role. This entails the user being removed from a distribution list, and from three groups, and restricting their access within the building’s security system.
End users – the requester, recipient and the assigned authorizers – do not understand the list, the groups, or the security system. All they understand or care about is that the user is no longer the floor fire marshal.
The requester changes some attributes on the user’s profile page and submits the request.
Bravura Security Fabric runs the request rewrite plugin to “fan out” the request to include operations affecting the list, the groups and the security system (using an implementer target). It also includes a psuedo operation to “update the user” to remove her from the floor fire marshal role.
The workflow view modification plugin rewrites what the users see so that the request only contains the removal from the role. The plugin can make the real operation details available if the user clicks a Details button where a summary of the request is listed.
The plugin is run by the Requests app whenever a request is viewed on the request details pages.
To use this plugin, type the name of the plugin in the IDSYNCH WORKFLOW MOD VIEW PLUGIN field on the Workflow > Options > Plugins configuration page.
There are no shipped plugins in use with this plugin point. A sample, plugin-wf-modview.psl, is available in the samples\ directory.
Requirements
See Writing plugins for general requirements.
Execution points
The plugin is run by the Workflow Manager Service.
Input
Input to the plugin includes:
"" "" = {
  "module" = "<module>"

  "recipient" "user" = { } #Recipient's data if they are an

                         # existing user
  "request" "" = { #Standard request data listing resources
    "resource" "" = {}
      }
  "detailResource" = "<itemID>" #If this is present,
                   # the user has just clicked the 'Details' button
                   # next to the resource with the itemID.
                   # The plugin should return only resources
                   # that are considered details of that resource.
  "requester" "user" = {} #Requester's data

  "viewer" "user" = {} #Viewer's data
                       # -- requester, recipient, or authorizer
   }
The "resource" KVGroup includes an "enact" key that is used to indicate which resources are affected during the request. This can be used to hide resources that are not affected during the request. For example, if the resource "enact" key is set to false, then the action on the resource is not executed, so it could be hidden.
Output
The operation view modification plugin returns the following output:
"" "" = {
 "errmsg" = ""    # error message, if any
 "retval" = "<N>"   # 0 is success, anything else is failure
 "changed" = "(true|false)"  # If this is included and set to false, it
                             # will be assumed that all items will be
                             # visible.
  "resource" "" = {
                   #Followed by any number of resource entries
          "display" = "(true|false)" # If this is present and set to false,
                             # hide the resource.  If the item is not in
                             # the output, it will be displayed.
          "detailsAvailable" = "(true|false)" # If this is present and set to
                             # true, display a button to allow details to
                             # be viewed for this resource. The plugin
                             # determines what resources are considered to
                             # be details of this resource.
    }
  }
Using pseudo operations
In some organizations the creation of accounts, additions to groups, or role changes are known to users only at an abstract level. Showing what modifications are going to be done is:
Potentially excessive
Potentially time-consuming to have the authorizer sift through the information to determine what is “really” being requested
Confusing for end users who “just want to do what sales people do”
Bravura Security Fabric allows you to display pseudo operations that describe what is being done at an abstract level as part of a request. The operations can be searched on and audited, but nothing is actually done by any connector. Pseudo operations simply allow end users to understand what is being requested even if they do not understand the details.
They can be standard operations that contain pseudo data; for example to add a user to a group that doesn’t actually exist on a target system. They can also be completely customized operations; for example, users can request to “update a user” to make them the new “floor fire marshal”.
The request rewrite plugin must be used to generate output for a pseudo operation. That information can then be used to display details of the request to users, and as input for the workflow view modification plugin . The Abstract modifications use case in Modifying how operations are viewed illustrates how pseudo operations are used.
How plugins handle pseudo operations
Input
Plugins receive information about pseudo operations in three key-value pairs within the main "request" KVGroup:
"request" "" = {
     ...
  "resource" "<resource identifier>" = {
    "authorizationsReceived" = "<number of authorizations received>"
    "authorizationsRequired" = "<number of authorizations required>"
    "authorizer" = "<authorizers for this resource>" ⋆

    "notes" = ""  # empty - only filled in upon provisioning
    "operation" = "<operation code>"
    "pseudoData" = "<Data for replacement in pseudoTag>"
    "pseudoOp" = "true|false" #Is this a pseudo Operation?
         # If true, this operation is NOT handled by idtm
    "pseudoTag" = "<m4 tag for display in the GUI>"
    "result" = "<status of the resource>"
    "itemType" = "<item type>"
    ...
    }
 }
See Request data for a listing of the full request KVGroup.
Data about pseudo operations is included in the reqacct table along with other operations data. Any normally requested operation, such as create and update, can be passed in as a pseudo operation. For example:
    "operation" = "GRUA" #add the user to a group
    "pseudoData" = ""
    "pseudoOp" = "true" #The group does not exist on a target system.
    "pseudoTag" = ""
Custom operations
You can also use custom operation tags CUST1, CUST2, CUST3 for requests that are not standard to Bravura Security Fabric . For example:
    "operation" = "CUST1" #Update the user
    "pseudoData" = "Fire marshal"
    "pseudoOp" = "true" #
    "pseudoTag" = ""
You can customize the description for these operations in M4 files, so that they can be displayed and searched on as request types in the Bravura Security Fabric user interface.
Note
These operations differ from the OPC1, OPC2, OPC3, and OPC4 operations, which can be used to trigger events resulting from input to custom fields in the user interface.
To use pseudo data with standard operations, customize:
!!!JOB_SEARCH in
batchmod.m4to allow it to be specifiedThe _BATCHMOD_PSEUDO_DATA_ tag in
en-us-language.kvgThe BATCHMOD_PSEUDO_DATA tag in
en-us-errmsg.kvg
To use custom operations, customize:
!!!JOB_SEARCH_OPERATION_OPTIONS in
batchmod.m4One or more of the following in
en-us-language.kvg:_BATCHMOD_SELECT_CUST1_
_BATCHMOD_SELECT_CUST2_
_BATCHMOD_SELECT_CUST3_
One or more of the following in
en-us-language.kvg:_BATCHMOD_REQ_CUSTOM1_ACCT_
_BATCHMOD_REQ_CUSTOM2_ACCT_
_BATCHMOD_REQ_CUSTOM3_ACCT_
One or more of the following in
batchmod.kvg:!!!BATCH_LONG_CUSTOM1_ACCT_ROW
!!!BATCH_LONG_CUSTOM2_ACCT_ROW
!!!BATCH_LONG_CUSTOM3_ACCT_ROW
Customize messages in
en-us-errmsg.kvgfor:REQACCT_OPERATION_CUST1
REQACCT_OPERATION_CUST2
REQACCT_OPERATION_CUST3
Customize messages in
en-us-errmsg.kvgfor:REQOPERTYPE_CUST1
REQOPERTYPE_CUST2
REQOPERTYPE_CUST3
Customize messages in
en-us-errmsg.kvgfor:WF_REQACCT_DESC_CUSTOM1
WF_REQACCT_DESC_CUSTOM2
WF_REQACCT_DESC_CUSTOM3
Below is an example of customized batchmod.m4:
!!!JOB_SEARCH_OPERATION_OPTIONS
<!-- JOB_SEARCH_OPERATION_OPTIONS -->
<SELECT name="SEARCH_OPERATION">
<OPTION value="" %NONE_SELECTED%>_BATCHMOD_SELECT_NONE_
<OPTION value="RLUA" %RLUA_SELECTED%>_BATCHMOD_SELECT_RLUA_
<OPTION value="ACUA" %ACUA_SELECTED%>_BATCHMOD_SELECT_ACUA_
<OPTION value="UPDT" %UPDT_SELECTED%>_BATCHMOD_SELECT_UPDT_
<OPTION value="DELU" %DELU_SELECTED%>_BATCHMOD_SELECT_DELU_
<OPTION value="TERM" %TERM_SELECTED%>_BATCHMOD_SELECT_TERM_
<OPTION value="RENU" %RENU_SELECTED%>_BATCHMOD_SELECT_RENU_
<OPTION value="MVCU" %MVCU_SELECTED%>_BATCHMOD_SELECT_MVCU_
<OPTION value="ENAU" %ENAU_SELECTED%>_BATCHMOD_SELECT_ENAU_
<OPTION value="DNAU" %DNAU_SELECTED%>_BATCHMOD_SELECT_DNAU_
<OPTION value="GRUA" %GRUA_SELECTED%>_BATCHMOD_SELECT_GRUA_
<OPTION value="GRUD" %GRUD_SELECTED%>_BATCHMOD_SELECT_GRUD_
<OPTION value="GROA" %GROA_SELECTED%>_BATCHMOD_SELECT_GROA_
<OPTION value="GROD" %GROD_SELECTED%>_BATCHMOD_SELECT_GROD_
<OPTION value="CRTG" %CRTG_SELECTED%>_BATCHMOD_SELECT_CRTG_
<OPTION value="DELG" %DELG_SELECTED%>_BATCHMOD_SELECT_DELG_
<OPTION value="CUST1" %CUST1_SELECTED%>_BATCHMOD_SELECT_CUST1_
<!-- <OPTION value="CUST2" %CUST2_SELECTED%>_BATCHMOD_SELECT_CUST2_ -->
<!-- <OPTION value="CUST3" %CUST3_SELECTED%>_BATCHMOD_SELECT_CUST3_ -->
</SELECT>
!!!BATCH_LONG_CUSTOM1_ACCT_ROW
<!-- BATCH_LONG_CUSTOM1_ACCT_ROW -->
<TR>
TABLE_TDBD
Available for replacement are:
HostId(%HOST_ID%) (target ID) ACCT_ID(%ACCT_ID%) (long ID) ACCT_NAME(%ACCT_NAME%) (user fullname)
SRC_ID(%SRC_ID%) TFR_ID(%TFR_ID%) GROUP_ID(%GROUP_ID%)
REQ_OPERATIONS(%REQ_OPERATIONS%) PSEUDO_DATA(%PSEUDO_DATA%) PSEUDO_TAG(%PSEUDO_TAG%) %DETAILS_BUTTON%
TABLE_TDE
</TR>Below is an example of customized en-us-errmsg.kvg:
"language" "EN_US" = {
  "codepage" = "28591"
  "encoding" = "iso-8859-1"
  "version" = "fox 1234"
  "REQACCT_OPERATION_CUST1" "" = {
    "text" = "Cust1 is in the dropdown"
  }
  "REQOPERTYPE_CUST1" "" = {
    "text" = "Cust1 description"
  }
  "WF_REQACCT_DESC_CUSTOM1" "" = {
    "text" = "reqacct custom1 description"
  }
  "CUSTOM_PSEUDO_TAG" "" = {
    "text" = "contents of the tag that is the pseudo data"
  }
  "CUSTOM_TAG_OKAY" "" = {
    "text" = "contents of the OKAY tag that is the pseudo data"
  }
}
Below is an example of customized en-us-language.kvg:
"language" "EN_US" = {
  "codepage" = "28591"
  "encoding" = "iso-8859-1"
  "version" = "fox 1234"
  "_BATCHMOD_REQ_CUSTOM1_ACCT_" "" = {
    "text" = "This introduces custom1 requests (customized)"
  }
  "_BATCHMOD_SELECT_CUST1_" "" = {
    "text" = "Search for cust1 (I'm in the dropdown)"
  }
  "_BATCHMOD_PSEUDO_DATA_" "" = {
    "text" = "Here is the intro to the pseudo data:"
  }
}
Output
The output for the plugin is:
"" "" = {
  "errmsg" = ""
  "retval" = "<N>" # 0 is success, non-0 is failure.
  "resource" "" = {
    ...
   }
}
There may be 0 or more resource KVGroups. The resources returned will replace the ones in the request. If you do not want to modify the request, all resources passed into the plugin must be returned as output.
The format and contents of the resource KVGroup should be the same as the input would be if the resource was part of a normal request. It is recommended that you issue a request for the resource requested to gather the input format for that specific operation.
General workflow options
To configure general settings related to workflow:
Click Workflow > Options > General.
Enable options and type values for the fields listed in Table 2, “General workflow options”.
If required, configure event options listed in Table 3, “Workflow general events that launch interface programs”and Table 4, “Workflow manager service (
idwfm) events that launch interface programs”.Click Update.
Some of the options on this page may apply to products that you do not have installed.
Options marked with a
 in this document can also be configured from the Modules menu.
Option | Description |
|---|---|
ENABLE DELETE OTHER OWNER | Active Directory network resource owners are allowed to delete other group owners. |
HIDE PLUGIN ERRMSG FROM USERS | Hide detailed plugin error messages from end users. When enabled, end uses only see "Plugin failed". When disabled (default) plugin error messages include the path to the plugin, and if possible, the script line number and error message. |
IDACCESS GROUPS THRESHOLD | If the number of groups with access to a network resource is greater than or equal to this threshold, consider the resource problematic. This value is used by the IDACCESS TOO MANY GROUPS event option. For example, too many groups with access to a resource may indicate an infrastructure management issue. The interface program set by IDACCESS TOO MANY GROUPS can check to see if the problematic resource has been reviewed before, and if not, send information about the resource to the system administrator. |
| If enabled, authorizers can approve or deny requested resources individually. |
| Authorizers are required to enter a reason when they approve a request. |
| Authorizers are required to enter a reason when they deny a request. |
IDSYNCH FULL NAME FORMAT | How the full name of a user displays in email and Bravura Security Fabric web pages. |
| Implementers must enter a reason for marking a task as completed. |
| Implementers must enter a reason for being unable to complete a task. |
IDWFM AUTH PHASE PROPAGATION | If an authorizer is configured to be in more than one phase, allow the authorizer’s response in the first phase to be propagated to later phases. |
IDWFM AUTO APPROVE | Allow requests where the requester is also the authorizer to be automatically approved. |
IDWFM AUTO REJECT TIME | Number of days before a request is automatically denied if it is not processed. This field ignores the REQUIRES REASON DELETION option if it is set. |
IDWFM CURRENT EVENT CACHE TIME | Cache events in the Workflow Manager Service that are younger than this many hours. Default is 12. The larger the number, the more memory spaces are allocated to the Workflow Manager Service for cache; however, if this number is too big, it may break Windows memory management, causing unexpected results. |
IDWFM DAYS COUNT WEEKDAY ONLY | If enabled, the Workflow Manager Service auto reject time and escalation time only includes weekdays. |
MAX AUTH ALLOWED | The maximum number of authorizers or implementers that the workflow service can assign to each resource in a request. When the number of authorizers or implementers exceeds this value, the request is put on hold. The value can be from 0 to 200. The default is 20. |
MAX UPLOAD FILE SIZE | The maximum file size allowed for uploaded profile and request attributes. The default is 1000KB. |
REQUIRES REASON DELETION | Requesters and recipients are required to enter a reason when they delete a change request when using the Requests . |
WF ALLOW GROUP WITH NO ACCOUNT | Allow users to request groups on target systems where they do not have an account. |
WF ATTRVAL PLUGIN RUN IDR SUMMARY | When enabled, the attribute validation plugin will execute on the request summary page. This will allow any additional attributes to be added to the request prior to submission. By default, this option is disabled. |
WF CLEAN RESERVEOBJ | When a request is initiated, and before it is posted, Bravura Security Fabric reserves IDs to ensure that they are unique. By default, Bravura Security Fabric cleans up a request’s reserved objects when a request fails to post or goes into “On hold pending administrator intervention” status.This allow reservations to be made again if a previous request attempted to make the reservation and failed. Turn this off if you want clean up of reserved IDs to be handled in another way, for example, by calling API processes, to avoid situations where valid reservations are deleted. |
WF HIDE AUTHORIZERS | When enabled, the list of authorizers assigned to a request is hidden on the request details page. By default, this option is enabled. Authorizers can choose to see who else may be reviewing a request by selecting the Authorizers checkbox. When disabled, the authorizers list is always shown. |
WF HIDE OTHER OPERATIONS | When enabled, authorizers only see operations they are assigned to when reviewing a request. By default, this option is enabled. Authorizers can change this view by selecting a Show all—Show mine toggle, or by selecting an All operations checkbox on the request details page. When disabled, all operations that are part of a request are always shown. |
WF ONLY PROP ATTRS ON UPDATE | When enabled, profile and request attribute changes are only propagated to target system attributes during profile update requests. By default, this option is disabled. When disabled, all updates to attributes are propagated to affected target systems, regardless of the operation being performed. |
WF ONLY SHOW EXPECTED OPERATIONS | When a request is viewed and a resource is not enacted the default view will to show all operations expected. When this is set to enabled the request will show only the operations that will occur. Users can change this view on the request page with a Show all and Hide button. |
WF PHASED AUTH | Enable this option to allow phased authorization of resources and policies. To disable this option, you must first delete all phases from resources and policies. |
WF REMOVE PERMANENT RESERVATIONS ON DENIAL | Enable this option to allow deleting permanent reservations when the request is denied. |
WF RESERVE ON PRIMARY | Enable this option to send reserve requests to the primary instance when the requests are made from a replication node. |
WF RESOURCE RELATEDONLY | Enable this option to include only resources assigned to the recipient in authorizer notification emails |
WF ROLE USERADDDEL IGNORE DEPS | When this option is enabled, role membership will be added or deleted even if some dependent operations fail. |
WF RUN CONFLICTING OPS | When this option is enabled, conflicting operations (for example, remove a group, add the same group) are both run. If set to disabled, the operations cancel each other out, and neither is run. |
WF USER EDITABLE PARENT REQUEST | Enable this option to allow workflow managers to manually "attach" and "detach" child requests to/from a specific parent request. |
WF WAIT AUTHORIZER CALCULATION | Enable this option to get Bravura Security Fabric to wait while authorization requirements are being calculated before returning to CGI pages where requests are issued. This may be useful in cases where users who are auto-approved may be confused when the request status is temporarily shown as waiting for authorization. |
Determining the full name format
You determine how Bravura Security Fabric displays the full name of a user in email and Bravura Security Fabric web pages by modifying the value of IDSYNCH FULL NAME FORMAT.
This field consists of sub-strings, where each are enclose by % characters and can contain specific start/end positions.
An end position cannot be specified without a start position.
Some sub-string examples include:
%FIRST_NAME%displays the first name as entered when the user was created.%OTHER_NAME:1:2%displays the first letter of the other name as entered when the user was created.%LAST_NAME:1:9%displays the first 8 letters of the last name as entered when the user was created.%LAST_NAME:9%displays the last letters of the last name starting at the 9th letter as entered when the user was created.
The default is %FIRST_NAME% %OTHER_NAME% %LAST_NAME% which is the user’s first name followed by their other (middle) name and then their last name.
See also
See Modifying workflow options for sending mail to learn how to customize settings for sending messages during authorization workflow.