User classes
In Bravura Security Fabric , a user class is a way to segment users. A user class defines the criteria for segmenting users.
User classes are used throughout Bravura Security Fabric to help configure product administrators, user access rules, plugins, membership, and relationships between users.
These terms apply to user classes:
Participants | Describes types and interactions of class members; it does not refer to the members themselves. Participants may sometimes be referred to as actors . |
Personal user classes | Personal user classes have a single participant, defined by attribute or group membership. This participant can simply be identified as USERID. |
Relational user classes | Relational user classes have multiple participants; for example, MANAGER and SUBORDINATE. Users may be included in this class if they meet the criteria of any participant, or all participants. |
Built-in user classes | These user classes are pre-defined and cannot be modified. |
Policies | These are places within Bravura Security Fabric that are able to utilize user classes, such as pre-defined requests, administrator groups, plugin points, user access rules, authorizer groups. Policies may contain one or both types of user class points (below). |
Policy participants | These are participants in policies that are defined by user class participants using participant mapping. |
PSLang | PSLang is a scripting language developed by Bravura Security. The language uses a syntax much like C, but with a large set of built-in functions, some of which are geared towards the Bravura Security Fabric environment. |
User class test points | These are policies used to determine whether or not the participants satisfy the user class criteria. |
User class list points | These are policies used to list the participants that satisfy the user class criteria. |
User class criteria
There are three types of criteria that you can use to segment users :
Attribute criteria – defined by profile and request attributes
Membership criteria – defined by group membership
PSLang criteria – defined by PSLang expressions
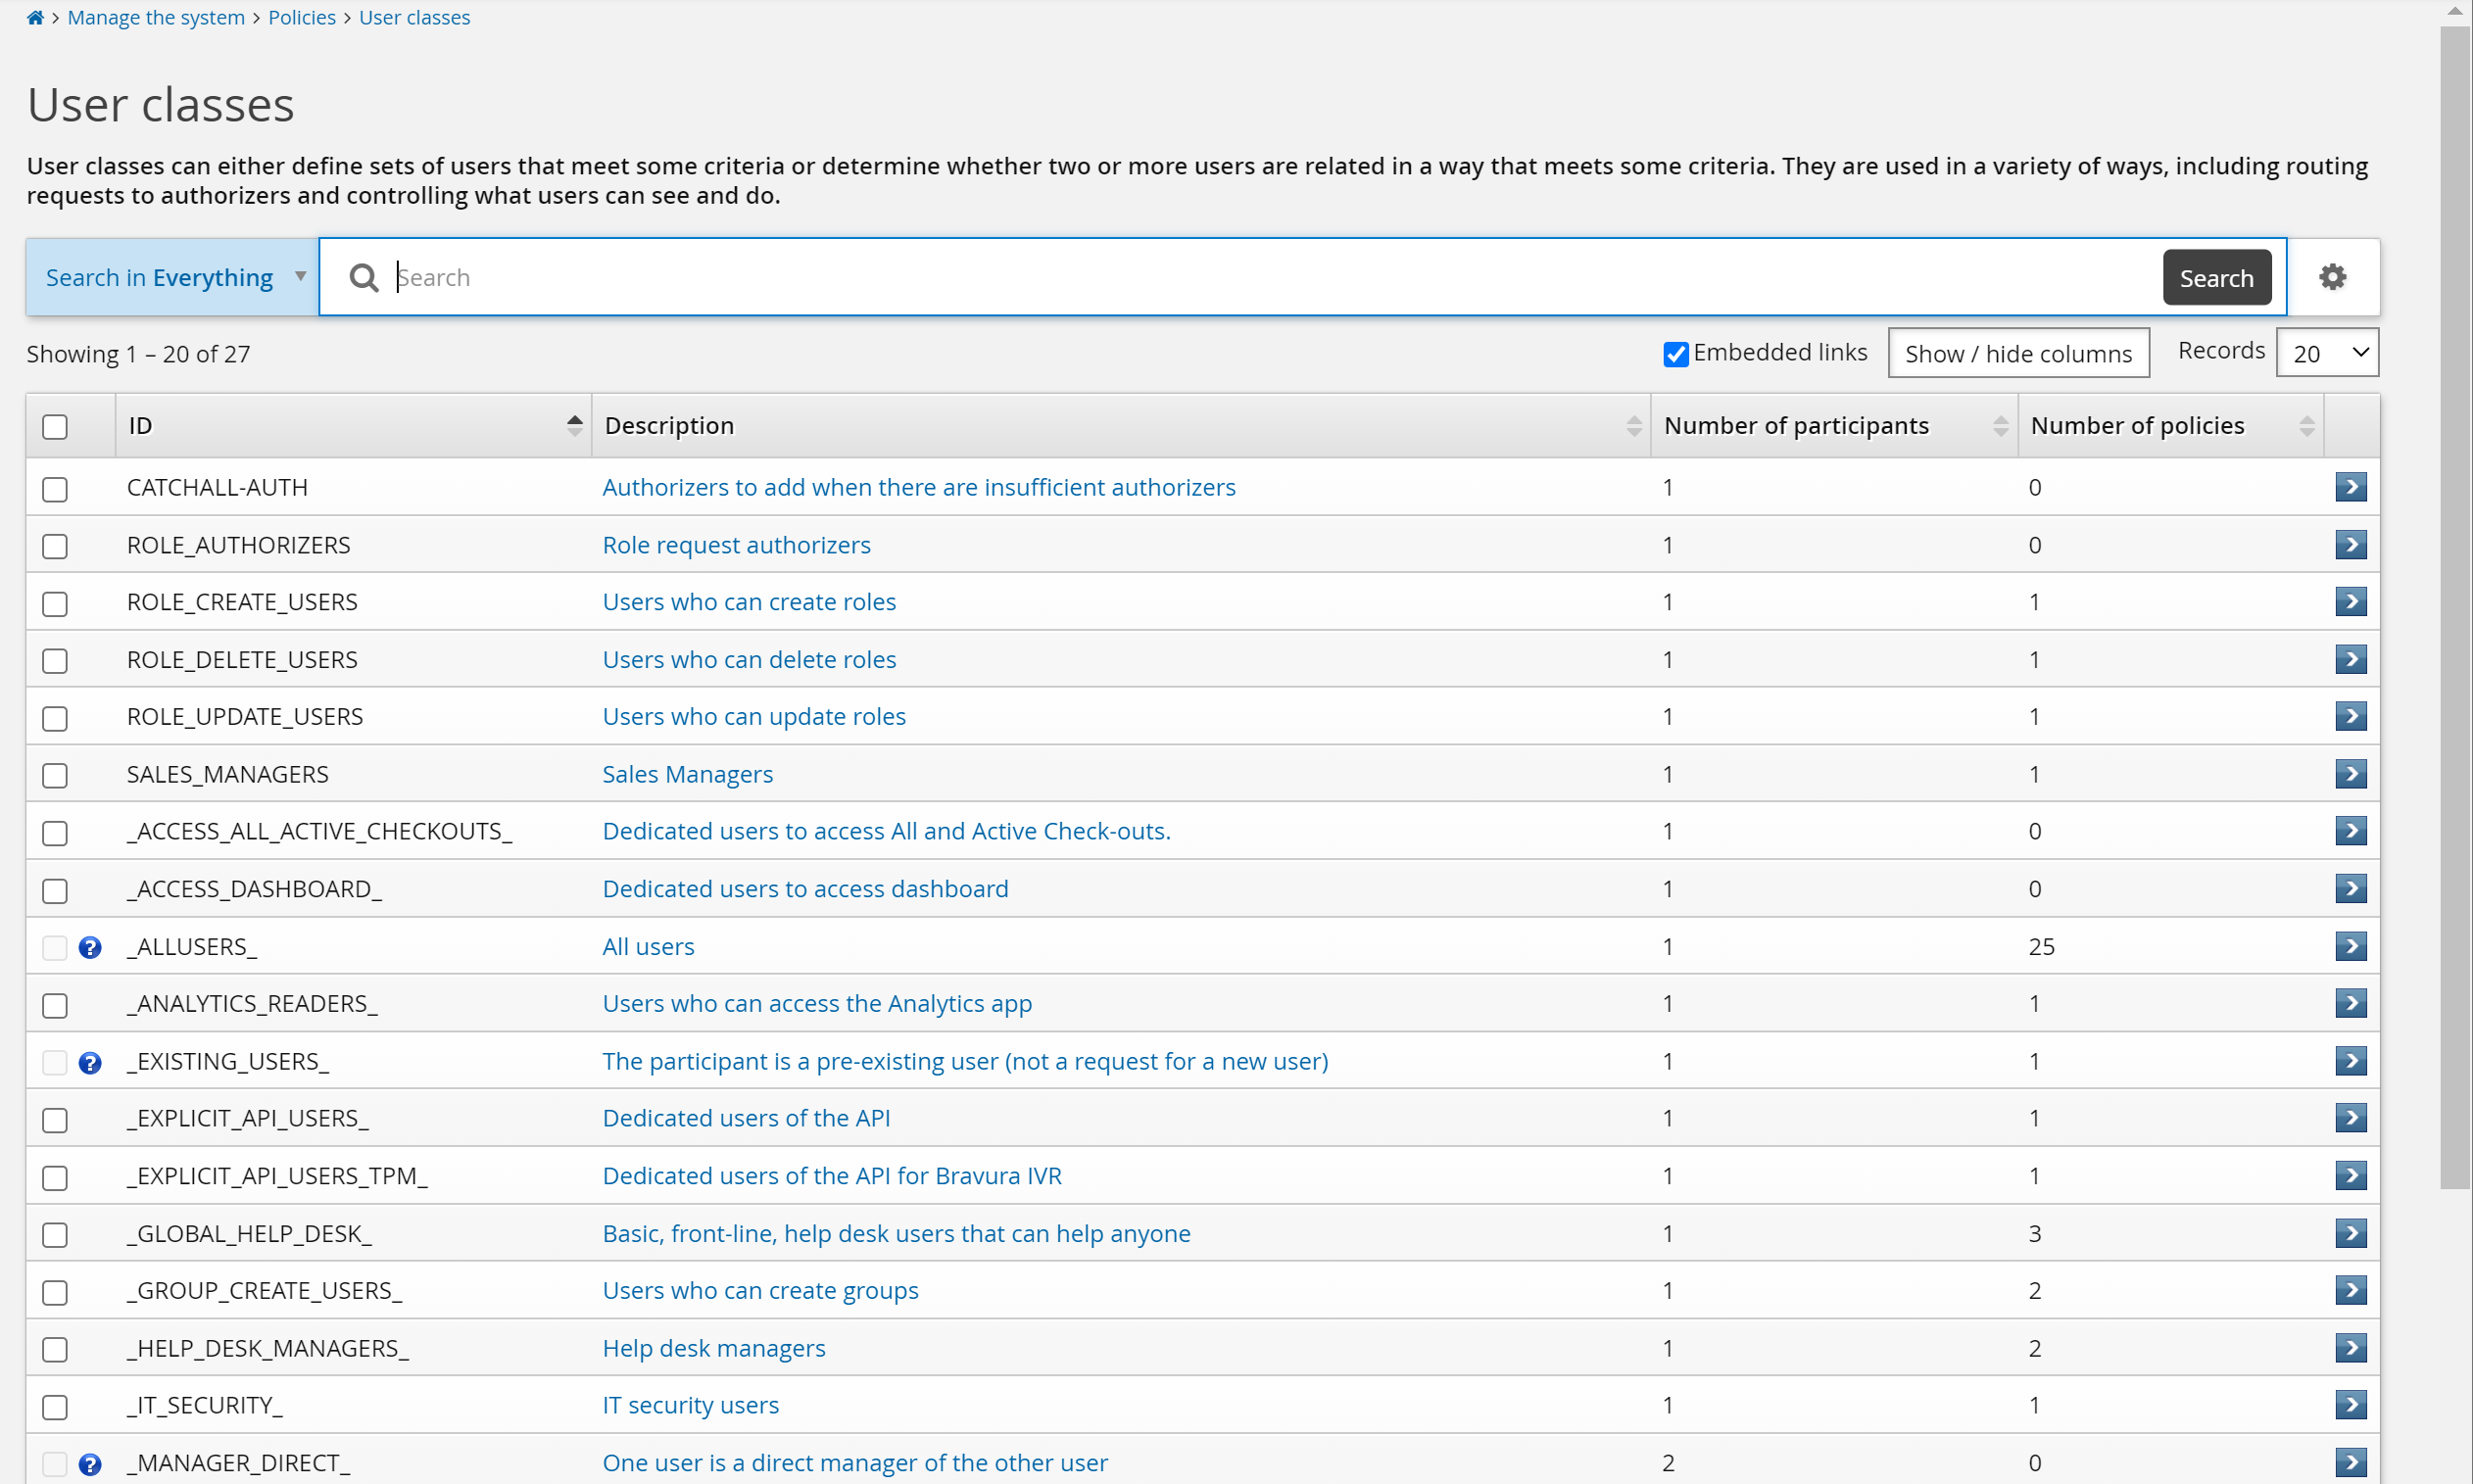
Built-in user classes
There are default user classes set up for basic workflow and security. Installing Bravura Pattern also adds several user classes.
The following are built-in user classes installed with the base product:
Note
User classes marked with a  cannot be modified.
_ACCESS_ALL_ACTIVE_CHECKOUTS_ | This includes all users that will be granted the All and Active privileged access check-out filters. |
_ACCESS_DASHBOARD_ | This class includes all users who can access dashboards. |
| This built-in user class includes all users. Users that are pre-existing and those that do not yet exist. |
_ANALYTICS_READERS_ | The user being included can run, save, and read reports. The user can access the Analytics if it has been installed. |
| In this built-in user class the participant is a pre-existing user. |
_EXPLICIT_API_USERS_ | This includes dedicated users of the API. Users assigned to this class have default API access. |
_EXPLICIT_API_USERS_TPM_ | This includes dedicated users of the API. Users assigned to this class have default API access, which is used by Phone Password Manager . |
_EXPLICIT_REST_API_USERS_ | This includes dedicated users of the REST API. |
_GLOBAL_HELP_DESK_ | This includes all basic, front-line, help desk users. |
_GROUP_CREATE_USERS_ | This includes users who can create groups. |
_HELP_DESK_MANAGERS_ | This includes help desk users who have elevated privileges, including access to help other help desk users and help desk managers. |
_IT_SECURITY_ | This is for all IT Security users. Installation of Bravura Workforce Pattern configures criteria, where participants who have the DEPT attribute of IT-SECURITY will be a member of this user class. |
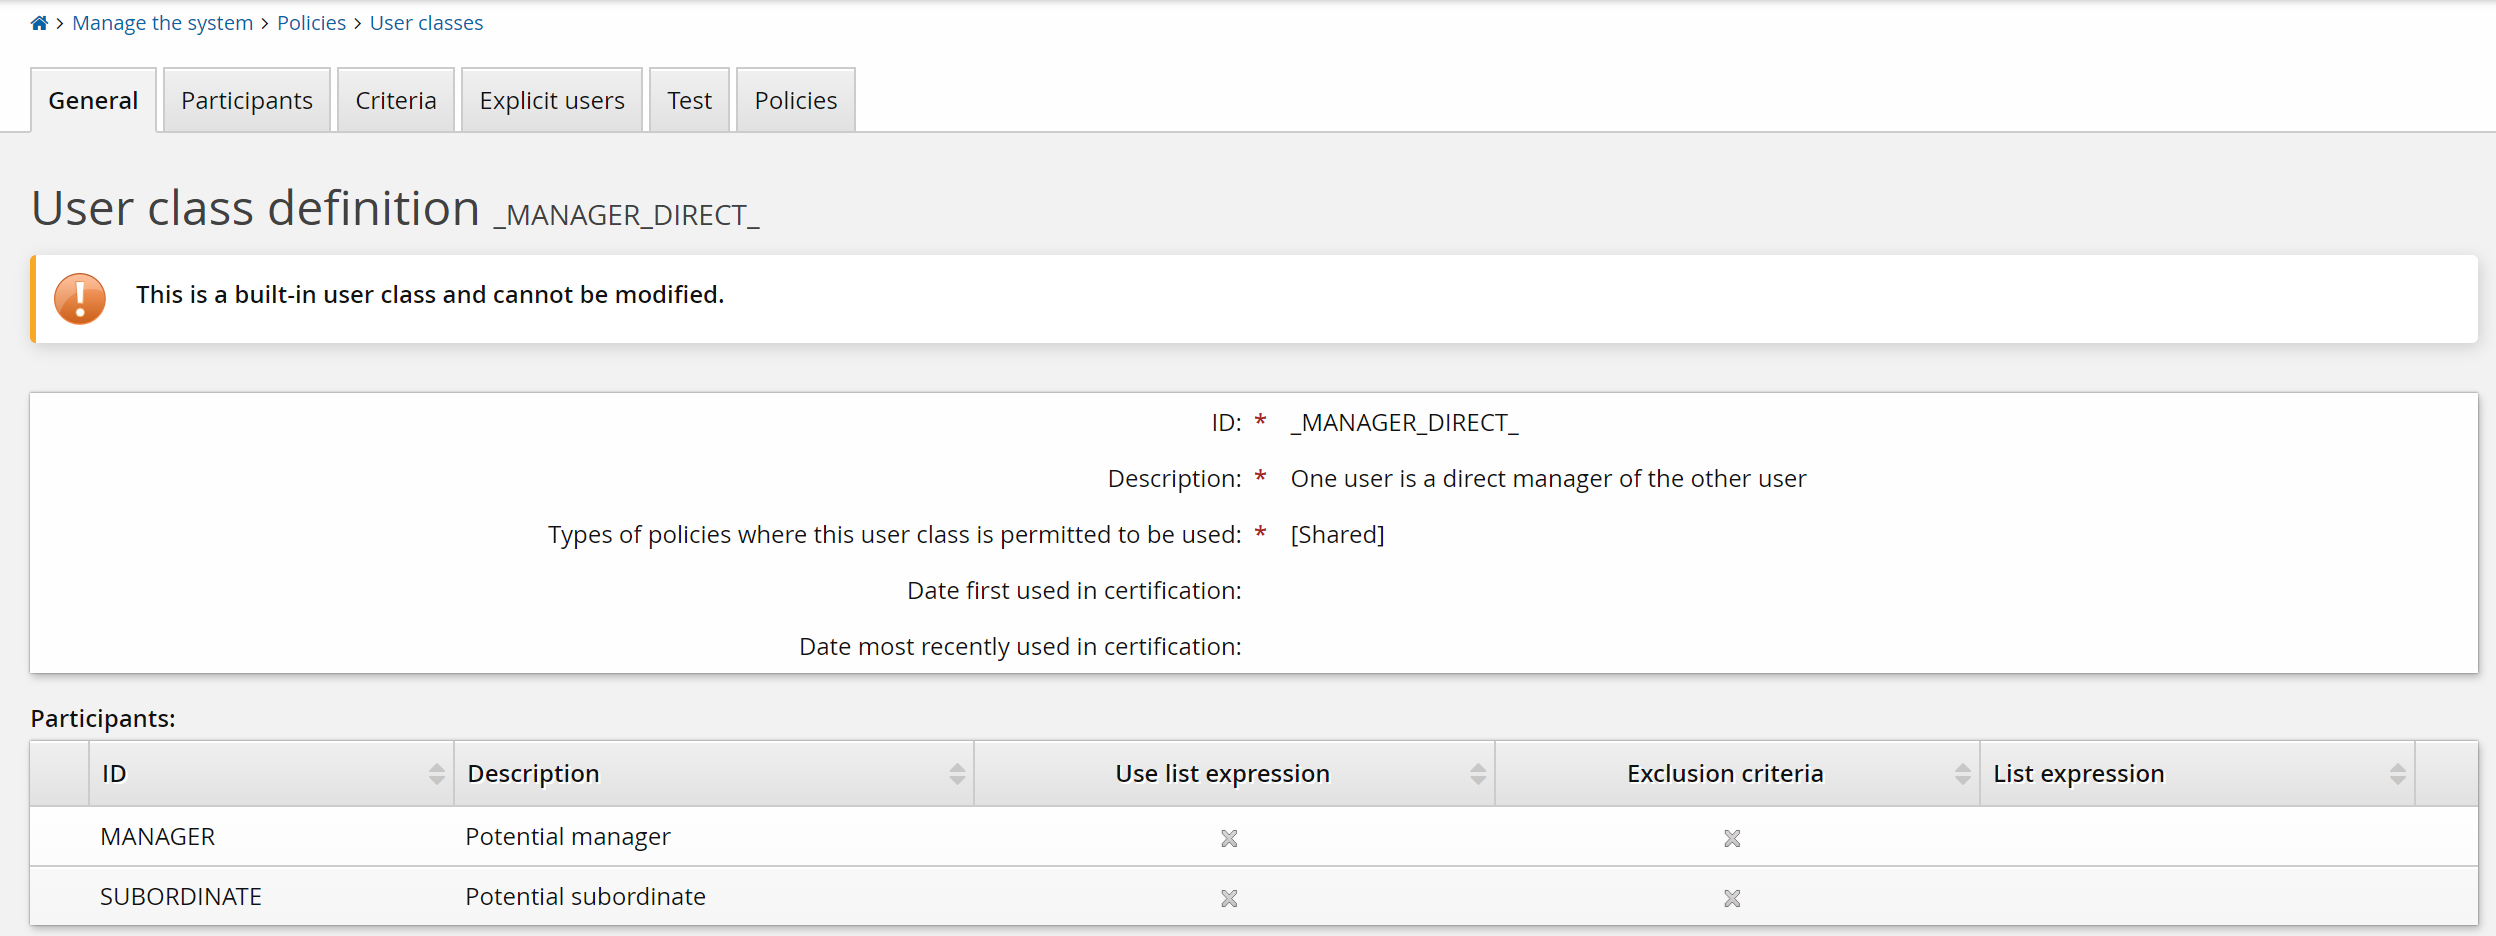
| The recipient of an access change request is the direct subordinate of the requester. This user class is useful in pre-defined requests and access certification. By default this built-in user class is an equivalent, though optimized, version of the PSLang expression reportsTo($RECIPIENT,$REQUESTER,1) . |
| The recipient of an access change request is a subordinate of the requester, directly or via other managers. This built-in user class is similar to the _MANAGER_DIRECT_ user class, except it also includes their manager’s manager, etc. |
| This built-in class includes users who have registered mobile devices. |
| In this built-in user class the participant does not yet exist as a user. |
| In this built-in user class, the two participants are different users. |
| In this built-in user class, both participants are the same user. This relationship is often used to restrict access to specific requests for self service only. |
_REPORT_READERS_ | The user being included can run, save, schedule, and read reports. |
| The user in the ATTR_AUTO_PROPAGATE_REQUESTER system variable , used to automatically propagate profile attribute value changes. |
| The user in the RBAC_AUTO_PROPAGATE_REQUESTER system variable, used to automatically re-align users with their expected RBAC entitlements. |
| The user being included is a manager. By default this built-in user class is an equivalent, though optimized, version of the PSLang expression isManager($USERID) . |
User classes for segmented certification campaigns
When you set up an access certification campaign, the user population for a resource (application or group) can be too large for a single reviewer; nonetheless, access should be certified by those with knowledge of the resource, rather than by each user’s manager.
In this case, it is desirable to:
Enable multiple reviewers to certify different segments of a user population.
Ensure that every user is reviewed – that is, no uncertified users remain after certification campaigns are complete.
You can do this by segmenting users into personal user classes, and assigning reviewers according to class when you create a certification campaign. Any user can be assigned to certify a segment.
It is possible for a user class that contains no users to be included in a certification campaign. Reviewers can, in effect, be asked to certify that there are no users in a user class, or not included in a user class.
Relational user classes do not apply to access certification.
User class policies
A user class policy is a point within Bravura Security Fabric where user classes can be utilized to define a group of users. This can sometimes remove the need for writing complicated scripts.
The user class policies available within Bravura Security Fabric are:
[Shared] – available to all user class policies.
Pre-defined request – user classes can define access to pre-defined requests.
Administrator group – user classes can define membership to administrator groups.
Filter user plugin – user classes can filter out users with the FILTER USER PLUGIN.
Keep user plugin – user classes can filter users to keep with the KEEP USER PLUGIN.
Generate user plugin – user classes can generate lists of users with the GENERATE USER PLUGIN.
Delegated administrator rule – user classes can define membership to delegated administration rules.
Global help desk rule – user classes can define membership to the global help desk rules.
Self-service rule – user classes can define membership to the self-service rules.
Profile comparison rule – user classes can define membership to the profile comparison rules.
Authorizer group for template – user classes can define membership to the authorizer group for templates.
Authorizer group for target system – user classes can define membership to the authorizer group for target systems.
Authorizer group for role – user classes can define membership to the authorizer group for roles.
Authorizer group for segregation of duties rule – user classes can define membership to the authorizer group for segregation of duties rule.
Authorizer group for managed group – user classes can define membership to the authorizer group for managed groups.
Authorizers for a request to search recorded sessions – user classes can define membership to the authorizer group for requests to search recorded sessions.
Authorizers for a request to view a recorded session – user classes can define membership to the authorizer group for requests to view recorded sessions.
Authorizers for a request to access accounts – user classes can define membership to the authorizer group for requests to access accounts.
Implementer group for template – user classes can define membership to the implementer group for templates.
Implementer group for target system – user classes can define membership to the implementer group for target systems.
Implementer group for managed group – user classes can define membership to the implementer group for managed groups.
Escalation plugin – user classes can determine to whom a request should be escalated, or provide a short list with ESCALATION PLUGIN.
First change escalation plugin – user classes can determine to whom a request should be escalated, or provide a short list with FIRST CHANCE ESCALATION PLUGIN.
Certification – user classes can determine who will be reviewed in certification campaigns.
Certification by user class – user classes can determine reviewer relationships in certification campaigns by defined relationship.
Notification – user classes can determine pre-conditions for notifying users.
User groups: Access to profile and request attributes – user classes can define membership in user groups for access controls on profile and request attributes.
User groups: Access to resource attributes – user classes can define membership in user groups for access controls on resource attributes.
User groups: Privileged access to systems – user classes can define membership in user groups for issuing Bravura Privilege requests.
Automated group membership – user classes can determine who should automatically be assigned or removed from roles.
Automated role membership – user classes can determine who should automatically be assigned or removed from roles.
Password policy for target system group – user classes can determine which password policies applies to groups of users, via target system groups .
Getting started
Requirements
Before you add a user class:
You require the "Manage policies" administrative privilege in order to access the User classes menu item.
If you want to use profile/request attribute values as user class criteria, you must first configure those specific profile/request attributes.
If you want to segment users based on Bravura Security Fabric membership, you must first configure those specific managed groups.
Navigation steps
Use the page to add and configure user classes. To navigate to this page:
Click Manage the system > Policies > User classes .
To define a:
New user class – click Add new... if Bravura Security Fabric displays a list of existing user classes. The page is displayed by default if there are no defined user classes.
Existing user class –search for, or select the user class you want to view or modify.
The bottom of the general User class definition page displays a summary of all participants, criteria and explicit users for that user class.
The summary includes any errors in the user class configuration. For detailed error information look in the configuration tabs, or run the user class errors report
Click below to view a demonstration using Policies > User classes to review participants and define criteria for the built-in _GLOBAL_HELP_DESK_ user class for help desk users that have privileges allowing them to assist others within the product.
Adding user classes
Click below to view a demonstration of creating a user class via the Policies > User classes menu, including: adding a new user class, specifying participants, defining group membership criteria, testing resultant users and then refining the participant list by adding attribute criteria.
To add a user class:
Navigate to the User class definition page for a new user class.
Type an and Description to search on and identify the user class.
Click the drop-down menu to select the policy type for your new user class. Select "[Shared]” if you want your new user class to be available to all user class policies.
Click Add.
The Participant specification page loads.
Next
Specify user class participants .
Specifying participants
Each user class requires at least one participant. Relational user classes require at least two.
The Participants tab of the User class definition pages defines the meaning of the user class, not necessarily the profile "members" of the user class.
A one-participant class, or personal user class, is just a flat list of user profiles; for example: product administrators , or help desk users who can manage everyone in the system, or (for Identity or Privilege) catch-all managers who can approve requests for everyone in the system.
You can add segments of users or explicit users to a personal user class.
A two-participant class is a direct relationship; for example: a manager and their direct subordinates, a group owner and its group members, an approver and the user profiles whose requests he is assigned to approve, a site manager and all employees at that site, and so on.
A three-participant, or multiple-participant are much more esoteric relationships, in which some of the "participants" change the relationship between the other participants; for example: a manager of a specific type over a set of employees (HR manager, Site manager, Direct manager, and so on), the type being the third "Participant" in the relationship, based on which specific privileges can be granted to manager over employees, or vice-versa.
Single-participant user class membership is cached at the end of the auto discovery process (psupdate) , so when they are used to display segments of the Profile lists in the WebUI, they are faster.
Multi-participant user classes are not cached, so their criteria are evaluated on-the fly when the user class is used (similar to script-driven plugin points )
Adding a new participant specification
If you have just added a new user class, the page loads automatically. Skip to Step 4 in the following procedure. To add a participant for an existing user class:
Navigate to the User class definition page.
Click the Participants tab.
Click Add new… if Bravura Security Fabric displays a list of existing participants.
The page is displayed by default if there are no defined participants.
Type an ID and Description to identify the participant. The ID is used to differentiate participants in relational user classes; for example, “Recipient” and “Requester”. In personal user classes, ID is simply a placeholder. For consistency with the default personal user classes, type USERID.
If you want to restrict user listing, then see Using list expressions for details on the Listing members option.
Click Add.
Next
If you are defining a relational user class, click Add new… to add another participant, which returns you to step 4.
or
Define user class criteria .
Modifying a participant specification
To modify an existing participant specification:
Navigate to the User class definition page.
Click the Participants tab to view the page.
Select the participant you want to view or modify.
Modify the Description if required.
If you are modifying a user class list point and want to restrict user listing, then see Using list expressions for details on the Listing members option.
Click Update.
Using list expressions
The Listing members function allows you to modify the default listing behavior for a user class. This optional function is only relevant to user class list points using PSLang criteria. The default listing behavior lists all users and every single user is tested for membership. This may be cumbersome and unnecessary, and a listing expression may be more efficient.
For example:
"Is <User> a manager of JohnB?” This PSLang criteria is defined by a simple expression. The default listing behavior would list and individually test every single user, which could take a long time. However, writing a List expression to simply answer the question "Who is JohnB’s manager?” is much more efficient. The List expression outputs a shortlist that is filtered by the user class criteria.
Exclusive and non-exclusive listing
The Listing members function can be used for either exclusive or non-exclusive listings. Exclusive listings simply run the List expression, and the users in the resulting shortlist automatically become members of the user class. Non-exclusive listings run the List expression and then filter the returned users through the other user class criteria. They are filtered through the attribute and membership criteria first, and the resulting list is then filtered through the PSLang criteria.
The listing type is defined by the Participants match this class solely via membership in this list (other criteria not considered) option. If this option is:
Enabled then the List expression is exclusive and the users that are output by the expression automatically become members of the user class.
Disabled then the List expression is non-exclusive and the users that are output by the expression are filtered through all additional user class criteria.
Caution
When writing a PSLang expression for the Listing members function, you must ensure that the list expression is compatible with the PSLang criteria expression. If the list expression does not return the same users that the PSLang criteria allows, then any user class policies affected by this user class will behave inconsistently.
Configuring the list expression
Configure the Listing members function from the Participant specification page.
To use a list expression:
Enable the Use the list expression checkbox.
Type the PSLang List expression into the text field.
If you want to exclude other criteria, enable Participants match this class solely via membership in this list.
Click Add if you are adding a new participant, or click Update if you are modifying an existing participant.
List expression example
The list expression should be a PSLang expression that invokes the USERCLASSUSERFOUND() function once for each profile ID to include in the class. If it needs to obtain the profile IDs from another source, it is recommended to do so in a loop as per the following example.
#Example: Include all users that have an account on the target "AD_HELPDESK_USERS":
#
function fn() {
    var $arr = getUsersByTarget("AD_HELPDESK_USERS");
    for(var $i=0; $i < size($arr); $i++) {
        UserclassUserFound( $arr[$i] );
    };
    return 0;
}
fn()
See also
See more information on writing PSLang expressions .
Static vs dynamic user membership
When specifying user class membership, a decision has to be made whether to assign members statically via the Explicit users tab, and/or dynamically via the "Criteria" tab or statically via the "Explicit users" tab. Data processing speed during discovery and adminstrative effort must be considered when making this decision.
Defining membership criteria according to membership in a specific group or by attribute values can result in more data processing time during discovery, but it can also avoid administrative effort when large numbers of users are involved. This is particularly true if a suitable group already exists or if identification by attribute criteria is feasible (for example, to identify all users that are part of a specific department).
Declaring static "explicit users" is the fastest method from a data-processing perspective, and the least error-prone during initial setup, particularly for small to medium-size organizations where there are a small number of employees responsible for specific tasks. However, explicit user definitions require manual changes whenever staffing or role changes occur. This administrative effort can become significant for larger organizations. Explicit user definitions become more prone to errors as time passes and staffing changes occur.
Many businesses implement a combination of both static explicit user and dynamic criteria-based memberships.
Note
In Bravura Privilege implementations, Bravura Privilege Pattern makes it easier to use team management (which uses dynamic workflow).
Here are pros and cons to be considered for each approach:
Static Explicit user - Pros
Bravura Pass administrator has full control.
Changes made on the "Explicit users" list take effect right away.
No need to create new groups in AD for specific Bravura Security Fabric purposes.
No dependency on the AD integration listing a group without error.
Suitable, and often best practice, as the method for:
smaller Bravura Pass environments.
environments that do not already have security groups configured, or other ways of establishing the access rules required in the Bravura Security Fabric solution.
busy environments with multiple admin teams performing maintenance on targets without communicating changes to other teams, or excessive red tape between Bravura Security Fabric and AD teams.
Static Explicit user - Cons
Bravura Pass administrator must keep up-to-date with employee and role changes, potentially repeating work done in AD.
Explicit user selection must be done one by one from the list of valid Profiles.
this can be a benefit, since if a user is not yet valid (listed from a Source of Profile target), the Bravura Pass administrator will notice during explicit user selection.
Dynamic Criteria - Pros
Recommended when very large groups of users require segregation to achieve particular workflows, or for granting different privileges.
Existing user-grouping structure can be leveraged when it already exists on target systems and it must be used verbatim in Bravura Security Fabric .
Used more often for larger clients and with Bravura Privilege and Bravura Identity product licenses. This option is used less for Bravura Pass clients.
Dynamic Criteria - Cons
Can require data processing resources for both the target and Bravura Security Fabric .
Dependant on Autodiscovery:
Changes made to group membership in AD must wait for a successful autodiscovery to be propagated to Bravura Security Fabric .
Any Autodiscovery listing or object-loading issue becomes a security-configuration issue as well.
Listing too many groups/group members/attributes, as well as calculating userclass membership caches can slow autodiscovery. It is advised to only list data used in the product solution.
Defining criteria for segmenting users
Criteria allow you to test users in order to define which users belong to a user class. They are extremely flexible filters which act in series. Users only pass the test if they satisfy all defined criteria. This provides many options that can be used in any combination.
There are three types of user class criteria that you can use to determine segmentation:
Attribute criteria – defined by profile and request attributes, and only apply to personal user classes.
Membership criteria – defined by group membership, and only apply to personal user classes.
PSLang criteria – defined by PSLang expressions, and apply to both types of user classes.
You can define as many criteria as you require to properly define your segment of users for the user class.
To define criteria for segmenting users:
Navigate to the User class definition page (Manage the system > Policies > User classes) for an existing user class.
Click the Criteria tab.
Click Add new… in the appropriate section for the type of criteria that you want to add.
Bravura Security Fabric displays a new page for the selected criteria type.
Enter the required information on the criteria page.
If required, repeat the above procedure to add additional criteria to the user class.
Continue to test the user class membership after you add each criteria. This allows for much easier troubleshooting if a mistake occurs while adding user class criteria.
Creating either/or rules for user class memberships
Either/or rules for user class criteria are necessary when users do not have overlapping criteria, but you want them to be part of the same user class. For example, an either/or rule would be required if there was a need for users with membership from two different Active Directory groups to be part of the same user class, but the users did not have membership of both groups. Adding both groups to the user class criteria would result in only users that are members of both groups becoming user class members. Therefore, we need a different configuration.
To achieve either/or rules for user classes, it is best practice to create multiple user classes. User classes themselves do not have the ability to contain either/or criteria rules unless using a PSLang expression. However, the areas of the product that require membership from user classes to assign access and privileges do have the ability to assign multiple user classes. Once multiple user classes are assigned, options appear to determine if users need to be members of both user classes or just one of them to gain the assigned privileges. This is determined by selecting the options for "Any" or "All" for the member user classes listed.
Although it is an option to create a PSLang rule to create either/or criteria definitions, PSLang rules can cause lengthy user class membership calculations, especially for companies with product environments that have many systems and users.
To assign security privileges to users that are part of two different AD groups:
Create user class A for users that have group memberships matching AD group 1.
Create user class B for users that have group memberships matching AD group 2.
Create a security user group containing the desired privilege to be assigned.
In the membership criteria tab of the user group, add both user class A and user class B as members.
An option for users to be part of "All" or "Any" of the multiple user classes appears.
For the option, The participants have to match which of the user classes: select Any of the user classes .
Membership criteria for the security user group is now defined as a user needs to be a member of either user class A or user class B. Users from AD group 1 OR AD group 2 will now have the allowed privileges of the security user group.
For a more detailed example, see Example: Either/or rules for user class memberships .
Adding attribute criteria
On the criteria page:
Select a Participant if you are adding criteria to a relational user class. The participant is automatically selected for personal user classes.
Search for or type the profile/request Attribute to use for the comparison.
If required, enable the Participant’s value must equal the value of this other participant option to compare attributes with another participant. This option is only displayed for relational user classes.
If this option is:
Disabled (default) then you must select a Comparison method.
Enabled, then the Comparison method menu and Value field are replaced by a drop-down list of participants. Select a participant to compare attributes with.
When enabled, you can only compare the same attribute, and the values must be equal to satisfy the criteria. You can compare against a fixed value, or the same attribute of a different user. You cannot define asymmetrical relationships through attribute criteria; for example, the MANAGER INDIRECT user class.
If required, select the Comparison method.
The available comparison methods depend on the type of attribute selected. For example, “starts with” does not appear for date or boolean attribute types.
Disable the Case sensitive comparison checkbox if you want the comparison to be case-insensitive.
By default, this option is enabled, making comparisons case-sensitive.
This option is only available for relational user classes with “character” or “memo” attribute types.
Click Add.
Adding group membership criteria
On the criteria page:
Select a Participant if you are adding criteria to a relational user class. The participant is automatically selected for personal user classes.
Choose the appropriate value from the Membership drop-down list. Select:
Required– to include users who belong to the specified group in the user class.Disallowed– to include users who do not belong to the specified group in the user class.
Search for, or type the ID of the Target system to which the group belongs.
Search for the ID of the managed Group.
Click Add.
Adding PSLang criteria
On the criteria page, type your PSLang expression, then click Add.
Users are included in the class if the expression evaluates to true. Depending on the type of user class, you can include the Participant IDs in your expression. For example:
$USER– In a personal user class, where the participant ID is set to USER.$REQUESTER– In a relational user class, where the participant ID of the requester is set to REQUESTER.$RECIPIENT– In a relational user class, where the participant ID of the recipient is set to RECIPIENT.
To learn the difference between personal and relational user classes, see the User classes introduction.
You can also use the following helper functions, intended specifically for PSLang expressions that define user classes:
getUsersByAttrValue
getUsersByAttrValue( $attrid, $value)
Gets a list of users by attribute value.
Parameters:
attrid | The profile attribute ID to search on. |
value | The exact value to match on. |
Return value: An array of users that match the profile attribute value.
getUsersByGroup
getUsersByGroup( $targetid, $groupid )
Gets a list of users that have group membership to the specified managed group.
Parameters:
targetid | The target system ID. |
value | The long ID of the managed group on the target system. |
Return value: An array of users that belong to a managed group.
getUsersByManager
getUsersByManager( $manager, $direct )
Gets a list of subordinates by manager.
Parameters:
manager | The manager profile ID. |
direct | If 0, the function will return all the managers subordinates in the management chain. If non-zero, the function will return only the managers direct subordinates. |
Return value: An array of subordinates for the manager.
getUsersByRole
getUsersByRole( $roleid )
Gets a list of users by role.
Parameters:
roleid | The role ID to search on. |
Return value: An array of users that have a specified role.
getUserAttrValueFirst
getUserAttrValueFirst ( <userID>, <attributeID> )
Gets the first value of a given attribute for a given user.
Parameters:
userID | The profile ID of the user being evaluated. |
attributeID | The ID of the profile/request attribute. |
Return value: The value of the user’s profile/request attribute.
getUserAttributeValues
getUserAttributeValues ( <userID> , <attributeID> )
Gets multiple values of a given attribute for a given user.
Parameters:
userID | The profile ID of the user being evaluated. |
attributeID | The ID of the profile/request attribute. |
Return value: An array containing the values of the user’s profile/request attribute.
isGroupMember
isGroupMember ( <userID>, <hostID>, <groupID> )
Checks if a user is a direct or indirect member of a given group.
Parameters:
userID | The profile ID of the user being evaluated. |
hostID | The target on which the group exists. |
groupID | The long ID of the group. |
Return value: 1 if true, 0 if false.
isRoleMember
isRoleMember (<userID>, <roleID> )
Checks if a user has the specified role.
Parameters:
userID | The profile ID of the user being evaluated. |
roleID | The ID of the role. |
Return value: 1 if true, 0 if false.
hasAccount
hasAccount ( <userID>, <hostID> )
Checks if a user has an account on the specified target system.
Parameters:
userID | The profile ID of the user being evaluated. |
hostID | The ID of the target system to check. |
Return value: 1 if true, 0 if false.
isManager
isManager ( <userID> )
Checks if a user is a manager in the OrgChart.
Parameters:
userID | The profile ID of the user being evaluated. |
Return value: 1 if true, 0 if false.
accountAttributeGet
accountAttributeGet( <accountID>, <hostID>, <attributeID> )
Gets the value of a specified account attribute for the specified account.
Parameters:
accountID | The long ID of the account. |
hostID | The target system on which the account exists. |
attributeID | The ID of the account attribute. |
Return value: The value of the account attribute.
isLocked
isLocked ( <userID> )
Checks whether a user’s profile is locked.
Parameters
userID | The profile ID of the user being evaluated. |
Return value 1 if true, 0 if false.
reportsTo
reportsTo ( <subordinate>, <manager>, <is_direct>)
Checks whether a user reports to the specified manager.
Parameters
subordinate | The profile ID of the subordinate to check. |
manager | The profile ID of the manager. |
is_direct | If 0 , the function checks the entire management chain. If non-zero, the function checks the subordinate’s direct manager only. |
Return value: 1 if true, 0 if false.
Examples
The following examples illustrate how you can use PSLang expressions when defining user classes:
Get a user’s first name and store it in a variable for later use:
var $fname = getUserAttrValueFirst( $USERID, "FIRST_NAME" )
Check if a user is in the Accounting group on target system ADCAN:
isGroupMember( $USERID, "ADCAN", "CN=Accounting,OU=Groups,DC=mtdemo,DC=com" )
Check if a subordinate reports directly to a manager:
reportsTo ( $RECIPIENT, $REQUESTER, 1)
Examples 1 and 2 apply to personal user classes. Example 3 applies to relational user classes.
See also
The PSLang Manual ( pslang.pdf ) has more detail about the PSLang language.
Selecting explicit users
Personal user classes, which have only one participant, allow you to specify explicit users.
Explicit users are included in the user class regardless of the user class criteria.
To select explicit users:
Navigate to the User class definition page. for the personal user class you want to modify.
Click the Explicit users tab.
Click Select… .
Enable the checkboxes for the users you want to select as explicit users.
Alternatively, you can search for a user.
Click Add.
The users you have added are displayed on the Explicit users page.
Explicit users can also be removed from a class on this page.
Example: Segregating help desk privileges
A two-participant relationship user class would allow group owners (for example, team Managers) to provide help desk duties for their group members (for example DirectSubordinate). Those two relationship endpoints (Manager and DirectSubordinate) would be the participants of the class.
With such a configuration, when managers log in and use the Help user link, they would have access to only the employees in their own group.
That user class could be used to provide access of managers to provide help desk duties to their direct employees in Manage the system> Security> Access to user profiles> Delegated administration rules.
The same user class can control profile visibility: configured in a user-class-based user filter like GENERATE_USER_PLUGIN (for specifying who should be managed) or the reverse, FILTER_USER_PLUGIN (to specify who should not be managed) Both plug-in points are in Manage the system> Modules> Options.
The security rule provides access, while the user filter plugin provides visibility.
So if the user class is used in the security rule, but not in the user filter, all profiles would be listed for everyone, but the managers would have access to see only the details of their own employees.
In practice, managers are usually too busy to help their employees with their self-service or approval functionality provided by Bravura Security Fabric , so most of the time there would be specific help desk teams in specific regions working the same time zones as the employees they are supposed to help, and the class relationship would be based on the city or region attribute, with a three-participant user class.
Do not use two-participant classes with PSLang expressions that check on attributes for these use cases. Even though it is feasible for small companies, and easier to configure than writing plugin scripts or three-participant classes, the performance would be impacted during auto discovery and during use the product, such as display of the list of users who can be helped by the viewer and using help desk features.
Example: Segments by group
This example demonstrates how to add a user class to segment users by managed group:
Click Manage the system > Policies > User classes.
Click Add new….
Type an ID and Description to search on and identify the user class.
Select the "
[Shared]Policy type.Click Add.
Bravura Security Fabric displays the participant specification page.
Type any placeholder value for the ID and an appropriate Description to identify the participant; for example USERID .
Click Add.
Select the tab.
Bravura Security Fabric displays the criteria specification page.
Click Add new… in the group membership criteria section.
Bravura Security Fabric displays the add criteria page.
Choose the appropriate value from the Membership drop-down list. Select:
Required– to include users who belong to the specified group in the user class.Disallowed– to include users who do not belong to the specified group in the user class.
Search for, or type the ID of the Target to which the group belongs.
Search for the ID of the Managed group.
Click Add.
Click the Test tab to test a specific ID, or list all users who fit the criteria.
If required, repeat the above procedure to add additional criteria to the user class.
Note
Continue to test the user class membership after you add each criteria. This prevents mistakes in the class being rendered irreversible if a faulty user class is used for certification.
Example: Either/or rules for user class memberships
This configuration example demonstrates the use case where a company wants to provide permissions to reset user passwords without requiring authentication to users in the IT-HELPDESK-MANAGERS and HR-MANAGERS Active Directory groups. A user from EITHER of these Active Directory groups will be granted this permission. Therefore, a user group must be configured with the required privilege and allow membership from ANY assigned user classes.
The built-in HELP_DESK_MANAGER user group already has the required privileges to bypass authentication to reset user passwords. To assign user classes to the user group, we must add the IT-HELPDESK-MANAGERS and HR-MANAGERS AD groups to separate user classes.
This use case assumes an Active Directory target called AD has been configured and has both the IT-HELPDESK-MANAGERS and HR-MANAGERS groups managed.
Add IT-HELPDESK-MANAGERS AD group to the built-in _HELP_DESK_MANAGERS_ user class
As superuser, navigate to Manage the system > Policies > User classes .
Select the _HELP_DESK_MANAGERS_ user class.
We need to add membership criteria to this user class.
Click the Criteria tab.
In the group memberships table, click Add new. . . .
In the Target system field, enter
AD.Click the search icon
 next to the Group: field.
Search for and select
 the IT-HELPDESK-MANAGERS group.
Click Add.
Click the Test tab and click List to see the users that are now members of the _HELP_DESK_MANAGERS_ user class.
Return to the General tab and next to the option for Membership cache valid click Recalculate.
You may need to click the Recalculate button twice and refresh the window before it says the cache is valid.
Users have been successfully added as members to the _HELP_DESK_MANAGERS_ user class.
Add HR-MANAGERS AD group to a created HR-MANAGERS user class
Now we need to define and add a user class for the HR-MANAGERS active directory group.
As superuser, navigate to Manage the system > Policies > User classes .
Click Add new. . . since we know the HR-MANAGERS user class doesn't exist.
Enter the following:
ID HR_MANAGERS
Description HR department managers
Leave Types of policies where this user class is permitted to be used as the default value.
Click Add.
This takes you to the Participants tab.
Click Add new. . . to define participants of the user class.
Enter the following:
ID USERID
Description User ID
Click Add.
This takes you to the Criteria tab.
In the group memberships table, click Add new. . . .
In the Target system field, enter
AD.Click the search icon
next to the Group: field.Search for and select
the HR-MANAGERS group.Click Add.
Click the Test tab and click List to see the users that are now members of the HR_MANAGERS user class.
Return to the General tab and next to the option for Membership cache valid click Recalculate .
You may need to click the Recalculate button twice and refresh the window before it says the cache is valid.
Users have been successfully added as members to the HR_MANAGERS user class.
Assign both user classes to the HELP_DESK_MANAGER user group
As superuser, navigate to Manage the system > Security > Access to user profiles > Global help desk rules.
Select
the HELP_DESK_MANAGER user access rule.The privileges are already set by default to allow help desk managers to see a user’s security questions for help desk question set and bypass them without requiring authentication. This is set by the view and bypass security questions privileges.
Click the Membership criteria tab.
Ensure the _HELP_DESK_MANAGERS_ user class is already a member by default configuration.
To add the HR-MANAGERS user class as a member, click Add new. . . .
From the list of user classes, search for and select HR-MANAGERS .
Click Add.
Click the radio button for Any of the user classes on the Membership criteria tab.
Click Update.
Now in order to be a member of the HELP_DESK_MANAGER user group, a user can be a member of either the _HELP_DESK_MANAGERS_ or HR_MANAGERS user class or both of them.
Click the General tab and click Recalculate for Membership cache valid.
Through this configuration, permission to reset user passwords without requiring authentication has now been given to users in the IT-HELPDESK-MANAGERS and HR-MANAGERS Active Directory groups.
Editing and deleting user classes
You can edit user classes by:
Adding and removing participants
Editing the description and list expression for participants
Adding, editing and removing membership criteria
Changing user class policies
Default user classes should be edited during the initial Bravura Security Fabric setup and configuration. For example, define membership and assign user access rules to the _GLOBAL_HELP_DESK_ and _HELP_DESK_MANAGERS_ user classes to create a user base that can help regular users.
There are restrictions to what type of changes you can make to a user class, limited by which policies have that user class in use. See the table below for details.
The product administrator doing the editing must have the "Manage policies" administrative privilege.
Status | Restrictions |
|---|---|
Single policy user classes | |
In use | User classes that are in use by a single user class policy:
|
Not in use | User classes that are not in use, and are only linked to one user class policy:
|
In use | Shared user classes that are in use:
|
Not in use | Shared user classes that are not in use:
|
You can remove or edit the definition of a user class as long as it has not been used in a certification campaign. If a user class has dependents, such as plugin points, it cannot be removed.
For auditing purposes, a user class cannot be deleted or changed after it has been used. A “used” user class is indicated by the following fields on the User class definition page:
Date first used in certification
Date most recently used in certification
Testing and listing members
Once the criteria for a user class is defined, you can use the page to see if a specific User IDs matches the criteria, or to list the User IDs for the members of a user class.
Testing user classes
You can test the segmentation rules for any user class.
To test the rules defined for a user class:
Navigate to the User class definition for the user class you want to test.
Click the Test tab.
To test the rules defined for a:
Personal user class, Search for, or type the User ID of the user to evaluate, then click Test.
Relational user class, Search for, or type a User ID for each participant in the corresponding fields, then click Test.
The Test button evaluates all criteria defined for the user class, not just the criteria displayed on the page.
Bravura Security Fabric displays the test results, specifying whether the users satisfied the criteria for the user class.
Listing members in a user class
You can list members for any participant in any user class.
In personal user classes, there is a single participant, so all members of the user class are listed.
In relational user classes, members can be listed for one participant, and the other participant in the relationship must be specified.
To list members in a user class:
Navigate to the User class definition for the user class for which you want to list participant.
Click the Test tab.
To list the participant within a:
Personal user class, click List.
Relational user class, select a participant from the List matching users drop-down menu, type in User IDs for the other participant, then click List.
The list of members is displayed. If no members are listed, then there are no users matching the criteria for the specified participant.
Caching user classes
User classes can be cached to improve performance for complex user classes and user class points.
On the General tab for a user class definition, there is an option to Recalculate or Invalidate the user class cache. Membership cache valid indicates the current status of the cache Yes or No.
If the status is Yes, then the user class is cached on the time indicated by Date membership cache last updated. Users that are a member of the user class when it is cached will remain members until the cache expires or is recalculated. Even if the member’s criteria changes, the profile will be considered a member until either recalculation is performed or no longer valid. When there is a cached user class then Invalidate and Recalculate are available.
If the status is No, then the user class has no cached information. Only Recalculate is available to load the cache information.
Note
In a replicated environment, cache recalculation can only be performed on the instance which runs psupdate .
Only single-participant user class points can be cached. Built-in user classes cannot be changed and cached. This includes:
_ALLUSERS_
_UC_ATTR_AUTO_PROPAGATE_REQUESTER_
_UC_RBAC_AUTO_PROPAGATE_REQUESTER_
_USER_IS_MANAGER_
These are directly evaluated and do not require caching.
User class points that include only built-in user classes do not require any options to cache them. Adding one or more user classes that are not built-in will allow caching to be calculated. When recalculating a user class, any dependent user class points that are cached are also recalculated.
The user class cache expiry time is set by the USERCLASS CACHE EXPIRY variable at Manage the system > Policies > Options. Default is 72 hours.
The psupdate program runs loaduccache at the end of the auto discovery process.
User class cache events
The following user class options are triggered by the Manage the system (PSA) module, API Service, or directly by running the loaduccache program. They can be accessed from Manage the system > Maintenance > System variables or Manage the system > Policies > Options:
Option | Description |
|---|---|
LOADUCCACHE FINISH | The loaduccache program finishes loading caches. |
LOADUCCACHE START | The loaduccache program starts to load caches. |
USERCLASS CACHE FAILURE | A userclass fails to be cached. |
USERCLASS CACHE INVALIDATE SUCCESS | A userclass’ cache is explicitly invalidated. |
USERCLASS CACHE SUCCESS | A userclass is successfully cached. |
USERCLASS POLICY CACHE FAILURE | A userclass policy fails to be cached. |
USERCLASS POLICY CACHE INVALIDATE SUCCESS | A userclass policy’s cache is explicitly invalidated |
USERCLASS POLICY CACHE SUCCESS | A userclass policy is successfully cached. |
See Event Actions for more information about event configuration.
Using user classes with plugin points
User class definitions can be added to the following plugin points:
Manage the system > Workflow > Options > Escalation > ESCALATION PLUGIN
Manage the system > Workflow > Options > Escalation > FIRST CHANCE ESCALATION PLUGIN
Manage the system > Workflow > Options > Plugins > AUTHORIZATION DETAIL MASK PLUGIN
Manage the system > Modules> Options > FILTER USER PLUGIN
Manage the system > Modules> Options > KEEP USER PLUGIN
Manage the system > Modules> Options > GENERATE USER PLUGIN
These plugin points include the Use user classes option, which allows you to filter or generate lists of users based on user user classes.
If you choose to use user classes, then you do not need to write a plugin. However, user classes can also be used in conjunction with a plugin.
For example, if you:
Use user classes | then the specified user classes are used to filter or generate lists of users. |
Use user classes and write a plugin | then the specified user classes and plugin script are both used to filter or generate lists of users, with the plugin taking its input from results provided by the user class. |
Write a plugin | then the plugin is used to filter or generate lists of users. For details, see:
|
To configure the Use user classes option:
Click Use user classes under the field for the plugin point you want to modify.
A page loads related to the option you are modifying. For example, if you are modifying FILTER USER PLUGIN, then the Filter Criteria filter_user_plugin page loads. If user class definitions already exist for this option, they are listed.
Define your user classes. You can choose existing user classes, create new user classes, or both:
To select from existing user classes:
Click Select… .
Enable the checkboxes next to the user classes you want to select, then click Select.
The list of user class members is displayed.
Complete the participant definitions for the newly added user classes by selecting from the drop-down menu.
Click Update.
To create a new user class:
See Adding user classes for details on how to create a user class.
Once created, complete the participant definition for your new user class by selecting from the drop-down menus.
Once you’ve added at least one user class to the list of user class members, you can also:
Delete user classes from the list.
Update the participant definitions for the user classes in the list.
If you have multiple user classes in the list of user class members, then The participants have to match which of the user classes option is displayed.
This can be set so that:
The participants can match Any of the user classes listed
The participants must match All of the user classes listed
Mapping participants for authorization
Currently, participant mapping is required where user classes are used to define the function of policy participants.
Participant mapping uses user classes to define complex relationships by mapping the policy participants (recipient, requester, authorizer) to the user class participants :
User class participants – In personal user classes, the participant defines something about a user, such as their location. For example, the class NEW_YORKER which has a single participant named “RESIDENT”.
In relational user classes, the participants define the relationship between users. For example, a default user class that ensures one user is another user’s manager, _MANAGER_DIRECT_, has two participants: SUBORDINATE and MANAGER.
With both types of user class participants, the function for each participant is undefined. These user classes can be used with any policy. For example, they can be used when defining authorizers.
Policy participants – define the function for each user in the current policy. For example, the recipient, the requester and the authorizer of a request are all possible policy participants.
Personal user classes require you to map the single user class participant. Relational user classes require you to map one or more policy participants.
This functionality is highly flexible and there are many configuration possibilities depending on which user classes you select and how you map their participants. However, all valid configurations require an authorizer.
For example, when defining an authorizer using user classes, you could define the relationship between the AUTHORIZER, REQUESTER, and RECIPIENT. The policy participants determine who authorizes (AUTHORIZER) whose request (REQUESTER) on behalf of whom (RECIPIENT). To define membership for each policy participants, map user class participants to each policy participants.
To configure participant mapping:
Navigate to the Authorizer user classes tab of the resource for which you want to configure authorizers.
For example:
Managed groups > <group> > General
Segregation of duties rules > <rule> > Authorization
Managed system policies > <policy> > Authorizers: <type>
Click the User classes sub-tab.
Use Case 1: Manager must approve requests
This use case ensures that a user’s manager must authorize requests before the user can receive access for a resource, regardless of who makes the request. This case involves two participants: the recipient and the authorizer. The requester is irrelevant in this case.
The default _MANAGER_DIRECT_ user class can be used to define the required relationship between the recipient and the authorizer.
Participant mapping
Navigate to the page.
Add the default _MANAGER_DIRECT_ user class and configure mapping as follows:
MANAGER: Authorizer
SUBORDINATE: Recipient
Use Case 2: Printer access must be approved by a user’s manager
In this use case, business rules require that a user’s manager must request access to printers on his behalf. For example, Joe wants access to a printer and speaks to Bob, his manager. Printer access is managed by membership to a managed group. Bob issues the request. Additionally, business rules require that Bob’s manager must authorize the request.
Participant mapping
Navigate to the page.
Add the default _MANAGER_DIRECT_ user class and configure the mapping as follows:
MANAGER: Requester
SUBORDINATE: Recipient
This ensures that requests are being performed by the recipient’s manager.
Add a second _MANAGER_DIRECT_ user class and configure the mapping as follows:
MANAGER: Authorizer
SUBORDINATE: Requester
This ensures that the authorizer is the requester’s manager.
Configure the user class matching as follows:
The participants have to match which of the user classes : All of the user classes
Use Case 3: Department head must authorize all requests for a high security resource
This use case ensures that a user’s department head must authorize all requests for access to a specific high-security resource.
This case involves two participants: the recipient of the request and the department head who must authorize the request.
User class configuration
Create and configure a new user class to define the relationship:
Create a new user class named DEPARTMENT_HEAD.
Create Participants :
DPT_HEAD: The head of the department
DPT_MEMBER: A member of the department
Configure Criteria:
Group criteria: Since all department heads are members of the Department Head group, add a group criteria requiring that the DPT_HEAD participant is a member of the "DepartmentHead” managed group:
Participant: DPT_HEAD
Membership: Required
Target System: AD
Group: CN=DepartmentHead,OU=Company,DC=domain,DC=net
Attribute criteria: In order to target the department head, add an attribute criteria to ensure that the DEPARTMENT profile and request attribute is the same for both the user and the department head:
Participant : DPT_HEAD
Attribute : DEPARTMENT
Participant’s value must equal the value of this other participant : DPT_MEMBER
Participant mapping
Navigate to the page.
Add the new DEPARTMENT_HEAD user class and configure the mapping as follows:
DPT_HEAD: Authorizer
DPT_MEMBER: Recipient