Privileged access management workflow examples
The following are some common scenarios for Bravura Privilege Pattern setups.
Example: Onboard a system vault
This procedure describes how to install a Bravura Privilege Pattern component, a scenario component, create a team, onboard a system vault and add users to that vault.
A System vault represents systems in the environment and allows you to store account information without a connector or technical integration.
Install the components
This example requires the following components:
RefBuild.pam_team_management.
Scenario.pam_system_type_vault.
Configure the Corporate AD target system
Click Manage the system > Resources > Target systems > Manually defined .
Select the Corporate AD target system.
Click Change next to the Address field and enter the domain for your environment.
Click Continue.
Click Update.
Click the Credentials tab.
Enter your target’s credentials.
Click Update.
Click Maintenance > Auto discovery Execute auto discovery.
Click Continue.
Create and set up a team
Create a team administrator:
Click Manage the system > Policies > User classes .
Select the PAM_TEAM_ADMINS.
Click the Explicit users tab.
Click Select .
Search and select a user.
Click Add.
This user can now log in and create, delete and manage teams.
Log into Front-end (PSF) as the team administrator.
Click Manage Resources.
The Pre-defined requests page is displayed.
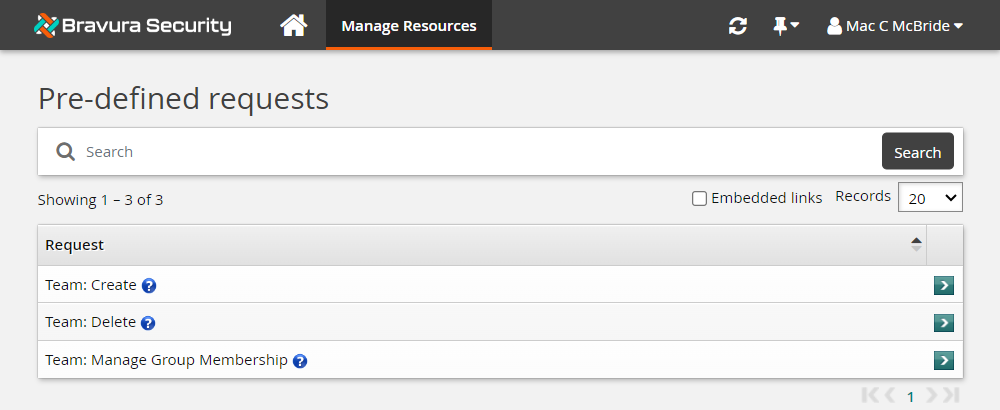
The team administrator can create, delete and manage teams using these pre-defined requests.
Click Team: Create.
Bravura Security Fabric displays the team creation wizard
Enter the following information:
Team Name: Vault-Management-Team
Team Description: Team to manage system vault
Click Next .
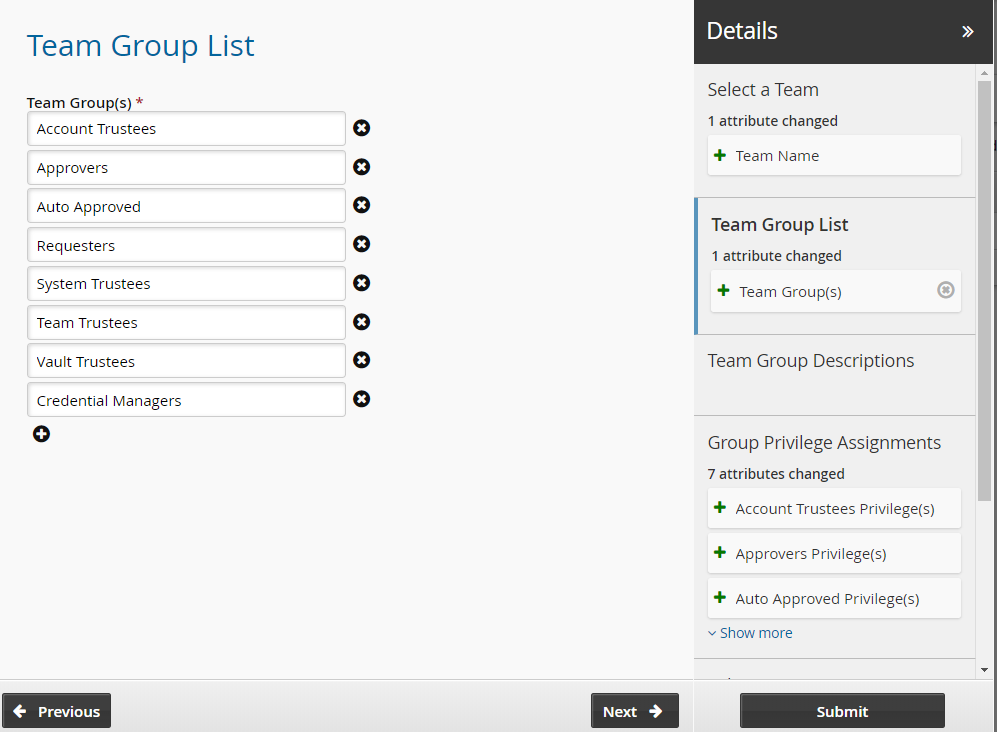
Add seven groups. Use the ”More” icon to add more team name fields to the list.
Team Trustees Users who can make team management requests.
Account Trustees Users who can make account management requests (onboard accounts).
Approvers Users who allow or disallow access requests.
Auto Approved Users who can check-out access to systems and accounts without making an access request.
Requesters Users who can make access requests.
Credential_Managers Users who can override or randomize the stored password on a checked-out account.
System Trustee Users who can make system management requests (onboard systems).
Vault Trustees Users who can make vault management requests.
Click Next and add team descriptions.
Click Next .
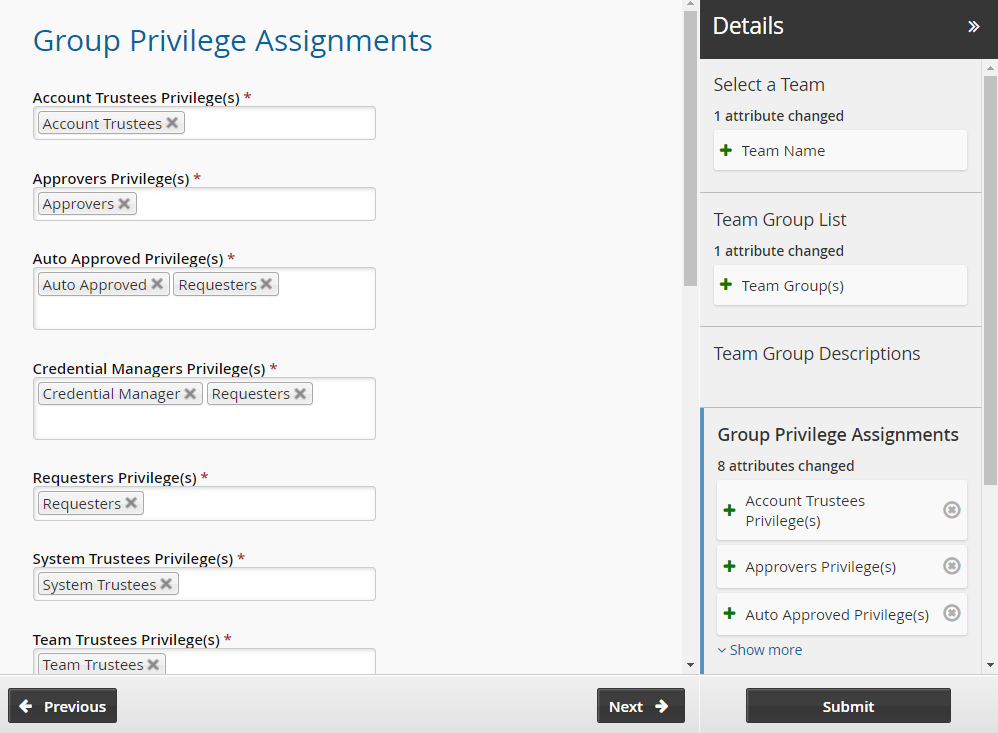
Assign privileges to the team groups:
Team Trustees Team trustees
Account Trustees Account trustees
Approvers Approvers
Auto Approved Auto_Approved and requesters
Requesters Requesters
Credential Managers Requesters and Credential_manager
System Trustees System trustees
Vault Trustees Vault trustees
The Credential_Manager privilege allows a user to override or randomize the stored password on a checked-out account.
Click Next .
Set the initial team trustees for the new team. There must be at least one team trustee to create a team.
Click Submit.
Bravura Security Fabric notifies authorizers to review the request if required.
Click the View request link at the top of the page to view the status of the request.
Once the request has been approved, the team will be configured.
Add users to the additional groups in the team.
Log into Front-end (PSF) as a team trustee.
From the home page, click Manage resources.
Click Team: Manage Group Membership.
Select the Vault-Team.
Click Next .
Select the Account Trustees, Approvers, Auto Approved, Requesters, System Trustees, Vault Trustees, Credential Managers and Team Trustees groups.
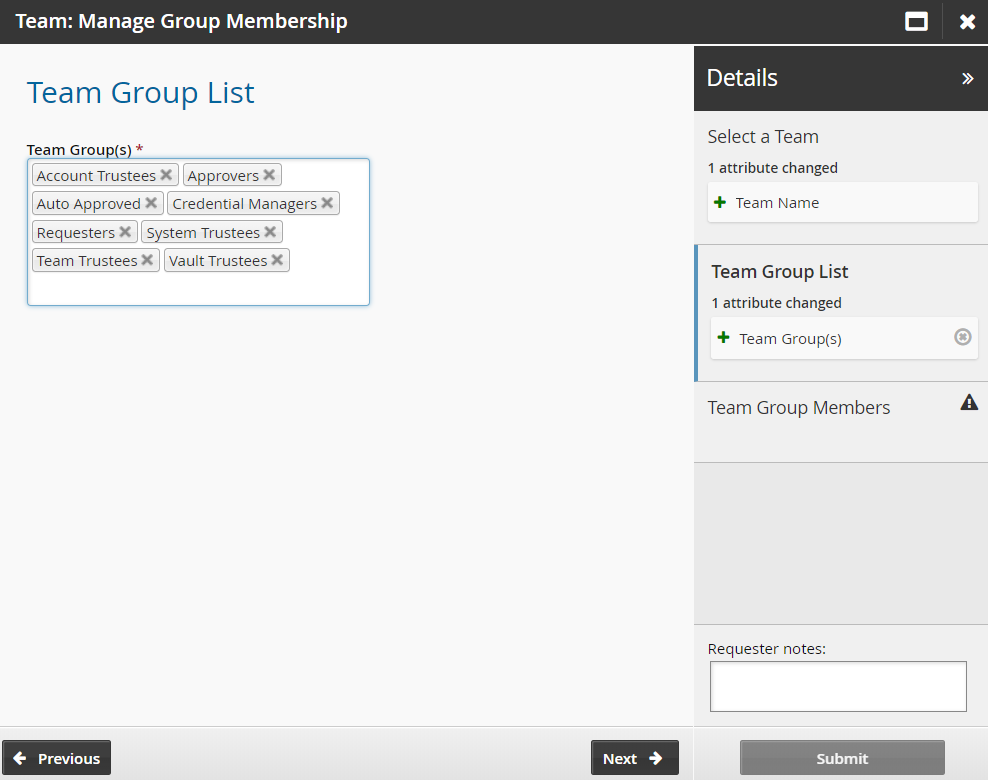
Click Next .
Add members to each team group.
Click Submit.
Bravura Security Fabric notifies authorizers to review the request if required.
Click the View request link at the top of the page to view the status of the request.
Once submitted and approved, the group’s membership will be updated to include the selected users.
Onboard a system vault
Log in to Front-end (PSF) as the system trustee for the vault-management-team.
Click Manage Resources.
The page is displayed.
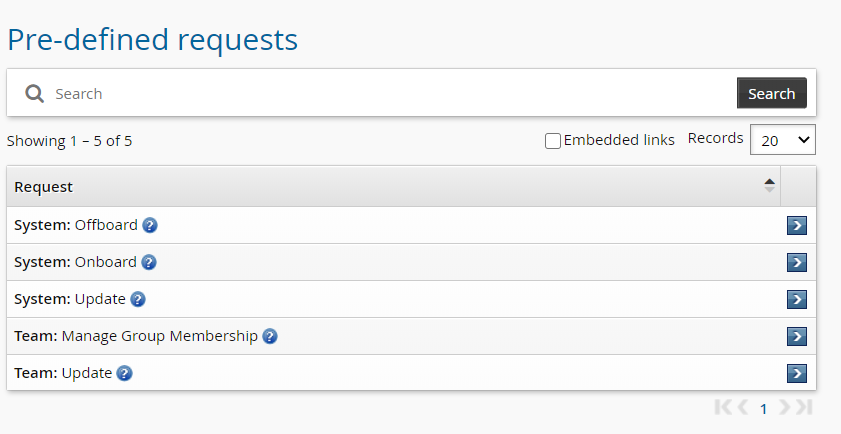
Click System: Onboard.
Select the Vault System type from the drop-down menu.
Click Next .
Enter the System FQDN. A system vault will be created with this name.
Select the System Team to manage the system vault.
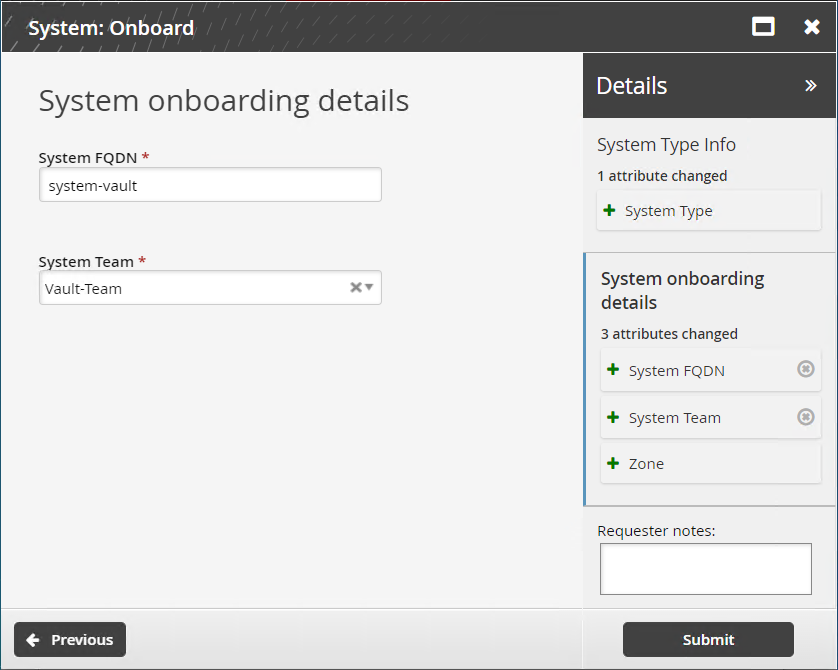
Click Submit.
Bravura Security Fabric notifies authorizers to review the request if required.
Click the View request link at the top of the page to view the status of the request.
Once the request has been approved, trustees can manage accounts on this system.
Create vault users
Log into Front-end (PSF) as the vault trustee for the vault-management-team.
Click Manage Resources.
Click Vault Account: Create.
Select the Vault:system-vault managed system.
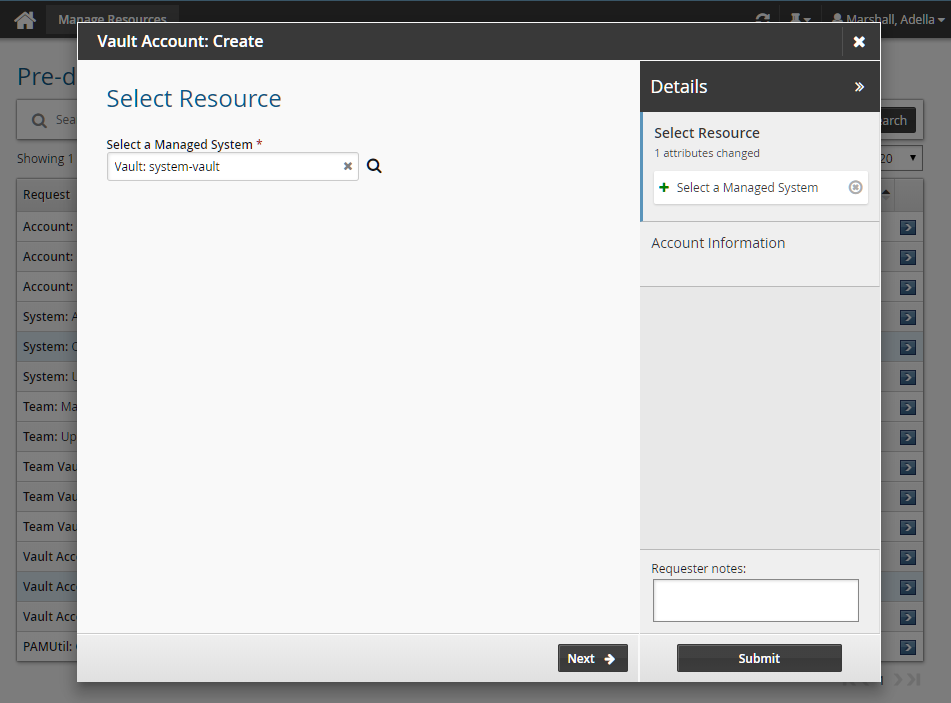
Click Next .
Enter the account information:
Account Name
Managed Password
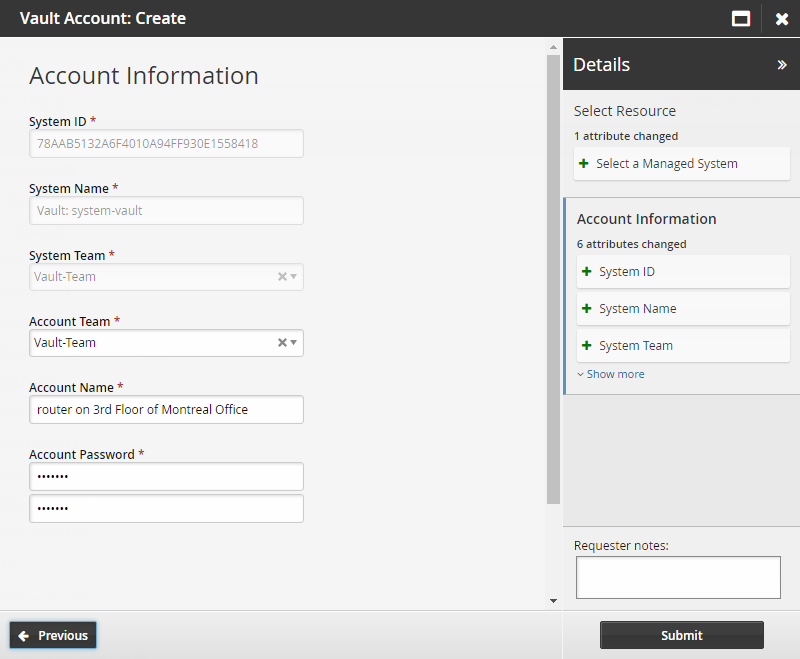
Click Submit.
Bravura Security Fabric notifies authorizers to review the request if required.
Click the View request link at the top of the page to view the status of the request.
Once the request has been approved, users assigned the requester or auto-approved privileges in the Vault-Management-Team can now check out this account and view the password.
Example: Onboard users from an Active Directory target
This example describes how to manage an Active Directory target and onboard accounts to be managed by a team.
Install the components
The following components are required for this example:
RefBuild.pam_team_management.
Scenario.pam_system_type_vault.
Manage the Corporate AD target system
Click Manage the system > Resources > Target systems > Manually defined .
Select the Corporate AD target system.
Select Automatically create a Bravura Privilege managed system.
Click Change next to the Address field and enter the domain for your environment.
Click Continue .
Click Update.
Click the Credentials tab.
Enter your target’s credentials.
Click Update.
Click Maintenance > Auto discovery Execute auto discovery.
Click Continue.
Click Privileged access > Managed system policies.
Select the ONBOARDED_ACCOUNTS managed system policy.
Click the Member systems tab.
Click Add new… .
Select the Corporate AD managed system and click Select.
Create and set up a team
Create a team administrator:
Click Manage the system > Policies > User classes .
Select the PAM_TEAM_ADMINS.
Click the Explicit users tab.
Click Select .
Search and select a user.
Click Add.
This user can now log in and create, delete and manage teams.
Log into Front-end (PSF) as the team administrator.
Click Manage Resources.
The Pre-defined requests page is displayed.
The team administrator can create, delete and manage teams using these pre-defined requests.
Click Team: Create .
Bravura Security Fabric displays the team creation wizard
Enter the following information:
Team Name: Vault-Management-Team
Team Description: Team to manage system vault
Click Next .
Add six groups. Use the ”More” icon to add more team name fields to the list.
Team Trustees Users who can make team management requests.
Account Trustees Users who can make account management requests (onboard accounts).
Approvers Users who allow or disallow access requests.
Auto Approved Users who can check-out access to systems and accounts without making an access request.
Requesters Users who can make access requests.
Credential_Managers Users who can override or randomize the stored password on a checked-out account.
System Trustee Users who can make system management requests (onboard systems).
Click Next and add team descriptions.
Click Next .
Assign privileges to the team groups:
Team Trustees Team trustees
Account Trustees Account trustees
Approvers Approvers
Auto Approved Auto_Approved and requesters
Requesters Requesters
Credential Managers Requesters and Credential_manager
System Trustees System trustees
The Credential_Manager privilege allows a user to override or randomize the stored password on a checked-out account.
Click Next .
Set the initial team trustees for the new team. There must be at least one team trustee to create a team.
Click Submit.
Bravura Security Fabric notifies authorizers to review the request if required.
Click the View request link at the top of the page to view the status of the request.
Once the request has been approved, the team will be configured.
Add users to the additional groups in the team.
Log into Front-end (PSF) as a team trustee.
From the home page, click Manage Resources.
Click Team: Manage Group Membership .
Select the Vault-Team.
Click Next .
Select the Account Trustees, Approvers, Auto Approved, Requesters, System Trustees, Vault Trustees, Credential Managers and Team Trustees groups.
Click Next .
Add members to each team group.
Click Submit.
Bravura Security Fabric notifies authorizers to review the request if required.
Click the View request link at the top of the page to view the status of the request.
Once submitted and approved, the group’s membership will be updated to include the selected users.
Onboard the Corporate AD system
Log into Front-end (PSF) as a superuser.
Click Manage the system > Privileged access > Managed systems.
Select the Corporate AD managed system.
Enter the name of the team that will manage this system.
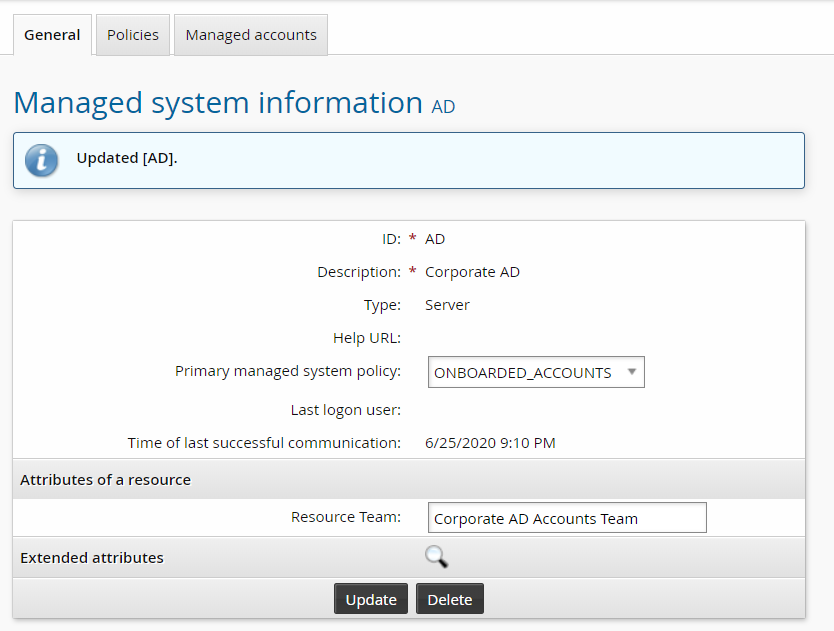
Click Update.
Onboard Corporate AD accounts to a team
Log into Front-end (PSF) as the account trustee for the corporate AD team.
Click Manage Resources.
Click Account: Onboard.
Select an account to be managed by the corporate AD team.
Click Next .
Select the standard policy as the Managed System Policy ID .
Enable View and Copy Password.
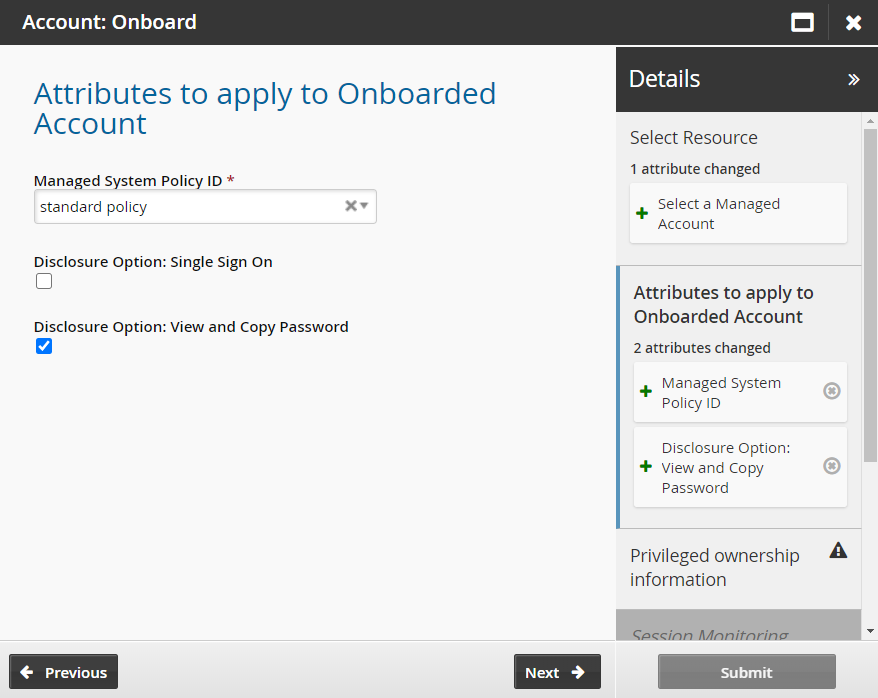
Click Next .
Select the Corporate AD Accounts Team as the account team.
Click Next .
Click Next .
Enable Allow override and randomization of password.
Click Submit.
Once the request has been approved, trustees of the AD Corporate team can manage accounts on this system.
Example: Onboard accounts for a personal admin
Instead of requesters on a team being granted access to an onboarded account, account trustees can give a specific user exclusive access to the account, regardless of team. The user, referred to as the personal admin, would be able to check out an account without needing authorization. The access will also be automatically checked out (for 12 hours by default) at login.
Install the Scenario.pam_personal_admin component for this example.
Any managed systems onboarded before the scenario is installed will need to be manually binded to the PERSONAL_ADMIN_ACCOUNTS managed system policy. This example will onboard accounts from the Corporate AD target system.
Log into Front-end as a superuser.
From the main menu click Manage components > RefBuild.
Select the checkbox for Scenario.pam_personal_admin_management.
Click Install component(s).
The panel on the right will indicate when the installation is complete.
Configure the Corporate AD target system with the additional step of selecting Automatically create a Bravura Privilege managed system.
Click Privileged access > Managed system policies.
Select the PERSONAL_ADMIN_ACCOUNTS managed system policy.
Click the Member systems tab.
Click Add new… .
Select the Corporate AD managed system and click Select.
Log into Front-end (PSF) as the account trustee for the corporate AD team.
Click Manage Resources.
Click Account: Onboard.
Select an account to be managed by the corporate AD team.
Click Next .
Select the Personal administrator access policy as the Managed SystemPolicy ID.
Select disclosure options, as needed.
Click Next .
Select a user to be the privileged access owner (the personal admin)
Click Next .
Select session monitoring options, if desired.
Click Next .
Enable Allow override and randomization of password , if desired.
Click Submit.
Once the request has been approved, the personal admin will have instant access to the onboarded account the next time they log in.
Example: Create an OTP API user
This example demonstrates how to create an OTP API user that can be used to retrieve managed account passwords using pamutil .
Requirements
This example requires managed accounts to be onboarded. See Example: Onboard users from an Active Directory target for an example.
Create an OTP API group
Log into Front-end (PSF) as a team trustee for the corporate AD accounts team.
Use the Team: Update PDR.
Select the Corporate AD Accounts Team.
Add a new group called
OTP API Trustee.Provide this group with OTP trustee privileges.
Submit the request.
Use the Team: Management Group Membership PDR.
Add a user to the OTP API Trustee group.
OTP trustees are users who can make OTP API account management requests.
Create an OTP_User
Log into Front-end (PSF) as a user from the OTP API Trustee group created in Create an OTP API group .
Only an otp_api trustee can see the PAMUtil: Create OTP API User PDR.
Click the PAMUtil: Create OTP API User PDR.
Choose the Corporate AD Accounts Team as the System Team.
Click Next .
Add a PAM OTP Account Description
Select the managed accounts onboarded earlier.
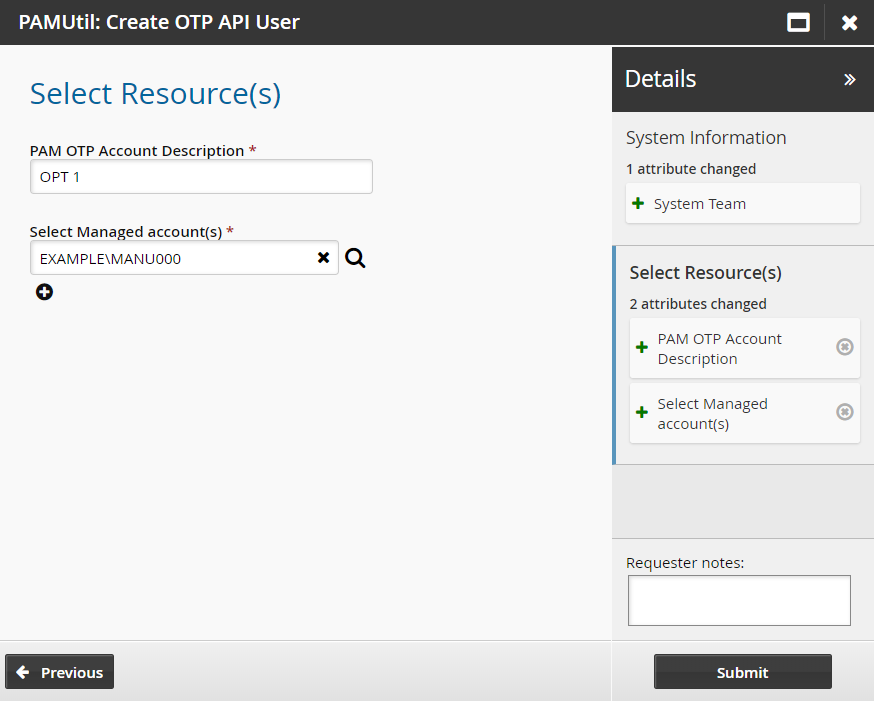
Click Submit.
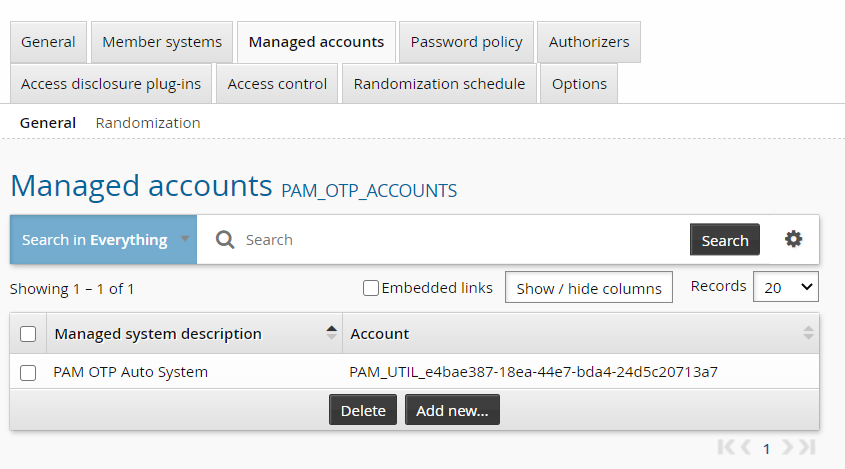
The PAMUtil: Create OTP API User PDR creates a managed account that appears in the PAM_OTP_ACCOUNTS managed system policy in the format of PAM_UTIL_ <guid> , and a product administrator profile to manage the account.
Check out the account
Log into Front-end (PSF) as a user from the OTP API Trustee group created earlier.
Click Privileged access from the Privileged access to managed systems section.
Click Accounts from the Filter panel .
Select the PAM OTP account from the Results panel.
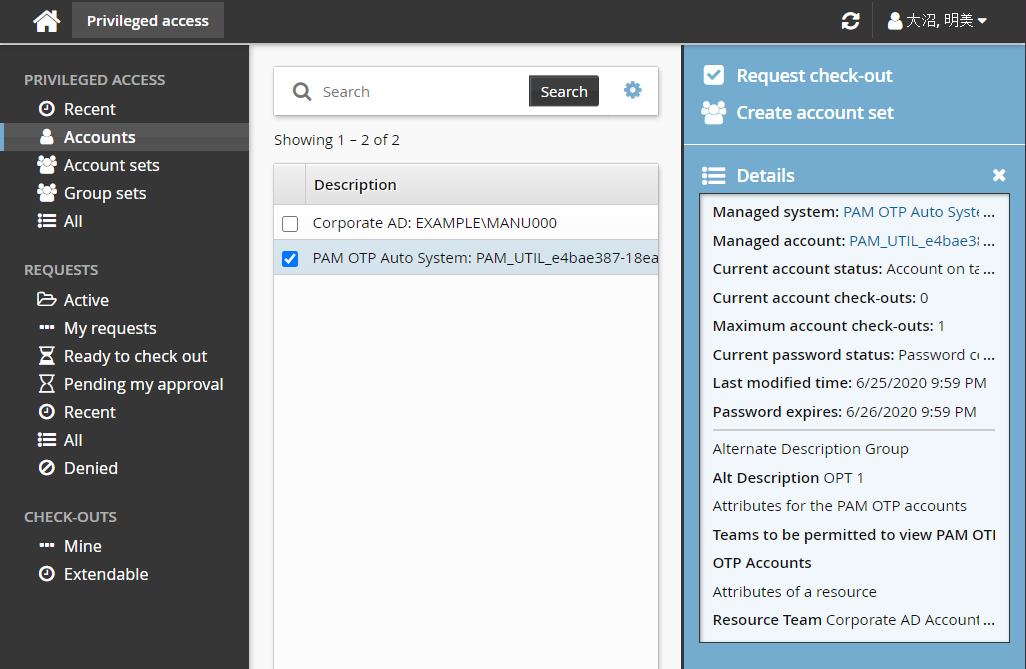
Click Request check-out.
Click Submit.
Authorize the request.
Click Check out from the Actions panel.
The PAM OTP account can now be used by the product administrator profile created earlier, to retrieve credentials of managed accounts it has access to using
pamutil.Warning
Do not check out the vault account again because it will be randomized on check-out and then the one used with
pamutilwill be wrong as it does not get updated with the new, randomized password.
Example: Onboard a Windows server with subscribers
This example describes how to install the subscriber scenario component, onboard a Windows server and configure the subscribers so they receive the new password when it is randomized.
Install the components
The following components are required for this example:
RefBuild.pam_team_management.
Scenario.pam_system_type_vault.
Scenario.pam_subscriber_validation
Scenario.pam_system_type_winnt
Create and set up a team
To create and set up a team:
Create a team administrator.
Log in as the administrator to create the team.
Add users to the groups in the team
Steps are detailed below.
Click Manage the system > Policies > User classes .
Select the PAM_TEAM_ADMINS.
Click the Explicit users tab.
Click Select .
Search and select a user.
Click Add.
This user can now log in and create, delete and manage teams.
Log into Front-end (PSF) as the team administrator.
Click Manage Resources.
The page is displayed.
The team administrator can create, delete and manage teams using these pre-defined requests.
Click Team: Create.
Bravura Security Fabric displays the team creation wizard
Enter the following information:
Team Name: Vault-Management-Team
Team Description: Team to manage system vault
Click Next .
Add seven groups. Use the ”More” icon to add more team name fields to the list.
Team Trustees Users who can make team management requests.
Account Trustees Users who can make account management requests (onboard accounts).
Approvers Users who allow or disallow access requests.
Auto Approved Users who can check-out access to systems and accounts without making an access request.
Requesters Users who can make access requests.
Credential_Managers Users who can override or randomize the stored password on a checked-out account.
System Trustee Users who can make system management requests (onboard systems).
Subscriber Trustees Users who can make subscriber validation requests.
Click Next and add team descriptions.
Click Next .
Assign privileges to the team groups:
Team Trustees Team trustees
Account Trustees Account trustees
Approvers Approvers
Auto Approved Auto_Approved and requesters
Requesters Requesters
Credential Managers Requesters and Credential_manager
System Trustees System trustees
Vault Trustees Vault trustees
Subscriber Trustees Subsriber trustees
The Credential_Manager privilege allows a user to override or randomize the stored password on a checked-out account.
Click Next .
Set the initial team trustees for the new team. There must be at least one team trustee to create a team.
Click Submit.
Bravura Security Fabric notifies authorizers to review the request if required.
Click the View request link at the top of the page to view the status of the request.
Once the request has been approved, the team will be configured.
Log into Front-end (PSF) as a team trustee.
From the home page, click Manage resources.
Click Team: Manage Group Membership.
Select the Vault-Team.
Click Next .
Select the Account Trustees, Approvers, Auto Approved, Requesters, System Trustees, Vault Trustees, Credential Managers and Team Trustees groups.
Click Next .
Add members to each team group.
Click Submit.
Bravura Security Fabric notifies authorizers to review the request if required.
Click the View request link at the top of the page to view the status of the request.
Once submitted and approved, the group’s membership will be updated to include the selected users.
Onboard the Windows system
Log into Front-end (PSF) as the system trustee for the Windows system team.
Click Manage Resources.
The Pre-defined requests page is displayed.
Click System: Onboard.
Select the Windows Server system type from the drop down menu.
Click Next .
Enter the System FQDN.
If the Windows system is not on the domain use <hostname> .local
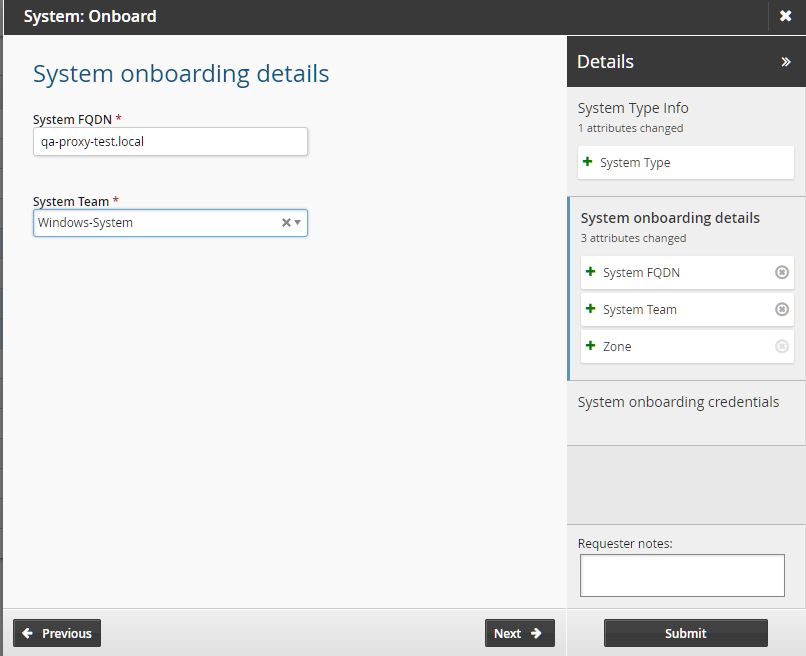
Select the Windows system team to manage the system.
Click Next
Enter the system credentials.
Click Submit.
Bravura Security Fabric notifies authorizers to review the request if required.
Click the View request link at the top of the page to view the status of the request.
Once the request has been approved, trustees can manage accounts on this system.
Set discovery options
Log into Front-end (PSF) as a superuser.
Click Manage the system > Resources > Target systems > Automatically discovered .
Select the Windows system you recently onboarded.
Click the Discovery options tab.
Select the following depending on what subscribers you expect to manage:
Link accounts on this target system to subscribers
Load scheduled task subscribers
Load service manager subscribers
Load IIS manager subscribers
Load DCOM manager subscribers
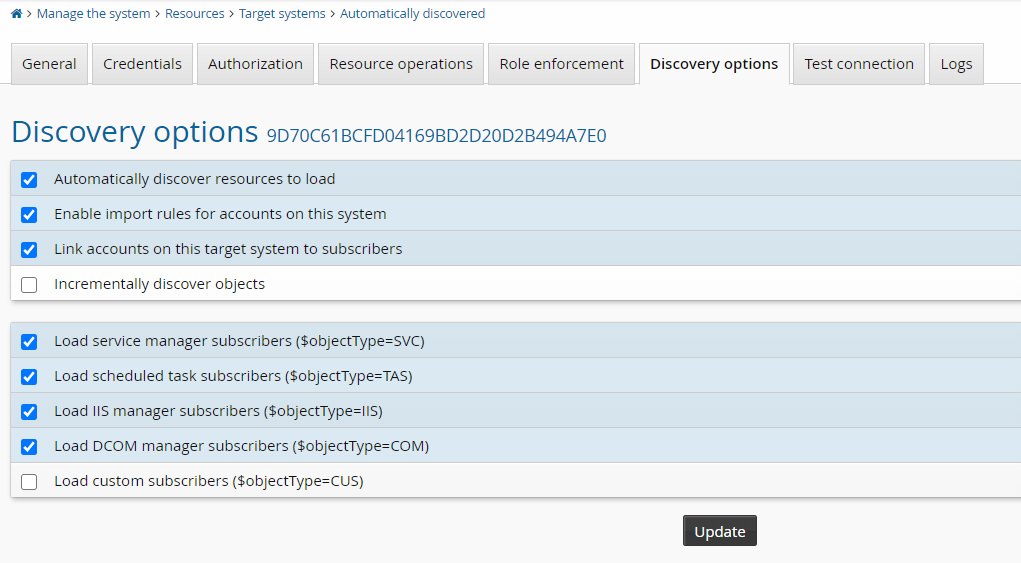
Click Update.
Execute Auto discovery.
Onboard Windows service account
Ensure the subscribers have been set up and discovered before onboarding the account. For example; your scheduled tasks and services set to use a managed account and auto discovery is ran to discover those accounts (subscribers).
Log into Front-end (PSF) as the account trustee for the windows system team.
Click Manage Resources.
Click Account: Onboard.
Select the service account to be managed by the Windows system team
Click Next .
Select the standard policy as the Managed System Policy ID.
Click Next .
Select the Windows system team as the Account Team .
Click Next .
Click Next .
Click Submit.
Bravura Security Fabric enters the request into the authorization workflow.
As a superuser, execute auto discovery to generate subscriber validation requests.
Log into Front-end (PSF) as a subscriber trustee for the windows system team.
Click There is 1 request(s) awaiting your approval link at the top of the page.
Select the request from the Results panel .
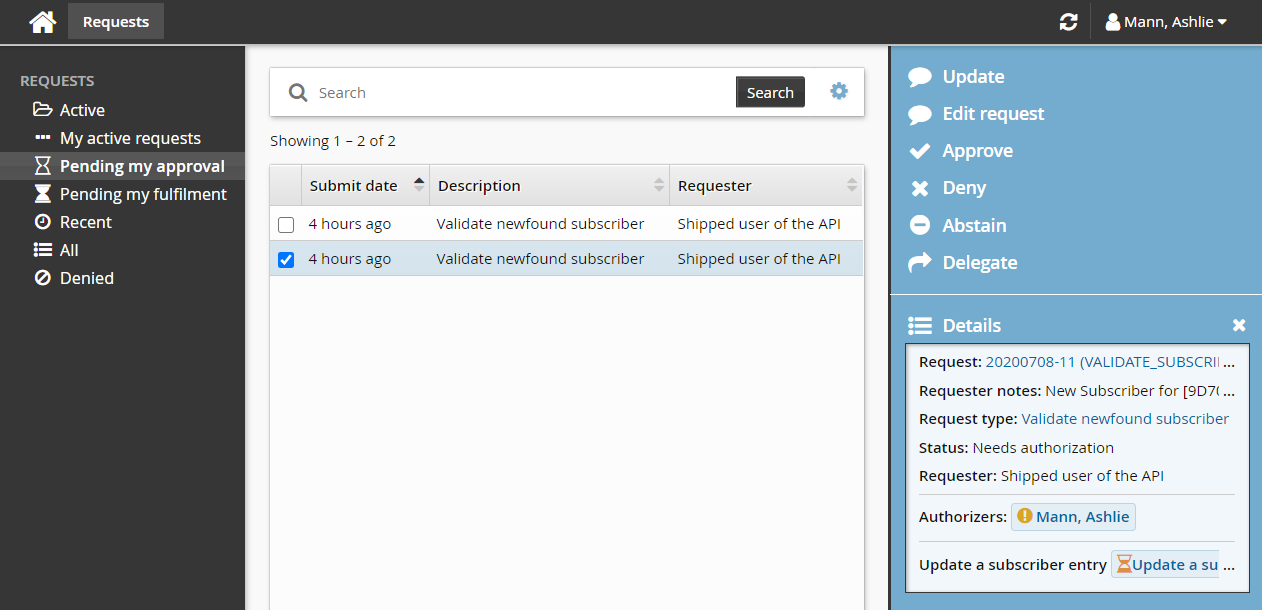
Click Edit request.
Set Notify subscriber of randomization to a value:
After randomizing
Before and after randomizing
Before randomizing
No Notification
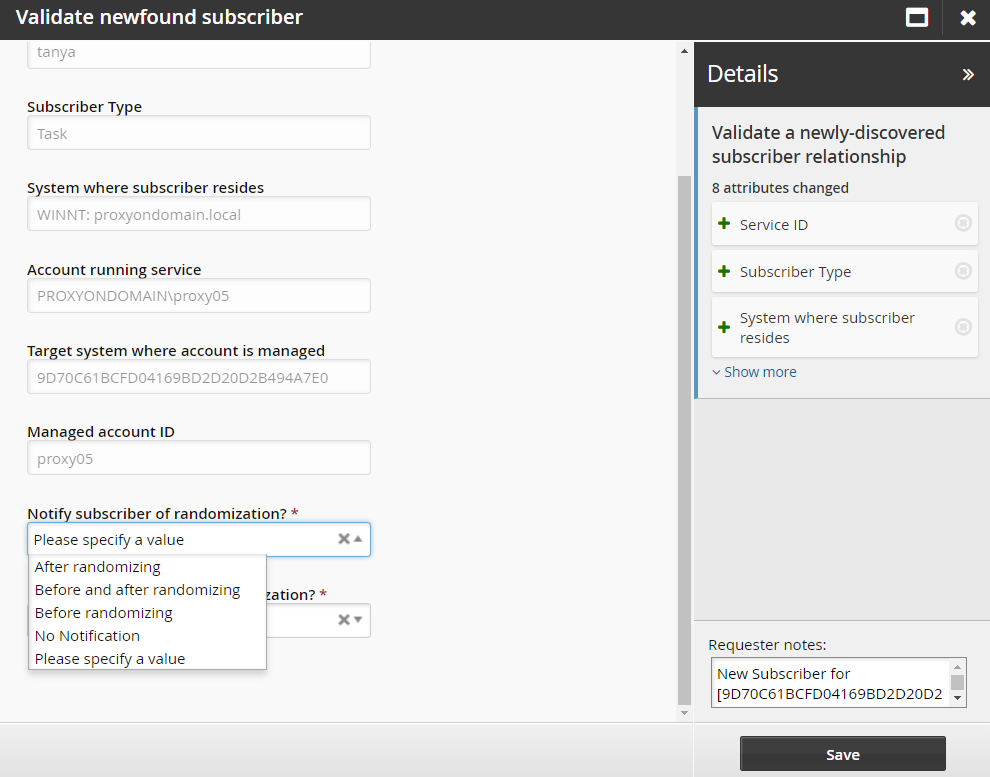
Set Restart subscriber after randomization to either Yes or No.
Restarting may not be needed for large, slow, heavy subscribers like SQLserver; the notification (changing the configured account password) is enough, as the service account password is used only when the service starts up. However, tasks or services which use the service account to run several operations which require login, would lock the service account if they use the old password several times quickly, so they have to be restarted.
Click Save.
Approve the request.
The Deny option is not valid for this type of request. If you do not want to send notifications before or after randomizing, update the request with Notify subscriber of randomization set to "No notification".
Manually randomize the password for the service account.
The password orchestration is now successfully set up.
Example: Configure import rules to onboard, update and offboard systems and accounts
By default, import rules do not affect systems and accounts managed through self service management. However, import rules can be used to configure resource attributes generally set through self service management to onboard, update and offboard systems and accounts.
The following resource attributes can be set by managed systems import rules:
Attributes of a resource
Resource Team
The following resource attributes can be set by managed accounts import rules:
Personal privileged owner
Privileged access owner
Password Reset/Randomization
Allow override
Allow randomization
PAM Account Disclosure Attributes
Direct connection
Copy password
Download file
View password
Attributes for the PAM OTP accounts
Teams to be permitted to view PAM OTP Account
OTP Accounts
Attributes of a resource
Resource Team
PAM Account Sessmon Attributes
Clipboard
Keystroke
Screenshot
Sample import rules
Sample rules are available to be installed as components:
Scenario.pam_sample_import_rules
Data.pam_importrule_acct_onboard_admin
Data.pam_importrule_set_policy
Data.pam_importrule_sys_onboard_winnt
Data.pam_importrule_tgt_import_non_critical
They can be found in the <instance> \ samples \ idmlib \ component \ directory.
RefBuild.pam_team_management must be installed before installing samples.
Once installed, the following rules are available:
Target systems: IMPORT_NON_CRITICAL – enabled by default and imports non-critical systems
Managed systems:
ONBOARD_WINNT – enabled by default and manages all Windows NT systems listed from the demo.local domain
OFFBOARD_OFFLINE_SYS – enabled by default and offboards systems that cannot be contacted for 40 days or more
Managed accounts:
MANAGE_ADMINS – disabled by default, but when enabled will manage all ”admin” accounts
OFFBOARD_OFFLINE_ACCT – enabled by default and offboards accounts on systems that cannot be contacted for 30 days or more
By default, the sample rules are configured with dummy data to:
run against demo.local
assign team_winnt as the resource team
enable session recording
disclose a direct connection (remote desktop) upon check-out
Update the import rules as required.
Configure import rules to set resource attributes
To use import rules to set management resource attributes:
Create and configure import rules .
Select an import rule.
Under the General tab, set resource attribute values to be assigned upon match.
Run the import rule, either manually or through discovery.
By default, import rules will not overwrite existing resource attribute values if they have already been set.
Configure import rules to update resource attributes
Resource attributes that have already been set through self service management pre-defined requests are not updated by import rules by default. To allow import rules to overwrite set values, enable IMPORT ACCOUNT RESATTR OVERWRITE and/or IMPORT SYSTEM RESATTR OVERWRITE for managed accounts and systems respectively. These system variables are found at Manage the system > Maintenance > System variables.
Example: Import systems using a pre-defined request
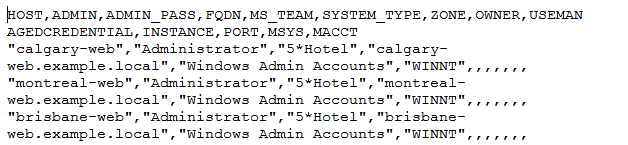
In this example, the client has a CSV file that is kept up to date by the administrators. This CSV file can be used to onboard systems using a pre-defined request.
Column Name | Description |
|---|---|
HOST | Optional: The host name of the system. |
ADMIN | The username of the admin user. |
ADMIN_PASS | The password of the admin user. |
FQDN | The FQDN of the server. |
MS_TEAM | The team name that the server will be onboarded to. |
SYSTEM_TYPE | The connector platform type. For example, "WINNT" is the platform associated to the ( |
ZONE | Optional: Used to specify the zone to tell which proxy to use if the system requires a Bravura Security Fabric proxy. |
OWNER | Optional: The owner of the system. |
USEMANAGEDCREDENTIAL | Optional: This is set to True if you wish to use a managed credential. |
INSTANCE | Optional: Used to specify a particular instance. |
PORT | The port to use for communication - This can be left blank in most cases. |
MYSTS | Optional: This is the managed system hostid containing the managed account. |
MACCT | Optional: This is the managed account name. |
REQUEST_TEAM | The team in which its system trustee(s) will be used to authorize the request. |
Below is the contents of the source CSV file used in this case:
To import systems using a pre-defined request:
From the administrator home page, click Manage components.
Search for and install the
Functional.hid_batch_request_submitcomponent.Log in to Bravura Security Fabric as a team trustee.
Click Manage Resources in the Requests section on the main menu.
Click Submit a request batch via CSV PDR to launch the wizard.
The PDR reads the CSV file and submits a request for each row in the CSV.
Enter the following values:
Pre-defined request to submit
System: Onboard.
Batch request reason
The reason for your request
CSV Request File
Search for and select your CSV file.
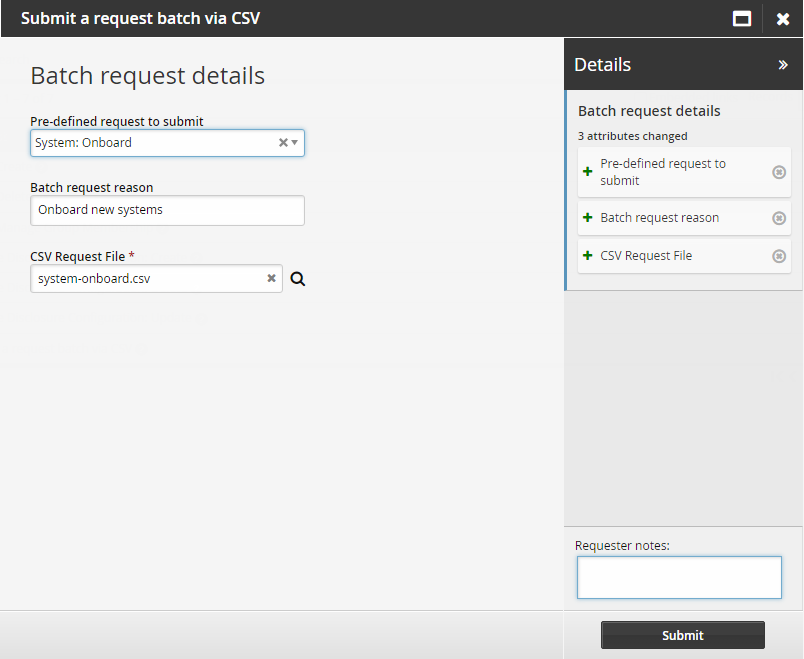
Click Submit.
The request will be auto-approved and the systems will be onboarded.
Click Manage the system > Privileged access > Managed systems.
You should be able to see the new onboarded target systems.

Troubleshooting
When a file is opened in Python it may have a bad/unexpected name for the first column See Workaround for dealing with UTF-8 BOM encoding .