Unix Server
Connector name |
|
Connector type | Executable, with local agent - Unix Listener |
Type (UI field value) | Unix target system |
Target system versions supported / tested | Linux glibc-2.28.x64 systems |
Connector status / support | Bravura Security-Verified This connector has been tested and is fully supported by Bravura Security. |
Installation / setup | The connector and Unix Listener is shipped with Connector Pack.The Unix Listener, which you install on the Unix system , is distributed with the Connector Pack as an archive file, psunix-linux-glibc-2.28.x64.tar.gz . |
Upgrade notes | Listener packages for other systems were deprecated as of Connector Pack 4.6. For other integrations use SSH connectors for AIX Server , HP-UX Server , Oracle Solaris Server , Linux Server and other SSH-enabled systems . |
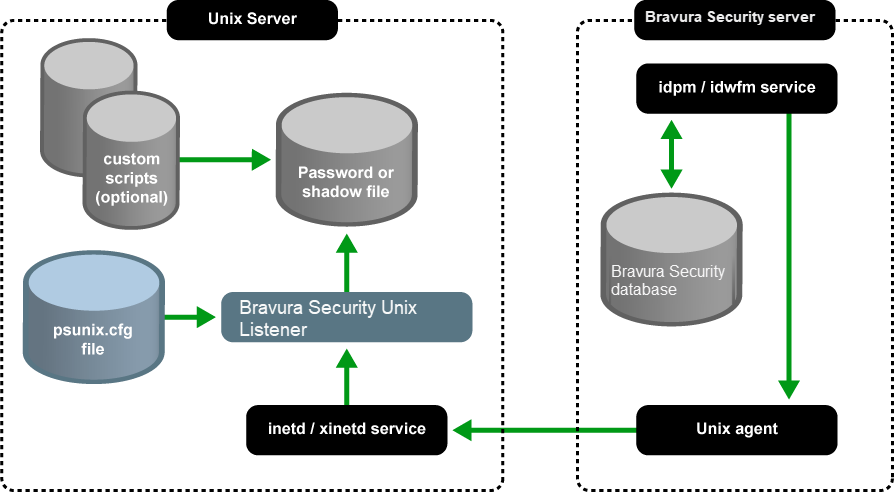
The connector for Unix (agtunix) connects to the Unix Listener, a local agent run by the inetd or xinetd service, to update and retrieve information from the Unix system.The Unix Listener provides secure, encrypted communication between Bravura Security Fabric components and the Unix system.
The following Bravura Security Fabric operations are built-in to the Unix Listener:
user verify password
get server information
user change password
administrator reset password
administrator reset+expire password
expire password
unexpire password
check password expiry
administrator verify password
verify+reset password
disable account
check account enabled
create account
delete account
add user to group
delete user from group
enable account
create group
delete group
unlock account *
update attributes
list account attributes
List:
accounts
attributes
groups
members
Note
*The unlock account operation is not implemented by default and a script must be used to add support.
For a full list and explanation of each connector operation, see Connector operations.
When a password or an account operation is requested by Bravura Security Fabric , the agent for Unix (agtunix) connects to a designated port (default 905) on the Unix system. The inetd/xinetd daemon forwards the connection to the Unix Listener, which performs the requested operations and returns the results.
The Unix Listener requires a configuration file to define interaction between Bravura Security Fabric components and your system. A default psunix.cfg file and psunix.d directory are created for you during the listener installation. If required, you can edit this file to override the built-in behavior of the Unix Listener. See Unix Configuration Scripts for more information on editing Unix scripts.
This process is illustrated in the figure below.
If Bravura Privilege will be used to manage the password on any Unix system that uses a file system integrity checking program (fcheck, tripwire, debsums), you need to either configure the program to ignore changes to the shadow file or be prepared to filter the error messages it generates.
The following sections show you how to:
Define an account for the target system administrator on a Unix server
Create template accounts
Install and configure the Bravura Security Fabric Unix Listener on the target system
Create server scripts for NIS systems
Add the target system in Bravura Security Fabric
This chapter also describes how Bravura Identity handles special attributes, used when creating or modifying accounts on a Unix target.
See also
Bravura Security Fabric can also perform operations on Unix implementations using either a Telnet or Secure Shell (SSH) script, assuming either services are available on the Unix system. These methods require you to write a script. The Telnet method is not secure. SSH script methods offer varying levels of security, depending on the system. See TCP Telnet HTTP or HTTPS Access for details on writing a telnet script. For SSH integrations use connectors for AIX Server , HP-UX Server , Oracle Solaris Server , Linux Server and other SSH-enabled systems .
Preparation
The sections that follow describe how to prepare a Unix target system before adding them in Bravura Security Fabric , including:
Configuring a target system administrator.
Creating at least one template account.
Installing the Unix Listener.
Writing server scripts for NIS systems.
Note
Bravura Security Fabric does not support plus (+) or minus (-) entries in UNIX local passwd and group files to incorporate NIS. Instead, you can use /etc/nsswitch.conf to incorporate NIS.
Configuring a target system administrator
Bravura Security Fabric requires a designated account (for example, psadmin) on the Unix target system in order to perform operations. Bravura Security Fabric uses the account’s credentials to verify that it is the authorized Bravura Security Fabric server on the network. It is only used for authentication purposes to allow the operations to run on the Bravura Security Fabric server.
Set up the designated account on the Unix system with no privileges. Set the account’s shell to /bin/false and the home directory to /tmp .
Ensure that you set and note the account’s password. You will be required to enter the login ID and password when you add the target system to Bravura Security Fabric .
Creating a template account
Bravura Security Fabric uses template accounts as models or "blueprints" for creating new Unix accounts. The following is an overview of a typical procedure for creating a (template) Unix account:
Add the account to the system.
Add the groups.
It is recommended that you do not add template accounts to Bravura Security Fabric managed groups. Managed group memberships should be handled by including them in roles.
Create the account’s home directory.
The detailed procedure for adding an account to your system varies depending on your specific Unix implementation.
Some systems include command-line utilities to help you create new accounts. For example, Debian Linux includes the useradd program. Other systems may require you edit the passwd file, shadow file , and set the password directly.
Note
It is recommended that you use the proper administrative tools to add or delete users. If the /etc/passwd and /etc/shadow files do not have corresponding entries, agtunix will only allow listing and deleting of the faulty records.
See your Unix documentation or man pages for more information.
Setting up the Unix Listener
You must install the Unix Listener on each Unix system where Bravura Security Fabric performs operations. To do this:
If you did not select the Unix Installation Packages when you installed the Connector Pack, install the
psunixinstallation packageRun the installation shell script in:
Requirements
Before you begin:
Ensure that the xinetd or inetd service is configured.
The Unix Listener requires an Internet services daemon for operation, and the installer checks for xinetd/inetd configuration prior to installation. If either service is installed but not configured, the installer will configure the service. If neither service is installed, the installer will inform you that the Unix Listener requires either xinetd or inetd for operation. The xinetd server is the preferred server and is chosen by default if both inetd and xinetd are available.
Bravura Security Fabric supports xinetd versions 2.3.4 and newer.
Have the following information available:
The local administrative account that will be used to authenticate the Unix Listener
This is the same account that you use as credentials when adding the target in Bravura Security Fabric .
The port the Unix Listener will be listening on; the default is 905.
The encrypted communication key (COMMKEY), or a copy of the idmsetup.inf configuration file.
The
idmsetup.infconfiguration file is located on the <instance>\psconfig\ directory.
Tip
After copying
idmsetup.inf, the best practice is to remove all unrequired data from the file before use.You will be prompted to enter these values during the Unix Listener installation.
Bravura Security Fabric does not support plus (+) or minus (-) entries in UNIX local passwd and group files to incorporate NIS. Instead, you can use /etc/nsswitch.conf to incorporate NIS.
Installing the Unix Listener interactively
Installing interactively takes less preparation and allows you to specify settings during installation. You can use the idmsetup.inf configuration to pass through some of the information as defaults.
Ensure that you have met the requirements.
To interactively install the Unix Listener on the Unix system:
Run the shell script
install.shfrom the root of the installation package:sudo sh install.sh [ -inf <path>/idmsetup.inf ] [ -inst <instancename> ]
where:
Option
Description
-inf
Specifies the path to the
idmsetup.inffile. If omitted, you must enter communication key (or Master Key) and other information when prompted.-inst
Specifies the instance name for location of the psunix files. If omitted, files are copied to the /usr/local/psunix/default instance. See Determining the psunix instance for more information about the instance location.
Follow the instructions displayed by the installer script.
In the installation process:
Allow system files to be backed up.
Select the Listener Service.
Submit the Communication Key.
Submit the local administrative account. This is the same account that you use as credentials when adding the target in Bravura Security Fabric .
Note the port number that was assigned to Bravura Security Fabric by the installation shell script. It is normally 905, but may be different on your system.
You need this port number when adding the Unix target system to Bravura Security Fabric , as described in Targeting a Unix system .
On systems where /etc/services defines port 905/tcp to be reserved, the installer will consider that port as unavailable. To make it available, first make sure it is not in use, then comment out the 905/tcp line in /etc/services . This can be done while the installer is waiting for a new port number to be input.
Installing the Unix Listener non-interactively
The installer’s non-interactive mode allows you to perform unattended installations. This would be advantageous where you want to install on many systems over SSH, for example. This mode requires you to write a response file that is used with a command line option.
Ensure that you have met the requirements.
To install the Unix Listener non-interactively:
Edit the following sections of the
psunix-responsefile.cfgin the root of the installation package:###################################################################### ## general options # Prior to installing PSUNIX, the installer allows the option to # backup files affected by the installation process. pre-backup = "Y"; # By default, if pre-existing configuration file(s) contains all the # required options, do not replace them. use-preexisting-cfg = "Y"; ###################################################################### ## listener options # The port that the PSUNIX listener binds to and listens on. The # default is port "905". listener-port = "905";
Edit the
<psunix-root>/conf/psunix.d/listenerconfiguration file to specify the administrative user that the Listener will authenticate against.Edit
<psunix-root>/conf/psunix.cfgto define the communication key (or Master Key) that matches the one set during installation on the Bravura Security Fabric server; for example:commkey = "<encrypted commkey value>";
Optionally, you can pre-configure other options in this file if you want different behavior from the default. See Unix Configuration Scripts for details.
Run the shell script
install.shfrom the root of the installation package:sh install.sh -c 1 -ni [ -inst <instancename> ]
where:
Option
Description
-inst
Specifies the instance name for location of the
psunixfiles. If omitted, files are copied to the /usr/local/psunix/default instance. See Determining the psunix instance for more information about the instance location.
pspasswd and non-default instances
The psunix local instance name, defined by the -inst option when running the install.sh script, is not connected to the main Bravura Security Fabric instance name. If specified, it designates a sub-target.
During install/setup, if the instance name is the default, the installer symbolically creates a link from:
/usr/local/psunix/<instance>/psunix.d to /etc/psunix.d, and
/usr/local/psunix/<instance>/psunix.cfg to /etc/psunix.cfg
The pspasswd binary (due to the fact that only one version can be installed in /usr/bin or /bin) always looks for /etc/psunix.cfg.
See also
Unix Configuration Scripts includes a more general usage reference for the
install.shscript.Once the
psunixfiles have been extracted, apslangutility is available for further scripting on the Unix system. See Writing a PSLang script for more information.Transparent Password Synchronization shows how to set up transparent synchronization on a Unix server.
Configuring the inetd.conf and xinetd.conf files
The install script automatically finds and updates the inetd.conf or xinetd.conf file and restarts the service.
The script updates the inetd.conf file with:
psunix-<instance> stream tcp nowait root /usr/local/psunix/<instance>/server.<os>.<cpu> server
A new file called psunix–<instance> is placed in the /etc/xinetd.d folder and contains the following:
service psunix-<instance>
{
    socket_type     = stream
    protocol        = tcp
    flags          = IPv4
    port            = 905
    wait            = no
    user            = root
    server          = /usr/local/psunix/<instance>/server.<os>.<cpu>
    server_args     =
    disable         = no
}
On some Unix systems, inetd (or inetutils-inetd ) only listens on IPv6 sockets by default. In that case, if IPv4 operation is required, replace "tcp" with "tcp4" in the psunix line in inetd.conf .
Once changes are made, restart the inetd process.
Determining the psunix instance
The psunix local instance name, defined by the -inst option when running the install.sh script, is not connected to the main Bravura Security Fabric instance name. If specified, it designates a sub-target.
All instances are configured to use the default database (/etc/passwd) but they can each be changed to match the logic needed for each sub-target.
It is recommended that you use port 905 and the default name to install the first local instance that targets the Unix server. You can then setup sub-targets with their own configuration (communication key (or Master Key), administration user, database, policies, scripts, and so on).
For example, you could use a PSLang script for psunix to target an application, such as a MySQL database, messaging server, or internal web-based application, while still retaining the default instance to manage the unix users themselves separately.
In another example, when implementing privileged access management, regular users could be served by the default instance, where it would be forbidden to touch administrators, and administrative users would be handled by a separate psunix instance with different credentials, and would be allowed to touch privileged users.
Editing the Unix Listener configuration file
A default configuration file, psunix.cfg , is created for you in the etc directory during the Unix Listener installation. A default directory, /etc/psunix.d/, is also created and contains additional configuration files. You can edit these files to modify the values you entered during installation, or to set additional options.
You may also override account operations, built into the Unix Listener, by adding a PSLang file specified by the pslang-override-path option in psunix.cfg . The conf directory of the psunix archive contains three samples :
pslang-override-sample– a generic sample frameworkpslang-override-passwd– for calling passwd interactively, using the PSLang popen callpslang-override-nis– for use with NIS servers
See:
Writing NIS server scripts for more information about creating and editing scripts for an NIS deployment.
Unix Configuration Scripts for details about editing Unix configuration files.
Relocating psunix
The default path for psunix is /usr/local/psunix . At times it might be necessary to change this location in the psunix installer using the -bd option, for example:
./install.sh -bd /usr/share/psunix
In addition to this, you need to add an LD_LIBRARY_PATH entry for mtcspi in the service account’s .profile (by default, psadmin).
Modifying directory permissions for psunix
By default, the directory permissions for /usr/local/psunix are set for root for the user and group ownerships. It may be necessary at times to change this for an alternate administrative account when root is not used for the services.
For example, when the Unix Listener is installed, check to see what user is used to run the xinetd or inetd service for the psunix listener. Another example could be if LDAP Transparent Synch is installed and a different administrative user is used for the directory server service.
If any of these services are not root, you will need to modify the configuration files for psunix for this alternate administrative user, for example:
chown -R <user>:<usersgroup> /usr/local/psunix
Writing NIS server scripts
In order to target an NIS system, you must create or modify the following script files:
Configuring the psunix.cfg file
An NIS server derives its password database NIS maps from NIS source files. You must configure psunix so that it can locate and update the NIS source files.
In the psunix.cfg configuration file, configure passwd-path, group-path, shadow-path, and grpshadow-path to point to the NIS source files. A typical NIS instance does not use a shadow or gshadow file; this section may be commented out. The following is a sample excerpt from the psunix.cfg file for an NIS target system:
 database = {
   user = {

# Specifies an alternate path to the password database file where all
# user information is stored.  If it is not specified (default
# behavior), the location is /etc/passwd.
#

      passwd-path = "/var/yp/maps/passwd";

          };

      group = {

# Specifies an alternate path to the group database file where all
# group information is stored.  If it is not specified (default
# behavior), the location is /etc/group.
#


      group-path = "/var/yp/maps/group";

     };
    };
For transparent synchronization (pspasswd ) the configuration will be taken from the system (nsswitch.conf) since pspasswd uses system calls to get user credentials and set passwords, it does not use the specified configuration lines found in psunix.cfg.
Adding the PSLang override option
Copy the provided pslang-override-nis.psl file located inside the conf directory in the psunix archive, into /usr/local/psunix/<instance>/. Edit the file to suit your requirements.
In the psunix.cfg file, add a pslang-override-path option that points to the PSLang override file:
# This option allows users to script pslang code that either:
# 1) overrides builtin psunix operations, or
# 2) adds pre/post operations that augement the builtin operations.
#
# Please refer to the psunix conf/pslang-override-sample.psl for a
# general example.
#
# Please refer to the psunix conf/pslang-override-nis.psl for a
# NIS example.
#
      pslang-override-path = "/usr/local/psunix/<instance>/pslang-override-nis.psl";
Adding a script to build the NIS maps
An NIS server builds the NIS maps using the make utility. Copy the following script into /usr/local/psunix/<instance>/make-nis.sh and edit accordingly. Ensure that the script includes the "hashbang" (#!) line with the full path to the interpreter program.
#!/bin/sh
# This script runs make to build the nis maps.


# Change the NISDIR to the path of the NIS makefile.

NISDIR=/var/yp/maps/
NISTARGET=passwd


# Change the NISTARGET to the make target(s) of interest.

cd $NISDIR
/usr/bin/make $NISTARGET
Ensure that the script has execution rights:
chmod u+x /usr/local/psunix/<instance>/make-nis.sh
Test the script to ensure it works.
Targeting a Unix system
For each Unix system, add a target system (Manage the system > Resources > Target systems):
ID a unique value, for example UNIXSRV
Type is Unix target system.
Address uses options described in the table below.
Set Program to generate a list of target systems to the program name, if you use a sub-host plugin.
Bravura Security Fabric includes the unixsub sub-host plugin to accelerate password replication from Unix target systems.
The full list of target system parameters is explained in Target system options .
Option | Description |
|---|---|
Options marked with a | |
Server | The Unix system's DNS name or IP address. (key: server) |
Port | The port that the Unix Listener Service is listening on. For example: 905. (key: port) |

Using a sub-host plugin to replicate password changes on local workstations
You can use the unixsub sub-host plugin to replicate password changes from the main Unix target system serving the Bravura Security Fabric server to a local client machine accessed by a user.
See Target systems composed of multiple servers for details.
Handling account attributes
You can view the complete list of attributes that Bravura Security Fabric can manage, including native and pseudo-attributes, using in the Manage the system (PSA) module. To do this, select Unix Target from the Manage the system >Resources > Account attributes > Target system type menu.
This section describes the attributes that Bravura Security Fabric uses to compose values, set flags, or control behavior on Unix.
Note
Unix is case-sensitive.
_homedir_option This attribute is currently not used.
_sup_homedir_option This attribute is currently not used.
acct_expiry_date The format of this attribute is YYYY/MM/DD.
acct_inactive The number of days after a password is expired that the account is disabled (if it has not been changed).
gecos This attribute corresponds to the gecos field in the Unix /etc/passwd file. The gecos field contains general information about the user; the exact information depends on your Unix system. By default, the gecos attribute is set to user’s full name, using a PSLang expression.
groups By default, when creating a new Unix account, the groups attribute is copied. A new group is created with the ID of the new user.
The groups attribute is a multi-valued attribute. Each value must be written in the format <group name> (the gid will not work).
If you set this attribute, a new user’s primary group is the first group in the list.
Group IDs containing the symbols # , : , and leading or trailing spaces are invalid and will be disallowed.
pw_change_war The number of days before a password is to expire that the user is warned.
subgroup This attribute is only listed from AIX systems.
uid By default when creating a new Unix account, the uid attribute is ignored. The account is instead given a free UID as determined by the Unix Listener.
See Unique numerical identifiers on Unix systems for more information.
Note
Unix systems do not recognize account attribute sequence numbers and will not have any effect (see Specifying attribute values for more information).
Unique numerical identifiers on Unix systems
On Unix based systems, each account has a unique numerical identifier called a UID. This means the account is not only identified on the system by their login ID, but they are also identified by the assigned UID. Similarly, each group has a unique numerical identifier called a GID.
It is important to keep track of the UIDs and GIDs, especially if you are using Bravura Identity to create and manage accounts/groups on more than one Unix system. This ensures that the numerical identifier is only used once and that the account/group is identified by that number on both systems.
Troubleshooting
Connectivity:
Verify that you can connect from the Bravura Security Fabric server to the listener on the Unix server by typing from a command prompt on the Bravura Security Fabric server:
telnet <servername> <port-number>
(for example, telnet unix1 905 )
The screen may appear blank, because there is no handshake response. As long as you get no errors, this is OK.
If this fails:
Check the host name: You should be able to ping the Unix server, and probably also to Telnet to it.
Compare the port number in the /etc/services file on the Unix server against the one on the Bravura Security Fabric server.
Verify that /etc/services and /etc/inetd.conf on the Unix server contain entries for the Bravura Security Fabric Unix listener.
Verify that the inetd daemon on the Unix server is running, and has received a HUP signal (kill -1 pid).
Verify that the correct Unix listener binary was installed in /usr/local/psunix/<instance>, by trying to run it from a Unix shell prompt. If you get a password-listener prompt, then all is well.
Passwords:
Verify that the psadmin account has been defined on the Unix server, that it is a local account, and that the same password has been entered for it on both the Unix server and the Bravura Security Fabric server.
If the Change and expire function fails, you may need to upgrade the Unix listener. Please contact support@bravurasecurity.com for more information.
If password expiry functions fail, ensure that shadow passwords are enabled.
User names:
Ensure that user names on the Unix target system are composed of valid characters only. Although it is possible to create user names with special characters, some combinations are invalid in Unix (refer to your Unix system documentation to learn about creating valid user names).
It is strongly recommended that user names do not contain meta-characters, these characters often have special meaning and may not produce expected results when processed by the command line shell (such as the # character which is often used to begin a comment).
Note
If a password reset is attempted on an invalid user name in Unix, the password reset will not succeed.
Inetd:
Verify that the inetd server is installed and running, that the /etc/inetd.conf and /etc/services files are updated to include entries for Bravura Security Fabric , and that the service is listening for connections on the appropriate port.
Permissions:
Check that Bravura Security Fabric is configured to run as root in /etc/inetd.conf, so that the Unix listener can perform operations.
Key match:
Verify that the comm-key in the psunix-config section of the /etc/psunix.cfg configuration file matches the key on the Bravura Security Fabric server, to ensure matching encrypted communication between the Bravura Security Fabric server and the Unix server.
Note
It is possible to have mismatched versions of the Bravura Security Fabric server and the Unix server. They will negotiate the key length and default to the shortest communication key. In this case, ensure that the first 128 bytes of the key are the same on both servers.