Viewing and Updating Profiles
Bravura Security Fabric provides you with a means to manage your own profile and resources. When Bravura Identity is licensed, you may also be able to manage other users profiles, depending on access controls.
Getting started
From the Home Dashboard, click View and update profile under:
My profile to view or update your own profile.
Other users to select another existing user to view or update.
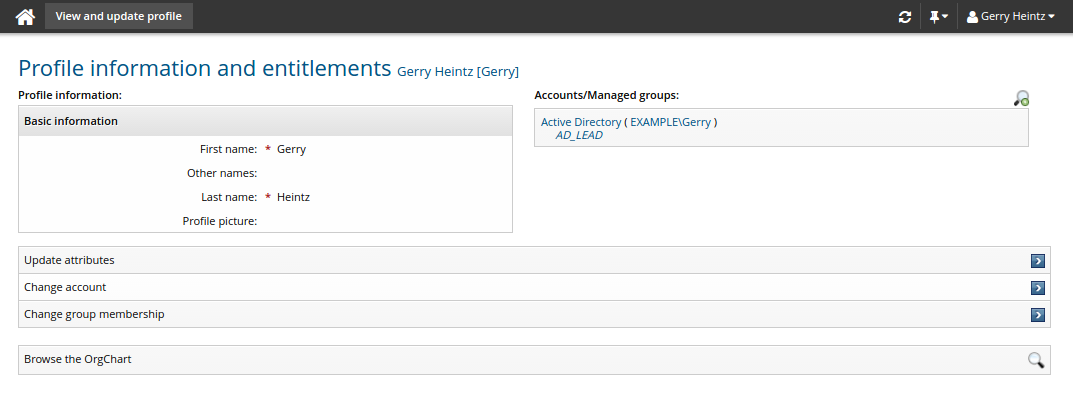
Account status
You can also view account status by clicking the "Account status" icon  , provided you have required permissions ("View account"). The status will be displayed next to the account.

Request actions
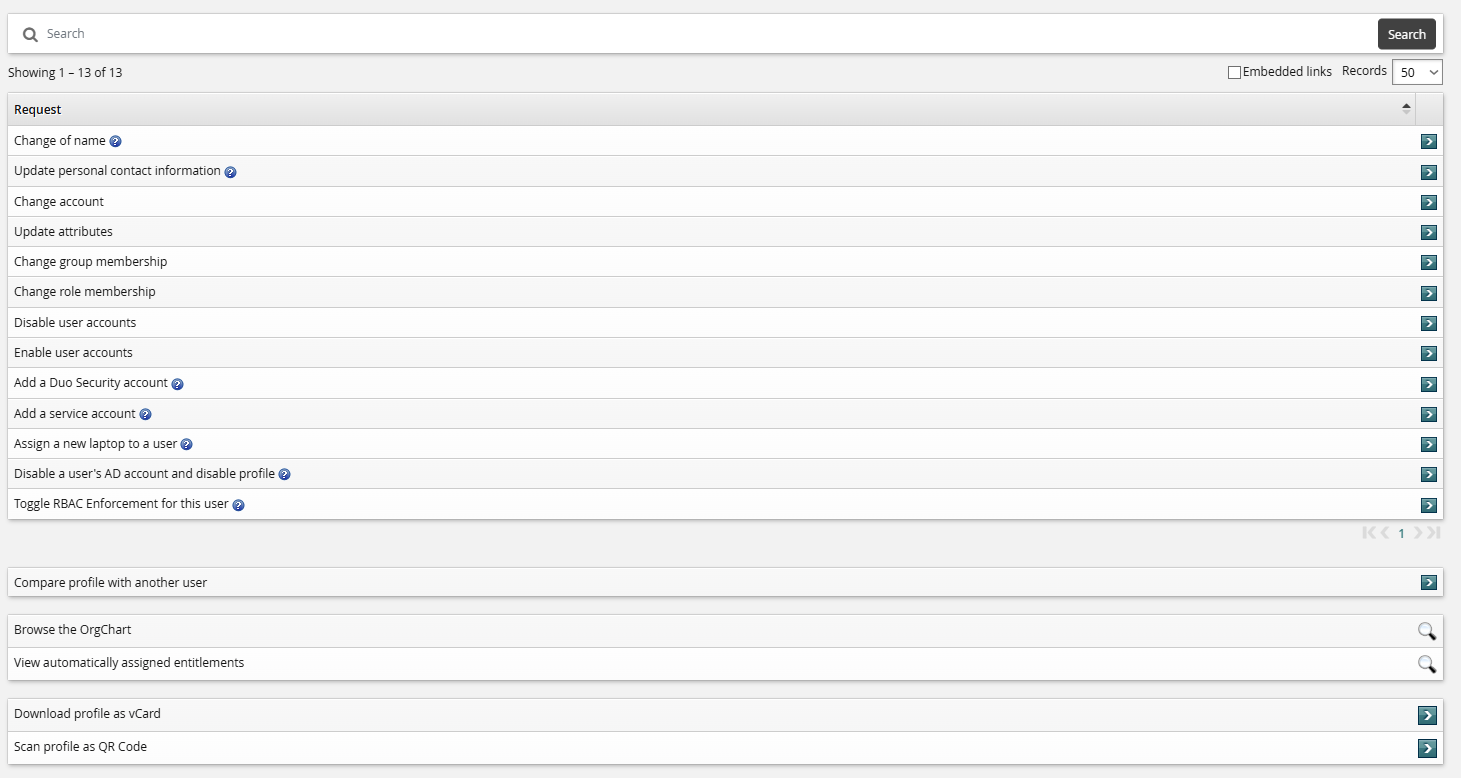
Depending on configuration and your permissions, Bravura Security Fabric displays profile information and a menu of request options, which are set up by Bravura Security Fabric administrators and use a simplified wizard form. License requirements are noted in this section.
The operations that you are allowed to carry out on another user’s profile are controlled by an operation filter. By default, the only operation that regular users can perform for other users is to request new resources, if Bravura Identity is licensed.
See also
For information about delegation, see Delegating Responsibility.
Updating profile information
Bravura Security Fabric uses profile and request attributes to collect information about you, and if Bravura Identity is licensed, to help define requested resources. Attributes are grouped for organizational purposes and to determine who can read or write the information.
When a provisioning or access request workflow is implemented, Bravura Security Fabric can be configured with other customized groups of attributes listed on the View and update profile page and other request forms.
You can update profile information provided you have write permissions for profile attributes.
Note the following:
If an attribute field allows multiple values, you can click the More icon
 or button until the configured maximum number of values has been entered.
If you do not enter values for all required attributes (marked with a red asterisk), Bravura Security Fabric will return an error.
If a field has been filled with a default value, this value will be included unless you change it. This applies to both required and optional values.
You may be required to confirm a value by re-typing it in a second text box. For example, some password-type attributes "hide" the value as you type.
Update attributes
Click below to view a demonstration.
The following procedure describes updating profile information using the standard Update attributes request. Details may vary according to configuration. To update profile information:
Navigate to the Profile information and entitlements page for yourself or another user.
Click Update attributes in the requests section.
Bravura Security Fabric displays the request wizard.
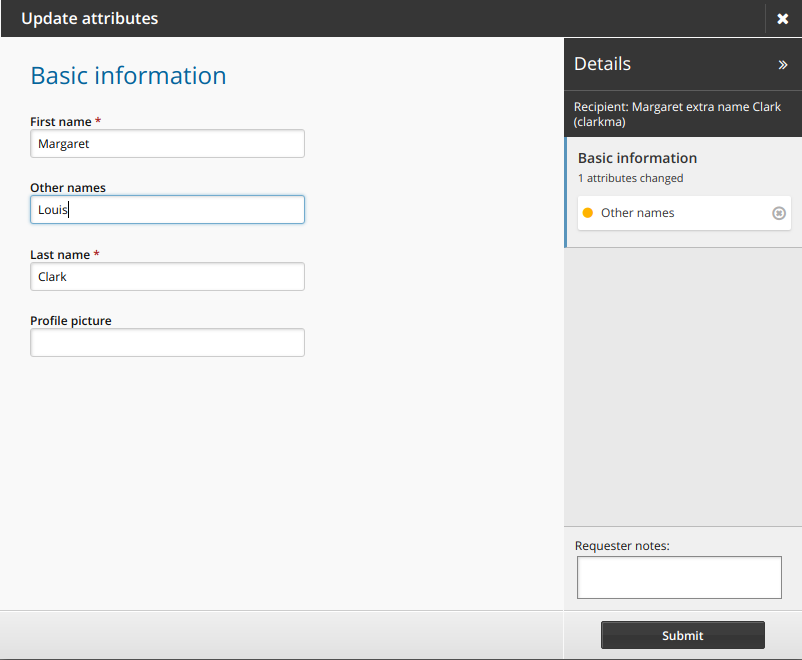
Make changes as required.
Click Next if available to proceed through attribute group pages.
If required, select accounts that you want to update.
If an account selection page is not present, Bravura Security Fabric updates all accounts attached to your profile.
Click Submit.
When authorization workflow is implemented, relevant authorizers are notified to review the request if necessary. See Tracking and Updating Requests to learn how to see your request progress.
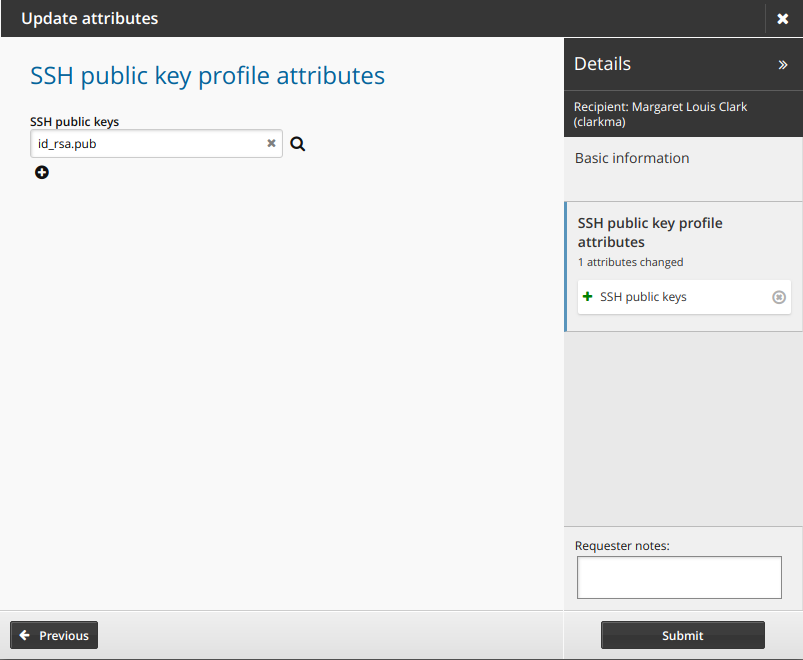
Store and update SSH public keys in profiles
You can store and update SSH public key files in your profile provided you have read and write permissions for SSH public key profile attributes.
Depending on configuration, your SSH public keys on a system may already be in your profile.
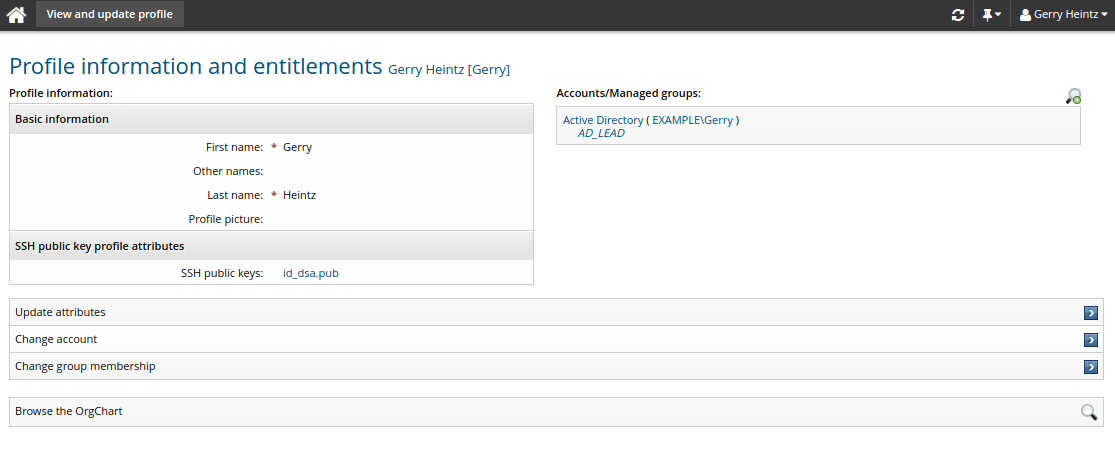
Add, delete, or replace files under SSH public key profile attributes. SSH public keys must have different filenames.
Viewing profile information as vCard
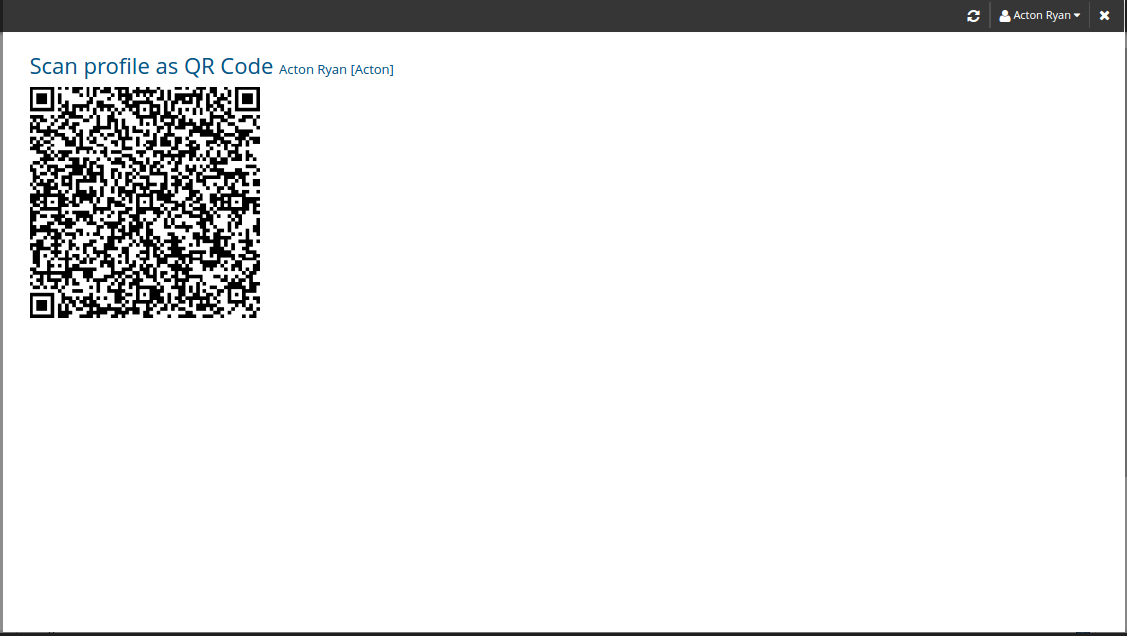
If profile information is mapped to vCard properties, you can view a user’s profile information as a vCard contact record (.vcf). You can download the contact record or scan a QR code with the contact record onto a mobile device.
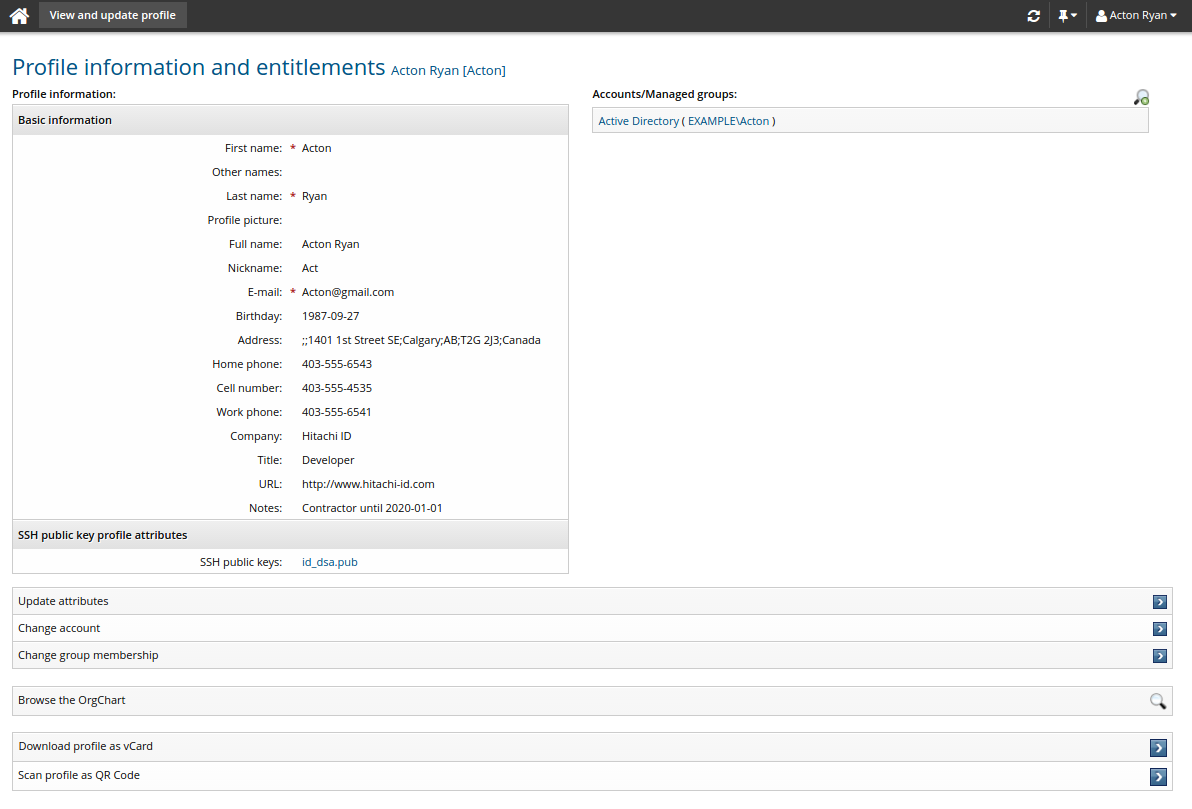
Navigate to the Profile information and entitlements page , then click Download profile as vCard to download the contact record saved as a .vcf file:
BEGIN:VCARD
VERSION:3.0
FN:John Doe
EMAIL:doejo@example.net
ADR:;;1401 1st Street SE;Calgary;AB;T2G 2J3;Canada
BDAY:1987-07-23 06:00:00
TEL;TYPE=CELL:403-555-4535
ORG:Bravura Security
TEL;TYPE=FAX:403-555-2545
FN:John Doe
N:Doe;John
NICKNAME:Johnny
NOTE:Contractor until 2015-12-31
TEL;TYPE=HOME:403-555-6543
TITLE:Developer
URL:http://www.bravurasecurity.com
TEL;TYPE=WORK:403-555-6541
END:VCARD
Click Scan profile as QR code to display the QR code:
The contact record may also be imported directly into the native contacts lists for both Android and iOS mobile devices from the Download profile as vCard link when accessed from the Bravura One app .
From the Bravura One app, navigate to a user's page and then click Download profile as vCard. The contact record will be added to the native contacts lists for the Android or iOS mobile device.
See also
See Mobile Access for more information about Bravura One and the Bravura One app.
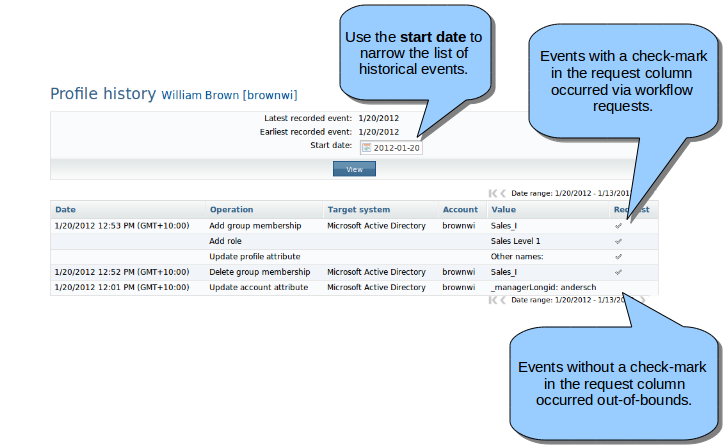
Viewing profile history
You can view user profile history, provided you have the required "View profile history" permission.
Viewing profile history allows you to view a chronological list of changes that have been made to a user profile. This can include changes to attributes, account ownership, group memberships, role memberships, and requests where the selected user is the recipient.
Navigate to the Profile information and entitlements page , then click View profile history.
Changing accounts
In addition to updating information (attributes), you may be able to request the following account operations for yourself or others:
Adding new accounts
You can request new accounts on supported target systems.
Disabling or enabling accounts
You can request that an account be disabled if it is no longer needed, but it should not be deleted. The account itself remains intact, and you can enable it later.
Deleting accounts
You can request that an account be deleted if it is no longer needed and should be removed.
On almost every target system, this operation is permanent, and all your information in the account is lost. A more prudent course of action would be to disable the account, recover any data the account may have, and then delete the account later.
Moving accounts to another directory
Without affecting other account properties, you can move accounts between directories on context target systems such as LDAP Directory Service, Novell Directory Services (NDS), and Microsoft Active Directory.
Depending on how Bravura Security Fabric is configured, you set the destination (the To container) by selecting it from the drop-down list or by typing it in the text field.
Change accounts
The following procedure describes how to request modifications to accounts using the standard Change accounts request. To modify existing accounts:
Click Change accounts in the requests section.
Bravura Security Fabric displays the request wizard.
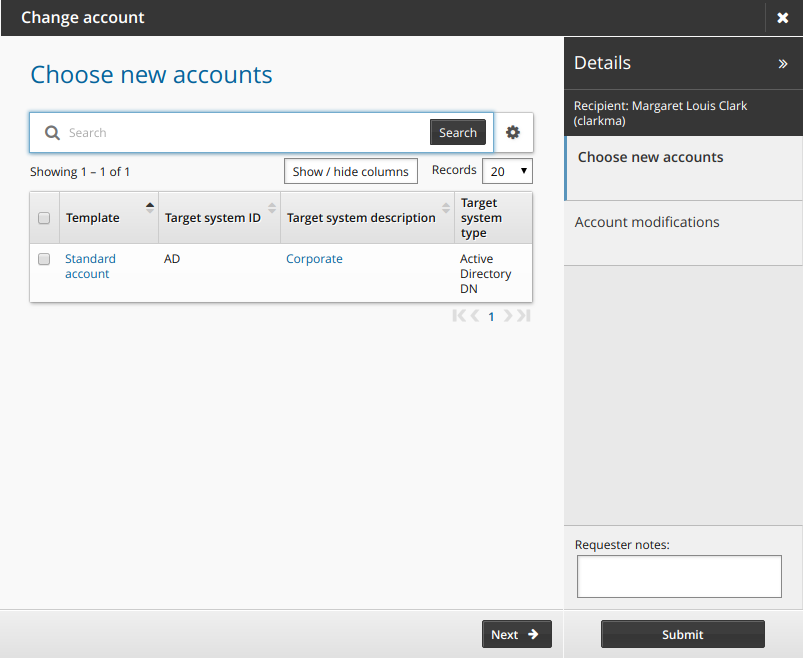
Select the checkboxes for accounts you want to add.
Click Next to navigate to the Account modifications page.
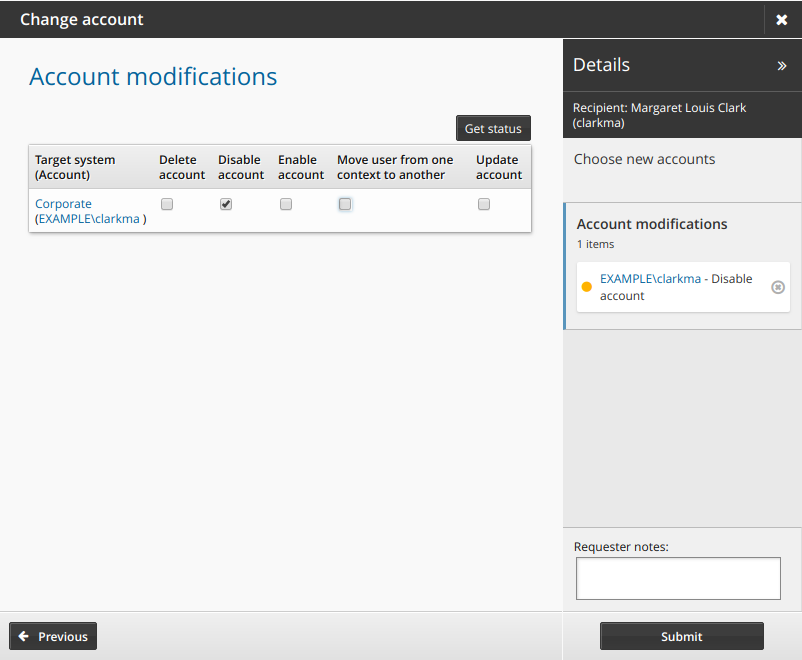
Select actions for the accounts you want to modify.
Actions are grayed out if you do not have appropriate permission.
Click Get status to see whether accounts are enabled.
If required, resolve enforcement violations .
If the selected accounts cause new SoD violations, resolve SoD violations .
Click Submit.
Relevant authorizers are notified to review the request if necessary. See Tracking and updating requests to learn how to track your request.
Changing group memberships
Most systems have some sort of group membership that allows you certain access privileges. You can manage group memberships for each account you have on different systems. You can also manage group memberships using the Groups app .
Change group membership
The following procedure describes how to update profile information using the standard Change group membership request. To update group membership:
Click Change group membership in the requests section.
Bravura Security Fabric displays the request wizard.
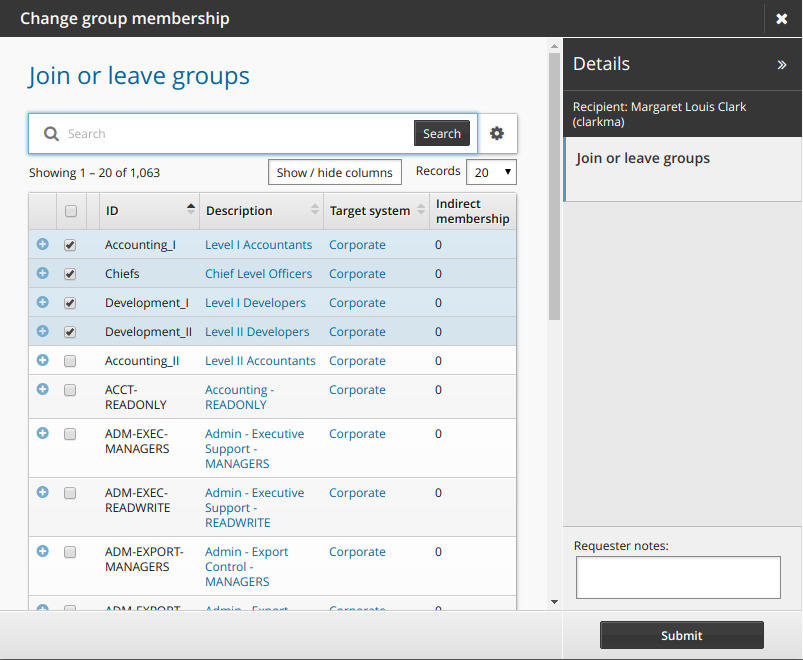
Select or deselect the checkboxes for the groups that you want to join or leave.
If required, resolve enforcement violations .
If the selected accounts cause new SoD violations, resolve SoD violations .
Click Submit.
Relevant authorizers are notified to review the request if necessary. See Tracking and updating requests to learn how to track your request.
Group recommendations
Product administrators can configure the Change group membership page so that users see recommendations of group memberships to add or delete, based on consistency among the user’s peer group.
A peer group is a group of users who share a common attribute; for example, users working at the same location or in the same department, or with the same manager.
When configured, users can show or hide recommendations by clicking the Recommendations button in the middle panel. Recommendations are visually represented by a color bar with a number stating the percentage of peers who are members. This can help the user to decide whether to add or delete a membership.

In the above screenshot:
 Membership is not recommended. None of the user’s peers are members.
 Membership is recommended. 25% of the user’s peers are members.
 Membership is strongly recommended. 75% of the user’s peers are members.
Changing role memberships
Entitlements such as accounts and group memberships can be grouped as roles.
Roles may be assigned even when the recipient of the request already has some or all of the required entitlements (such as an account or group memberships).
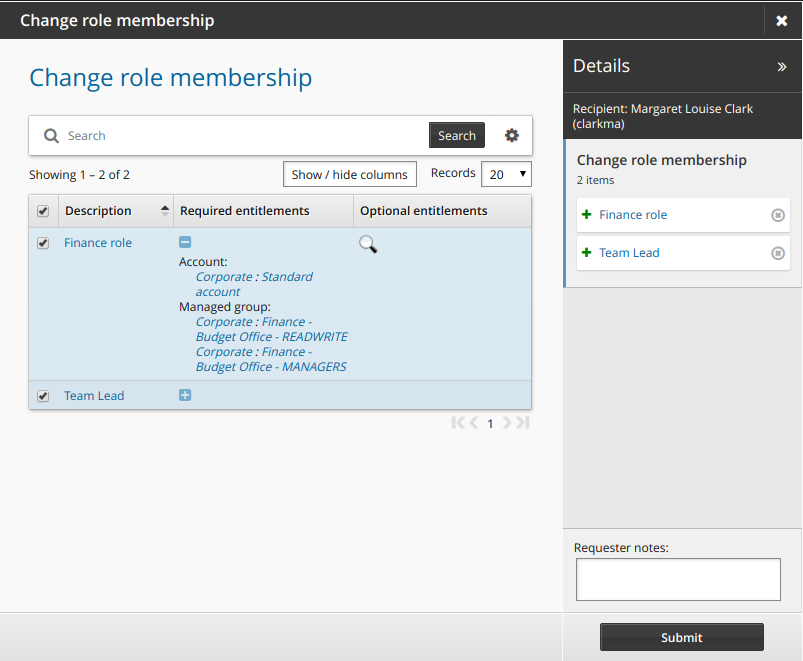
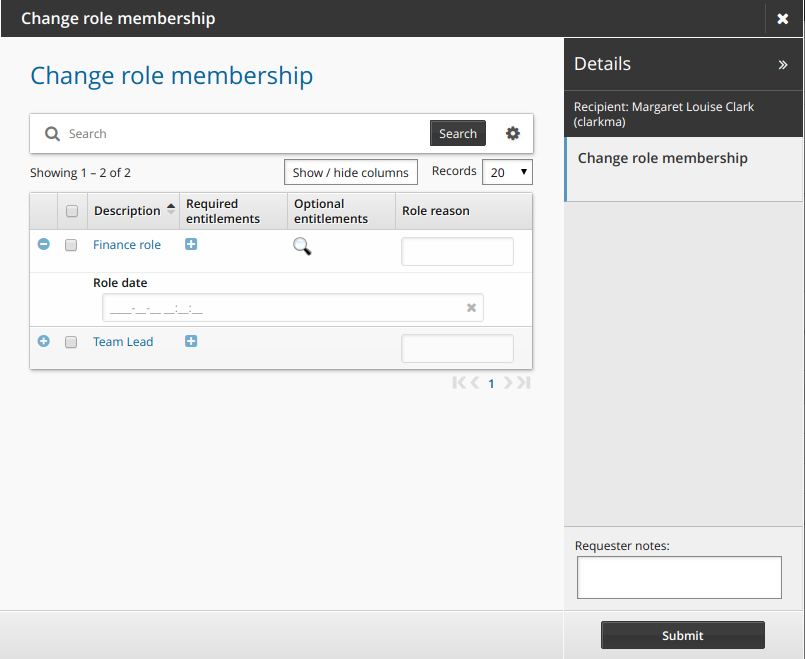
Change role membership
The following procedure describes how to update profile information using the standard Change role membership request. To update role membership:
Click Change role membership in the requests section.
Bravura Security Fabric displays the request wizard.
The list of provided entitlements is collapsed by default. To expand the list of entitlements use the "expand"/"collapse"
 icon in the "Required entitlements" column.
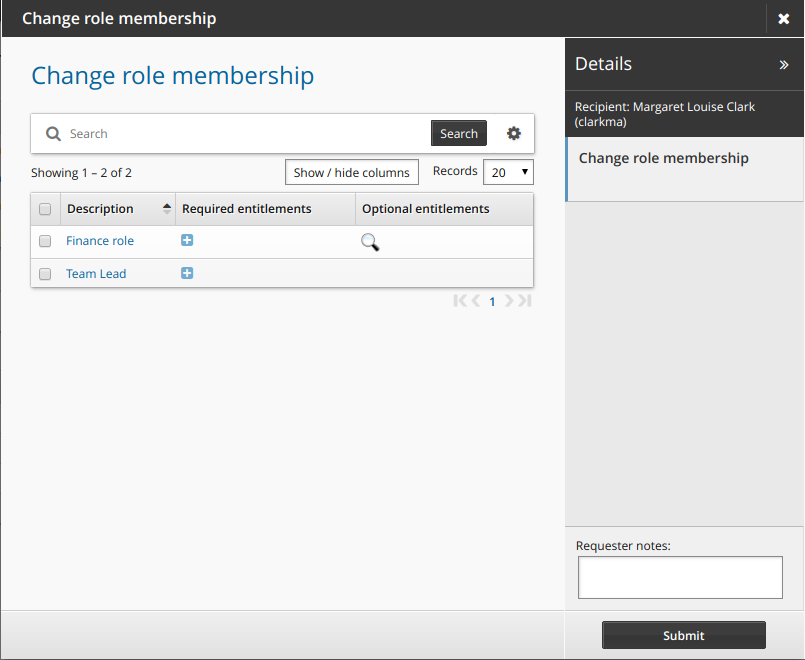
Select or deselect the checkboxes for the roles that you want to join or leave.
If the role includes optional entitlements, click the magnifying glass
 icon to open the Optional entitlements pop-up box.
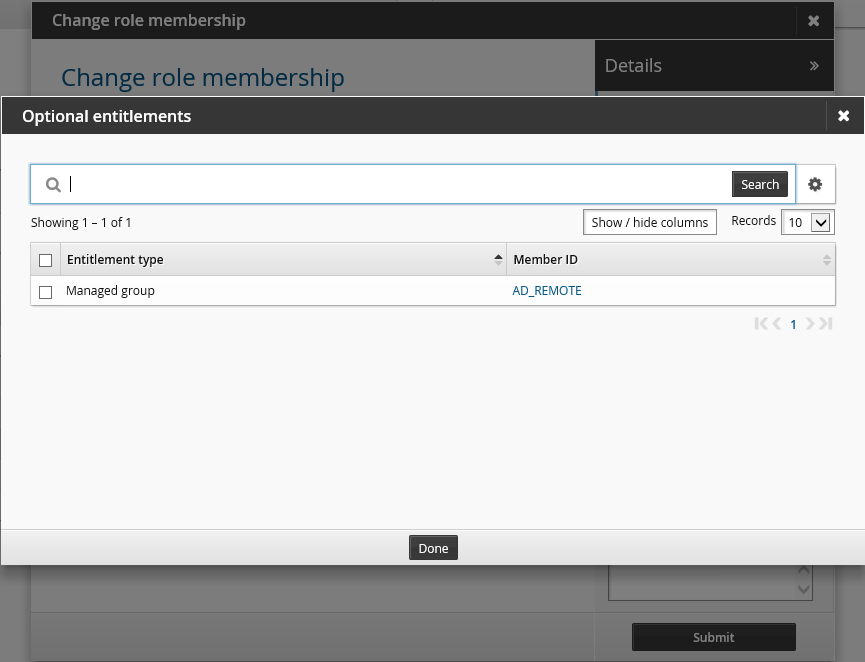
Select checkboxes for the entitlement that you want to include in the request, then click Done .
Selected entitlements are noted in the Details panel.
If required, resolve enforcement violations .
If the selected accounts cause new SoD violations, resolve SoD violations .
Click Submit.
Relevant authorizers are notified to review the request if necessary. See Tracking and updating requests to learn how to track your request.
Change role membership attributes
Administrators can add attribute fields to gather additional information about role membership. End users can add or update the attribute values by requesting a change in role membership. The following procedure describes how to update role membership attribute values using the standard Change role membership request. It assumes that roles have been defined and assigned to an end user.
To add role membership attributes:
As a product administrator, click Manage the system > Resources > Resource attributes.
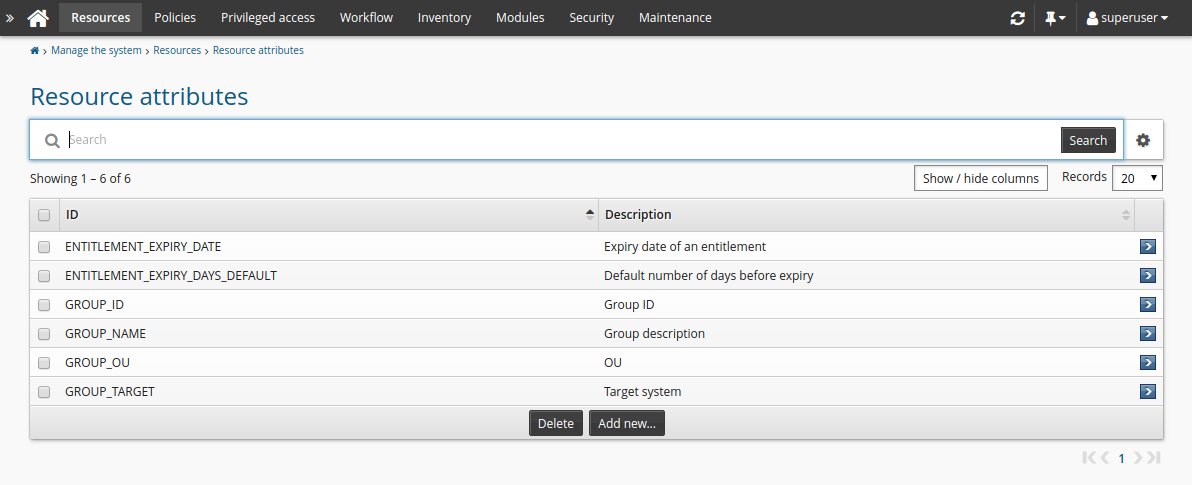
Click Add new…
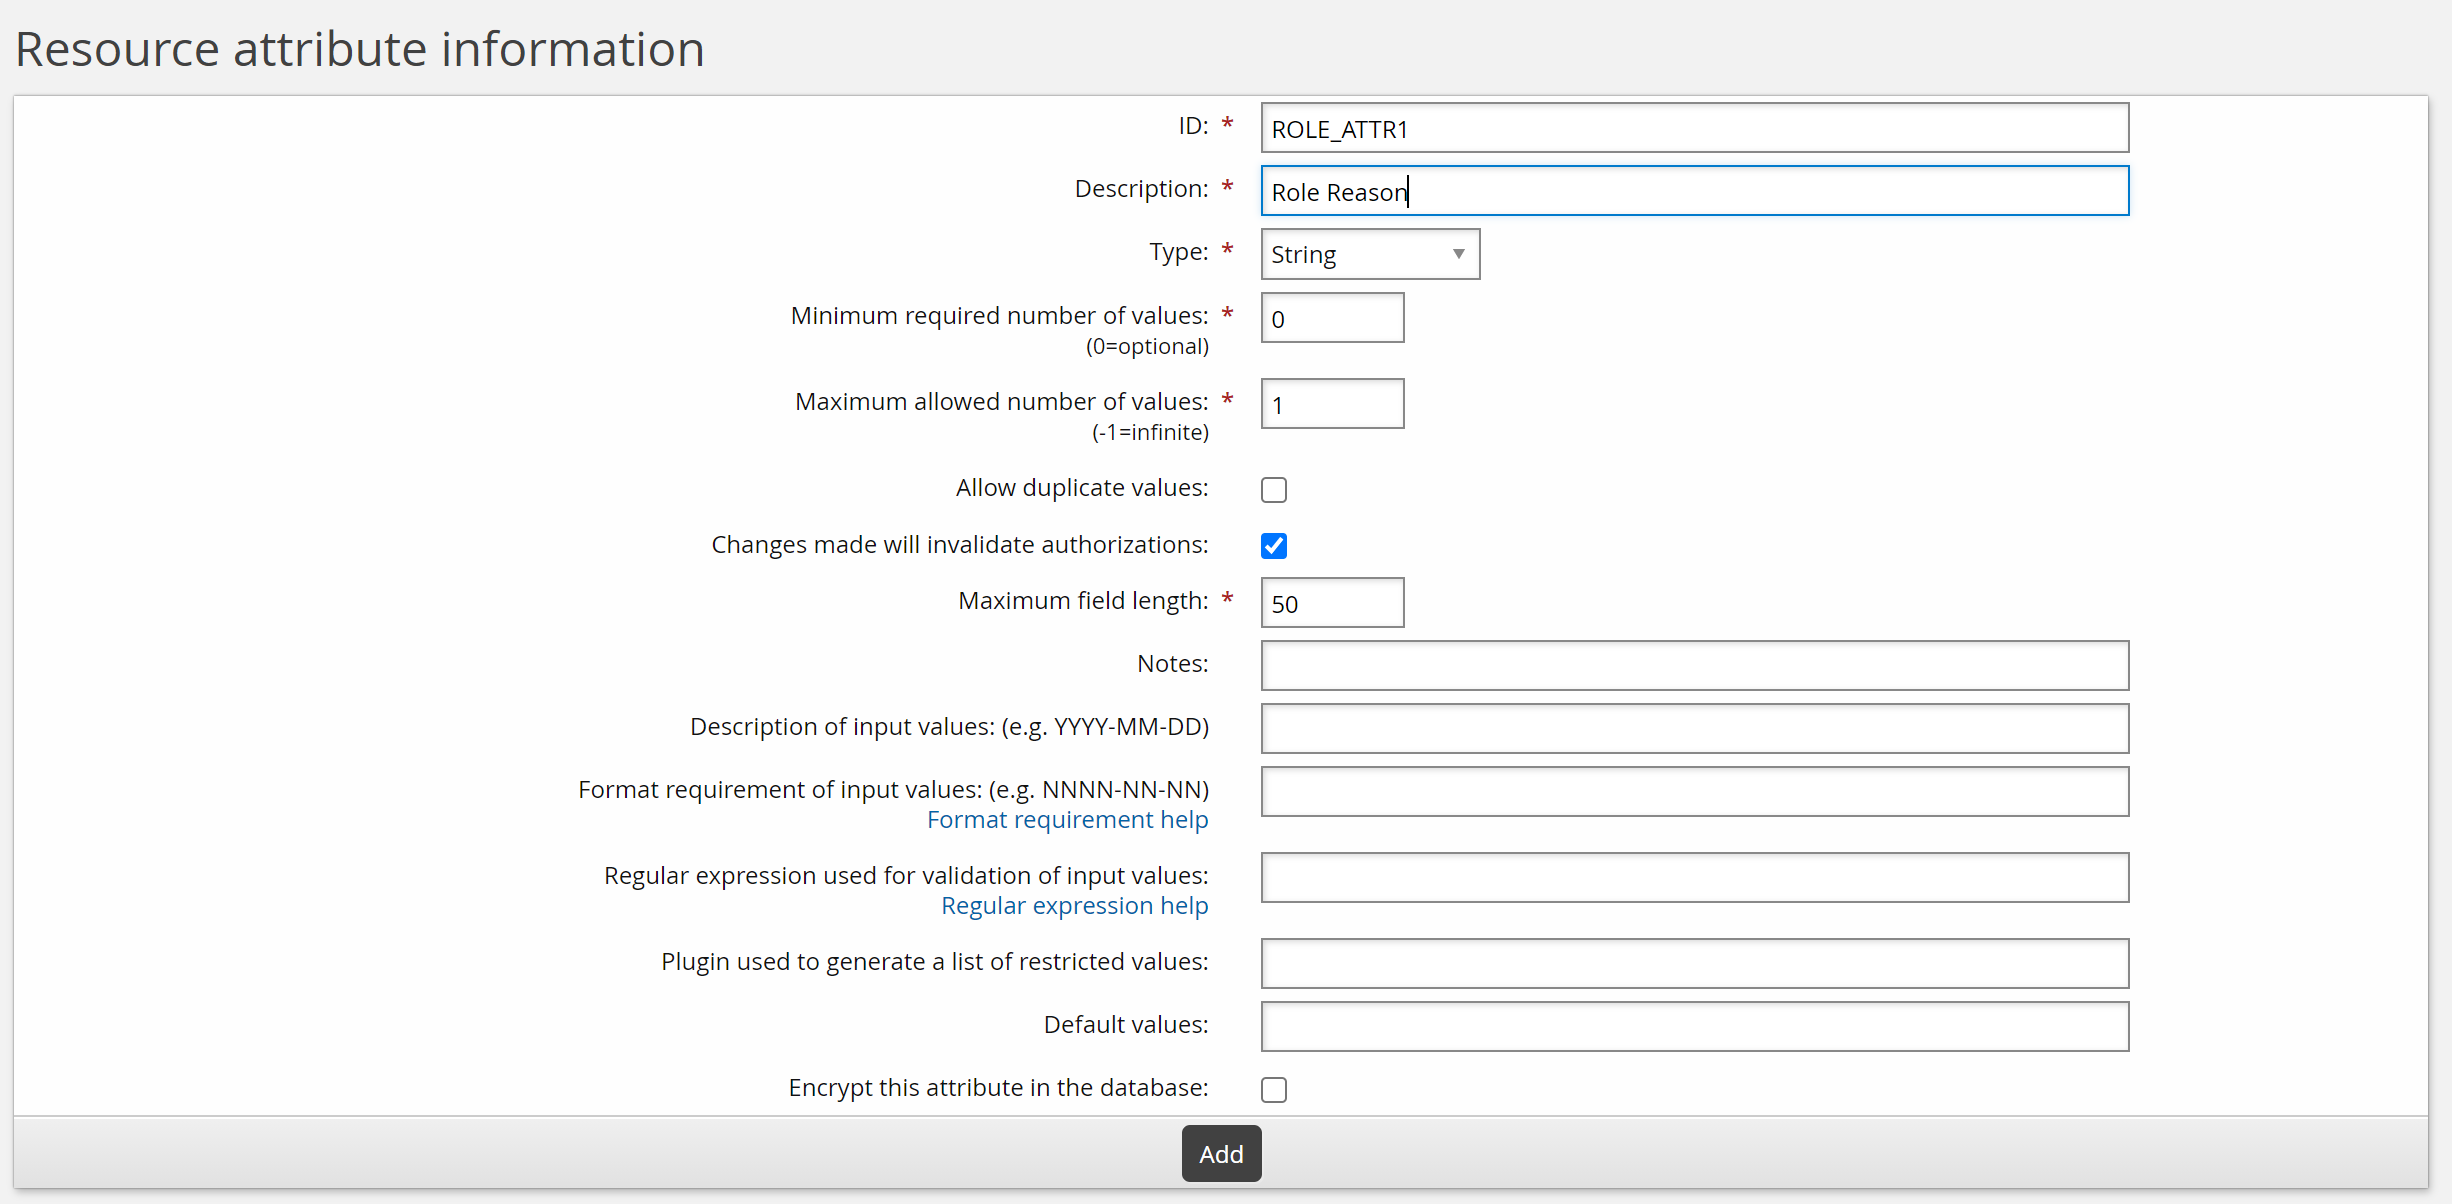
Enter values as follows:
ID: ROLE_ATTR1
Description: Role reason
Type: String
Minimum required number of values: 0
Maximum required number of values: 1
Click Add.
Click Add new… to add another attribute.
Enter values as follows:
ID: ROLE_ATTR2
Description: Role date
Type: Date/time
Minimum required number of values : 0
Click Add.
Now two attributes can be added to the role membership request page.
To set access controls for the new attribute, add it to an attribute group:
As a product administrator, click Manage the system > Resources > Resource attribute groups.

Click Add new…
Enter the following values:
ID: ROLE_ATTR_GROUP
Description: Role attributes
Resource type: Role memberships

Click Add.
Click the Access control tab.
Select the checkboxes to allow the ALLUSERS group read and write permission.
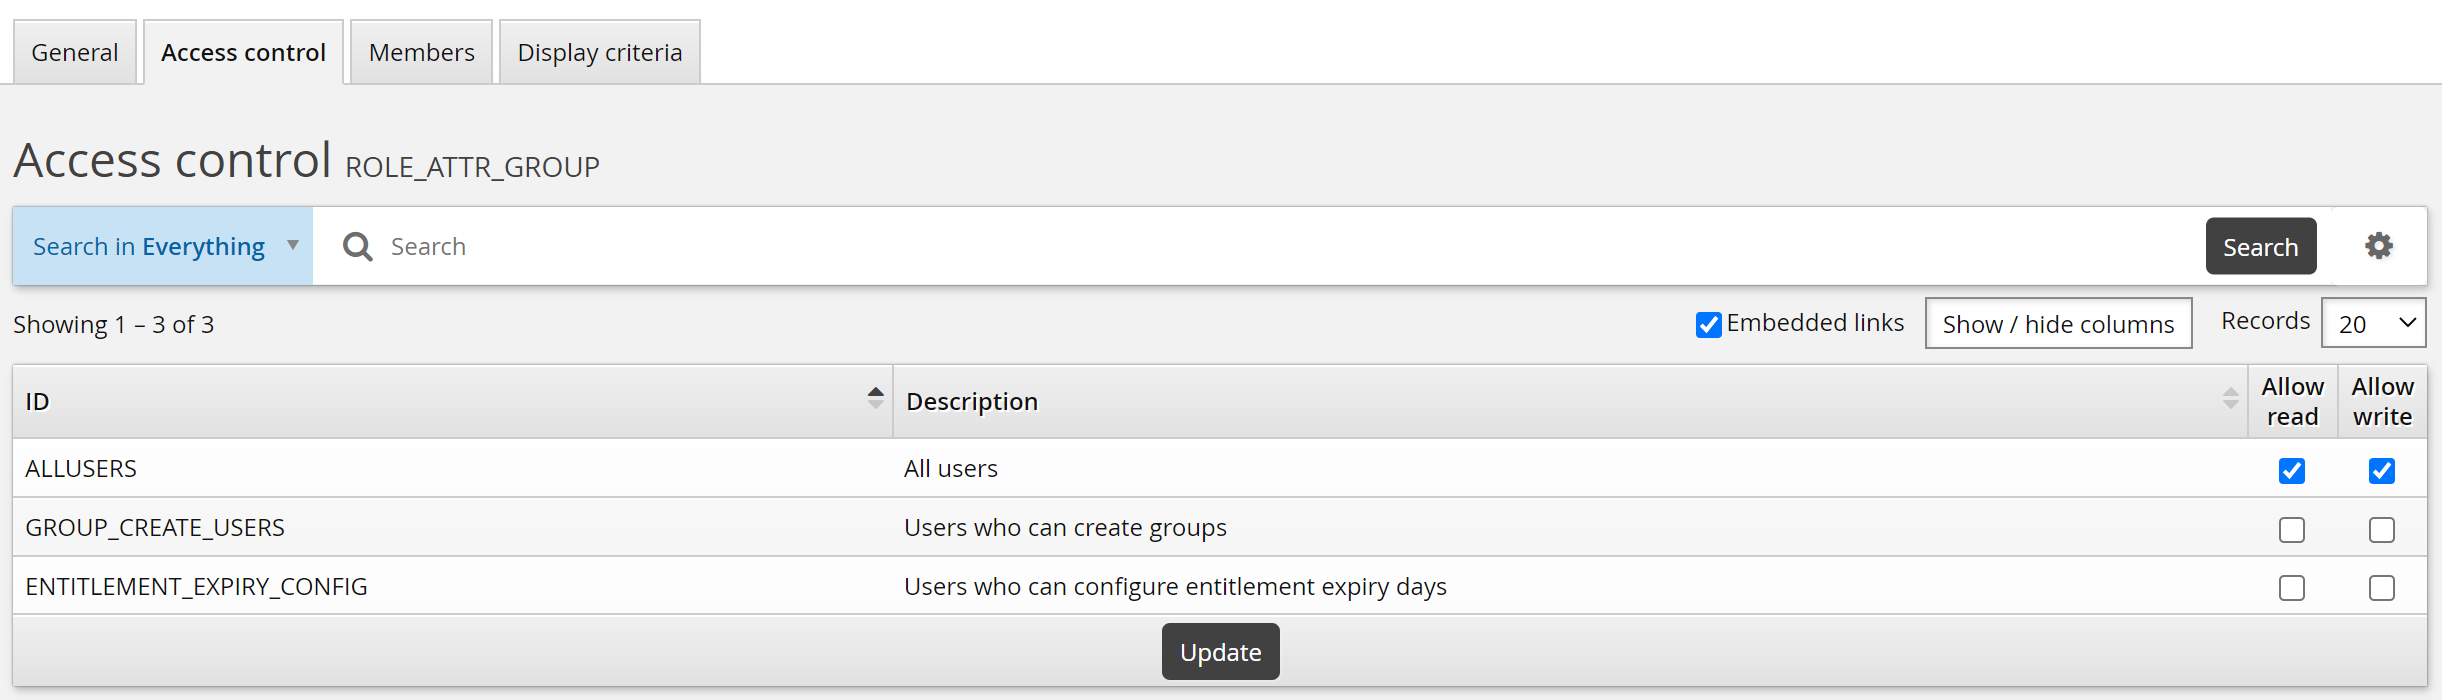
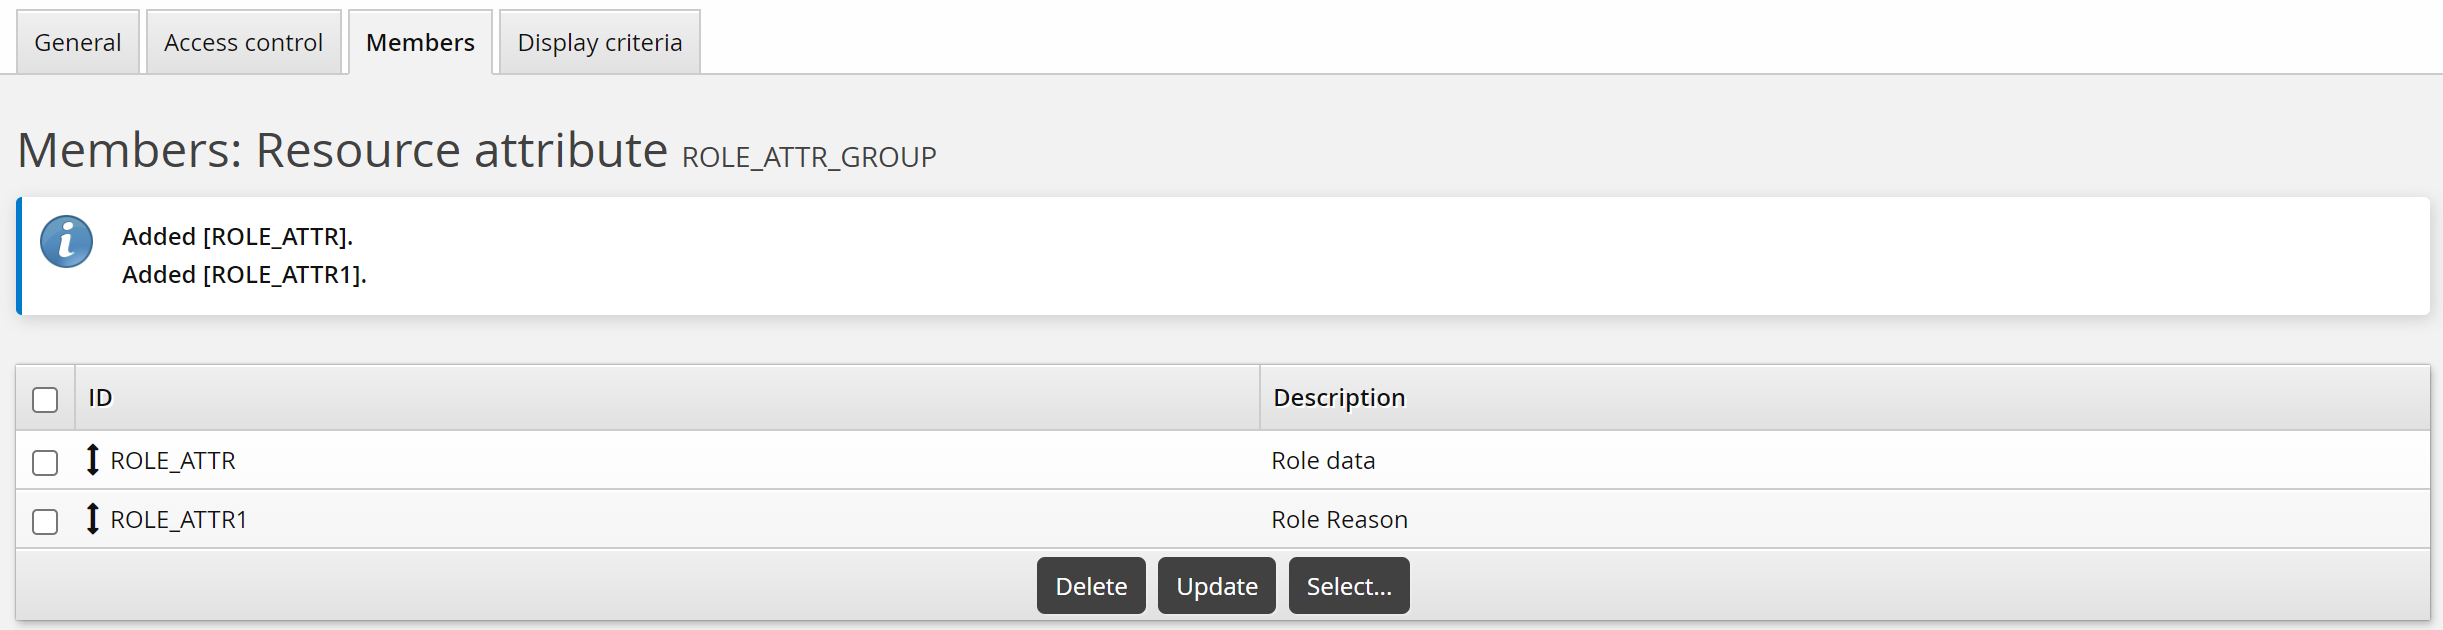
Click the Members tab.
Click Select…
Select the checkboxes for ROLE_ATTR1 and ROLE_ATTR2, then click Select.
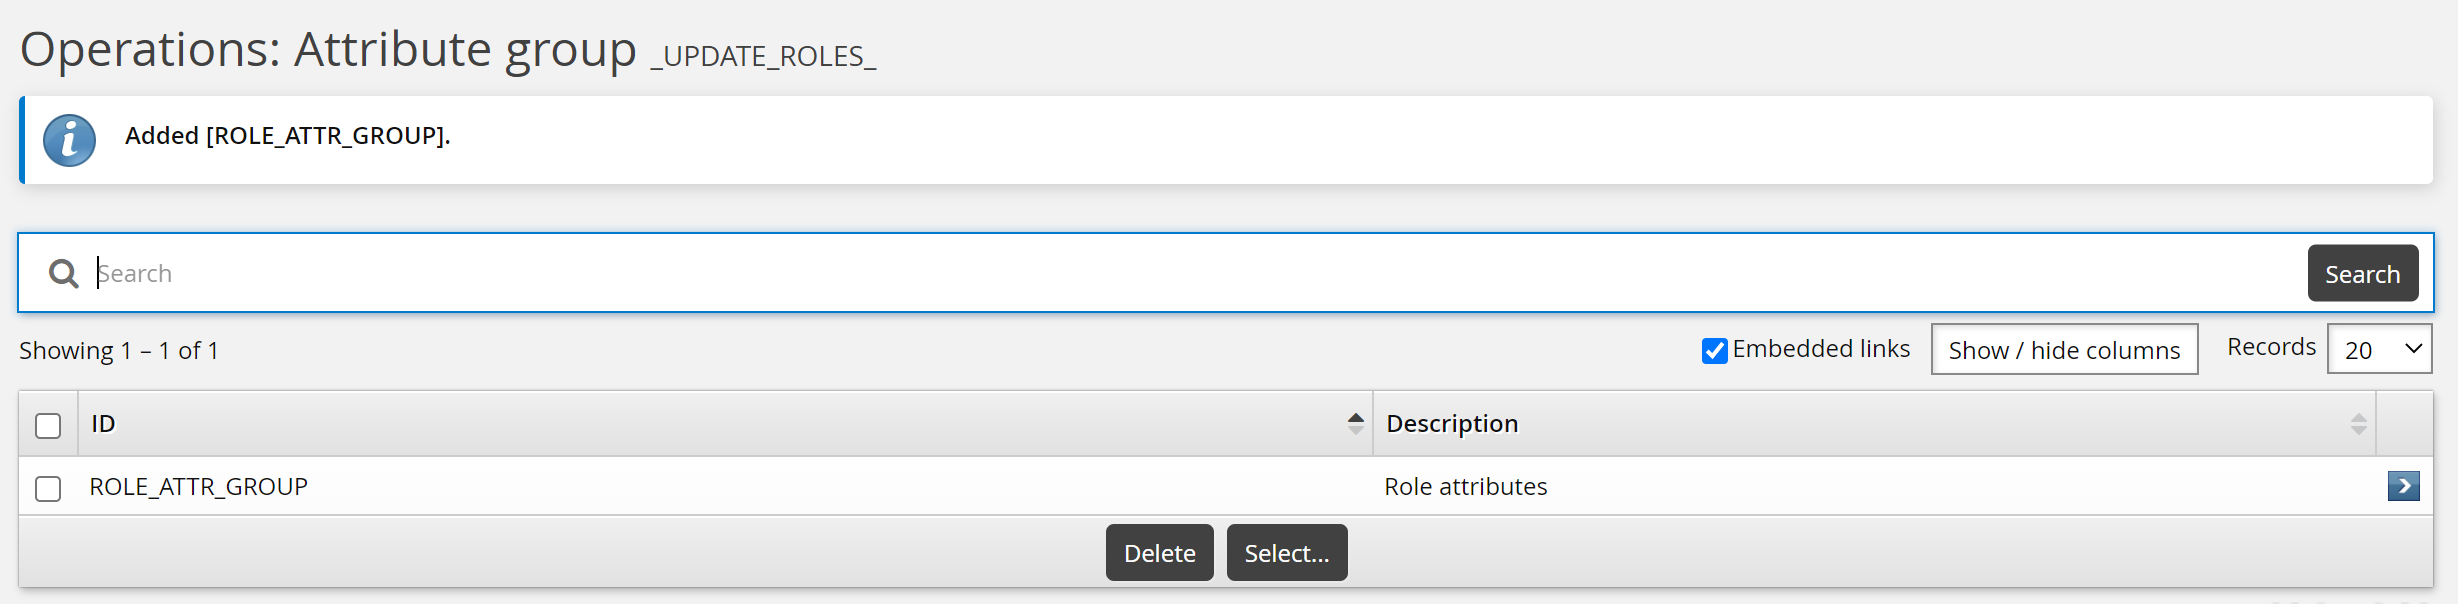
To add the role membership attributes to the Update role membership request:
As a product administrator, click Manage the system > Workflow > Pre-defined requests .
Select the built-in _UPDATE_ROLE_ request.
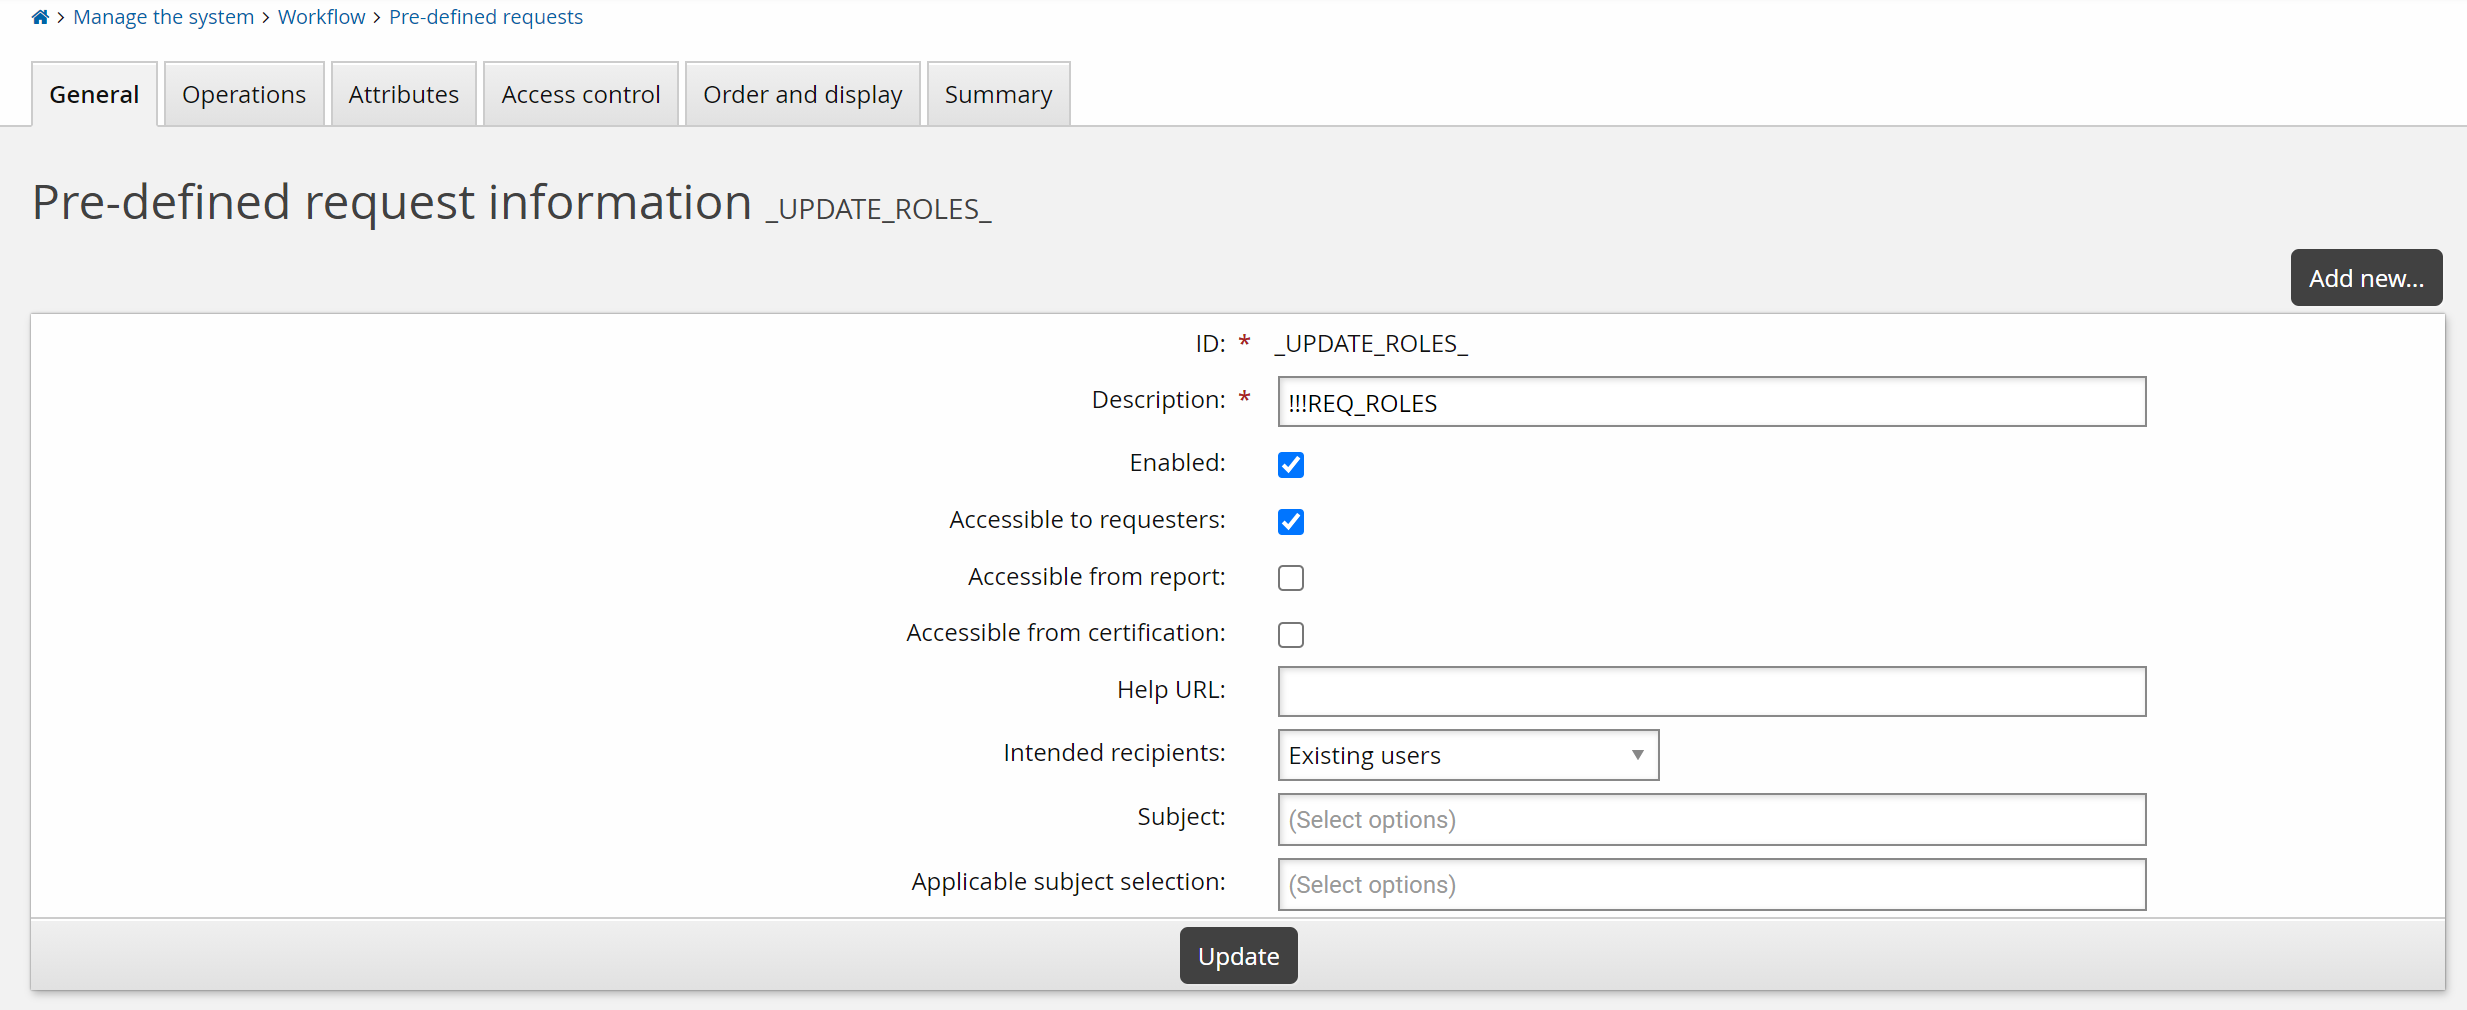
Select the Attributes tab.
Click Select…
Select the checkbox for the ROLE_ATTR_GROUP, then click Select.
To update role attributes as an end user:
Click Change role membership in the requests section.
Bravura Security Fabric displays the request wizard.
Enter values for the attributes.
Click Submit.
Relevant authorizers are notified to review the request if necessary.
Attribute values are displayed on the request details page.

Resolving role enforcement violations
When adding or removing entitlements, you may be required to resolve role enforcement violations before continuing. Role enforcement rules are put in place to ensure users have the correct access privileges according to roles that are assigned to them.
In order for users to resolve role enforcement violations, role-based access enforcement must be enabled globally and for entitlements involved. Users must also have the "Enforce role-based access for user" attribute set to "True".
If the recipient of your request has a surplus violation – that is, too many privileges – you can resolve it by:
Removing the resource from the profile
Requesting an exception to the rule for the resource
Requesting a role to which the resource is required
If the recipient of a request has a deficit violation – that is, not enough privileges – you can resolve it by:
Adding the resource to the profile
Requesting an exception to the rule for the missing resource
Removing a role so that there are no deficits
Once your request is approved, the rule is overridden for the user.
Note
Running auto discovery will automatically resolve enforcement violations. Depending on configuration Bravura Security Fabric will submit a request for an exception, or to add an entitlement in deficit, or to remove a surplus entitlement.
Resolve enforcement violations
The following example procedure describes how to resolve enforcement violations when changing group membership is requested and would cause the recipient to be in surplus and deficit violation.
If surplus and deficit violations are detected, Bravura Security Fabric adds a wizard page to Resolve enforcement violations.
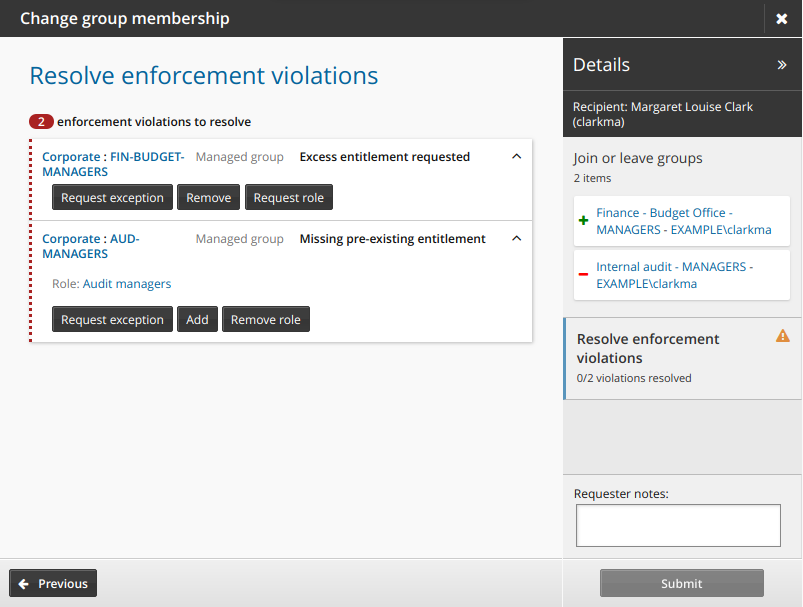
To resolve a surplus violation, click:
Request role to open the wizard that lists roles that require the entitlement in question, select a role, then click Accept to request the selected role.
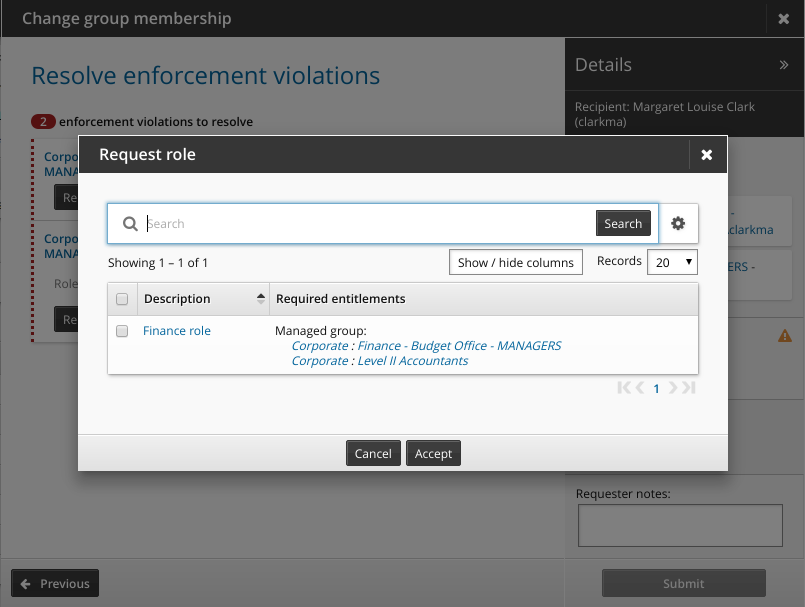
Roles that include the entitlement as a legacy entitlement will not be listed.
Request exception to allow the user to keep the excess entitlement.
Remove to remove the excess entitlement.
Undo to bring back the three action buttons: Request exception, Remove, and Request role.
To resolve a deficit violation, click:
Request exception to allow the user to keep the role with the missing entitlement.

Add to allow the user to add the missing entitlement.
Remove role to remove the role corresponding to the missing entitlement.
Undo to bring back the three action buttons: Request exception, Add, and Remove role.
After every violation is resolved, click Submit to submit the request. Authorization may be required, depending on configuration.
If there are no deficits, and the last step in the request results in a surplus, the request is automatically submitted with the default action for a surplus. The user does not see the Resolve enforcement violations page in this case. For example, assuming:
Role1 includes group1
UserA has no deficits, does not belong to Role1, and is not a member of group1
UserA navigates to the Join or leave groups page.
The page includes a Submit button, and no Next button.
UserA selects group1.
UserA clicks Submit .
Bravura Security Fabric submits the request for group membership for group1, and an exception for a surplus violation.
Adding missing role entitlements
When role-based access enforcement is enabled, and an administrator adds an entitlement to role to which you are assigned, you will be tagged as having a deficit violation.
Depending on configuration, Bravura Security Fabric may automatically submit a request to add the new entitlement to your profile, or request an exception, during the next auto discovery process.
Before the auto discovery, you can manually submit a request to add missing entitlements to your profile, or request an exception. Depending on configured access controls, an administrator may be able to submit the request for you.
In order for this request to be available, role-based access enforcement must be enabled. Users must also have the "Enforce role-based access for user" attribute set to "True". Once the request is approved, the enforcement rule is overridden.
Add missing role entitlements
To add missing role entitlements, or request an exception:
Navigate to the Profile information and entitlements page .

Click Add missing role entitlements.
By default, this link is only available for yourself if you have missing role entitlements. The link may be available for other users depending on access control settings for the built-in pre-defined request (PDR) _RESOLVE_ROLE_DEFICITS_.
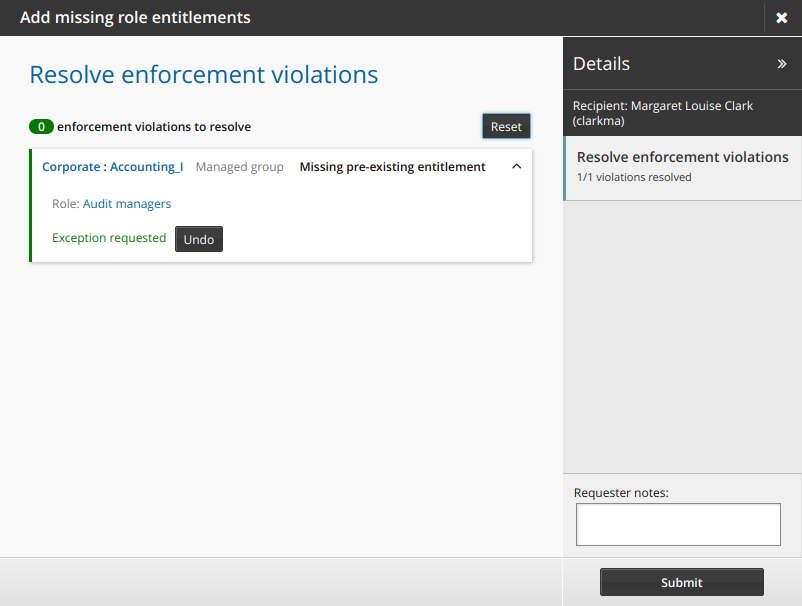
Depending on how the administrator configured the enforcement settings for the role or entitlement, the default action will be to request to add the entitlement, or request an exception.
Click Undo to choose an action other than the default.
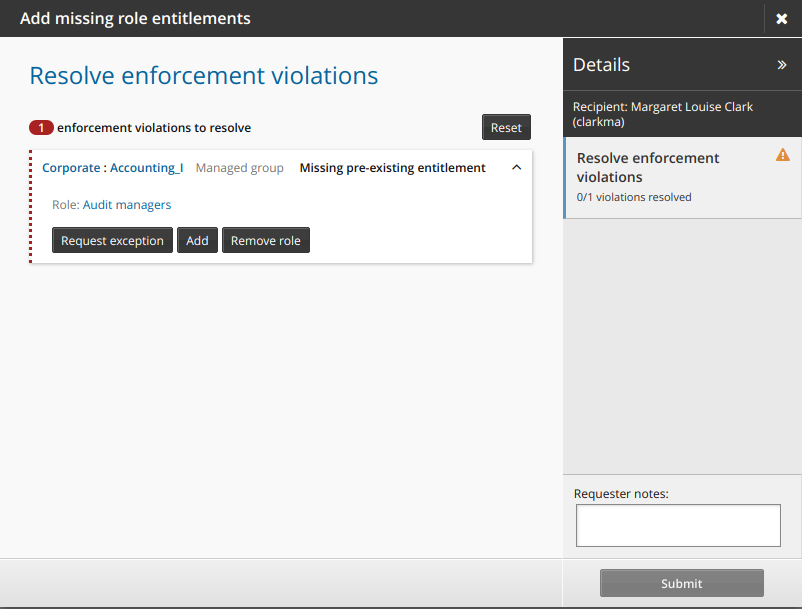
Click Reset if you want to reset requests for all entitlements to the default setting.
Add requester notes if necessary.
Click Submit to submit the request.
Resolving security rule violations
When requesting resources, your request might violate a Separation of Duties (SoD) rule, which is a security rule designed to ensure that users do not have too much access to certain restricted entitlements. An error is displayed when a request violates an SoD rule.
You must resolve the violation by:
Requesting an exception to the rule,
or
Removing entitlements from the request
If an exception is approved, the SoD rule will be ignored, and the requested entitlements will be assigned to you.
If an outstanding request conflicts with a new request, you will not be able to submit the request. The outstanding request needs to be completed, canceled or denied before an exception to the SoD rule can be requested.
If a user already had the conflicting entitlements before the SoD rule was created, the violations can be resolved via a user’s Profile information and entitlements page. The standard built-in request is Default resolution for segregation of duties rules, which navigates to an SoD wizard page where all pre-existing SoD violations are listed.

The link may be available from other users’ profile pages depending on access controls for the built-in PDR _RESOLVE_SOD_VIOLATIONS_.
When a request causes new SoD violations, the SoD wizard page will present before submitting the request. All unresolved SoD violations including existing ones are listed on that page.
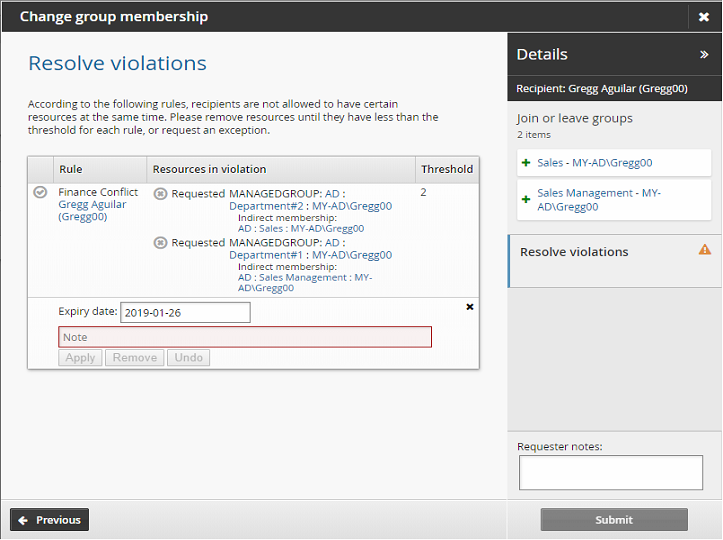
Group membership change causing rule violation
The following procedure describes how to request an exception to a rule where a request for group memberships would cause the recipient to be in violation.
If exceptions are allowed, Bravura Security Fabric adds a wizard page to Resolve violations.
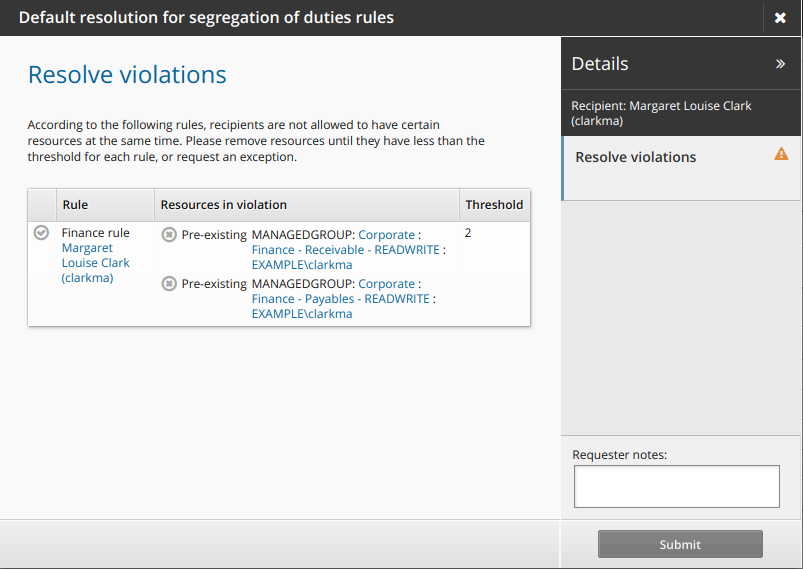
Click the request exception icon
 to submit a request to allow the user to keep the conflicting entitlements.
Type a reason for the exception and modify the expiry date if necessary, then click Apply.
Alternatively, click the revoke icon
 to remove one of the conflicting entitlements.
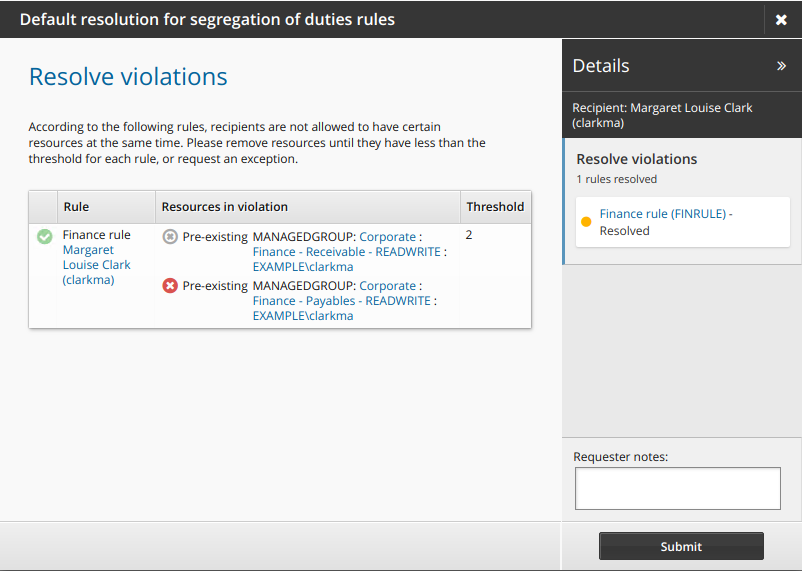
Click Submit.
Relevant authorizers are notified to review the request if necessary. See Tracking and Updating Requests to learn how to track your request.
When you remove a resource from a user’s profile, it is permanently deleted.
Indirect group membership change causing rule violation
Some target systems support the concept of a nested group. A nested group is a group that is a member of another group. For example, in Active Directory you can add a group as a member of another group. The nested group then inherits the rights of the parent group.
Bravura Security Fabric also calls these groups parent groups and child groups. If an account is a member of a child group, they have what is called indirect membership to the parent group.
When requesting resources that have nested groups, your request might violate a SoD rule applied to a nested resource.
The main procedure on how to request an exception for a rule remains the same for indirect groups, except that Indirect membership details are displayed on the Bravura Security Fabric wizard page.
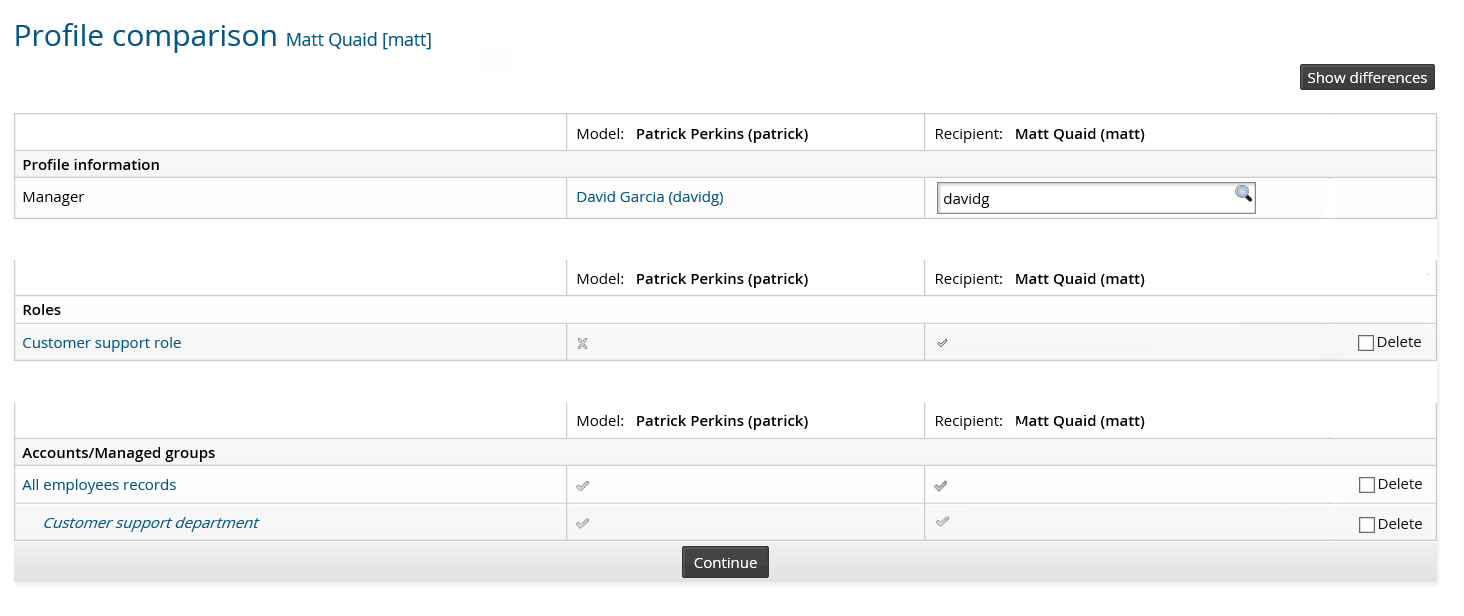
Comparing profiles
You can compare your profile (or the profile of another user) against a model user, provided that you (or the user for whom you are acting) and the model user meet the criteria set by profile comparison rules.
Compare profiles
To compare your profile with another user:
Click Compare profile with another user.

Select the user you want to compare with (this cannot be the same user as the one that is being compared).
The profile comparison page is displayed along with attributes which are configured to be used in a profile comparison.
Depending on your permissions, you can copy, delete or modify the attributes, roles and accounts and group membership.
Clicking on Show differences will filter out any common elements between the existing profiles of the model and recipient users. Only the differences between the two existing profiles will be displayed. Clicking on Show all will remove this filter.
Reviewing all entitlements for a user
Depending on configured access controls, you may be able to initiate an an access certification campaign for another user from their profile page or on the menu of request types.
Access certification is the process by which you review the login IDs, personal information, and memberships within one or groups. You identify access privileges that are appropriate and remove those that aren't, and sign a statement that indicates that the review has been completed. You can carry out the review yourself or delegate it to another user.
To initiate an access certification campaign for a single user:
Click View and update profile in the Other users section.
Click Initiate a review of all entitlements.
Review entitlements as described in Acting on user entitlements .