Upgrade steps Rolling upgrade - Secondary servers
Carry out the following steps for each node. Ensure that each step is addressed for a node before proceeding to the next step. The first two nodes should be completed in succession and in production. The remaining nodes can be done in parallel, as long as at least two other nodes have been successfully upgraded and are running in production.
Upgraded nodes should always be isolated (for example, via firewalls) from non-upgraded and upgrading nodes.
Restrict access
Restrict access via a global load balancer to the upgrading node
Restrict all traffic to and from the primary node.
Configure firewalls to isolate upgrading node
Block all Bravura Security traffic to and from the upgrading node.
For example, in Windows Firewall, configure rules to block Bravura Security outbound traffic from upgrading node to other nodes, and rules to block inbound Bravura Security traffic from other nodes to the upgrading node.
Ensure Bravura Security traffic is isolated between the old version, upgraded and upgrading node.
Any changes made on nodes of differing states will be delayed until all nodes are upgraded and thus on the same build version.
Restrict access to the IIS server
Restrict access to the IIS server to only a local IP address and the loopback interface by using the IP and Domain Restrictions IIS feature.
You may need to install the IP and Domain Restrictions security feature for IIS.
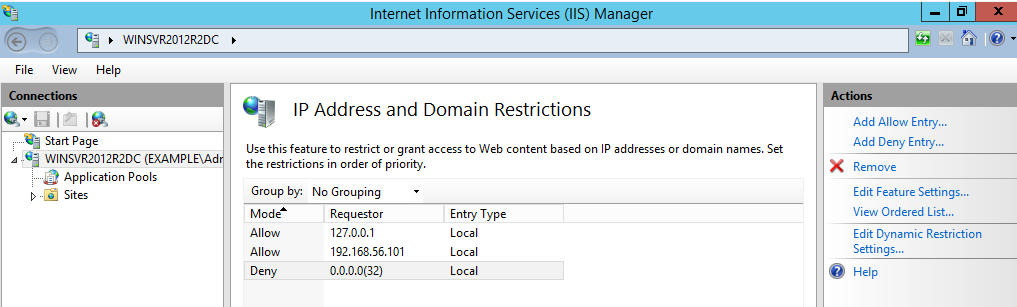
IP and Domain Restriction settings:
Mode | Requestor | Entry type |
Allow | 127.0.0.1 | Local |
Allow | Local IP address of IIS server | Local |
Deny | 0.0.0.0/32 | Local |
If a load balancer or round-robin DNS has been configured in front of the Bravura Security Fabric , remove all application nodes from availability to the load balancer to stop new user sessions from being created (and avoid interrupting them when services go down). Optionally, redirect users to a static web page that mentions the cause and duration of the outage (and can be updated with notes if the outage takes longer than expected).
Backup the application node
Back up the application node
Virtualized servers If you are using a virtualization solution to run your Bravura Security Fabric nodes as virtual machines, create a snapshot of each of node. Create a snapshot of each node’s corresponding database server if the application and database are not on the same server.
Physical servers If you are running the application and database nodes on bare-metal, image the server disks, including all disks where Bravura Security Fabric and its backend database files are stored. To determine the paths, you can check in the Windows registry:
HKLM\SOFTWARE\Bravura Security\Bravura Security Fabric\<instance>\PsInstallDir
HKLM\SOFTWARE\Bravura Security\Bravura Security Fabric\<instance>\PsTempDir
Upgrade Connector Pack
Upgrade Connector Pack if necessary.
This step may not be necessary if no connector changes are made. It is not necessary for a build patch.
If custom connectors are used, they may need to be manually reloaded.
See Upgrading Connector Pack .
If Connector Pack is 3.1.x or older, you need to uninstall the old Connector Pack , and install a new one.
Note
The loadplatform program may fail, since the Database Service has been stopped; however the program will run as part or the post-installation tasks once Bravura Security Fabric has been upgraded.
Ensure services and IIS are off on each node after the Connector Pack upgrade.
Start setup on the secondary node
Upgrade the instance on each secondary node:
Run
setupas an Administrator with the latest MSI.After pre-installation checks, continue through upgrade steps.
Click Install to start the upgrade or patch.
The installer begins copying files to your computer. The page appears after the Bravura Security Fabric features have been installed.
Do not proceed to the s page.
Remove the firewall between the primary and node.
Firewalls should isolate upgraded nodes from non-upgraded/upgrading nodes.
Remain on the page.
Caution
Do not stop the post-installation tasks. The installer is attempting to load connectors from the Connector Pack, language tags, and reports.
The Database service (
iddb) and File replication service (idfilerep) need to be running on the primary node for post upgrade tasks to properly sync files on secondary nodes.
Manually rebuild skins if required
The Bravura Security Fabric installer normally rebuilds user interface skins during post-upgrade tasks. If the skins failed to rebuild or there were issues, rebuild the skins manually.
See Customization for more information.
For secondary nodes, you have the option to resynchronize files from primary.
Manually reload connector pack if required
The Bravura Security Fabric installer normally loads connectors during post-upgrade tasks. If loading connectors failed or there were issues, reload connectors using the command:
loadplatform -target
See loadplatform usage for information.
Manually reload components if required
The Bravura Security Fabric installer normally reloads components during post-upgrade tasks. If component initialization fails or has issues during the upgrade:
From a command prompt, navigate to the instance directory.
Run the command:
instance.bat
Run the command:
script\manage_components.py load --upgrade
Confirm they succeed.
The API service (idapi) is required for this step.
Trigger file replication
Trigger file replication from the primary to secondary nodes. If any of the secondary nodes failed the "Finalizing replicated components and skins" post-upgrade task, run this command from the primary node command line:
updinst.exe -syncreg -syncfile -serverid <serverid>
If the primary node in each instance has the Connector Pack installed as global (no agents in the instance's agent\ directory), add the -globalcp option to the command.
File replication may take longer (an hour or two) since it has to interrogate the entire state of the secondary node and this notably depends on network latency to check the file system state.
Turn on IIS Service
Before running the installer on the node, you turned off the IIS service. You should now remove the IIS server access restrictions to localhost or re-enable completely.
Run smoke tests
Carry out the following tasks:
Start the Asynchronous Request, Messaging, API and API SOAP services
Verify skins.
Verify that end users can authenticate.
Start the Workflow Manager service and Privileged Access Manager service
Verify workflow.
Verify requests to access a password using an auto-approved case.
Verify requests to access a password using an authorization case.
Start the rest of the services
Use the installer to continue past the page.
If any of the post-installation tasks produce warnings or errors, click:
Report for details on all post-installation tasks
or,
Messages... for details on a specific post-installation task
Otherwise, wait until the status changes to success, then click Finish.
If connectors (agents) were not installed successfully, see Troubleshooting Connector Pack installation.
Restore access
Restore access to the upgraded node via the load balancer. This step will put the upgraded node back into production.
Any changes made on nodes of differing states will be delayed until all nodes are upgraded and thus on the same build version.
Remove all traffic restrictions to and from upgraded node.
Confirm end users can access nodes from globally available URLs.
Next
Carry out further post upgrade steps as necessary.