Dedicated database, user, and schema
Bravura Security Fabric requires a dedicated database, user and schema in SQL Server in order to connect to and install schema objects.
When using the Bravura Security Fabric setup installer, you can:
Allow
setupto do this for you, when asked to enter the database connection and user information;Or
Use the following instructions to pre-configure the user and schema, then enter database server connection settings when configuring the installation.
If you choose to pre-configure the user and schema:
Start Microsoft SQL Server Management Studio.
Connect to the server as a system administrator (sysadmin role).
You can do this using SQL Server authentication and the sa account, or using Windows authentication if the Windows user has the sysadmin role.
For example, to connect to the server using the sa account, set:
Server type: Database Engine
Server name: <host name or IP address> \ <instance>
Authentication: SQL authentication
Login: sa
Password <password for sa>
Click Connect.
Create a new database for Bravura Security Fabric :
In the (left) pane, right-click Databases, then click New Database….
Type the Database name .
Click Options .
Select Recovery model and choose Simple.
Note
Ensure that an appropriate database backup policy is in place. See http://technet.microsoft.com/en-us/library/ms189275.aspx for more information.
Select Compatibility level and ensure that this is set to a minimum value of SQL Server 2014 (120).
The compatibility level for the installed version of Microsoft SQL Server is suitable.
Select Auto Create Statistics and choose True.
Select Auto Update Statistics and choose True.
Select Auto Update Statistics asynchronously and choose False.
Click OK.
Create a new login:
In the Object Explorer pane, expand Security.
Right-click Logins, then click New Login….
On the page, type the Login name.
Select:
SQL Server Authentication
Type and confirm the password for the new login. Deselect the User must change password at next login and Enforce password expiration checkboxes.
Or
Windows authentication
Pick a local or domain account or group.
Set Default database to the database that you created in Step 3.
Click OK.
Create a new schema in the database:
In the Object Explorer pane expand Databases > < Newdatabase > > Security.
Where <New database> is the database that you created in Step 3..
Right-click Schemas, then click New Schema….
Type the Schema name.
Click OK.
Set the user in the database:
In the Object Explorer pane, expand Databases > <Newdatabase> > Security.
Where <New database> is the database that you created in Step 3..
Right-click Users, then click New User…
Type the User name.
Set the Login name to the user you created in Step 4.
Set the Default schema to the schema you created in Step 5.
In the Database role membership area, enable:
db_datareader
db_datawriter
db_ddladmin
db_owner
Click OK.
Close the connection to the schema by collapsing the database tree and highlighting the root of the SQL Server management interface.
This ensures that the database can be locked to perform the following operation.
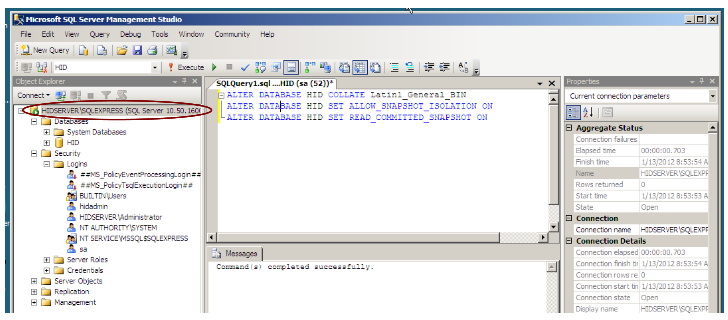
Alter the database collation:
In the toolbar, click New Query.
In the new query window, type the following:
ALTER DATABASE <database name> SET SINGLE_USER WITH ROLLBACK IMMEDIATE
ALTER DATABASE <database name> COLLATE Latin1_General_BIN
ALTER DATABASE <database name> SET ALLOW_SNAPSHOT_ISOLATION ON
ALTER DATABASE <database name> SET READ_COMMITTED_SNAPSHOT ON
ALTER DATABASE <database name> SET MULTI_USER
If the database name is ”default”, enclose it in square brackets:
[default].Click Execute.
Exit SQL Server Management Studio.
Note the database name, and the name and password of the login that you create. You will need these values, as well as the information you gathered earlier, when you install Bravura Security Fabric .