Preparation
Before targeting a SiteMinder system:
Configure target system administrators
Define the SiteMinder user directory
Install the pssiteminder service plugin
Create an attribute configuration file
Configure the Bravura Security Fabric server
Configuring target system administrators
Bravura Security Fabric uses a designated account on the SiteMinder server to list and manage users. A SiteMinder agent is also required to logon to the SiteMinder server.
The target administrator must have the following privileges:
Manage System and Domain Objects (for listing users)
Manage Users (for user management tasks)
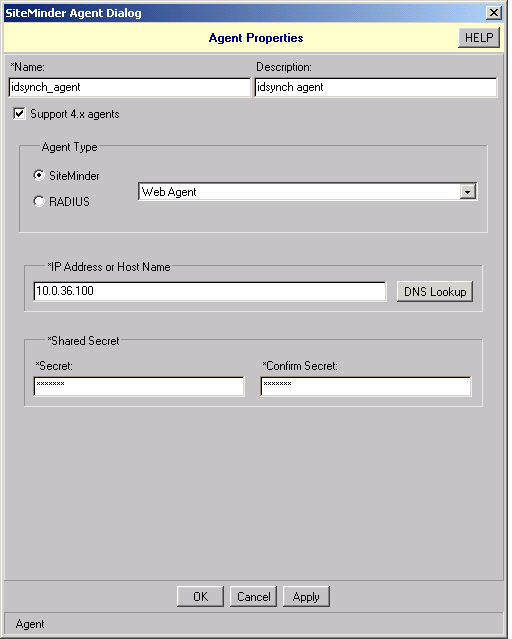
Create a SiteMinder agent to be used by the Bravura Security Fabric connector to log into the SiteMinder server. Configure the second administrator as follows:
Name to be used as the additional target system ID when configuring the SiteMinder target system in Bravura Security Fabric
Description any value
Support 4.x agents must be checked
Agent Type SiteMinder, Web Agent
IP address or host name the IP address or host name of the Bravura Security Fabric server
Shared secret password for the additional target system administrator when configuring the SiteMinder target system in Bravura Security Fabric
This is illustrated in the figure below.
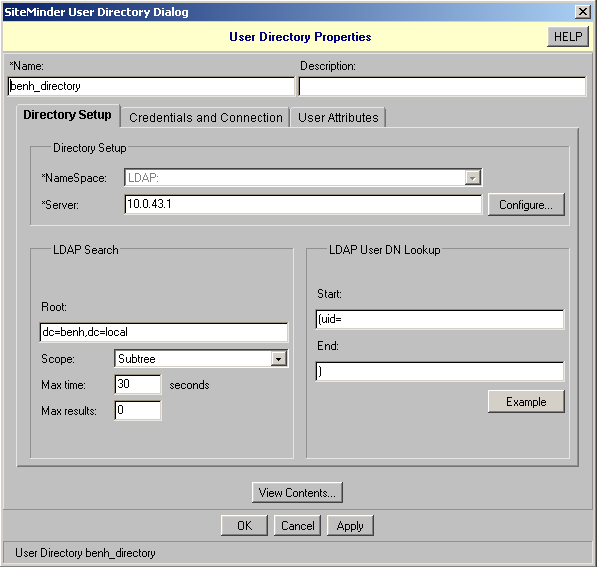
Defining the SiteMinder user directory
If required, configure the user directory on the SiteMinder server to use a short "authentication attribute" by changing the LDAP User DN Lookup option. If not configured, the agent will assume the input is the full DN.
This is illustrated in the figure below.
Installing the pssiteminder service plugin on the SiteMinder server
Before targeting SiteMinder, you must install the pssiteminder service plugin, shipped with Connector Pack, on the SiteMinder server.
Unix
To install pssiteminder on a Unix SiteMinder server:
If you did not select the Unix Installation Packages when you installed Connector Pack, run the Connector Pack setup on the Bravura Security Fabric server to modify your instance and choose to make a custom installation.
See Installing Connector Pack for more details.
Extract the
pssitemindershared object for your platform from the appropriatepsunixarchive, located in the unix directory (for example, pssiteminder.solaris8.sparc).Determine where Siteminder is installed on your Unix server (for example /opt/siteminder).
Copy the
pssitemindershared object into <Siteminder_install_dir>/lib and rename it to pssiteminder.so :cp ./pssiteminder.solaris8.sparc /opt/siteminder/lib/pssiteminder.so
Restart the SiteMinder server.
Windows
To install pssiteminder on a Windows SiteMinder server:
Locate
pssiteminder.dllin <Connector Pack Install>/agent.Copy
pssiteminder.dllto your SiteMinder server into the directory <Siteminder install dir>/bin.Restart the SiteMinder server.
Creating a SiteMinder attribute configuration file
A SiteMinder target system requires a configuration file defining server attributes. This file must be located in the <Program Files path>\Bravura Security\Bravura Security Fabric\<instance>\ script\ directory.
The script must describe the following attributes:
accountport account port
authport authentication port
azport authorization port
platform specifies whether it is a Windows based server or a Unix based server.
UserDir specifies the user directory the SiteMinder server agent is working on.
Other attributes can be set as required.
For example:
  "m-tech:agent:agtmtech" "1" = {
       "accountport" = "44441"
       "authport" = "44442"
       "azport" = "44443"
       "timeout" = "300"
       "connmin" = "1"
       "connmax" = "100"
       "connstep" = "1"
       "platform" = "UNIX"
       "UserDir" = "localLDAP"
  }
Configuring the Bravura Security Fabric server
To set up the Bravura Security Fabric server to target SiteMinder:
Install the SiteMinder SDK.
Install the Oracle client, or just copy the oci.dll into an accessible path.
Modify the PATH environment variable to include a directory with SMAgentAPI.dll and oci.dll in it. For example:
If you installed a SiteMinder SDK, SMAgentAPI.dll can be found in <path to SiteMinder SDK >\bin\win32.
If you installed an Oracle client, oci.dll can be found in <path to Oracle client>\bin.
The jvm.dll can be found in <path to java>\jre\bin\client and <path to java>\jre\bin\server.