Using idmsetup.inf to install Bravura Security Fabric
When you install Bravura Security Fabric on the main server, an idmsetup.inf file is created in the \<instance>\psconfig\ directory. You can use the file to aid in installing proxy servers, backup servers, and add-on software. It is a recommended best practice to use this file during migration projects. It acts as an "answer file" for the installer by populating instance-specific configuration parameters and encryption keys at every step during the setup process.
It is highly recommended that you:
Copy the
idmsetup.inffile to each new server and place it in the same directory from which you will run the installer (idm.msi).Ensure the architecture of the new server matches the architecture of the primary server.
Following is an example of using idmsetup.inf to install a replication node.
When you install Bravura Security Fabric on the main server, an idmsetup.inf file is created in the \<instance>\psconfig\ directory. You can use to file to aid the installation of a replication node. It contains the encrypted communication key (or Master Key) and other correct default values and encryption keys for prompts during installation.
To install a replication node using the idmsetup.inf configuration file:
Log into the host Windows server as a member of the Administrators group.
If required, download and unzip the Bravura Security Fabric distribution folder.
Contact your Bravura Security account representative for details.
Copy
idmsetup.inffrom the \<instance>\psconfig\ directory on the primary server to the replication node and place it in the root of the distribution folder.Launch the setup program located at the root of the distribution folder.
The setup program asks you to choose a product to install.
Tip
Do not install Connector Pack first; choose Bravura Security Fabric .
Select Bravura Security Fabric .
Click Next .
Verify that the instance name is already filled in and optionally enter a description.
Click Next .
The setup program performs a pre-installation check and verifies all of the requirements for installation.
If all of the checks are successful, click Next to proceed with the installation.
If any of the pre-install checks produce warnings or errors, click Report for details.
The Configure a Dedicated Database User page is displayed.
Choose your database user setup option, then click Next .
Create and configure a new dedicated database user for a new database node, as illustrated below.
On the page, when you select Create a new dedicated database user for the new instance, setup displays the database user and connection information page depending on your database system.
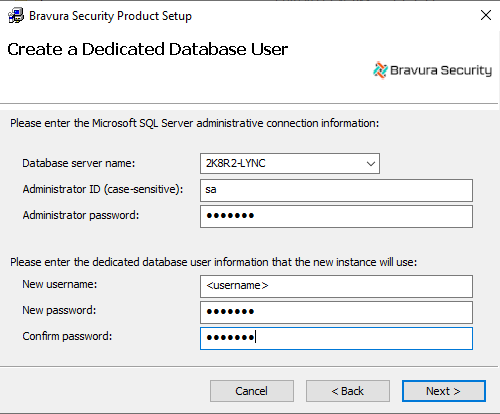
Enter the database connection and user information, then click Next .
Use an existing database user when creating a shared schema node, or a hybrid schema node if the database node already exists.
On the tab uncheck the options to install the schema and default data.
The setup program launches
idm.msi.Click Next .
Read and accept the license agreement.
Click Next.
Verify the location of the license file already filled in.
It is recommended that all replicated servers use the same license file.
Click Next .
Choose the setup type:
Typical to accept the settings from the
idmsetup.inffile.Custom to customize settings.
It is recommended that all replicated servers have the same installed components.
Verify that the psadmin passwords are already filled in (masked with stars).
Click Next .
Verify that the communication key is the same as the one entered for the main Bravura Security Fabric server.
Click Next .
Verify that the database encryption key is the same as the one entered for the main Bravura Security Fabric server.
Click Next .
Verify that the workstation authentication encryption key is the same as the one entered for the main Bravura Security Fabric server.
Click Next .
Verify that the connector encryption key is the same as the one entered for the main Bravura Security Fabric server.
Click Next .
Verify that the IDMLib encryption key is the same as the one entered for the main Bravura Security Fabric server.
Click Next .
Verify the administration login ID and password.
Click Install.
Click Finish to exit.
The post-installation tasks begin.
Do not stop the post-installation tasks. The installer is attempting to load connectors from the Connector Pack, language tags, and reports.
If you install the Bravura Security Fabric before a Connector Pack has been installed (recommended), a warning appears at this stage that no connectors could be found. It is safe to proceed.
If any of the post-installation tasks produce warnings or errors, click:
Report for details on all post-installation tasks
Or,
Messages... for details on a specific post-installation task
Otherwise, wait until the status changes to success, then click Finish.
Run setup again to install a Connector Pack for this instance (unless you installed a global Connector Pack first, which is not recommended, as it can introduce maintenance issues).
Install all software required for integration with target systems and for accessing all resources. Configure the firewall on the new server and other required networking that allows access to needed resources.
The setup of the application node’s Connector Pack should match the setup of the primary node’s Connector Pack. See Installing Connector Pack for details.