Access disclosure plugins
The following access disclosure plugins may be available, depending on configuration and the type of privileged access checked out:
Browser driver | Access the managed system via a web site. |
Command prompt | Access the managed system via a program. The program is determined by Bravura Security Fabric administrators. You may be prompted for your password before or after the program opens. |
Copy | Paste the password into any application or document. |
Display | Reveals the password. Display is the only control that can run without JavaScript or additional extensions. |
In-browser RDP | Access the managed system via a remote desktop connection. |
In-browser Remote App | Access a program on the managed system. |
In-browser SSH | Access the managed system using Secure Shell (SSH). |
In-browser Telnet | Access the managed system via Telnet terminal. |
In-browser VNC | Access the managed system via virtual network computing. |
Run command | For use with account set check-outs where connectors will run commands on managed systems using managed account credentials. |
PuTTY over SSH | Access the managed system via a PuTTY program. The connection uses SSH keys, passwords are not used. |
Remote App RDP | Access a program on the managed system via a remote desktop connection. |
Remote desktop | Access the managed system via a remote desktop connection. |
Warning
Any time you reveal a password, ensure that you are the only person who can see the screen.
Disclosure plugins that use passwords are unavailable if the account has no password stored or if a password conflict has been detected for the account.
If you are using an in-browser access disclosure plugin on a mobile device, ensure you set the input method.
No additional software or extensions are required to view in-browser (Guacamole) access disclosure plugins. However, depending on the browser type, you may need to install additional software or extensions for other access disclosure plugins to work. See Installing access disclosure plugins for more information.
Setting the input method to use the in-browser (Guacamole) access disclosure plugins on a mobile device
The in-browser access disclosure plugins can be viewed on a mobile device, including Android and iOS. Other devices are supported as long as it has an HTML5 compatible browser. By default, they do not set an input method. This will need to be set in order to enter text.

To change the input method on a touchscreen device, or to change the display size or to change the mouse emulation mode for RDP and VNC, swipe right from the left edge of the screen to access the menu. To exit the menu, swipe left.
Currently, only text input can be used as the input method.
Installing access disclosure plugins
Depending on the browser type, you may need to install additional software or extensions for some native access disclosure plugins to work. This section shows you how to install and run access disclosure plugins using:
Internet Explorer 11 and Microsoft Edge Legacy
Firefox
Google Chrome and Microsoft Edge Chromium
One-time disclosure method
Internet Explorer 11 and Microsoft Edge Legacy
In order to view access disclosure plugins on Internet Explorer 11 and Microsoft Edge Legacy, an ActiveX extension needs to be downloaded from the Bravura Privilege server. This needs to be done for each disclosure plugin that will be accessed.
Using the Active X controls requires these browsers to be in IE mode.
To install access disclosure plugins on Internet Explorer 11 and Microsoft Edge Legacy:
On the Internet Explorer browser, select an access disclosure plugin in the Check-outs screen.
Click Install.
An ActiveX component extension installation window should appear.
Click Allow for the web page to run the ActiveX add-on.
Click Install to install the ActiveX extension.
The access disclosure plugin should now be available.
After an upgrade if controls are not installed close all IE browsers, delete all CONFLICT directories found in C:\Windows\Downloaded Program Files\ and attempt the control installation again.
Mozilla Firefox
A Firefox extension as well as a native browser extension is required to view access disclosure plugins on Firefox. A download link will be available to install the browser extension if it has not been installed yet.
To install the Firefox and native browser extension:
On the Firefox browser, select an access disclosure plugin in the Check-outs screen.
Click Install firefox extension.
A prompt to allow and install the Bravura Security Browser Add-On is displayed in the browser.
In the Check-outs screen, click Install native extension.
Run the
firefox-extension-x86.msiorfirefox-extension-x64.msifile. Alternatively, download and save the file onto your workstation and run the file.If you are logged in as an administrator, you can choose to install the browser extension for yourself or for all users on the workstation.
The access disclosure plugins should now be available.
If a previous version of native browser extensions for Firefox is already installed on the workstation (11.1.x or older) you must uninstall and install the current version.
Google Chrome and Microsoft Edge Chromium
A Chrome extension as well as a native browser extension is required to view access disclosure plugins on Chrome. A download link will be available to install the extensions if it has not been installed yet.
To install the Chrome and native browser extension:
On the Chrome browser, select an access disclosure plugin in the Check-outs screen.
Click Install Chrome extension.
This will open a new browser tab to the Bravura Security Browser Extension in the Chrome web store.
Click Add to Chrome.
Click Add extension.
In the Check-outs screen, click Install native extension.
Run the
browser-extension-win-x86.msifile, or download and save the file onto your workstation and run the file.If you are logged in as an administrator, you can choose to install the browser extension for yourself or for all users on the workstation.
When the installation completes, go to the Extensions Manager on the Chrome browser.
Locate 'Bravura Security Browser Extension' in the Plugins section and select the checkbox beside Enabled.
The access disclosure plugins should now be available.
One-time disclosure method
You can view access disclosure plugins using the one-time disclosure method. These have the same functionality as the native access disclosure plugins and do not require additional software, however they are good for one-time use only. The one-time disclosure is available as an executable that can be run directly or downloaded to be run on a different workstation. A new executable needs to be generated in order to view the access disclosure plugin again.
The one-time disclosure option is only available if the product administrator has enabled it, otherwise you will see this option grayed out.
To run the one-time disclosure:
On a browser, select an access disclosure plugin in the screen.
Click One-time disclosure.
Run the executable, or download and save the file onto your workstation, and run the file.
The access disclosure plugin should be available after running the executable.
Make sure you do not modify the file name of the one-time disclosure, otherwise the executable will not work properly.
Saving sessions
If you are able to modify attributes on a disclosure plugin, you can save your preferences to save time and avoid errors next time you want to access a managed account.
This capability is not available for Copy, Display, and Run command plugins.
To save session settings:
Select the access disclosure plugin from the Actions panel.
If attribute override is allowed, you can edit values.
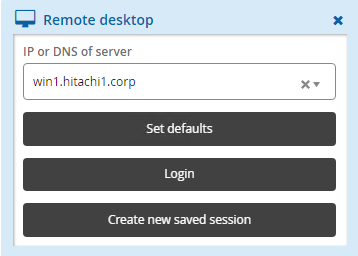
Click:
Set defaults to save values as default for the next time you use this plugin.
Login to launch the plugin and save the values for the next time you use this plugin. This option is only available for in-browser disclosures or where a browser extension or ActiveX control is installed.
Create new saved session to create a named saved session.
If you chose to create a saved session:
Type a New saved session name.
Select an existing category or type a new category.
Type Notes about your settings.
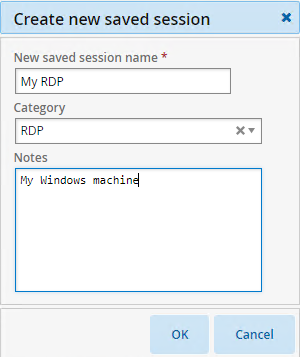
Click OK.
The saved session is added to the menu in the Filter panel.
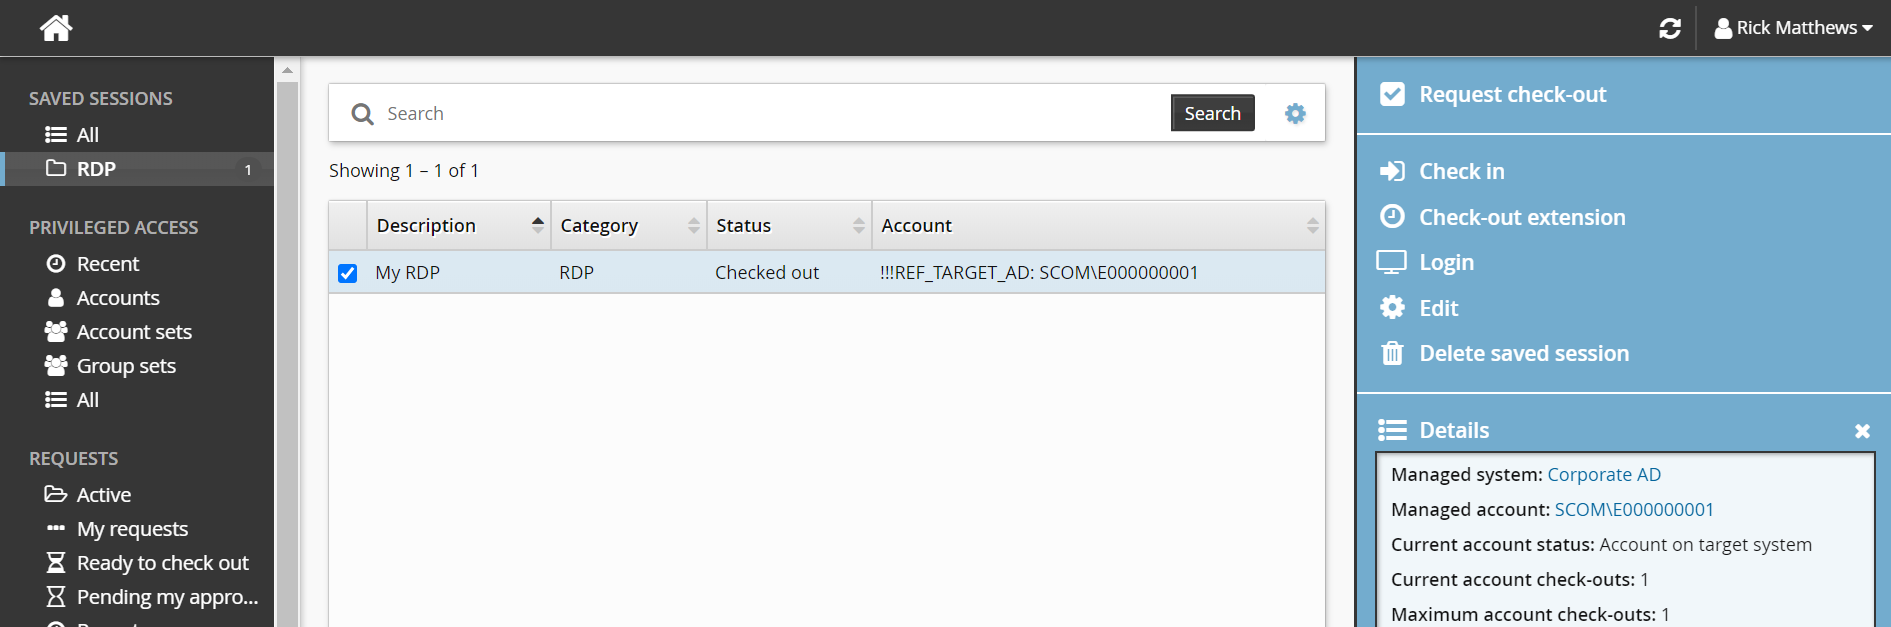
When you select the saved session, options are presented in the Actions panel:
Request check-out You can request access to the managed account the saved session was created for, if it is available.
Check in
Check-out extension
Login This launches the disclosure plugin using the saved attribute values.
Edit You can edit information and attributes, and save as the current session or create a new one.
Delete saved session You can delete one or more saved sessions.
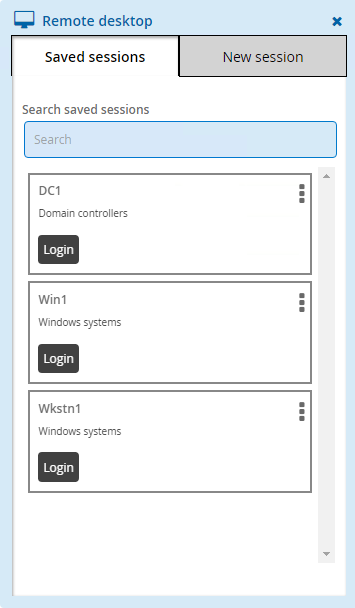
Using saved sessions
Click Privileged access on the home page.
Click All or a category group under the SAVED SESSIONS heading in the Filter panel.
The Results panel will list the available saved sessions.
Select a saved session.
Click Request check-out to request access to the managed account the saved session was created for.
Click Check out.
Click Login.
The disclosure plugin will be launched using the saved attribute values
Click Edit to edit information and attributes, and save as the current session or create a new one.
Click Privileged access on the home page.
Request and check out privileged account access.
Select an available access disclosure plugin.
Click the Login button on the saved session you want to use.