Challenge-response authentication
Users can be allowed at access Bravura Security Fabric using challenge-response authentication, including tokens, via applicable Authentication (Tokens/MFA) connectors. The connector package agent module runs the built-in agent.pss authentication program.
The challenge-response is performed externally
When using any challenge-response authentication factors, all profiles being directed to that factor in any of their login paths or usecases must have an associated account from the target configured in the challenge-response module. That account on the challenge-response system needs to have at least one enrolled device or other authentication factors configured.
If this requirement is not met, the authentication cannot proceed, and will log an error both in:
The login Web UI
idmsuite.logfrom the connector binary of the challenge-response targetFor example, the DUO connector (
agtduo) might return: "Warning: Didn't find user enrolled devices"
Configuration
Challenge-response authentication in Bravura Security Fabric cans can be implemented in different ways. The following example makes use of the connector package agent module:
Three separate custom authentication chains are configured:
Chain
Module
Control type
chain_password
Password authentication (
password.pss)binding
chain_questions
Security questions (
response.pss)binding
chain_token
Connector package agent (
agent.pss)binding
The connector package agent module is configured as follows:
Target system to use for address and credentials : <RSA AM7.x/8.x target ID>
Password verification operation : Challenge response authentication
Each of the three separate custom authentication chains must be added to the Available chains section of the DEFAULT_LOGIN authentication
When logging in, the end user chooses the applicable method and enders a valid passcode.
For more detail see example configuration steps for Bravura OneAuth , Okta , DUO , RADIUS ,or RSA .
Add Bravura OneAuth authentication to Bravura Security Fabric
Bravura OneAuth is a passwordless authentication method that allows you to use a trusted mobile device and biometrics to verify your identity. Bravura OneAuth can be used as a secure primary or multi-factor authentication method when accessing Bravura Security applications.
Bravura OneAuth supports mobile versions iOS13+ and Android 9+.
Configure a custom authentication chain for Bravura OneAuth
You can integrate Bravura OneAuth authentication in Bravura Security Fabric by configuring a custom authentication chain, using the agent.pss authentication module with the Bravura OneAuth connector agthypr , to perform a challenge response operation.
The following steps demonstrate how to integrate Bravura OneAuth in Bravura Security Fabric :
Add the Bravura OneAuth target system.
Add a new custom authentication chain:
Add the Connector package agent (
agent.pss) module to the chain.In the module’s settings:
Set Target system to use for address and credentials to the target you created.
Set Password verification operation to ”Challenge response authentication”.
Enable the custom authentication chain.
Add the new custom authentication chain to the DEFAULT_LOGIN chain:
Click Policies > Authentication chains > Front-end login .
Disable the chain so that you can edit it.
Edit the
select_chainmodule to add the new custom authentication chain to the list of Available chains .Update and enable the DEFAULT_LOGIN chain.
Test challenge response authentication with Bravura OneAuth
The following steps demonstrate how to authenticate with Bravura OneAuth in Bravura Security Fabric :
Test the authentication by logging in as an end user associated with the target system.
You will be notified that an authentication request will be sent to the HYPR app on the user’s registered device,
Click Continue.
A Bravura OneAuth push notification for the authentication request will appear on the HYPR app for "Login" or "Deny" to approve or deny the request.
Tap Login to approve the authentication request.
The app will indicate that login is successful.
Access is then granted on Bravura Security Fabric .
See also:
Bravura OneAuth for details on how to target Bravura OneAuth
Add Okta authentication to Bravura Security Fabric via API integration
This section demonstrates how to configure Okta, using the API integration method, as an authentication chain with Bravura Security Fabric .
See Okta integration strategy for information about SAML versus API integration.
This demonstration assumes:
An Okta target system has been configured as described in Connector Pack documentation.
The Okta target system is set as a source of profiles, or the Okta accounts are associated to another source.
Auto discovery has been run.
Click Manage the system > Policies > Authentication chains > Front-end login .
Disable the DEFAULT_LOGIN chain and click Add new… to add a new module.
Select
Connector package agentfor the module type.Click Update.
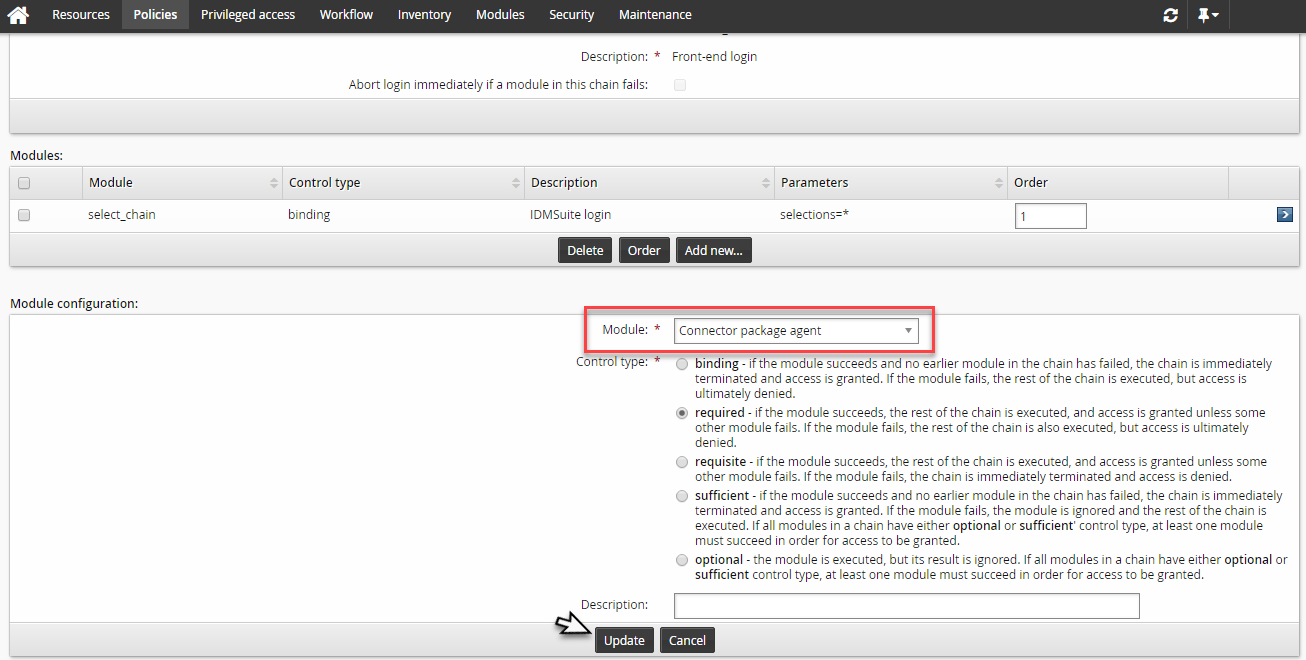
Set the Okta target system in Target system to use for address and credentials .
Select
Challenge response authenticationfor Password verification option.Click Update.

(Optional) Reorder the authentication chain modules so the Okta module comes first.
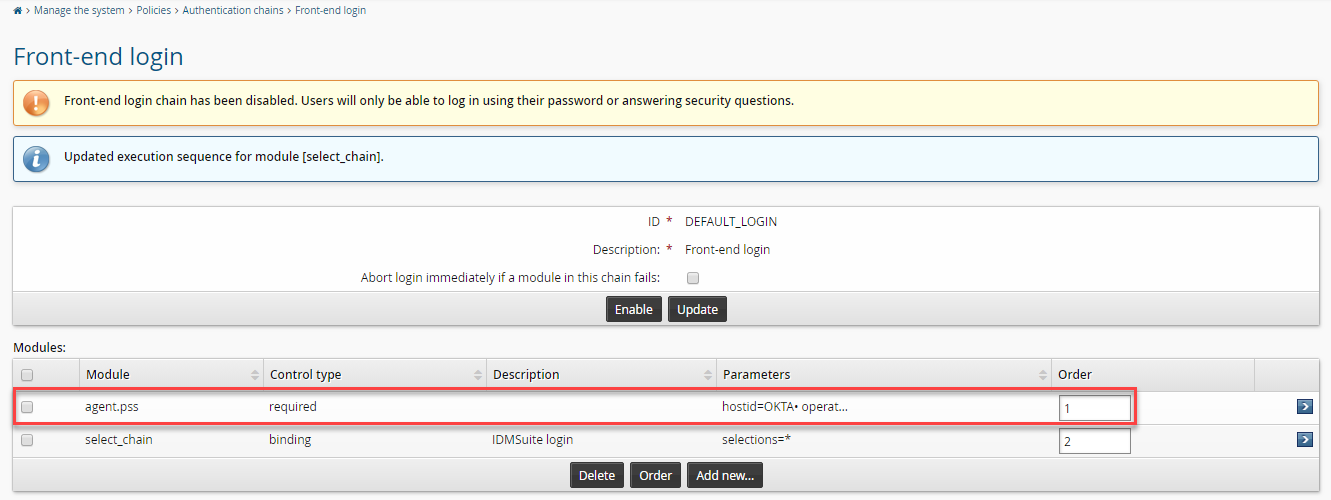
Enable the authentication chain.
Test the authentication by logging in as a user with an Okta account.
Select an Okta factor from the list of registered factors for the user.
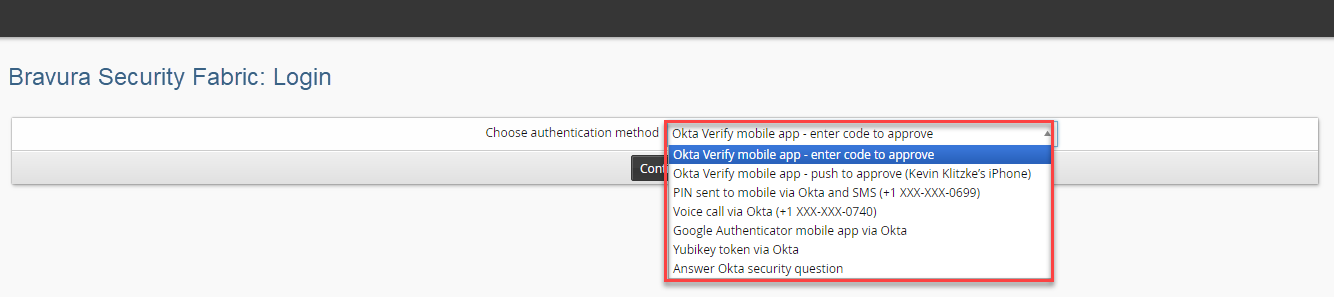
Complete the Okta authentication step.
Sign in to Bravura Security Fabric by completing the next step; the non-Okta authentication step.
Authentication into Bravura Security Fabric should now be complete.
Add DUO Authentication to Bravura Security Fabric
You can integrate DUO authentication in Bravura Security Fabric by configuring a custom authentication chain, using the agent.pss authentication module with the DUO Authentication connector agtduo , to perform a challenge response operation.
The following steps demonstrate how to integrate DUO authentication in Bravura Security Fabric :
Add the DUO Authentication target system.
Add a new custom authentication chain:
Add the
Connector package agent(agent.pss) module to the chain.In the module’s settings:
Set Target system to use for address and credentials to the target you created.
Set Password verification operation to ”Challenge response authentication”.
Enable the custom authentication chain.
Add the new custom authentication chain to the DEFAULT_LOGIN chain:
Click Policies > Authentication chains > Front-end login .
Disable the chain so that you can edit it.
Edit the
select_chainmodule to add the new custom authentication chain to the list of Available chains .Update and enable the DEFAULT_LOGIN chain.
Test the authentication by logging in as an end user associated with the target system.
You will be prompted for the DUO authentication methods that are available for the user and will depend on what the user has registered on the DUO Authentication server.
Here are a few examples of some of the available authentication methods that may be presented to the user:
Phone call to authenticate from a key press
SMS text message for a passcode
Passcode from the Duo Mobile app
Push notification to accept or deny from the Duo Mobile app
See also:
DUO Authentication in the Connector Pack Documentation for details on how to target DUO Authentication.
Add RADIUS authentication to Bravura Security Fabric
You can integrate RADIUS authentication in Bravura Security Fabric by configuring a custom authentication chain, using the agent.pss authentication module with the RADIUS Authentication connector agtradius, to perform a challenge-response operation.
The following steps demonstrate how to integrate RADIUS Authentication in Bravura Security Fabric :
Add the RADIUS Authentication target system .
Create a list file to associate users with the target system .
The
agtradiusconnector does not support listing operations. You must create a list file to associate users during auto-discovery, so that users can authenticate against the target system.Add a new custom authentication chain:
Add the
Connector package agent(agent.pss) module to the chain.In the module’s settings:
Set Target system to use for address and credentials to the target you created.
Set Password verification operation to ”Challenge response authentication”.
Enable the custom authentication chain.
Add the new custom authentication chain to the DEFAULT_LOGIN chain:
Click Policies > Authentication chains > Front-end login.
Disable the chain so that you can edit it.
Edit the
select_chainmodule to add the new custom authentication chain to the list of Available chains .Update and enable the DEFAULT_LOGIN chain.
Test the authentication by logging in as an end user associated with the target system.
You should be prompted to enter a valid RADIUS passcode.
Add RSA Authentication via connector authentication chain module
You can integrate RSA Authentication Manager authentication in Bravura Security Fabric by configuring a custom authentication chain, using the agent.pss authentication module with the RSA Authentication Manager 7.1/8.2 connector agtrsaam , to perform a challenge-response operation.
The following case illustrates how to integrate RSA Authentication Manager authentication in Bravura Security Fabric :
Note
If the requirements include using this target for authentication and do not need the other administrative features from the Java Administrative API , it's simpler and less maintenance to only install the C Authentication API . If you do need administrative features and also require authentication failover, which only the C Auth API provides, it is recommended to install both APIs.
Optional: Configure RSA Authentication Manager 7.1/8.2.
Optional: Add the system as an RSA Authentication Manager 7.1/8.2 target system .
Alternatively, if an actual RSA Authentication Manager 7.1/8.2 target system is not being used and only the challenge response authentication operation for the
agtrsaamconnector is to be used, the following steps must be taken:Add an RSA Authentication Manager 7.1/8.2 target system.
Leave the target system address parameters as defaults or provide any value for each of the parameters.
Uncheck the List accounts option for the target system.
Check Automatically attach accounts for the target system.
Manually create a <TARGETID> .db list file and copy it to the <instance>\psconfig\ directory.
A sample targetid.db file is located in the samples directory.
Add data for each user; or run the following queries in SQLite:
INSERT INTO discobj (stableid, type, longid, shortid,displayid,sd) values ("1001","ACCT","rsauser1","rsauser1","RSA Userone",NULL);
INSERT INTO discobjattr (stableid,type,attrkey,attrval,seqno) values ("1001","ACCT","@fullname","RSA Userone","0");
INSERT INTO discobj (stableid, type, longid, shortid,displayid,sd) values ("1002","ACCT","rsauser2","rsauser2","RSA Usertwo",NULL);
INSERT INTO discobjattr (stableid,type,attrkey,attrval,seqno) values ("1002","ACCT","@fullname","RSA Usertwo","0");
The value for the longid field must be the user IDs of the RSA Authentication Manager 7.1/8.2 users that will be used to authenticate with their SecurID tokens.
See also: Creating a list file and copying data from other targets.
Add a new custom authentication chain:
Add the Connector package agent (
agent.pss) module to the chain.In the module’s settings:
Set Target system to use for address and credentials to the target you created.
Set Password verification operation to ”Challenge response authentication”.
Enable the custom authentication chain.
Add the new custom authentication chain to the DEFAULT_LOGIN chain:
Click Policies > Authentication chains > Front-end login .
Disable the chain so that you can edit it.
Edit the
select_chainmodule to add the new custom authentication chain to the list of Available chains .Update and enable the DEFAULT_LOGIN chain.
Test the authentication by logging in as an end user associated with the target system.
You will be prompted to enter a valid passcode for the user’s SecurID token.
There will also be additional prompts if the user’s SecurID token is in an extended mode for either the new pin or next token code modes.