Adding local service mode managed systems
In local service mode , Bravura Privilege performs local password resets and other operations using software, the Local Workstation Service, that you install on the managed resource. The system is automatically registered the first time the Local Workstation Service communicates with the Bravura Privilege server. For more information about how this mode works, see Local service mode .
To add a local service mode managed system:
Download the MSI installation package and the ini file.
See Downloading the installation package for details.
Install the Local Workstation Service on the system.
See Installing local service mode software on Windows systems for details.
Allow the system to contact the Bravura Privilege to register itself as a discovered object.
Manage the discovered system, either manually, or using import rules.
Downloading the installation package
To download the installation package, from the Bravura Security Fabric main menu:
Click Manage the system > Privileged access > Local workstation service installation package.
Click Local workstation service installation package.
Click INF file download to download the
idmsetup.inffile that contains the encrypted workstation authentication key and address of the Bravura Privilege server.Click on MSI download (32-bit) or MSI download (64-bit) , depending on the system type, to download the Local Workstation Service installer. The installers are called
hipamlws-win-x86.msiandhipamlws-win-x64.msirespectively.Alternatively, you can retrieve the installation package from the addon idarchive directory.
You can now install the Local Workstation Service installation package.
Installing local service mode software on Windows systems
This section shows you how to install the Local Workstation Service on a Windows server or workstation by manually running the MSI installer that you downloaded in Downloading the installation package .
Note
Listing of accounts and groups are disabled for Local Workstation Service installed on domain controllers.
Do not install Local Workstation Service on Bravura Privilege
Bravura Privilege servers, or any server or workstation which is discoverable through psupdate and can be managed as a push system.
You can also install the software automatically. For example, use a software package distribution product like Microsoft’s System Center Configuration Manager and use the command line options or use group policy.
See Add-on installation command-line options for more information on the command-line options.
If you use workstation images you can install Local Workstation Service as described below. Disable the service by default and configure to Automatic after the image is placed on the workstation if you want to use the Local Workstation Service.
You can use a plugin to digitally sign files if required. See Digitally signing files for details.
To install the Local Workstation Service manually:
Copy the MSI and INF files that you downloaded earlier to a temporary location on the new server or workstation.
Launch the MSI.
A welcome screen appears.
Click Next .
Read and accept the license agreement.
Click Next .
Choose Typical setup type.
Clicking Custom allows you to change the install location
hipamlwsdirectory. This is not recommended.Enter the workstation authentication encryption key.
This is the authentication key that was entered when Bravura Privilege was originally installed. This should already be pre-filled if you downloaded the
idmsetup.inffile.Click Next .
Set the following parameters:
Bravura Privilege server The address and the virtual path of the Bravura Privilege CGI. This should already be pre-filled if you downloaded the
idmsetup.inffile. The format should be:https://<server>/<instance>/cgi/pamlws.exe
Change
serverto the Bravura Privilege server address andinstanceto the instance name or virtual directory name if required.Web proxy If the Local Workstation Service must contact the Bravura Privilege server through a proxy, type the proxy server address and port number in the format: <address> : <port> .
Validate server certificate Enable this checkbox if the web server on your Bravura Privilege server is running HTTPS. This is strongly recommended in a production installation to avoid information being sent over the network unencrypted.
Initial poll delay (seconds) Specify the time used to determine how long to wait before doing the initial poll to the Bravura Privilege server.
The actual wait time will be ±10% of the specified time, randomly determined in order to prevent a large number of systems contacting the Bravura Security Fabric server at the same time.
Click Advanced to set some extra options:
Disable service after installation Check this box to disable the Local Workstation Service after installation. You may want to disable it, for example, when building a system image for workstations with this service pre-installed.
By default this option is not checked.
Defer initial service startup until next system restart Check this box if you want to postpone running the Local Workstation Service until the system has been restarted. This requires that Disable service after installation to be deselected.
Re-register this workstation Enable this option if you are reinstalling the Local Workstation Service on a system that has previously had the Local Workstation Service installed on it. When enabled, this option checks if the managed system ID already exists on the Bravura Privilege server. If it exists, then the managed system uses that ID as its own.
Click Next .
The installer displays the page.
If required, enter the path of a Custom attribute file .
Click Next .
The installer displays the page.
Click Install to start the installation.
The installer begins copying files to your computer. The page appears after the Bravura Privilege features have been successfully installed.
Click Finish to exit.
The Local Workstation Service can now contact the Bravura Privilege server to register the host system as a discovered object. Once the service has contacted the server, it sends its system data and registers itself as a discovered system. The default interval for this initial registration is 300 seconds. After registration, the service periodically polls the Bravura Security Fabric to determine whether any jobs, such as password change or attribute listing, are required on the host system. Depending on the task that has been assigned, the service will contact the server at different intervals. If no tasks are assigned, the service will wait the poll time, as defined by the RES POLL INTERVAL, until it rechecks the server for tasks.
If the Local Workstation Service is unable to contact the Bravura Privilege server using the proxy server, it will attempt to poll again without connecting to the proxy server.
In local service mode, a service running locally on the managed system, connects via TLS-encrypted communication over a single outgoing port, the one port made available by the IIS web server into the Bravura Privilege nodes, by default, that port is 443. Please ensure, through either firewall, switch, proxies, tunneling or other networking configuration, that the workstations on which the Local Workstation Service is installed can connect to the Bravura Privilege server IIS.
You can capture log data on local service mode managed systems using the logutil program which is installed with the service.
Custom attribute file
You can use custom system attributes to define requirements for import rules. For local service mode systems, computer information is not stored on the Bravura Privilege server, but locally on the system itself.
The local service installer can read a custom attribute file and send information back to the server to be used by import rules as discovered system attributes. The custom attribute file must be in KVGroup format:
# KVGROUP-V2.0
"custom_attribute" "" = {
  "<attribute1>" = "value1";
  "<attribute2>" = "value2";
  ...
  "<multi-valued attribute1>" "" = {
     "<mv1-value1>";
     "<mv1-value2>";
     ...
  "<multi-valued attribute2>" "" = {
     "<mv2-value1>";
     ....
  };
};
For example:
# KVGROUP-V2.0
"custom_attribute" "" = {
  "location" = "calgary";
  "system_type" = "laptop";

  "departments" "" = {
     "sales";
     "marketing";
  };
};
There are some restrictions on what names the custom attributes may use. If any of the custom attributes are using these values, they will invalidate the attribute file and any new attributes will not be sent to the Bravura Privilege server. The attribute names such as NETBIOS, dNSHostName and failedAttempts are some examples.
Custom discovered system object attributes can be removed by setting the cust-attr-file registry entry of the local service of the workstation to an empty string.
Custom discovered system object attributes can be added by setting the cust-attr-file registry entry of the local service of the workstation to the full path name of the custom attribute file.
Integrating with McAfee ePolicy Orchestrator (ePO)
The Local Workstation Service can send properties of its installation to the McAfee ePolicy Orchestrator (ePO) via McAfee Agent. These properties include the product version, the installation path, and language version.
The server or workstation on which the Local Workstation Service will be installed must be added as a system on the ePO. Consult the McAfee ePolicy Orchestrator documentation to learn how to do this.
Supported versions of ePO include v4.6 or greater.
To install and configure Local Workstation Service to be ePO aware:
Contact support@bravurasecurity.com to obtain the
hipamlws-win.zipfile for integration with McAfee ePolicy Orchestrator.Copy over the
hipamlws-win.zipfile onto the ePO server.On the ePO console, go to Menu > Master Repository .
Click Check In Package.
In the File Path, click Browse to locate the
hipamlws-win.zipfile.Click Next .
Click Save.
Go to Menu > Policy > Client Task Catalog.
Click New Task.
In the Task Types dropdown menu, click Product Deployment.
Click OK.
Enter the task name; for example,
InstallLWS.In Products and components :
Select LocalWorkstationService from the first dropdown menu.
Select Install as the Action.
In the Command line field, specify the following arguments, each separated by a space:
Enable ePO integration:
ADDLOCAL=PAMLWS_EPO
The address of the Bravura Privilege server .
SERVER=http://<server>/<instance>/cgi/pamlws.exe
You can define other Local Workstation Service command line arguments .
Best practice
It is recommended that the installer pick the encrypted version of the AUTHKEY from the .inf file
Click Save.
Warning
Ensure that any previous installations of the Local Workstation Service is removed, or the installation will fail. Also, if the system is already discovered in the Bravura Privilege server from an existing installation, the installation will fail. If you are re-registering this system, ensure that the proper arguments are defined in the command line.
To run the Local Workstation Service installation manually using ePO:
Go to Menu > Systems section > System Tree.
Select the Systems tab (if not already redirected to this section).
Check off the systems to install the Local Workstation Service.
Click Actions > Agent > Run Client Task Now.
Select the install task you’ve previously created.
Click Run Task Now.
The Local Workstation Service installation will commence.
To run the Local Workstation Service installation immediately after adding a new system to the ePO:
Go to Menu > Policy > Client Task Assignments.
On the left menu pane, select the group in the system tree where the Local Workstation Service will be installed.
Click Actions > New Client Task Assignment.
In Task to Schedule, select the task you’ve previously created.
Click Next .
Set the Schedule type to Run immediately .
Click Save.
When new systems gets added to the ePO and the McAfee Agent is successfully installed on the system, the installation of the Local Workstation Service will run automatically.
To view the properties of the Local Workstation Service on ePO:
Go to Menu > Systems section > System Tree.
Select the system where the Local Workstation Service is installed.
Select the Products tab.
Select Local Workstation Service.
The properties of the Local Workstation Service will be displayed.
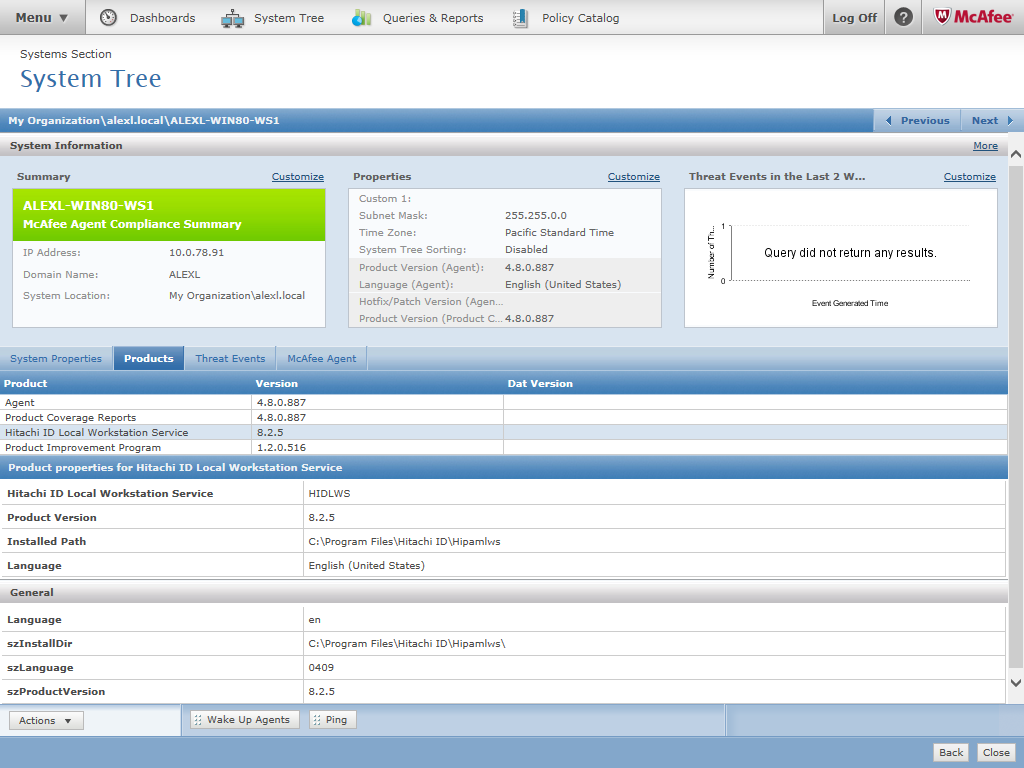
Initially, the Local Workstation Service will not show up in the list of products. You may need to wait until next time the McAfee agent sends properties to the ePO.
To uninstall the Local Workstation Service using ePO:
Go to Menu > Policy > Client Task Catalog.
Click New Task .
In the Task Types dropdown menu, click Product Deployment.
Click OK.
Enter the task name; for example,
RemoveLWS.In Products and components :
Select LocalWorkstationService from the first dropdown menu.
Select Remove as the Action.
Click Save.
Go to Menu > Systems section > System Tree.
Select Systems tab (if not already redirected to this section).
Check off the systems to remove the Local Workstation Service.
Click Actions > Agent > Run Client Task Now.
Select the uninstall task you’ve previously created.
Click Run Task Now.
The Local Workstation Service will be uninstalled.
The Local Workstation Service will be removed from the system, however this will not remove the system from the Bravura Privilege server.