Use case: SSH key access
This use case demonstrates how to set up and check out an SSH key.
Requirements
This use case assumes that:
The target system is Unix operating system (Linux, Solaris, AIX, HP-UX are supported)
OpenSSH installed is installed on the target system
The use case environment details are:
A linux system with hostname linux01 .
linux01 contains the following:
User admin1 , used to request SSH key access
User sshkeyaccount , in which admin1 will request SSH key access to
Both admin1 and sshkeyaccount have SSH keys defined
Create SSH Key pairs
The following steps are based on a CentOS 7 64-bit server with OpenSSH pre-installed. The steps may vary depending on which linux distributions you decide to use.
For more information about OpenSSH visit: https://www.ssh.com/academy/ssh/keygen
SSH into the linux system as root and enter its password:
ssh root@linux01
Create 2 users: admin1 and sshkeyaccount using the useradd command:
useradd admin1
useradd sshkeyaccount
Set a password for the accounts using the passwd command:
passwd admin1
passwd sshkeyaccount
SSH into linux01 as admin1 and enter its password:
ssh admin1@linux01
Create an SSH key pair using ssh - keygen . Accept all defaults.
ssh-keygen
This saves the keys into the user’s .ssh directory.

End the SSH session for admin1.
SSH into linux01 as sshkeyaccount and enter its password:
ssh sshkeyaccount@linux01
Create an SSH key pair using ssh-keygen. Accept all defaults.
ssh-keygen
This saves the keys into the user’s .ssh directory.
End the SSH session for sshkeyaccount.
If you provide a passphrase for the ssh key, this will also need to be specified upon SSH key account check out, even when a password is not required.
Add an SSH key target system
Log in to the Front-end as superuser.
Click Manage the System > Resources > Target systems > Manually defined.
Click Add new…
Specify:
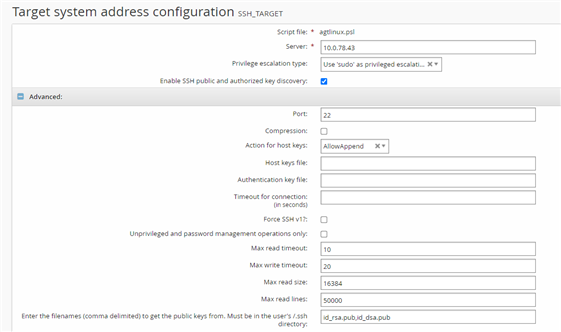
ID : SSH_TARGET
Description : SSH key system
Set type to "Generic Linux Server (SSH)"
(Optional: Select the checkbox for Source of profile IDs.
SSH_TARGET does not need to be a source of profile IDs, however accounts in SSH_TARGET must be able to be associated with accounts in the source of profile target in order to request SSH key access.
Select checkbox for Automatically create a Privileged Access Manager managed system.
Click Change in the Address field:
Set server as linux01.
Select the checkbox for Enable SSH public and authorized key discovery .
Optional: If the ssh keys are of a non-standard file name (ie. rsa or dsa public keys are not named id_rsa.pub or id_dsa.pub), or of a different algorithm (ecdsa, ed25519):
Expand Advanced .
Update Enter the filenames (comma delimited) to get the public keys from. Must be in the user's /.ssh directory to include all other public key filenames.
Click Continue.
Click Add.
Specify credentials for the target system.
Click Update.
Click Test connection tab.
Click Test credentials.
Verify that the credential test is successful.
Run auto discovery to list accounts and public keys.
To confirm that SSH public keys are successfully listed:
Map the authorized_keys account attribute.
Click Manage the system > Account attributes > Target system > <target id> > Defaults tab
Override the authorized_keys account attribute
Set Map account attribute to profile/request attribute to the SSH_PUBLIC_KEYS profile/request attribute
Click Add.
Run auto discovery.
Expose the SSH_PUBLIC_ATTRS attribute group.
Click Manage the system > Workflow > Attribute groups.
Click SSH_PUBLIC_ATTRS.
Click Display Criteria.
Set Display type = Main.
Click Update.
Confirm that the SSH public keys appear for the user's profile.
Log in to the Front-end as admin1.
Under My Profile, click View and update profile.
Under SSH public key profile attributes, confirm that the public key(s) are attached to the profile.
Manage SSH key accounts
As superuser, click Manage the system > Privileged access > Managed system policies.
Click Add new…
Set the following:
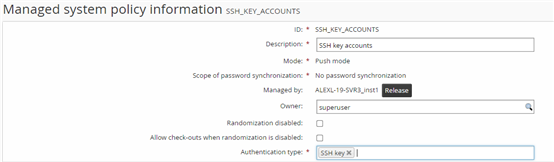
ID: SSH_KEY_ACCOUNTS
Description: SSH key accounts
Authentication type: SSH key
Click Add.
Click the Member systems tab.
Click Add new…
Select SSH_TARGET.
Click Select
Click the Managed accounts tab.
Click Add new…
Select sshkeyaccount.
Click Select
Click the Authorizers tab
Under Authorizers, click Select…
Select a user to be the authorizer, and click Select
Click the Access disclosure plugins tab.
Select PuTTY over SSH (using SSH keys)
Click Select.
Select the checkbox for Access SSH keys.
Click Update.
Additional configuration is required for this disclosure to work, including the installation of PuTTY on the workstation that will launch the disclosure. This will be done in Launch SSH using PuTTY over SSH disclosure below.
Request access to SSH key
Log in to the Front-end as admin1.
Click Privileged access.
Click the Accounts filter in the left panel.
Select sshkeyaccount.
Click Request check-out.
Fill in required fields.
Set Operation to perform for check-out and check-in’to SSH Key, if not already set.
Optional: Select a public key from SSH public key to add to account, if the user has multiple public keys.
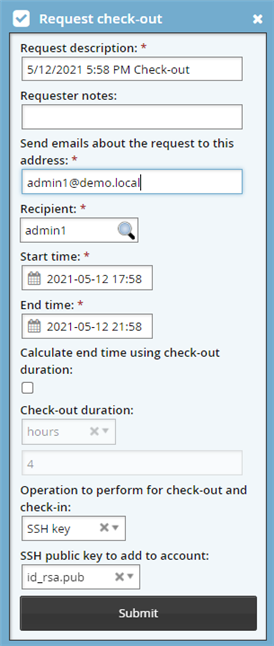
Click Submit.
If authorization is required, approve the request as the authorizer.
Check out SSH key access
After checking out an SSH key account, the requester should be able to ssh into the managed account without a password.
Log in to the Front-end as admin1.
Click Your privileged access requests have been approved.
Click Check out.
Wait until check out is complete.
To verify:
SSH into linux01 as admin1 and enter its password:
ssh admin1@linux01
SSH into linux01 as sshkeyaccount:
ssh sshkeyaccount@linux01
Confirm admin1 should now be able to SSH using sshkeyaccount without prompting for a password.
If you specified a passphrase for the SSH key, you will be prompted to provide one, even if a password is not required.
Launch SSH using PuTTY over SSH disclosure
In order to use the PuTTY over SSH (using SSH keys) access disclosure plugin, additional configuration must be done, including:
Installing PuTTY on the client workstation that will launch the disclosure.
Adding the requester’s private key on the workstation.
(If Session Monitor is configured) Configure SMON HTTP URL system variable. See Session Monitoring section in the config doc on how to do this.
On the client workstation that will launch the PuTTY over SSH disclosure, download and install PuTTY. This can be found at https://www.putty.org/
Ensure PuTTY can be run by opening up a command prompt window and typing ‘putty’. If it does not resolve properly, add the full path to PuTTY to your PATH environment variables.
Copy over the foreign key of admin1 from linux01 (ie. id_rsa or id_dsa) to the client workstation. This can be found in the .ssh directory.
Use the
puttygenutility, found in C:\Program Files\PuTTY, to generate a .ppk private key file from the foreign key:Click Load.
Locate and select the foreign key file
The key should now be loaded into puttygen.
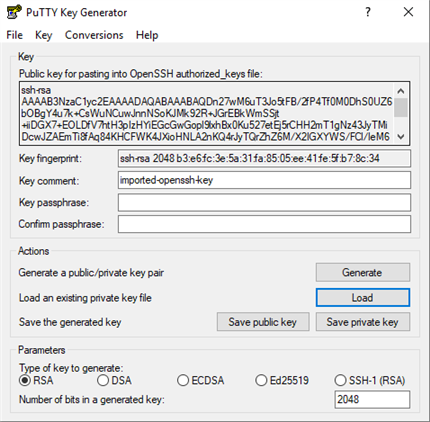
Optional: Provide a passphrase for the SSH key.
Save the private key file in a local directory.
Double-click on the .ppk file. Pageant (PuTTY authentication agent) will launch and load the private key file. You should see the icon of the Pageant program in the taskbar.
To verify that PuTTY over SSH disclosure successfully ssh into the managed account without a password:
Log in to the instance as admin1.
Click Privileged access.
Under Check-outs, click the Mine filter in the left panel.
Select sshkeyaccount.
Click PuTTY over SSH (using SSH keys).
Confirm PuTTY is launched, and admin1 is automatically logged in as sshkeyaccount using SSH without prompting for a password.
If you specified a passphrase for the SSH key, you will be prompted to provide one, even if a password is not required.
Check in SSH key access
After checking in a SSH key account, the requester should no longer be able to ssh into the managed account without a password.
Log in to the Front-end as admin1.
Click Privileged access.
Under Check-outs, click Mine filter from the left panel.
Select sshkeyaccount.
Click Check in.
To verify:
SSH into linux01 as admin1 and enter its password:
ssh admin1@linux01
SSH into linux01 as sshkeyaccount :
ssh sshkeyaccount@linux01
Confirm admin1 is prompted for a password for sshkeyaccount.