Writing your script
In the <instance>/samples folder, most of the script connector types have a representative sample file. These samples offer a boilerplate for quick turn around in writing your custom connector. Copy the sample file file into the agent folder with the connector script name you wish – in the case of the Python connector, the sample file is named agtpython-simple.py. This sample also contains useful documentation at the beginning of the script. Do not move the sample file and also ensure to leave the original file in the sample folder unmodified.
Ensure when writing your script that you bring the code into compliance with appropriate coding practices (for example pep8.)
View the structure of an existing sample script
Looking at the agtpython-simple.py comment section, the sample script documents:
Several useful variables for inputs from the Bravura Security product.
The Python function points for operations.
The Python callbacks used to integrate outputs to the Bravura Security product.
The Python connector return codes
Following the comment section are code samples for integrating all the operations, generally in the order of precedence.
The addressattr definition allows you to expose target address attributes in your custom connector. These address attributes are parameters that expose configuration when targeting your connector. For example, our SuccessFactor EC rest connector (which is written in Python) provides the following target system address configuration:

And this is exposed via the following addressattr function:
def addressattrs(cinfo):
 """ Target address settings must specify:
 """
 agent.addAddressAttr(

   "url", "SuccessFactors OData REST API URL", "string", "", True)

 agent.addAddressAttr("proxy", "Proxy server to use", "string", "", False)
 agent.addAddressAttr("groupTypes",
        "GroupType(s) to list",
        "string",
        "permission",
        False)
The connect/disconnect definitions allow you to implement the connection/disconnection logic to your target. These definitions are called automatically before and after an operation function such as listusers or reset are called. The provided sample script as-is does not connect to anything but shows what variables are useful during connection. Note that cinfo Python dictionary often exposes many of the inputs from the connector framework. There are also commented out lines in the sample which present how to validate addressattr values passed in from the target system address configuration, such as port numbers. Also noteworthy is the log.info example to log to our logging facility (to the idmsuite.log):
log.info("connecting as adminid [{0}] sysid [{1}] with address line [{2}] "
       "timeout [{3}] settings [{4}]".format(adminid,
                                 sysid,
                                 address,
                                 timeout,
                                 settings))
And the agent.error example to return an error code and an error message back through the connector framework to the caller of the connector:
agent.error("Port number option must be defined");
 return ACUnknownError
The serverinfo function is mandatory with the list operation. The serverinfo operation is also used to test your connection on the Test connection tab of your target configuration in the product UI. This operation, and the function itself returns general information on the target, such as its version or any general functionality that this target might offer. Generally, the information returned is inconsequential and returning any version value is fine. As is the case in the provided sample using the agent.serverInfo callback:
attr_dict = {'attr1': ['value1-1'], 'attr2': ['value1-2']}
agent.serverInfo("1.1", attr_dict)
The listusers,listgroups,listcomputers,listsubscribers definitions provide the ability to return list information on the associated objects. The samples fill in mock data, but it shows how you can return account/group/computer/subscriber information through the connector framework using the provided agent.addAccount/agent.addGroup/agent.addComputer/agent.addSubcriber callbacks. These callbacks write the object information into the connector sqlite db files stored in psconfig, and these files are read by the iddiscover service into the product database.
Caution
Sometimes, a failure to list objects or their attribute information can fail unexpectedly due to connectivity issues or simply because the attributes or tables read do not exist for that object. It is not uncommon for targets to return object information using paged fetches. A failure to list but returning success can cause objects that were unsuccessfully listed to become invalid in the product. For example, a user’s account can disappear. Keep all this in mind when implementing the list operations.
There are other operations in the sample script, for example, verify, change, reset, expirepw, etc, that are unimplemented and return success. The operations and their respective Python definitions are generally considered push operations. Sometimes, they return attribute information, but generally, their main intent is to update the end target. As a result, they are generally easier to implement except for create and update.
Finally, the custom operations and the challengeresponse operation require detailed knowledge of the product and are complicated to implement. These are not operations we recommend writing yourself.
Hello World: Start on writing your own script
Prerequisites
Bravura Security Fabric is installed.
Steps
Find the
agtpython-simple.pysample script in <instance>/samples folder.Copy
agtpython-simple.pyand paste it into your <instance>/agent folder. Later on when we package the script as a component, it is moved elsewhere.Rename
agtpython-simple.pytoagthelloworld.py.With PyCharm or the editor of your choice, open up your agthelloworld.py script so you can follow along with the code that matches this walkthrough.
In the agent folder, create a connector file named
agthelloworld.conin the <instance>/agent folder with the following content:# KVGROUP-V2.0 agthelloworld = { agent = agtpython.exe; script =.py; category = SCRIPT; platform = HELLOWORLD; description = "Hello World Python Agent"; system = true; }Execute
loadplatformfrom the utils directory to load your connector file into Bravura Security Fabric .loadplatform.exe -a agthelloworld
Log into Bravura Security Fabric as an administrator and navigate to Manage the System -> Resources -> Target Systems and click Add new…
For the target type, select your "Hello World" Python agent:
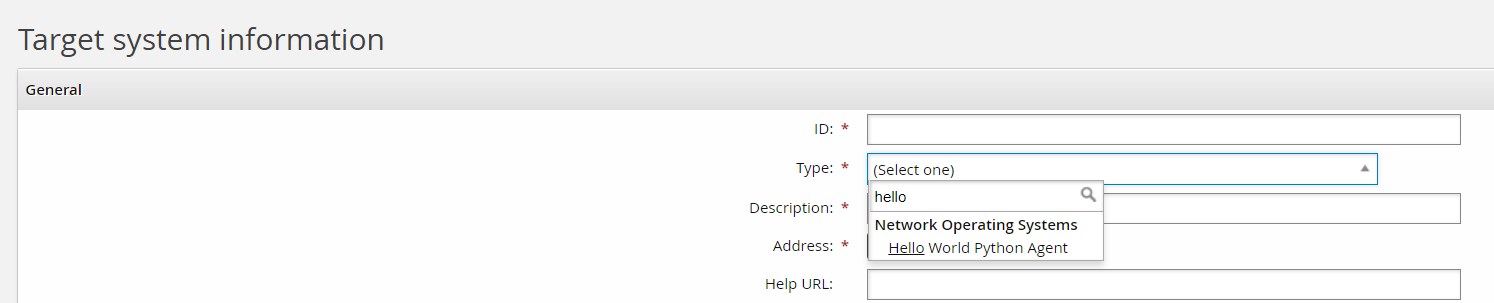
Add an appropriate ID and Description. For example:
ID: MYWORLDROCKS
Description: My World Rocks
Click Change next to the Address field. Note the address attribute options match the
addressattrsPython definition in your agthelloworld.py file. View the file to get a better understanding of the power of exposing functionality to the target address configuration UI.def addressattrs(cinfo): agent.addAddressAttr("verbose", "Log extra information", "boolean", "false", False) agent.addAddressAttr("host", "Host name", "string", "", False) ...The matching address configuration might look something like this:
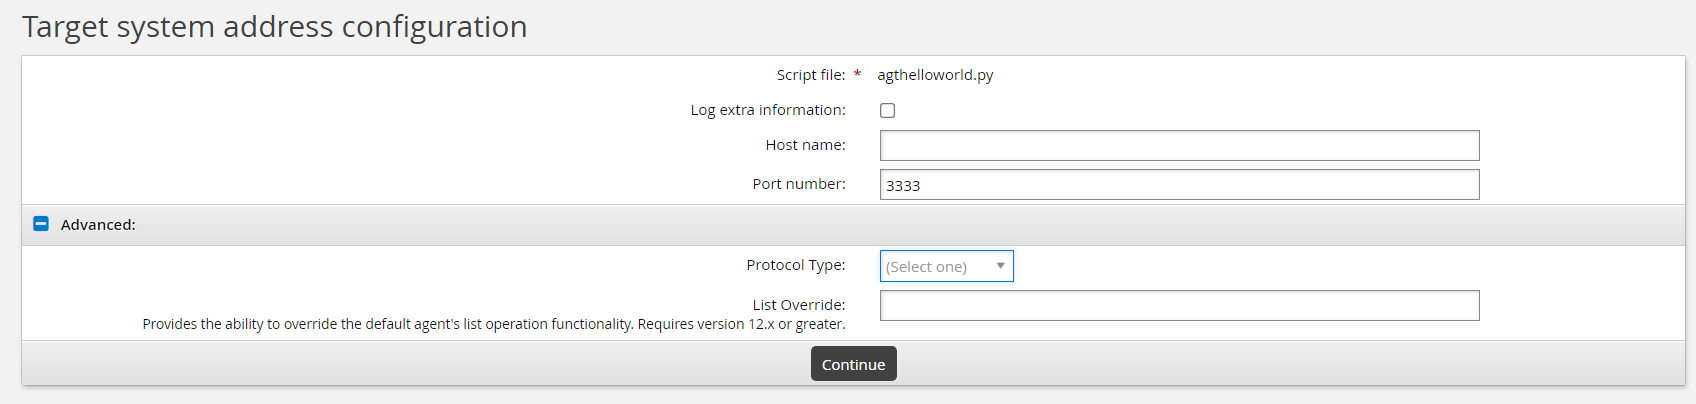
Since these options are for illustration purposes only, none of these options actually do anything. Click Continue.
Set Automatically manage groups to "All groups, approval required"
Set Groups whose membership will be listed to "Managed groups"
Click Add on the target main page.
On the credential page enter in placeholder credentials. Since this connector does not actually target any actual target end point, these credentials can be anything. For this example:
Administrator ID: placeholder
Password: North*1
Confirm password: North*1
Click Update.
Select the Test connection tab.
Click Test credentials .
Results should return success.
The Test connection tab executes the server info operation, which implicitly calls the connect operation first. This corresponds with both the
connectand theserverinfoPython definitions. In your sample navigate to these respective definitions for a better idea how these work. Keep in mind that these are samples and do not actually connect to any end target:def connect(cinfo): agentinput = cinfo['agentinput'] instance = agentinput['instance']['VALUE'][0] hostid = agentinput['hostid']['VALUE'][0] log.info("agent python with instance name [{0}] hostid [{1}]". format(instance, hostid))And
def serverinfo(cinfo):
  # The serverinfo operation must be defined and return ACSuccess
  # for a successful list (discovery) operation.
  opinput = cinfo['opinput']
  lastModifiedTime = ''
  if 'lastModifiedTime' in opinput:
    lastModifiedTime = opinput['lastModifiedTime']
  log.info("lastModifiedTime [{0}]".format(lastModifiedTime))
…
Click Test list.
Results should return the two users in the script.
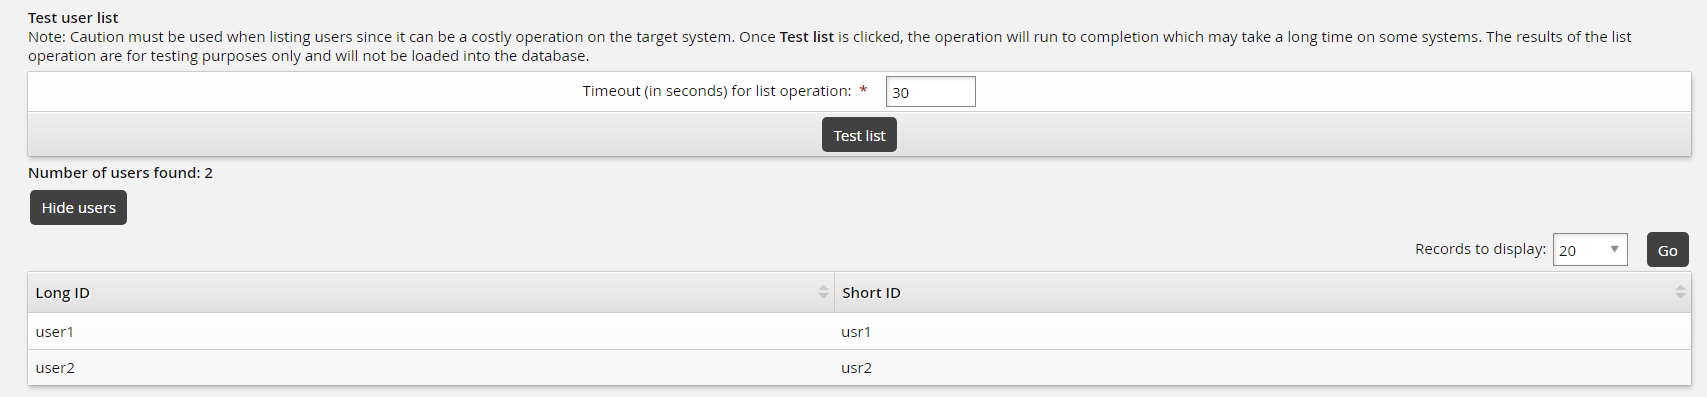
This corresponds with your
agthelloworld.pylistusersdefinition which adds two users:def listusers(cinfo, wantGroups, wantAttributes): log.info("listing users") listattributes = cinfo['listattributes'] log.info("agent python listattributes [{0}]".format(listattributes)) …Go back to the General tab and click Run discovery.
Click the Home icon and navigate to Manage Reports > Reports > Users > Accounts. Select your Target System ID "MYWORLDROCKS" and click Run.
You should see the two accounts from the target.
Navigate to Manage Reports > Reports > Roles and Groups > Groups. Select your Target System ID "MYWORLDROCKS" and click Run.
You should see the two groups from the target.