Add a service provider to the Bravura Security Fabric IdP
Bravura Security currently ships out-of-the-box templates for the following service providers:
Microsoft Office 365/Azure.
Bamboo HR
Hitachi Content Platform Anywhere (HCP Anywhere).
YouTrack.
Active Directory Federated Services (ADFS)
Google Applications (Mail, Calendar, etc.).
WebEx.
Salesforce.
For other SAML-compliant SPs, follow the procedure to add a service provider that is not pre-configured in Bravura Security Fabric .
Service provider with pre-configured template
If your SP has a pre configured template follow this process to integrate the SP with Bravura Security Fabric IdP.
Follow the vendor's steps to prepare the service provider. See Configure a Salesforce service provider for an example.
Add the service provider to the Bravura Security Fabric identity provider
As superuser on the IdP server navigate to Manage external data store > sp_mapping.
Enable the sp_mapping table issuer that corresponds to your service provider:
Rows exist for the following SPs: bamboohr, google, webex, hcpa, adfs, youtrack, salesforce and azure.
All rows have a value of 0 in the enabled column, by default. Change the value in the row for your service provider to 1.
Ensure the following field values match the values used on the service provider. In Salesforce these values can be found in the SAML Single Sign on settings.
issuer In Salesforce this is called the Entity ID
sp_folder contains
__non_saml__, and <sp folder name on the Bravura Security Fabric IdP server>acs_url In Salesforce this is the Login URL.
idp_url In Salesforce this is the issuer entry .
Click Update.
Optional: As superuser on the IdP server navigate to Manage external data store > sp_access.
Edit the following entries if you want to restrict access to the service provider to a more specific set of users:
sp_folder: contains __non_saml__, and <sp folder name>
userclass: _ALLUSERS_
deny_acl: 0
Click Update.
Optional: As superuser on the IdP server navigate to Manage external data store > sp_authchain.
Edit the following entries if you have different authentication requirements:
sp_folder: contains __non_saml__, and <sp folder name>
authchain: column values are set to REGUSER
Click Update.
Test the login process
The SP should now be set up to authenticate with Bravura Security Fabric as IdP. To test this setup:
Open the SP instance login page.
Submit the username of one of the test accounts that is a member of SAML_USERS.
You should be redirected to IdP's login page.
Complete the authentication process, using valid credentials.
Login uses the SAML authentication chain.
Upon successful authentication, the user’s web browser is redirected back to the service provider, where they are logged in automatically.
Example: Configure a Salesforce service provider
If your organization makes use of the Salesforce service, it can be configured to allow end users to login via Bravura Security Fabric .
Prepare Salesforce as service provider
Log into Salesforce as an administrator.
Add SAML Single Sign-On Settings for Bravura Security Fabric :
Navigate to the Single Sign-On Settings configuration page (Settings > Identity > Single Sign-On Settings).
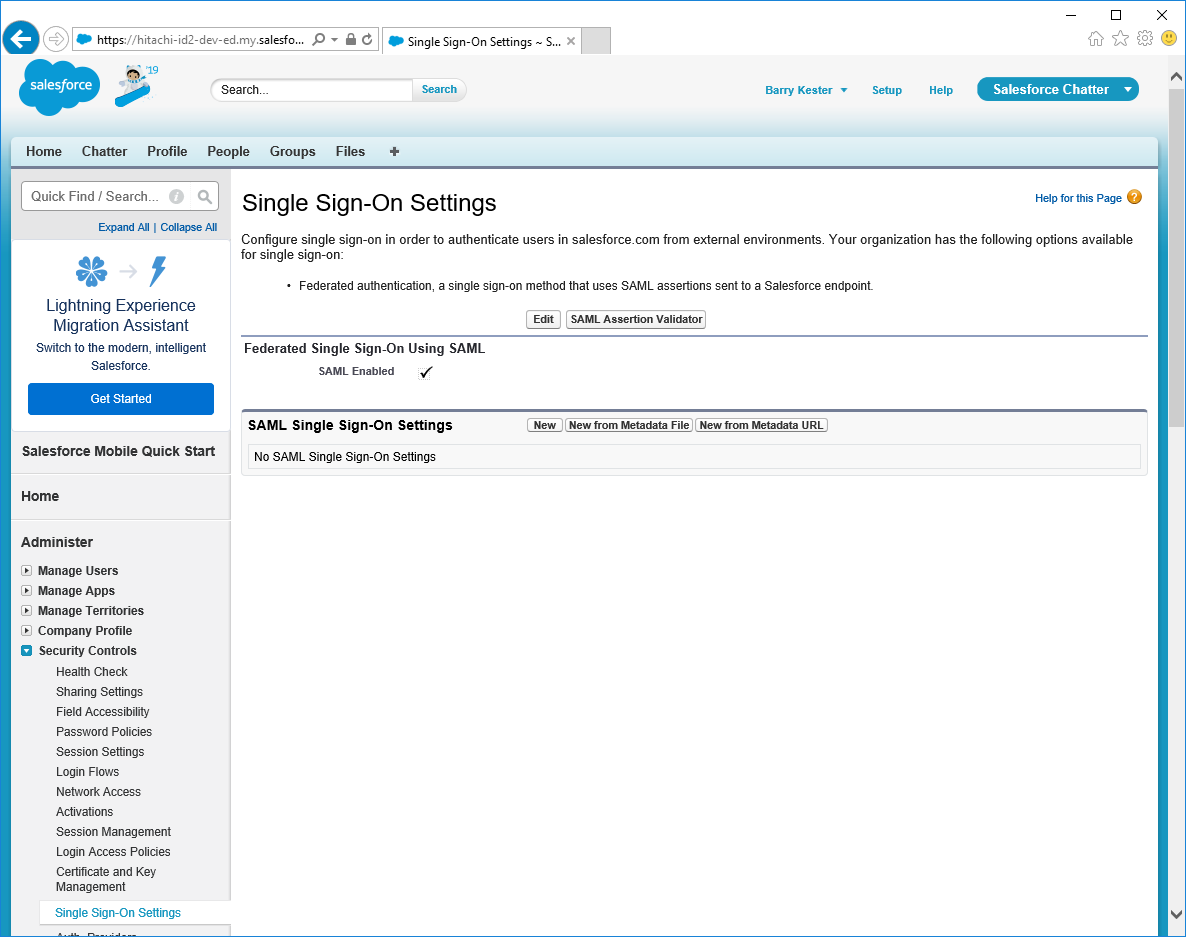
Click New from Metadata file.
Browse to the <instance>\idp folder on your Bravura Security Fabric instance to find the idp-metadata.xml file.
Select idp-metadata.xml and click Create.
Configure SAML Single Sign-on Settings in Salesforce:
Choose a Name for the IdP configuration.
This will appear on the Salesforce Login page.
You can also update the API Name, but Salesforce should automatically correct it upon import.
Note the value of the Entity ID.
This will be used by Salesforce to identify itself to Bravura Security Fabric .
If required, update the Issuer value with the hostname of the Bravura Security server.
This is populated by default with https://<Bravura Security Host>/instance/sso/
Select the SAML Identity Type that you expect Bravura Security Fabric to send to Salesforce in order to uniquely identify users when they log in.
If unsure leave this as the Salesforce username.
Select the SAML Identity Location.
By default this should be the NameIdentifier element of the Subject.
Ensure that HTTP Redirect is selected for Service Provider Initiated Binding.
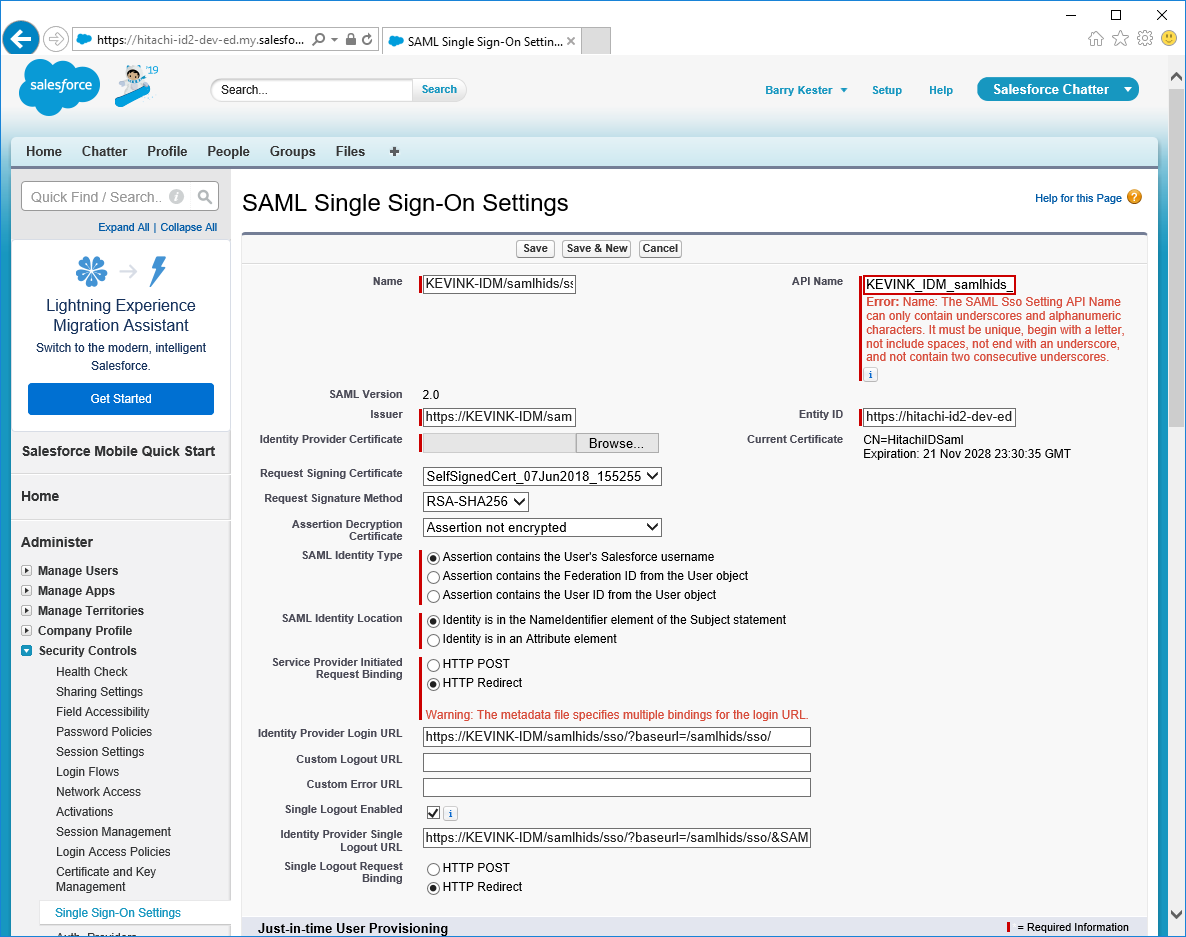
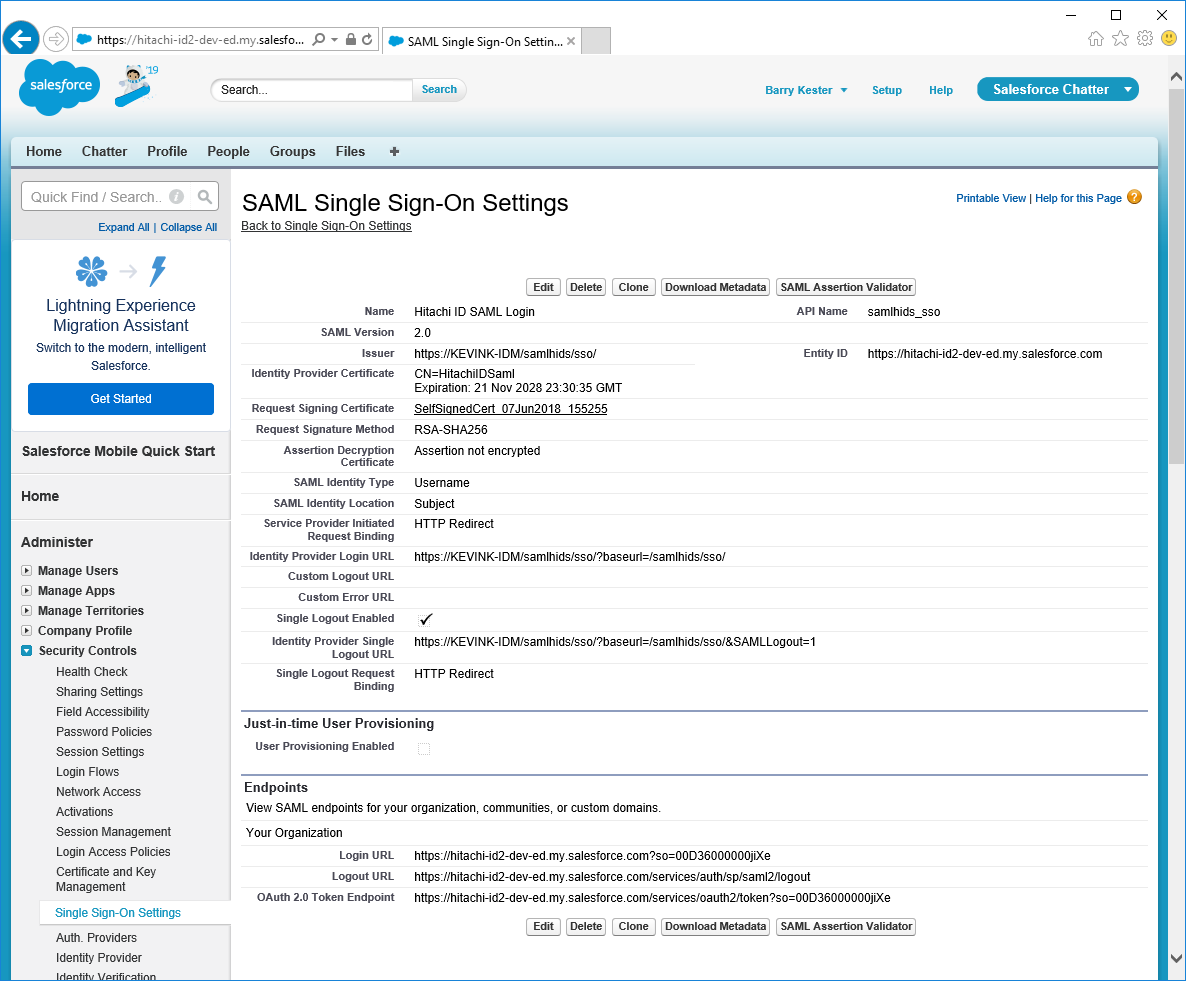
Click Save.
Once saved successfully, make note of the Login URL in the Endpoints section near the bottom.
This is used to tell Bravura Security where to send the SAML assertion.
Enable SAML for your Salesforce domain:
Within Salesforce, navigate to Settings > Company Settings > Domains.
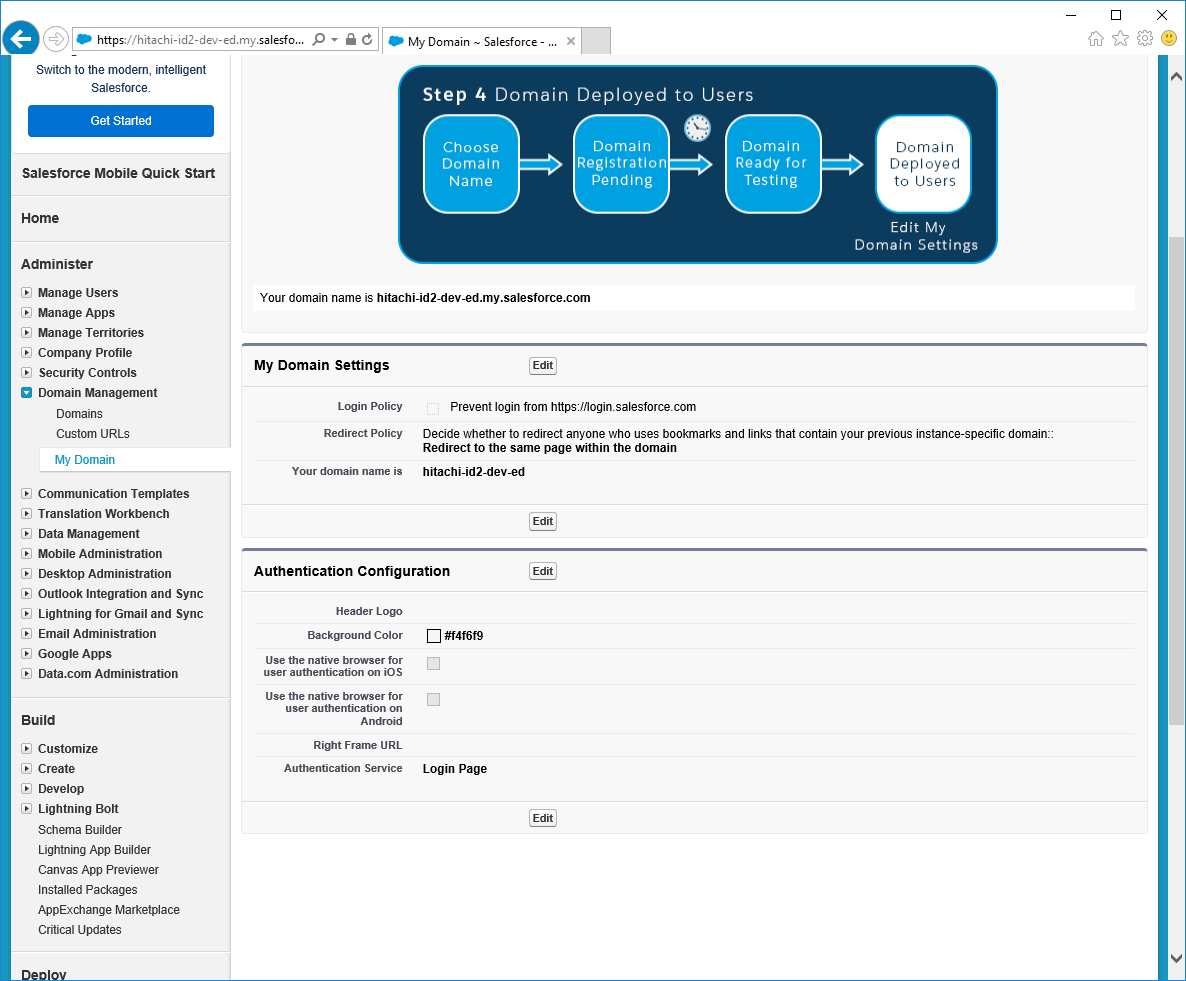
Select the domain you want to enable SAML for.
In the Authentication Configuration section, click Edit.
Enable the SAML configuration option created above.
If you want to continue to allow direct user ID and password login to Salesforce then leave Login Page checked.
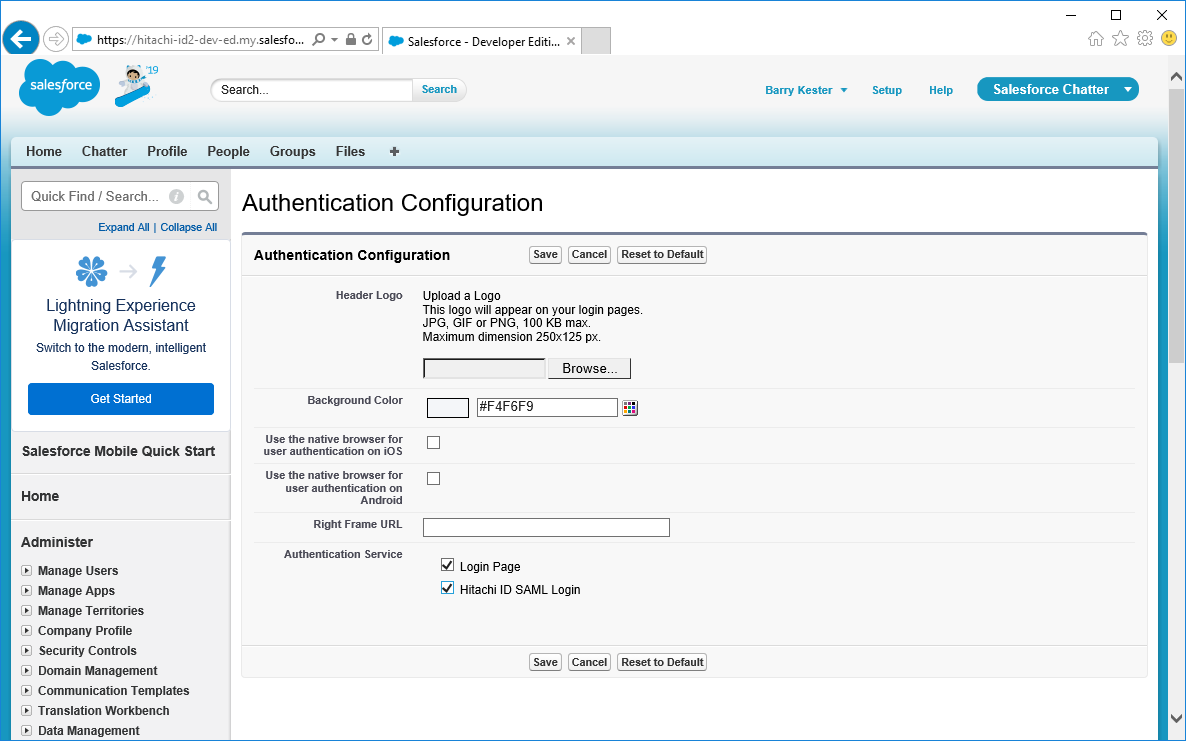
Click Save.
Add the service provider to the Bravura Security Fabric identity provider
As superuser on the IdP server navigate to Manage external data store > sp_mapping.
Enable the sp_mapping table issuer that corresponds to your service provider:
Rows exist for the following SPs: bamboohr, google, webex, hcpa, adfs, youtrack, salesforce and azure.
All rows have a value of 0 in the enabled column, by default. Change the value in the row for your service provider to 1.
Ensure the following field values match the values used on the service provider. In Salesforce these values can be found in the SAML Single Sign on settings.
issuer In Salesforce this is called the Entity ID
sp_folder contains
__non_saml__, and <sp folder name on the Bravura Security Fabric IdP server>acs_url In Salesforce this is the Login URL.
idp_url In Salesforce this is the issuer entry .
Click Update.
Optional: As superuser on the IdP server navigate to Manage external data store > sp_access.
Edit the following entries if you want to restrict access to the service provider to a more specific set of users:
sp_folder: contains __non_saml__, and <sp folder name>
userclass: _ALLUSERS_
deny_acl: 0
Click Update.
Optional: As superuser on the IdP server navigate to Manage external data store > sp_authchain.
Edit the following entries if you have different authentication requirements:
sp_folder: contains __non_saml__, and <sp folder name>
authchain: column values are set to REGUSER
Click Update.
Test the login process
Log into Salesforce via Bravura Security Fabric :

On the Salesforce login page, select the new option to login using the SAML IdP.
You will be redirected to Bravura Security Fabric .
Authenticate into Bravura Security Fabric as an end user that wants access to Salesforce.
After successfully authenticating with Bravura Security Fabric you will be redirected back to Salesforce and be logged in.
Note
By default the Salesforce configuration in Bravura Security Fabric assumes that the EMAIL profile attribute is what should be sent to Salesforce as the Name Identifier as the subject of the assertion. If this is not the case and a different mapping is needed, you can edit this in the saml-response.xml file in the following folder: C:\Program Files\Bravura Security\Bravura Security Fabric\\samlhids\idp\salesforce\
Service provider with no pre-configured template in Bravura Security Fabric
If support for your service provider is not included in Bravura Security Fabric by default, it can be added manually.
Create a new folder to hold the service provider’s SAML assertion template in the <instance>\idp \<new sp folder> directory.
You can give this folder any name. Take note of this folder name. It will be added to the sp_access table in a later step.
Copy the XML template file from an existing sp_folder over to your new service provider folder.
Edit the new
saml-response.xmlto ensure the assertion includes all requirements for the service provider you are configuring.Follow the vendor's steps to prepare the service provider. You will be prompted for the XML file created in step 3 during the setup.
As superuser on the IdP server navigate to Manage external data store > sp_mapping.
Add a new entry with values:
issuer: "%SP server's BASE IDSYNCH URL%/SP/"
sp_folder: <sp folder name on the Bravura Security Fabric IdP server>
acs_url: The endpoint login url
idp_url: This must exactly match the "identity provider issuer" value. https://<Bravura Security Host>/instance/sso/ is most commonly used.
enabled: 1
idp_initiated: 1
disp_name: "<display name>" This value will be displayed on the end user launchpad and in messages when redirecting the users from the IdP to the SP.
default_pin: 1
relay_state: < value provided by the SP vendor > . The RelayState will be provided to the SP during an IdP initiated flow if required.
sig_loc: Assert
Click Update
As superuser on the IdP server navigate to Manage external data store > sp_access.
Add a new entry with the values:
sp_folder: contains __non_saml__, and <sp folder name>
userclass: _ALLUSERS_- Optional: Add a different user class to restrict access to the service provider to a more specific set of users:
deny_acl: 0
Click Update.
As superuser on the IdP server navigate to Manage external data store > sp_authchain.
Add the following entries:
sp_folder: contains __non_saml__, and <sp folder name>
authchain: column values are set to REGUSER Optional: This can be edited to use a custom authentication flow.
Click Update.
The SP should now be set up to authenticate with Bravura Security Fabric as IdP. To test this setup:
Open the SP instance login page.
Submit the username of one of the test accounts that is a member of SAML_USERS.
You should be redirected to IdP's login page.
Complete the authentication process, using valid credentials.
Login uses the SAML authentication chain.
Upon successful authentication, the user’s web browser is redirected back to the service provider, where they are logged in automatically.
Example: Configure Bravura Security Fabric as an SP and integrate with a Bravura Security Fabric IdP server
Bravura Security Fabric can be configured to operate as a service provider and as an identity provider, providing a federated login solution.
As an identity provider, Bravura Security Fabric provides unified third-party authentication for a variety of federation-capable applications using the Bravura Security Fabric login process, reducing the burden of managing multiple app-specific credentials. Once users authenticate they are redirected back to the application along with a cryptographically signed SAML assertion indicating who they are (identity), and what they may access (authorization).
The following example describes how to configure Bravura Security Fabric as a SP and how integrate with a Bravura Security Fabric IdP.
Follow instructions to install Scenario.hid_saml_idp component to prepare Bravura Security Fabric as an IdP .
Navigate to the IdP instance's \install\idp directory and copy idp-metadata.xml to a location where it can be accessed by the Bravura Security Fabric IdP server in order to finish configuring the authentication chain module.
Create a new folder to hold the service provider’s SAML assertion template in the <instance>\idp\ directory; for example <instance>\idp\<new sp folder>.
You can give this folder any name. Take note of this folder name. It will be added to the sp_access table in a later step.
Copy the XML template file from an existing sp_folder over to your new service provider folder.
Edit the new
saml-response.xmlto ensure the assertion includes all requirements for the service provider you are configuring.
Follow instructions to install the Scenario.hid_authchain_saml_sp component to prepare Bravura Security Fabric as an SP .
Follow instructions to configure the Bravura Security Fabric SP to authenticate with the Bravura Security Fabric IdP.
As superuser on the IdP server navigate to Manage external data store > sp_mapping.
Add a new entry with values:
issuer: "%SP server's BASE IDSYNCH URL%/SP/"
sp_folder: <sp folder name on the Bravura Security Fabric IdP server>
acs_url: The endpoint login url
idp_url: This must exactly match the "identity provider issuer" value. https://<Bravura Security Host>/instance/sso/ is most commonly used.
enabled: 1
idp_initiated: 1
disp_name: "<display name>" This value will be displayed on the end user launchpad and in messages when redirecting the users from the IdP to the SP.
default_pin: 1
relay_state: < value provided by the SP vendor > . The RelayState will be provided to the SP during an IdP initiated flow if required.
sig_loc: Assert
Click Update
As superuser on the IdP server navigate to Manage external data store > sp_access.
Add a new entry with the values:
sp_folder: contains __non_saml__, and <sp folder name>
userclass: _ALLUSERS_-
deny_acl: 0
Click Update.
As superuser on the IdP server navigate to Manage external data store > sp_authchain.
Add the following entries:
sp_folder: contains __non_saml__, and <sp folder name>
authchain: column values are set to REGUSER
Click Update.
Verify the rule in table hid_authchain_select:
RuleNumber
=120
Comment
SAML authentication chain
Proceed
False
MatchType
sessdata
MatchKey
SAML_REQUEST
MatchCondition
set
MatchValue
<null>
Action
flush
ChainId
SAML
Installing this component in stand-alone mode on a new instance will override all default authentication chains, and may prevent non-SAML and console users from logging into Bravura Security Fabric . To avoid this, confirm that the hid_authchain_select table includes a valid chain for users authenticating without a SAML_REQUEST before continuing.
Two Bravura Security Fabric instances should now be configured to authenticate via SAML. To test this setup:
Open the SP instance login page.
Submit the username of one of the test accounts that is a member of SAML_USERS.
You should be redirected to IdP's login page.
Complete the authentication process, using valid credentials.
Login uses the SAML authentication chain.
Upon successful authentication, the user’s web browser is redirected back to the service provider, where they are logged in automatically.
See also
Authentication chains: Bravura Security Fabric as service provider provides more detail on Scenario.hid_saml_idp component deployment and configuration.