Use cases and examples
The following examples demonstrate some common tasks performed by product administrators. See Privileged Access in the User guide for instructions and examples for requesting and checking out privileged access, and viewing and downloading recorded sessions.
Example: Manually manage accounts on a vault-only system
This example demonstrates how to manually manage administrator credentials stored in a vault-only managed system:
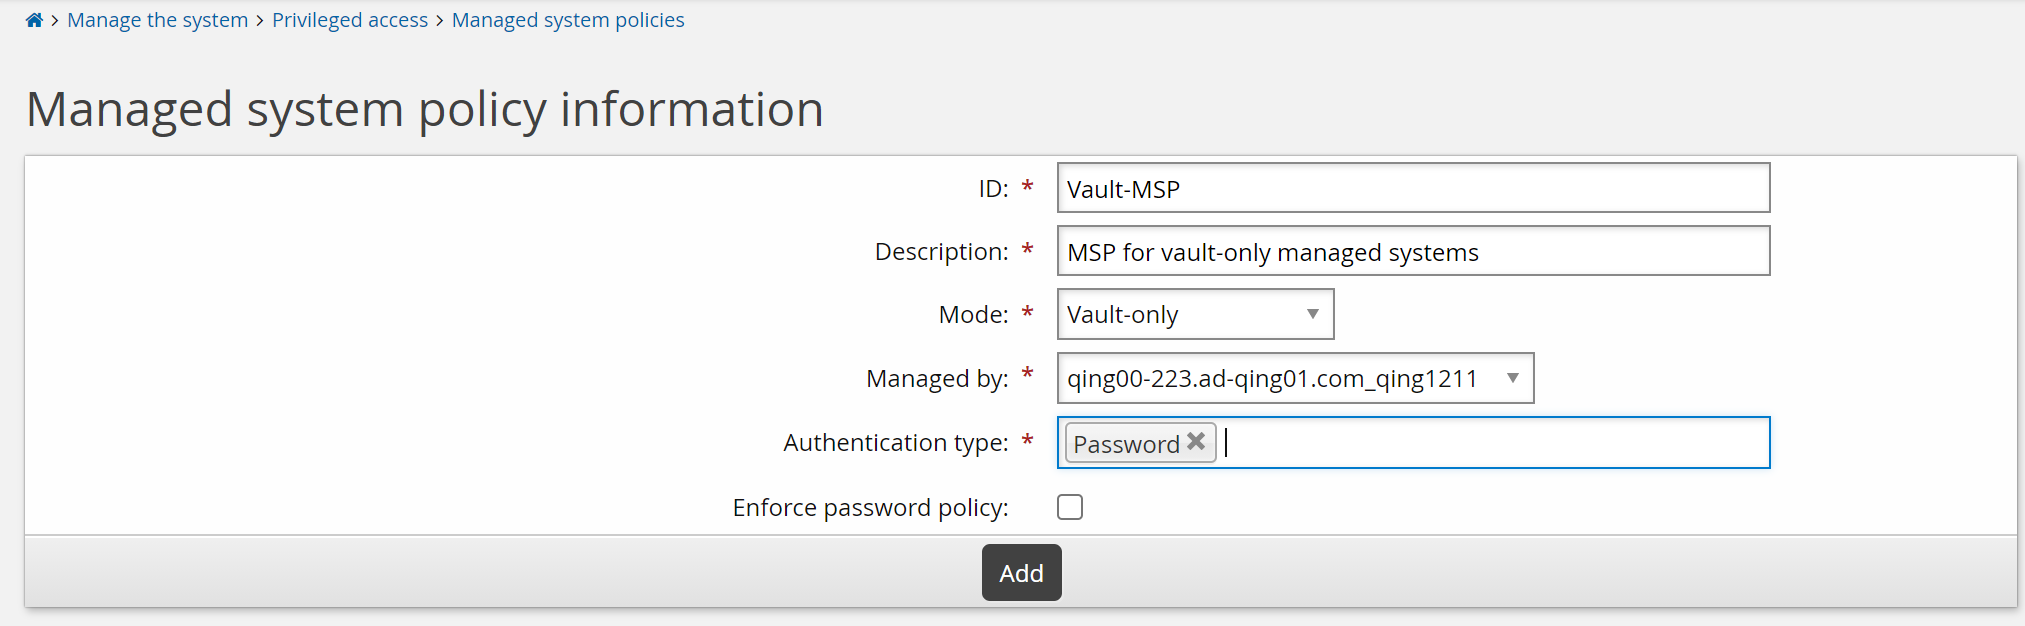
Create a new vault-only managed system policy .
Click Manage the system > Privileged access > Managed system policies.
Click Add new…
Enter the following:
ID
Vault-MSP
Description
MSP for vault-only managed systems
Mode
Vault-only
Managed by
Select the Privileged Access Manager Service in the Managed by list. This is the service that will manage systems in this policy.
Authentication type
Password
Enforce password policy
leave deselected
Click Add.
Define the Access disclosure plugins.
Click the Access disclosure plugins tab.
Click Select …
Select the Copy and Display plugins and click Select.
Select Access current password for both the copy and display plugins.
Select Access old passwords for the display plugin.
Click Update.
Configure Access control.
Click the Access control tab.
Select the following for IT_SEC_USERS.
View properties for this policy
Modify properties for this policy
Pre-approved check-out of managed accounts
Randomize/override password of managed accounts
These settings are part of the privileges required to check out the managed accounts and to override the passwords.
Click Update.
Provide the IT_SEC_USERS group the "Create managed systems" administrative privilege. This privilege is required to override passwords.
Click Manage the system > Security > Access to product features > Administrator groups.
Click Add new…
Enter the following:
ID
IT-SECURITY
Description
IT Security Group
Allowed privileges
Create managed systems
Click Add.
Click the Membership criteria tab.
Click Select …
Select the _IT_SECURITY_ user class.
Members of the _IT_SECURITY_ user class are also linked to the IT_SEC_USERS group and can now override passwords in addition to checking out accounts.
Click Select .
Create a vault-only managed system.
Click Manage the system > Privileged access > Managed systems.
Click Add new…
Enter the following:
ID
Router-ADM
Description
Router used by the admin team
Help URL
http://intranet/routerinfo.html
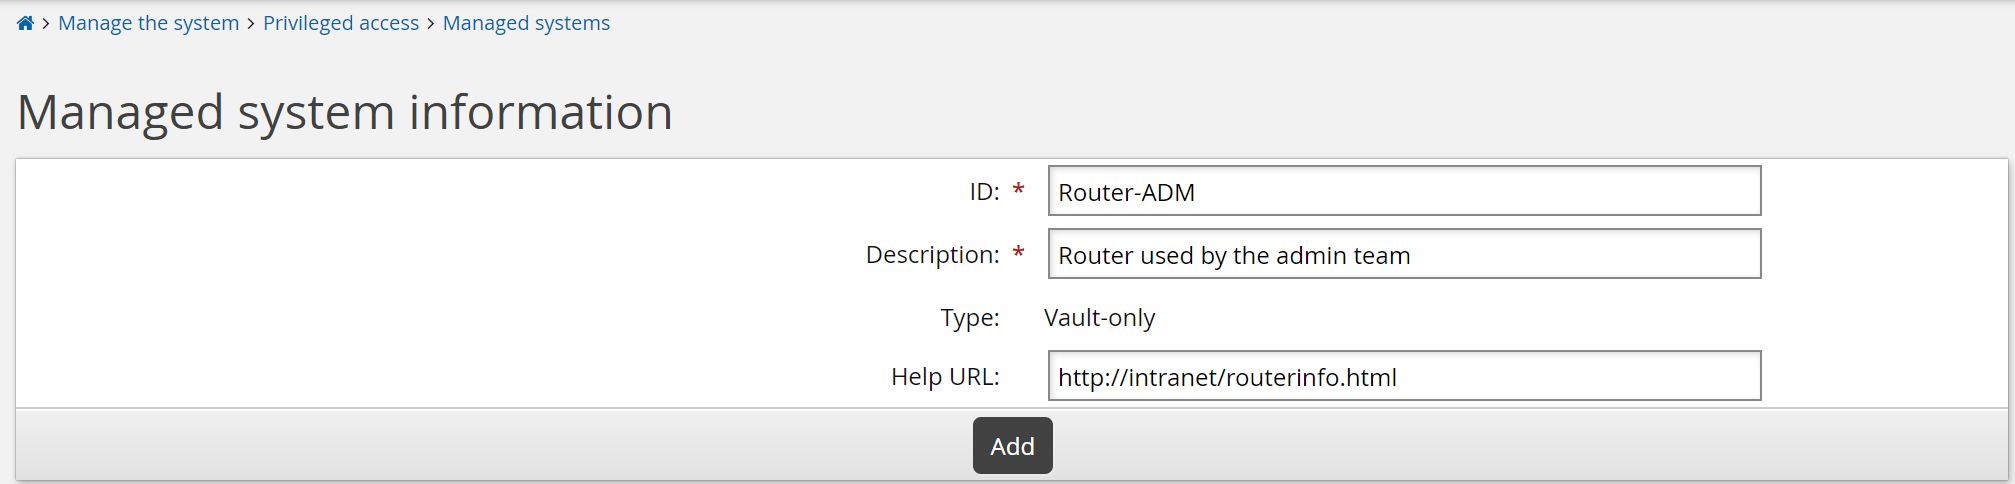
Click Add.
Click the Policies tab.
Click Select …
Select the VAULT-MSP managed system policy.
Click Select .
Click the Managed accounts tab.
Click Add new… at the bottom of the page.
Type the ID of the account in the Account field.
Type a password in the Password and Confirm password fields.
Click Add.
Example: Automatically rotate target system credentials
This example demonstrates how to manage and automatically rotate target system credentials for an Active Directory DN target system.
Even without a Bravura Privilege license, organizations can manage target system credentials using the limited-license Bravura Privilege features available with Bravura Pass and Bravura Identity . Automatic rotation of target system credentials is accomplished by linking the target system credentials to a managed account within the target system credentials tab.
Passwords are randomized daily by default. You can change this frequency system-wide, or for individual managed system policies. See Password randomization for more information.
Manage the domain target system:
Navigate to the Target system information page for the domain target system.
Select the checkbox to Automatically create a Bravura Privilege managed system.
Run auto discovery .
Add the managed system and accounts to an MSP:
Navigate to Privileged access > Managed system policies > VAULT_ADM_GRP.
This is a default managed system policy for managing administrative credentials .
Click the Member systems tab, then add the managed domain target system.
Click the Managed accounts tab, then add the domain accounts you want to manage.
Manually randomize the account passwords:
Click the Randomization sub tab.
Select and randomize the passwords for the domain accounts.
Bravura Security Fabric randomizes the password for the selected accounts on the target system.
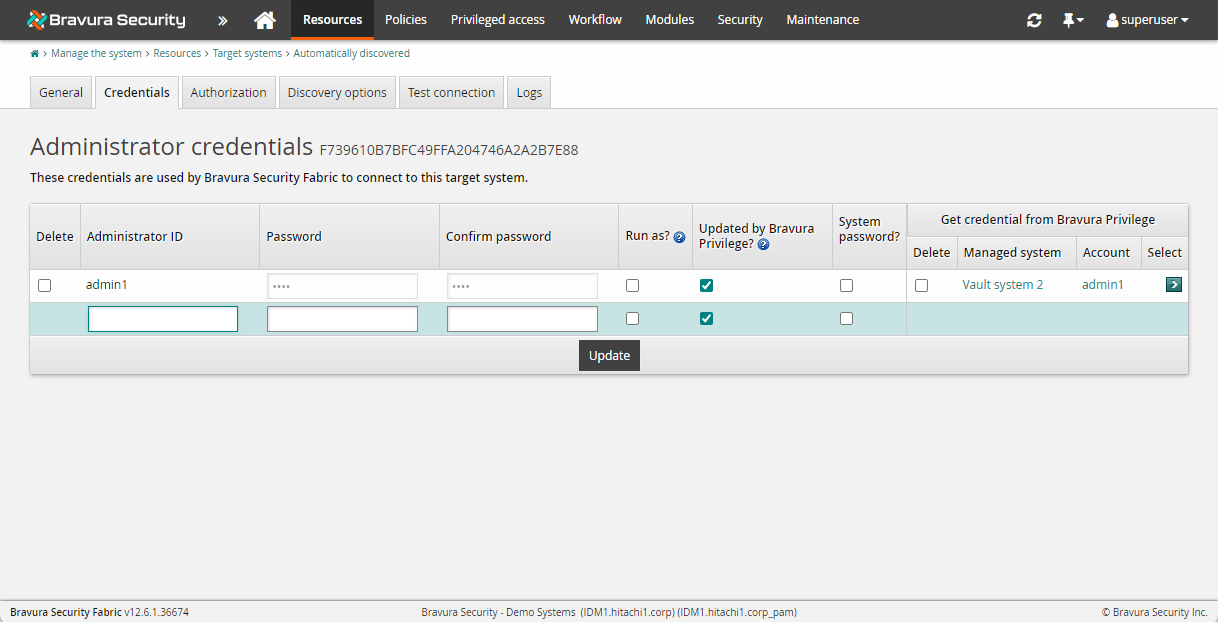
Link the target system credentials to a managed account:
Navigate back to the Target system information page for the domain target system.
Click the Credentials tab.
Add the accounts you want to manage on this page.
Ensure you check the Updated by Privileged Access Manager? box so the new credentials will be updated here when the password is randomized.
For each credential, click Select under Get credential from Bravura Privilege and select a managed account from which to get the Password.
It is highly recommended that you configure your password policies before Bravura Security Fabric starts managing system passwords.
Example: Requesting Windows account access
Click below to view a demonstration of requesting to check out a Windows administrator account, authorizing the request, checking out the account and using display disclosure to view the password and then checking the account back in.
This example demonstrates a request to check out the Windows administrator account, authorize the request and then check the account back in.
Requirements
This example assumes:
Bravura Privilege and Connector Pack are installed.
An Active Directory target has been set up as source of profiles.
Bravura Privilege Pattern has been installed.
Global Team Groups and Privileges have been set up
Managed systems are onboarded, as in Example: Onboarding a system
Windows and Linux accounts are onboarded
In this example the BILLIG user has permissions via teams to request check outs of the Windows and Linux managed accounts.BILLIG is assigned as a requester for the Windows Admin Accounts and Unix Admin Accounts teams.
The Approver group for Windows Admin Accounts is set up so that a request to check out the Windows administrator account needs approval from a member of the IT-WINDOWS-MANAGERS group. Requests to check out Linux managed accounts from the Unix Admin Accounts team are configured to require approval from a member of the IT-UNIX-MANAGERS group.
Open a new browser tab to Bravura Privilege .
Log in to the Front-end (PSF) as the standard user billig .
Click Privileged access.
The Privileged access app opens.
Click Accounts under the PRIVILEGED ACCESS heading from the Filter panel to see available accounts.
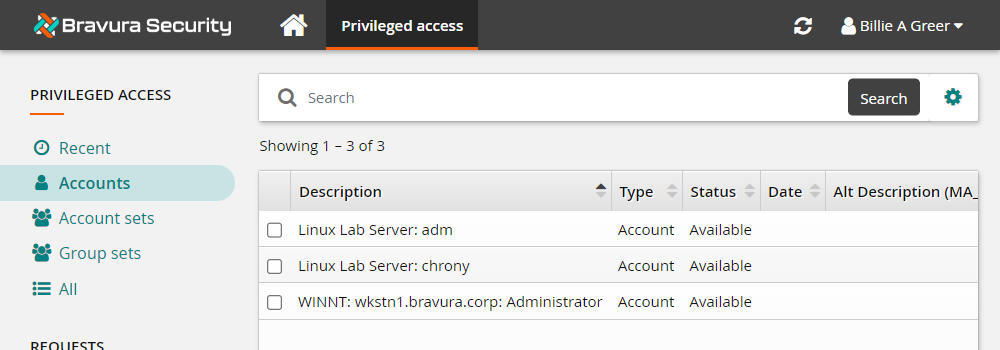
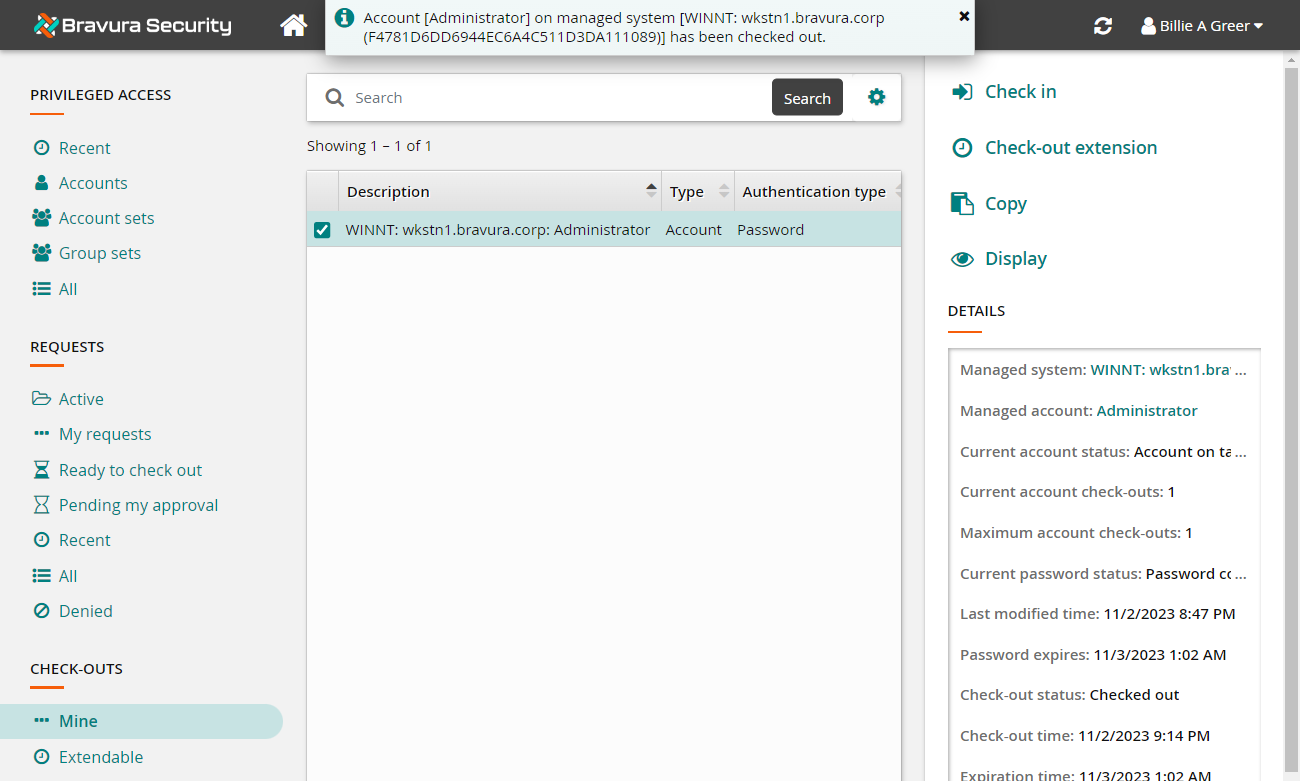
Select the WINNT:wkstn1.bravura.corp:Administrator account to request access.
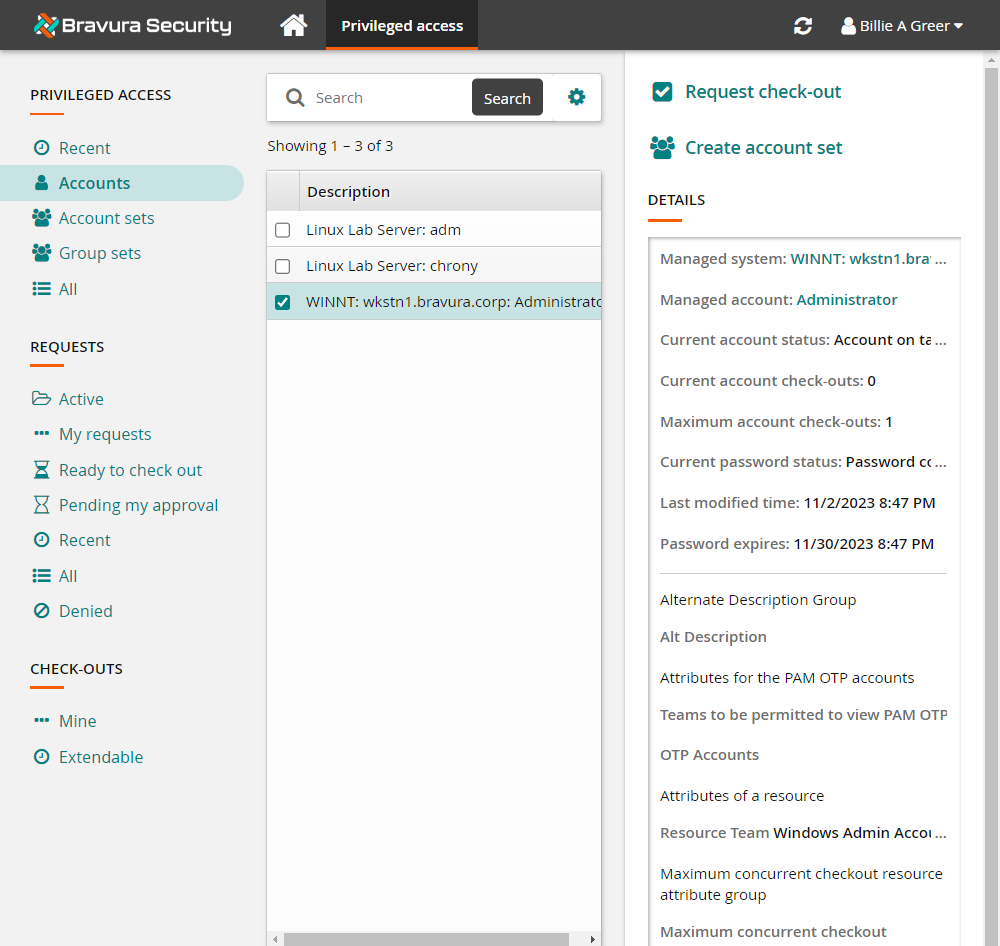
Click Request check-out from the Actions panel on the right to open the request details form.
Review the required information for the request.
Enter any Requester notes that you would like displayed to the authorizers.
Click the Submit button at the bottom of the request details form.
Bravura Privilege issues the request, notifies appropriate authorizers and displays a summary of the request under DETAILS .
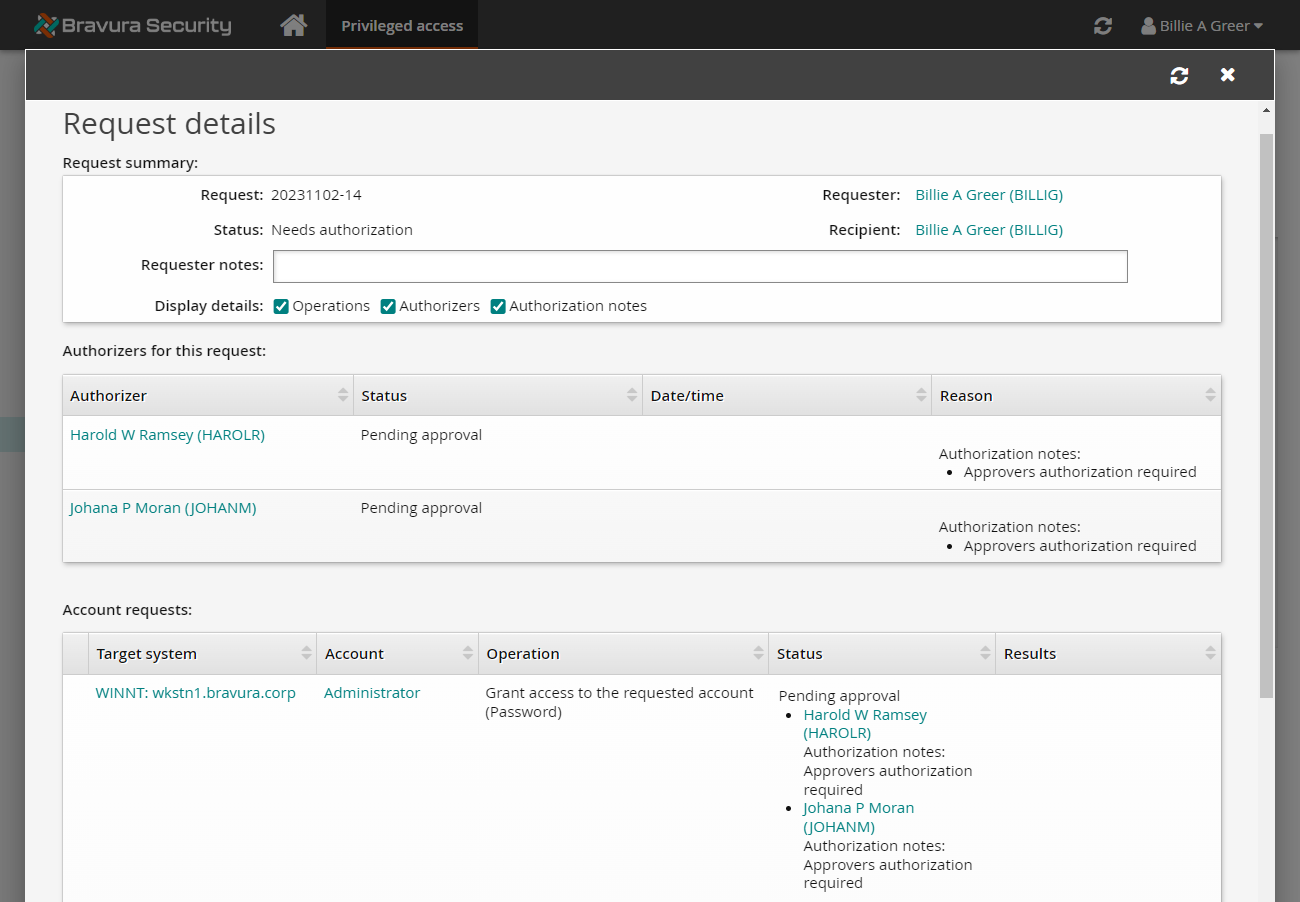
Click View request.
Bravura Privilege displays a summary of the request.

Click the Request: ID link to open request details.
Select the Display details boxes at the top of the request for Operations, Authorizers and Authorization notes to review the available authorizers.
To authorize the request:
Open another browser tab to Bravura Privilege .
Log in to the Front-end (PSF) as the authorized user
harolr.Click the link: There are 1 request(s) awaiting your approval .
The Requests app opens.
From the Results panel, select the request you want to review.
Bravura Privilege displays the details in the Actions panel on the right.
Review the request.
Click Approve.
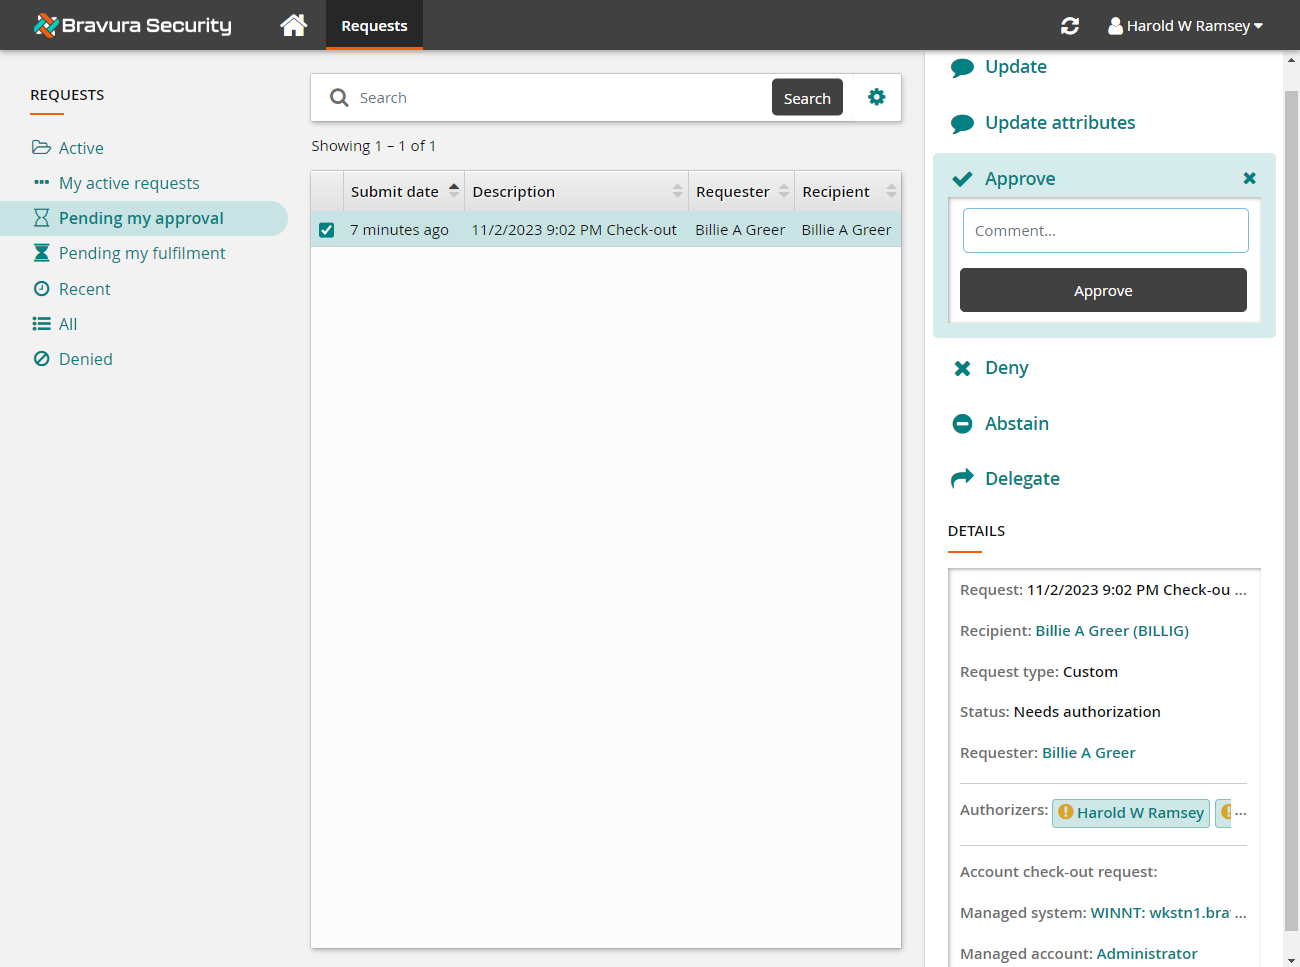
Click the Approve button below the Comment field.
The request to check out the account has been successfully granted approval as configurations are such that only one approver is required to authorize the request before access is granted.
Once the request has been approved, you can check out the account:
Return to the tab where you are acting as
billig.Click Home .
Click the link: Your privileged access requests have been approved .
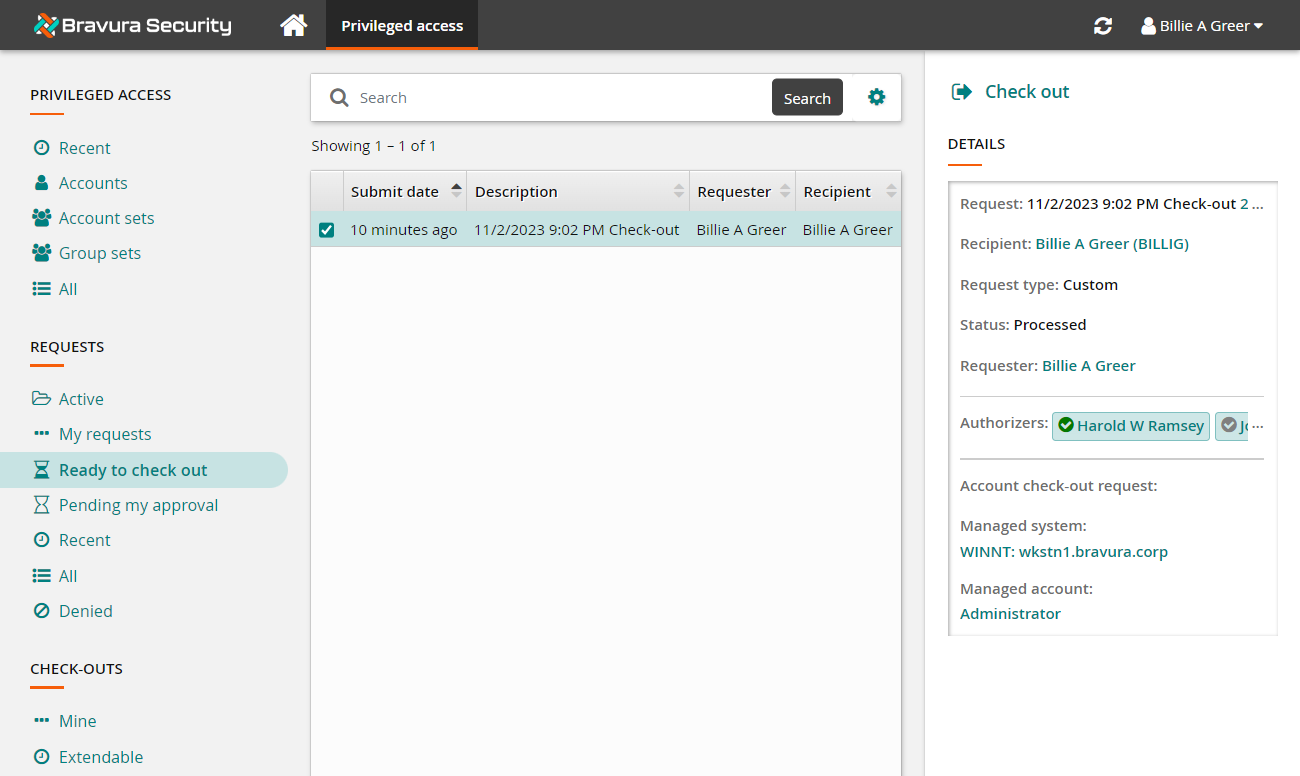
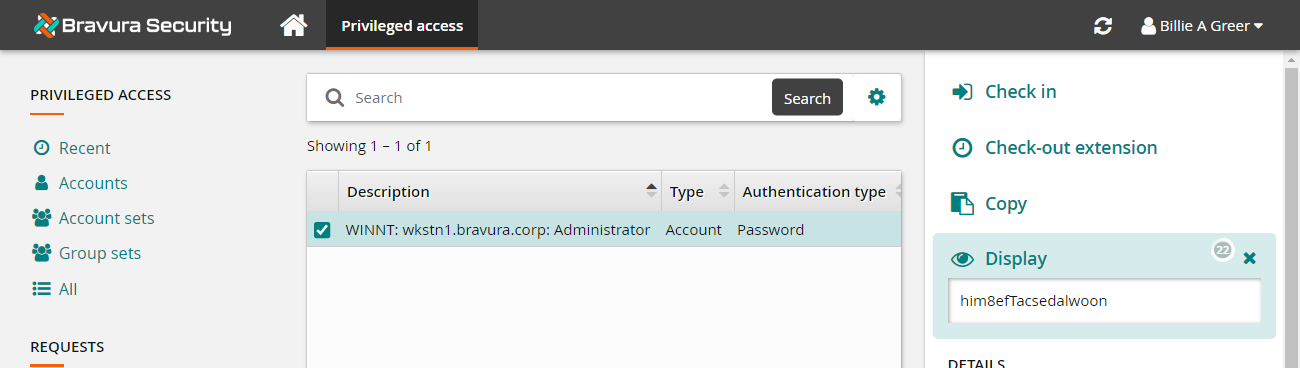
Click Check out from the Actions panel .
The Privileged access app displays available actions and disclosure options in the Actions panel to the right.
To view the password, click the Display disclosure option.
Once you have finished using the account, you can check it in again.
As
billig, navigate to the Privileged access app (if you are not there already).Click Mine under the CHECK-OUTS heading from the Filter panel .
Select the account from the Results panel to display the check-out details in the Actions panel .
Click Check in from the Actions panel .
Due to the configurations set in the managed system policy, the password is randomized automatically when the account is checked back in.
If you were able to check-out the Administrator account, approve the request, view the password with display disclosure and check it back in, you have successfully completed the lab.
Example: Requesting Linux account access
Click below to view a demonstration of requesting to check out a Linux administrator account, authorizing the request, checking out the account and using it in PuTTy and then checking the account back in.