Azure MFA integration using RADIUS NPS
Azure MFA is a feature of Azure Active Directory that can be used as an additional form of identification. By using Azure MFA, users can be prompted during the sign-in process to provide a code on their mobile phone, Face ID, a fingerprint scan, or other authentication factor.
A Bravura Security Fabric instance can be configured to use Azure MFA through RADIUS, enabling cloud-based MFA capabilities to an existing network without having to install, configure, and maintain new servers. Azure MFA can be used directly as a passwordless Bravura Security Fabric login method, or as a provider of 2FA.
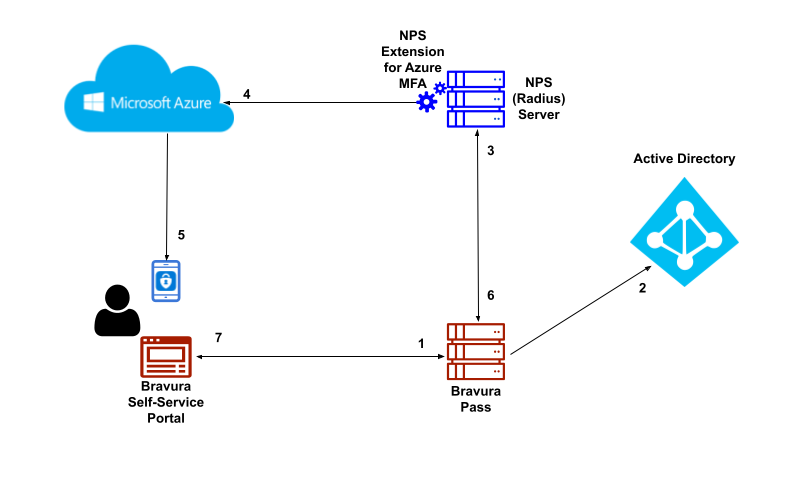
The following is the workflow of logging into Bravura Security Fabric using Azure MFA push notifications as a second factor:
End user navigates to the Bravura Pass self-service portal.
End user performs primary authentication with Active Directory username and password. Primary authentication can be configured to authenticate users against any connected system or authenticator.
After primary authentication the end user is presented with a list of secondary factors that are available to them.
End user selects Azure MFA Push notification for a second factor. The Bravura Security RADIUS connector initiates an authentication request against the NPS server with the NPS Extension for Azure MFA installed.
NPS Extension for Azure MFA triggers MFA request to Microsoft Azure.
End user receives push notification on their Microsoft Authenticator mobile application and approves the request.
NPS server responds with authentication status to the Bravura Security RADIUS connector.
End user is successfully authenticated into the Bravura Pass self-service portal.
Setting up Azure MFA through Radius
Azure MFA is a feature of Azure Active Directory that can be used as an additional form of identification. By using Azure MFA, users can be prompted during the sign-in process to provide a code on their mobile phone, Face ID, a fingerprint scan, or other authentication factor.
A Bravura Security Fabric instance can be configured to use Azure MFA through RADIUS, enabling cloud-based MFA capabilities to an existing network without having to install, configure, and maintain new servers. Azure MFA can be used directly as a passwordless Bravura Security Fabric login method, or as a provider of 2FA.
This use case illustrates a sample setup to use Azure MFA for Bravura Security Fabric login.
This sample setup uses:
Local Active Directory server
In this example a local Active Directory server is used to manage the office network. This AD server will be used as a target system of the Bravura Security Fabric instance so that users can log into the Bravura Security Fabric instance using their AD credentials.
You will also need to sync users from the AD server to the Azure AD tenant, so that those users can be authenticated by Azure AD when performing MFA through RADIUS.
In the sample setup, an AD server running on a Windows 2016 environment (named "CorpAD") is used.
Bravura Security Fabric Instance
This example includes a Bravura Security Fabric instance for users to log on using Azure MFA through RADIUS.
In the sample setup, the Bravura Security Fabric instance runs on a Windows 2016 server (named "Corp1").
Once the Bravura Security Fabric instance is installed and ready, users are loaded from the local Active Directory server by adding the server as an Active Directory DN target system.
Azure Active Directory tenant
Azure MFA is a feature provided through Azure Active Directory. An Azure AD tenant is needed in order to use the Azure MFA.
If you don't have an Azure AD tenant with premium P1/P2 license to use, you can acquire a 30-day P2 trial license by creating a new free Azure account (credit card info required to register.) If you have an existing Azure account to use, then create an Azure AD tenant using the Azure account. See this link for details:
https://docs.microsoft.com/en-us/azure/active-directory/develop/quickstart-create-new-tenant .
The Azure AD tenant can be accessed and managed through Azure AD portal: https://portal.azure.com .
Create a cloud-only global administrator account on the Azure AD tenant (see "Prerequisites" section in https://docs.microsoft.com/en-us/azure/active-directory/cloud-sync/tutorial-single-forest ). Using an account that does not exist on our local AD target system ensures that you won't get locked out of the tenant. For details on how to create an account, see: https://docs.microsoft.com/en-us/azure/active-directory/fundamentals/add-users-azure-active-directory .
In addition to managing and configuring the Azure AD, this global administrator account can also be used as a work or school account upon installation of the NPS extension for Azure MFA. You can see and verify the assigned roles of the user .

You should now be able to log into the Azure portal with the global administrator account, to manage and configure the Azure Active Directory.
Enabling MFA for Azure portal login allows users to register using the Microsoft Authenticator app on their mobile devices. Registered users can use the Microsoft Authenticator app to receive and approve push notifications sent during Azure portal login.
Azure MFA must be configured to send these push-mode notifications before users can authenticate using the Microsoft Authenticator app. To do this:
Log onto the Azure portal with the global administrator account to manage the Azure Active Directory.
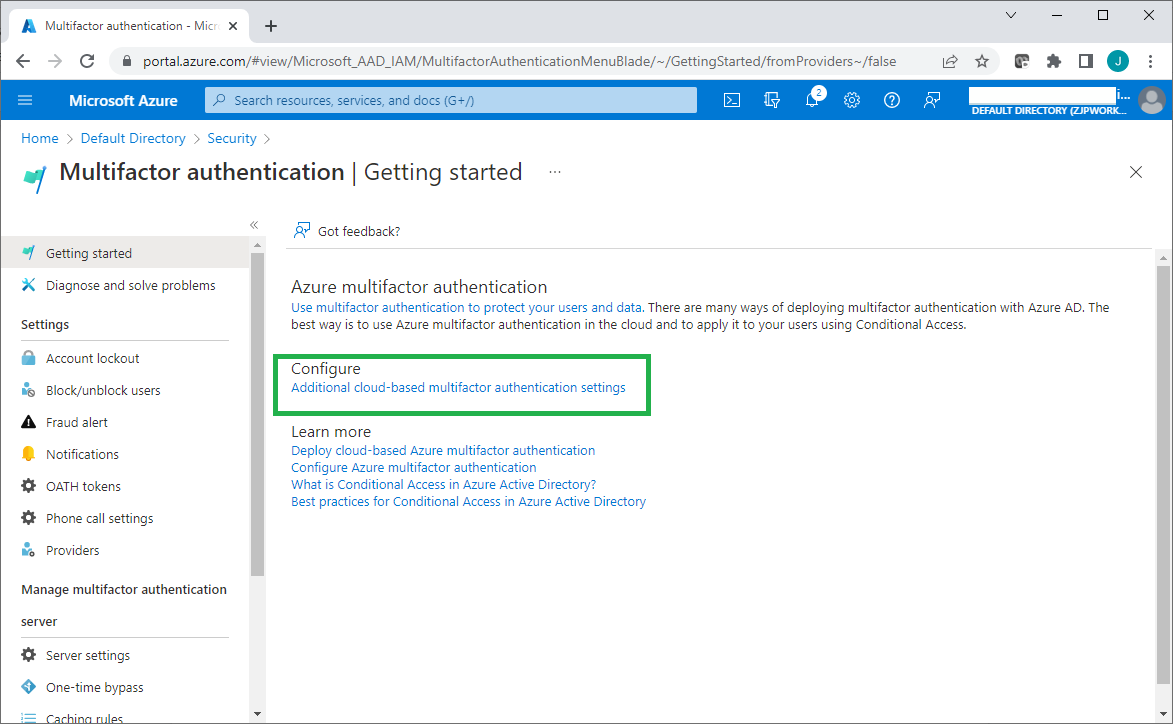
From the directory Overview page, left side menu, click Security > Multifactor authentication.
Click Additional cloud-based multifactor authentication settings from the Configure menu.
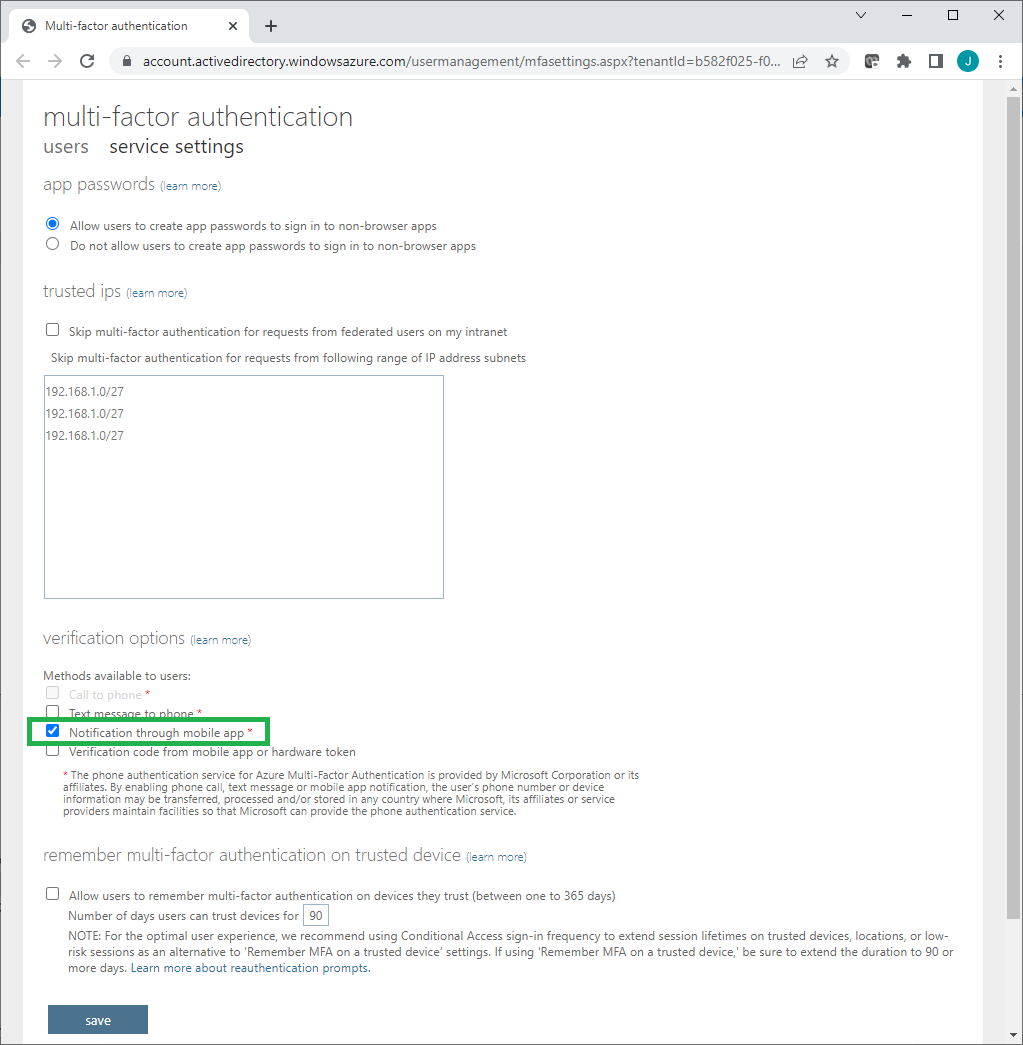
Select Allow users to create app passwords to sign in to non-browser apps.
Under Methods available to users, select Notification through mobile app.
Enable Azure MFA for users/groups on the Azure AD. For details see:
https://docs.microsoft.com/en-us/azure/active-directory/authentication/tutorial-enable-azure-mfa
After completion of MFA configuration, at the next Azure portal login, each user will be instructed to register on Microsoft Authenticator app using their mobile phone. The Microsoft Authenticator app can then receive push notifications from Azure AD for users to approve user authentication requests.
Enabling Azure AD Multi-Factor Authentication using Conditional Access policies is the recommended approach. Conditional Access is an Azure AD Premium P1 or P2 feature that lets you apply rules to require MFA as needed in certain scenarios. An activated Premium P1/P2 license may be needed for Conditional Access to work.
Note
For Azure AD free tenants without Conditional Access, you can use security defaults to protect users. Users are prompted for MFA as needed, but you cannot define your own rules to control the behavior. Conditional Access policies should not be used in conjunction with security defaults.
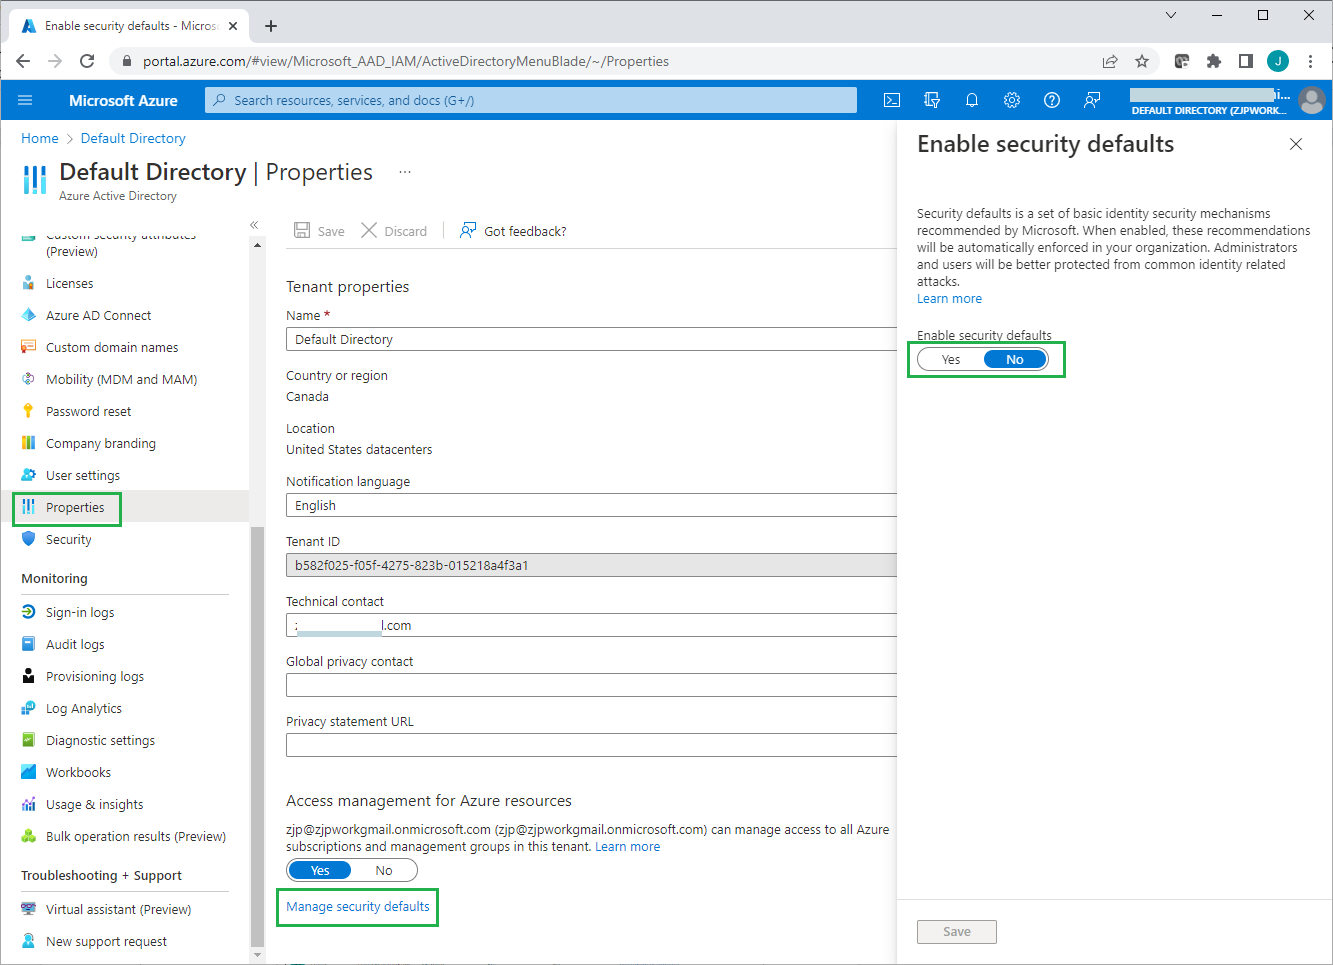
For details about using security defaults see: https://docs.microsoft.com/en-us/azure/active-directory/fundamentals/concept-fundamentals-security-defaults .
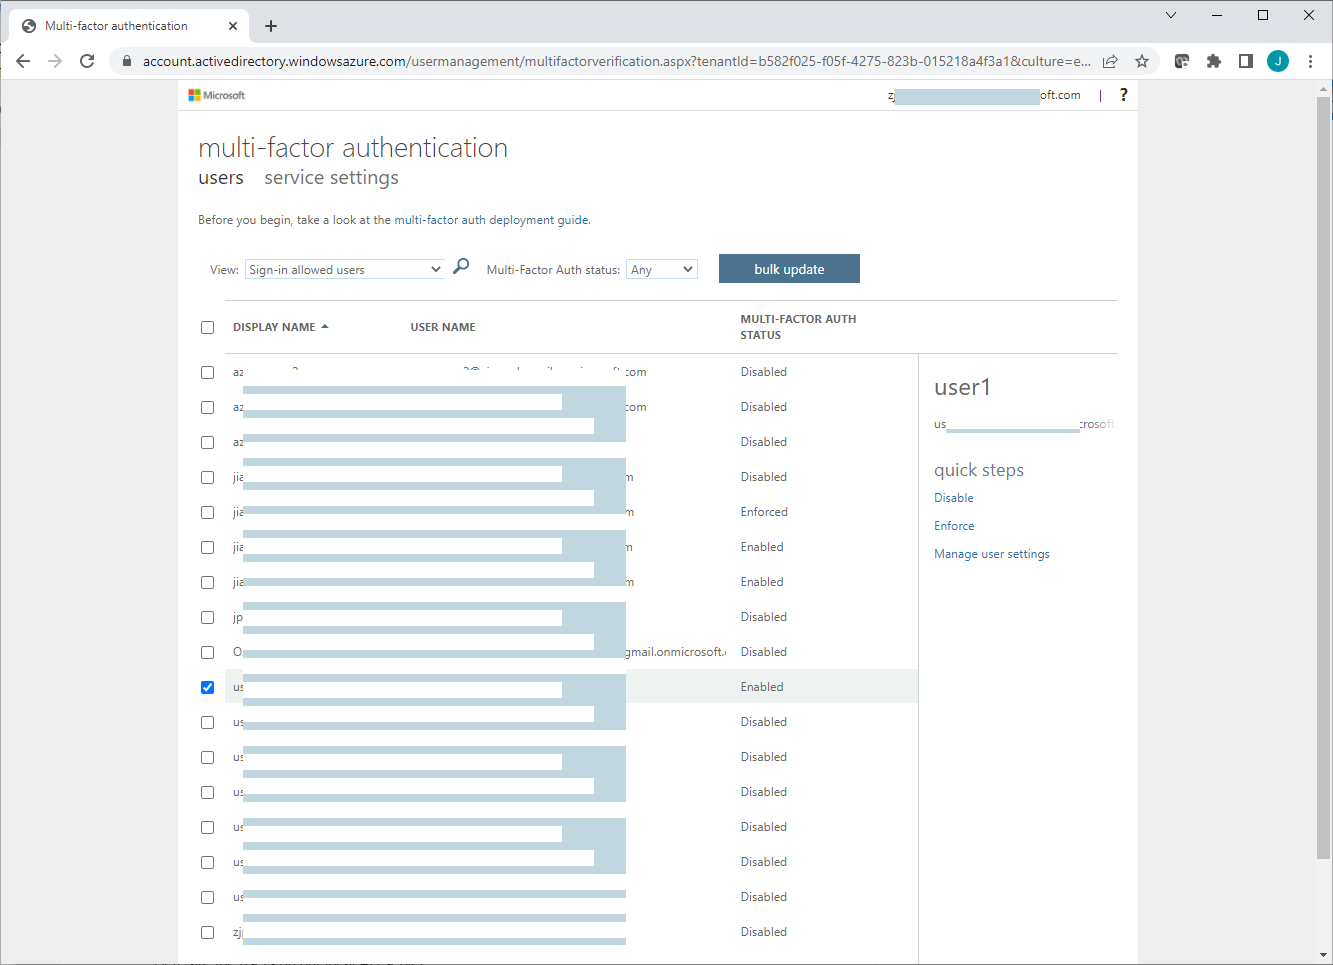
If needed, you can manually enable each account for per-user Azure AD Multi-Factor Authentication. When users are enabled individually, they perform multi-factor authentication each time they sign in (with some exceptions, such as when they sign in from trusted IP addresses or when the remember MFA on trusted devices feature is turned on). To do this:
Click "Per-user multifactor authentication" on the Users >All users page.

On the per-user multifactor authentication page, review each user's current MFA status, and enable/disable MFA for selected users.
Both per-user MFA and conditional access can enable/disable MFA for users, and the per-user MFA may take precedence over conditional access.
To learn about using per-user MFA and how to convert users from per-user MFA to Conditional Access based MFA, see:
https://docs.microsoft.com/en-us/azure/active-directory/authentication/howto-mfa-userstates
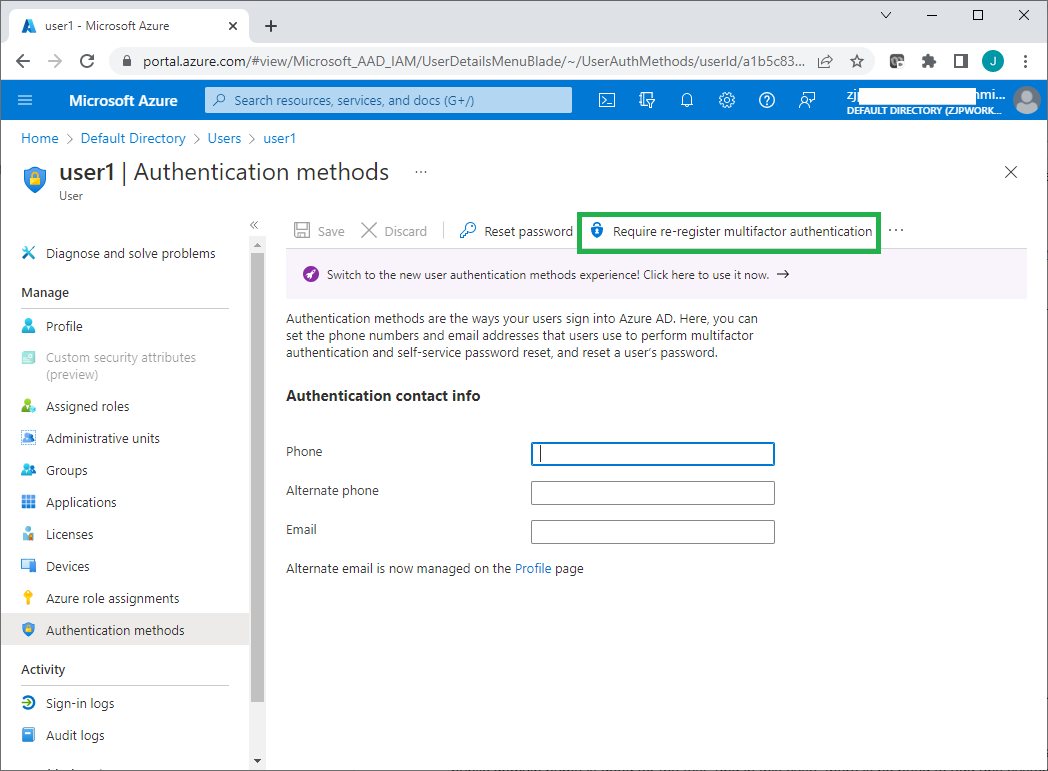
If a user wants to retry the Azure MFA registration process, or wants to switch to a new mobile phone, an admin can use the Require re-register multifactor authentication link to force a user to re-register MFA at the next Azure portal login.
Next, you need to sync user accounts on the local Active Directory server to the Azure AD tenant.
In this sample setup, a single domain is synced to the Azure AD tenant, so there is no need for the local domain to have a public domain name, and there is no need to create any custom domain name on the Azure Active Directory.
For details about syncing a single domain to the Azure AD see:
https://docs.microsoft.com/en-us/azure/active-directory/cloud-sync/tutorial-single-fores .
Syncing your directory to Azure requires that the "Azure AD Connect" application be locally installed on a machine in your domain. It is recommended to install it on the server hosting your RADIUS NPS extension. There should not be any password change requirements on the domain administrator account used to sync the directory. If the domain administrator password expires or changes, you will need to re-configure the Azure AD connect sync agent with the new credential To download the Azure AD Connect application, navigate to: Azure portal > Directory Overview > Azure AD Connect > Download Azure AD Connect.
Once Azure AD connect sync has been successfully configured on the local AD server, and all users on the local AD server have been synced successfully to the Azure AD tenant, you will see those synced accounts added to the Azure ADThe "Directory Synced" column indicates which accounts originated from the local AD server.
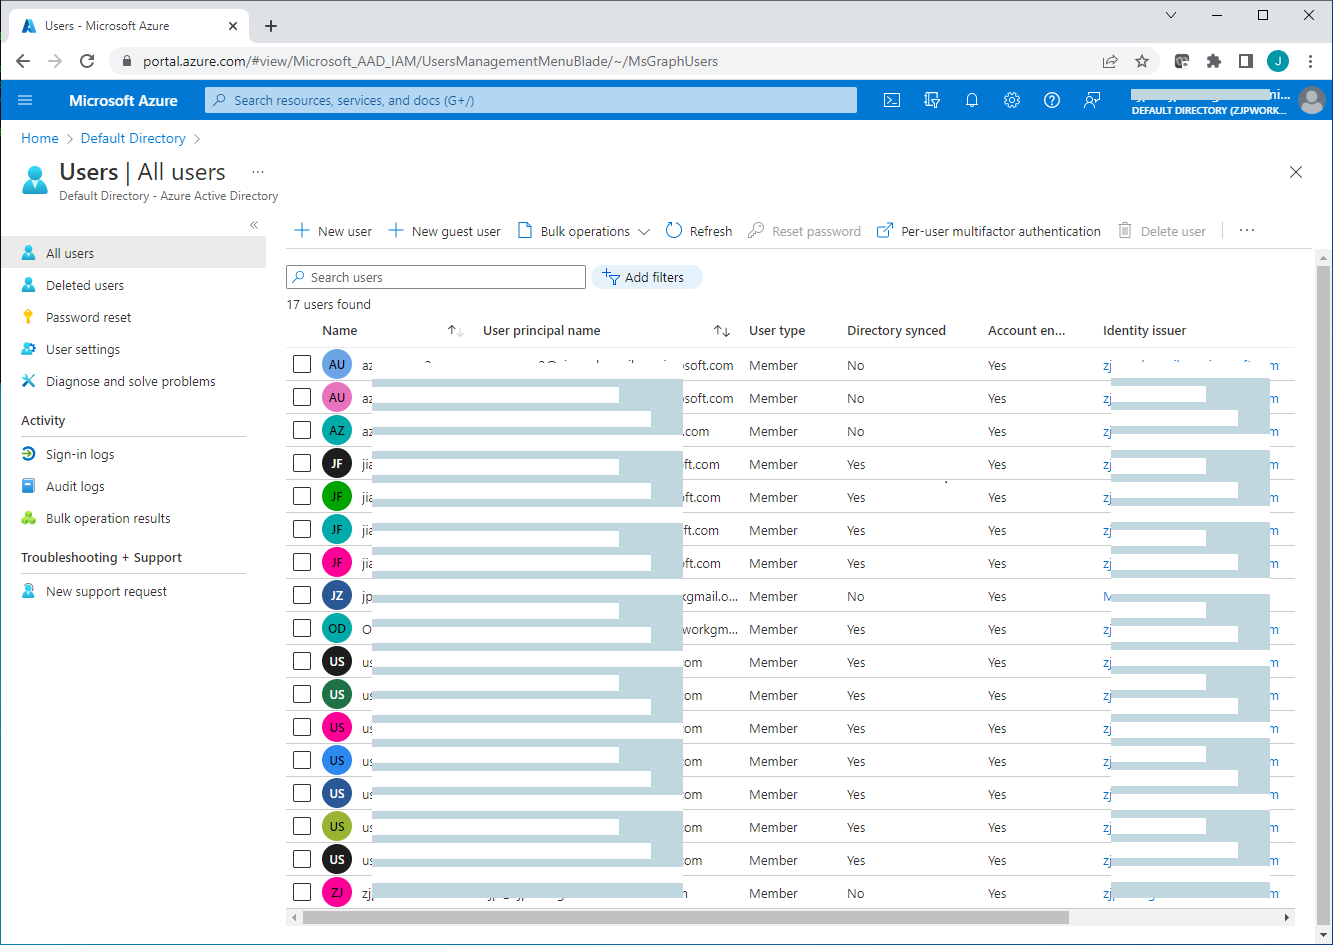
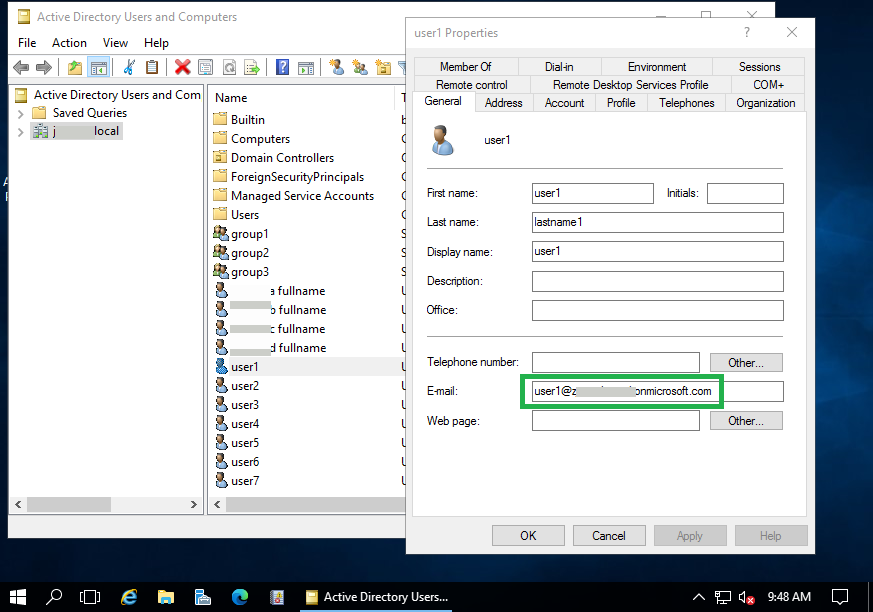
Because the local AD server has no public domain name, a custom domain is not used when user accounts are synced to the Azure AD. All user accounts are synced to the Azure AD under the default domain name "workexample.onmicrosoft.com" of the Azure . For example, user1 on the local AD server will be synced to the Azure AD as user1@workexample.onmicrosoft.com. Users that were synced to the Azure AD can also log on the Azure AD portal. Once MFA is enabled for them, those users will be instructed to register MFA on the Microsoft Authenticator app at the next Azure portal login in order to receive MFA push notifications.
Once the Azure AD connect sync has been successfully configured, it should normally show "Healthy" status on the Azure AD connect cloud sync page. Sometimes it might show an error status like "Quarantined may appear" when the network connection is broken or has some other err. It should go back to "Healthy" automatically at the next sync. Error status can also be cleared manually by an admin.
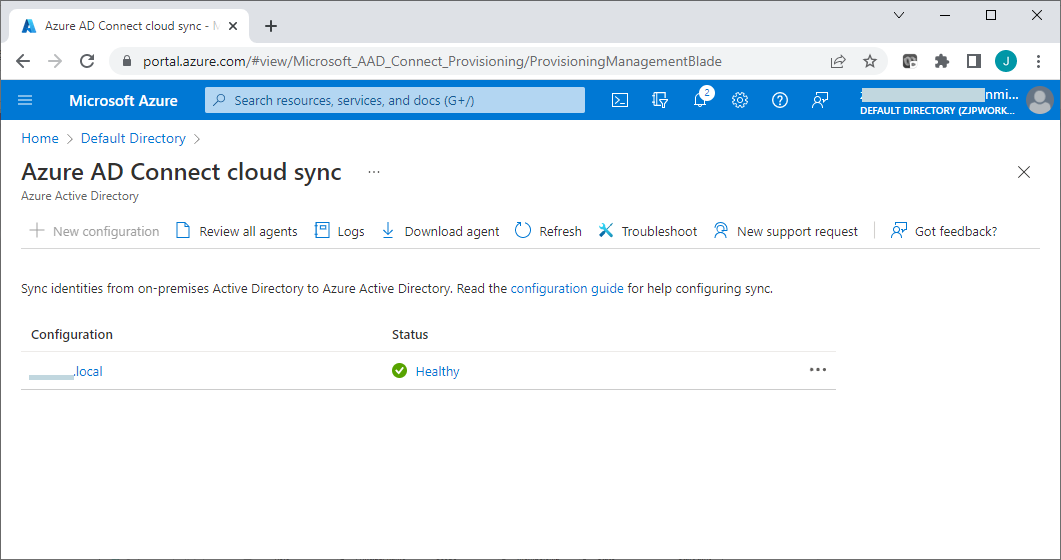
Once Azure AD connect cloud sync is working well, any change to user accounts on the local AD server will be automatically synced to the Azure AD.
Network Policy Server (NPS) with NPS extension for Azure MFA
The Network Policy Server acts as a RADIUS bridge between the Bravura Security Fabric instance and the Azure AD, passing authentication requests from the Bravura Security Fabric instance to the Azure MFA for approval.
NPS is available to Windows servers with the "Network Policy and Access Services" role enabled. The NPS role can be added to the AD server, but it's better to add it to a different windows server computer.
Before adding the Network Policy and Access Services server role to a machine that is not your local AD host, ensure the Windows server has joined to the domain of the local AD server.
To add NPS server role, see "Install Network Policy Server" in this link for details:
After the NPS server role has been added, confirm that the NPS server is registered with the local AD server:
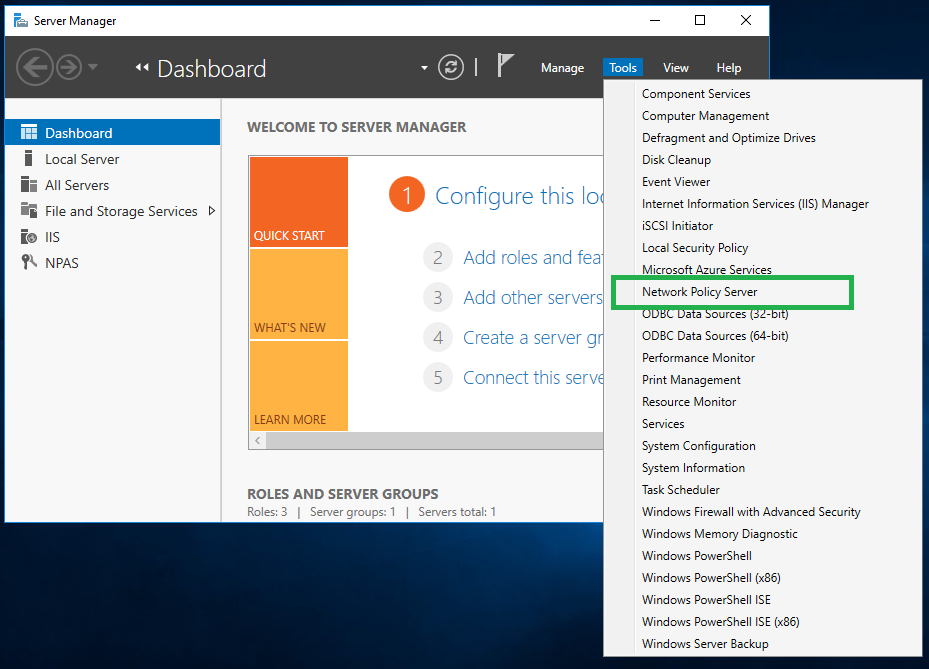
Launch Network Policy Server from Tools menu on the Server Manager
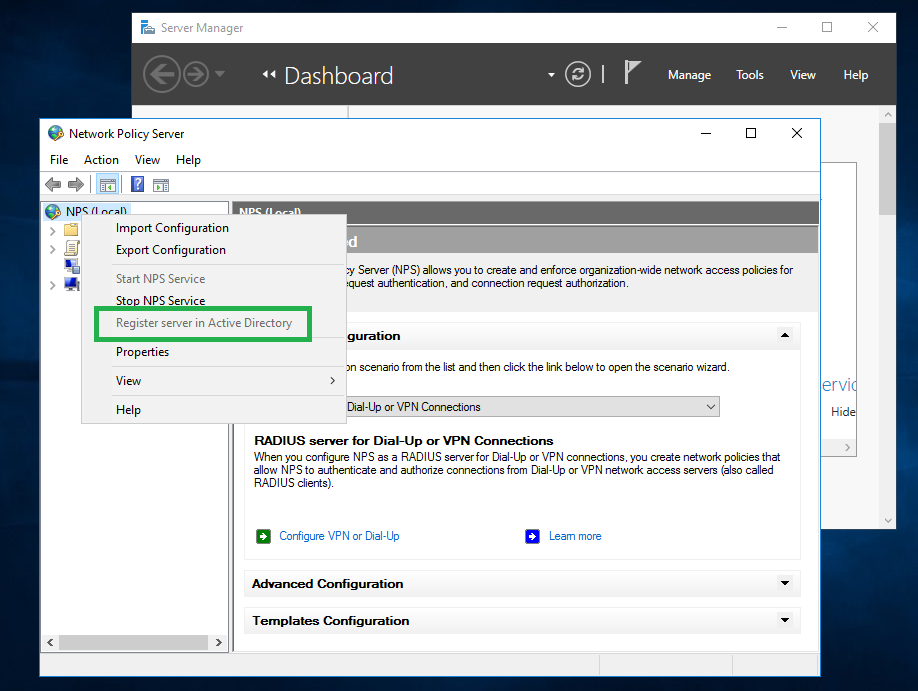
Right click on the NPS node, and select the Register server in Active Directory menu if it is not registered yet. This option will be grayed out if it has been registered already.
The NPS extension for Azure MFA uses winhttp to communicate with Azure AD, and the required port 443 may be blocked by your organization. In this case, you may need to set a winhttp proxy to allow the communication to work between the NPS extension and the Azure AD.
You can use the following command to set winhttp proxy on the NPS server before installing the NPS extension for Azure MFA:
netsh winhttp set proxy "http://your-proxy-address:80" "<local>"
and you can use this command to show current winhttp proxy settings:
netsh winhttp show proxy
After the winhttp proxy has been configured, reboot the NPS server to allow services/apps to use new winhttp proxy settings.
The installation of NPS extension for Azure MFA onto the NPS server asks for the following information:
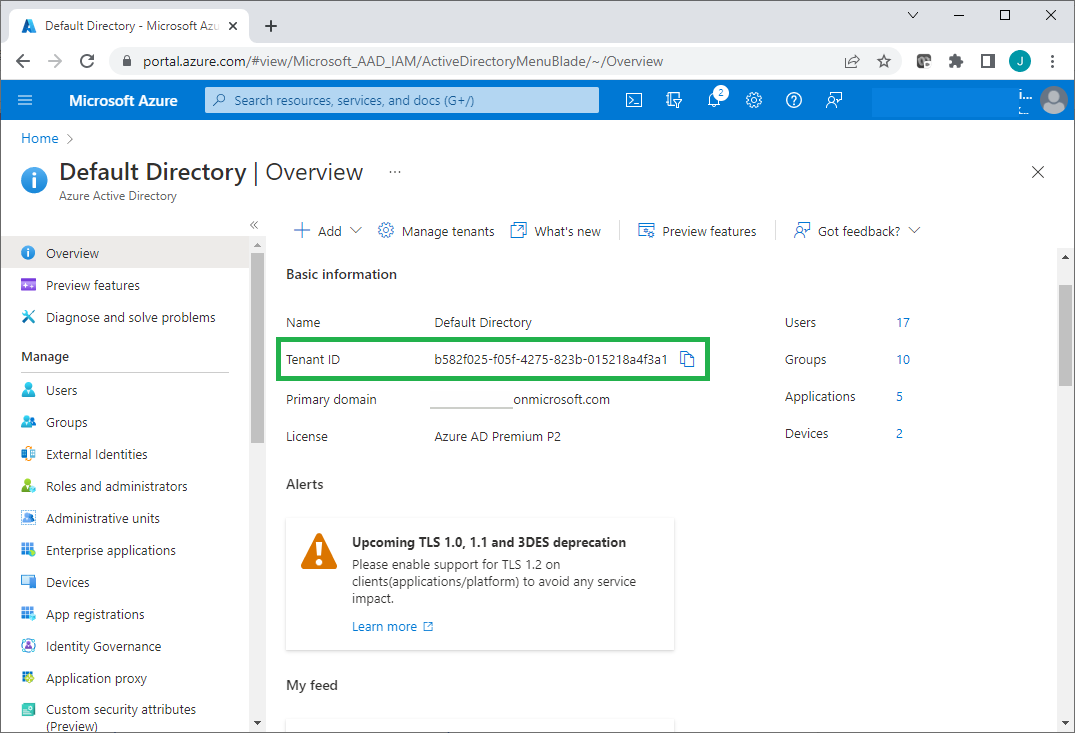
The tenant ID of the Azure AD
A work or school account with admin rights.
Each Azure AD tenant has a tenant ID, so you can find and copy its tenant ID at Azure portal.
If you created a cloud-only global administrator account on the Azure AD tenant, that account can be used as a work/school account. If you created a new Azure account for a free trial license, that account is not a work or school account.
To Install the NPS extension, see the "Install the NPS extension" section here:
https://docs.microsoft.com/en-us/azure/active-directory/authentication/howto-mfa-nps-extension
After the NPS extension for Azure MFA has been installed, and before running the config script for NPS Extension in the folder "C:\Program Files\Microsoft\AzureMfa\Config", you may need to run the following powershell command to set security protocol first, otherwise the config script may not run successfully.
[Net.ServicePointManager]::SecurityProtocol = [Net.SecurityProtocolType]::Tls12
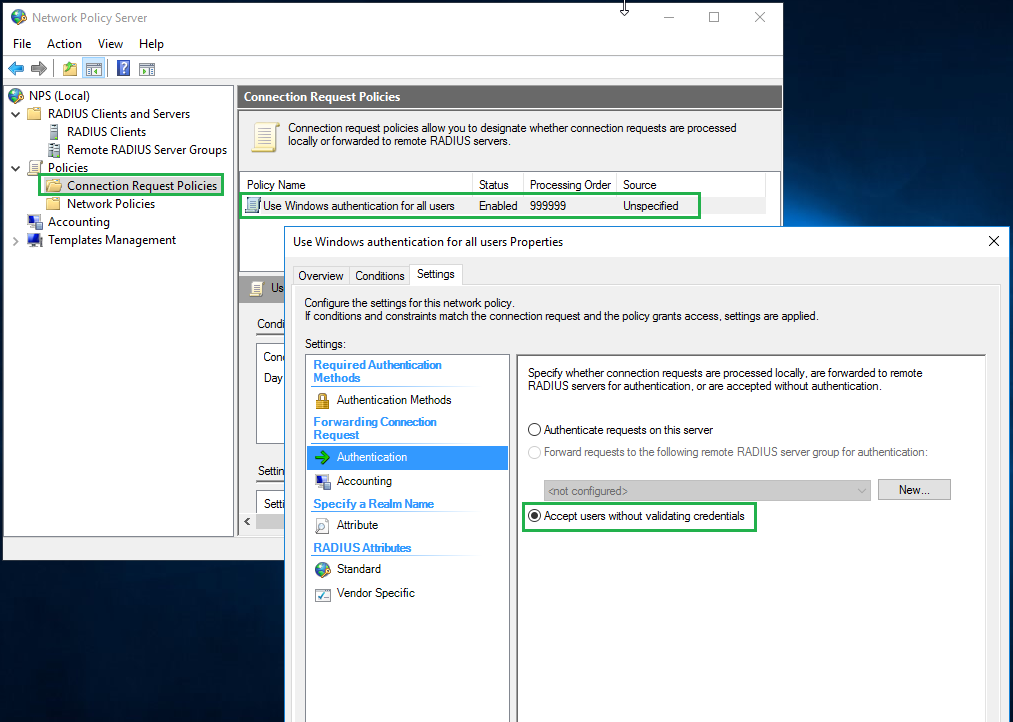
To allow the NPS server to accept RADIUS requests from the Bravura Security Fabric instance, you also need to add a new RADIUS client to the NPS server:
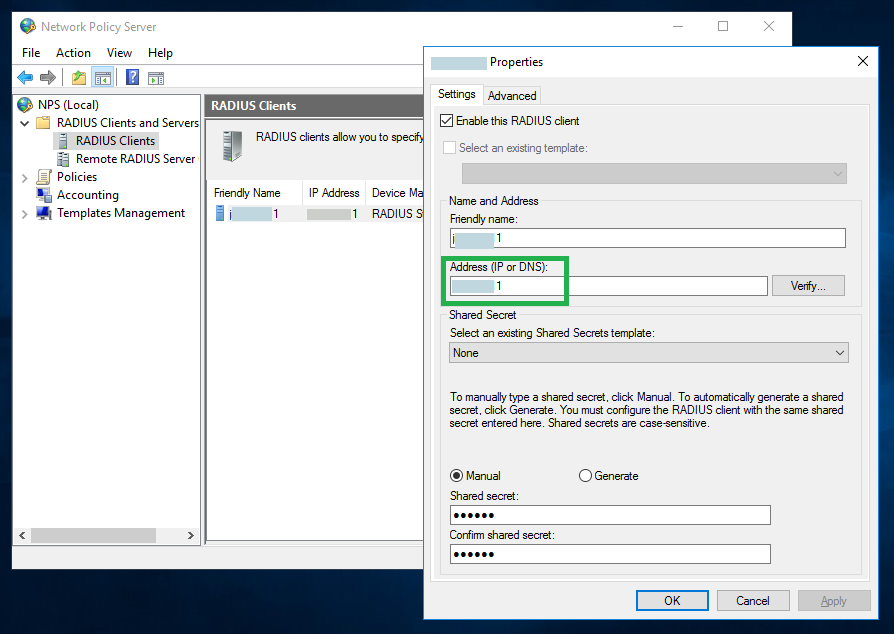
In the Network Policy Server window, right-click on RADIUS Clients, then click New.

Specify the address of the Bravura Security Fabric instance and a shared secret on the RADIUS client properties window. You can leave other settings with default values.
Expand the Policies tree, and set the authentication policy to Accept users without validating credentials.
Because our example AD only has a local domain name (CorpAD.local) and no public domain name, there is no custom domain configured on Azure AD for users synced from the local AD server. As a result, users on AD server are synced to Azure AD under the Azure AD default domain (i.e. workexample.onmicrosoft.com). This means that the domain name of the users on the AD server is different from the domain name of the synced users on Azure AD, and usernames in the MFA requests received from Bravura Security Fabric instance (i.e. user1@CorpAD.local) is different from UPN (Universal Principal Name) of the synced user on Azure AD (i.e. user1@workexample.onmicrosoft.com).
Azure MFA uses the UPN of the synced user to send push notifications send push notifications. The NPS extension for Azure MFA provides a solution to use an alternative user attribute as Azure MFA login attribute. This alternative user attribute can be specified using a registry key. Normally you would use the user's email attribute on the local AD server, so you can update the user's email address to the user's matching UPN on the Azure AD.
On the NPS server with NPS extension for Azure MFA installed, set the registry value of "HKLM\SOFTWARE\Microsoft\AzureMfa\LDAP_ALTERNATE_LOGINID_ATTRIBUTE" to "mail".
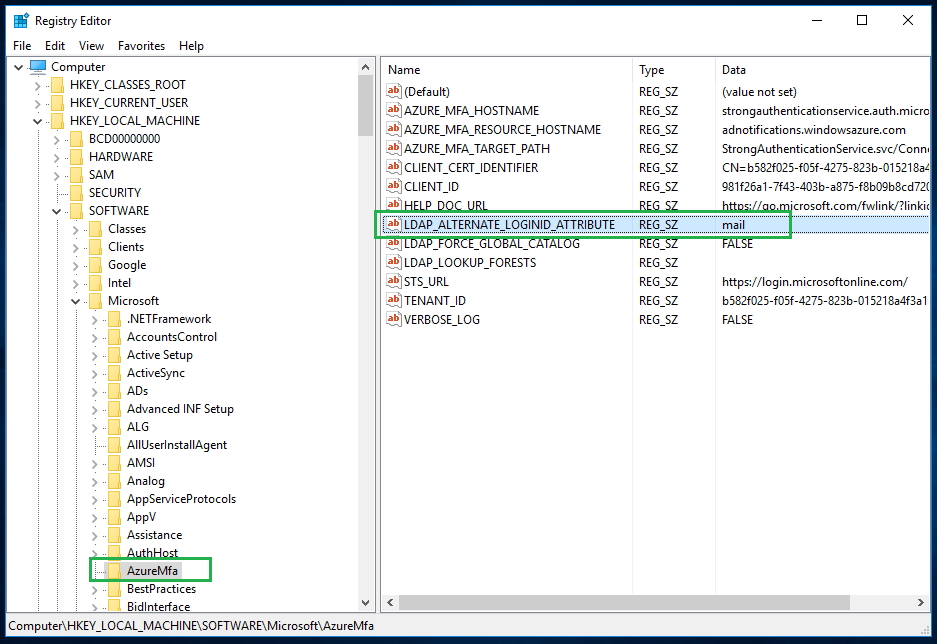
To allow the new registry value to take effect, you can either restart the computer, or the NPS service by itself.
Note
If you configured a custom public domain name in Azure, you can avoid needing to configure custom authentication attributes by having users under the same domain name on both local AD and Azure AD. See Azure AD documentation for how to sync users using custom domain: https://docs.microsoft.com/en-us/azure/active-directory/fundamentals/add-custom-domain.
Next:
You can integrate Azure MFA with Bravura Security Fabric by adding a RADIUS target system and a custom authentication chain.
Troubleshooting
If you have Active Directory connect sync issues, see:
If you have NPS extension issues, you can download Azure MFA NPS extension health check script:
The report of test errors on Azure URLs (i.e. https://login.microsoftonline.com or https://adnotifications.windowsazure.com) is inaccurate. It may still report those errors even when Azure MFA is actually working without issue.
The most useful application for troubleshooting of RADIUS request errors is the Event Viewer on the NPS server.
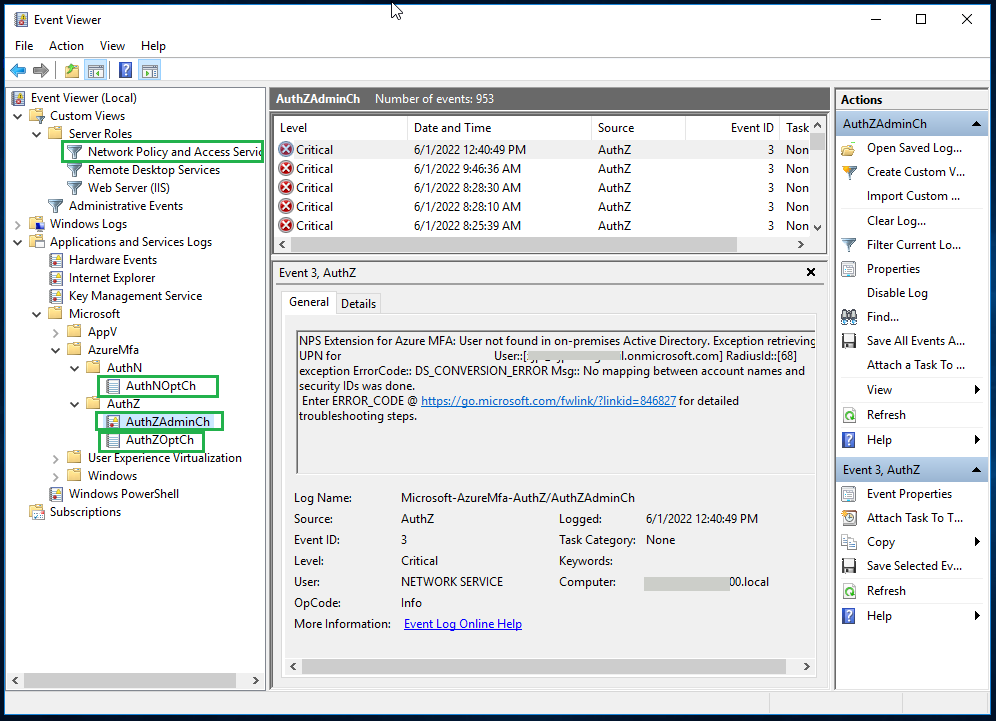
By looking into the events recorded in Event Viewer, you may be able to find the cause of common errors like request not received, incorrect attribute in the request, request timed out and , request rejected among others.
Integrating Azure MFA with Bravura Security Fabric
Once you have set up Azure MFA using RADIUS NPS , you must do the following to integrate Azure MFA with Bravura Security Fabric :
These steps are detailed below.
Configure the RADIUS Authentication target system
To configure the RADIUS Authentication target to support Azure MFA integration using RADIUS NPS:
Create a new RADIUS Authentication target system that will communicate with the Network Policy Server that is hosting the Azure MFA NPS extension.
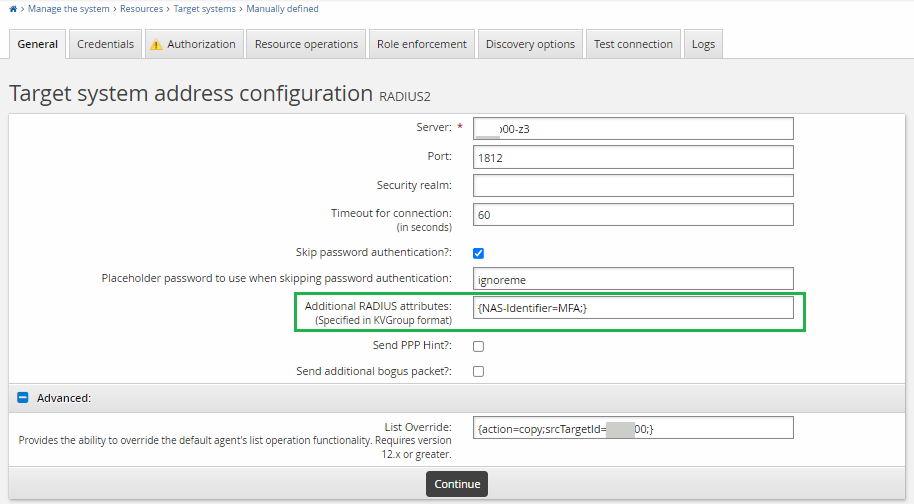
In the target address page configure the following parameters:
Server: Set this to the DNS hostname or IP address of your NPS server that contains the Azure MFA NPS extension.
Port: Port on which the RADIUS server will accept connections by default is port 1812.
Skip password authentication? Select this option. This will skip the primary authentication step when communicating with the NPS server so that only the MFA step is required.
Placeholder password to use when skipping password authentication: Set this to any value. For example; ignoreme . This value will be used in place of asking for the password. Since the NPS server will also ignore this any value can be used.
Additional RADIUS attributes Set this with at least an "NAS-Identifier" attribute. Each RADIUS request must contain this attribute otherwise the request will be rejected by the NPS server. The value of this attribute can be any identifier you like.
In the Advanced section configure another target system to use for a list of users when performing RADIUS authentication. Since the radius protocol does not support listing, the set of user ID’s is copied from another target system. Typically this would be the Active Directory target system.
List Override: set to:
{action=copy;srcTargetId=<TARGETID OF AD>;}
As described in Creating a list file to support challenge-response authentication in the Connector Pack documentation, when you need to copy a list from an Active Directory target, you should set the list override to something like
{action=copy;srcTargetId=ADDN;script=listoverride.py;postHook=replaceLongIdWithShortId;}.If you used an alternative attribute for NPS extension, you can set the list override to something like
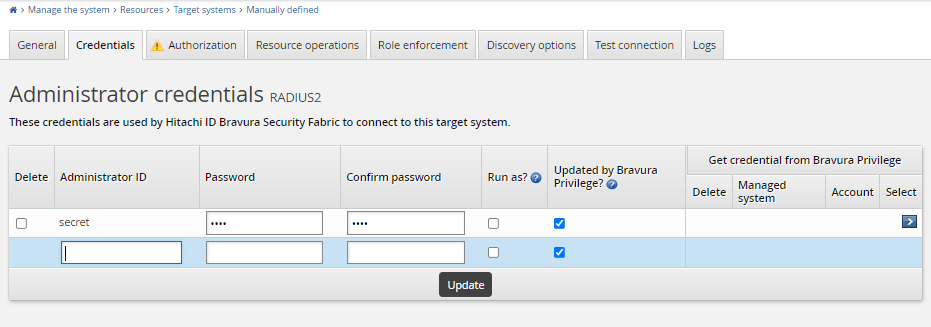
{action=copy;srcTargetId=ADDN;}without needing postHook.Configure the administrative credentials for the target. For RADIUS integrations Bravura Security Fabric leverages the shared secret that is configured on the NPS server side. This shared secret is used as the Administrator Password for the target system. The Administrator ID is ignored.
Administrator ID: Set this to “shared_secret” or similar the value itself is ignored.
Password: Set this to the value of the shared secret that is configured on the NPS server.
Ensure that you configure the target order using Maintenance > Auto discovery > Connector execution. Ensure the Active Directory target system is listed before the RADIUS target system, so that the RADIUS target system can copy the list file successfully.
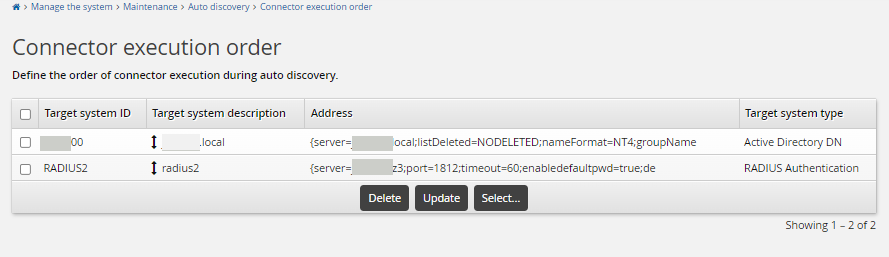
There is no need to add the Azure AD target to the Bravura Security Fabric instance.
Once both Active Directory and Radius target systems added to the Bravura Security Fabric instance and users are loaded into the Bravura Security Fabric instance using auto discovery or psupdate , you can log on to the Bravura Security Fabric instance using the loaded users.
Configure the Azure MFA authentication chain
To configure the Azure MFA authentication chain:
Click Manage the system > Policies > Authentication chains > Custom.
Click Add New.. to create a new authentication chain.
Give the authentication chain a name and description:
Name: AZURE_MFA
Description: Azure MFA
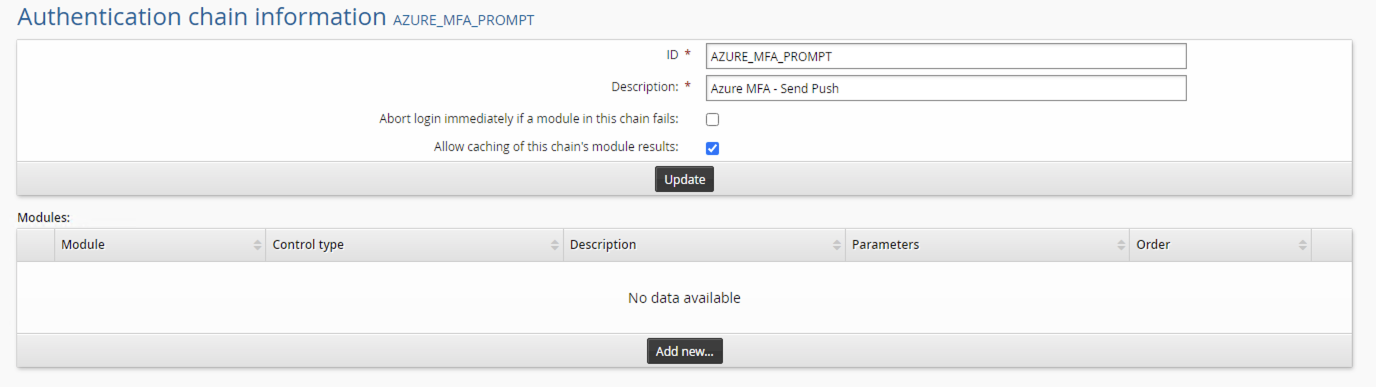
After creating the chain in the modules section click Add new…
In the module drop-down select
Connector package agent.For control type select
required.For description enter a description for this module; for example, Azure MFA.
Click Update.
After clicking update configure the rest of the module settings:
Target system to use for address and credentials: select the RADIUS target that was configured in the previous step.
Password verification operation: Select "Challenge response authentication".
Click Update.

Click Enable to enable the authentication chain and make it available.
Add the new custom authentication chain to the front-end login authentication chain . This front-end login authentication chain allows users to use Azure MFA through RADIUS for passwordless login, thus users can receive the push notification on the mobile phone to approve the login request.
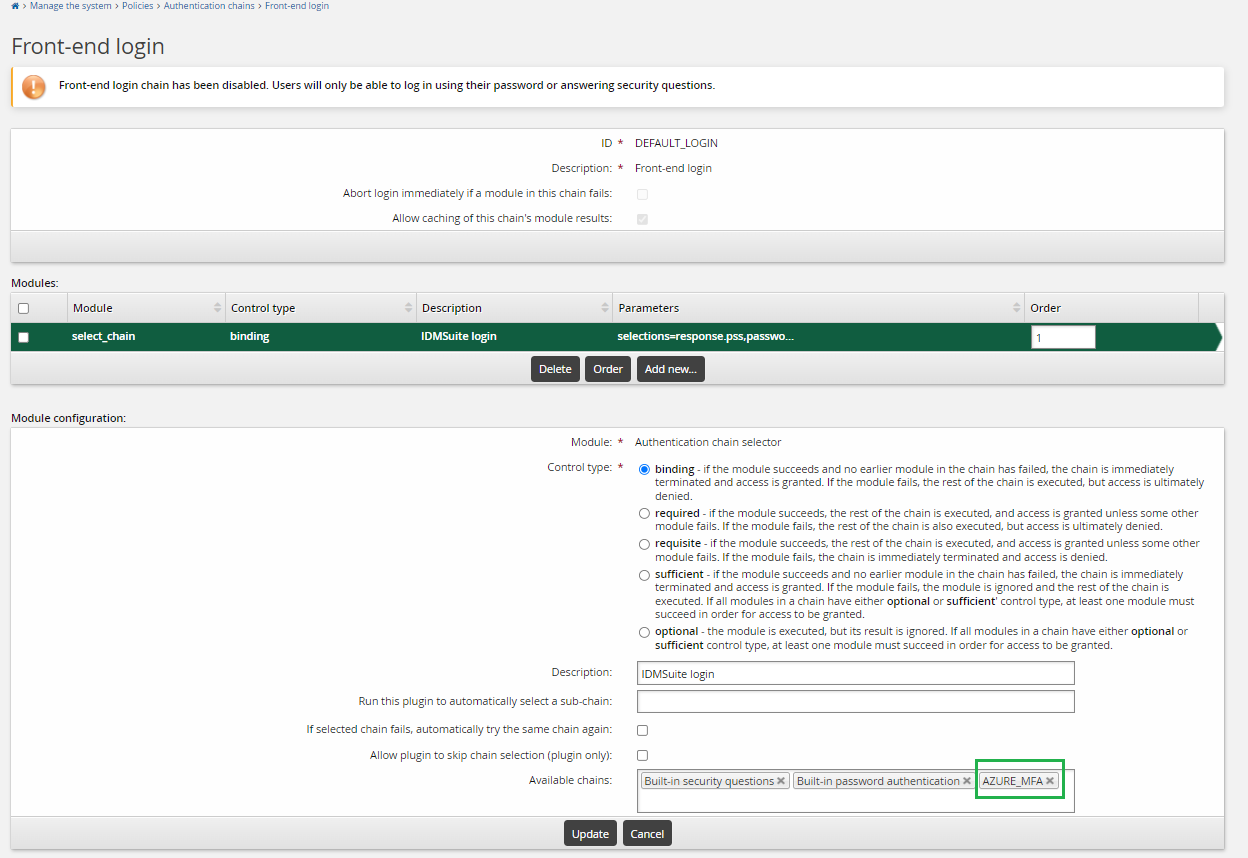
End users should now be able to log into Bravura Security Fabric by selecting Azure MFA as one of the authentication methods.
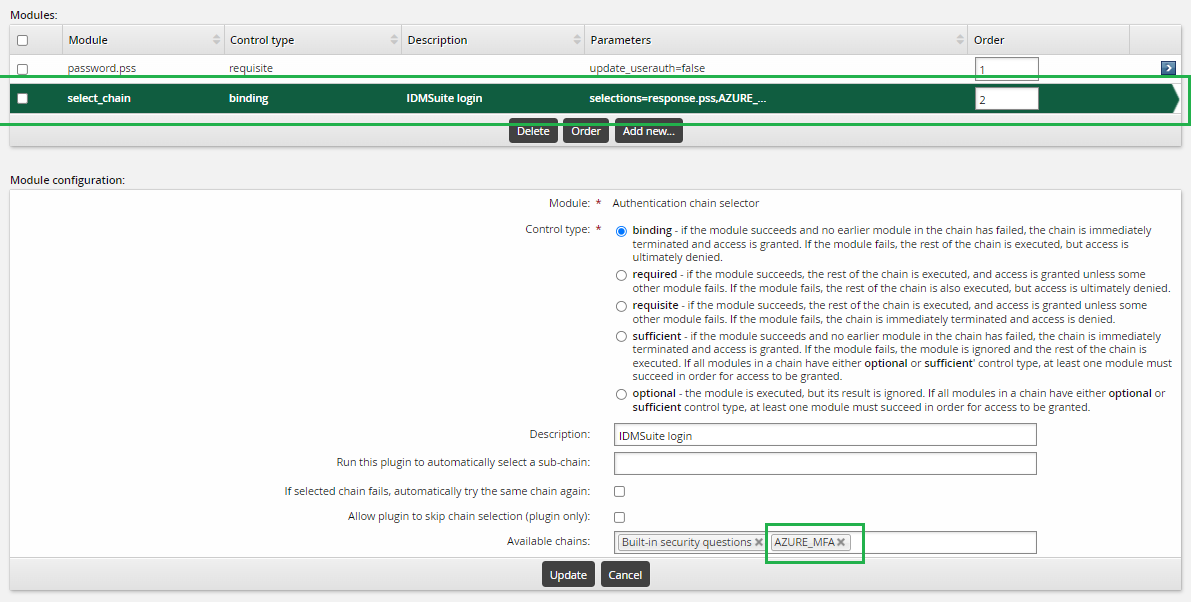
You can also configure the authentication chain differently to use Azure MFA as part of two-factor authentication:
Before Azure MFA can be available to use at Bravura Security Fabric instance login, the NPS server must be running, and auto discovery or psupdate should have successfully processed the NPS server target.
If the NPS server is shut down or cannot be contacted by the Bravura Security Fabric instance, the profiles of the NPS server target will be disabled at the next auto discovery. At that time, Azure MFA will not be listed on the Choose an authentication method page.
Logging in using Azure MFA
Before using Azure MFA for Bravura Security Fabric instance login, ensure the user has already completed Azure portal login at least once using Azure MFA, and user has registered on the Microsoft Authenticator app to receive Azure MFA push notifications.
If authentication chains are configured as described above , end users can log into Bravura Security Fabric login using Azure MFA:
Enter the user name on the instance login page.
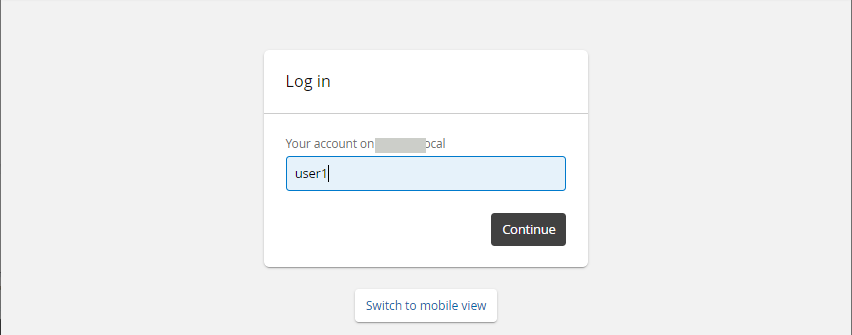
Select "Azure MFA" from the page

The user should receive a Azure MFA push notification on their mobile phone to approve the login request.
The user approves the request, then logs on the Bravura Security Fabric instance.