Install or upgrade Login Assistant manually
Upgrade note
When upgrading Login Assistant from 12.5.0 - 12.8.0 and then to 12.8.1 and up, and when the VPN test page URL and VPN test page search words configuration options are used for the Login Assistant, additional steps must be performed before running the upgrade for ska-x64.msi. See Upgrading Login Assistant from 12.5.x to 12.8.1 and up using VPN test page options.
To manually install or upgrade Login Assistant on a workstation:
Copy the
ska.msiinstaller, orska-x64.msiinstaller for 64-bit systems, from the addon directory to a scratch directory (C:\temp) on the local workstation or to a publicly accessible share.Launch the installer.
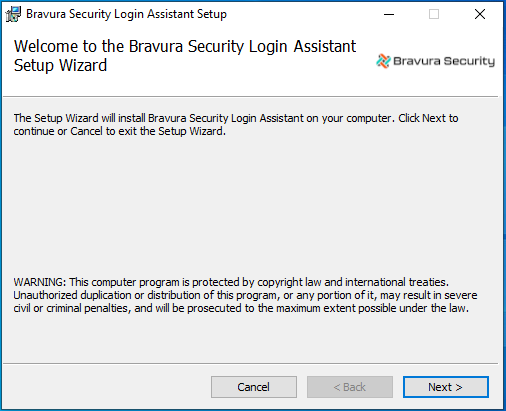
Click Next .
Read and accept the license agreement.
Click Next .
Click Typical, then click Next .
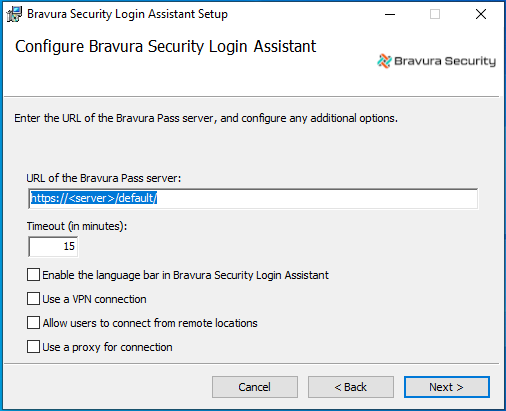
Configure the Login Assistant:
URL of the Bravura Pass server The full path to the Bravura Pass server. The URL can include skin name or other parameters. Do not set this URL to a redirect page.
Timeout This is the maximum amount of time the Login Assistant secure kiosk account can be used before it automatically closes. Default is 15 minutes.
Enable the language bar in the Login Assistant Select this option if you want users to be able to select a different language while using the Login Assistant.
Use a VPN connection Select this option if you want to establish a VPN connection before opening the Bravura Pass login page in a kiosk browser.
Allow users to connect from remote locations Select this option if you want users to be able to connect from remote locations, using direct connection, WiFi hotspot, or AirCard. This is generally used along with a VPN connection.
Use a proxy for connection Select this option if you want the secure kiosk account browser to use the Edge proxy server to connect to the Bravura Pass instance. You can configure settings for the proxy later.
Click Next .
Set up the help account.
Type the User ID (default is help). The help account is used to login and launch
runurl.Use the format
<User ID>@<Domain> or <Domain>\<User ID>if the help account is a domain user.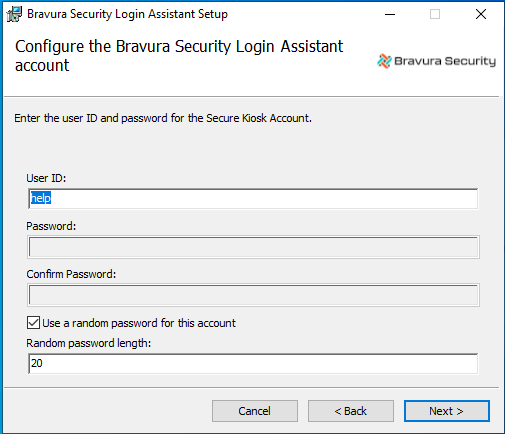
If the Use random password for this account checkbox is selected, you do not need to enter a password. A random password will be used instead. You must specify a password if you are only installing the Login Assistant and not the Credential Provider, or if you are using a domain account.
Click Next .
Configure a VPN connection program if you selected that option earlier:
Connection program: Name and full path of the program to run in order to establish a VPN connection.
Connection program arguments: Command-line arguments for the VPN connect program; for example -u %USERID% -p %PASSWORD% .
Disconnection program: Name and full path of the program to run to disconnect from the VPN.
Disconnection program arguments: Command-line arguments for the VPN disconnect program; for example -u %USERID% -p %PASSWORD% .
User ID: To be used with the VPN connect and disconnect programs.
Password: For the VPN user ID.
Timeout: The period in seconds that the runurl program should wait before checking to see if connectivity has been established after the VPN connect program has run. Default value is 30.
Retries: Number of times to test for connectivity after the VPN connect program has run. If this value is blank, there will only be one retry attempt. Default value is 3.
VPN test page URL: This option may be used when the Bravura Pass server is in a SaaS environment and accessible directly from the internet and the VPN must still be established. This would be for a case such as connecting to an Active Directory server that is behind the VPN and is required by the local reset extension when resetting a user's password using the Credential Provider. If this URL cannot be reached by the SKA / Credential Provider, then a VPN connection will be established to access it. For example, a Bravura Pass server may exist behind the VPN.
VPN test page search words (multiple sets of search words allowed, separated by \n): This is a marker that is in the HTML source code for what to search for in the page from VPN test page URL. For example, if there is a Pass server behind the VPN, you can search for an HTML tag that contains a GUID that can be used for the search such as:
SKA MARKER 81A84EBD-2CE5-4794-8341-E1828711FFBC.
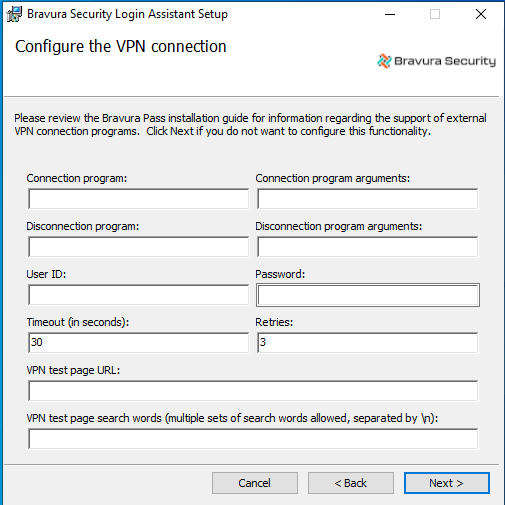
Note
If you are using a Cisco anyConnect VPN connection, there are additional settings that can only be set by running the MSI on the command line.
Click Next .
Configure the remote account access if you selected that option earlier.
External URL to test for connectivity This will be the URL of a website that used to determine if the computer is connected to the Internet, or still behind a registration screen or captive portal. This defaults to www.msftncsi.com/ncsi.txt.
Data expected from URL This is a string that is expected from the above website. It should be unique enough to ensure that a registration page will not have the data, but always present on the external URL. The default is
Microsoft NCSI.Program to use to create a connection If users will be using an AirCard or Internet stick, this is the name of the program to run in order to connect. This program will be run from the Login Assistant to allow the user to connect.
Main window title of program If the Program to use to create a connection is used, this is the main window title of the program when run. In AirCard, this is listed under the Task column on the Applications tab.
Captive portal time limit (seconds) Specify the length of time to wait to see if a connection has been established by the captive portal used to create a connection.
The time limit may be set between 0 and 600 seconds. The default is 300.
Address of the VPN server / Port of the VPN server If specified these allow the remote Login Assistant to test a connection to the VPN server to see if it can be accessed before starting the VPN. This can help with better diagnosis and faster connection times.
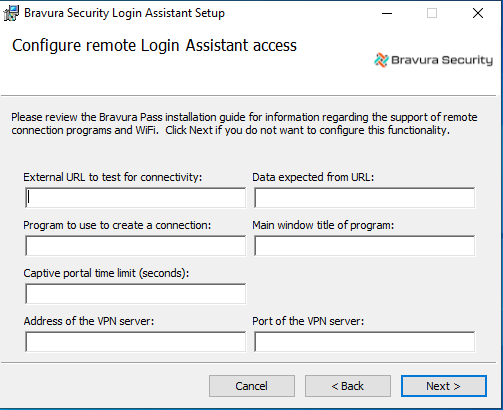
Click Next.
If you chose to use a proxy for connection earlier, configure the Edge proxy server for the secure kiosk account. These settings match those set in Edge > Internet Options > Local Area Network (LAN) Settings:
Automatically detect proxy settings Sets Edge proxy server to "Automatically detect settings".
Use automatic configuration script Sets the proxy server to use "Use automatic configuration script".
Use a proxy server Sets proxy server to use a manually defined proxy server.

Click Next .
Select the languages to be displayed by the Login Assistant.
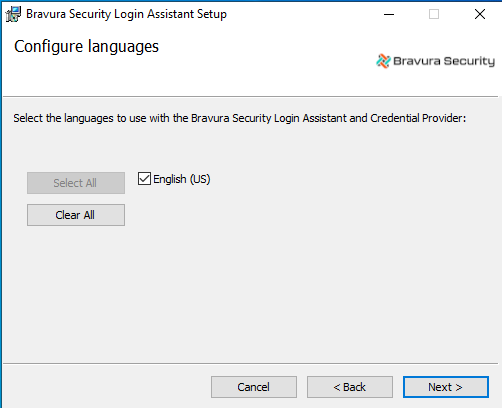
Click Next .
Once you have finished configuring the various installation options, you are prompted to start the installation.
Click Install.
The installer begins copying files to your computer. The Installation Complete dialog appears after the software has been successfully installed.
Click Finish to exit.
Depending on your installation options, you may be prompted to restart Windows.