Examples
This section includes steps through some typical examples for pre-defined requests.
Request a group membership
This example demonstrates how to add a pre-defined request to allow users to easily request membership to a limited set of groups. It assumes you have set up a target system and managed groups .
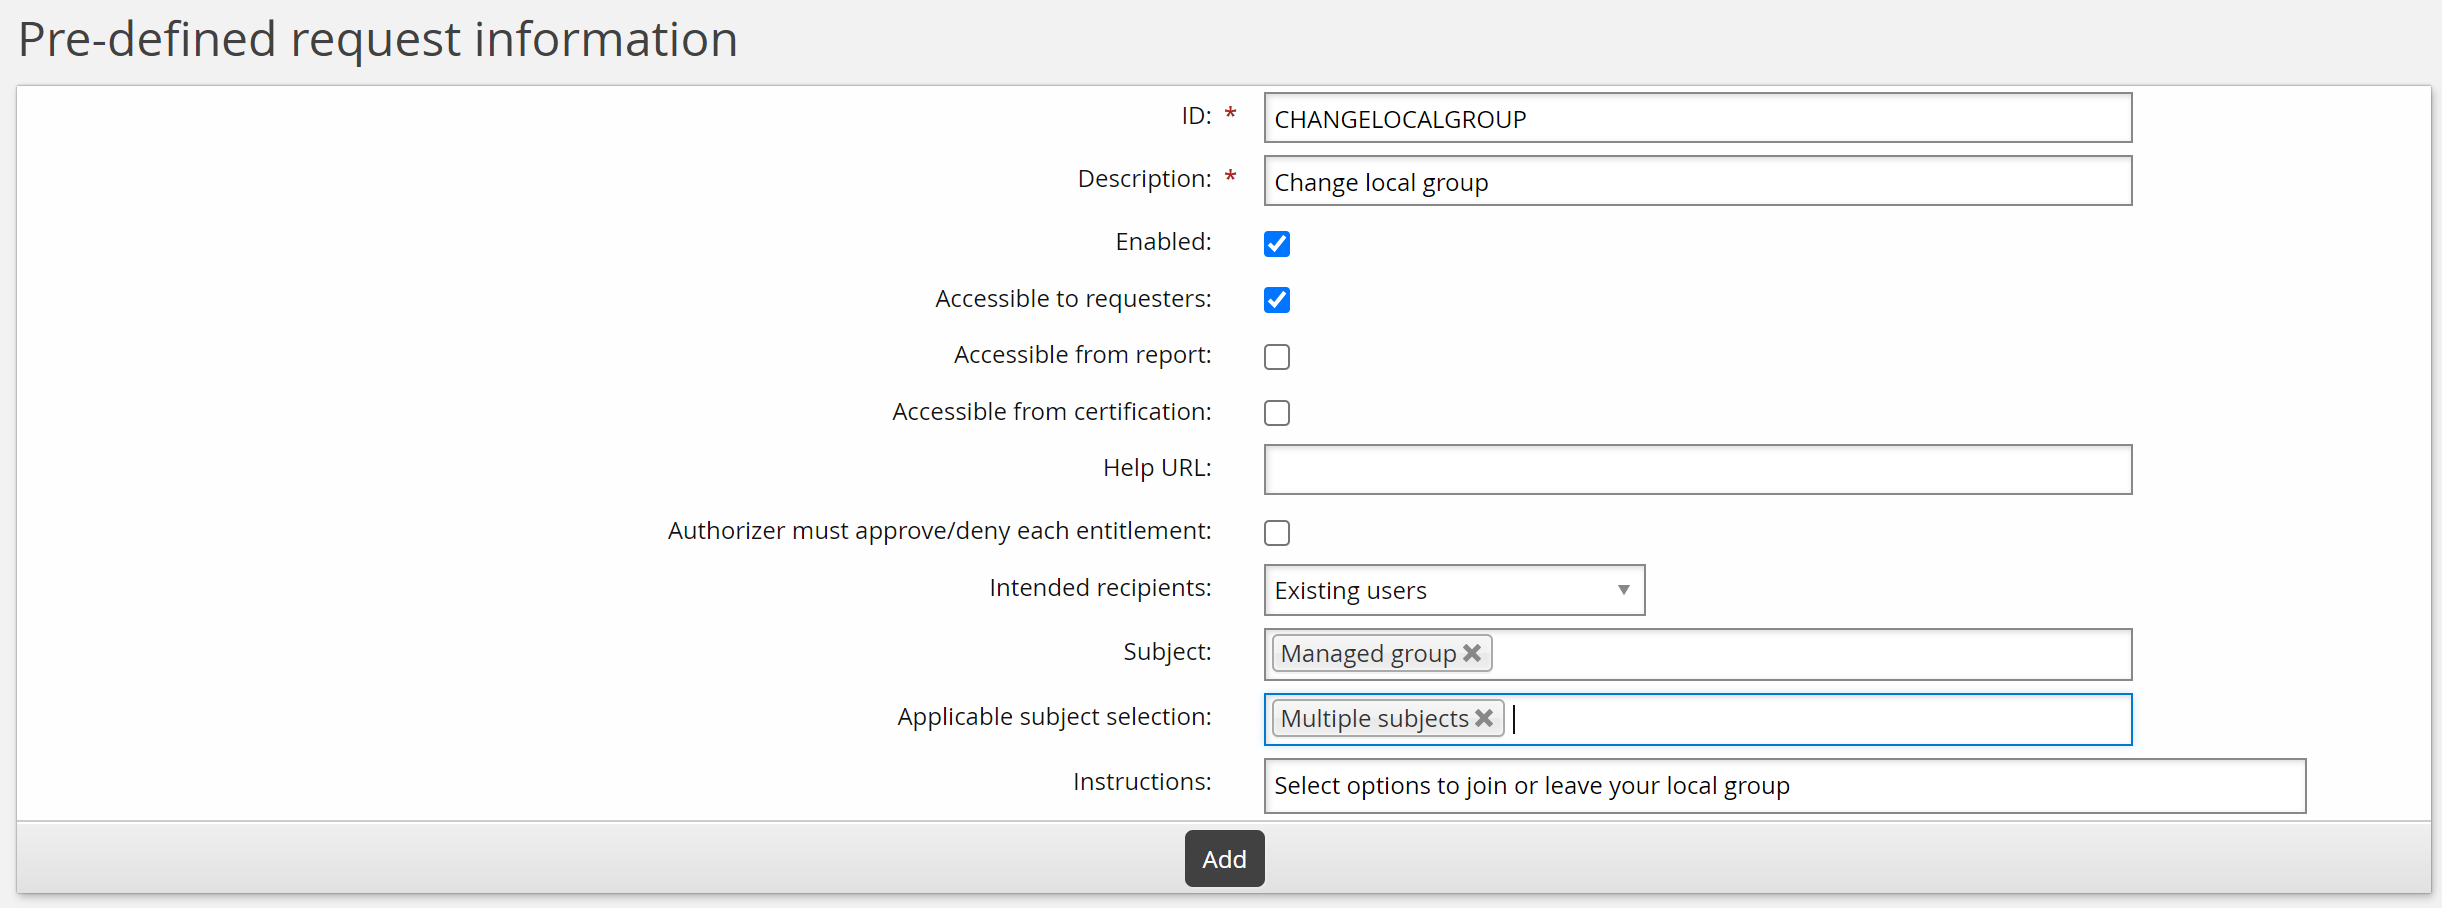
Click Manage the system > Workflow > Pre-defined requests and add a new request with the following general settings:
ID CHANGELOCALGROUP
Description Change local group
Enabled Selected
Intended recipients Existing users
Instructions Select options to join or leave your local group.
Click Add.
You can now define operations and other parameters.
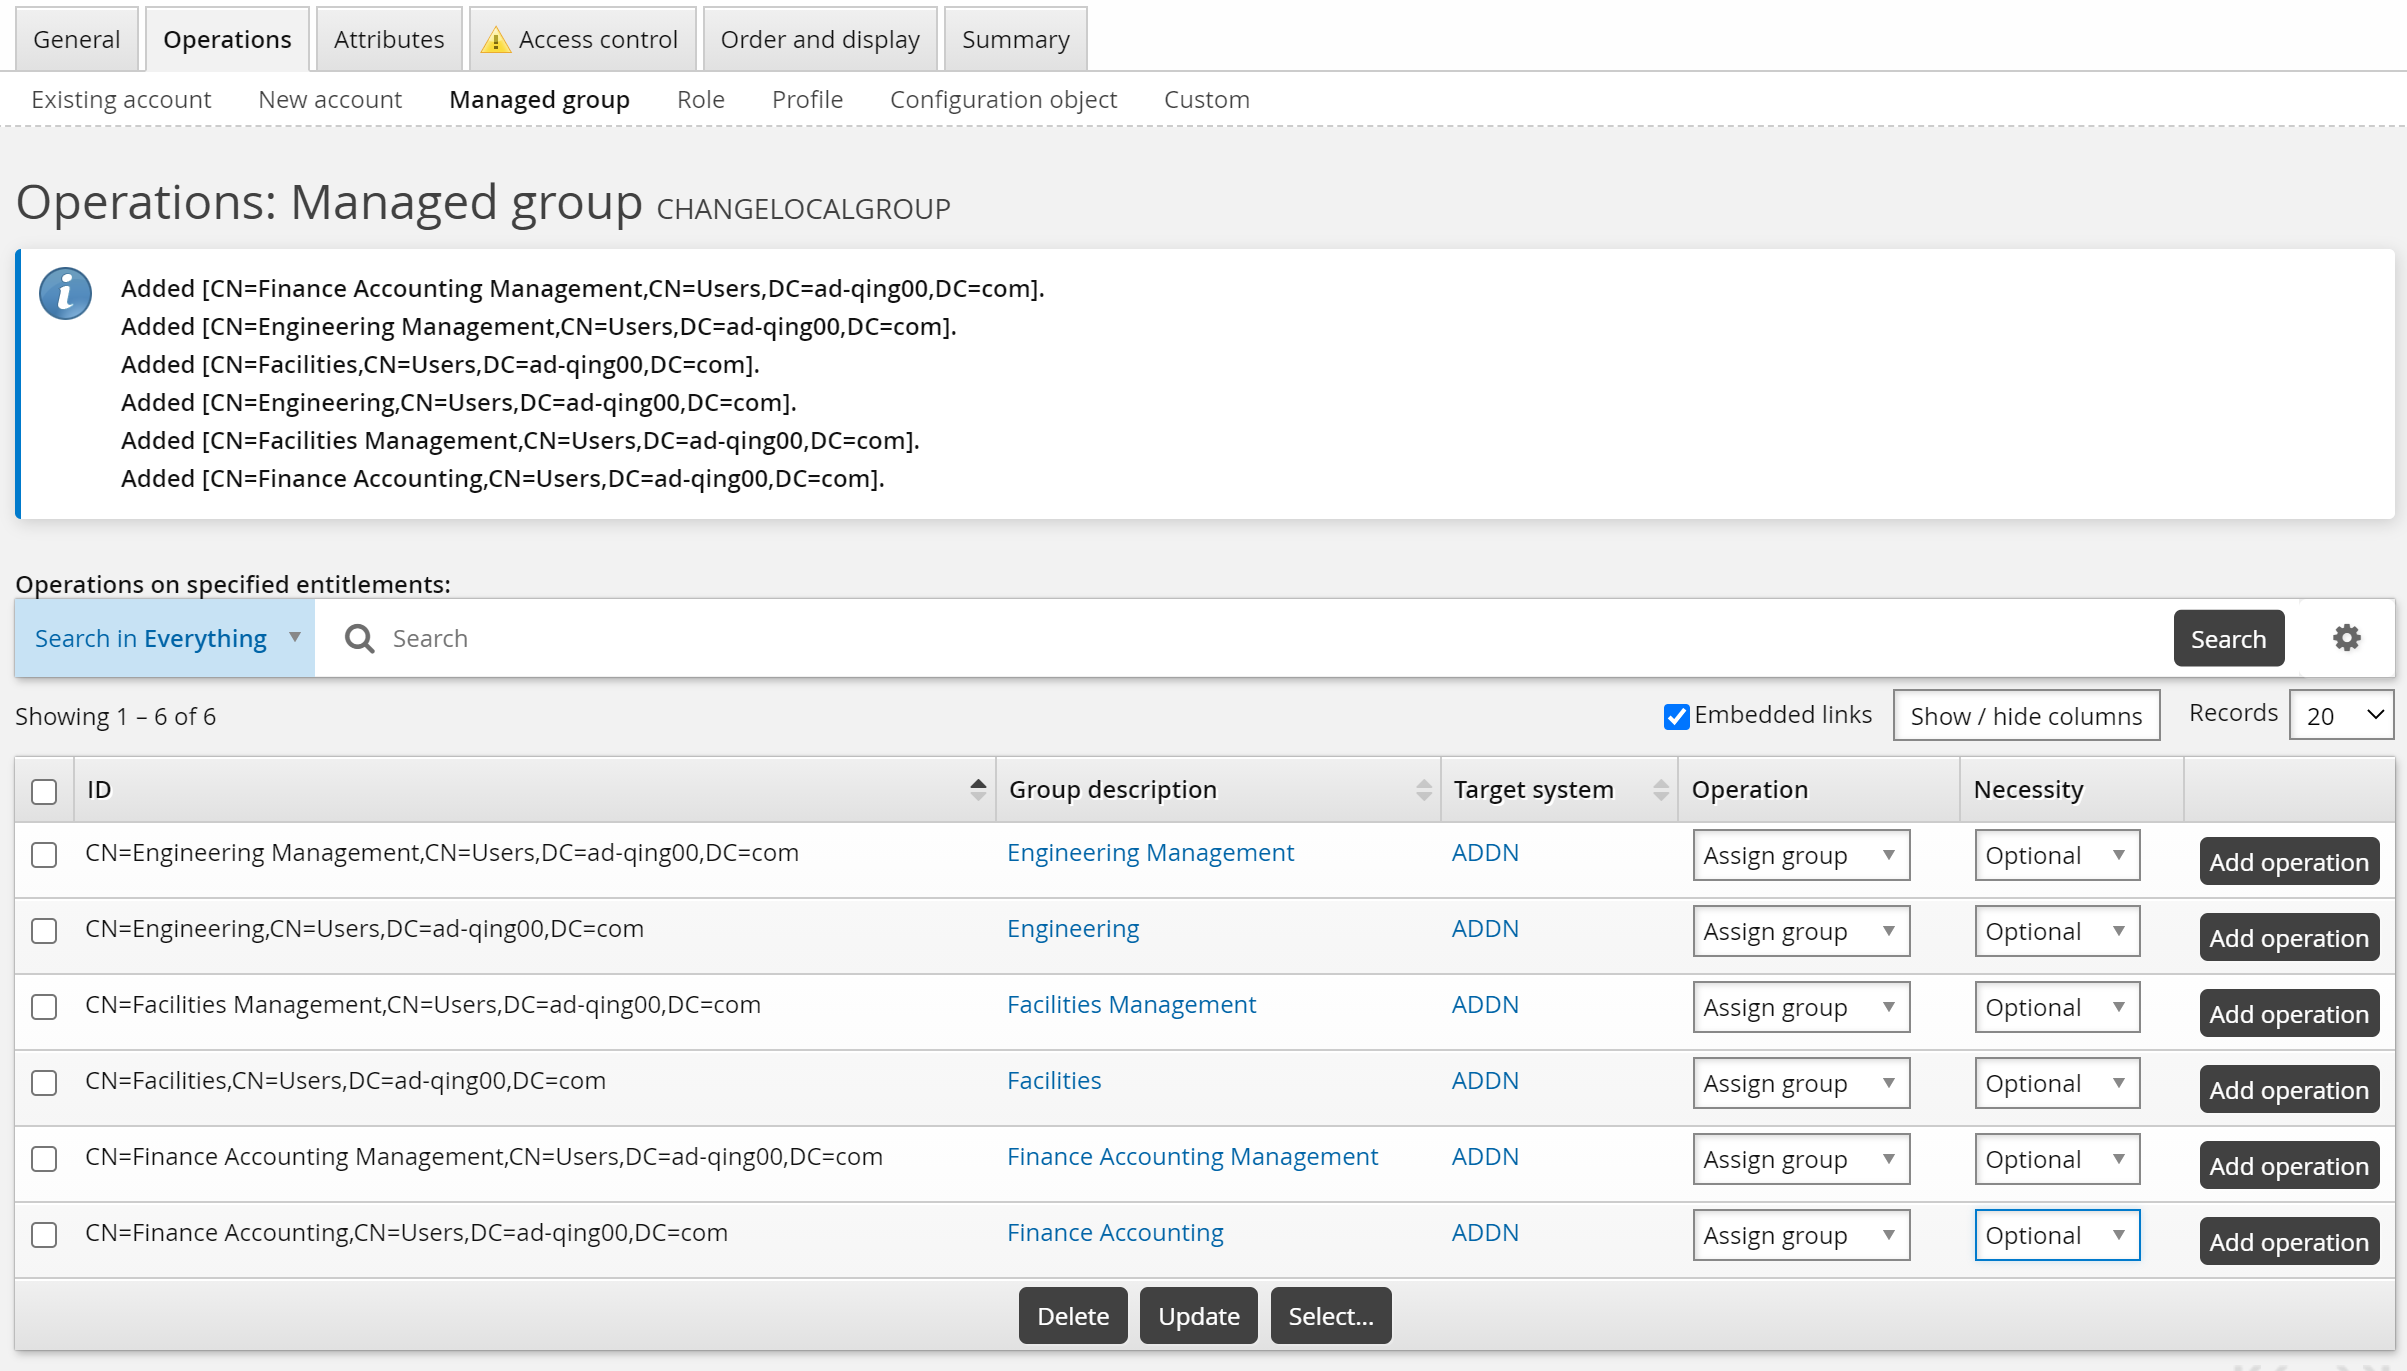
For this example, the request is to assign or revoke group memberships:
Click the Operations tab, then the Managed group sub-tab.
Click Select… to select managed groups that you want included in the request.
Click Select .
Select "Assign group" from the Operation drop-down list, and "Optional" from the Necessity drop-down list next to each group.
Click Update.
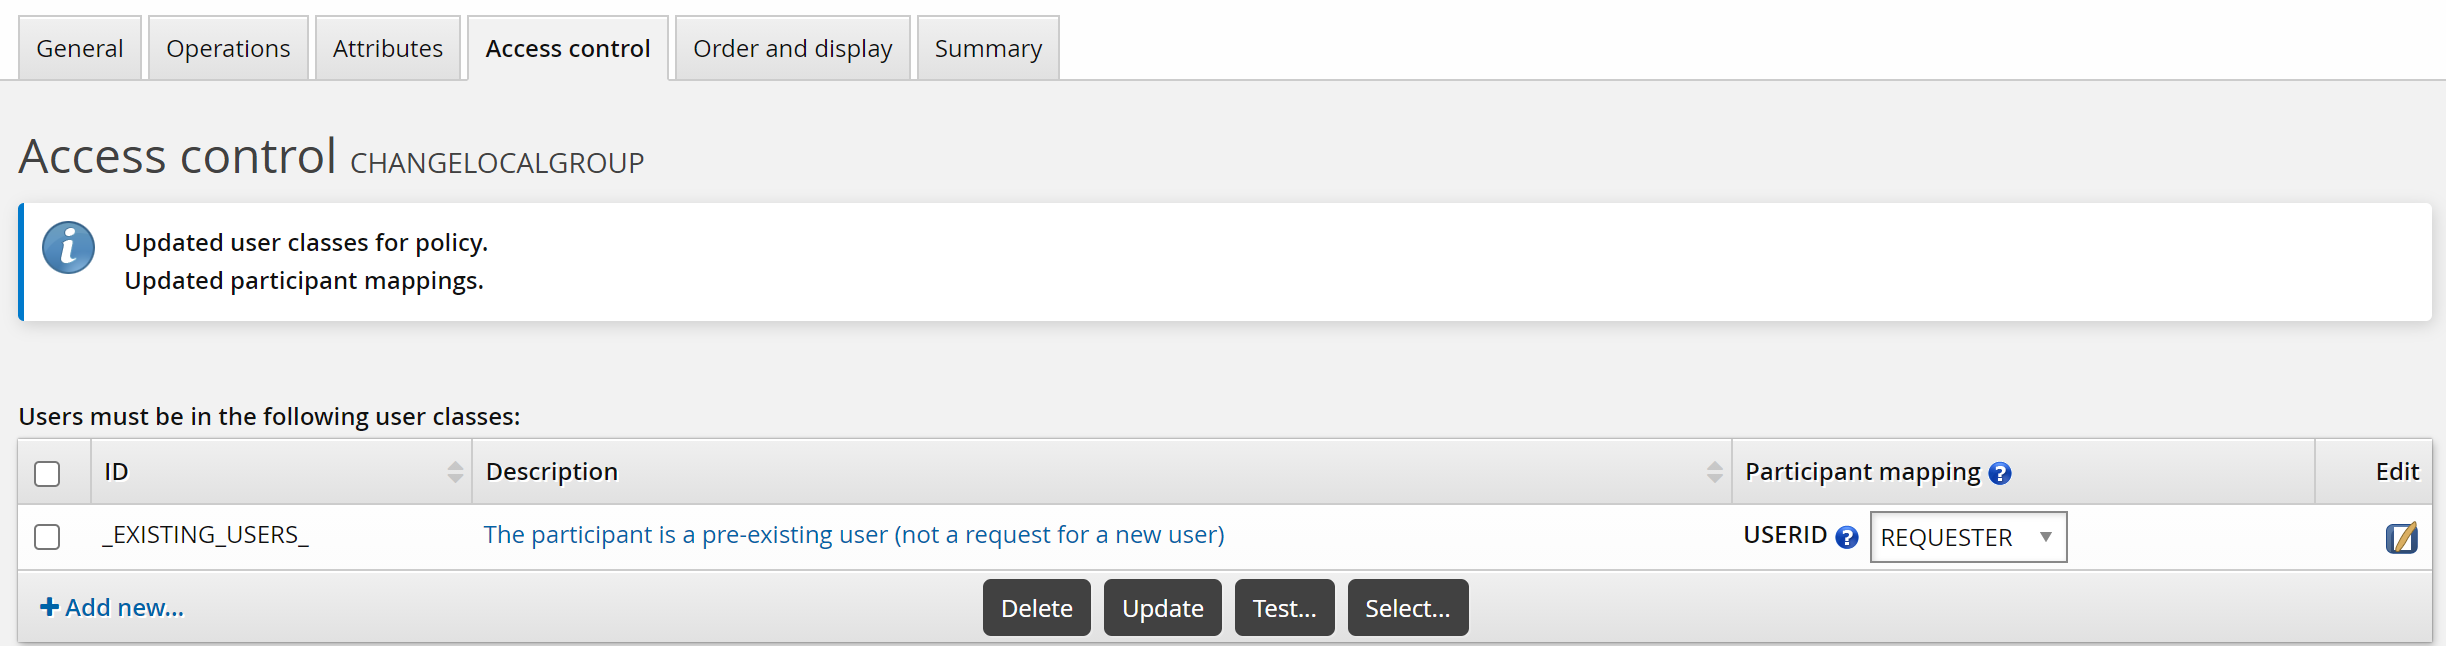
For this case, use the default _EXISTING_USERS_ class to allow existing users to request the new group membership.
To set up access controls:
Click the Access control tab.
Click Select… .
Select the _EXISTING_USERS_ user class and click Select.
Bravura Security Fabric warns that you need to complete the access control configuration by mapping user class participants to a participant in the policy (requester or recipient).
Set the Participant mapping to REQUESTER.
Click Update.
To submit the pre-defined request, login as an end user:
Click View and update profile .
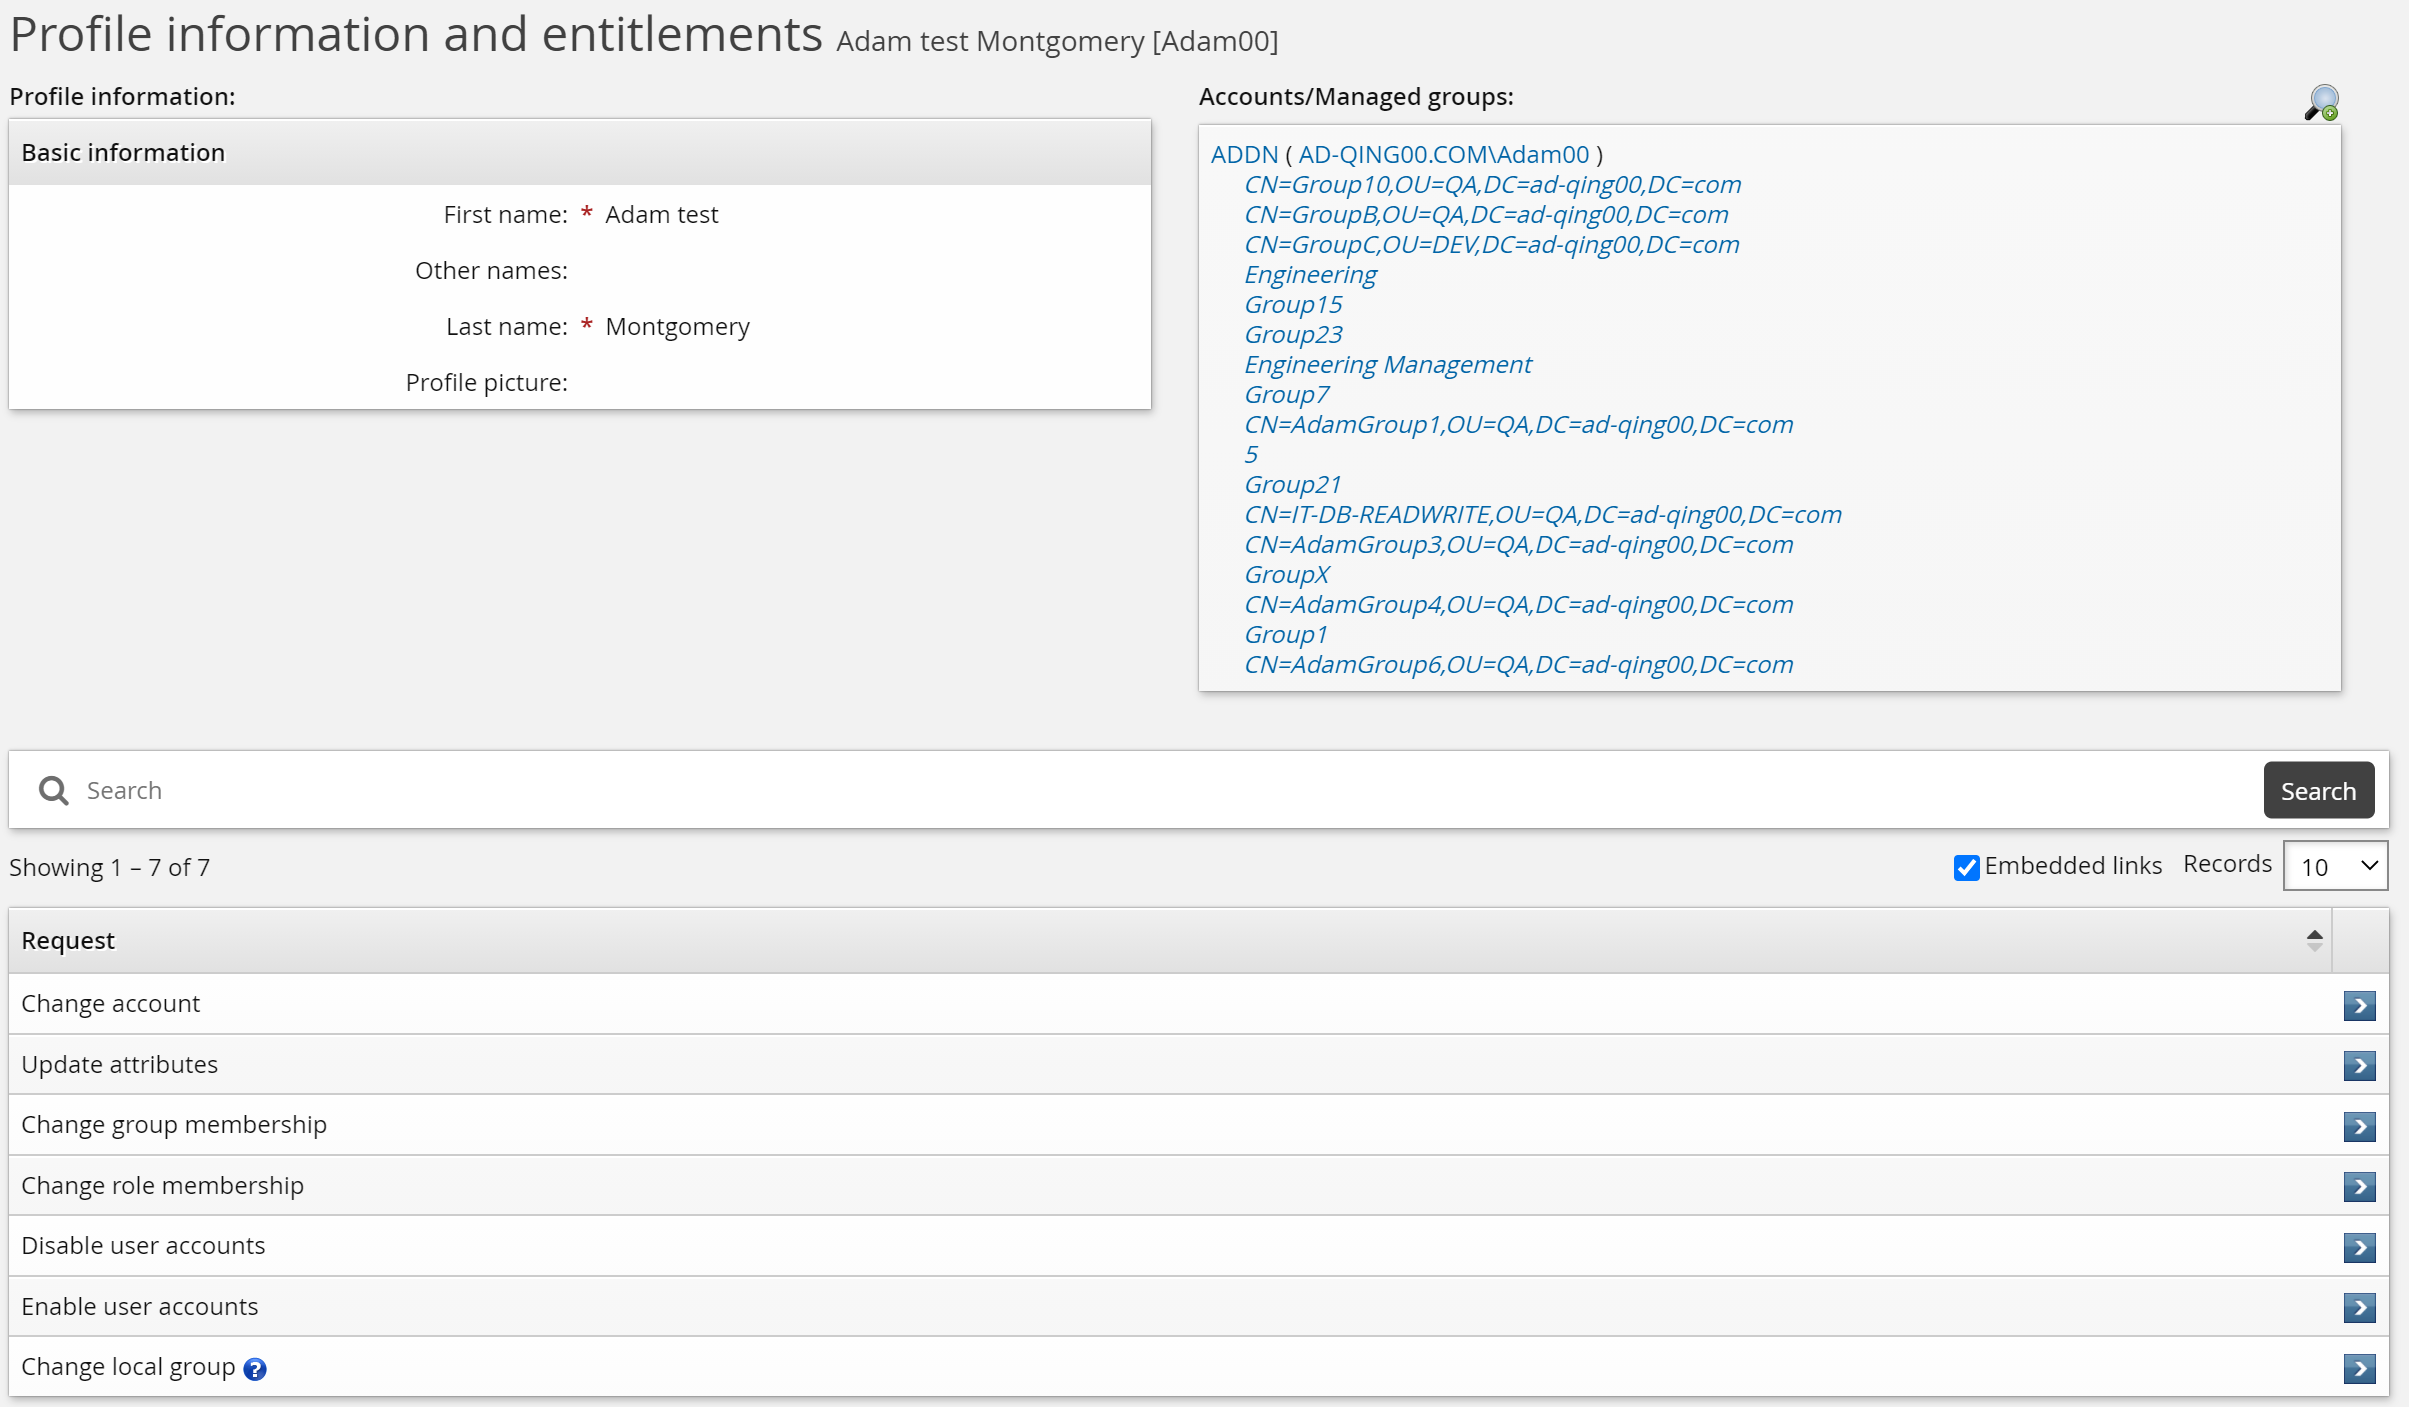
Click Change local group.
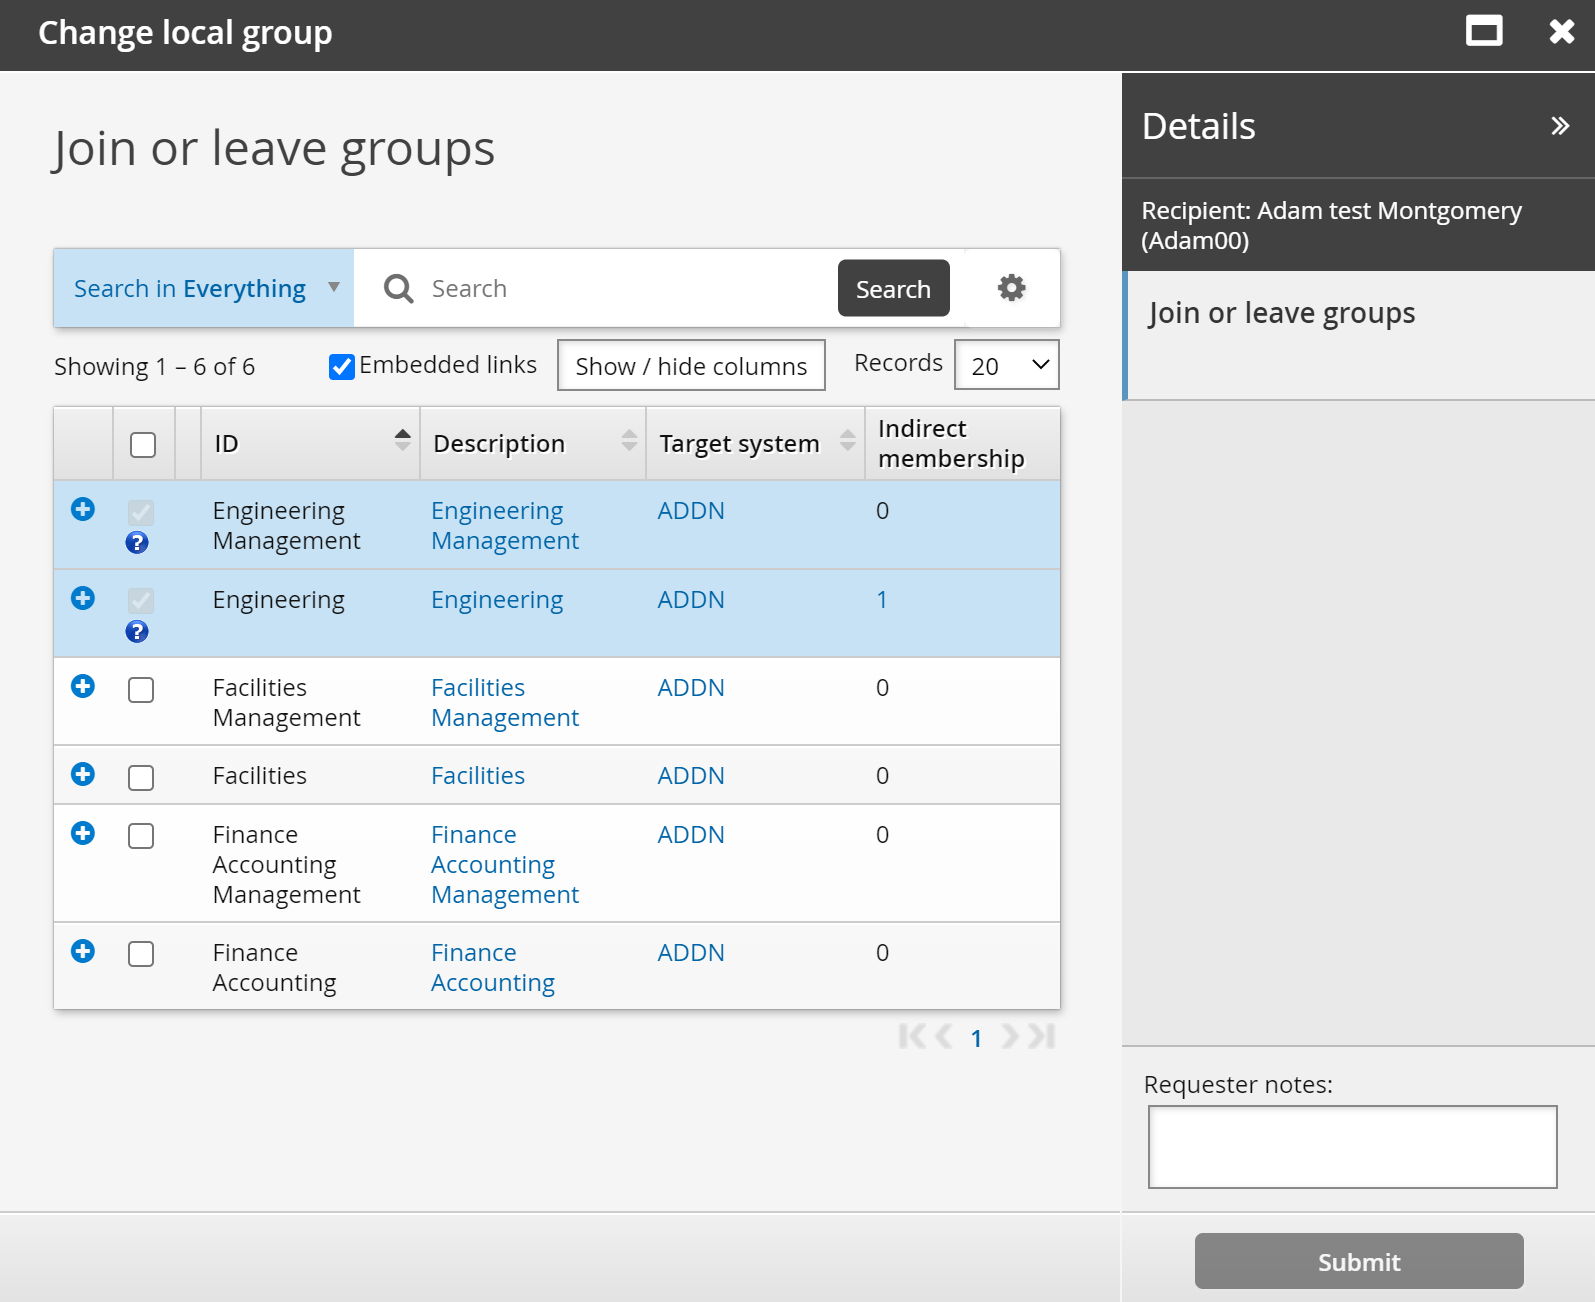
Select groups you want to join, then click Submit.
Create a new user using a standard pre-defined request
Bravura Workforce Pattern provides all the configuration to allow users to submit onboarding requests for new employees, using the NEW-EMPLOYEE pre-defined request.
This example shows how to create a new user profile using a pre-defined request NEW-EMPLOYEE.
Requirement
This example assumes that:
You have installed Bravura Workforce Pattern so the pre-defined request NEW-EMPLOYEE has been added.
You have linked the template account AD_TEMPLATE to an actual account on the Active Directory target system.
You have updated the im_policy_authorization rule for the pre-defined request (PDR) NEW-EMPLOYEE.
Click below to view a demonstration:
To create a new user:
Log into the Bravura Security Fabric web app as an end user.
Click Create a new user profile.
Select New Employee Basic Setup.
The New employee basic setup request will be automatically triggered if it is the only available request type in the Create a new user profile menu.
Enter Basic information for the new user.
Click Next .
Enter Mobile information.
Click Next .
Enter Personally identifying information.
Click Next .
Enter Work contact information.
Click Submit.
Click the link at the top of the page to check the status of the request.
The status is displayed in the Requests app , which users use to track their requests.
To approve the submitted NEW-EMPLOYEE request:
Log in to the Bravura Security Fabric web app as one of the authorizers of the request.
By default, the authorizers are selected by the authorization plugin from members of the HR department. You can update the im_policy_authorization rule for the NEW-EMPLOYEE PDR to assign authorizers.
From the main menu, click Requests.
The Requests app opens.
From the Results panel, select the request you want to review.
Bravura Security Fabric displays the details in the Actions panel panel on the right.
Review the request.
Click Approve and confirm the approval by clicking the Approve button below the notes field.
To check the status of the submitted NEW-EMPLOYEE request as the requester:
Log in to the Bravura Security Fabric web app as the requester.
From the main menu, click Requests.
The Requests app opens.
From the Results panel, select the request you want to review.
Bravura Security Fabric displays the details in the Actions panel panel on the right.
At first the status will change to "Approved, performing requested operations".
After a few more minutes click the Refresh button on the request and you should see the status change to "Processed" with a comment in the Results column that says, "Success Created with login ID" indicating that the account has been created on Active Directory.
Create a new user using a role
Click below to view a demonstration showing the creation of a PDR using both required and optional role operations, selected attributes, access controls and order and display settings for use in hiring.
Click below to view a demonstration of a request submission using the above PDR to hire, approve and confirm a new user to the associated roles.
This example demonstrates how to define a request to hire a new sales representative, based on a role that includes necessary accounts and groups.
This case assumes that you have set up target systems and:
Configured template accounts and managed groups.
Added a role called SALESPERSON that contains standard accounts and groups required for sales employees.
Created an attribute group called ORG-INFO to collect standard information such as employment type.
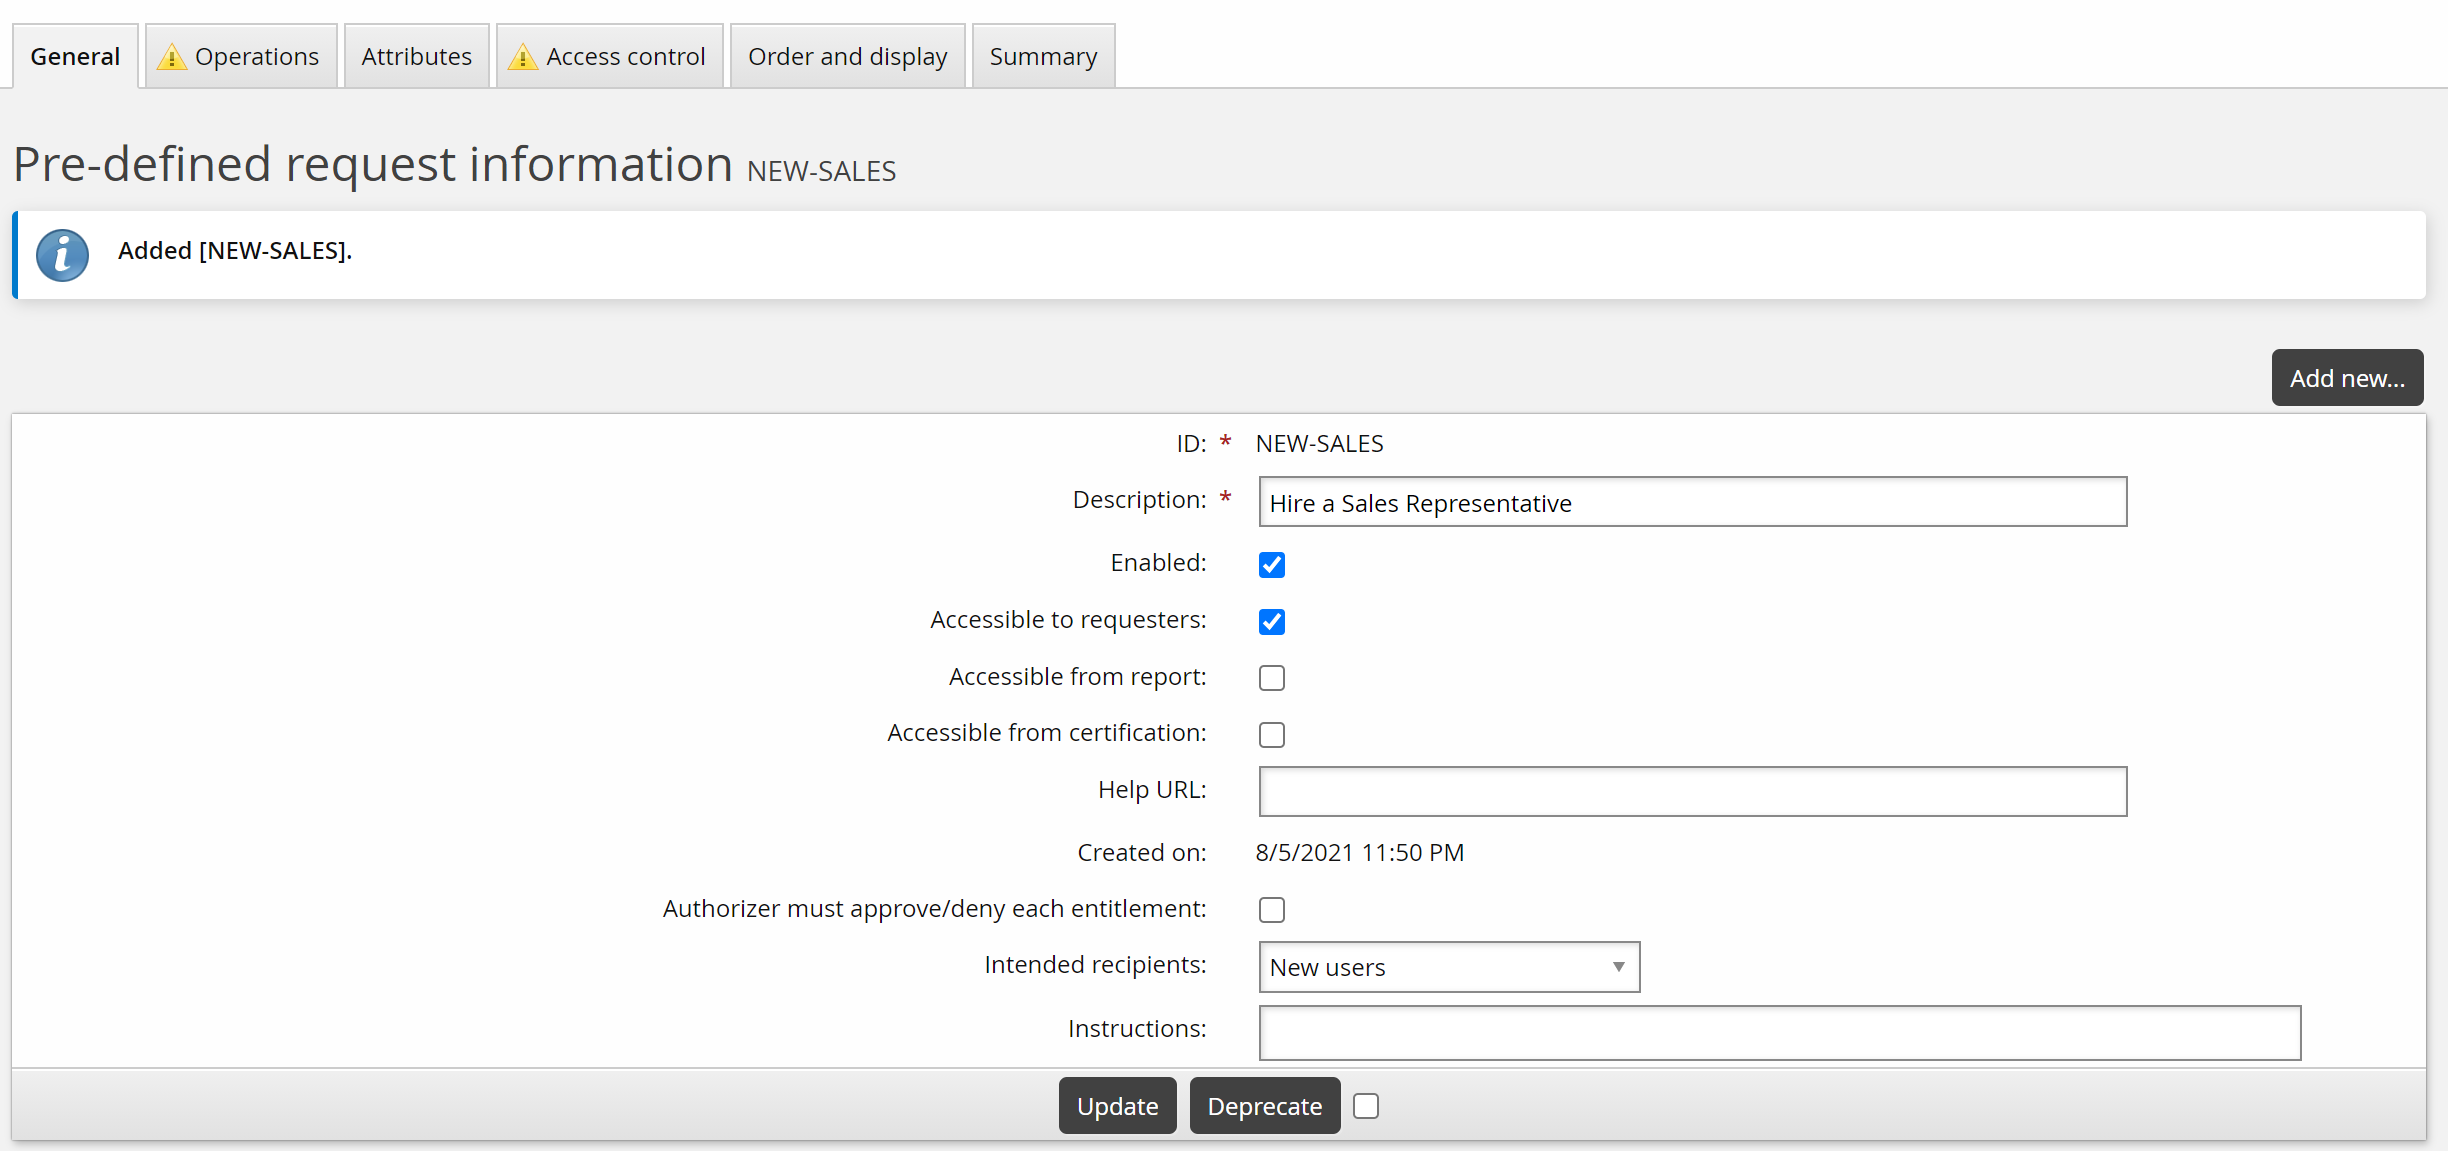
Click Manage the system > Workflow > Pre-defined requests and add a new request with the following general settings:
ID NEW-SALES
Description Hire a Sales Representative
Enabled Selected
Intended recipients New users
Click Add.
You can now define operations and other parameters.
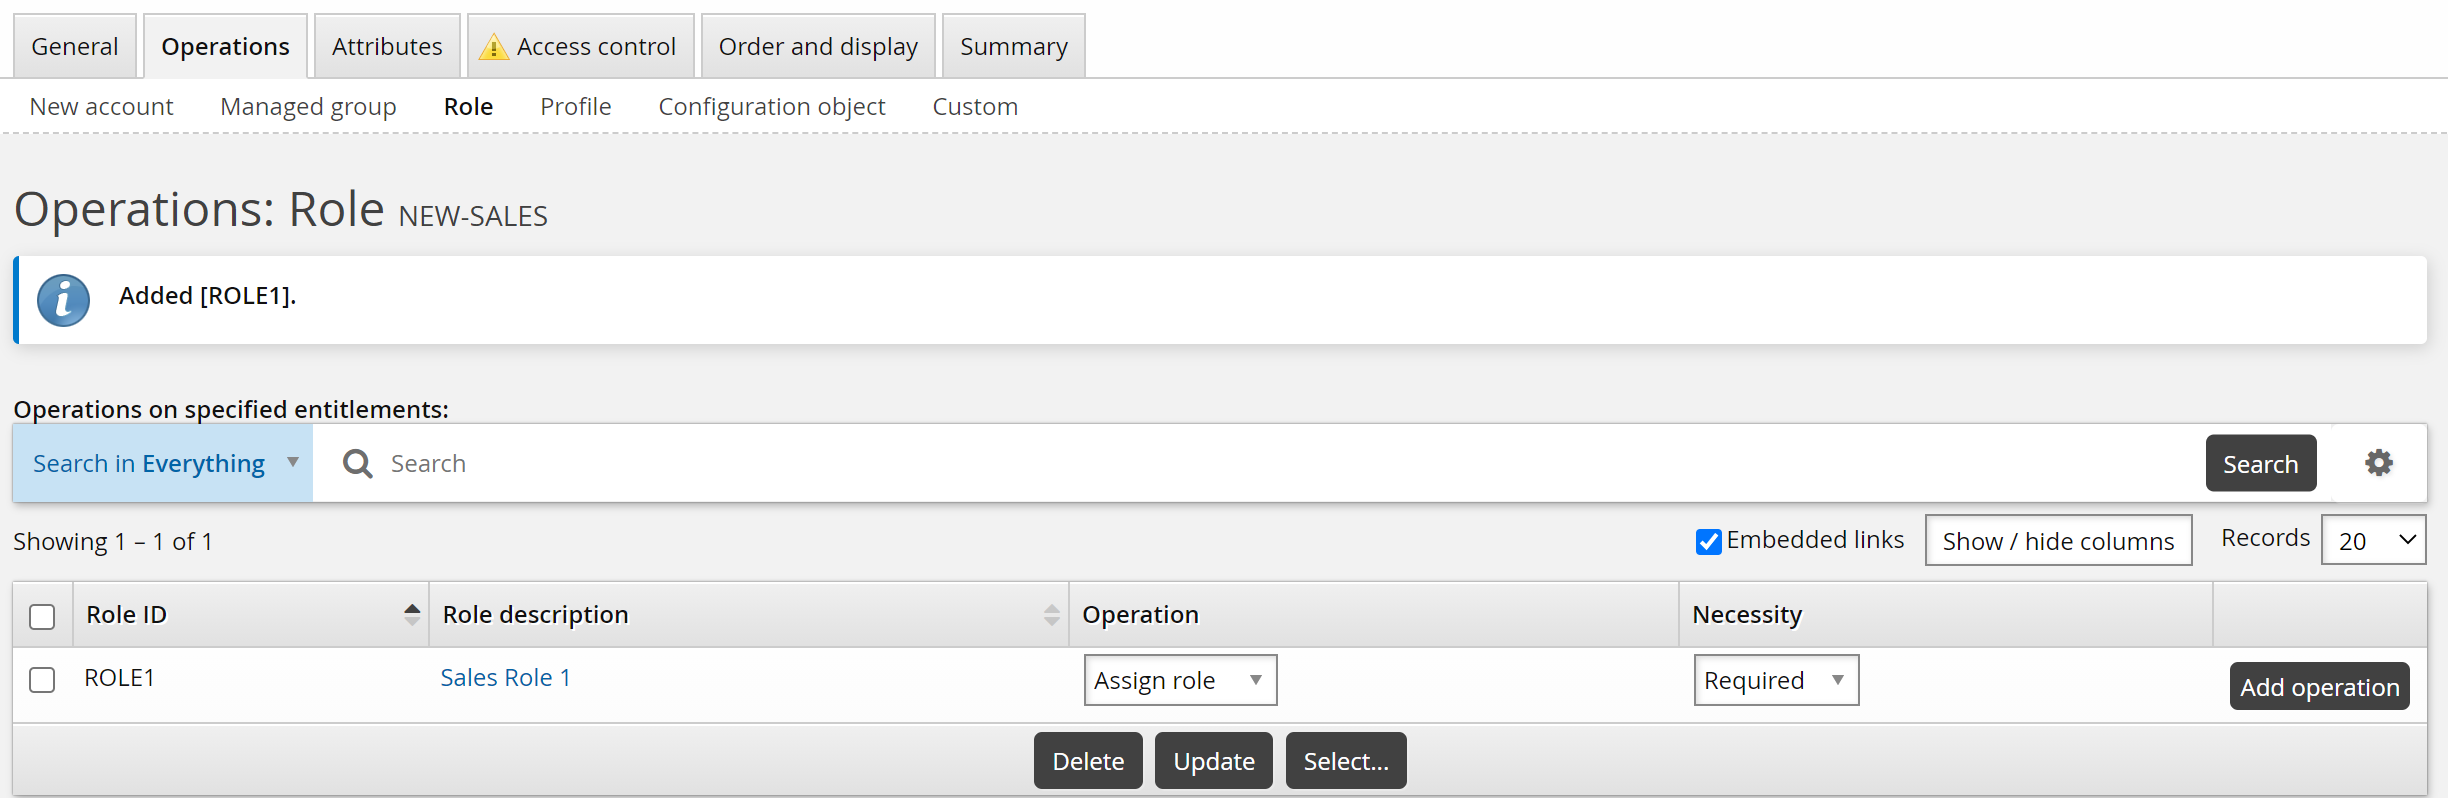
For this use case, the request is to add a role to a new user profile:
Click the Operations tab, then the Role sub-tab.
Click Select… in the upper table.
Select the SALESPERSON role and click Select.
Ensure the Necessity is set to ”Required”.
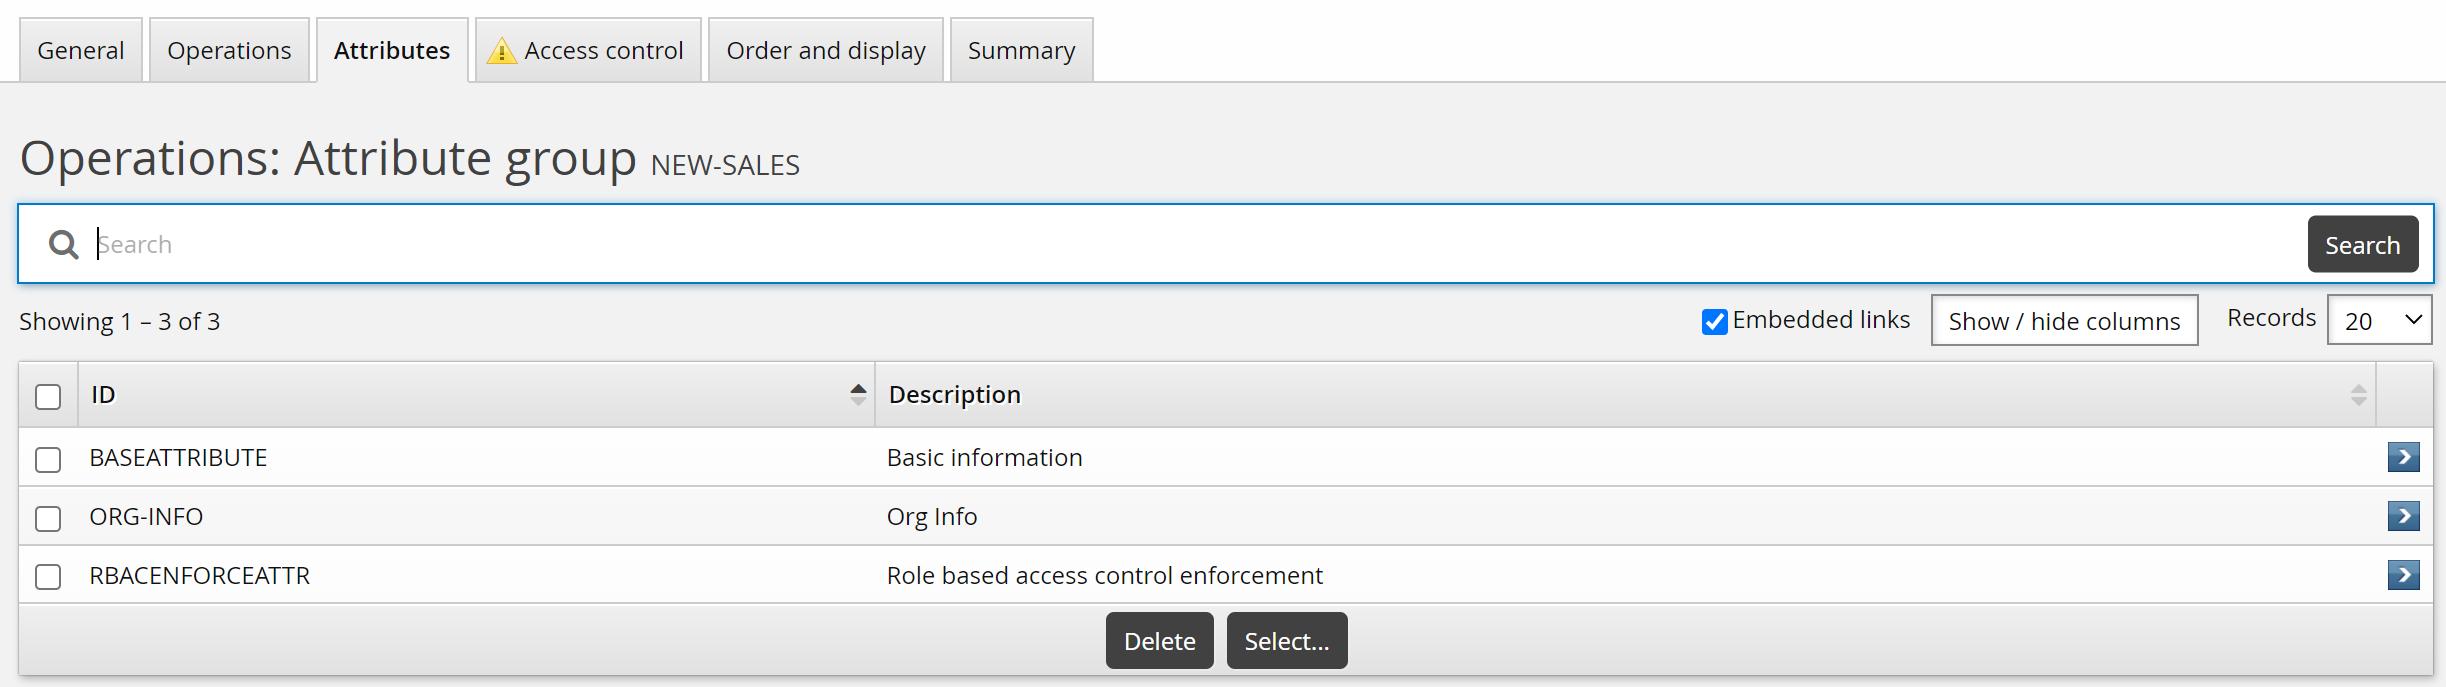
Select attribute groups to determine what information needs to be updated.
Click the Attributes tab.
Click Select…
Select:
BASEATTRIBUTE
ORG-INFO
RBACENFORCEATTR
Click Select .
For this case, create a custom SALES_MANAGER class to allow a sales manager to request a new sales employee.
To set up access controls:
Click the Access control tab.
Click Add new…
Bravura Security Fabric displays the User class definition page in a pop-up window.
Define a SALES_MANAGERS user class .
Close the pop-up window.
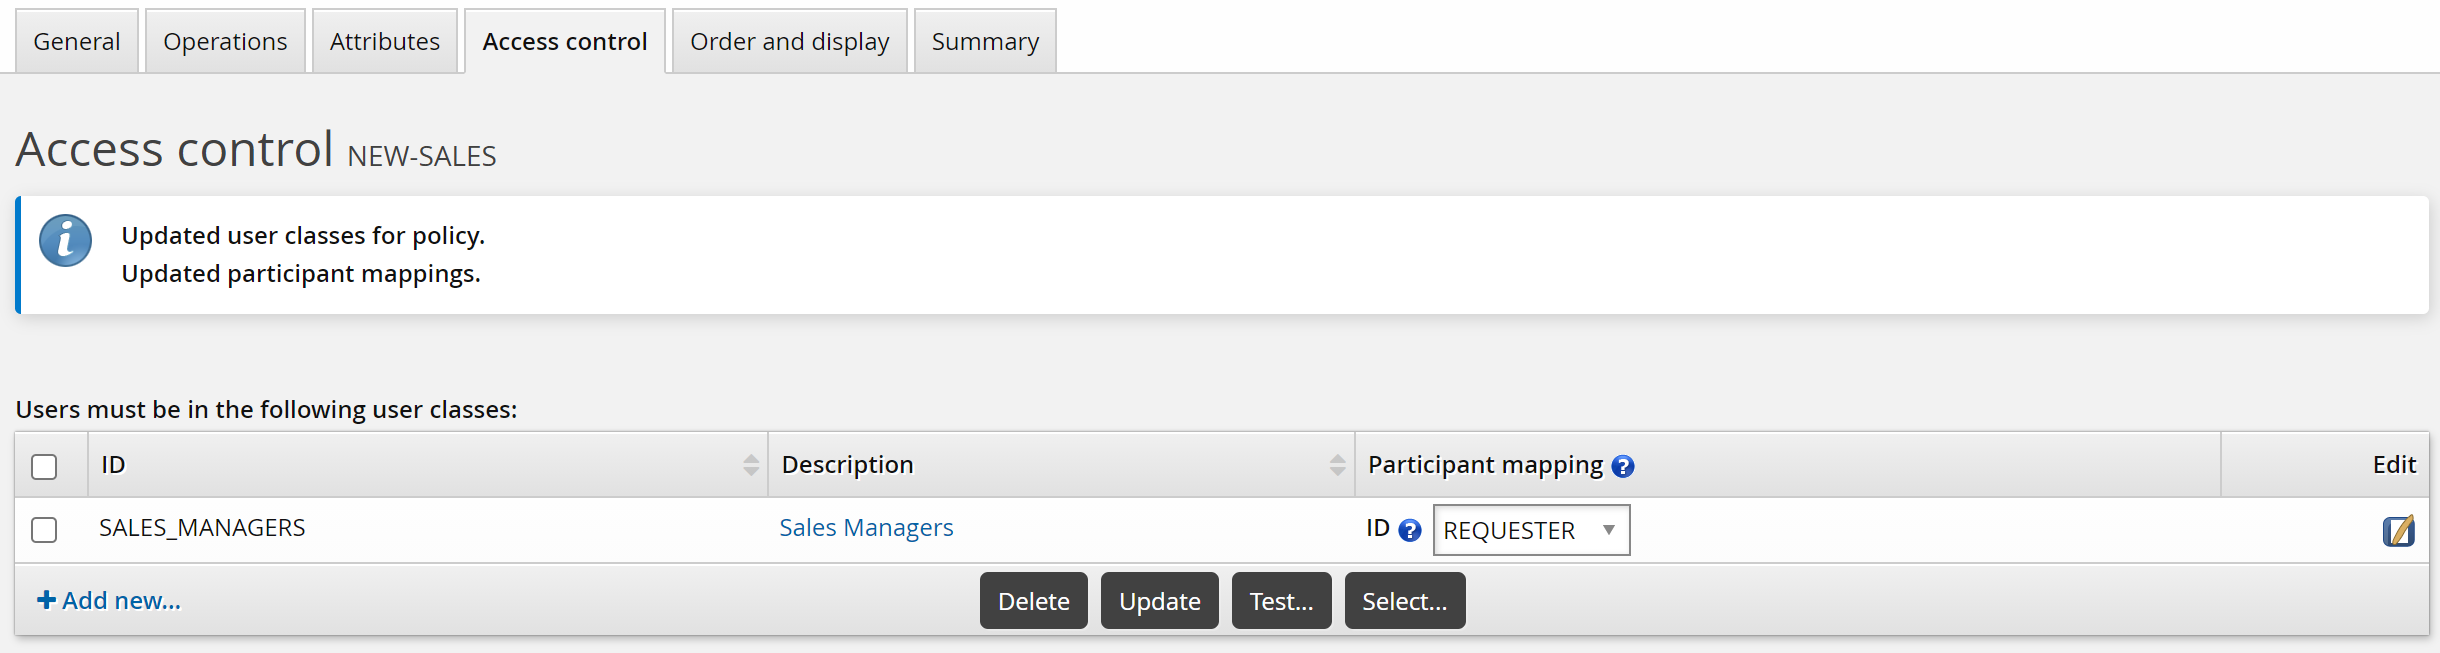
Bravura Security Fabric warns that you need to complete the access control configuration by mapping the user class participant to a participant in the policy (requester or recipient).
For the user class you just created, set the Participant mapping to REQUESTER.
Click Update.
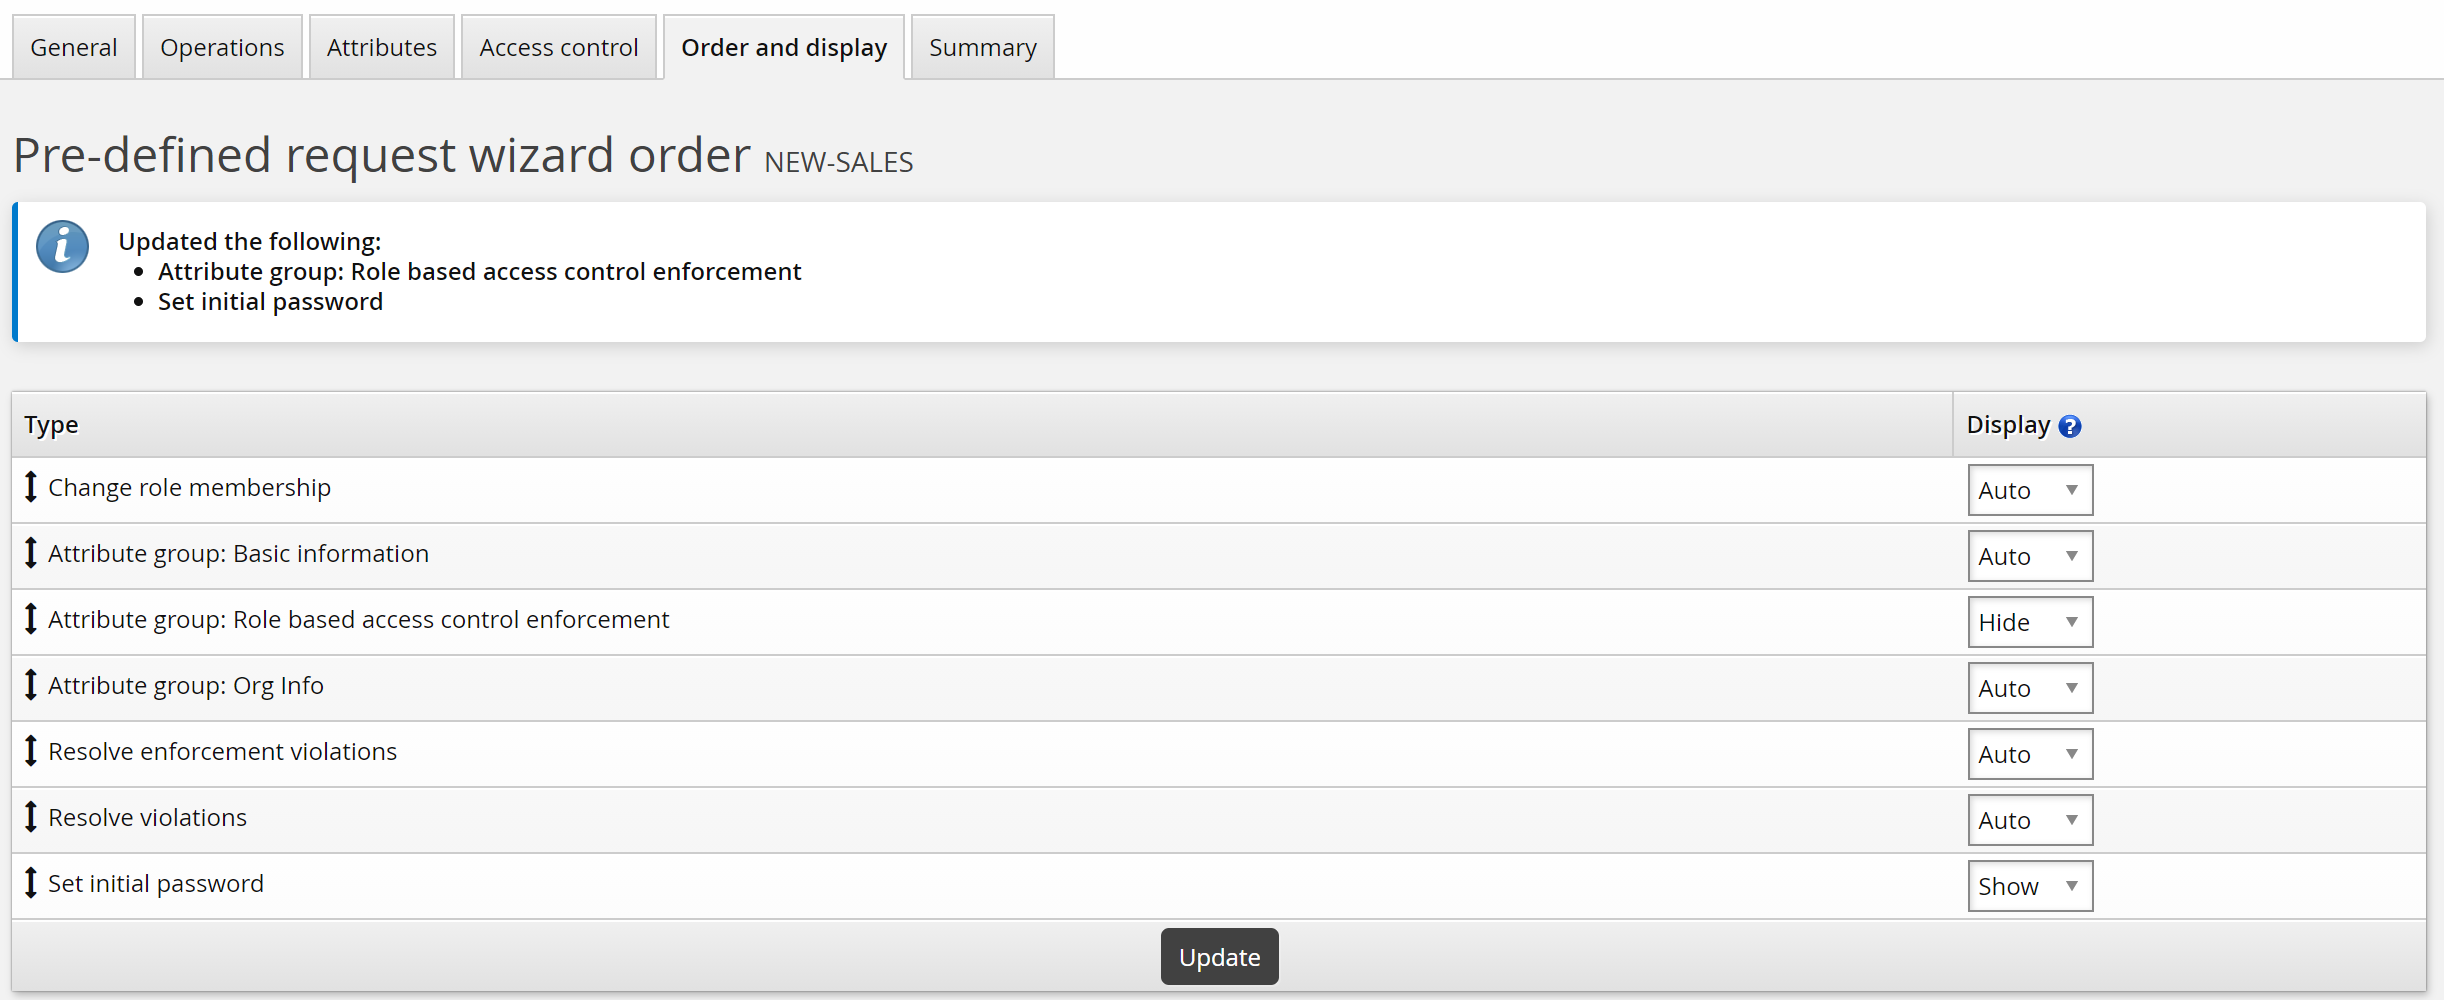
Bravura Security Fabric automatically adds request wizard pages according to the operations and attributes you add. In this case, Bravura Security Fabric added a page for each of the attribute groups. In this case, you will hide the RBACENFORCE group from requesters, because the default setting is assumed.
To customize the wizard:
Click the Order and display tab.
Set the Attribute group: Role based access control enforcement setting to ”Hide”.
Set the Set initial password setting to ”Show”.
Click Update.
To submit the pre-defined request, login as an end user:
From the main menu, click Create a new user profile.
If your administrator has set up pre-defined requests, Bravura Security Fabric displays a menu of request types.
Click Hire a Sales Representative.
Enter basic profile information.
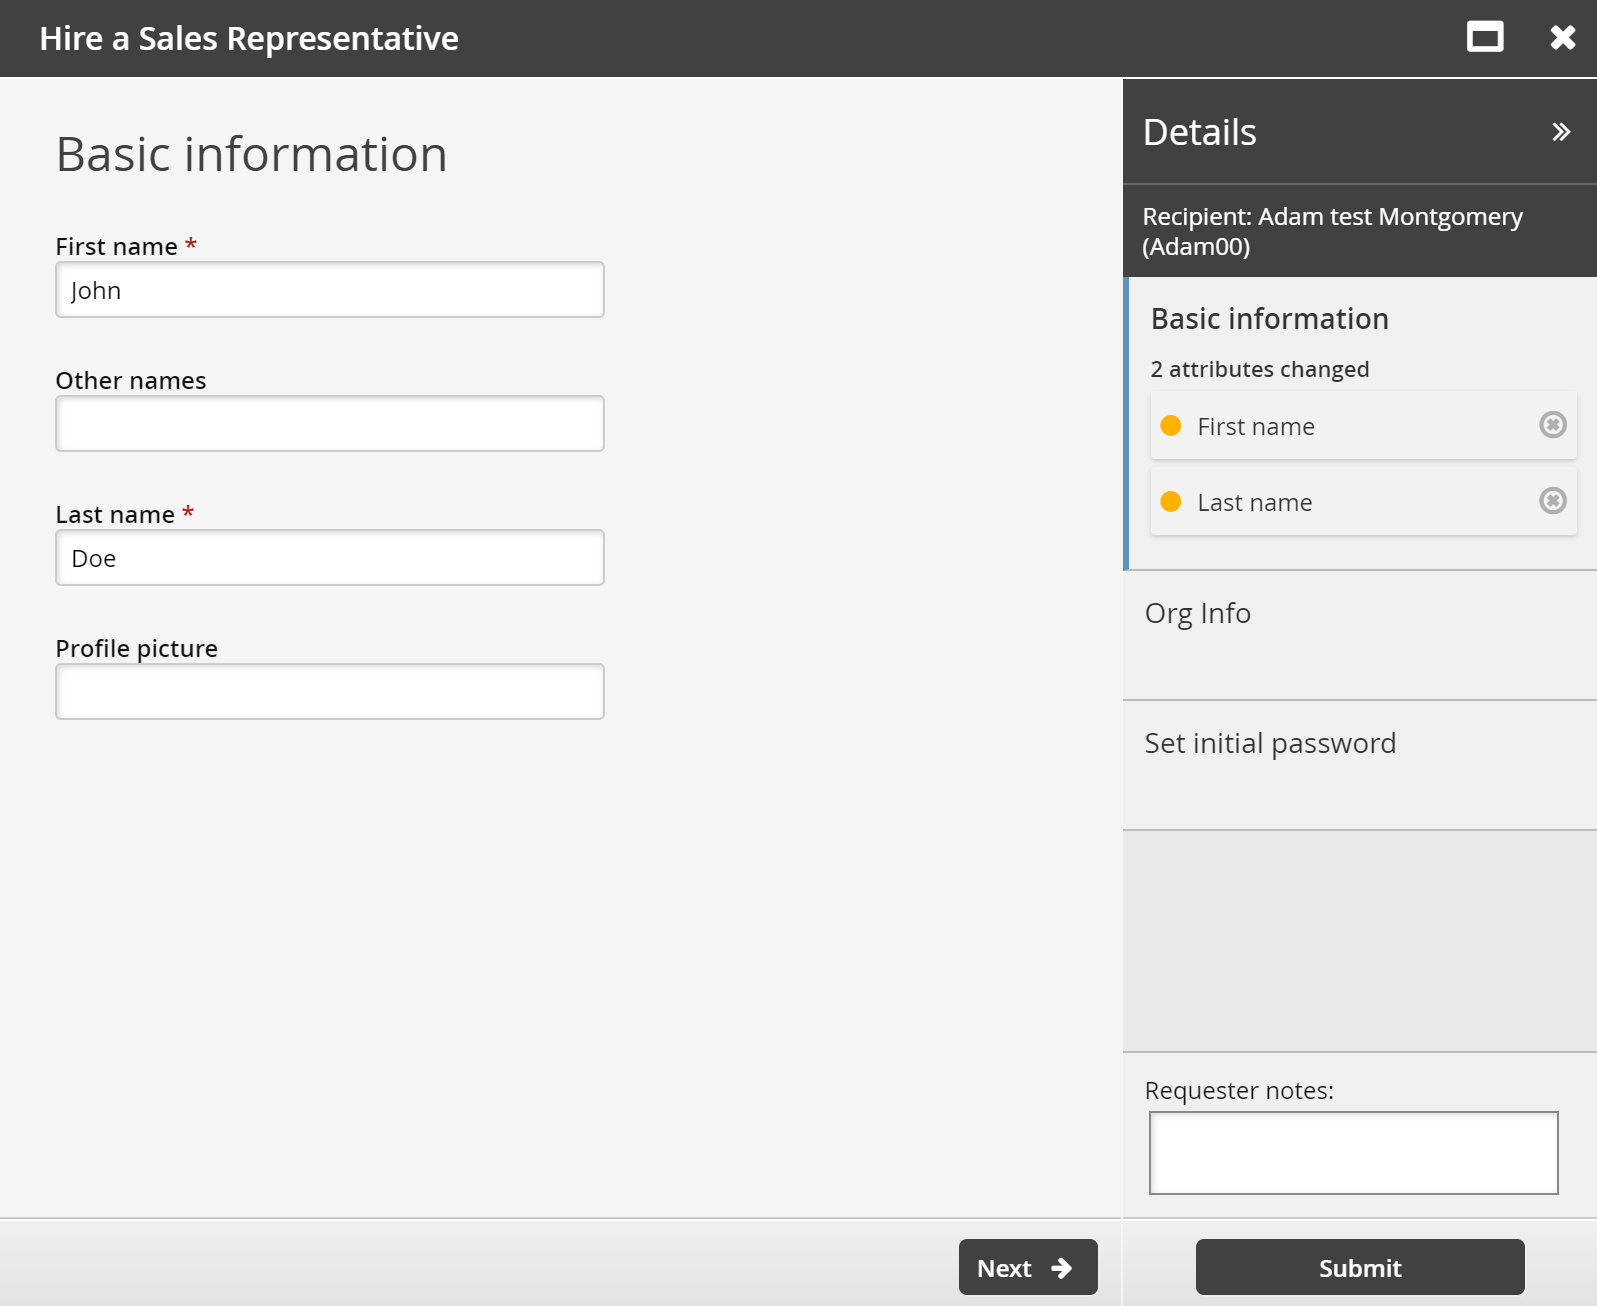
Click Next .
Enter employment information.
This is information defined by the ORG-INFO attribute group.
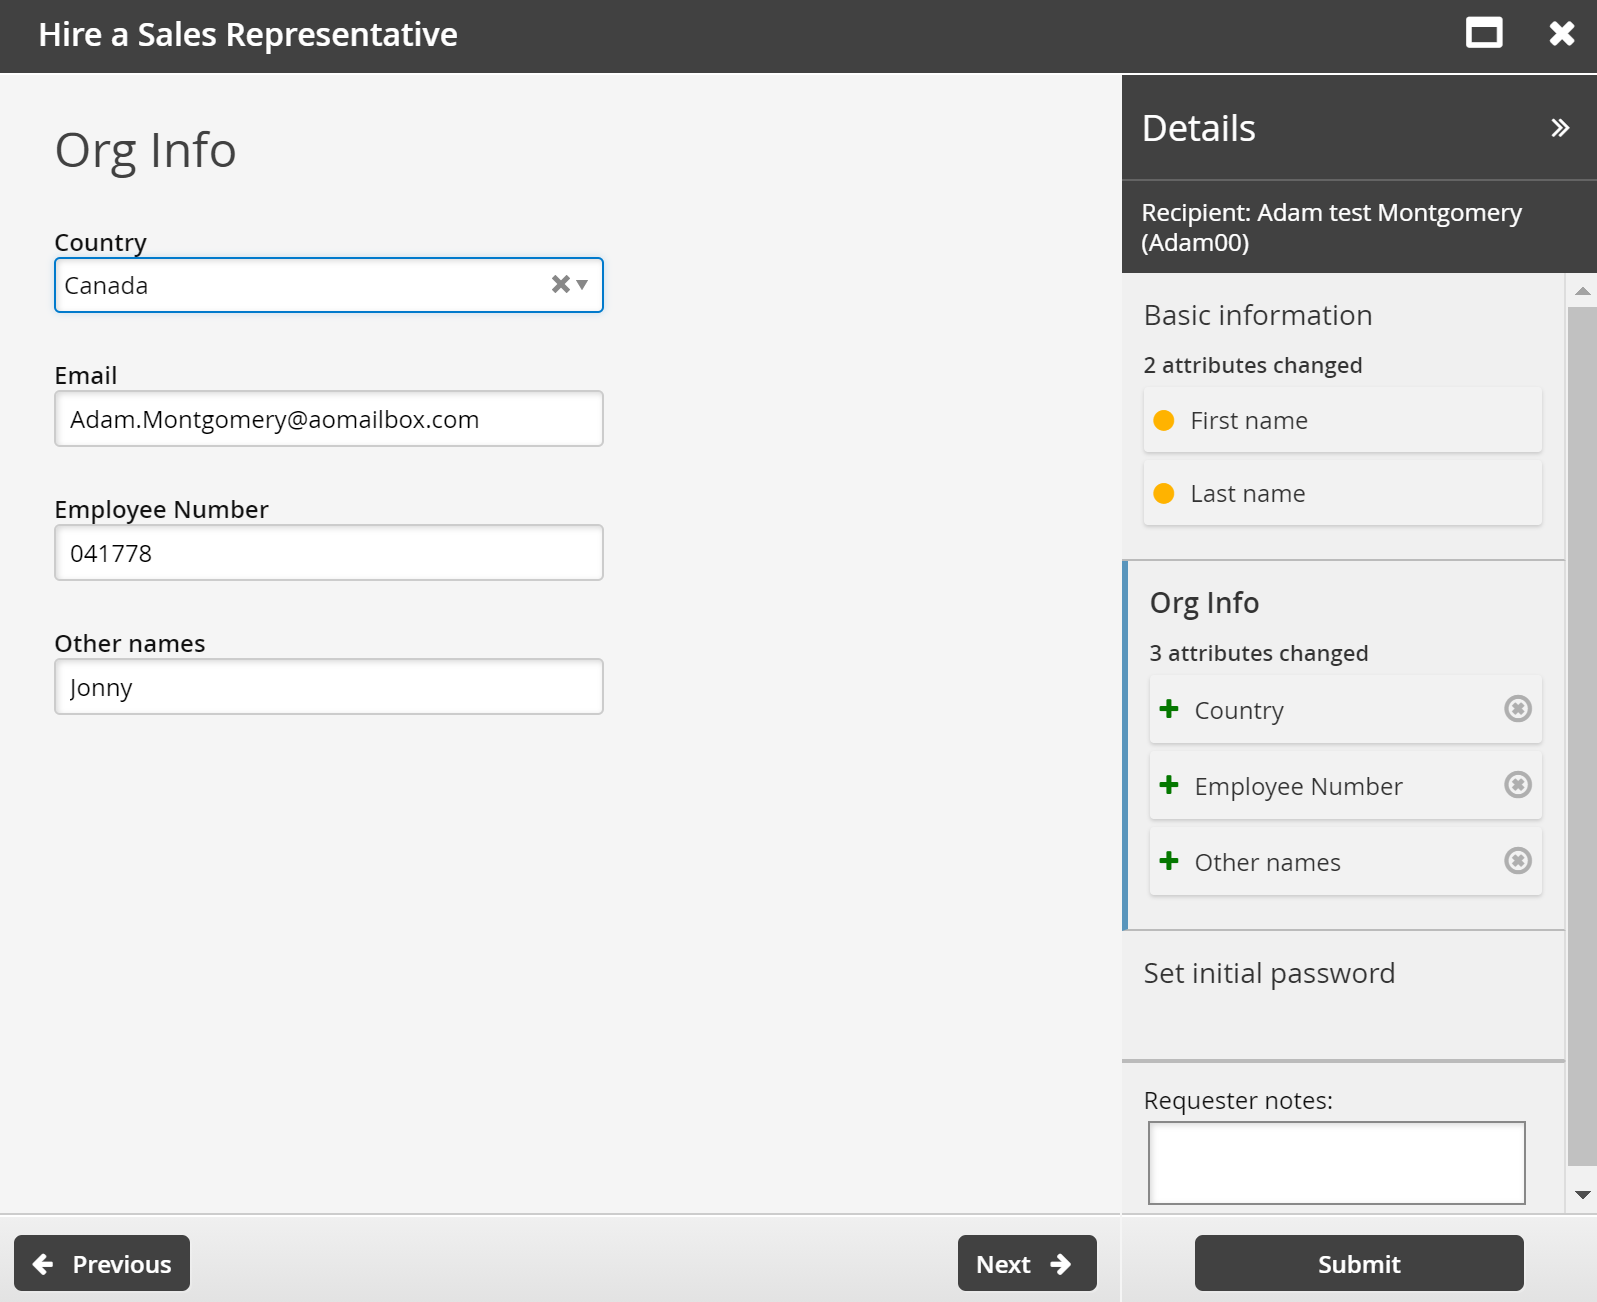
Click Next .
Set the initial password as required for new accounts.
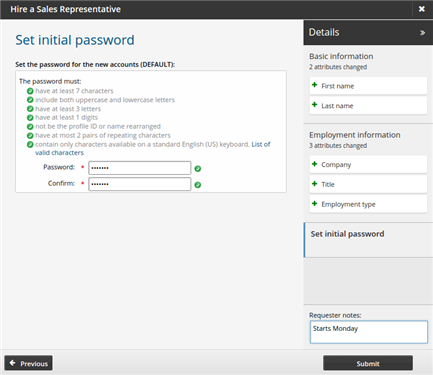
Click Submit.
Request a new desktop computer
This example demonstrates how to define a request users can select to submit a request for a new desktop computer.
This case assumes:
You have set a NULL target system for inventory.
A REQUEST-NOTES profile and request attribute exists.
The profile and request attribute is a member of an attribute group called REQUEST_NOTES.
Click Manage the system > Workflow > Pre-defined requests and add a new request with the following general settings:
ID NEW-DESKTOP
Description Request a new desktop
Enabled Selected
Intended recipients Existing users.
Click Add.
You can now define operations and other parameters.
For this example, the request is to add an inventory item to an existing user profile:
Click the Operations tab, then the New account sub-tab.
Click Select… in the upper table.
Select the DESKTOP template and click Select.
Ensure the Necessity is set to ”Required”.
Inventory templates are used to attach inventory items to user profiles rather than create new accounts.
Select attribute groups to determine what information needs to be updated.
Click the Attributes tab.
Click Select…
Select REQUEST_NOTES.
Click Select .
For this case, use the default _EXISTING_USERS_ class to allow existing users to request a new desktop.
To set up access controls:
Click the Access control tab.
Click Select… .
Select the _EXISTING_USERS_ user class and click Select.
Bravura Security Fabric warns that you need to complete the access control configuration by mapping user class participants to a participant in the policy (requester or recipient).
Set the Participant mapping to REQUESTER.
Click Update.
Bravura Security Fabric automatically adds request wizard pages according to the operations and attributes you add. To customize the wizard:
Click the Order and display tab.
Set the Attribute group: Request notes setting to ”Show”.
Click Update.
To submit the pre-defined request, login as an end user:
Click View and update profile .
Click Request a new desktop.
Enter request details.
Click Submit.
The request has been submitted and in this case, the implementer will receive a notification and action the request.
Update a subordinate’s scheduled termination
This example demonstrates how to invite a manager to defer a subordinate’s scheduled termination. The manager will receive an email two weeks prior to the termination with a link to Bravura Security Fabric . When the manager follows the link and successfully logs in they can use the pre-defined request to update the subordinate’s termination date.
This case assumes that an HR system that contains termination details is set up as a target system, and:
The HR system’s scheduled termination date account attribute is mapped to a profile and request attribute called SCHEDULED_TERMINATION_DATE.
The profile and request attribute is a member of an attribute group called SCHEDULED_TERMINATION.
Click Manage the system > Workflow > Pre-defined requests and add a new request with the following general settings:
ID SCHEDULETERMINATION
Description Update termination date
Enabled Selected
Intended recipients Existing users
Click Add.
You can now define operations and other parameters.
For this example, the request is to update existing accounts:
Click the Operations tab, then the Existing account sub-tab.
In the bottom table select Update account and select ”All” from the All/User-selectable drop-down list.
Click Update.
Select attribute groups to determine what information needs to be updated.
Click the Attributes tab.
Click Select…
Select SCHEDULED_TERMINATION.
Click Select .
For this case, use the default _MANAGER_INDIRECT_ class to allow a manager to request the update on behalf of a subordinate. We will assume that the Orgchart has been set up, and that managers have permission to update subordinates’ information.
To set up access controls:
Click the Access control tab.
Click Select… .
Select the _MANAGER_INDIRECT_ user class and click Select.
Bravura Security Fabric warns that you need to complete the access control configuration by mapping user class participants to a participant in the policy (requester or recipient).
Set the Participant mapping for MANAGER to REQUESTER, and set SUBORDINATE to RECIPIENT.
Click Update.
Bravura Security Fabric automatically adds request wizard pages according to the operations and attributes you add. In this case, Bravura Security Fabric added a page for each of the attribute groups. In this case, you will hide the RBACENFORCE group from requesters, because the default setting is assumed.
To customize the wizard:
Click the Order and display tab.
Set the Attribute group: Role based access control enforcement setting to ”Hide”.
Click Update.
Set up automated user administration (
idtrack) to track the scheduled termination attribute.During the nightly processing, when a termination is scheduled for two weeks from now, send an email to the manager notifying her of the upcoming termination. Embed a URL linking the user to the View and update profile (IDR) module; for example:
https://idm-server/default/view-and-update-profile.
When the manager successfully logs in she will be automatically redirected to the View and update profile (IDR) module, where she can select the Update termination date pre-defined request to update the termination date.
Use report output to disable orphaned accounts
This example demonstrates how to create a pre-defined request and run a report to list orphaned accounts and then submit request to disable those accounts.
Click Manage the system > Workflow > Pre-defined requests and add a new request with the following general settings:
ID ORPHANED-ACCOUNTS
Description Disable orphaned accounts
Enabled Selected
Accessible from report Selected
Intended recipients Existing users
Click Add.
You can now define operations and other parameters.
For this example, the request is to disable existing accounts based on certain conditions:
Click the Operations tab, then the Existing account sub-tab.
In the bottom table select Disable account and select ”User-selectable” from the All/User-selectable drop-down list.
Click Update.
For this case, use the default _REPORT_READERS_ user class to allow users who can run reports to submit this pre-defined request. We will assume that users have been added to the user class.
To set up access controls:
Click the Access control tab.
Click Select… .
Select the _REPORT_READERS_ user class and click Select.
Bravura Security Fabric warns that you need to complete the access control configuration by mapping the user class participant to a participant in the policy (requester or recipient).
Set the Participant mapping to REQUESTER.
This allows any user in the user class to act as requester of the request.
Click Update.
The pre-defined request is ready to use with report output.
To run a report and use the output to submit a request to disable orphan accounts:
Log in as a member of _REPORT_READERS_.
Click Manage reports > Reports > Users > Orphan / Inactive.
Run the report.
Expand Submit pre-defined requests using report output at the bottom of the report form.
Select the ORPHANED-ACCOUNTS pre-defined request.
Click on the magnifying glass icon to configure Attributes.
Map the Recipient ID to a static ID, such as the user running the report.
The recipient ID needs to match a Bravura Security Fabric profile ID. If the report output has that information, you can map this attribute to that output, otherwise, you will need to enter a static ID.
Map the target ID and account attributes to the respective columns.
Click Done.
Click Run for submission.
Bravura Security Fabric displays a summary of the requests submitted.
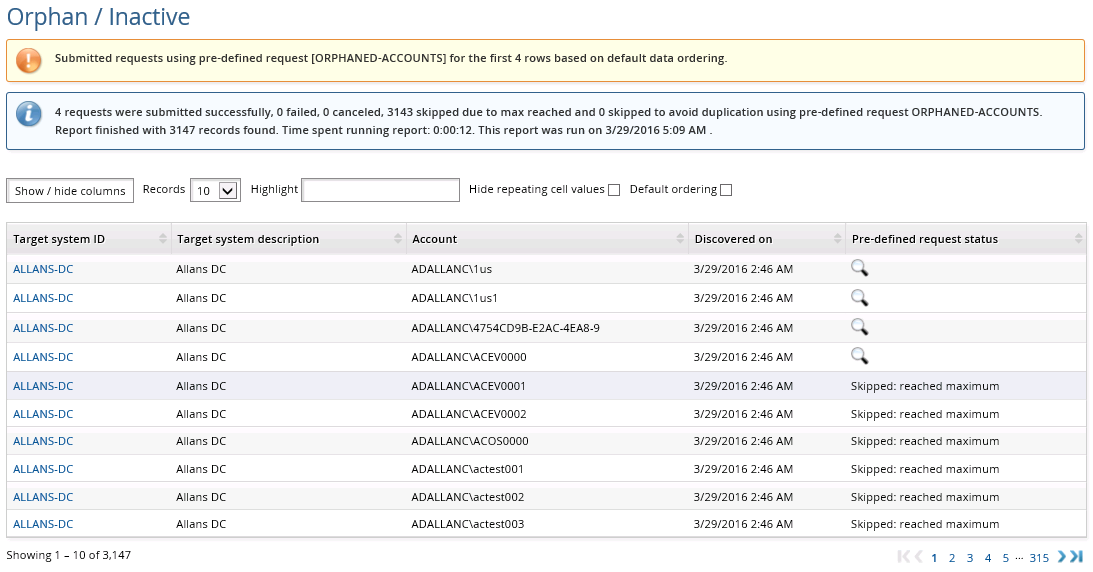
You can click on the info icon  in the request status column to view the status of each request, or use the Requests link from the main menu.
See Reports for more information on running reports.
Use report output to enable disabled accounts
This example demonstrates how to run the account report to list disabled accounts, then use the output to submit a request to enable those accounts.
Click Manage the system > Workflow > Pre-defined requests and add a new request with the following general settings:
ID ENABLE-ACCOUNTS
Description Enable disabled accounts
Enabled Selected
Accessible from report Selected
Intended recipients Existing users
Click Add.
You can now define operations and other parameters.
For this example, the request is to enable existing disabled accounts:
Click the Operations tab, then the Existing account sub-tab.
In the bottom table select Enable account and select "User-selectable" from the All/User-selectable drop-down list.
Click Update.
For this case, use the default _REPORT_READERS_ user class to allow users who can run reports to submit this pre-defined request. We will assume that users have been added to the user class.
To set up access controls:
Click the Access control tab.
Click Select… .
Select the _REPORT_READERS_ user class and click Select.
Bravura Security Fabric warns that you need to complete the access control configuration by mapping the user class participant to a participant in the policy (requester or recipient).
Set the Participant mapping to REQUESTER.
This allows any user in the user class to act as requester of the request.
Click Update.
The pre-defined request is ready to use with report output.
To run a report and use the output to submit a request to enable disabled accounts:
Log in as a member of _REPORT_READERS_.
Click Manage reports > Reports > Reports > Users > Account attributes.
Set account attribute @accountEnabled to false.
Run the report.
Expand Submit pre-defined requests using report output at the bottom of the report form.
Select the ENABLE-ACCOUNTS pre-defined request.
Click on the magnifying glass icon to configure Attributes.
Map the Recipient ID to a static ID, such as the user running the report.
The Recipient ID needs to match a Bravura Security Fabric profile ID. If the report output has that information, you can map this attribute to that output, otherwise, you will need to enter a static ID.
Map the Target system ID and Account attributes to the respective columns.
Click Done.
Click Run for submission.
Bravura Security Fabric displays a summary of the requests submitted.
You can click on the info icon in the request status column to view the status of each request, or use the Requests link from the main menu.
See Reports for more information on running reports.